

| << Previous | Contents | Next >> |
Geotechnical Aspects of Pavements Reference Manual
Chapter 4.0 Geotechnical Exploration And Testing (continued)
4.5.6 Borings and Sampling
The final exploration method includes drilling bore holes or, in some cases, making excavations to obtain samples. This is the most complex and expensive part of the exploration program, and requires a great degree of care. Disturbed and undisturbed samples of the subsurface materials must be obtained for laboratory analyses (and/or tested in the field) to determine their engineering properties and verify geophysical and in-situ exploration results.
Disturbed samples are generally obtained to determine the soil type, gradation, classification, consistency, moisture-density relations (Proctor), CBR, presence of contaminants, stratification, etc. The methods for obtaining disturbed samples vary from hand or mechanical excavation of test pits using truck-mounted augers and other rotary drilling techniques. These samples are considered "disturbed," since the sampling process modifies their natural structure.
Undisturbed samples are obtained where necessary to determine the in-place stiffness and strength, compressibility (settlement), natural moisture content, unit weight, permeability, discontinuities, fractures, and fissures of subsurface formations. Even though such samples are designated as "undisturbed," in reality they are disturbed to varying degrees. The degree of disturbance depends on the type of subsurface materials, type and condition of the sampling equipment used, the skill of the drillers, and the storage and transportation methods used. Serious and costly inaccuracies may be introduced into the design if proper protocol and care is not exercised during recovery, transporting, or storing of the samples.
Table 4-11 provides a summary of the use and limitation of boring methods using disturbed and undisturbed sampling equipment. Additional information on each of these methods is contained in FHWA NHI-01-031.
| Method | Use | Limitations |
|---|---|---|
| Auger Boring ASTM D - 1452 | Obtain samples and identify changes in soil texture above water table. Locate groundwater. | Grinds soft particles - stopped by rocks, etc. |
| Test Boring ASTM D - 1586 | Obtain disturbed split spoon samples for soil classification. Identify texture and structures; estimate density or consistency in soil or soft rock using SPT (N). | Poor results in gravel, hard seams. |
| Thin Wall Tube ASTM D - 1587 | Obtain 51 - 86 mm (2 - 3-3/8 in.) diameter undisturbed samples of soft-firm clays and silts for later lab testing (e.g., resilient modulus tests). | Cutting edge wrinkled in gravel. Samples lost in very soft clays and silts below water table. |
| Stationary Piston Sampler | Obtain undisturbed 51 - 86 mm (2 - 3-3/8 in.) diameter samples in very soft clays. Piston set initially at top of tube. After press is completed, any downward movement of the sample creates a partial vacuum, which holds the sample in the tube. In pavement design, these samples can be used for evaluating pavement settlement and/or treatability studies. | Cutting edge wrinkled in gravel. |
| Pits, Trenches | Visual examination of shallow soil deposits and man-made fill above water table. Disturbed samples for density and CBR tests, or undisturbed block samples for resilient modulus tests, may be extracted. | Caving of walls, groundwater. Requires careful backfill and compaction. |
To begin the boring and sampling exploration process, a boring layout and sampling plan should be established to ensure that the vertical and horizontal profile of the different soil conditions can be prepared. A typical design practice for pavements is to assign one subgrade support value to long roadway lengths, i.e., 1 - 16 km (0.6 - 10 mi). This approach may be reasonable for uniform soil deposits, especially considering the construction advantage of maintaining a uniform pavement cross section. However, for highly variable sites, this approach is questionable, as it invariably leads to either an overly conservative design or premature pavement distress in some sections. Significant local variations can best be handled as special design features. There may be more variation of soil properties vertically (drill holes) than horizontally at shallow depths; however, again, only one value is assigned. Thus, one of the primary sampling issues is how best to sample such that appropriate values can be assigned to long sections of roadway. Two sampling options are available: systematic or representative.
Systematic sampling is a common agency practice. It is done at uniform horizontal and/or vertical intervals. Intermediate locations are sampled when varying conditions are encountered. A large number of samples can be obtained, but the testing may either be on a random basis to obtain an average value for similar materials or a representative basis for variable conditions.
Representative sampling and testing consists of taking samples that are believed to be representative of the typical or conservative soil support values. This type of sampling is based primarily on engineering judgment based on other information about the site (i.e., evaluation of available information, site reconnaissance, remote sensing, and geophysical testing) and involves fewer samples.
AASHTO 1993 requires the use of average subgrade support values along the alignment, and uses reliability to account for variation in subgrade strength along the alignment. To obtain a true statistical average, random sampling would be appropriate, provided the soil conditions are rather homogeneous. Systematic is not random, but it may be close with respect to averaging. Unfortunately, with systematic, additional borings are often not performed in areas where varying conditions are encountered. So while an average may be achieved, localized conditions along the alignment that could significantly impact performance are often missed. Statistically, the objective is to delineate locations with similar properties (origins and moisture conditions) and assign design values using random methods for the defined population. This is best accomplished by a combination of methods, as outlined in the following subsections.
Frequency (number/spacing) of Borings
The design engineer should prescribe the spacing and depth of the borings based on an evaluation of available information. As indicated in the previous section, only limited representative borings and sampling are required if geophysical and in-situ testing have been performed. Again, some borings should be performed at several cone locations for calibration and at critical locations identified by the preceding methods. A more extensive program is required in the absence of this alternative exploration information.
The spacing and depth of these borings depend on the variability of the existing soil conditions, both vertically and horizontally, and the type of pavement project. Spacing of borings vary considerably among agencies, on the order of 12 per km (20 per mi) to as few as 2 per km (3 per mi), with spacing generally decreased with high-volume roads and fine-grained soils, as reported by Newcomb and Birgisson, 1999. Considering the variability of soils and the tests used to evaluate geotechnical materials, even the high number appears relatively low. The following provides a review of recommended practice from a geotechnical perspective based on guidelines from textbooks, several state agencies, and the FHWA.
The spacing of borings along the roadway alignment generally should not exceed 60 m (200 ft) for a fully invasive program. Where subsurface conditions are known to be uniform, a minimum spacing of 120 m (400 ft) is generally recommended. In a program supported by geophysical and in-situ tests, such as recommended in Sections 4.5.4 and 4.5.5, a spacing of 150 - 450 m (500 - 1500 ft) as indicated in NCHRP 1-37A may be all that is necessary, depending on the uniformity of site conditions. For new pavement projects, most agencies locate borings along the centerline, unless conditions are anticipated to be variable. Borings should be located to disclose the nature of subsurface materials at the deepest points of cuts, areas of transition from cut to fill, and subgrade areas beneath the highest points of embankments. The spacing and location of the borings should be selected considering the geologic complexity and soil/rock strata continuity within the project area, with the objective of defining the vertical and horizontal boundaries of distinct soil and rock units within the project limits. It should be noted that the cost for a few extra borings is insignificant in comparison to the cost of unanticipated field conditions or premature pavement failure.
The spacing of borings for rehabilitation and reconstruction projects will depend on the condition of the existing pavement, the performance of non-destructive geophysical tests, and the availability of previous subsurface information. As indicated in the NHI (1998) "Techniques for Pavement Rehabilitation" Participants Manual, drilling and sampling is performed on three levels: 1) a high level in the absence of non-destructive geophysical tests, 2) a low level to complement geophysical tests, and 3) at a diagnostic level to evaluate mechanisms of distress where it occurs. In the absence of non-destructive geophysical tests, spacing on the order of one boring every 150 m (500 ft) would appear to be a minimum for pavements with no unusual distressed conditions. Additional borings should be located in problem areas (e.g., areas of rutting or fatigue cracking, which are often associated with subgrade issues) identified in the condition survey as discussed in Sections 4.2.2 and 4.2.3. The number of borings should be increased to the level of new pavement projects when rehabilitation projects include substantial pavement removal and replacement. Again, performance of geophysical tests (e.g., FWD) and/or in-situ tests (e.g., DCP) tests could be used to supplement borings, in which case, sampling at a minimum of every 450 m (1500 ft) may be adequate to complement the geophysical or non-destructive test results, provided there are no areas of significant distress that require special attention. Spacing of borings should be decreased as the variability of the geophysical or in-situ results increase to verify those results via laboratory testing.
For pavement rehabilitation projects, borings should be located in the wheel path to evaluate performance of existing unbound materials, as well as the subgrade. Borings should also be specifically located (and the number increased as required) to investigate the presence of wet or soft subgrade conditions indicated by site reconnaissance and/or maintenance records. If the project involves replacing or rubblizing the existing pavement, all borings would be drilled through the existing pavement. If the project involves adding a lane, plus replacing or rubblizing the existing pavement, half the borings should be in the new lane and half in the existing pavement.
As previously indicated in the introduction of Section 4.5.6, borings should be taken to a minimum depth of 1.5 - 2 m (5 - 7 ft) below the proposed pavement subgrade elevation, with at least a few borings taken to 6 m (20 ft) below the grade line. These deeper borings should also be used to determine the water table depth and occurrence of bedrock. Deeper borings are not generally required for rehabilitation projects, unless the previous section experienced premature failure due to subgrade conditions or there is a change in vertical alignment. All borings should extend through unsuitable foundation strata (for example, unconsolidated fill, highly organic materials, or soft, fine-grained soils) to reach relatively hard or compact materials of suitable bearing capacity to support the pavement system. Borings should extend a minimum of 1.5 m (5 ft) into relatively stiff or dense soils beneath soft deposits. Borings in potentially compressible fine-grained strata of great thickness should extend to a depth where the stress from superimposed traffic loads or a thick embankment is so small (less than 10% of the applied surface stress) that consideration will not significantly influence surface settlement.
Greater depth of borings may be required where deep cuts are to be made, side hill cuts are required, large embankments are to be constructed, or subsurface information indicates the presence of weak (or water-saturated) layers. In those cases, the borings should be deep enough to provide information on any materials that may cause problems with respect to stability, settlement, and drainage. For side hill cuts, additional borings should be performed on the uphill side in uniform soil conditions and on the uphill and downhill side for nonuniform conditions. Additional borings may be required for slope stability considerations and analysis.
Where stiff or compact soils are encountered at the surface and the general character and location of rock are known, borings should extend into sound rock. Where the location and character of rock are unknown or where boulders or irregularly weathered materials are likely to be found, the boring penetration into rock should be increased (NCHRP 1-37A, 2003), as discussed later in this section.
Take sufficient and appropriate auger, split tube, or undisturbed samples of all representative subsoil layers, as discussed in the next section. The soil samples must be properly sealed and stored to prevent moisture loss prior to laboratory testing. Prepare boring logs and soil profiles from this data.
Subsurface investigation programs, regardless of how well they may be planned, must be flexible to adjust to variations in subsurface conditions encountered during drilling. The project engineer should, at all times, be available to confer with the field inspector. On critical projects, the engineer responsible for the exploration program should be present during the field investigation. He/she should also establish communication with the design engineer to discuss unusual field observations and changes to be made in the investigation plans.
Soil Sampling (after NCHRP 1-37A)
Sampling will vary with the type of pavement project. For new construction projects, a majority of the samples taken will most likely be the disturbed type, such as those obtained by split barrel samplers. This will permit visual identification and classification of the soils encountered, as well as identification by means of grain size, water content, and Atterberg limit tests. In rehabilitation projects, sampling to determine the potential of full depth reclamation or the potential for rubbilization of asphalt pavements is somewhat different, requiring the sampling of the in-place base, subbase, and surface pavement to determine its suitability for reuse and/or rubblizing. The condition survey, as discussed in section 4.2.3, will help in identifying areas requiring sampling and the types of samples required. In general, sampling of the subgrade is not as intensive as is needed for new pavements. Detailed sampling of the base, subbase, and surface pavement will be required to determine if there is a large amount of variability in materials along the project and the condition of those materials for reuse (e.g., base and subbase that has been contaminated with large quantities of fines would not be desirable).
Sampling at each boring location may be either continuous or intermittent. In the former case, samples are obtained throughout the entire length of the hole; in the latter (primarily used in areas of deep cuts), samples are taken about every 1.5 m (5 ft) and at every change in material. Initially, it is preferable to have a few holes with continuous sampling so that all major soil strata present can be identified. Every attempt should be made to obtain 100 percent recovery where conditions warrant. The horizontal and vertical extent of these strata can then be established by intermittent sampling in later borings, if needed.
To obtain a basic knowledge of the engineering properties of the soils that will have an effect on the design, undisturbed samples (such as those obtained with thin-wall samplers or double tube core barrel rock samplers) should be taken, if possible. The actual number taken should be sufficient to obtain information on the shear strength, consolidation characteristics, and resilient modulus of each major soil stratum. Undisturbed samples should comply with the following criteria:
- The samples should contain no visible distortion of strata, or opening or softening of materials.
- Specific recovery ratio (length of undisturbed sample recovered divided by length of sampling push) should exceed 95 percent.
- The samples should be taken with a sampler with an area ratio (cross sectional area of sampling tube divided by full area or outside diameter of sampler) less than 15 percent.
At least one representative undisturbed sample should be obtained in cohesive soil strata, in each boring for each 1.5-m (5-ft) depth interval, or just below the planned surface elevation of the subgrade. Recommended procedures for obtaining undisturbed samples are described in AASHTO Standard T207, Thin-Walled Tube Sampling of Soils. If undisturbed samples cannot be recovered, disturbed samples should be taken.
All samples (disturbed and undisturbed) and cores should be wrapped or sealed to prevent any moisture loss, placed in protective core boxes, and transported to the laboratory for testing and visual observations. Special care is required for undisturbed tube samples. When additional undisturbed sample borings are taken, the undisturbed samples are sent to a soils laboratory for testing. Drilling personnel should exercise great care in extracting, handling, and transporting these samples to avoid disturbing the natural soil structure. Tubes should only be pressed, not driven with a hammer. The length of press should be 100 - 150 mm (4 - 6 in.) less than the tube length (DO NOT OVERPRESS). A plug composed of a mixture of bees' wax and paraffin should be poured to seal the tube against moisture loss. The void at the upper tube end should be filled with sawdust, and then both ends capped and taped before transport. The most common sources of disturbance are rough, careless handling of the tube (such as dropping the tube samples in the back of a truck and driving 50 km (30 mi) over a bumpy road), or temperature extremes (leaving the tube sample outside in below zero weather or storing in front of a furnace). Proper storage and transport should be done with the tube upright and encased in an insulated box partially filled with sawdust or expanded polystyrene to act as a cushion. Each tube should be physically separated from adjacent tubes, like bottles in a case. A detailed discussion of sample preservation and transportation is presented in ASTM D 4220, Practice for Preserving and Transporting Soil Samples, along with a recommended transportation container design.
Rock Sampling
The need for sampling rock will depend on the location of bedrock with respect to the design subgrade elevation, geology of the region, the availability of geophysical data and local experience. The transition from soil to weathered rock to sound rock can be erratic and highly variable, often causing major geotechnical construction problems (i.e., claims). Rock above the subgrade elevation will need to be removed by ripping or blasting. Considering blasting typically cost 4 to 20 times more than ripping, in addition to the noise and vibration problems associated with blasting, a determination of rippability is an important part of the subsurface exploration program. As previously discussed in Section 4.5.4, rippability can be determined by refraction survey methods, and should be confirmed by coring a sampling of the rock. SPT values have also been used to assess rippability, with values or 80 to 100 typically assumed to be the demarcation between ripping and blasting (Rolling and Rolling). However, there do not appear to be any hard-and-fast rules. The regional geology and the local ability of the contractor are both significant factors. Considering the determination of ripping versus basting is not an exact science, test pits are recommended to confirm the exploration results.
If the bedrock is near the subgrade level, then the pavement design will dictate requirements for additional samples. Technically pavements can be located directly above competent, intact rock with only a cushion/drainage layer, generally consisting of 150 mm (6 in.) of gravel required between flexible or rigid pavement and the rock. The rock surface should be sloped to promote drainage. It is imperative that the rock surface be level to provide a uniform bearing surface and prevent water from being trapped in local depressions. Undulating rock may therefore require additional excavation, especially if pockets contain poor quality materials, such as frost susceptible soils. For example, Figure 4-14 shows representative excavation requirements where frost susceptible soils exist over undulating rock.
Figure 4-14. Excavation requirements for frost susceptible soils over undulating rock.
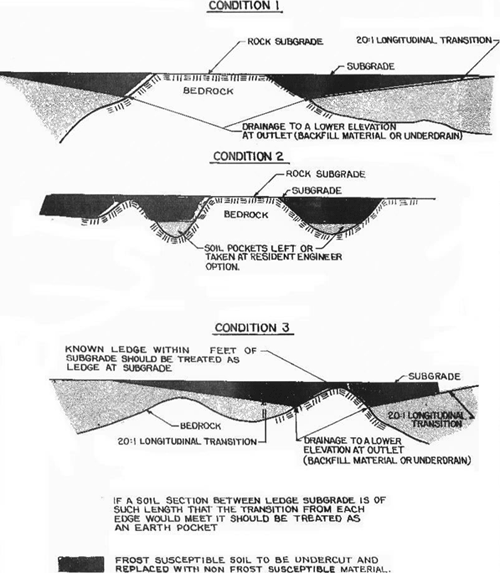
Highly weathered rock and deleterious rock (i.e., rock that degrades easily when exposed to the environment) such as shale, will be required to be removed to a greater depth, on the order of 0.6 - 1 m (2 - 3 ft) based on local experience. In either case, the reason for sampling is to determine the competency of the rock and the amount of excavation required.
It is generally recommended that a minimum 1.5-m (5-ft) length of rock core be obtained to verify that the boring has indeed reached bedrock and not terminated on the surface of a boulder (Mayne et al., 2002). Coring methods and evaluation of rock quality is covered in FHWA NHI-01-031. This rock core depth should be followed if rock is encountered within 1 m (3 ft) of pavement subgrade level, and could be reduced if rock is located at greater depths.
Cores should be used to identify the rock, determine the quality of the rock, and evaluate its durability. Evaluation of durability should be based on a review of past performance, slaking tests and physical degradation tests (Rollins and Rollins, 1996). Many problems with deleterious rocks have been regionally identified across the U.S. Durability tests are reviewed in Chapter 5.
Groundwater
Observations of the groundwater level and pressure are an important part of geotechnical explorations for pavement design and construction, and the identification of groundwater conditions should receive the same level of care given to soil descriptions and samples. The water level is part of the input in the mechanistic-empirical design approach. Also, as mention is Section 4.5.4, the location of the water level will influence interpretation of FWD and other geophysical results. The water level is also critical to determine the drainage requirements for construction and long-term performance of the pavement. In addition, the water level will influence the selection of appropriate stabilization methods, as discussed in Chapter 7.
Measurements of water entry during drilling, and measurements of the groundwater level at least once following drilling, should be considered a minimum effort to obtain water level data, unless alternate methods, such as installation of observation wells or piezometers, are defined by the geotechnical engineer. Detailed information regarding groundwater observations can be obtained from ASTM D 4750, Standard Test Method For Determining Subsurface Liquid Levels in a Borehole or Monitoring Well and ASTM D 5092, Design and Installation of Groundwater Wells in Aquifers.
The water level in the boring is not the only indication of the groundwater level. If the borehole has caved, the depth to the collapsed region should be recorded and reported on the boring record, as this may have been caused by groundwater conditions. The elevations of the caved depths of certain borings may be consistent with groundwater table elevations at the site, and this may become apparent once the subsurface profile is constructed. Drilling mud obscures observations of the groundwater level owing to filter cake action and the higher specific gravity of the drilling mud compared to that of the water. If drilling fluids are used to advance the borings, the drill crew should be instructed to bail and flush the hole prior to making groundwater observations.
Unless the soils are granular with little or no fines (i.e., clay and/or silt size particles), the water level in the boring may take days or weeks to rise to the actual groundwater level. Considering the potential for cave-in and infiltration of surface water during this period and with consideration for the potential for seasonal changes in the groundwater level, a bore hole is usually not the best means to get a true picture of the long-term water conditions at a site. For accurate measures of groundwater, observation wells or piezometers should be installed in the borehole. An "observation well" measures the level in a water table aquifer, while a "piezometer" measures the pressure in a confined aquifer, or at a specific horizon of the geologic profile (Powers, 1992).
The simplest type of observation well is formed by a small-diameter polyvinyl chloride (PVC) pipe set in an open hole. The bottom of the pipe is slotted and capped, and the annular space around the slotted pipe is backfilled with clean sand. The area above the sand is sealed with bentonite, and the remaining annulus is filled with grout, concrete, or soil cuttings. A surface seal, which is sloped away from the pipe, is commonly formed with concrete in order to prevent the entrance of surface water. The top of the pipe should also be capped to prevent the entrance of foreign material; a small vent hole should be placed in the top cap.
Piezometers are available in a number of designs. Commonly used piezometers are of the pneumatic and the vibrating wire type. Interested readers are directed to the reference manuals of the FHWA NHI course on Geotechnical Instrumentation (FHWA-NHI-98-034), FHWA NHI course on Subsurface Investigation (FHWA-NHI-01-031), or Dunnicliff (1988) for a detailed discussion of the various types of piezometers.
Permeability of the subgrade is rarely an issue for pavement design, but may be of interest in terms of dewatering requirements for excavations or installation of interceptor drains to lower groundwater. For rehabilitation projects, permeability of existing base and subbase may be of interest in order to evaluate drainage characteristics (e.g., time to drain) of in-place materials. Field permeability tests may be conducted on natural soils (and rocks) by a number of methods, including simple falling head, packer (pressurized tests), pumping (drawdown), slug tests (dynamic impulse), and dissipation tests. Simple falling head tests are typically used for evaluating the permeability of in-place base and subbase materials. A brief listing of the field permeability methods is given in Table 4-12.
| Standard | Title | |
|---|---|---|
| AASHTO | ASTM | |
| M 146 | C 294 | Descriptive Nomenclature for Constituents of Natural Mineral Aggregates |
| T 86 | D 420 | Guide for Investigating and Sampling Soil and Rock |
| - | D 1195 | Test Method for Repetitive Static Plate Load Tests of Soils and Flexible Pavement Components, for Airport and Highway Pavements |
| - | D 1196 | Test Method for Nonrepetitive Static Plate Load Tests of Soils and Flexible Pavement Components, for Use in Evaluation and Design of Airport and Highway Pavements |
| T 203 | D 1452 | Practice for Soil Investigation and Sampling by Auger Borings |
| T 206 | D 1586 | Standard Penetration Test and Split-Barrel Sampling of Soils |
| T 207 | D 1587 | Practice for Thin-Walled Tube Sampling of Soils |
| T 225 | D 2113 | Practice for Diamond Core Drilling for Site Investigation |
| M 145 | D 2487 | Test Method for Classification of Soils for Engineering Purposes |
| - | D 2488 | Practice for Description and Identification of Soils (Visual-Manual Procedure) |
| T 223 | D 2573 | Test Method for Field Vane Shear Test in Cohesive Soil |
| - | D 3385 | Infiltration Rate of Soils in Field Using Double-Ring Infiltrometer |
| - | D 3550 | Practice for Ring-Lined Barrel Sampling of Soils |
| - | D 4220 | Practice for Preserving and Transporting Soil Samples |
| - | D 4428 | Test Method for Crosshole Seismic Test |
| - | D 4544 | Practice for Estimating Peat Deposit Thickness |
| - | D 4694 | Test Method for Deflections with a falling-Weight-Type Impulse Load Device |
| - | D 4700 | General Methods of Augering, Drilling, & Site Investigation |
| - | D 4719 | Test Method for Pressuremeter Testing in Soils |
| - | D 4750 | Test Method for Determining Subsurface Liquid Levels in a Borehole or Monitoring Well (Observation Well) |
| - | D 5079 | Practices for Preserving and Transporting Rock Core Samples |
| - | D 5092 | Design and Installation of Ground Water Monitoring Wells in Aquifers |
| D 5126 | Guide for Comparison of Field Methods for Determining Hydraulic Conductivity in the Vadose Zone | |
| - | D 5777 | Guide for Seismic Refraction Method for Subsurface Investigation |
| - | D 5778 | Test Method for Electronic Cone Penetration Testing of Soils |
| - | D 6391 | Field Measurement of Hydraulic Conductivity Limits of Porous Materials Using Two Stages of Infiltration from a Borehole |
| - | D 6635 | Procedures for Flat Plate Dilatometer Testing in Soils |
| - | D 6951 | Test Method for Use of Dynamic Cone Penetrometer in Shallow Pavement Applications |
| - | G 57 | Field Measurement of Soil Resistivity (Wenner Array) |
Test Pits
Exploration pits and trenches, excavated by hand, a backhoe, or bulldozer, permit detailed examination of the soil and rock conditions at shallow depths and relatively low cost. Exploration pits can be an important part of geotechnical explorations where significant variations in soil conditions occur (vertically and horizontally), large soil and/or non-soil materials exist (boulders, cobbles, debris) that cannot be sampled with conventional methods, or buried features must be identified and/or measured.
The depth of the exploration pit is determined by the exploration requirements, but is typically about 2 - 3 m (6.5 - 10 ft). In areas with high groundwater level, the depth of the pit may be limited by the water table. Exploration pit excavations are generally unsafe and/or uneconomical at depths greater than about 5 m (16 ft), depending on the soil conditions. The U.S. Department of Labor's Construction Safety and Health Regulations, as well as regulations of any other governing agency, must be reviewed and followed prior to excavation of the exploration pit, particularly in regard to shoring requirements.
During excavation, the bottom of the pit should be kept relatively level so that each lift represents a uniform horizon of the deposit. At the surface, the excavated material should be placed in an orderly manner adjoining the pit with separate stacks to identify the depth of the material. The sides of the pit should be cleaned by chipping continuously in vertical bands, or by other appropriate methods, so as to expose a clean face of rock or soil. Survey control at exploration pits should be done using optical survey methods to accurately determine the ground surface elevation and plan locations of the exploration pit. Measurements should be taken and recorded documenting the orientation, plan dimensions and depth of the pit, and the depths and the thicknesses of each stratum exposed in the pit. In logging the exploration pit, a vertical profile should be made parallel with one pit wall. After the pit is logged, the shoring will be removed and the pit may be photographed or video logged at the discretion of the geotechnical engineer. Photographs and/or video logs should be located with reference to project stationing and baseline elevation. A visual scale should be included in each photo or video.
Exploration pits can, generally, be backfilled with the spoils generated during the excavation. The backfilled material should be compacted to avoid excessive settlements. Tampers or rolling equipment may be used to facilitate compaction of the backfill.
Sampling for Fill/Borrow Materials
Samples are also required to determine the suitability of cut materials to be used as fill and to evaluate suitable borrow sources for additional fill, as required, and for base and subbase materials. Many different soils may be suitable for use in the construction of the roadway embankment or fill. The fill for the subgrade material must be of high quality and, preferably, granular material. Silt and clay type soils are less desirable for subgrade, as they will dictate a thicker pavement section. Bulk samples should be obtained in order to determine the moisture-density relations (Proctor) of each soil type encountered. Moisture-density tests should be used to determine the compaction characteristics for embankment and/or surface soils and untreated pavement materials. AASHTO T99 should be used for medium to high plasticity fine-grained soils, whereas AASHTO T180 should be used for coarse-grained and low plasticity fine-grained soils. The degree of compaction required for the in-place density should be expressed as a percentage of the maximum density from the specified test procedure. Design tests (e.g., resilient modulus, CBR, etc.) are also required on the compacted subgrade material.
Standards and Guidelines
Field exploration by borings should be guided by local practice, by applicable FHWA and state agency procedures, and by the AASHTO and ASTM standards listed in Table 4-12. Current copies of these standards and manuals should be maintained in the engineer's office for ready reference. The geotechnical engineer and field inspector should be thoroughly familiar with the contents of these documents, and should consult them whenever unusual subsurface situations arise during the field investigation. The standard procedures should always be followed; improvisation of investigative techniques may result in erroneous or misleading results that may have serious consequences on the interpretation of the field data.
4.5.7 Guidelines for Idealized Subsurface Exploration Program
The ideal exploration program would begin with remote sensing to survey the area for site access issues and to identify geologic formations and other features that would guide the selection and suitability of geophysical test methods. Next, geophysical testing would be performed using FWD as the principle tool, where possible, for back-calculation of resilient modulus values and/or profiling the site, thus, potentially reducing the number of borings required and the cost of laboratory testing. Resistivity would be used in conjunction with FWD to evaluate the extent of significant soil strata, and ground probing radar could be used to provide continuous thickness profiles for the pavement layers, as well as the location of groundwater. CPT or DCP would then be used to classify soil strata, obtain characteristic strength values, and confirm thickness profiles. This would be followed by limited borings and sampling, with some borings performed at several cone locations for calibration/verification, and at critical locations identified by the preceding methods. Again, disturbed samples are generally obtained to determine the soil type, gradation, classification, consistency, moisture-density relations (Proctor), CBR, presence of contaminants, stratification, etc. Undisturbed samples are obtained where necessary to determine the in-place stiffness and strength, compressibility (settlement), natural moisture content, unit weight, permeability, discontinuities, fractures, and fissures of subsurface formations.
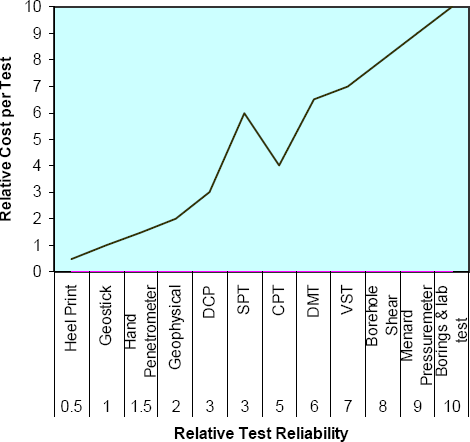
The primary reason for following this idealized program is to develop a detailed understanding of subgrade and/or the existing unbound pavement layers that will impact design, construction, and the long-term performance of the pavement structure. There is also a cost implication for this program. Figure 4-15 provides an indication of relative cost for each phase. However, the reduced number of borings and sampling, and the improved reliability of the pavement system, should more than offset the cost of this program.
Figure 4-15. Qualitative relationship between relative subsurface exploration cost and reliability (after Handy, 1980).
The Finnish roadway authority has fully integrated this approach into their pavement design. For example, to obtain an initial evaluation of the existing pavement section in rehabilitation and reconstruction projects, they use 1) GPR to provide an evaluation of the thickness of existing pavement components (using air-coupled antenna) and subgrade quality information (using ground-coupled antenna); 2) FWD to obtain the existing roadway support conditions; 3) roughness and rutting measurements; 4) pavement distress mapping; 5) GPS positioning; and reference drilling based on GPR results. The collected road survey data is processed, interpreted, analyzed, and classified, using Road Doctor™ software specifically developed for this purpose, as shown in Figure 4-16a. Most recently, they have added resistivity surveys to evaluate moisture content. By combining technologies, they are able to develop a complete map of the subgrade system, including moisture (Figure 4-16b) and corresponding settlement profiles (Dumas et al., 2003). The analysis includes a classification of the critical elements affecting the lifetime of the road, including 1) overall pavement condition, 2) condition assessment of the unbound pavement structure, 3) road fatigue related to subgrade frost-action, 4) drainage condition, and 5) local damages, such as settlement of the road (Roimela et al, 2000). This information provides a better understanding of the causes of pavement distress and more precise rehabilitation measures for problem layers in the existing pavement system. Similar combinations of technology are used for the evaluation of subgrade conditions for new pavement design. This approach supports Finnish philosophy in pavement design, which presumes that any treatment to the subgrade should last from 60 - 100 years, the base and subbase should last from 30 - 50 years, and the surface should have a life of from 15 - 20 years. This sound philosophy is based on the relative cost of rehabilitation associated with each of these layers, and the importance of engineering in characterizing the soil and selecting material of the lower pavement layers.
Figure 4-16. Geophysical evaluation used by the Finnish National Road Administration for rehabilitation and reconstruction projects showing
a) results from road analysis and
b) moisture profile beneath the pavement (Tolla, 2002).
a)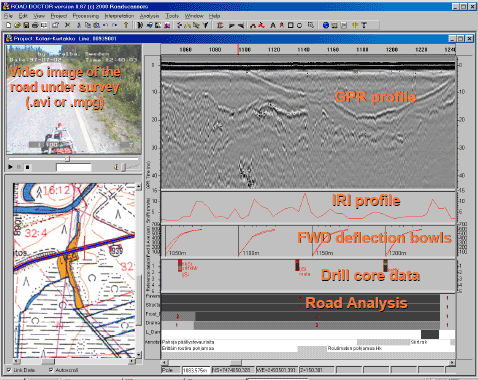
b)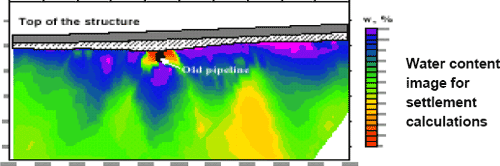
Texas DOT has recently developed a guideline, which supports the approach of using GPR and FWD data supported by DCP testing in the rehabilitation/reconstruction project evaluation process, as reported by Wimsatt and Scullion (2003). Computer programs have been developed to analyze the GPR and FWD data. GPR data is processed specifically to determine pavement layer thicknesses and the presence of excessive moisture or excessive air voids in pavement layers. FWD data is processed to generate remaining life estimates and pavement and subgrade layer moduli values. The DCP data is then used as required to verify the results of FWD data analysis, such as measuring base, subbase, and stiffness, or determining the depth to a stiff layer. Cores are generally collected at locations based on the GPR results (e.g., in suspect areas).
4.6 Identify Source For Other Geotechnical Components
As indicated in section 4.1, the next subsurface exploration step is to evaluate conceptual designs and determine sources for other geotechnical components (e.g., base and subbase materials). The requirements for subsurface drainage and subgrade stabilization, as well as construction material properties, should also be determined. Sampling of construction materials was discussed briefly in Section 4.5.6. The detailed requirements for these components will be covered in Chapter 7.
4.7 Subgrade Characterization
The last step in the exploration process is to characterize the subgrade through 1) an evaluation of the field data, 2) performance of classification tests to support the field-identified subsurface stratigraphy, 3) develop stratigraphic profiles of the site, and 4) use that information to select representative soil layers for laboratory testing. Evaluation of the field data includes compiling and examining the stratigraphic information from the field investigation steps (i.e., existing information, geophysical results, in-situ tests and borings), and the generation of final boring logs. The final logs are generated using classification tests to establish and support stratigraphy in relation to the design parameters. Soil profiles and plan views along the roadway alignment can then be created and examined to determine resilient modulus or other design testing requirements for each influential soil strata encountered.
4.7.1 Boring Logs
The boring log is the basic record of almost every geotechnical exploration and provides a detailed record of the work performed and the findings of the investigation. A boring log is a description of exploration procedures and subsurface conditions encountered during drilling, sampling, and coring. The field log should be written or printed legibly, and should be kept as clean as is practical.
Boring logs provide the basic information for the selection of test specimens. They provide background data on the natural condition of the formation, on the groundwater elevation, appearance of the samples, and the soil or rock stratigraphy at the boring location, as well as areal extent of various deposits or formations. The subsurface conditions observed in the soil samples and drill cuttings or perceived through the performance of the drill rig (for example, rig chatter in gravel, or sampler rebounding on a cobble during driving) should be described in the wide central column on the log labeled "Material Description," or in the remarks column, if available. The driller's comments are valuable and should be considered as the boring log is prepared. All appropriate portions of the logs should be completed in the field prior to completion of the field exploration. Following is a brief list of items, which should be included in the logs.
- Topographic survey data, including boring location and surface elevation, and bench mark location and datum, if available.
- An accurate record of any deviation in the planned boring locations.
- Identification of the subsoils and bedrock, including density, consistency, color, moisture, structure, geologic origin.
- For rehabilitation and reconstruction projects, an accurate thickness (+/- 2 mm {0.1 in.}) of each existing pavement layer should be carefully documented.
- The depths of the various generalized soil and rock strata encountered.
- Sampler type, depth, penetration, and recovery.
- Sampling resistance in terms of hydraulic pressure or blows per depth of sampler penetration. Size and type of hammer. Height of drop.
- Soil sampling interval and recovery.
- Rock core run numbers, depths/lengths, core recovery, and Rock Quality Designation (RQD).
- Type of drilling operation used to advance and stabilize the hole.
- Comparative resistance to drilling.
- Loss of drilling fluid.
- Water level observations with remarks on possible variations due to tides and river levels.
- The date/time that the borings are started, completed, and of water level measurements.
- Closure of borings.
A wide variety of drilling forms are used by various agencies, with some agencies using computerized logs entered on hand-held computers in the field. The specific forms to be used for a given type of boring will depend on local practice. A typical boring log is presented in Figure 4-17. A key or legend should be established by the agency for use by either in-house or outsource drilling in order to maintain uniformity in boring log preparation. A representative legend for soil boring logs and for core boring logs is included in Appendix E.
Figure 4-17. Subsurface exploration log.

In addition to the description of individual samples, the boring log should also describe various strata. The record should include a description of each soil layer, with solid horizontal lines drawn to separate adjacent layers. Soil description/identification is the systematic, precise, and complete naming of individual soils in both written and spoken forms (ASTM D-2488, AASHTO M 145). During progression of a boring, the field personnel should only describe the soils encountered. Group symbols associated with classification should not be used in the field. Samples are later returned to the lab where samples may be classified. Soil classification is the grouping of the soil with similar engineering properties into a category based on index test results; e.g., group name and symbol (ASTM D-2487, AASHTO M 145). A key part of classification of soil classification is the assignment of group symbols, which should only be assigned after supporting laboratory tests have been performed.
It is important to distinguish between visual identification (i.e., a general visual evaluation of soil samples in the field) versus classification (i.e., a more precise laboratory evaluation supported by index tests) in order to minimize conflicts between field and final boring logs. Some agencies have assigned symbols in the field based on visual observation and later corrected them on final boring logs based on lab tests. This practice leads to discrepancies between the field logs and the final logs that have on several occasions been successfully used to support contractor's claims in litigation procedures. In order to avoid these problems, it is recommended that group symbols not be included on field logs, but be reserved only for classification based on lab tests. Some states have avoided these problems by using lower-case symbols for field logs and upper-case symbols for lab-supported classification results, with the lower-case symbols clearly defined on the logs as based on visual observation only.
The stratigraphic observations should include identification of existing fill, topsoil, and pavement sections. Visual descriptions in the field are often subjected to outdoor elements, which may influence results. It is important to send the soil samples to a laboratory for accurate verification of visual identification, classification tests, and the assignment of appropriate group symbols, as discussed in the next section.
Data from the boring logs are combined with laboratory test results and other field information (i.e., historical logs, soil survey and geological information, geophysical and in-situ tests) to identify subgrade profiles showing the extent and depth of various materials along the roadway alignment. Detailed boring logs, including the results of laboratory tests, are included in the geotechnical investigation report. Guidelines for completion of the boring log forms, preparation of soil descriptions and classifications, and preparation of rock descriptions and classifications are covered in detail in FHWA NHI-01-031, Subsurface Investigation manual.
4.7.2 Soil Classification
All soils should be taken to the laboratory and classified using the AASHTO (or Unified) soil classification system (see Figure 4-18). As previously indicated, final identification with classification can only be appropriately performed in the laboratory. This will lead to more consistent final boring logs and will avoid conflicts with field descriptions. The Unified Soil Classification System (USCS) Group Name and Symbol (in parenthesis) appropriate for the soil type in accordance with AASHTO M 145, ASTM D 3282, or ASTM D 2487 is the most commonly used system in geotechnical work and, more recently, highway subgrade material. It is covered in detail in this section. The AASHTO classification system has been often used for classification of highway subgrade material, and is shown in comparison with the USCS in Figures 4-18 and 4-19. While both methods are based on grain size and plasticity, USCS groups soils with similar engineering properties.
Figure 4-18. The AASHTO and the Unified Soil Classification System (after Utah DOT, 1998).
|
|
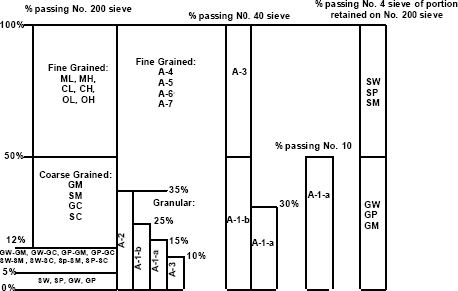
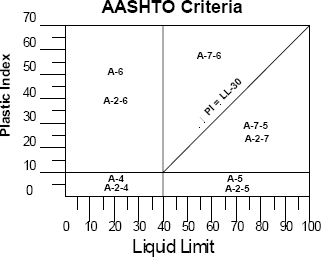
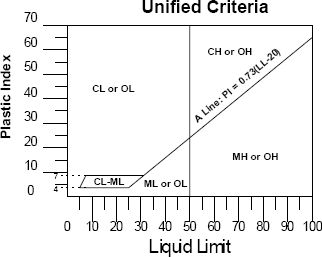
Figure 4-19. Particle size limit by different classifications systems.
Click here for text version of image
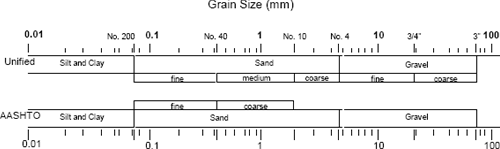
Table 4-13 provides an outline of the laboratory classification method. Table 4-14 relates the Unified soil classification of a material to the relative value of a material for use in a pavement structure.
| Criteria for Assigning Group Symbols and Group Names Using Laboratory Testsa | Soil Classification | ||||||||||||||
|---|---|---|---|---|---|---|---|---|---|---|---|---|---|---|---|
| Group Symbol | Group Nameb | ||||||||||||||
| GRAVELS More than 50% of coarse fraction retained on No. 4 sieve | CLEAN GRAVELS Less than 5% fines | CU ≥ 4 and 1 ≤ CC ≤ 3e | GW | Well-graded Gravel | |||||||||||
| CU ≤ 4 and 1 ≥ CC ≥ 3e | GP | Poorly-graded Gravelf | |||||||||||||
| GRAVELS WITH FINES More than 12% of finesc | Fines classify as ML or MH | GM | Silty Gravelf,g,h | ||||||||||||
| Fines classify as CL or CH | GC | Clayey Gravelf,g,h | |||||||||||||
| SANDS 50% or more of coarse fraction retained on No. 4 sieve | CLEAN SANDS Less than 5% finesd | CU ≥ 6 and 1 ≤ CC ≤ 3e | SW | Well-graded Sandi | |||||||||||
| CU ≤ 6 and 1 ≥ CC ≥ 3e | SP | Poorly-graded Sandi | |||||||||||||
| SANDS WITH FINES More than 12% finesd | Fines classify as ML or MH | SM | Silty Sandg,h,i | ||||||||||||
| Fines classify as CL or CH | SC | Clayey Sandg,h,i | |||||||||||||
| SILTS AND CLAYS Liquid limit less than 50% | Inorganic | PI > 7 and plots on or above "A" linej | CL | Lean Clayk,l,m | |||||||||||
| PI < 4 or plots below "A" linej | ML | Siltk,l,m | |||||||||||||
| Organic | Liquid limit - ovendried | < 0.75 | OL | Organic Clayk,l,m,n | |||||||||||
| Liquid limit - not dried | Organic Siltk,l,m,o | ||||||||||||||
| SILTS AND CLAYS Liquid limit more than 50% | Inorganic | PI plots on or above "A" line | CH | Fat Clayk,l,m | |||||||||||
| PI plots below "A" line | MH | Elastic Siltk,l,m | |||||||||||||
| Organic | Liquid limit - ovendried | < 0.75 | OH | Organic Siltk,l,m,p | |||||||||||
| Liquid limit - not dried | Organic Siltk,l,m,q | ||||||||||||||
| Highly fibrous organic soils | Primary organic matter, dark in color, and organic odor | Pt | Peat and Muskeg | ||||||||||||
|
NOTES:
FINE-GRAINED SOILS (clays & silts): 50% or more passes the No. 200 sieve COARSE-GRAINED SOILS (sands & gravels): more than 50% retained on No. 200 sieve | |||||||||||||||
| Major Divisions | Name | Subgrade Strength when Not Subject to Frost Action | Potential Frost Action | Compressibility & Expansion | Drainage Characteristics | |
|---|---|---|---|---|---|---|
| Gravel And Gravelly Soils | GW | Well-graded gravels or gravel-sand mixtures, little or no fines | Excellent | None to very slight | Almost none | Excellent |
| GP | Poorly graded gravels or gravel-sand mixtures, little or no fines | Good to excellent | None to very slight | Almost none | Excellent | |
| *d GM--- u | Silty gravels, gravel-sand silt mixtures | Good to excellent | Slight to medium | Very slight | Fair to poor | |
| Good | Slight to medium | Slight | Poor to practically impervious | |||
| GC | Clayey gravels, gravel-sand-clay mixture | Good | Slight to medium | Slight | Poor to practically impervious | |
| Sand and Sandy Soils | SW | Well-graded sands or gravelly sands, little or no fines | Good | None to very slight | Almost none | Excellent |
| SP | Poorly graded sands or gravelly sands, little or no fines | Fair to good | None to very slight | Almost none | Excellent | |
| *d SM--- u | Silty sands, sand-silt mixtures | Fair to good | Slight to high | Very slight | Fair to poor | |
| Fair | Slight to high | Slight to medium | Poor to practically impervious | |||
| SC | Clayey sands, sand-clay mixtures | Poor to fair | Slight to high | Slight to medium | Poor to practically impervious | |
| Silts & Clays with Liquid Limit Less Than 50 | ML | Inorganic silts & very fine sand, rock flour, silty or clayey fine sand or clayey silts with slight plasticity | Poor to Fair | Medium to Very High | Slight to medium | Fair to Poor |
| CL | Inorganic clays of low to medium plasticity, gravelly clays, sandy clays, silty clays, lean clays | Poor to Fair | Medium to High | Slight to medium | Practically Impervious | |
| OL | Organic silts & organic silt-clays or low plasticity | Poor | Medium to High | Medium to high | Poor | |
| Silts & Clays with Liquid Limit Greater Than 50 | MH | Inorganic silts, micaceous or diatomaceous fine sand or silty soils, elastic silts | Poor | Medium to Very High | High | Fair to Poor |
| CH | Inorganic clays of high plasticity, fat clays | Poor to Fair | Medium to Very High | High | Practically Impervious | |
| OH | Organic clays of medium to high plasticity, organic silts | Poor to Very Poor | Medium | High | Practically Impervious | |
| Highly Organic Soils | (Pt) | Peat & other highly organic soils | Not Suitable | Slight | Very high | Fair to Poor |
*Division of GM and SM groups is based on Atterberg Limits (See Chapter 6) with suffix d used when L.L. is 28 or less and the PI is 6 or less. The suffix u is used when L.L. is greater that 28.
4.7.3 Subsurface Profile
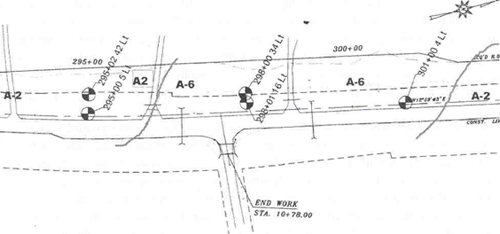
On the basis of all subsurface information (i.e., from the literature review, geophysical evaluation, in-situ testing, soil borings, and laboratory test data), a subsurface profile can be developed. Longitudinal profiles are typically developed along the roadway alignment, and a limited number of transverse profiles may be included for key locations, such as at major bridge foundations, cut slopes, or high embankments. The subsurface information should also be presented in plan view, providing a map of general trends and changes in subsurface conditions. Vertical and plan view profiles provide an effective means of summarizing pertinent subsurface information and illustrating the relationship of the various investigation sites. By comparing the vertical profiles with the plan view, the subsurface conditions can be related to the site's topography and physiography, providing a sense of lateral distribution over a large horizontal extent. Subsurface profiles should be developed by a geotechnical engineer, as the preparation requires geotechnical judgement and a good understanding of the geologic setting for accurate interpretation of subsurface conditions between the investigation sites.
In developing a two-dimensional subsurface profile, the profile line (typically the roadway centerline) needs to be defined on the base plan, and the relevant borings, projected to this line. Judgment should be exercised in the selection of the borings since projection of the borings, even for short distances, may result in misleading representation of the subsurface conditions in some situations. Due to the subjective nature of the interpretation required, subsurface profiles and plan views should not be included in either the subsurface investigation report or the construction bid documents.
The subsurface profile should be presented at a scale appropriate to the depth of the borings, frequency of the borings and soundings, and overall length of the cross-section. Generally, an exaggerated scale of 1(V):10(H) or 1(V):20(H) should be used. A representative example of an interpreted subsurface profile is shown in Figure 4-20, and a plan view profile is shown in Figure 4-21. The subsurface profile can be presented with reasonable accuracy and confidence at the locations of the borings. Generally, however, owners and designers would like the geotechnical engineer to present a continuous subsurface profile that shows an interpretation of the location, extent, and nature of subsurface formations or deposits between borings. At a site where rock or soil profiles vary significantly between boring locations, the value of such presentations becomes questionable. The geotechnical engineer must be very cautious in presenting such data. Such presentations should include clear and simple caveats explaining that the profiles, as presented, cannot be fully relied upon. Should there be a need to provide highly reliable, continuous subsurface profiles, the geotechnical engineer should increase the frequency of borings and/or utilize geophysical methods to determine the continuity, or the lack of it, of subsurface conditions.
Figure 4-20. Subsurface profile based on boring data showing cross-sectional view.
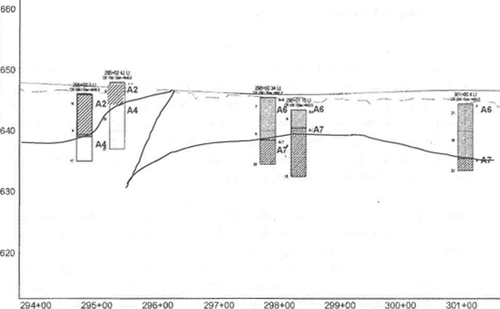
Figure 4-21. Plan view of subsurface information.
4.7.4 Select Samples for Laboratory Testing
A program of laboratory tests will be required on representative samples of the foundation soils or soils to be used as construction materials so that pertinent properties can be determined. The extent of the laboratory program depends on the criticality of the design and on the complexity of the soil conditions. Those laboratory tests and analyses that are typically performed or required for an analysis and selection of the pavement type and thickness are listed in Table 4-15. A deep cut or high embankment, as used in the table, general implies greater than a few meters (6 ft or more).
| Type of Laboratory Test | Deep Cuts | High Embankments | At-Grade |
|---|---|---|---|
| Moisture Content and Dry Unit Weight | X | X | |
| Atterberg Limits | X | X | X |
| Gradation | X | X | |
| Shrink Swell | X | X | |
| Permeability | X | ||
| Consolidation | X | ||
| Shearing and Bearing Strength | X | X | X |
| Resilient Modulus | X | X | X |
Representative soil layers are selected for laboratory testing by examining the boring logs, soil profiles, and classification tests. The primary test for design will be either resilient modulus tests, CBR, or other agency-specific design value, as outlined in Chapter 5, along with other properties required for each design level. Where possible, resilient modulus tests should be performed on undisturbed specimens that represent the natural conditions (moisture content and density) of the subgrade. For disturbed or reconstituted specimens, bulk materials should be recompacted to as close to the natural conditions as possible. For rehabilitation projects, the type of distress is also an important consideration, with engineering properties required for structural design of the selected rehabilitation strategy. These tests must also indicate the existing condition of the pavement and highlight any degradation that has taken place during the life of the pavement. Geophysical tests will significantly help in this effort. Tests to evaluate stabilization alternatives typically can be performed on material from disturbed, undisturbed, or bulk samples, prepared and compacted to the field requirements, as detailed in Chapter 7. Tests will also be required for constructability and performance. These tests can usually be performed on disturbed specimens and/or bulk samples.
The number of test specimens depends on the number of different soils identified from the borings, as well as the condition of those soils. The availability of geophysical and/or in-situ tests will also affect the number and type of tests. Most of the subgrade test specimens should be taken from as close to the top of the subgrade as possible, extending down to a depth of 0.6 m (2 ft) below the planned subgrade elevation. However, some tests should be performed on the soils encountered at a greater depth, especially if those deeper soils are softer or weaker. No guidelines are provided regarding the number of tests, except that all of the major soil types encountered near the surface should be tested with replicates, if possible. Stated simply, resilient modulus tests or other design tests (e.g., CBR) should be performed on any soil type that may have a detrimental impact on pavement performance (NCHRP 1-37A Pavement Design Guide). Other properties, such as shrink/swell and consolidation, will be required for evaluating stabilization requirements and long-term performance (e.g., potential deformation).
For construction, as was discussed in section 4.5.6, moisture-density tests will be required on each soil type that will be used as fill in the pavement section, as well as the roadway embankment. AASHTO T99 should be used for medium to high plasticity fine-grained soils, whereas AASHTO T180 should be used for coarse-grained and low plasticity fine-grained soils. The degree of compaction required for the in-place density should be expressed as a percentage of the maximum density from the specified test procedure. Design tests (e.g., resilient modulus, CBR, etc.) are also required on the compacted subgrade material.
For rehabilitation projects, the number of tests will depend on the condition of the existing pavement. The condition survey as discussed in section 4.2.3, should be analyzed to show where problems may exist and require detailed material property information.
Another important point to remember in selecting the number of specimens to be tested is that the resilient modulus or other design value measured on different soils and soil structures (density, moisture) from repeated load tests can be highly variable. A coefficient of variation exceeding 25 percent for the resilient modulus on similar soils measured at the same stress-state is not uncommon. Repeatability studies indicate that coefficients of variation below 5 percent are not uncommon when testing replicated soil specimens (Boudreau, 2003). The potential high variability in test results requires increased testing frequencies (i.e., many more than two or three resilient modulus tests along a project). As a general guide and suggested testing frequency, three resilient modulus tests should be performed on each major subgrade soil found along the highway alignment. If the variability of test results (resilient modulus measured at the same stress-state) exceeds a coefficient of variation of 25 percent, then additional resilient modulus tests should be performed to obtain a higher confidence in the data (NCHRP 1-37A).
Student Exercise 4-1.
Boring logs and a stratagraphic profile from a proposed roadway alignment will be provided and the teams will be asked to 1) determine if the information is adequate, 2) evaluate method(s) for obtaining additional subsurface information, and 3) develop a laboratory testing program. One team will be randomly selected to present the results, followed by a solution discussion with the entire class.
Student Exercise 4-2.
The students will be asked to provide considerations regarding selection, assignment, and number of laboratory tests. Each item will be noted on a flip chart and, upon completion, reviewed with the list in the Reference Manual. The class will discuss the implications of not running the right test, running too many tests, and incorrectly running tests.
4.8 References
- AASHTO (1972). AASHTO Interim Guide for Design of Pavement Structures, American Association of State Highway and Transportation Officials, Washington, D.C.
- AASHTO (1986). AASHTO Guide for Design of Pavement Structures, American Association of State Highway and Transportation Officials, Washington, D.C.
- AASHTO (1988). Manual on Subsurface Investigations, Developed by the Subcommittee on Materials, American Association of State Highway and Transportation Officials, Washington, D.C.
- AASHTO (1993). AASHTO Guide for Design of Pavement Structures, American Association of State Highway and Transportation Officials, Washington, D.C.
- AASHTO (2002). Standard Specifications for Transportation Materials and Methods of Sampling and Testing: Part II: Tests, American Association of State Highway and Transportation Officials Sixteenth Edition, Washington, D.C.
- Al-Qadi, I.L., Lahouar, S. and Loulizi, A (2003). "Ground Penetrating Radar Evaluation for Flexible Pavement Thickness Estimation," Journal of Transportation Engineering, ASCE, Vol. 129, No.1, Jan./Feb., pp. 93-99.
- American Society for Testing & Materials (2003). ASTM Book of Standards, Vol. 4, Section 03, Road and Paving Materials; Vehicle-Pavement Systems, ASTM International, West Conshohocken, PA.
- American Society for Testing & Materials (2000). ASTM Book of Standards, Vol. 4, Section 08 and 09, Construction Materials: Soils & Rocks, ASTM International, West Conshohocken, PA.
- Boudreau, R. L. (2003). "Repeatability of the Resilient Modulus Test Procedure," ASTM STP 1437, Resilient Modulus Testing for Pavement Components, G.N. Durham, A.W. Marr, and W.L. DeGroff, Eds., American Society for Testing and Materials, West Conshohocken, PA.
- Caterpillar Handbook of Ripping, 8th Edition, Caterpillar Company, Peoria, IL.
- Chassie, R.G. (2000) Soils and Foundations Workshop Manual, FHWA NHI-00-045, National Highway Institute. Federal Highway Administration, Washington, D.C.
- Cheney, R. and Chassie, R.G. (2000). Soils and Foundations Workshop, FHWA NHI-00-045, NHI Course No. 132012, Federal Highway Administration, Washington, D.C.
- Dumas, C., Cannon, R.R., Lwin, M.M., Mansukhani, S., McLain, K.W., Pelnik, T.W., Porbaha, A., Putcha, S., Brown, D.A., Short, R.D., Macnab, A., and Christopher, B.R. (2003). FHWA Scan Tour Report on The Innovative Technology for Accelerated Construction of Bridge and Embankment Foundations, FHWA International Technology Scanning Program, Federal Highway Administration, Washington, D.C.
- Dunnicliff, J. (1988). Geotechnical Instrumentation for Monitoring Field Performance, John Wiley & Sons, Inc., New York.
- Dunnicliff, J. (1998). Geotechnical Instrumentation Reference Manual, FHWA-NHI-98-034, National Highway Institute, Washington D.C.
- FHWA-NHI-98-034 (1998) Geotechnical Instrumentation, author: Dunnicliff, J., National Highway Institute, 238 p.
- FHWA TS-78-209 (1978). Guidelines for Cone Penetration Test: Performance and Design, prepared by J.H. Schmertmann for the Federal Highway Administration, Washington, D.C.
- FHWA NHI-01-031 (2001) Subsurface Investigations, authors: Mayne, P.W., Christopher, B.R., DeJong, J., National Highway Institute, 394 p.
- Greenhouse, J.P., Slaine, D.D., and Gudjurgis, P. (1998). Application of Geophysics in Environmental Investigations, Matrix Multimedia Publishing, Toronto.
- Handy, R.L. (1980). "Realism in Site Exploration: Past, Present, Future, and Then Some - All Inclusive," Proceedings, Symposium on Site Exploration in Soft Ground Using In-Situ Techniques, Report FHWA-TS-80-202, Federal highway Administration, Washington D.C.
- Huang, Y.H. (1993). Pavement Analysis and Design. Englewood Cliffs, NJ: Prentice Hall.
- Kleyn, E.G., "The Use of the Dynamic Cone Penetrometer (DCP)," Transvaal Roads Department, Report Number L2/74, Pretoria, 1975.
- Kulhawy, F.H. and Mayne, P.W. (1990). Manual on Estimating Soil Properties for Foundation for Design, Prepared by Cornell University for the Electric Power Research Institute, Report Number EPRI EL-6800, Electric Power Research Institute, Palo Alto, CA.
- LTPP Manual for Falling Weight Deflectometer Measurement: Operational Field Guidelines, Version 3.1 (August 2000) Prepared by: LAW PCS, A Division of Law Engineering and Environmental Services, Inc., Office of Infrastructure R&D, Long-Term Pavement Performance Team, HRDI-13. Federal Highway Administration, McLean, Virginia.
- Mayne, P.W., Christopher, B.R., Dejong, J. (2002). Subsurface Investigations, FHWA -NHI-01-031, Federal Highway Administration, Washington, D.C.
- Morey, R.M. (1998). Ground Penetrating Radar for Evaluating Subsurface Conditions for Transportation Facilities, NCHRP Synthesis 278, Transportation Research Board, Washington, D.C.
- Muhammad, L.N., Titi, H.H., and Herath, A. (2002). Effect of Moisture Content and Dry Unit Weight on the Resilient Modulus of Subgrade Predicted by Cone Penetration Test, FHWA/LA.00/355, Louisiana Transportation Research Center, Baton Rouge, LA.
- NCHRP 1-37A Design Guide (2002). 2002 Design Guide - Design of New and Rehabilitated Pavement Structures, Draft Final Report, Part 1 - Introduction and Part 2 - Design Inputs, Prepared for the National Cooperative Highway Research Program by ERES Division of ARA.
- Newton, T., Anderson, N., and Hatheway, A. (1998). "Application of Innovative Geophysical Methods for Subgrade Investigations in Karst Terrain," Report published by the University of Missouri, Rolla, for Missouri Department of Transportation and the Federal Highway Administration
- Newcombe, D.A., and B. Birgisson (1999). "Measuring In-situ Mechanical Properties of Pavement Subgrade Soils," NCHRP Synthesis 278, Transportation Research Board, Washington, D.C.
- NHI (1998). Techniques for Pavement Rehabilitation; A Training Course, Participant's Manual, National Highway Institute course number 13108, Federal Highway Administration, Washington D.C.
- Powers, J.P. (1992). Construction Dewatering, John Wiley & Sons, Inc., New York.
- Roimela, P., Salmenkaita, S., Maijala, P., Saarenketo, T. (2000). "Road Analysis: a Tool for Cost-effective Rehabilitation Measures for Finnish Roads," Presented at GPR 2000, the Eighth International Conference on Ground Penetrating Radar, May 23-26, 2000, Gold Coast, Australia.
- Rollings, M.P., and R.S. Rollings (1996). Geotechnical Materials in Construction, McGraw-Hill, NY.
- Santamarina, J.C., Klein, K. and Fam, M.A. (2001). Soils and Waves, Particulate Materials Behavior Characterization, & Process Monitoring, John Wiley & Sons, Ltd., N.Y., 488 p.
- Scullion, T. (2004). Implementation of Ground Penetrating Radar Technology, AASHTO's Technical Implementation Group, Demo CD Distributed at TRB 2004 Annual Meeting, Texas Transportation Institute.
- Tolla, P. (2002). Presentation to the FHWA Scan Team on "Innovative Technology for Accelerated Construction of Bridge and Embankment Foundations."
- U.S. Department of Labor Construction Safety and Health Regulations (current) Standard - 29 CFR, Part 1926: Available online.
- Utah D.O.T. (1998). "Pavement Management and Pavement Design Manual."
- Vandre, B., Budge, A., Nussbaum, S. (1998). "DCP- A Useful Tool for Characterizing Engineering Properties of Soils at Shallow Depths," Proceedings of 34th Symposium on Engineering Geology and Geotechnical Engineering, Utah State University, Logan, UT.
- Webster, S.L., Brown, R.W. and Porter, J.R. (1994). Force Projection Site Evaluation Using the Electric Cone Penotrometer (ECP) and the Dynamic Cone Penetrometer (DCP), Technical Report GL-94-17, U.S. Air Force, Tyndall AFB, FL.
- Wightman, W.E., Jalinoos, F., Sirles, P., Hanna, K. (2003). Application of Geophysical Methods to Highway Related Problems, Report developed by Blackhawk GeoSciences, A Division Of Blackhawk GeoServices for FHWA under FHWA Contract Number DTFH68-02-P-00083, Federal Highway Administration, Washington D.C.
- Wimsatt, A.J. and Scullion, T. (2003). "Selecting Rehabilitation Strategies for Flexible Pavement in Texas," presented and published at the annual meeting of the Transportation Research Board, TRB, Washington D.C.
- www.fema.gov
- www.ce.gatech.edu/~geosys/misc/links.htm
- www.geoforum.com/info/geophysical/.
- http://soils.usda.gov/survey/online_surveys/
- www.usgs.gov
| << Previous | Contents | Next >> |