LTPP Manual for Profile Measurements and Processing
APPENDIX E. PROCEDURE FOR DETERMINING DIPSTICK ® FOOTPAD SPACING
Background
Testing performed in the field has indicated that the
spacing between the centerline of the footpads in various Dipsticks® that are used in the LTPP program is not exactly 304.8 mm. Therefore, each RSC
is required to perform a field test annually to determine the footpad spacing
of each Dipstick® in their possession. This appendix describes
procedures for performing the field test and the procedure for computing the
footpad spacing of the Dipstick® from that data.
Test Plan
This test should be performed on a smooth AC or PCC pavement that is free of distress. Use the following procedure to layout the section and perform the test.
- Layout a 30.48 m long test section. Use a cloth tape that is in a good condition to
layout the section. A longitudinal chalk line should be marked on the section.
When marking the chalk line, extend the chalk line 0.3 m past the end on the
test section. Two transverse chalk lines should be marked perpendicular to the
longitudinal survey line at the start (0 m) and the end (30.48 m) of the section. Figure
99 shows the layout of the test section.
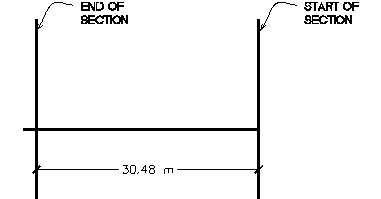
Figure 99. Illustration. Test section layout.
-
- Measure the diameter (in mm) of each footpad in the Dipstick® using a caliper and record the values.
-
- Place the back end of the back footpad of the Dipstick® in line with the transverse line marked at the beginning of the test section (see figure 100).
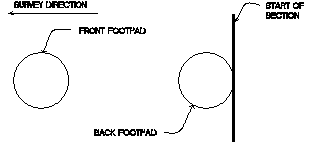
Figure 100. Illustration. Location of back footpad of Dipstick® at start of the section.
-
- Walk the Dipstick® along the section following the procedures outlined in section 3.3.3 of this
manual. After taking the 100th reading, measure the distance (in mm) from the back end of the front footpad of the Dipstick® to the transverse line that was marked at the end of the section. The following possible scenarios can occur:
- Back end of front footpad is past the transverse line at the end of the test section (see figure 101). The distance to be measured is the distance X indicated in figure 101. Measure this distance (in mm).
-
- Back end of the front footpad is before the transverse line at the end of the section (see figure 102). The distance to be measured is the distance X indicated in figure 102. Measure this distance (in mm).
-
- Back end of the front footpad is exactly on the transverse line at the end of the section, in which case the offset X is zero.
-
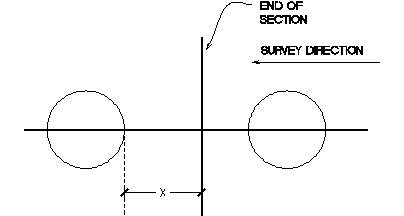
Figure 101. Illustration. Back end of front footpad is past the end of the test section when last reading is obtained.
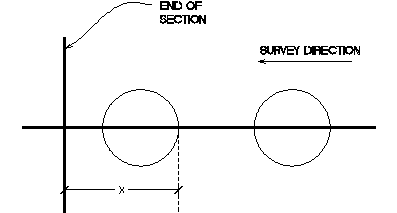
Figure 102. Illustration. Back end of the front footpad is before the end of the test section when last reading is obtained.
-
- Repeat steps 3 and 4 two additional times.
-
Computation of Dipstick® Footpad Spacing
- Compute the footpad spacing for the Dipstick® for each run using the following procedure:
If back edge of front footpad was past the end of the section when the last reading was obtained (case shown in figure 101), use the following formula to compute footpad spacing:
Footpad spacing (mm) = (30480 + X) /100 (3)
Where:
X is in mm.
If back edge of front footpad was before the end of the test section when the last reading was obtained (case shown in figure 102), use the following formula to compute footpad spacing:
Footpad spacing (mm) = (30480 - X) / 100 (4)
Where:
X is in mm.
If the back edge of the front footpad is exactly in line with the end of the section, the footpad spacing is 304.8 mm.
Compute the average footpad spacing for each Dipstick® by averaging the values obtained for the three runs (to two decimal places).
-
- Maintain a log in the RSC office that indicate the following information: date when testing was performed, Dipstick® model number, diameter of the Dipstick® footpads, results from the field tests, computed footpad spacing for each run and the average footpad spacing. The suggested format of the log is shown in the following table (date of testing should be included in the log).
Table 3. Suggested format of RSC office log.
| Dipstick Model | Serial Number | Diameter of Footpad
(mm) | Test Number |
Offset at End of Section(1)
(mm) | Footpad Spacing
(mm) | Average Footpad Spacing
(mm) |
| Front | Back |
| | | | | 1 | | | |
| | | | | 2 | | | |
| | | | | 3 | | | |
| | | | | 1 | | | |
| | | | | 2 | | | |
| | | | | 3 | | | |
| | | | | 1 | | | |
| | | | | 2 | | | |
| | | | | 3 | | | |
Note 1: Offset is positive if back end of front footpad is
past end of section at last reading, offset is negative if back end of front footpad is before
end of the section when last reading is obtained
-
- Write
the average Dipstick® footpad spacing and date when testing was
performed on a sheet of paper and securely tape it to the inside of the
Dipstick® carrying case.
-


