U.S. Department of Transportation
Federal Highway Administration
1200 New Jersey Avenue, SE
Washington, DC 20590
202-366-4000
Federal Highway Administration Research and Technology
Coordinating, Developing, and Delivering Highway Transportation Innovations
| TECHBRIEF |
| This report is an archived publication and may contain dated technical, contact, and link information |
| Publication Number: FHWA-HRT-12-071 Date: October 2012 |
Publication Number: FHWA-HRT-12-071 Date: October 2012 |
PDF files can be viewed with the Acrobat® Reader®
FHWA Contact: Justin Ocel, HRDI-40, (202) 493-3080, justin.ocel@dot.gov
On August 1, 2007, the I-35W bridge collapsed in Minneapolis, MN. The bridge was a three-span (255- by 456- by 255-ft) continuous subdivided Warren deck truss over the Mississippi River. The National Transportation Safety Board (NTSB) investigated the collapse and leveraged technical assistance from the Federal Highway Administration (FHWA). NTSB determined that the cause of the collapse was due to undersized gusset plates at a particular node location on the main truss. The plates should have been twice as thick or should have had twice the yield strength to provide adequate resistance to prevent the collapse.(1)
It was noted during the investigation that the gusset plates of one particular bottom chord joint (L11 joint) had isolated corrosion where the gusset plate intersected the bottom chord. While it was determined that this isolated section loss did not contribute to the collapse mechanism, it was troublesome to NTSB that the corrosion was not noted in the Minnesota Department of Transportation inspection records. The L11 joint geometry was such that inspectors could not see the interior of the connection to document the corrosion and could not quantify the remaining section for load rating. To minimize this potential widespread problem, NTSB issued the following recommendation to FHWA at the conclusion of the collapse investigation:
“Require that bridge owners assess the truss bridges in their inventories to identify locations where visual inspections may not detect gusset plate corrosion and where, therefore, appropriate nondestructive evaluation technologies should be used to assess gusset plate condition.”(1)(p.153)
In response to this recommendation, FHWA issued Technical Advisory (TA) 5140.31 on January 29, 2010, to provide guidance to bridge owners as to which nondestructive evaluation (NDE) technologies can be used to supplement gusset plate inspections when visual techniques are not feasible.(2) The TA recommended the use of ultrasonic testing (UT) to determine the remaining section thicknesses in gusset plates that have areas that cannot be seen. Ultrasonic thickness measuring devices (also known as D-meters) are attainable, inexpensive, and easy to use.
UT relies on imparting high-frequency elastic stress waves into a material and using sensors to measure the response. Reflections of the stress waves from voids (i.e., cracks, corrosion, etc.) appear as peaks in the frequency spectrum. The D-meter is the simplest of UT devices; it measures the reflection of stress waves off the back of a steel plate and calculates the thickness using equations from the theory of elasticity and the known longitudinal stress wave velocity of steel. The primary limitation of UT is that the stress wave attenuates in the gap between multiple layers of plates (excluding acoustic coupling, which can occur in closely mated surfaces like pins and hangers). For the inspection of trusses, if the connection uses single-layer gusset plates, typical UT is sufficient. However, when the gusset plate is built from multiple layers of individual plates (sometimes referred to as “shingle” or “nested” plates), UT can only assess section loss in the plate that the sensor is coupled to. FHWA acknowledged that there was not a suitable technology available for the evaluation of the remaining section in multilayered gusset plates.(2) This TechBrief explores the use of radiographic testing (RT) to identify if it may be suitable for inspecting multilayered gusset plates.
In response to the I-35W collapse, FHWA and the American Association of State Highway Transportation Officials conducted an experimental program to investigate the structural behavior of gusset plates.(3) This research program tested 13 gusset plate connections to failure, meaning they could no longer support external loads. Four of these experimental connections had simulated section loss in the gusset plates to investigate the role of deterioration on the overall behavior of the connection. This offered a unique opportunity to test NDE technologies on real gusset plate connections in a controlled environment with a known level of section loss. The following sections describe the results attained through RT of two multilayer gusset plate specimens.
Two specimens (307SS3-1 and 307SS3-3) with simulated corrosion were used in this study. A schematic of the overall connection is shown in figure 1. Two gusset plates were used to bolt together five built-up I-shapes and boxes. A shingle plate was added to each gusset plate but did not cover the entire gusset plate. Both the primary gusset and shingle plate had a nominal thickness of 0.375 inches.
To simulate section loss from corrosion, a fixed pattern was milled out of the back of each primary gusset plate. The back of the gusset plate faces the interior of the connection, which is the area that was difficult to inspect in the I-35W bridge. Each of the two specimens used a different simulated corrosion pattern, as shown in figure 2 and figure 3. The remaining thickness in each of the simulated corrosion areas was measured with a D-meter. The D-meter was also used to verify the thicknesses of the gusset plates and shingle plate. The thicknesses of specimen 307SS3-1, specimen 307SS3-3, and the shingle plate were 0.371, 0.370, and 0.375 inches, respectively. The shingle plate was reused during RT for each specimen.
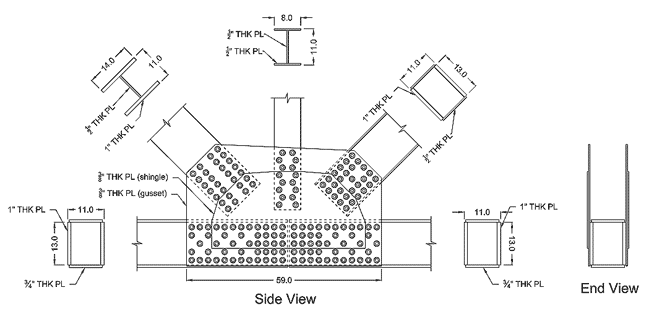
Figure 1. Illustration. Overall connection geometry used in testing.
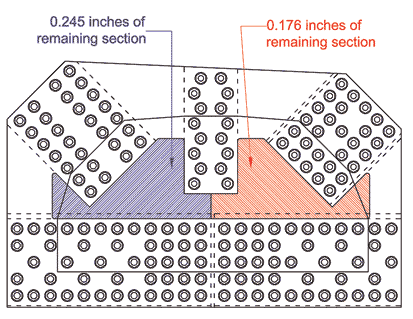
Figure 2. Illustration. Corrosion pattern for specimen 307SS3-1.
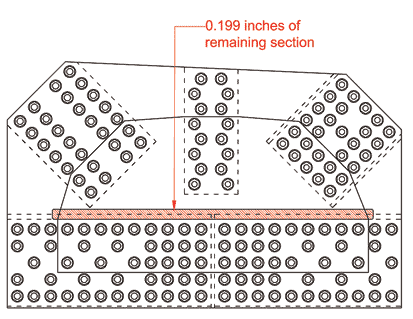
Figure 3. Illustration. Corrosion pattern for specimen 307SS3-3.
Computed radiography with a gamma ray source was used to evaluate the remaining thickness of the primary gusset plate that was partially hidden behind a shingle plate. The advantage of computed radiography is the imaging plate is rapidly converted into digital data for immediate post-processing, which is not possible with conventional radiographic film that would have to be developed. The source was placed on the outside of the connection, and the imaging plate was placed on the inside of the connection.
In this case, the gamma rays were directed through the steel plates. The intensity of the gamma rays that reached the imaging plate was proportional to the density (or thickness) of the steel they passed through.(4) A Selenium-75 radiation source was used, which, at the time of testing, had decayed to a strength of 23 Curies. All imaging plates had 0.010-inch-thick lead screens (front and back) to reduce the effects of scattered radiation. The imaging plates were 14 by 17 inches to cover an area large enough to quantify the shape and magnitude of any section loss while minimizing the number of shots required. The distance from the source to the imaging plate was 30 inches, and each shot required a 20-min exposure period.
The Selenium-75 source only required a 50-ft standoff radius to establish a safe radiation exposure zone around the connection. This could mean that for deep deck trusses where the lower chord joints are being inspected, it may be feasible to perform gamma ray RT without lane closures. However, each bridge presents its own unique attributes in terms of when and how RT would be performed.
Four images were taken of specimen 307SS3-1 at different locations of the connection, and five images were taken of specimen 307SS3-3. Two examples showing the placement of the imaging plate and actual RT grayscale image are shown in figure 4 and figure 5. In each case, the outlines of the gussets, shingles, members, and simulated section loss are shown. Even the strain gauge cables (used for the National Cooperative Highway Research Program Project 12-84) affixed to the back of the gussets can be seen in figure 4.(3)
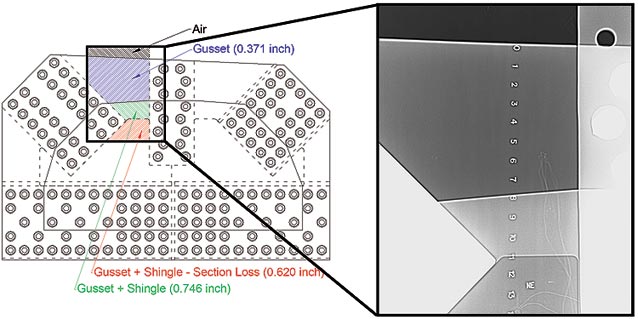
Figure 4. Illustration. Scan location and associated grayscale image of top northeast quadrant of specimen 307SS3-1.
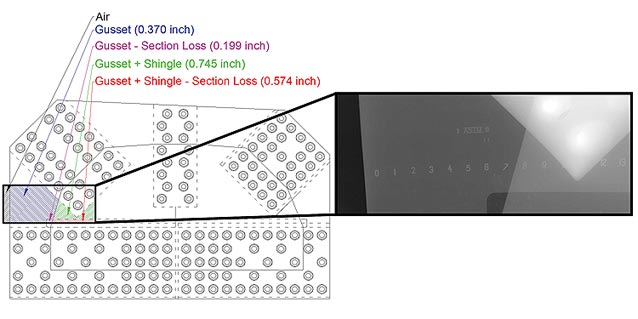
Figure 5. Illustration. Scan location and associated grayscale image of bottom northeast quadrant of specimen 307SS3-3.
The images created by the radiographic imaging process provided qualitative results, as the milled-out areas and all other areas of different thicknesses are clearly visible. However, quantitative results are desired in order to judge the magnitude of the section loss. To convert the grayscale images to an image of remaining section thickness required multiple post-processing steps. The first step included converting the grayscale image into pixels with heights and widths of 0.05 inches and assigning each pixel a grayscale density value ranging from 0 to 1,023 (using a 10-bit analog to digital converter) based on the grey level in the original image.
It would be expected that regions of equal thickness should have very close grayscale density values. However, the raw images showed much wider ranges than expected; areas of known constant thickness showed a radial gradient of density about a point directly in line with the radiation source. This occurred for two reasons: (1) the intensity of the gamma ray source was inversely proportional to the square of the distance between the source and the imaging plate and (2) as the angle between the source and a point on the imaging plate increased, the gamma ray traveled through the plate thickness at an angle, thus having an apparent increase in density. The imaging plate used for specimen 307SS3-1 was full-sized, while the imaging plate for specimen 307SS3-3 was folded in half to produce a 7-by-17-inch image. In either case, this is a very large area to be covered by the Selenimum-75 source, and these radial gradient effects were to be expected. Not correcting for these effects can severely impact the ability to accurately judge the magnitude of the remaining section thickness.
Two corrections had to be applied to the original grayscale density values to correct for the effects described above.
In order to compensate for the error stemming from the distance between the source and imaging plate, each measured grayscale density value was adjusted based on its radial position from the source using the equation in figure 6. The correction is a simple equation based on the Pythagorean theorem in three dimensions to account for inverse square decay of the gamma ray. Ideally, the exact position of the source relative to the film should be documented, which was the case for specimen 307SS3-3. However, this was not documented for specimen 307SS3-1, and the source location was assumed to be in the center of each of the four images taken of this specimen.
![]()
Figure 6. Equation. Densitycor1.
Where:
densitycor1 = Modified grayscale density after the first correction is applied.
densitymeasured = Raw grayscale density value from the analog to digital conversion.
∆x= Horizontal distance between the pixel from the theoretical projection of the source onto the film.
∆y= Vertical distance between the pixel and theoretical projection of the source onto the film.
R = Distance between the film and gamma ray source.
To correct for radiation not passing orthogonally through the plate, the densitycor1 value had to be modified with a second correction. Without this correction, the steel would have an apparent increase in thickness since the density is proportional to the real gamma ray path length through the plate, not the plate thickness. The formulation of the second correction term also relies on the Pythagorean theorem, as shown in figure 7. Note that the terms used in figure 6 and figure 7 are shown schematically in figure 8.

Figure 7. Equation. Densitycor2.
Where:
densitycor2 = Final modified grayscale density after the second correction is applied.
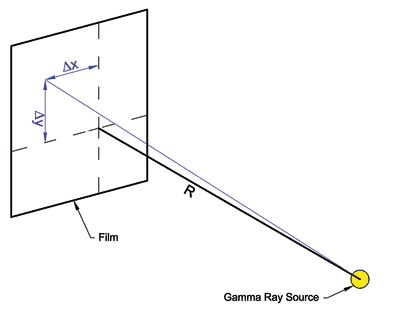
Figure 8. Illustration. Variables used in grayscale density corrections.
The total corrected grayscale density values themselves are not useful for judging the amount of section loss present within a plate. To be useful, they must be converted into physical thickness units. This is done by correlating corrected grayscale density values to known thicknesses at multiple points and using linear regression to attain a conversion between density and thickness. Due to a lack of data, higher order fitting algorithms were not investigated. Depending on the image, two or three calibration points were generally used from the following four possibilities depending on the image: (1) air (zero thickness), (2) a point on the gusset plate, (3) a point on the shingle plate, and (4) the flange of the vertical member.
Figure 9 shows the first of two color contour plots developed from the grayscale image shown in figure 5 based on uncorrected data. For this particular image, the source was located approximately -0.75 inches on the x-axis and -6.90 inches on the y-axis. The plates and the simulated section loss should have uniform thicknesses; however, on the right side of the plot, the thickness appears to be increasing. This would be expected in the uncorrected image because this part of the image is the furthest from the gamma ray source. The same effect is not as apparent on the left side of the image because the image in mostly air. A contour plot using the corrected grayscale data is shown in figure 10. With the correction applied, the uniformity of the individual element thicknesses is restored on the right side of the plot, particularly in the region of simulated corrosion covered by the single plate.
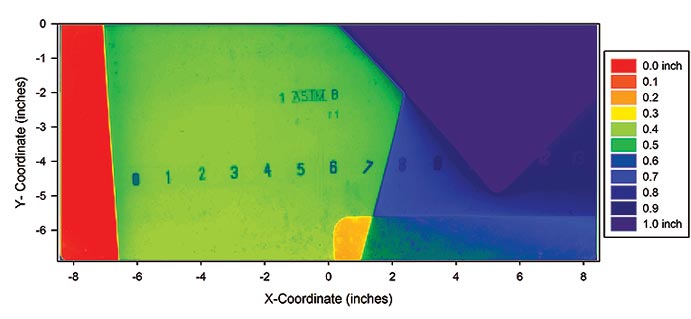
Figure 9. Graph. Thickness of bottom northeast quadrant of specimen 307SS3-3 using uncorrected data.
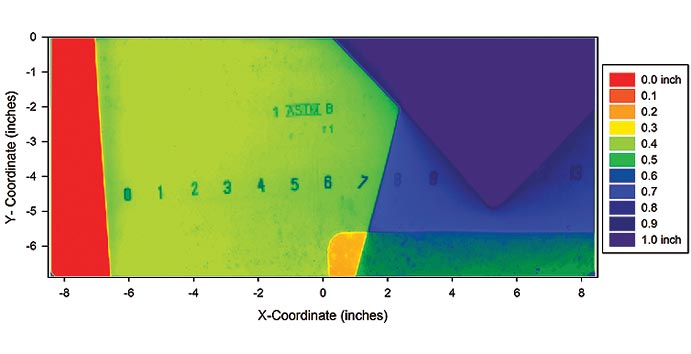
Figure 10. Graph. Thickness of bottom northeast quadrant of specimen 307SS3-3 using corrected data.
The accuracy of the RT thickness estimation was assessed for each of the nine images collected by determining the remaining thickness of the simulated corrosion regions captured in each image. Table 1 outlines the results from the nine images of the uncorrected RT data, corrected RT data, physical measurement taken with a D-meter when the connection was disassembled, and the difference between the corrected RT and D-meter thickness. In the majority of cases, the corrected RT data were in better agreement with D-meter measurements, especially since many of the uncorrected images from specimen 307SS3-3 that predicted the simulated section loss had a negative thickness.
It should also be noted that the source locations are unknown for the four images taken of specimen 307SS3-1, and this could weigh heavily on the prediction. Except for two outlier points, many of the RT thickness predictions were within ±0.04 inches of the D-meter measurement. FHWA’s Bridge Inspector’s Reference Manual does not provide a specific accuracy at which section loss must be evaluated, though it does indicate that the dimensions of gusset plates should be measured within an accuracy of 0.0625 inches.(5) This is probably intended to be the planar dimensions of the plate, not its thickness. The current practice to evaluate the remaining section in hidden areas would rely on large outside calipers, which have an accuracy in the range of 0.0625 inches. Therefore, while it may seem that the RT evaluation has a large error based on the plate thickness, its accuracy is about the same or better than current practices. Additionally, RT evaluation can provide much more data on the shape of the section loss compared to a caliper.
| Specimen | Image | Uncorrected Thickness from RT (inches) |
Corrected Thickness from RT (inches) |
D-meter Thickness (inches) |
Difference Between Corrected RT and D-meter (inches) |
| 307SS3-1 | Image 1 | 0.310 | 0.327 | 0.245 | 0.082 |
| Image 2 | 0.180 | 0.160 | 0.176 | 0.016 | |
| Image 3 | 0.255 | 0.255 | 0.236 | 0.019 | |
| Image 4 | 0.197 | 0.201 | 0.236 | -0.035 | |
| 307SS3-3 | Image 1 | 0.233 | 0.239 | 0.199 | 0.040 |
| Image 2 | -0.094 | 0.187 | 0.199 | -0.012 | |
| Image 3 | -0.208 | 0.161 | 0.199 | -0.038 | |
| Image 4 | -0.151 | 0.173 | 0.199 | -0.026 | |
| Image 5 | 0.028 | 0.032 | 0.199 | -0.167 |
Overall, RT of multilayered plates works very well for identifying the pattern of section loss. The quantification of the remaining section thickness had an accuracy of ±0.04 inches, although there were two outlier points with much greater error. It is assumed that with more careful documentation of the inspection and refinement of inspection procedure, RT will be a viable inspection technique for multilayered gussets.
It should be noted that the identification of all simulated section loss was incomplete in this evaluation. When the RT was performed on both connections, the imaging plate was set on top of the chord member even though the simulated section loss was purposely milled into the gusset plate below this level. This was done because the chord box section had chamfered corners that could collect debris and be a theoretical area of corrosion. Figure 11 illustrates the blind spot of the RT encountered in this evaluation.
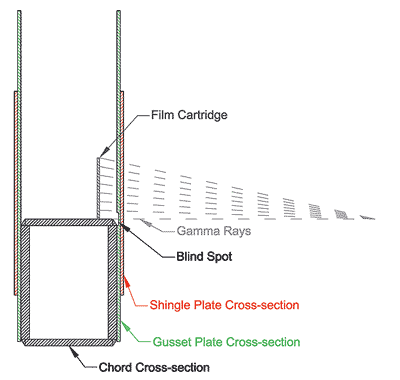
Figure 11. Illustration. Blind spot of image.
Until further research can be conducted to identify NDE technologies that can evaluate the remaining thickness behind multiple layers of plates, RT appears to be a viable tool used to determine section loss and its magnitude (area and depth) in multilayered gusset plate connections. The film sizes used in this project were up to 17 inches wide. These large films were purposely used to quantify the accuracy of RT over large areas. Correction of the images must account for the radial degradation of the gamma ray strength away from the source as well as the angled path of the gamma rays through the plates.
The simplest solution to mitigate the remaining section thickness errors is to use a stronger radiation source and larger standoff distance between the source and the gusset plate. This would lead to a more uniform distribution of radiation on the surface and thus eliminate the need to correct for it. Conversely, a larger number of closely spaced images with a less intense source could be used. The tradeoffs associated with each mitigation strategy must be balanced based on the geometry of the truss, available time for inspection, and available funds for inspection, as well as whether the bridge can be closed to traffic.
Additional work must be performed to develop procedures that can estimate the section loss that occurs between the gusset plate and a member. Based on the results provided in this TechBrief, RT inspection was not able to expose the entire area of section loss that extended into the faying surface between the chord and gusset plate. The only way to mitigate this is to take an angled shot through the chord; however, this approach causes shadowing from the fasteners and chord plates, which would make predicting section loss in these areas especially challenging if not impossible. In addition, the evaluations were performed using cleaned plates with no rust product. It would also be worthy to investigate the role rust may have in hindering the ability to assess the remaining section in RT images.
|
Researchers—Justin Ocel of FHWA was the principal investigator. The radiographic imagery was provided by Todd Kupfer and Dan McLeod of Applied Technical Services. Zachary May and Brian Moore assisted in post-processing the images. Distribution—This TechBrief is being distributed according to a standard distribution. Direct distribution is being made to the Divisions and Resource Center. Availability—This TechBrief may be obtained from the FHWA Product Distribution Center by email to report.center@dot.gov, fax to (814) 239-2156, phone to (814) 239-1160, or online at https://www.fhwa.dot.gov/research. Key Words—Gusset plate, Bridge inspection, Radiography, Truss bridge, Nondestructive evaluation. Notice—This document is disseminated under the sponsorship of the U.S. Department of Transportation in the interest of information exchange. The U.S. Government assumes no liability for the use of the information contained in this document. The U.S. Government does not endorse products or manufacturers. Trademarks or manufacturers’ names appear in this report only because they are considered essential to the objective of the document. Quality Assurance Statement—The Federal Highway Administration (FHWA) provides high-quality information to serve the Government, industry, and public in a manner that promotes public understanding. Standards and policies are used to ensure and maximize the quality, objectivity, utility, and integrity of its information. FHWA periodically reviews quality issues and adjusts its programs and processes to ensure continuous quality improvement. |