FOREWORD
This report documents independent testing results of failed anchor rod material removed from the San Francisco-Oakland Bay Bridge at Pier E2. The work was conducted in a time period when the California Department of Transportation was in the midst of an investigation into the cause of the anchor rod failures, and the work conducted by the Federal Highway Administration was in support of that investigation. Testing included mechanical, chemical, and microstructural characterization of two pieces of anchor rod.
This report would benefit those interested in high-strength steel bolts or rods used for the construction of steel bridges, including State transportation departments, researchers, and design consultants.
Jorge E. Pagán-Ortiz
Director, Office of Infrastructure
Research and Development
Notice
This document is disseminated under the sponsorship of the U.S. Department of Transportation in the interest of information exchange. The U.S. Government assumes no liability for the use of the information contained in this document.
The U.S. Government does not endorse products or manufacturers. Trademarks or manufacturers’ names appear in this report only because they are considered essential to the objective of the document.
Quality Assurance Statement
The Federal Highway Administration (FHWA) provides high-quality information to serve government, industry, and the public in a manner that promotes public understanding. Standards and policies are used to ensure and maximize the quality, objectivity, utility, and integrity of its information. FHWA periodically reviews quality issues and adjusts its programs and processes to ensure continuous quality improvement.
Technical Report Documentation Page
| 1. Report No.
FHWA-HRT-15-057 |
2. Government Accession No. | 3 Recipient's Catalog No. | ||
| 4. Title and Subtitle
Properties of Anchor Rods Removed from San Francisco-Oakland Bay Bridge |
5. Report Date August 2015 |
|||
| 6. Performing Organization Code | ||||
| 7. Author(s)
Justin M. Ocel, Ph.D., P.E.; and Jason Provines |
8. Performing Organization Report No.
|
|||
9. Performing Organization Name and Address Federal Highway Administration |
10. Work Unit No. (TRAIS) |
|||
11. Contract or Grant No. DTFH61-10-D-00017 |
||||
| 12. Sponsoring Agency Name and Address
Office of Infrastructure Research and Development |
13. Type of Report and Period Covered
Final Report—July 2013 to January 2015 |
|||
14. Sponsoring Agency Code HRDI-40 |
||||
15. Supplementary Notes This staff study (HRDI-40) was conducted with support from Jason Provines of Professional Service Industries, Inc., (PSI) of Herndon, VA, working under the Federal Highway Administration’s Support Services for the Structures Laboratories contract. Justin Ocel (FHWA) managed the mechanical testing, and Mr. Provines (PSI) conducted the metallography. The Contracting Officer’s Representative was Fassil Beshah, HRDI-40. |
||||
| 16. Abstract
In March 2013, the construction contractor for the new self-anchored suspension bridge between San Francisco and Oakland, CA, tensioned the threaded rods between the bearings/shear keys and the concrete pier cap. Within days of completion, it was discovered that one-third of the rods for the two shear keys on Pier E2 had fractured. An investigation began to determine the root cause for the fractures. The work reported herein was in support of that investigation at the request of the Federal Highway Administration California Division office. It includes data on the mechanical, chemical, and microstructural properties of two samples removed from Pier E2. |
||||
| 17. Key Words
Anchor rod, Chemical analysis, Hardness testing, ASTM A354, Tensile testing, Impact testing, Fracture toughness |
18. Distribution Statement
No restrictions. This document is available through the National Technical Information Service; Springfield, VA 22161. http://www.ntis.gov/about/contact.aspx |
|||
19. Security Classification Unclassified |
20. Security Classification Unclassified |
21. No. of Pages 64 |
22. Price N/A |
|
| Form DOT F 1700.7 | Reproduction of completed page authorized |
SI* (Modern Metric) Conversion Factors
Table of Contents
- Chapter 1. Introduction
- Chapter 2. TESTING PLAN
- Chapter 3. EXPERIMENTAL RESULTS
- Chapter 4. conclusions
- Chapter 5. Recommendations
- Appendix A. Tables of Hardness Testing results
- Appendix B. Tables of Charpy Testing results
- References
List of Figures
- Figure 1. Schematic. Plan view of S2 shear key hole pattern
- Figure 2. Schematic. Section Z-Z cross-sectional view of S2 shear key
- Figure 3. Photo. Received threaded sample after cleaning
- Figure 4. Photo. Received unthreaded sample after cleaning
- Figure 5. Schematic. Cutting plan for unthreaded sample
- Figure 6. Schematic. Cutting plan for threaded sample
- Figure 7. Schematic. Geometry of round bar tensile coupon
- Figure 8. Graph. Engineering stress versus strain curves for all tensile specimens
- Figure 9. Graph. Variation of yield and tensile properties through the rod radius
- Figure 10. Graph. Variation in area reduction and elongation through the rod radius
- Figure 11. Schematic. Location of hardness readings in unthreaded sample
- Figure 12. Schematic. Location of hardness readings in threaded sample
- Figure 13. Graph. Bubble contour plot of hardness readings on unthreaded sample
- Figure 14. Graph. Bubble contour plot of hardness readings on threaded sample
- Figure 15. Graph. Constant radius average hardness of unthreaded sample
- Figure 16. Graph. Constant radius average hardness of threaded sample
- Figure 17. Graph. Charpy energy results from unthreaded sample
- Figure 18. Graph. Charpy percent-shear results from unthreaded sample
- Figure 19. Graph. Charpy energy results from threaded sample
- Figure 20. Graph. Charpy percent-shear results from threaded sample
- Figure 21. Photo. Unetched example of stringer inclusions near center of rod at 200x magnification
- Figure 22. Photo. Unetched example of stringer inclusions near center of rod at 500x magnification
- Figure 23. Photo. Electron beam image of inclusion 1 from SEM and associated images at same location taken with an EDX detector
- Figure 24. Photo. Electron beam image of inclusion 2 from SEM and associated images at same location taken with an EDX detector
- Figure 25. Photo. Mounted cross section of threaded rod etched with Marshall’s reagent
- Figure 26. Photo. Micrograph near thread root etched with Marshall’s reagent at 50x magnification
- Figure 27. Photo. Micrograph near rod center etched with Marshall’s reagent at 50x magnification
- Figure 28. Photo. Micrograph near thread root etched with Marshall’s reagent at 500x magnification
- Figure 29. Photo. Micrograph near rod center etched with Marshall’s reagent 500x magnification
- Figure 30. Photo. Micrograph near thread root etched with 10-percent potassium metabisulfite at 500x magnification
- Figure 31. Photo. Micrograph near rod core etched with 10-percent potassium metabisulfite at 500x magnification
- Figure 32. Photo. Macrograph of thread with micrograph overlays taken at thread root and crest, etched with 2-percent nital
- Figure 33. Photo. Micrograph of typical delamination at thread surface etched with 2‑percent nital at 500x magnification
List of Tables
- Table 1. Results of tensile tests
- Table 2. Chemical composition (percent by weight)
- Table 3. Rockwell C hardness results for unthreaded sample
- Table 4. Rockwell C hardness results for threaded sample
- Table 5. Raw data unthreaded sample Charpy specimens
- Table 6. Raw data for threaded sample Charpy specimens
LIST OF ABBREVIATIONS
- AASHTO America Association of State Highway and Transportation Officials
- AISI American Iron and Steel Institute
- Caltrans California Department of Transportation
- CVN Charpy V-Notch
- EDM Electric Discharge Machining
- EDX Energy-Dispersive X-Ray
- FHWA Federal Highway Administration
- HRC Rockwell C Hardness
- LAST Lowest Anticipated Service Temperature
- SAS Self-Anchored Suspension
- SEM Scanning Electron Microscope
- SSRC Structural Stability Research Council
- TFHRC Turner-Fairbank Highway Research Center
CHAPTER 1. INTRODUCTION
On Labor Day, September 2, 2013, the California Department of Transportation (Caltrans) opened the new San Francisco-Oakland Bay Bridge between Yerba Buena Island and Oakland, CA. The signature span of the bridge is a steel orthotropic box girder in a self-anchored suspension (SAS) configuration. This new bridge is a more robust replacement for the double-deck steel truss bridge that had experienced a localized collapse of a deck portion during the 1989 Loma Prieta earthquake.
Overall construction of the new bridge began in January 2002, but SAS construction did not begin until 2007. One of the key design elements of the SAS was the connection of the superstructure to Pier E2 through large bearings and shear keys. The four shear keys were meant to resist lateral seismic forces and prevent excessive lateral movement of the four main bearings. Because of the massiveness of the bridge, the seismic forces would be quite large, thus requiring large connecting elements to clamp the bearings and shear keys to the pier cap. In this case, large-diameter, high-strength rods were used as the connecting element so large clamping forces could be developed. It was desired to specify a rod material with a 150-ksi minimum tensile strength, which is equivalent to a normal ASTM A490 high-strength structural bolt.(1) However, the required clamping forces necessitated the use of 3-inch-diameter rods, which is outside of the scope of ASTM A490. Thus, the material was specified as an ASTM A354 BD grade material.(1,2) This also came with a slight reduction on strength, because at this diameter, ASTM A354 BD sets a 140-ksi minimum tensile strength.(2) In addition, because the bridge is in a marine environment, the rods were specified to be galvanized for added corrosion resistance.
The other unique aspect of the shear key design is that two of the shear keys were directly over a column supporting the pier cap. Unlike the bearings and the two interior shear keys that could be bolted to the pier cap with rods running all the way through the pier cap, those for the shear keys over the columns had to be dead-ended within the pier cap. This meant the rods had to be installed within the pier cap before it was cast, long before they would be tensioned. The shear key rods were fabricated in 2008 and were the first of many batches of galvanized ASTM A354 BD rods fabricated for various portions of the SAS. References to the ASTM A354 standard throughout this report are purposely made to the 2007 edition because these specifications were enforced in the fabrication of the Pier E2 shear key anchor rods.
In March 2013, the contractor erecting the bridge began to tension the 96 rods for the 2 shear keys on Pier E2 over the pier columns. Within days, they discovered that 32 of the rods had fractured. With the bridge fully erected, these rods were impossible to replace because they were dead-ended in the pier cap. At the time this report was written, the investigation was still ongoing, but a variety of factors are believed to have contributed to the fractures, such as improper heat treatment, poor raw material, and most likely hydrogen embrittlement. To date, all fractures have been isolated to the 2008 batch of rods (96 in total). More detailed information on the bridge design and preliminary investigation into the failure mechanism(s) of the rods can be found in the Toll Bridge Program Oversight Committee’s Report on the A354 Grade BD High-Strength Steel Rods on the New East Span of the San Francisco-Oakland Bay Bridge With Findings and Decisions.(3)
In June 2014, the Federal Highway Administration (FHWA) California Division Office requested that Turner-Fairbank Highway Research Center (TFHRC) perform material testing and analytical work on two rod samples obtained from the 2008 batch of rods. The purpose of the testing was to supply Caltrans with unbiased, independent results.
Two samples were shipped to TFHRC. One was approximately 3 inches long and was from a threaded portion of the E8 rod of the S2 shear key. Figure 1 shows the alphanumeric grid system used to identify the 48 anchor rods holding the S2 shear key to Pier E2; the circle with the black fill represents the E8 location. Figure 2 shows an elevation view of the S2 shear key showing that the 3-inch-long sample was taken from approximately the middle portion of the threaded region on the top side of the rod. The second sample was approximately 13.5 inches long and was from an unthreaded portion of a rod from an unknown location. It was verbally communicated that this larger sample was from the 2008 batch of rods. Pictures of the two rod samples are shown in figure 3 and figure 4.
TFHRC was asked to test impact toughness, hardness, strength, and elongation, in addition to conducting microscopic inspection of thread roots for cracks. TFHRC was free to suggest additional tests if there was remaining material.
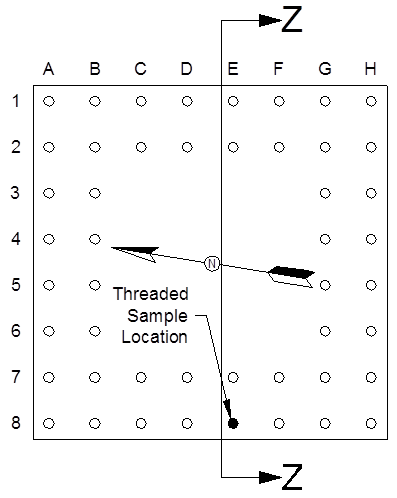
Figure 1. Schematic. Plan view of S2 shear key hole pattern.
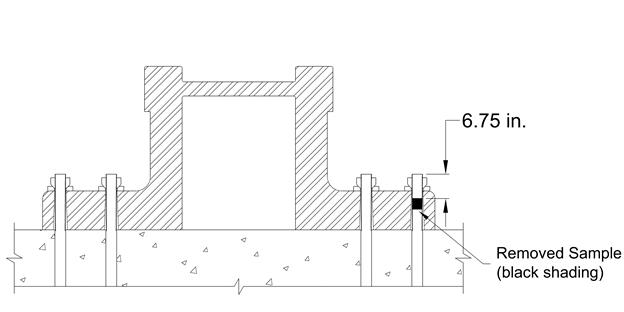
Figure 2. Schematic. Section Z-Z cross-sectional view of S2 shear key.
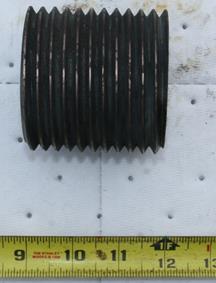
Figure 3. Photo. Received threaded sample after cleaning.
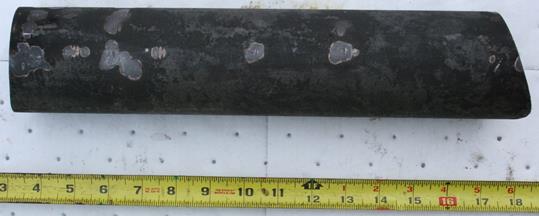
Figure 4. Photo. Received unthreaded sample after cleaning.
CHAPTER 2. TESTING PLAN
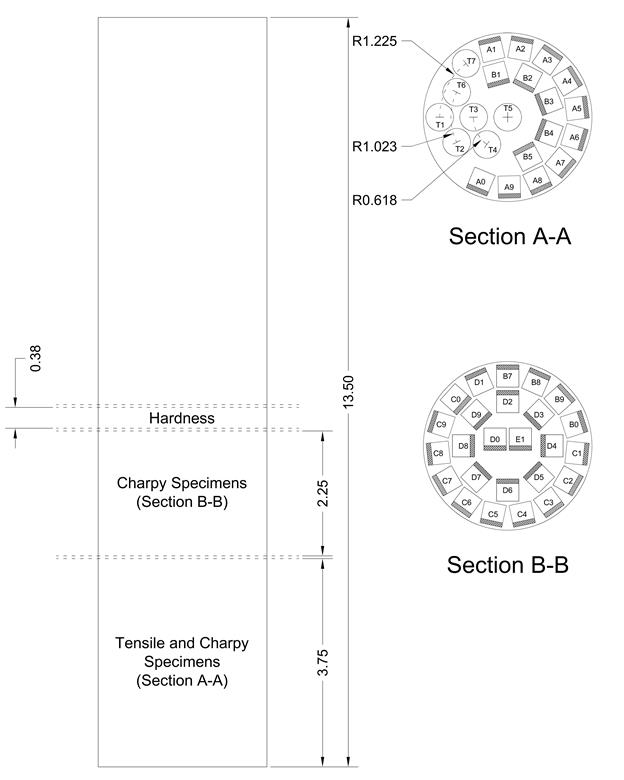
The unthreaded sample offered the greatest opportunity because of the volume of material provided. TFHRC staff removed three separate portions of this piece, as shown in the cutting plan of figure 5. A 0.38-inch-thick portion was removed for hardness testing. A 3.75-inch-long portion was used to make tensile testing coupons and Charpy specimens as shown in section A-A of the figure, where the circles represent the tensile specimens, and the squares represent Charpy specimens (with the hatched region in the square representing the location of the Charpy notch). A 2.25-inch-long piece was used exclusively for Charpy specimens as shown in section B-B of the figure. The Charpy and tensile specimens were rough cut out with a wire electric discharge machining (EDM) machine to maximize the number of specimens that could come from each portion.
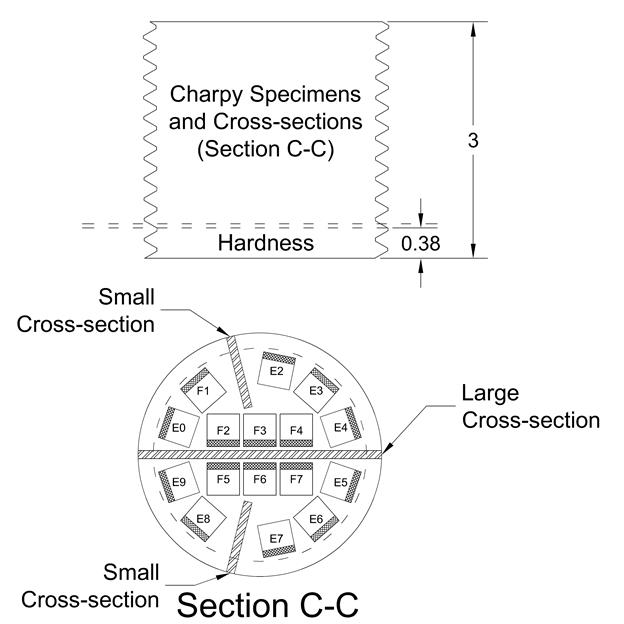
The threaded sample was too short to perform any tensile testing, and this piece was devoted to assessing Charpy impact toughness, hardness, visual inspection of macro sections, and microstructural characterization. It was cut according to the schematic shown in figure 6. A 0.38‑inch-thick portion was removed for hardness testing. Three longitudinal cross sections were removed, represented by the hatched area in section C-C of figure 6. These would be used for microstructural characterization and examination of the thread roots. The remainder of the section was turned into Charpy specimens, also shown in section C-C.
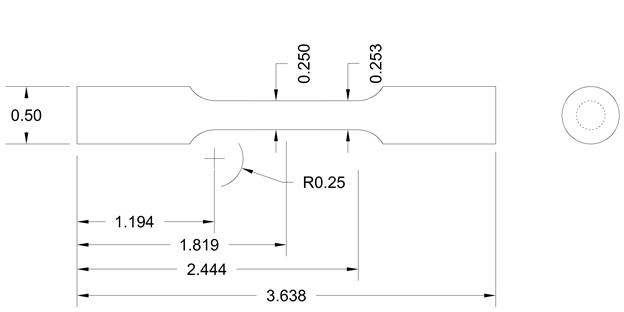
The tensile specimens were ASTM E8 round bar specimens with 0.25-inch reduced diameters and 1-inch gauge lengths as shown in figure 7.(4) The idea behind using a small specimen was to explore the variation in strength through the rod. As can be seen in the sampling plan, tensile specimens were taken at four different distances away from center of the rod cross section. This process allowed for assessment of the uniformity of tensile properties through the cross section.
The Charpy specimens followed a similar approach in that sampling was performed at different distances from the center of the rod cross section. Many Charpy specimens were needed to develop full transition curves by testing specimens at multiple temperatures.
Note: All units shown in the figure are in inches.
Note: All units shown in the figure are in inches.
Figure 5. Schematic. Cutting plan for unthreaded sample.
Note: All units shown in the figure are in inches.
Figure 6. Schematic. Cutting plan for threaded sample.
Note: All units shown in the figure are in inches.
Figure 7. Schematic. Geometry of round bar tensile coupon.
CHAPTER 3. EXPERIMENTAL RESULTS
The testing was performed in a digitally controlled servovalve hydraulic test frame with hydraulic grips. The specimens were loaded initially at a slow rate of approximately 36 ksi/min, whereas the standard allows for a range between 10 and 100 ksi/min. Once yielding had occurred, the loading rate was incrementally increased until it achieved approximately
0.07 strain/min, where the standard allows for a range of 0.05 to 0.50 strain/min. Strain was measured with a clip-on extensometer.
The pertinent results are reported in table 1, and plots of the stress versus strain results are shown in figure 8. In three locations, duplicate specimens from the same radial location were extracted and tested, although only one specimen could be made from the core of the rod. In figure 8, duplicates are plotted using the same line type, and the fracture point of each specimen is labeled with the specimen name from table 1. With each plot, note the three pauses shortly after the yield was exceeded. This is an artifact of the testing procedure used by TFHRC, and this is related to a Structural Stability Research Council (SSRC) recommendation in the Guide to Stability Design Criteria for Metal Structures.(5) SSRC recommends three pauses in loading after yielding to observe the load drop as the material relaxes under zero strain rate (i.e., static conditions). Holds were maintained for 90s. The static yield is reported as the intersection of the best-fit line through the three static holds intersecting the 0.02-percent offset line, and it is reported for informational purposes only.
Table 1. Results of tensile tests.
| Specimena | Modulus (ksi) | 0.2-Percent Offset Yield Stressb (ksi) | Static Yield Stress (ksi) | Tensile Strengthc (ksi) | Extensometer Percent Elongation | Percent Reduction in Area | Distance From Core of Rod (inches) |
| T1 | 29,670 | 159.7 | 149.9 | 174.3 | 14.8 | 50.1 | 1.225 |
| T7 | 30,165 | 157.0 | 158.6 | 172.0 | 14.7 | 49.5 | 1.225 |
| T2 | 29,640 | 145.1 | 153.7 | 168.6 | 11.0d | 41.0 | 1.023 |
| T6 | 29,826 | 151.8 | 158.5 | 174.9 | 11.4d | 35.9e | 1.023 |
| T3 | 30,014 | 127.0 | 137.2 | 156.6 | 12.7d | 33.8e | 0.613 |
| T4 | 29,642 | 127.0 | 136.9 | 157.7 | 16.1 | 37.9e | 0.613 |
| T5 | 30,506 | 119.8 | 132.2 | 151.4 | 12.7d | 33.5e | 0.000 |
|
aSpecimen names correlate to the locations shown in section A-A of figure 5. bASTM A354 grade BD requires a minimum of 115 ksi.(2) cASTM A354 grade BD requires a minimum of 140 ksi.(2) dFailed to meet minimum 14-percent elongation in a 2-inch gauge length in accordance with ASTM A354 grade BD.(2) eFailed to meet minimum reduction in area of 40 percent in accordance with ASTM A354 grade BD.(2) |
|||||||
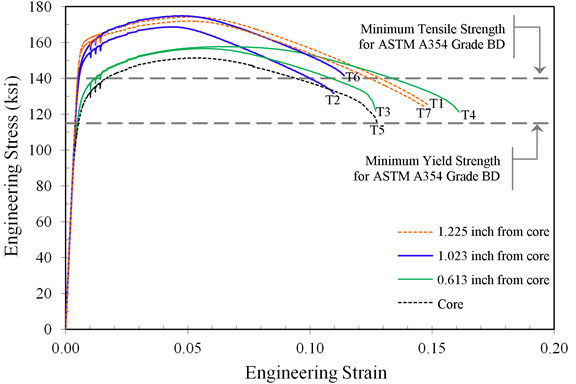
Figure 8. Graph. Engineering stress versus strain curves for all tensile specimens.
All the specimens met the yield and tensile strength requirements of ASTM A354 grade BD.(2) However, four specimens could not achieve the elongation requirement, and four (not all the same) could not achieve the reduction in area requirement. ASTM A354 requires a minimum reduction of area of 40 percent and minimum elongation of 14 percent on a 2-inch gauge length. The TFHRC specimens used a 1-inch gauge length but maintained the 4:1 aspect ratio assumed by ASTM E8; therefore, the measured elongation value is comparable to the standard value.(4) The property variation through the radius of the rod is shown in figure 9 and figure 10; in particular, yield strength, tensile strength, and area reduction all showed a trend toward decreasing values moving toward the core of the rod.
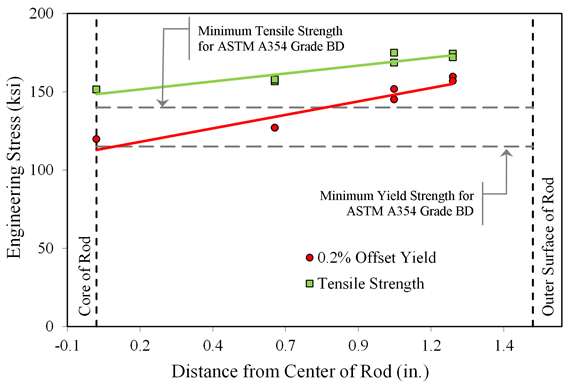
Figure 9. Graph. Variation of yield and tensile properties through the rod radius.
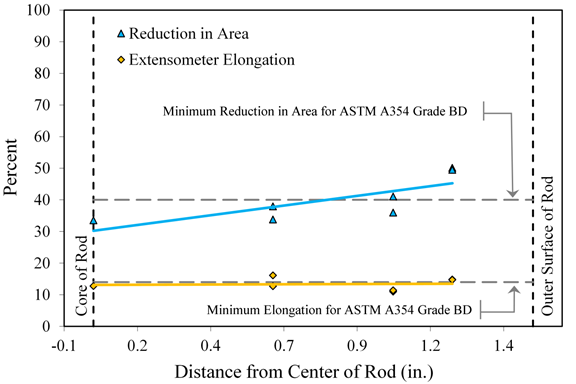
Figure 10. Graph. Variation in area reduction and elongation through the rod radius.
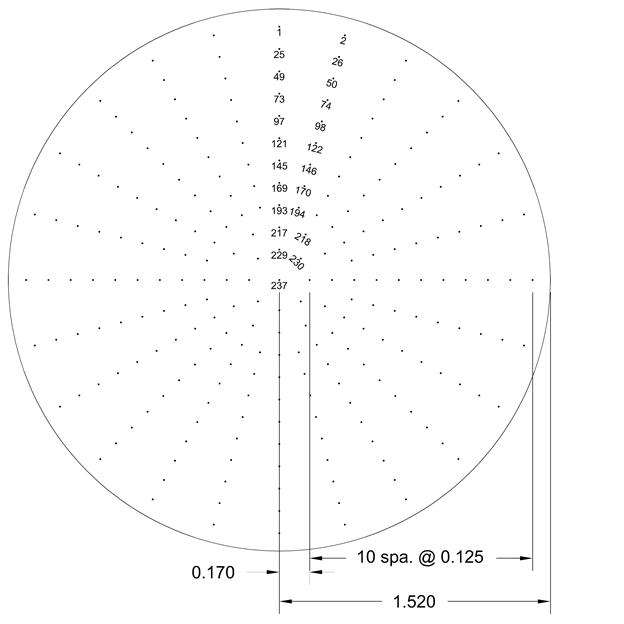
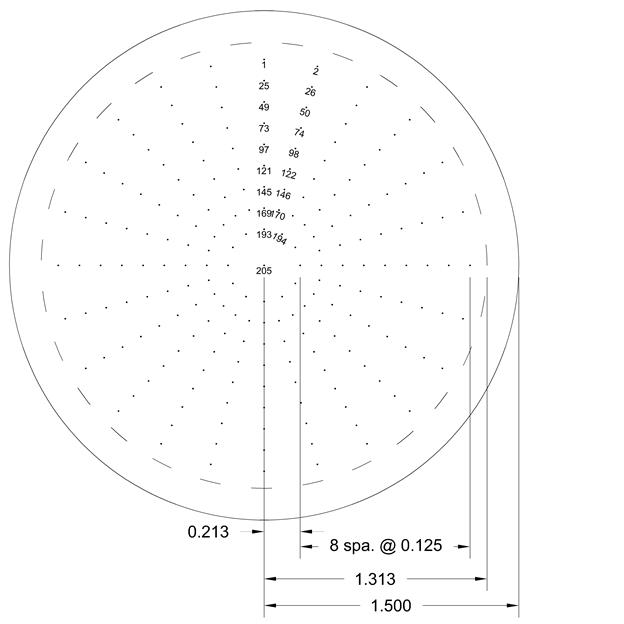
Hardness testing was performed on 0.38-inch-thick cross sections removed from each of the threaded and unthreaded samples. Hardness testing was performed with a diamond indenter and the Rockwell C scale. Figure 11 shows the locations of the 237 hardness readings taken on the unthreaded rod. Generally, the locations were laid out in a polar coordinate system, with measurements taken every one-eighth of an inch radially away from the core and every 15 degrees clockwise around the circle. According to the ASTM E18 standard, hardness readings must be spaced more than 3 indent diameters away from other indents, or 2.5 diameters from an edge.(6) This restricted measurement spacing in the core region to every 30 or 45 degrees at the same radial distance. The same philosophy was used for the threaded sample, although the “edge” was considered to be the thread root, which led to only 205 total measurements.
Figure 12 shows the locations of the measurements of the threaded rod. All the individual hardness measurements for both rods are reported in appendix A.
Note: All units shown in the figure are in inches.
spa. = Spaces.
Figure 11. Schematic. Location of hardness readings in unthreaded sample.
Note: All units shown in the figure are in inches.
spa. = Spaces.
Figure 12. Schematic. Location of hardness readings in threaded sample.
All hardness data for each of the rods were condensed into one bubble contour plot for each of the samples, as shown in figure 13 and figure 14. In these plots, a bubble is plotted in a Cartesian system matching the measurement locations shown in figure 11 and figure 12, and the diameter and color fill of each bubble is scaled to the hardness reading. Such plots can help visualize any spacial anomalies associated with the hardness readings. Both rods show the same linear decreasing trend in the hardness traversing from the surface of the rod to the core. The unthreaded sample showed more anomalous readings, with low readings intermixed near the surface and high readings near the core. This may be due to normal scatter in hardness readings or an indication of a rod with more inclusions within it. The threaded sample did not have the same anomalous readings, although it demonstrated a trend of slightly higher hardness at the surface in the upper left quadrant of the plot than the rest of the perimeter. These readings may suggest nonuniform heat treatment of this particular rod.
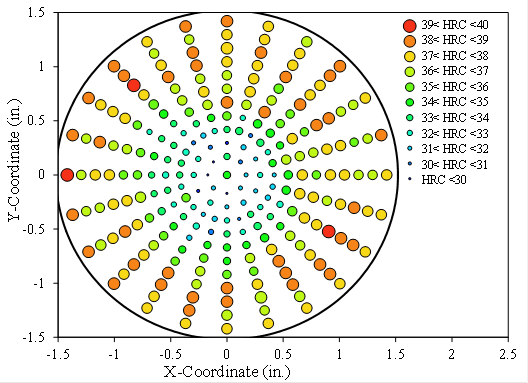
Figure 13. Graph. Bubble contour plot of hardness readings on unthreaded sample.
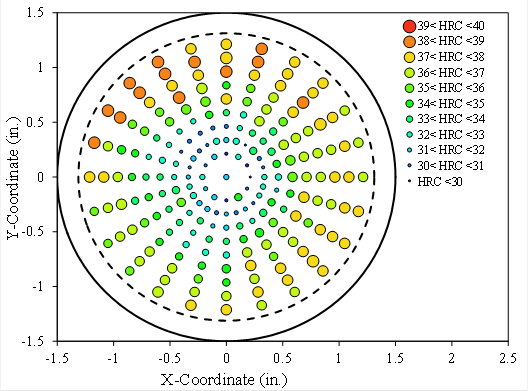
Figure 14. Graph. Bubble contour plot of hardness readings on threaded sample.
To better illustrate the variation of hardness through each rod, the two graphs in figure 15 and figure 16 were constructed by averaging all the hardness readings at a common radial distance. Each plot shows the outer surface of the rod as a vertical line. Red and blue dashed lines indicate the maximum and minimum hardness specified for ASTM A354 grade BD material, and in the case of the threaded rod, the thread root is shown as a vertical gray line. The actual data shown with green points and a green line represent the average of all the readings taken at a common radius. The reading taken at the exact core was neglected because it was only a single point measurement. Error bars are shown for each of the data points, and they represent the one standard deviation spread from all the measurements at each common radius. Each has a core hardness (Rockwell C Hardness (HRC)) in the low 30s, with an increasing trend to about 1 inch away from the core. From this point out to the surface, each rod appears to be uniformly hardened with average hardness ranging from about 37 to 38 HRC. In the sense of average hardness (solid green line), neither rod exceeded the maximum hardness of 39 HRC specified in ASTM A354; however, near the core region, each did go below the minimum ASTM A354 hardness of 31 HRC. The location for hardness testing to ensure conformance to the ASTM A354 standard is defined by the ASTM F606 standard.(7) However, the hardness measurement locations outlined in ASTM F606 are ambiguous for this particular product diameter. In the case of arbitration, four equidistant measurements are taken at the mid-radius. If the arbitration locations were used, each of the two rod samples tested met the hardness standard of ASTM A354 grade BD material; however, many individual readings near the core were lower than the minimum specified hardness, and some individual readings near the surface were in excess of the maximum specified hardness.
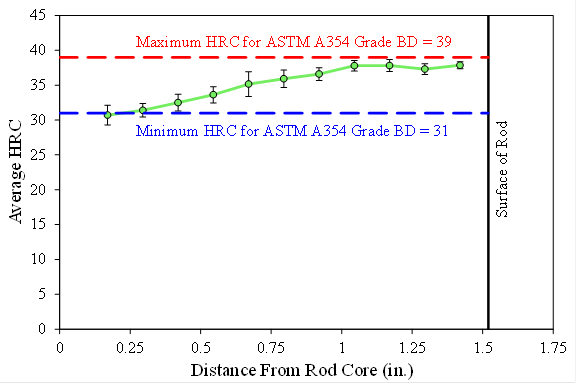
Figure 15. Graph. Constant radius average hardness of unthreaded sample.
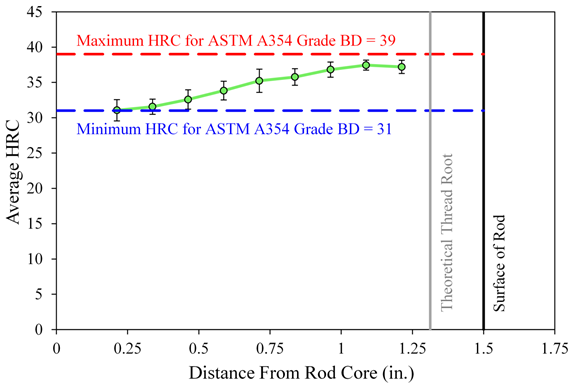
Figure 16. Graph. Constant radius average hardness of threaded sample.
Specimens were roughed out of the rods using an EDM machine and then finished to its final dimensions by surface grinding to remove the heat affected zone caused by the EDM machine. A notch was cut into the specimens according to the “type A” geometry from the ASTM E23 standard.(8) When numerous specimens were available from the same radial location within the sample, they were tested at a variety of temperatures to develop a full temperature–toughness transition curve. Testing was performed at temperatures ranging from approximately -60 to 200°F to find the upper and lower shelves. When specimens were not replicated, testing was performed at approximately 70 °F. A constant temperature bath was used to maintain the temperature of the specimens until they could be tested. For cold temperatures, the bath used denatured ethanol, and for temperatures above 70 °F, ethyl glycol was used.
The raw data for all the Charpy specimens can be found in appendix B. The data are plotted in figure 17 through figure 20, respectively, for the unthreaded and threaded samples and for both the fracture energy and the percent-shear fracture. When multiple samples were taken from an equidistant location away from the rod surface and tested at a variety of temperatures, a regression was performed on all that particular data. The regression was a least-square fit to a four-parameter hyperbolic tangent function. This four-parameter function looks like a step function with a gradual transition where the four parameters define the lower shelf energy, upper shelf energy, transition temperature, and transition temperature range. The regression represents the average through all the data, and it was plotted with a solid line of the same color as the individual data points. A couple observations can be made regarding the four figures compared with normal structural steels. First, the material exhibits a toughness transition over a wide temperature range (about 120 to 140 °F). Second, there is not a large disparity in the lower and upper shelf energies. Third, the material closer to the core of the rods shows a similar shaped transition curve to that from the surface, although it is shifted downward on the energy axis. Fourth, despite coming close to the upper shelf in terms of fracture energy, the majority of the specimens attained less than 40-percent shear on the fracture surface; more ductile steel would exhibit closer to 100-percent shear on the upper shelf.
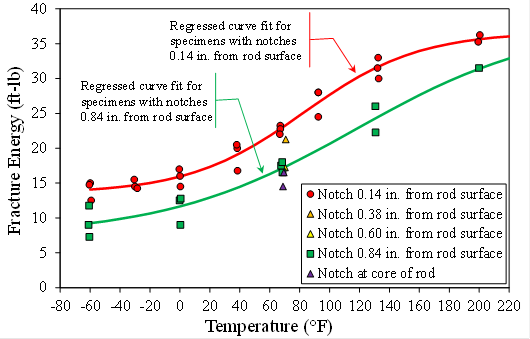
Figure 17. Graph. Charpy energy results from unthreaded sample.
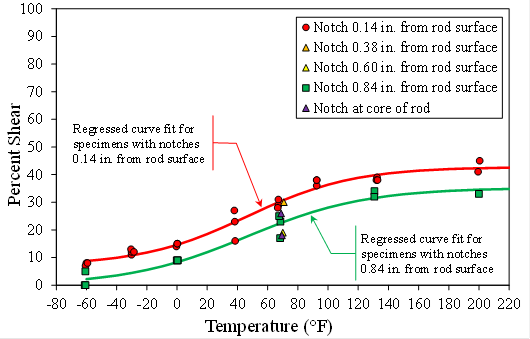
Figure 18. Graph. Charpy percent-shear results from unthreaded sample.
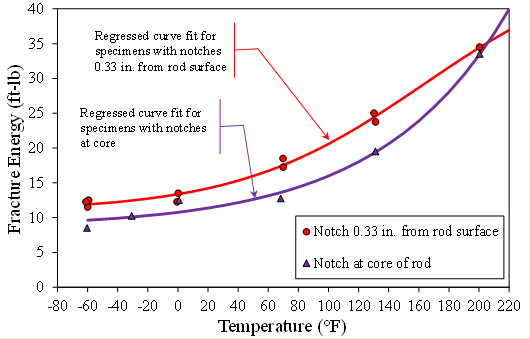
Figure 19. Graph. Charpy energy results from threaded sample.
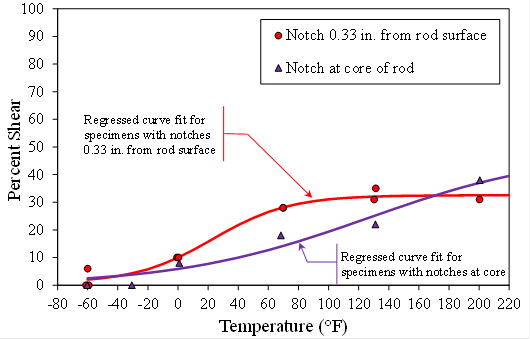
Figure 20. Graph. Charpy percent-shear results from threaded sample.
ASTM A354 has no established metrics of notch toughness. For reference, the American Association of State Highway and Transportation Officials (AASHTO) has established notch toughness requirements to mitigate fracture in welded steel bridges fabricated from hot-rolled steel.(9) The AASHTO toughness requirements ensure materials are not on the lower shelf of toughness at the possible lowest anticipated service temperature (LAST).(10) The popular minimum toughness of 15 ft-lb[1] was used by AASHTO, although it is higher for some grades and for members without redundancy.(11) The toughness requirements were also paired with a test temperature that relied on a temperature shift concept to equate the low dynamic toughness from a Charpy V-notch (CVN) test to that of a static plain strain fracture test because most bridges operate at near static conditions. Once the material yield strength exceeds 140 ksi, there is no temperature shift, and this must be considered when choosing a test temperature for a high-strength anchor rods. The LAST for San Francisco would be about 22 °F,[2] and based on the strength of the rods, there would be little to no temperature shift in the toughness requirements, so the LAST defines the CVN temperature.
This report does not purport to establish a CVN requirement for anchor rods. As the prior discussion points outs, existing bridge CVN requirements have been established for welded, hot-rolled product, and a threaded fastener is different because it does not have the same residual stress or notch acuity as a welded object would have. However, if 15 ft-lb at 22 °F is used, the data collected for the threaded and unthreaded samples do not pass this criterion. The threaded sample demonstrated less than 15 ft-lb of energy throughout the rod at 22 °F, and the unthreaded sample would pass at the surface, but not at its core.
Three spent Charpy specimen halves and extra material from machining of a fourth Charpy specimen were sent to an independent metallurgical laboratory for a standard nine-element compositional analysis. Two specimens were selected from both the threaded sample (F1 and F4) and the unthreaded sample (A1 and D0). For each rod, the two samples were taken from near the surface and near the core to see whether there was any evidence of segregation. The results of the chemical analysis are shown in table 2. According to quality control documentation, the rods were made from a grade 4140 alloy furnished under the ASTM A322 specification.(12) Three of the four samples were in conformance of ASTM A322 chemical requirements. The exception was the sample from location A1, which slightly exceeded the range for carbon and chromium. The results show all four specimens meet the ASTM A354 chemical requirements for a product analysis.(2) Generally, the four samples had very similar composition, and the chemical analysis did not suggest evidence of segregation within the rods, except for the higher carbon and chromium content in the A1 sample taken near the surface of the unthreaded rod.
Table 2. Chemical composition (percent by weight).
| Element | ASTM A322 Requirements | ASTM A354 Requirements | Location A1a | Location D0a | Location F1b | Location F4b |
| Carbon | 0.38–0.43 | 0.33–0.55 | 0.48c | 0.40 | 0.41 | 0.38 |
| Manganese | 0.75–1.00 | — | 0.96 | 0.92 | 0.99 | 0.99 |
| Phosphorus | 0.035 max | 0.040 max | 0.015 | 0.012 | 0.013 | 0.012 |
| Sulfur | 0.040 max | 0.045 max | 0.034 | 0.032 | 0.036 | 0.036 |
| Silicon | 0.15–0.35 | — | 0.31 | 0.27 | 0.31 | 0.30 |
| Nickel | — | — | 0.11 | 0.10 | 0.11 | 0.10 |
| Chromium | 0.80–1.10 | — | 1.12c | 1.00 | 1.00 | 1.04 |
| Molybdenum | 0.15–0.25 | — | 0.15 | 0.14 | 0.15 | 0.15 |
| Copper | — | — | 0.22 | 0.20 | 0.21 | 0.20 |
|
— Not specified. Max = Maximum. aSpecimen names correlate to the locations shown in section A-A and section B-B in figure 5. bSpecimen names correlate to the locations shown in section C-C in figure 6. cOutside the range of ASTM A322. |
||||||
Figure 6 showed three hatched areas that were removed from the threaded portion as longitudinal cross sections. The two smaller ones were removed to perform thread root examination, and the larger one was removed for the metallographic examination described in the next section. One of the smaller sections was damaged by the EDM machine when the specimen dropped during cutting and could not be used for evaluation. The second smaller one was sprayed with red dye penetrant and allowed to dwell for 1 h before being exposed with a white developer. The goal was to highlight any possible indications at the thread root, and after the developer had dried, the roots were examined under a stereo zoom microscope. No indications were found on the one cross section with red dye.
Ideally, the entire threaded portion should have been examined by wet magnetic particle inspection before the mechanical test specimens were extracted from it. For timing reasons, that did not occur. However, the intact remnants of the threaded portions (i.e., parts left over once the Charpy specimens were removed) were eventually inspected using wet fluorescent magnetic particle inspection using a black light. Again, no crack indications could be found with the wet magnetic particles.
The large longitudinal section removed from the threaded rod, referenced in figure 6, was cut into two equal, full-width sections using an abrasive cut-off wheel. Both samples were then prepared for metallographic evaluation in accordance with ASTM E3.(13) The samples were thoroughly cleaned and then mounted in a castable epoxy. Once the epoxy had cured, the exposed surface of each sample was prepared using a sequence of grinding and polishing. Grinding was conducted on a belt grinder using a series of increasingly finer silicon carbide grinding papers: 120, 240, 400, and 600 grit. The samples were then polished on a rotating wheel polisher using a 1-micron diamond compound on a red felt cloth. Between each grinding and polishing step, samples were washed with water, cleaned with ethanol, and dried with a warm air blower.
At this stage, the samples were examined in the as-polished condition under a compact inverted metallurgical microscope. Figure 21 and figure 22 show micrographs taken at the rod core at magnifications of 200x and 500x, respectively. By examining the samples in the as-polished or unetched condition, the large amount of non-metallic stringer inclusions became apparent. Although these two micrographs were taken at the rod core, they represent the typical size and prevalence of stringers located throughout the entire cross section of the rod. All of the stringers were oriented such that they were elongated in the rolling direction of the threaded rod.
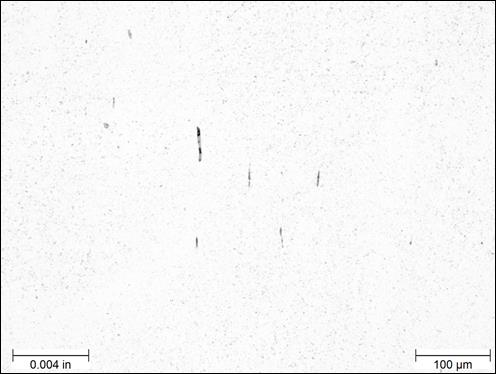
Figure 21. Photo. Unetched example of stringer inclusions near center of rod at 200x magnification.
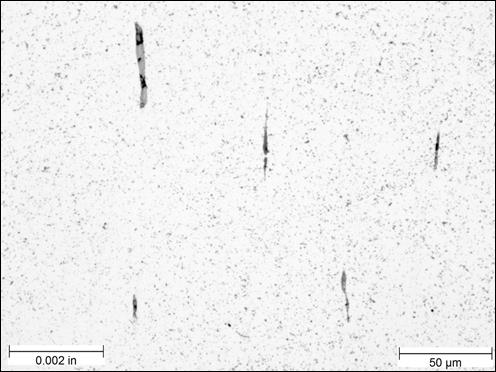
Figure 22. Photo. Unetched example of stringer inclusions near center of rod at 500x magnification.
The polished samples were then placed in a scanning electron microscope (SEM) for further analysis of inclusions with the energy dispersive X-ray (EDX) detector. Figure 23 and figure 24 show the results of two randomly selected inclusions from within the rod. The electron beam image is similar to that obtained from the inverted microscope. However, the EDX detector has the ability to transform that image into a domain of elemental composition. For the first inclusion, based on the element signatures, this particular inclusion has small nodules of manganese sulfide within a matrix of calcium silicate, or slag. The second inclusion appears to be simply manganese sulfide. Other inclusions were examined throughout the rod, and all were determined to be either manganese sulfides or slag.
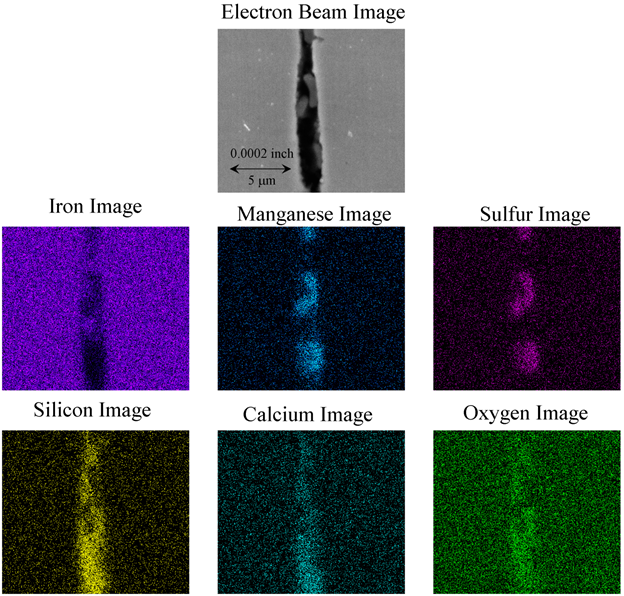
Figure 23. Photo. Electron beam image of inclusion 1 from SEM and associated images at same location taken with an EDX detector.
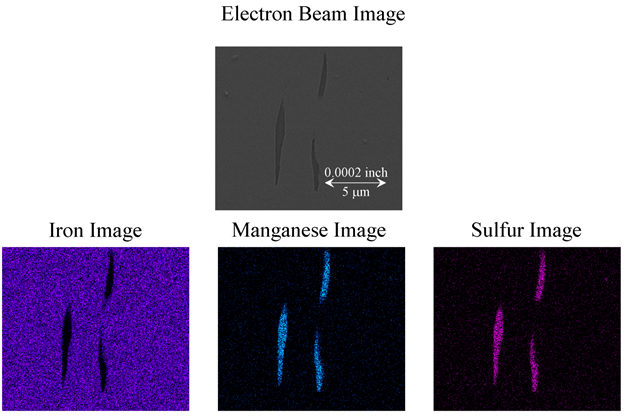
Figure 24. Photo. Electron beam image of inclusion 2 from SEM and associated images at same location taken with an EDX detector.
Once the unetched samples were examined, the samples were then freshly polished, and each sample was uniquely etched according to ASTM E407.(14) The two etchants selected were Marshall’s reagent (ASTM E407, Etchant #223) and 10-percent potassium metabisulfite (ASTME407, Etchant #78).(14) Marshall’s reagent was chosen over the more common 2-percent nital etchant (ASTM E407, Etchant #74) because it attacks the ferrite grain boundaries more effectively than nital, thus providing more sharpness and completeness to the grain structure image. Potassium metabisulfite was selected because it aids in distinguishing between tempered and as-quenched martensite as well as other phases.(15)
Figure 25 shows a macrograph of the mounted sample etched with Marshall’s reagent and viewed under a stereo zoom microscope. A simple macroscopic examination reveals light and dark areas. The dark regions near the threads are the changed microstructure from the quench and tempering of the rod. However, there is also non-homogeneity with severe banding present in approximately the middle 1.75 inches of the rod, alternating between light and dark etched microstructures. The bands are biased to the left side of the rod, with the hardened region deeper in the rod on the right side versus the left side. That is, the constant hardened region on the right starts at about +0.75 inches all the way to right edge, whereas on the left, the hardened region is constant from –1.0 inches to the left edge. This is indicative of some imbalance in the hardening operation and correlates to the unbalanced hardness observed in figure 14.
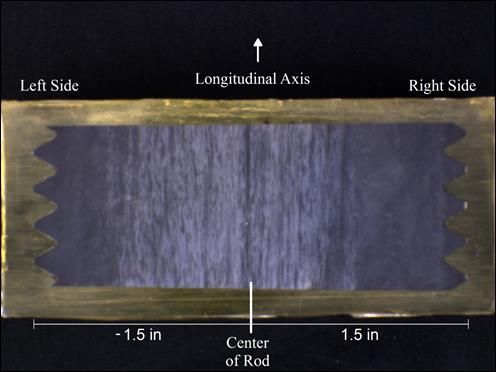
Figure 25. Photo. Mounted cross section of threaded rod etched with Marshall’s reagent.
Figure 26 shows a micrograph taken of the sample in figure 25 but at higher magnification under a bright field illumination near the thread root. The color is uniform, indicating a consistent microstructure. Figure 27 is another micrograph at the same magnification but taken near the core of the rod. This figure clearly shows the alternating banded layers of two different microstructures.
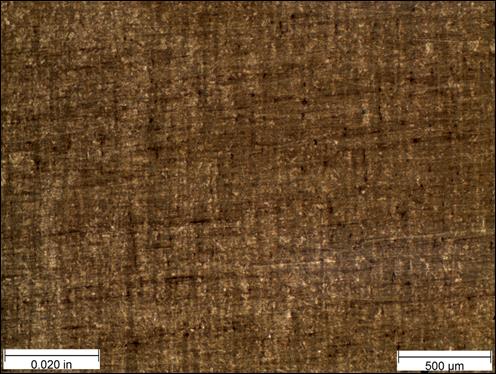
Figure 26. Photo. Micrograph near thread root etched with Marshall’s reagent at 50x magnification.
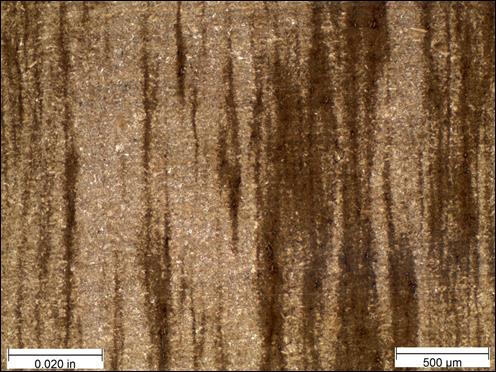
Figure 27. Photo. Micrograph near rod center etched with Marshall’s reagent at 50x magnification.
]Figure 28 presents the same micrograph as shown in figure 26 near the thread root but taken at a magnification of 500x. This microstructure is mostly tempered martensite and possibly some bainite, which is fairly representative of the quenched and tempered 4140 steel that was used for the anchor rods. By comparison, figure 29 shows the same micrograph as figure 27 near the core of the rod but at a magnification of 500x. Figure 29 highlights the bands that alternate between tempered martensite/bainite and ferrite/pearlite zones.
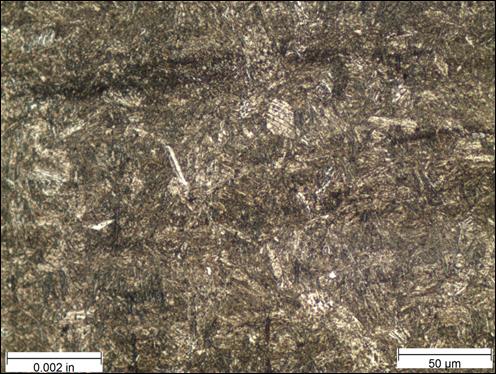
Figure 28. Photo. Micrograph near thread root etched with Marshall’s reagent at 500x magnification.
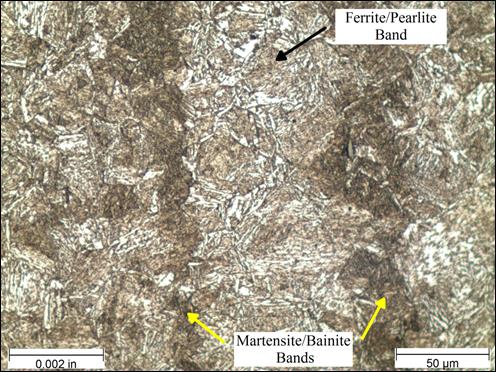
Figure 29. Photo. Micrograph near rod center etched with Marshall’s reagent 500x magnification.
Another portion of the large cross section was etched with 10-percent potassium metabisulfite, a tint etchant that is commonly used in color metallography. Figure 30 shows a micrograph taken near the thread root viewed with polarized light at a magnification of 500x with the sample etched in 10-percent potassium metabisulfite. Figure 31 is a similar micrograph but was captured near the center of the rod.
The dark blue colored microstructure, which is present in nearly all of figure 30, is tempered martensite and possibly some bainite. This same microstructure is also present in figure 31 but in a much smaller amount. There is also a region of untempered martensite present, which is shown in brown. Although not extremely common, there are a few streaks of untempered martensite scattered throughout the rod core. In addition, a combination of ferrite and pearlite is also present and is shown in the light blue areas. The microstructure near the rod core contains multiple phases but the microstructure near the thread roots is mostly tempered martensite suggests that something was awry with the heat treatment likely not allowing for complete transformation in the core.
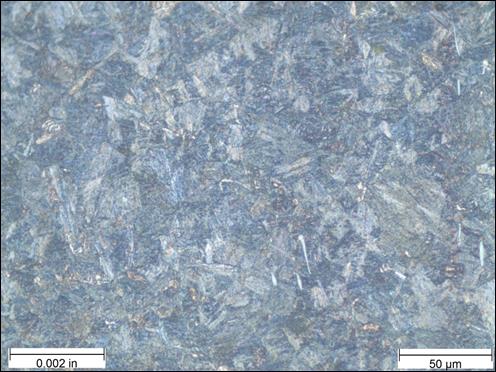
Figure 30. Photo. Micrograph near thread root etched with 10-percent potassium metabisulfite at 500x magnification.
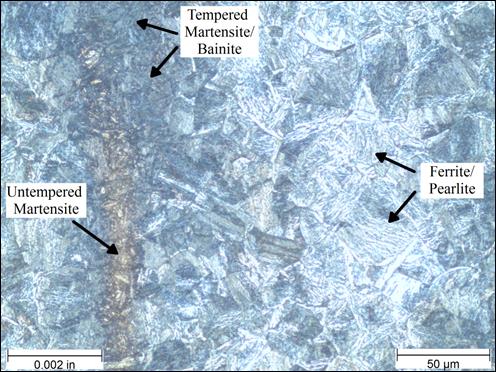
Figure 31. Photo. Micrograph near rod core etched with 10-percent potassium metabisulfite at 500x magnification.
In addition to examining the microstructure of the rod, the threads were also inspected to determine how they were formed. The threads were inspected using the small cross section shown in figure 6. These sections were mounted, ground, and polished using the same procedure as used for the large cross sections. These small samples were etched with a 2-percent nital solution. Figure 32 shows a macrograph of a thread from one of the samples with two smaller micrographs embedded, taken at the thread root and crest, overlaid on the macrograph.
The zinc coating applied during the galvanizing process can clearly be seen in both the macrograph and micrographs. A shallow band with a different morphology than the base metal can be seen near the surface of the root and thread diagonal. The band is approximately 0.006 to 0.010 inches deep and appears to be a compressed form of the base metal microstructure indicating cold work. Because the cold working is limited to just the surface of the thread and the overall absence of flow lines within the entire thread, it suggests these threads were cut in lieu of rolled. In addition, it is also obvious that the threads were cut after heat treatment; if the threads had been cut before heat treating, the microstructure would have been uniform all the way to the thread surface.
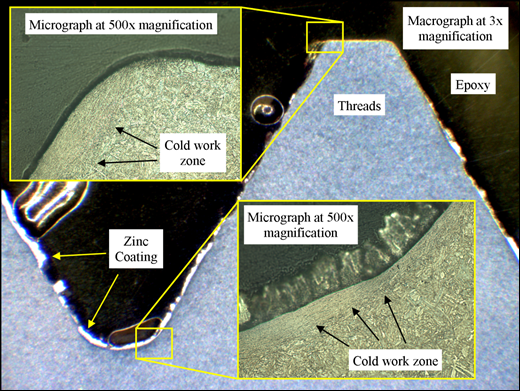
Figure 32. Photo. Macrograph of thread with micrograph overlays taken at thread root and crest, etched with 2-percent nital.
Figure 33 more clearly shows the laminated appearance of the compressed microstructures in the cold worked zone. The figure also shows what the authors of this report refer to as delaminations, which were observed frequently in many threads analyzed. These delaminations were shallow and were contained within the cold work region. According to the ASTM F788 standard, they are acceptable discontinuities that form as a result of thread forming because they are not aligned perpendicular to the longitudinal axis of the rod and their depth was very shallow.(16)
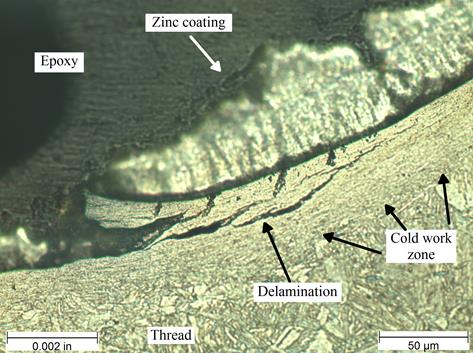
Figure 33. Photo. Micrograph of typical delamination at thread surface etched with 2‑percent nital at 500x magnification.
Chapter 4. conclusions
The results of the mechanical, chemical, and microstructural analyses lead to the following conclusions:
- The material did not fully meet the requirements of the ASTM A354 grade BD standard, with strict interpretation.(2) However, that statement needs some qualification because some of the material may be deemed acceptable within the vagueness of the ASTM standards and how it may be interpreted. For instance, the tensile testing performed conformed to the yield and tensile strength requirements of ASTM A354; however, some elongation values and reduction in areas did not conform, and some may judge that acceptable because strength requirements were met. As for hardness, the ASTM F606 standard is not clear where hardness should be measured, and in the results collected for both samples in this report, non-conformance could be found, depending on the location and number of samples collected.(7)
- The impact toughness of the samples showed variation through the cross section, with the surface region showing the largest values of toughness, then decreasing as testing moved into the core of the rods. Each of the samples also showed little difference between the upper and lower shelves of energy where the upper shelf was on the order of 30 ft-lb, and the lower shelf was about 10 ft-lb. Each also showed a wide temperature transition range where the lower shelf was about -60 °F and the upper shelf was in excess of 120 °F.
- The chemical analysis found that one of the four specimens did not meet the requirements of ASTM A322 grade 4140, which was the grade used by the manufacturer of the anchor rods. However, all four specimens did meet the chemical requirements of ASTM A354, which is less stringent than ASTM A322. Chemical samples were taken near the surface and the core; there was no evidence of gross differences between the two locations, indicating that the steel chemistry was uniform through the rod.
- No indications of preexisting crack-like discontinuities (perpendicular to the longitudinal axis of the rod) could be found in the thread roots of the threaded rod. This was confirmed using fluorescent wet magnetic particles on the entire threaded rod portion and also using red dye penetrant on a cross section of the threaded rod. Self-contained delaminations were observed on the threads under high magnification but these were acceptable discontinuities as defined in ASTM F788.(16)
- Something went awry with the hardening process, leading to a nonuniformly hardened cross section based on the mechanical test results and metallography performed. This observation is mainly applicable to the threaded sample, but is assumed to extend to the unthreaded sample because the mechanical test results were similar. The hardness, tensile, and impact toughness all showed a variation in properties between the surface of the rod and the core. To extend this further, the hardness also showed that the variation was not just across the diameter of the rod—that variation also occurred around the entire rod cross section. The metallography showed that the outer third of the rod had achieved uniform quench and tempered microstructures, but it was not uniform in the core. The core of the rod contained a high amount of ferrite and pearlite, which is softer and not as strong as the tempered martensite that is expected to be there. This result points to problems that may have occurred during the hardening process, but no conclusions can be drawn as to what they were.
Chapter 5. Recommendations
The following recommendations should be presented to ASTM International for consideration by the F16 committee on fasteners:
- Consider clarification of the intent of hardness measurements in the ASTM A354 and F606 standards so that more informed interpretation of material tests can be made. The specimens analyzed for this report were found to have variable properties across the diameter of the rods, and no ASTM quality control measures could account for that result. Because hardening variation through the cross section is a possibility, especially in larger diameter threaded connectors, consider the inclusion of radial traverses and range of variation from surface to core for products over a certain diameter.
- Consider the inclusion of supplemental toughness requirements for ASTM A354 that would establish a toughness number and sampling regime for the hardened product.
- Consider additional quality control measures with ASTM A354 that would assure more complete transformation to martensite throughout the rod during heat treatment.
Appendix A. Tables of Hardness Testing results
This appendix contains two tables of data representing the raw hardness measurements taken on the unthreaded and threaded rod cross sections. The location numbers in the table correlate to those shown in figure 11 and figure 12, but additional columns are provided in each table to represent the polar coordinates of each measurement point.
Table 3. Rockwell C hardness results for unthreaded sample.
| Location | Rockwell C Hardness Value |
Polar Coordinate Radius (inches) |
Polar Coordinate Angle (degrees) |
| 1 | 38.05 | 1.420 | 0 |
| 2 | 37.06 | 1.420 | 15 |
| 3 | 36.94 | 1.420 | 30 |
| 4 | 38.33 | 1.420 | 45 |
| 5 | 37.87 | 1.420 | 60 |
| 6 | 38.06 | 1.420 | 75 |
| 7 | 37.81 | 1.420 | 90 |
| 8 | 37.33 | 1.420 | 105 |
| 9 | 37.51 | 1.420 | 120 |
| 10 | 37.74 | 1.420 | 135 |
| 11 | 37.81 | 1.420 | 150 |
| 12 | 37.32 | 1.420 | 165 |
| 13 | 37.56 | 1.420 | 180 |
| 14 | 37.86 | 1.420 | 195 |
| 15 | 37.47 | 1.420 | 210 |
| 16 | 38.17 | 1.420 | 225 |
| 17 | 38.64 | 1.420 | 240 |
| 18 | 38.22 | 1.420 | 255 |
| 19 | 39.03 | 1.420 | 270 |
| 20 | 38.07 | 1.420 | 285 |
| 21 | 38.02 | 1.420 | 300 |
| 22 | 38.11 | 1.420 | 315 |
| 23 | 37.44 | 1.420 | 330 |
| 24 | 38.33 | 1.420 | 345 |
| 25 | 37.17 | 1.295 | 0 |
| 26 | 37.48 | 1.295 | 15 |
| 27 | 37.89 | 1.295 | 30 |
| 28 | 38.50 | 1.295 | 45 |
| 29 | 36.74 | 1.295 | 60 |
| 30 | 36.22 | 1.295 | 75 |
| 31 | 36.57 | 1.295 | 90 |
| 32 | 37.21 | 1.295 | 105 |
| 33 | 38.88 | 1.295 | 120 |
| 34 | 38.13 | 1.295 | 135 |
| 35 | 36.95 | 1.295 | 150 |
| 36 | 36.60 | 1.295 | 165 |
| 37 | 37.00 | 1.295 | 180 |
| 38 | 38.39 | 1.295 | 195 |
| 39 | 37.58 | 1.295 | 210 |
| 40 | 37.86 | 1.295 | 225 |
| 41 | 36.95 | 1.295 | 240 |
| 42 | 36.54 | 1.295 | 255 |
| 43 | 36.49 | 1.295 | 270 |
| 44 | 36.82 | 1.295 | 285 |
| 45 | 37.88 | 1.295 | 300 |
| 46 | 38.34 | 1.295 | 315 |
| 47 | 36.74 | 1.295 | 330 |
| 48 | 36.48 | 1.295 | 345 |
| 49 | 37.99 | 1.170 | 0 |
| 50 | 38.64 | 1.170 | 15 |
| 51 | 37.39 | 1.170 | 30 |
| 52 | 37.21 | 1.170 | 45 |
| 53 | 36.82 | 1.170 | 60 |
| 54 | 35.75 | 1.170 | 75 |
| 55 | 36.43 | 1.170 | 90 |
| 56 | 38.25 | 1.170 | 105 |
| 57 | 38.73 | 1.170 | 120 |
| 58 | 38.81 | 1.170 | 135 |
| 59 | 38.66 | 1.170 | 150 |
| 60 | 38.00 | 1.170 | 165 |
| 61 | 38.28 | 1.170 | 180 |
| 62 | 38.28 | 1.170 | 195 |
| 63 | 38.23 | 1.170 | 210 |
| 64 | 38.78 | 1.170 | 225 |
| 65 | 37.47 | 1.170 | 240 |
| 66 | 36.52 | 1.170 | 255 |
| 67 | 37.05 | 1.170 | 270 |
| 68 | 38.04 | 1.170 | 285 |
| 69 | 37.36 | 1.170 | 300 |
| 70 | 39.06 | 1.170 | 315 |
| 71 | 37.84 | 1.170 | 330 |
| 72 | 38.12 | 1.170 | 345 |
| 73 | 37.62 | 1.045 | 0 |
| 74 | 37.50 | 1.045 | 15 |
| 75 | 38.64 | 1.045 | 30 |
| 76 | 37.44 | 1.045 | 45 |
| 77 | 38.30 | 1.045 | 60 |
| 78 | 37.89 | 1.045 | 75 |
| 79 | 37.75 | 1.045 | 90 |
| 80 | 37.64 | 1.045 | 105 |
| 81 | 39.47 | 1.045 | 120 |
| 82 | 37.35 | 1.045 | 135 |
| 83 | 38.30 | 1.045 | 150 |
| 84 | 37.83 | 1.045 | 165 |
| 85 | 38.12 | 1.045 | 180 |
| 86 | 36.06 | 1.045 | 195 |
| 87 | 38.15 | 1.045 | 210 |
| 88 | 37.64 | 1.045 | 225 |
| 89 | 38.56 | 1.045 | 240 |
| 90 | 37.12 | 1.045 | 255 |
| 91 | 37.58 | 1.045 | 270 |
| 92 | 36.04 | 1.045 | 285 |
| 93 | 37.22 | 1.045 | 300 |
| 94 | 37.74 | 1.045 | 315 |
| 95 | 38.64 | 1.045 | 330 |
| 96 | 38.43 | 1.045 | 345 |
| 97 | 36.65 | 0.920 | 0 |
| 98 | 37.35 | 0.920 | 15 |
| 99 | 35.99 | 0.920 | 30 |
| 100 | 38.10 | 0.920 | 45 |
| 101 | 38.25 | 0.920 | 60 |
| 102 | 37.45 | 0.920 | 75 |
| 103 | 37.28 | 0.920 | 90 |
| 104 | 36.41 | 0.920 | 105 |
| 105 | 37.18 | 0.920 | 120 |
| 106 | 36.16 | 0.920 | 135 |
| 107 | 38.14 | 0.920 | 150 |
| 108 | 35.63 | 0.920 | 165 |
| 109 | 35.62 | 0.920 | 180 |
| 110 | 36.06 | 0.920 | 195 |
| 111 | 35.19 | 0.920 | 210 |
| 112 | 36.17 | 0.920 | 225 |
| 113 | 37.04 | 0.920 | 240 |
| 114 | 37.29 | 0.920 | 255 |
| 115 | 35.01 | 0.920 | 270 |
| 116 | 36.54 | 0.920 | 285 |
| 117 | 35.74 | 0.920 | 300 |
| 118 | 35.87 | 0.920 | 315 |
| 119 | 36.76 | 0.920 | 330 |
| 120 | 36.40 | 0.920 | 345 |
| 121 | 36.04 | 0.795 | 0 |
| 122 | 37.02 | 0.795 | 15 |
| 123 | 36.77 | 0.795 | 30 |
| 124 | 35.24 | 0.795 | 45 |
| 125 | 35.79 | 0.795 | 60 |
| 126 | 36.23 | 0.795 | 75 |
| 127 | 35.50 | 0.795 | 90 |
| 128 | 37.58 | 0.795 | 105 |
| 129 | 37.79 | 0.795 | 120 |
| 130 | 36.84 | 0.795 | 135 |
| 131 | 37.22 | 0.795 | 150 |
| 132 | 36.37 | 0.795 | 165 |
| 133 | 34.15 | 0.795 | 180 |
| 134 | 35.12 | 0.795 | 195 |
| 135 | 34.63 | 0.795 | 210 |
| 136 | 35.53 | 0.795 | 225 |
| 137 | 35.58 | 0.795 | 240 |
| 138 | 36.87 | 0.795 | 255 |
| 139 | 35.73 | 0.795 | 270 |
| 140 | 35.01 | 0.795 | 285 |
| 141 | 32.32 | 0.795 | 300 |
| 142 | 34.96 | 0.795 | 315 |
| 143 | 36.60 | 0.795 | 330 |
| 144 | 37.17 | 0.795 | 345 |
| 145 | 38.74 | 0.670 | 0 |
| 146 | 36.48 | 0.670 | 15 |
| 147 | 38.38 | 0.670 | 30 |
| 148 | 35.56 | 0.670 | 45 |
| 149 | 37.42 | 0.670 | 60 |
| 150 | 36.18 | 0.670 | 75 |
| 151 | 37.01 | 0.670 | 90 |
| 152 | 37.22 | 0.670 | 105 |
| 153 | 35.89 | 0.670 | 120 |
| 154 | 34.21 | 0.670 | 135 |
| 155 | 34.9 | 0.670 | 150 |
| 156 | 34.16 | 0.670 | 165 |
| 157 | 34.20 | 0.670 | 180 |
| 158 | 34.63 | 0.670 | 195 |
| 159 | 31.87 | 0.670 | 210 |
| 160 | 34.22 | 0.670 | 225 |
| 161 | 33.95 | 0.670 | 240 |
| 162 | 33.03 | 0.670 | 255 |
| 163 | 33.24 | 0.670 | 270 |
| 164 | 34.31 | 0.670 | 285 |
| 165 | 33.17 | 0.670 | 300 |
| 166 | 33.69 | 0.670 | 315 |
| 167 | 35.18 | 0.670 | 330 |
| 168 | 36.26 | 0.670 | 345 |
| 169 | 35.37 | 0.545 | 0 |
| 170 | 32.37 | 0.545 | 15 |
| 171 | 34.93 | 0.545 | 30 |
| 172 | 34.85 | 0.545 | 45 |
| 173 | 34.39 | 0.545 | 60 |
| 174 | 36.66 | 0.545 | 75 |
| 175 | 34.82 | 0.545 | 90 |
| 176 | 34.92 | 0.545 | 105 |
| 177 | 32.99 | 0.545 | 120 |
| 178 | 33.04 | 0.545 | 135 |
| 179 | 33.81 | 0.545 | 150 |
| 180 | 32.16 | 0.545 | 165 |
| 181 | 33.29 | 0.545 | 180 |
| 182 | 32.00 | 0.545 | 195 |
| 183 | 32.69 | 0.545 | 210 |
| 184 | 33.16 | 0.545 | 225 |
| 185 | 32.51 | 0.545 | 240 |
| 186 | 33.20 | 0.545 | 255 |
| 187 | 32.95 | 0.545 | 270 |
| 188 | 33.69 | 0.545 | 285 |
| 189 | 33.09 | 0.545 | 300 |
| 190 | 32.52 | 0.545 | 315 |
| 191 | 33.50 | 0.545 | 330 |
| 192 | 34.14 | 0.545 | 345 |
| 193 | 33.42 | 0.420 | 0 |
| 194 | 33.85 | 0.420 | 15 |
| 195 | 30.79 | 0.420 | 30 |
| 196 | 33.83 | 0.420 | 45 |
| 197 | 32.33 | 0.420 | 60 |
| 198 | 34.30 | 0.420 | 75 |
| 199 | 31.32 | 0.420 | 90 |
| 200 | 31.80 | 0.420 | 105 |
| 201 | 31.63 | 0.420 | 120 |
| 202 | 32.36 | 0.420 | 135 |
| 203 | 33.37 | 0.420 | 150 |
| 204 | 30.53 | 0.420 | 165 |
| 205 | 32.13 | 0.420 | 180 |
| 206 | 31.89 | 0.420 | 195 |
| 207 | 31.57 | 0.420 | 210 |
| 208 | 32.52 | 0.420 | 225 |
| 209 | 35.73 | 0.420 | 240 |
| 210 | 32.29 | 0.420 | 255 |
| 211 | 33.07 | 0.420 | 270 |
| 212 | 33.22 | 0.420 | 285 |
| 213 | 32.84 | 0.420 | 300 |
| 214 | 30.99 | 0.420 | 315 |
| 215 | 31.69 | 0.420 | 330 |
| 216 | 32.58 | 0.420 | 345 |
| 217 | 29.50 | 0.295 | 0 |
| 218 | 31.90 | 0.295 | 30 |
| 219 | 31.16 | 0.295 | 60 |
| 220 | 32.10 | 0.295 | 90 |
| 221 | 31.44 | 0.295 | 120 |
| 222 | 31.87 | 0.295 | 150 |
| 223 | 31.45 | 0.295 | 180 |
| 224 | 32.31 | 0.295 | 210 |
| 225 | 29.68 | 0.295 | 240 |
| 226 | 32.40 | 0.295 | 270 |
| 227 | 32.05 | 0.295 | 300 |
| 228 | 30.98 | 0.295 | 330 |
| 229 | 33.05 | 0.170 | 0 |
| 230 | 30.71 | 0.170 | 45 |
| 231 | 31.48 | 0.170 | 90 |
| 232 | 31.40 | 0.170 | 135 |
| 233 | 28.97 | 0.170 | 180 |
| 234 | 31.34 | 0.170 | 225 |
| 235 | 29.34 | 0.170 | 270 |
| 236 | 29.33 | 0.170 | 315 |
| 237 | 34.39 | 0.000 | 0 |
Table 4. Rockwell C hardness results for threaded sample.
| Location | Rockwell C Hardness Value |
Polar Coordinate Radius (inches) |
Polar Coordinate Angle (degrees) |
| 1 | 37.13 | 1.213 | 0 |
| 2 | 38.29 | 1.213 | 15 |
| 3 | 37.20 | 1.213 | 30 |
| 4 | 37.53 | 1.213 | 45 |
| 5 | 36.13 | 1.213 | 60 |
| 6 | 36.16 | 1.213 | 75 |
| 7 | 36.48 | 1.213 | 90 |
| 8 | 37.75 | 1.213 | 105 |
| 9 | 37.62 | 1.213 | 120 |
| 10 | 37.72 | 1.213 | 135 |
| 11 | 36.87 | 1.213 | 150 |
| 12 | 36.72 | 1.213 | 165 |
| 13 | 37.47 | 1.213 | 180 |
| 14 | 37.60 | 1.213 | 195 |
| 15 | 36.97 | 1.213 | 210 |
| 16 | 35.59 | 1.213 | 225 |
| 17 | 35.43 | 1.213 | 240 |
| 18 | 35.53 | 1.213 | 255 |
| 19 | 37.16 | 1.213 | 270 |
| 20 | 38.45 | 1.213 | 285 |
| 21 | 38.41 | 1.213 | 300 |
| 22 | 38.50 | 1.213 | 315 |
| 23 | 38.23 | 1.213 | 330 |
| 24 | 37.75 | 1.213 | 345 |
| 25 | 37.97 | 1.088 | 0 |
| 26 | 38.30 | 1.088 | 15 |
| 27 | 37.57 | 1.088 | 30 |
| 28 | 37.60 | 1.088 | 45 |
| 29 | 37.26 | 1.088 | 60 |
| 30 | 37.01 | 1.088 | 75 |
| 31 | 37.13 | 1.088 | 90 |
| 32 | 37.12 | 1.088 | 105 |
| 33 | 37.40 | 1.088 | 120 |
| 34 | 37.97 | 1.088 | 135 |
| 35 | 37.75 | 1.088 | 150 |
| 36 | 37.86 | 1.088 | 165 |
| 37 | 36.58 | 1.088 | 180 |
| 38 | 36.78 | 1.088 | 195 |
| 39 | 36.79 | 1.088 | 210 |
| 40 | 36.62 | 1.088 | 225 |
| 41 | 36.56 | 1.088 | 240 |
| 42 | 36.48 | 1.088 | 255 |
| 43 | 37.17 | 1.088 | 270 |
| 44 | 36.86 | 1.088 | 285 |
| 45 | 38.59 | 1.088 | 300 |
| 46 | 38.62 | 1.088 | 315 |
| 47 | 38.07 | 1.088 | 330 |
| 48 | 38.81 | 1.088 | 345 |
| 49 | 38.09 | 0.963 | 0 |
| 50 | 37.76 | 0.963 | 15 |
| 51 | 37.52 | 0.963 | 30 |
| 52 | 38.51 | 0.963 | 45 |
| 53 | 37.98 | 0.963 | 60 |
| 54 | 36.50 | 0.963 | 75 |
| 55 | 37.55 | 0.963 | 90 |
| 56 | 36.05 | 0.963 | 105 |
| 57 | 37.55 | 0.963 | 120 |
| 58 | 37.87 | 0.963 | 135 |
| 59 | 37.20 | 0.963 | 150 |
| 60 | 36.12 | 0.963 | 165 |
| 61 | 34.38 | 0.963 | 180 |
| 62 | 35.29 | 0.963 | 195 |
| 63 | 36.05 | 0.963 | 210 |
| 64 | 36.70 | 0.963 | 225 |
| 65 | 36.05 | 0.963 | 240 |
| 66 | 36.88 | 0.963 | 255 |
| 67 | 36.85 | 0.963 | 270 |
| 68 | 34.79 | 0.963 | 285 |
| 69 | 35.76 | 0.963 | 300 |
| 70 | 37.47 | 0.963 | 315 |
| 71 | 37.16 | 0.963 | 330 |
| 72 | 37.63 | 0.963 | 345 |
| 73 | 34.04 | 0.838 | 0 |
| 74 | 35.79 | 0.838 | 15 |
| 75 | 36.83 | 0.838 | 30 |
| 76 | 37.52 | 0.838 | 45 |
| 77 | 36.56 | 0.838 | 60 |
| 78 | 36.78 | 0.838 | 75 |
| 79 | 36.66 | 0.838 | 90 |
| 80 | 36.69 | 0.838 | 105 |
| 81 | 35.51 | 0.838 | 120 |
| 82 | 36.33 | 0.838 | 135 |
| 83 | 35.23 | 0.838 | 150 |
| 84 | 37.05 | 0.838 | 165 |
| 85 | 34.86 | 0.838 | 180 |
| 86 | 34.20 | 0.838 | 195 |
| 87 | 34.73 | 0.838 | 210 |
| 88 | 34.72 | 0.838 | 225 |
| 89 | 35.65 | 0.838 | 240 |
| 90 | 33.98 | 0.838 | 255 |
| 91 | 34.09 | 0.838 | 270 |
| 92 | 34.75 | 0.838 | 285 |
| 93 | 35.79 | 0.838 | 300 |
| 94 | 35.68 | 0.838 | 315 |
| 95 | 38.10 | 0.838 | 330 |
| 96 | 36.99 | 0.838 | 345 |
| 97 | 37.20 | 0.713 | 0 |
| 98 | 35.55 | 0.713 | 15 |
| 99 | 36.69 | 0.713 | 30 |
| 100 | 35.48 | 0.713 | 45 |
| 101 | 36.68 | 0.713 | 60 |
| 102 | 36.53 | 0.713 | 75 |
| 103 | 36.48 | 0.713 | 90 |
| 104 | 37.64 | 0.713 | 105 |
| 105 | 37.35 | 0.713 | 120 |
| 106 | 36.03 | 0.713 | 135 |
| 107 | 36.25 | 0.713 | 150 |
| 108 | 36.26 | 0.713 | 165 |
| 109 | 32.91 | 0.713 | 180 |
| 110 | 32.92 | 0.713 | 195 |
| 111 | 32.97 | 0.713 | 210 |
| 112 | 33.11 | 0.713 | 225 |
| 113 | 34.66 | 0.713 | 240 |
| 114 | 34.23 | 0.713 | 255 |
| 115 | 33.70 | 0.713 | 270 |
| 116 | 32.11 | 0.713 | 285 |
| 117 | 33.45 | 0.713 | 300 |
| 118 | 35.65 | 0.713 | 315 |
| 119 | 35.89 | 0.713 | 330 |
| 120 | 35.89 | 0.713 | 345 |
| 121 | 33.39 | 0.588 | 0 |
| 122 | 32.76 | 0.588 | 15 |
| 123 | 36.08 | 0.588 | 30 |
| 124 | 33.98 | 0.588 | 45 |
| 125 | 36.56 | 0.588 | 60 |
| 126 | 35.94 | 0.588 | 75 |
| 127 | 35.95 | 0.588 | 90 |
| 128 | 34.02 | 0.588 | 105 |
| 129 | 33.06 | 0.588 | 120 |
| 130 | 35.13 | 0.588 | 135 |
| 131 | 34.84 | 0.588 | 150 |
| 132 | 34.54 | 0.588 | 165 |
| 133 | 33.03 | 0.588 | 180 |
| 134 | 33.18 | 0.588 | 195 |
| 135 | 32.22 | 0.588 | 210 |
| 136 | 33.19 | 0.588 | 225 |
| 137 | 33.51 | 0.588 | 240 |
| 138 | 33.68 | 0.588 | 255 |
| 139 | 33.29 | 0.588 | 270 |
| 140 | 32.87 | 0.588 | 285 |
| 141 | 32.34 | 0.588 | 300 |
| 142 | 32.26 | 0.588 | 315 |
| 143 | 32.02 | 0.588 | 330 |
| 144 | 34.31 | 0.588 | 345 |
| 145 | 30.60 | 0.463 | 0 |
| 146 | 32.56 | 0.463 | 15 |
| 147 | 33.35 | 0.463 | 30 |
| 148 | 33.57 | 0.463 | 45 |
| 149 | 33.74 | 0.463 | 60 |
| 150 | 34.35 | 0.463 | 75 |
| 151 | 32.92 | 0.463 | 90 |
| 152 | 31.15 | 0.463 | 105 |
| 153 | 34.23 | 0.463 | 120 |
| 154 | 33.96 | 0.463 | 135 |
| 155 | 32.31 | 0.463 | 150 |
| 156 | 33.16 | 0.463 | 165 |
| 157 | 31.64 | 0.463 | 180 |
| 158 | 31.18 | 0.463 | 195 |
| 159 | 33.46 | 0.463 | 210 |
| 160 | 32.46 | 0.463 | 225 |
| 161 | 35.31 | 0.463 | 240 |
| 162 | 33.74 | 0.463 | 255 |
| 163 | 32.67 | 0.463 | 270 |
| 164 | 32.54 | 0.463 | 285 |
| 165 | 30.45 | 0.463 | 300 |
| 166 | 30.98 | 0.463 | 315 |
| 167 | 30.86 | 0.463 | 330 |
| 168 | 30.70 | 0.463 | 345 |
| 169 | 31.80 | 0.338 | 0 |
| 170 | 32.74 | 0.338 | 15 |
| 171 | 29.47 | 0.338 | 30 |
| 172 | 33.97 | 0.338 | 45 |
| 173 | 30.99 | 0.338 | 60 |
| 174 | 30.31 | 0.338 | 75 |
| 175 | 32.65 | 0.338 | 90 |
| 176 | 32.52 | 0.338 | 105 |
| 177 | 32.28 | 0.338 | 120 |
| 178 | 30.32 | 0.338 | 135 |
| 179 | 31.02 | 0.338 | 150 |
| 180 | 30.81 | 0.338 | 165 |
| 181 | 31.13 | 0.338 | 180 |
| 182 | 30.75 | 0.338 | 195 |
| 183 | 31.75 | 0.338 | 210 |
| 184 | 31.85 | 0.338 | 225 |
| 185 | 32.93 | 0.338 | 240 |
| 186 | 32.54 | 0.338 | 255 |
| 187 | 31.61 | 0.338 | 270 |
| 188 | 30.53 | 0.338 | 285 |
| 189 | 31.67 | 0.338 | 300 |
| 190 | 30.87 | 0.338 | 315 |
| 191 | 30.37 | 0.338 | 330 |
| 192 | 32.68 | 0.338 | 345 |
| 193 | 29.71 | 0.213 | 0 |
| 194 | 32.25 | 0.213 | 30 |
| 195 | 29.88 | 0.213 | 60 |
| 196 | 29.32 | 0.213 | 90 |
| 197 | 30.02 | 0.213 | 120 |
| 198 | 34.25 | 0.213 | 150 |
| 199 | 29.61 | 0.213 | 180 |
| 200 | 31.86 | 0.213 | 210 |
| 201 | 31.02 | 0.213 | 240 |
| 202 | 32.55 | 0.213 | 270 |
| 203 | 30.39 | 0.213 | 300 |
| 204 | 31.84 | 0.213 | 330 |
| 205 | 31.98 | 0.000 | 0 |
Appendix B. Tables of Charpy Testing results
This appendix contains two tables of data representing the raw Charpy impact toughness measurements taken on the unthreaded and threaded rod cross sections. The specimen identifications in the table correlate to those shown in figure 5 and figure 6. Additional columns in the table represent the test temperature, toughness value, lateral expansion measurement, percent-shear area, and distance from the specimen notch root to the surface of the rod.
Table 5. Raw data unthreaded sample Charpy specimens.
| Specimen | Test Temperature (°F) |
Impact Energy (ft-lb) |
Percent Shear |
Lateral Expansion (inches) |
Distance from Notch to Rod Surface (inches) |
| A1 | 132.4 | 55.8 | 39 | 0.0191 | 0.14 |
| A2 | -30.1 | — | 11 | 0.008 | 0.14 |
| A3 | 38.5 | 16.75 | 16 | 0.0043 | 0.14 |
| A4 | -60.0 | 15 | 8 | 0.0059 | 0.14 |
| A5 | 92.5 | 28 | 36 | 0.014 | 0.14 |
| A6 | 67.1 | 23.25 | 29 | 0.0103 | 0.14 |
| A7 | -0.4 | 17 | 14 | 0.0067 | 0.14 |
| A8 | 67.1 | 22.75 | 31 | 0.0114 | 0.14 |
| A9 | -60.5 | 14.75 | 7 | 0.0053 | 0.14 |
| A0 | 199.4 | 35.25 | 41 | 0.0213 | 0.14 |
| B1 | -0.2 | 12.5 | 9 | 0.004 | 0.84 |
| B2 | 0.5 | 12.75 | 9 | 0.0048 | 0.84 |
| B3 | -61.1 | 9 | < 5 | 0.0037 | 0.84 |
| B4 | 199.9 | 31.5 | 33 | 0.0171 | 0.84 |
| B5 | -60.5 | 7.25 | < 5 | 0.002 | 0.84 |
| B7 | 132.1 | 31.5 | 38 | 0.0149 | 0.14 |
| B8 | 0.3 | 14.5 | 15 | 0.0055 | 0.14 |
| B9 | -59.3 | 12.5 | 8 | 0.0043 | 0.14 |
| B0 | 200.5 | 36.25 | 45 | 0.0183 | 0.14 |
| C1 | -34.5 | 14.5 | 12 | 0.0074 | 0.14 |
| C2 | 33.6 | 28 | 38 | 0.013 | 0.14 |
| C3 | -34.7 | 15.5 | 13 | 0.0051 | 0.14 |
| C4 | 33.6 | 24.5 | 38 | 0.0117 | 0.14 |
| C5 | -33.6 | 14.25 | 12 | 0.0045 | 0.14 |
| C6 | -17.7 | 16 | 15 | 0.0061 | 0.14 |
| C7 | 56 | 30 | 38 | 0.0146 | 0.14 |
| C8 | 3.5 | 20 | 23 | 0.0088 | 0.14 |
| C9 | 3.3 | 20.5 | 27 | 0.0096 | 0.14 |
| C0 | 21.5 | 21.25 | 30 | 0.0124 | 0.38 |
| D1 | 19.3 | 22 | 28 | 0.0128 | 0.14 |
| D2 | 70.2 | 17.25 | 19 | 0.0081 | 0.60 |
| D3 | 130.8 | 22.25 | 34 | 0.0122 | 0.84 |
| D4 | -60.7 | 11.75 | 5 | 0.0041 | 0.84 |
| D5 | 67.6 | 17.5 | 25 | 0.0094 | 0.84 |
| D6 | 130.6 | 26 | 32 | 0.0152 | 0.84 |
| D7 | 68.4 | 18 | 17 | 0.0072 | 0.84 |
| D8 | 0.3 | 9 | 9 | 0.0035 | 0.84 |
| D9 | 68.5 | 16.5 | 23 | 0.0087 | 0.84 |
| D0 | 68.9 | 14.5 | 26a | 0.0075a | 1.5 |
| E1 | 69.4 | 16.5 | 18 | 0.0093 | 1.5 |
|
— Indicates ignored specimen; energy gauge not reset between specimens. aMeasurements are based on only one fracture face because the other half of the broken specimen was used for chemical analysis. |
|||||
Table 6. Raw data for threaded sample Charpy specimens.
| Specimen | Test Temperature (°F) |
Impact Energy (ft-lb) |
Percent Shear |
Lateral Expansion (inches) |
Distance from Notch to Rod Surface (inches) |
| E2 | 0.3 | 13.5 | 10 | 0.0057 | 0.33 |
| E3 | 130.3 | 25 | 31 | 0.0151 | 0.33 |
| E4 | -0.6 | 12.25 | 10 | 0.0041 | 0.33 |
| E5 | 70.0 | 17.25 | 28 | 0.0083 | 0.33 |
| E6 | 200.3 | 34.5 | 31 | 0.0222 | 0.33 |
| E7 | -60 | 11.5 | 6 | 0.0105 | 0.33 |
| E8 | 131.4 | 23.75 | 35 | 0.0117 | 0.33 |
| E9 | -61.1 | 12.25 | < 5 | 0.0051 | 0.33 |
| E0 | -59.3 | 12.5 | < 5 | 0.0045 | 0.33 |
| F1 | 69.8 | 18.5 | 28a | 0.0065a | 0.33 |
| F2 | -60.3 | 8.5 | < 5 | 0.0025 | 1.5 |
| F3 | 0.9 | 12.5 | 8 | 0.0099 | 1.5 |
| F4 | 68.4 | 12.75 | 18a | 0.005a | 1.5 |
| F5 | 131.2 | 19.5 | 22 | 0.0121 | 1.5 |
| F6 | 200.5 | 33.5 | 38 | 0.023 | 1.5 |
| F7 | -30.6 | 10.25 | < 5 | 0.0041 | 1.5 |
| aMeasurements are based on only one fracture face because the other half of the broken specimen was used for chemical analysis. | |||||
references
1. ASTM A 490-06. (2006). “Standard Specification for Heat-Treated Steel Structural Bolts, 150 ksi Minimum Tensile Strength,” Book of Standards Volume 01.08, ASTM International, West Conshohocken, PA.
2. ASTM A 354-07. (2007). “Standard Specification for Quenched and Tempered Alloy Steel Bolts, Studs, and Other Externally Threaded Fasteners,” Book of Standards Volume 01.08, ASTM International, West Conshohocken, PA.
3. Toll Bridge Program Oversight Committee (TBPOC). (2013). Report on the A354 Grade BD High-Strength Steel Rods on the New East Span of the San Francisco-Oakland Bay Bridge With Findings and Decisions. TBPOC. Sacramento, CA.
4. ASTM E8/E8M. (2013). “Standard Test Methods for Tension Testing of Metallic Materials,” Book of Standards Volume 03.01, ASTM International, West Conshohocken, PA.
5. Galambos, T.V. (1988). Guide to Stability Design Criteria for Metal Structures. John Wiley & Sons, New York, NY.
6. ASTM E18. (2014). “Standard Test Methods for Rockwell Hardness of Metallic Materials,” Book of Standards Volume 03.01, ASTM International, West Conshohocken, PA.
7. ASTM F606. (2014). “Standard Test Methods for Determining the Mechanical Properties of Externally and Internally Threaded Fasteners, Washers, Direct Tension Indicators, and Rivets,” Book of Standards Volume 01.08, ASTM International, West Conshohocken, PA.
8. ASTM E23. (2012). “Standard Test Methods for Notched Bar Impact Testing of Metallic Materials,” Book of Standards Volume 03.01, ASTM International, West Conshohocken, PA.
9. American Association of State Highway and Transportation Officials (AASHTO). (2014). AASHTO LRFD Bridge Design Specifications (7th Ed.). AASHTO, Washington, DC.
10. Barsom, J.M. (1975). “Development of the AASHTO Fracture-Toughness Requirements for Bridge Steels,” Engineering Fracture Mechanics, 7(3), 605–618.
11. Barsom, J.M. and Rolfe, S.T. (1999). Fracture and Fatigue Control in Structures—Applications of Fracture Mechanics. 3d Edition. ASTM International, West Conshohocken, PA.
12. ASTM A322. (2007). “Standard Specification for Steel Bars, Alloy, Standard Grades,” Book of Standards Volume 01.05, ASTM International, West Conshohocken, PA.
13. ASTM E3. (2001). “Standard Guide for Preparation of Metallographic Specimens,” Book of Standards Volume 03.01, ASTM International, West Conshohocken, PA.
14. ASTM E407. (2007). “Standard Practice for Microetching Metals and Alloys,” Book of Standards Volume 03.01, ASTM International, West Conshohocken, PA.
15. Vander Voort, G.F., ed. (2004). “Metallography and Microstructures,” Vol. 9. ASM Handbook, ASM International, Materials Park, OH.
16. ASTM F788. (2013). “Standard Specification for Surface Discontinuities of Bolts, Screws, and Studs, Inch and Metric Series,” Book of Standards Volume 01.08, ASTM International, West Conshohocken, PA.
[1]The 15 ft-lb requirement dates back to analysis of the Liberty ship fractures where most fractures were prevented if plates had 10 ft-lb of toughness, and 15 ft-lb was established as a higher performance standard.
[2]Determined using a type I extreme value probability distribution input with annual extreme minimum temperatures recorded at the San Francisco International Airport from 1948 to 2014. The 22 °F value is based on a return period of 300 years, or 0.33 percent chance of exceedance.

