U.S. Department of Transportation
Federal Highway Administration
1200 New Jersey Avenue, SE
Washington, DC 20590
202-366-4000
Federal Highway Administration Research and Technology
Coordinating, Developing, and Delivering Highway Transportation Innovations
 |
| This report is an archived publication and may contain dated technical, contact, and link information |
|
Publication Number: FHWA-HRT-06-089
Date: July 2006 |
PBCAT-Pedestrian and Bicycle Crash Analysis ToolVersion 2.0PDF Version (14.7 MB) PDF files can be viewed with the Acrobat® Reader®
CHAPTER 5. FORM CREATION AND DESIGNPBCAT allows the creation of customized data entry forms to simplify and streamline the data entry process. Customized data entry forms may contain only those database fields that are needed to match local crash reports or specific analysis needs. Furthermore, the data entry forms can be developed to approximate the design of the police crash report forms used in a State or municipality. This feature should enhance usability and reduce the time spent on data entry.
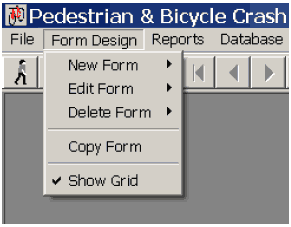
FORMS AND DATABASESForms are embedded in databases in the application.In Preferences under the File menu, the user can select the default database and the forms desired for data entry. (Refer to chapter 3.) The application accesses the selected Default Database when the Form Design menu options are selected. (See figure 24.) The creation of new forms, editing of existing forms, or deletion of forms will be done within that default database. Forms can be copied from one database to another using the Copy Form option, which is covered in a later section of this chapter.
Figure 24. Image. Create, edit, delete, and copy forms.
Special Note: Prior to creating a new form or modifying an existing form, set the desired Default Database and make all changes to the variables in the Database Fields in the Application Preferences. Refer to chapter 3 for further instruction on these steps. The forms used for data entry also affect analysis abilities. Specifically, the variables available for the creation of reports (tables or charts of crash frequencies or percentages) will only be those included in the form. For example, if Pedestrian Age is not included on the data entry form, it will not appear in the list of variables available for the production of analysis reports. (See chapter 7 for more information on Reports.)
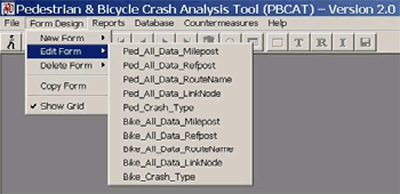
EXISTING FORMSThe application includes several forms that may be used for data entry as they are currently designed or edited to create different versions of the form. (See figure 25.) The forms included in the default database (PBCAT.MDB) of the application include:
Figure 25. Image. Select forms for editing.
The forms containing all database fields may be most helpful to those planning to use PBCAT to store and manage all pedestrian and bicyclist collision data in this application. The forms with crash type information only may be utilized by those users who plan to export crash typing information and merge it with another database that contains other crash data elements. All these forms are shown in appendix E. In addition to the forms within the PBCAT.MDB database, there are also two forms in the NC_PBCAT.MDB database (also included with the application) that have been customized to match the crash report forms used in North Carolina: NCDMV349-Pedestrian and NCDMV349- Bicyclist. These forms represent the type of customization that can be done with the software. Special Note: Custom design of forms to match the police crash report form may take a few hours to accomplish. However, it only has to be done once and may substantially improve the efficiency and accuracy of data entry.
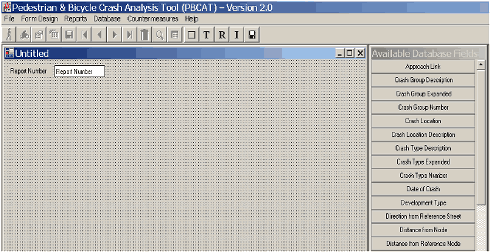
FORM CREATIONForms can be created in two ways. The user can select New Form or Edit Form. A click on the former followed by the selection of either Pedestrian Form or Bicyclist Form will open a window like the one shown in figure 26. The form will be untitled (as shown in the form header) and will include the field Report Number. This field is required in all forms and should be used as the unique identifier for a crash record. It is usually this field that is used to link to databases containing other crash report information. The form will also include a grid that can be used to help align fields and boxes. The grid can be turned on and off in the Form Design menu. To the right of the form is a list of Available Database Fields that may be added to the form. This list is populated by the Aliases given to the database fields in Preferences and will always include all database fields that are not currently on the form. Thus in the case of a new form, the list willbe populated with the entire list of fields available in the database. These two windows can be resized with a click and drag on the edges of the windows and can be moved as needed.
Figure 26. Image. Create a form using the New Form function.
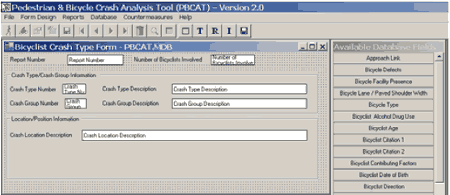
Creation of a form using the Edit Form function requires the user to select the form to be edited from the list of all forms included in the default database. The form window that opens will look very similar to the one shown for creating a new form. The primary differences are 1) the form name and database are provided in the header information, and 2) the form will include significantly more data fields.
Figure 27. Image. Create a form using the Edit Form function.
Creation of a new form using the New Form or Edit Form function is a matter of user preference. If a form exists that includes the majority of the variables desired by the user, and the layout is satisfactory or only requires small adjustments, the Edit Form function may be the best approach. If a form is being designed to match the layout of a police crash report form, it may be best to use the New Form option, since it is unlikely there is an existing form with a layout similar to what will be required. While creating a form to match the form of a local agency will take time to design and lay out, it is a one-time task that can save significant time during data entry.
Adding FieldsAdding fields to a new or existing form can be done in one of two ways. The user can use a dragand-drop function from the Available Database Fields list. (See figure 28.) Simply click on the variable to be added and hold the mouse button down. Drag it to the desired location on the form; the mouse pointer will be the upper left corner of the entry. Release the mouse button, and the field alias and entry space (white box) will be present on the form. Note that once a field is included in the form, it will no longer be in the list, which will ensure no field is included more than once.
Figure 28. Image. Insert a field on a form.
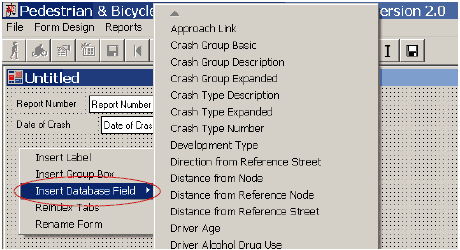
The second option for adding a field to a form is to place the mouse pointer at the location where the field is desired and right-click the mouse to access a menu of options, including one that says Insert Database Field. A click on that option produces the same list of available database fields. A click on the desired field places the alias and entry box on the form.
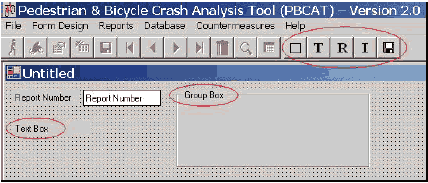
Adding Text and Group BoxesThe user can also insert text boxes and group boxes on the form. (See figure 29.) Text boxes can be used as headers or notes within a form or for other purposes where there is a need to provide additional text. These boxes can be up to 100 characters in length. Group boxes can be used to surround several variables that may be part of a group. For example, one can use a group box to encompass all the variables that include crash typing information. Group boxes include a title box that allows the group to be named. Inserting a text box or group box can be done with the right click of a mouse, as previously described for inserting database fields. The toolbar above the form also includes buttons that can be used to insert these boxes. Once inserted, each box can be moved by clicking on the box and dragging it to the desired location on the form. A right click on the inserted box will allow the box to be renamed, deleted, or sent to the back (group box only).
Figure 29. Image. Insert text and group boxes on a form.
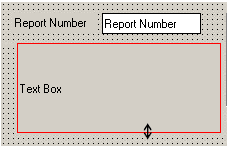
All items on a form—aliases, entry boxes, text boxes, and group boxes—can be moved and resized. Each component can be moved by clicking on the object and dragging it to the new location. (See figure 30.) Each item can be resized by clicking on the object, then clicking on the edge of the highlighted box and dragging to the needed size. Groups of objects can also be moved simultaneously. Hold the control key down while clicking on all objects to be moved. For the last object selected, keep the mouse button depressed. Drag the group of objects to a new location on the form.
Figure 30. Image. Resize a box.
Deleting FieldsDuring the course of creating a new form or editing an existing form, there may be a need to delete fields from the form. This is accomplished by clicking on the field (either the alias or entry box), right-clicking the mouse, and clicking Delete. A deleted database field will be added back to the list of available variables. If a field is deleted by mistake, simply add it back to the database using the steps previously described.
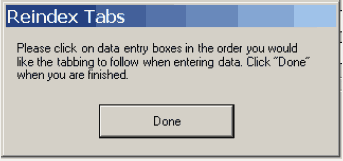
Indexing TabsThe Tab key is used during data entry to move from one field to the next. The sequence of the tabs for a new or existing form can be set or changed using the Tab Redindexing function. Click on the tool bar button labeled with an "I" or right click on the form (outside a box or field) and select the tab reindexing option. The instructional message shown here will appear. Simply click on the fields in the order desired for data entry. Click Done when the last data entry field is selected, and the order is set. (See figure 31.)
Figure 31. Image. Set the sequence of tabs for a new or existing form.
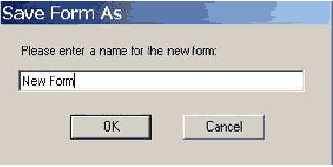
Saving and RenamingA form can be renamed by clicking on the "R" button on the toolbar or by rightclicking on the form and selecting the renaming option. A window will open to allow a new name to be entered for the form. Click OK to save the form under the new name. (See figure 32.) The new form name will appear in the header information.
Figure 32. Image. Rename and save a form.
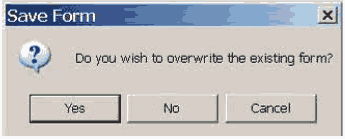
A form can be saved by clicking the Save button on the toolbar. For a new form that has not yet been saved, a window will open to allow a new name to be entered (same as the window described for renaming). For an existing form, the user will always be prompted as to whether the form should be overwritten, as shown in figure 33. A click on Yes will save the form under the existing form name. A click on No will open the Save Form As window. Cancel will not save the form and will return the user to the form itself.
Figure 33. Image. Overwrite an existing form.
Special Note: After a form is created, it must be selected as the default data entry form in Application Preferences if it is to be the form used for data entry. (See chapter 3.)
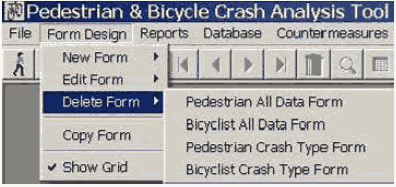
FORM DELETIONForms that are not being used for data entry and forms that may have been created in error can be deleted from a database. Select the Delete Form option under the Form Design menu, and select the form to be deleted. (See figure 34.) A click on the form to be deleted will prompt a confirmation message.
Figure 34. Image. Delete a form.
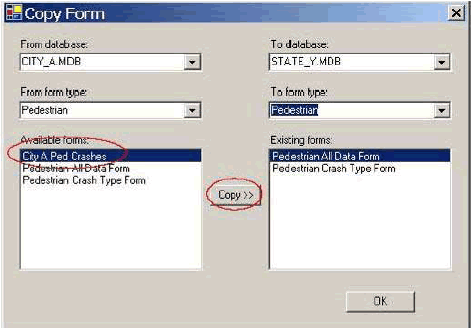
FORM COPYINGPBCAT features the ability to copy forms from one database to another or from the pedestrian table to the bicyclist table in the same database. (See figure 35.) This feature can expedite form creation by allowing the user to make minor modifications to a form that may already exist in another database or table. As an example, consider an agency (State Y) that is planning to create a new data entry form and discovers that another agency in the State (City A) is using PBCAT and has created a form that may fulfill State Y needs. Rather than create a new form, State Y acquires a copy of the database and desired form from City A. State Y can copy that form to their database following the steps shown in the Copy Form window. Select the to/from databases, to/from form types, and the form to be copied. Click Copy to have the form copied to the new database. This form can then be edited by State Y to meet their needs and avoid having to create an entirely new form.
Figure 35. Image. Copy a form.
The Copy Form feature also is valuable in the production of almost duplicate agency forms for pedestrian and bicyclist crashes. Since crash reports for both types of crashes will be the same in an agency, the data entry forms will also need to be similar. A form can be created for one type of collision (e.g., pedestrians), and then copied to the bicyclist table and edited to change the few fields that differ between the two modes.
FHWA-HRT-06-089 |