

Reverse Engineering Flow Chart
Main Flowchart
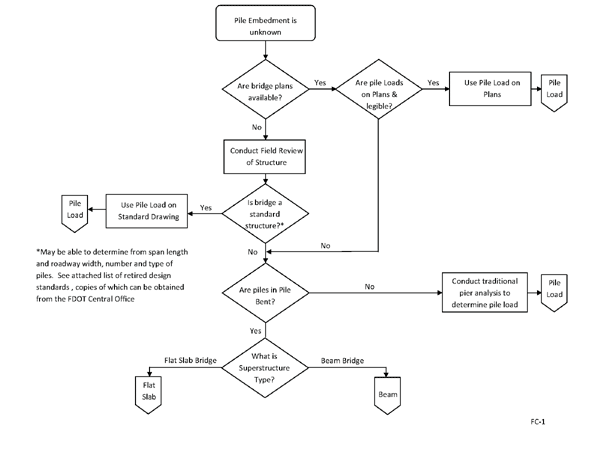
- Box 1 - Pile Embedment is Unknown
- Decision Box 2 - Are bridge plans available?
- If Decision Box 2 is yes, go to Decision Box 3 - Are pile loads on plans and legible?
- If Decision Box 3 is yes, go to Box 4 - Use Pile Load on Plans then go to Box 5 - Go to Flowchart for Pile Load
- If Decision Box 3 is no, go to Decision Box 10 below.
- If Decision Box 2 is no, Box 6 - Conduct Field Review of Structure, go to Decision Box 7 - Is bridge a standard structure?
- If Decision Box 7 is yes, go to Box 8 - Use Pile Load on Standard Drawing, then go to Box 9 - Go to Flowchart for Pile Load
- If Decision Box 7 is no, go to Decision Box 10 - Are piles in Pile Bent
- If Decision Box 10 is no, go to Box 11 - Conduct traditional pier analysis to determine pile load, then go to Box 12 - Go to Flowchart for Pile Load
- If Decision Box 10 is yes, go to Decision Box 13 - What is the Superstructure Type?
- If Decision Box 13 is Flat Slab Bridge, go to Box 14 - go to Flowchart for Flat Slab
- If Decision Box 13 is Beam Bridge, go to Box 15 - go to Flowchart for Beam
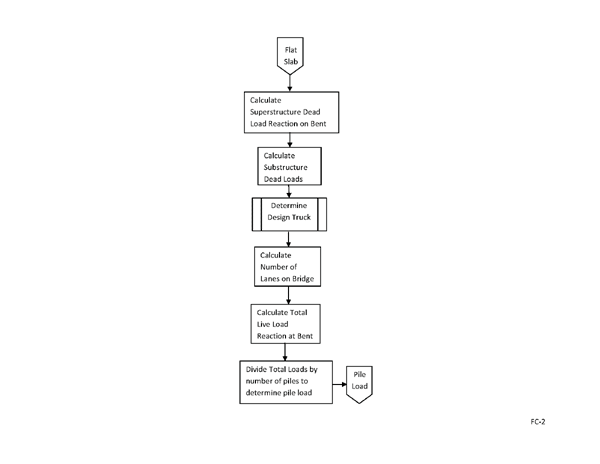
Flat Slab Flowchart
- Box 1 - Calculate Superstructure Dead Load Reaction on Bent
- Box 2 - Calculate Substructure Dead Loads
- Box 3 - Determine Design Truck (use Flowchart of Determining Design Truck)
- Box 4 - Calculate Number of Lanes on Bridge
- Box 5 - Calculate Total Live Load Reaction at Bent
- Box 6 - Divide Total Loads by number of piles to determine pile load
- Box 7 - Go to Flowchart for Pile Load
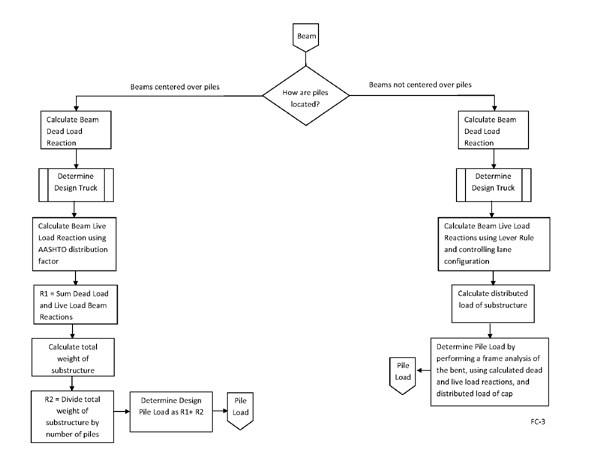
Beam Flowchart
- Decision Box 1 - How are piles located?
- If Beams are centered over piles, then
- Box 2 - Calculate Beam Dead Load Reaction
- Box 3 - Determine Design Truck (use Flowchart for Determining Design Truck)
- Box 4 - Calculate Beam Live Load Reaction using AASHTO distribution factor
- Box 5 - R1 = Sum Dead Load and Live Load Beam Reactions
- Box 6 - Calculate total weight of substructure
- Box 7 - R2 = Divide total weight of substructure by number of piles
- Box 8 - Determine Design Pile Load as R1 + R2
- Box 9 - Go to Flowchart for Pile Load
- If Beams are not centered over piles, thenBox 10 - Calculate Beam Dead Load Reaction
- Box 11 - Determine Design Truck (use Flowchart for Determining Design Truck)
- Box 12 - Calculate Beam Live Load Reactions using Lever Rule and controlling lane configuration
- Box 13 - Calculate distributed load of substructure
- Box 14 - Determine Pile Load by performing a frame analysis of the bent, using calculated dead and live load reactions, and distributed load of cap
- Box 15 - Go to Flowchart for Pile Load
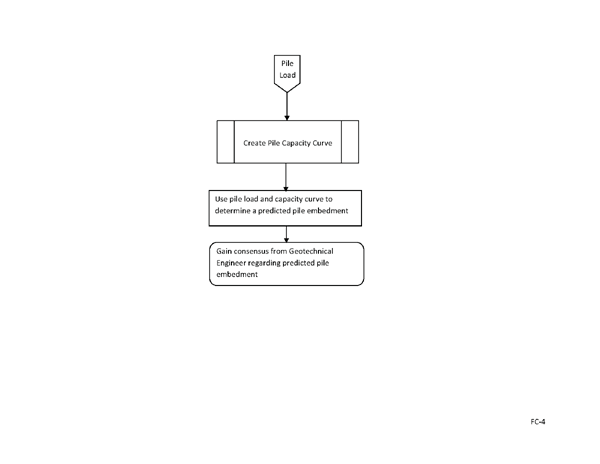
Pile Load Flowchart
- Box 1 - Create Pile Capacity Curve
- Box 2 - Use pile load and capacity curve to determine a predicted pile embedment
- Box 3 - Gain consensus from Geotechnical Engineer regarding predicted pile embedment
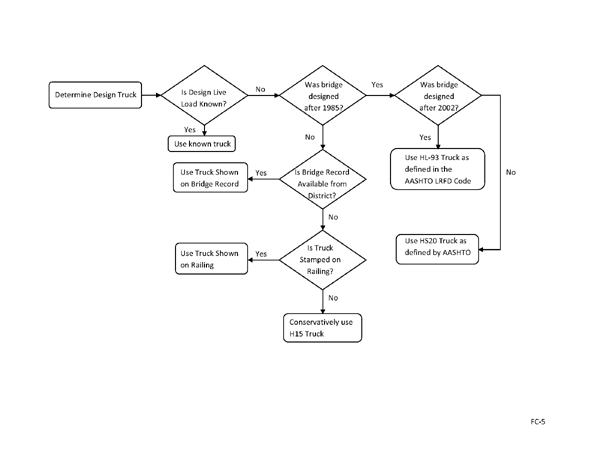
Determine Design Truck Flowchart
- Decision Box 1 - Is Design Live Load Known?
- If Decision Box 1 is yes, go to Box 2 - Use known truck
- If Decision Box 1 is no, go to Decision Box 3 - Was bridge designed after 1985?
- If Decision Box 3 is yes, go to Decision Box 4 - Was bridge designed after 2002?
- If Decision Box 4 is yes, go to Box 5 - Use HL-93 Truck as defined in the AASHTO LRFD Code
- If Decision Box 4 is no, go Box 6 - Use HS20 Truck as defined by AASHTO
- If Decision Box 3 is no, go to Decision Box 7 - Is Bridge Record Available from District?
- If Decision Box 7 is yes, go Box 8 - Use Truck Shown on Bridge Record
- If Decision Box 7 is no, go to Decision Box 9 - Is Truck Stamped on Railing?
- If Decision Box 9 is yes, go to Box 10 - Use Truck Shown on Railing
- If Decision Box 9 is no, go to Box 11 - Conservatively use H15 Truck