U.S. Department of Transportation
Federal Highway Administration
1200 New Jersey Avenue, SE
Washington, DC 20590
202-366-4000
Federal Highway Administration Research and Technology
Coordinating, Developing, and Delivering Highway Transportation Innovations
| REPORT |
| This report is an archived publication and may contain dated technical, contact, and link information |
|
| Publication Number: FHWA-HRT-17-042 Date: November 2017 |
Publication Number: FHWA-HRT-17-042 Date: November 2017 |
The two connection details shown in 0 and 0 were modeled with Abaqus® version 6.11-1 to explore the limit states for each of the connections.(7) This chapter discusses the details of how the connections were modeled and the various inputs that were used within the model.
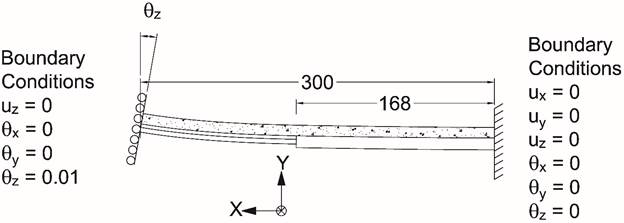
A total of 5 load/boundary condition scenarios were investigated for each of the connection designs (i.e., a total of 10 models). The five scenarios were (1) pure positive moment, (2) pure negative moment, (3) high shear, (4) combined shear and positive moment, and (5) combined shear and negative moment. The first scenario was a displacement controlled analysis of pure positive moment, as illustrated in 0, with a fixed rotation of 0.01 radians at the left support. The deck was present for this first scenario.
Source: FHWA
Figure 3. Illustration. Boundary conditions and loading for constant positive moment loading.
Where:
ux = translation in X-direction.
uy = translation in Y-direction
uz = translation in Z-direction
θx = rotation about X-axis.
θy = rotation about Y-axis.
θz = rotation about Z-axis.
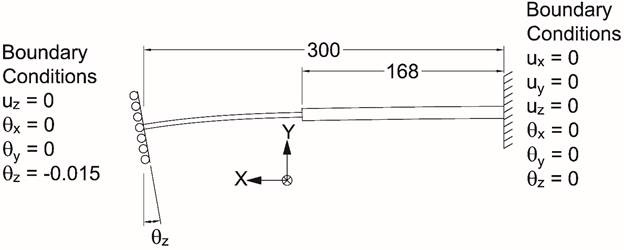
The second scenario was a displacement controlled analysis of pure negative moment, as illustrated in 0, with a fixed rotation of -0.015 radians at the left support. The deck was not present in the pure negative moment scenario.
Source: FHWA
Figure 4. Illustration. Boundary conditions and loading for constant negative moment loading.
The third scenario was the imposition of high shear with minimal moment in the splice, as shown in 0. A fixed-fixed beam with a 2.5-inch support settlement analogy was used, and this scenario forced the splice to be located 132 inches from the right support, which is the theoretical inflection point. Because the internal and external moments at the supports in the high shear scenario eventually exceeded the yield moment of the girder sections, the ends were modeled with elastic elements, as shown in the figure. It is also important to note that the deck was not present in the high shear scenario. The first three scenarios were displacement-controlled analyses because the ultimate limit state was being explored, which could be readily compared to the design demand.
The fourth scenario was a load-controlled analysis that investigated the model under a proportional application of the factored positive moment and shear (Mu,pos = 8,016 kip-ft and Vu = 1,312 kip, respectively). In this scenario, a cantilevered beam, where the right support was fixed, was used, as shown in 0. Loads were applied to the free end, which created a constant shear along the entire model, and the moments applied at the left support were chosen so that the design moment was imposed at the location of the splice. However, loads at the free end were also amplified by a factor of two so that the analysis could continue beyond the design loading. The deck was present for this scenario. Because the internal moment at the right support eventually exceeded the yield moment of the girder sections, that end was modeled with elastic elements as shown in the figure.

Source: FHWA
Figure 6. Illustration. Boundary conditions and loading for positive moment proportional loading.
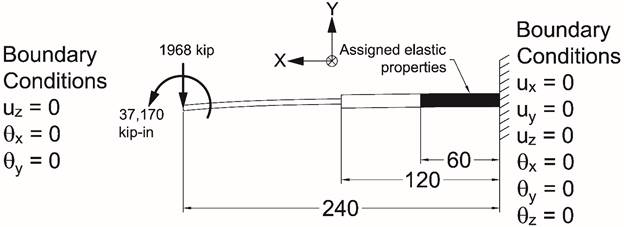
The fifth scenario was a load-controlled analysis that investigated the model under a proportional application of the factored negative moment loading in the presence of the design shear (Mu,neg = 15,185 kip-ft and Vu = 1,312 kip, respectively). The same philosophy of loading was used as in the positive moment proportional loading scenario; however, the length of the overall model was reduced, and the loads had to change. The scenario is fully shown in 0 and also used elastic elements near the fixed support.
Source: FHWA
Figure 7. Illustration. Boundary conditions and loading for negative moment proportional loading.
The 10 models were built within the preprocessor in accordance with the splice detailing shown in 0 and 0. The models were built mostly with three-dimensional shell elements for all of the plate elements, but the bolts were modeled with fastener elements described in the Fastener Properties section in this chapter.
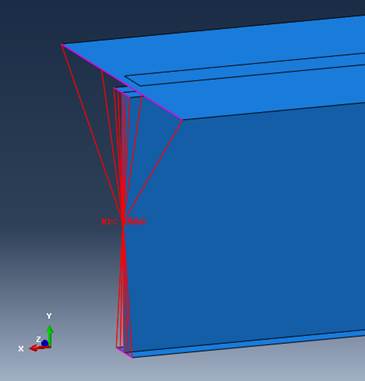
Each end of the model was kinematically constrained to a reference point located at the centroid of the girder on each end. This is shown in 0 by the lines emanating from the reference point to the entire cross section of the girder and the concrete deck. A multi-point constraint (MPC) was used to enforce the kinematic constraint; the Beam MPC was used to enforce all six degrees of freedom to be the same on the cross section as the reference point. This essentially forced plane sections to remain plane and normal. This offered the advantage that all loads and boundary conditions could be specified on just the reference point and evenly distributed to the entire cross section. For the scenarios in which the deck was not present, the MPC only constrained the portions of the model representing the girder.
Source: FHWA
Note: Only the left side is shown in the figure.
Figure 8. Illustration. Example of end kinematic constraint.
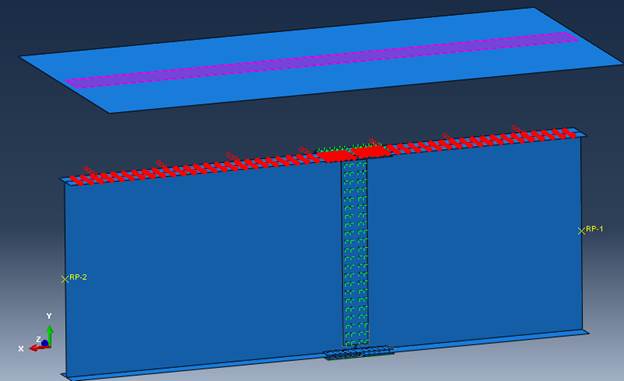
When the deck was present for some scenarios, it was modeled with elastic shell elements and assigned a thickness of 8 inches, E = 3,600 ksi, and ν = 0.2. The deck was 12 ft wide (because the girder spacing was specified as 12 ft). The deck was attached to the girders with tie constraints. This is best shown in 0, where the circles represent potential shear connector locations (four across the flange and 6-inch pitch). Any nodes within the circles are the master nodes in the constraint, and the three translational degrees of freedom are constrained between the master nodes and the slave nodes within the purple rectangle on the deck.
Source: FHWA
Note: The deck is overly offset from the girder for illustrative purposes only.
Figure 9. Illustration. Example of constraint between deck and girders.
All steel was given elastic properties of E = 29,000 ksi and ν = 0.3. For areas of the girder that were not specified as “only elastic,” they were assigned additional nonlinear material properties with an initial assumed yield stress of 50 ksi. After yielding, the steel had a strain hardening relationship as shown in 0. This model was based on real coupon data tested by FHWA but scaled so that the yield stress was ideally 50 ksi and the tensile strength was ideally 65 ksi, which are the design values for ASTM A709 Grade 50 steel.(5)
Finally, preliminary model runs experienced nonlinear geometric effects through certain buckling modes (i.e., web buckling). Because this study was trying to identify strength, not stability limit states, the final analysis results reported herein were conducted with the nonlinear geometry turned off.
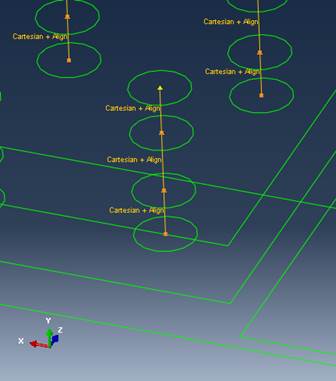
The 7/8-inch ASTM A325 bolts were modeled with discrete connector elements.(6) These are point-based elements that impose kinematic relationships between surfaces, and the connector can be assigned nonlinear properties. 0 shows an example of one connector element passing from top to bottom through an inner flange splice plate, the lower girder flange, fill plate, and outer splice plate. The “Cartesian + Align” is the combined Abaqus® connector element used to represent bolts. Furthermore, the connector element has the benefit of being applied over an influence area in each ply of the splice. In this case, an influence radius of 0.75 inch was specified, which ties the nodes within this radius on each surface to the other surfaces with the designated fastener properties. This somewhat replicates how a real nut and washer would spread load.
Source: FHWA
Figure 11. Illustration. Example connector element at lower flange of left girder with the connector passing through the inner splice, flange, fill, and outer splice plates.
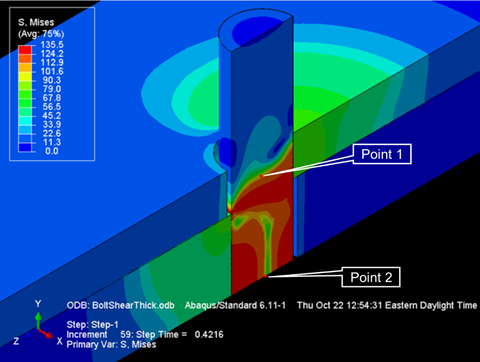
To determine the material properties of the actual connector elements, a quarter space model of a butt joint with a single pin was modeled using solid elements where the pin represented a loose bolt. A representation of this model is shown in 0. The steel plate was assigned the nonlinear material properties shown in 0, and the pin was assigned the nonlinear material properties shown in 0. Post-processing was done by outputting the z-displacement of the two red dots shown in 0 and plotting that displacement against the applied shear force. Because the girder splice models used shell elements representing mid-plane thickness, the red dots correspond to the displacement at the mid-thickness of the plates being joined. In the model shown, a 9/16-inch-thick plate was joined to a 2-inch-thick plate. The actual plot of the assumed fastener shear force and displacement values for the refined fastener model is shown in 0. It was found that an elastic stiffness of 4,000 kip/inches was appropriate based on the solid modeling. This is not shown in the plot because the plastic deformation is separated from the elastic deformation.
Source: FHWA
Figure 12. Illustration. Quarter space model of butt joint for fastener characterization.
The shear forces from the solid element model were ultimately scaled to represent the actual design strength of a 7/8-inch ASTM A325 bolt. In single shear, this bolt could have an ultimate shear resistance of 0.58(120)(π/4)(0.8752) = 41.9 kip. Therefore, the maximum shear force in the bolt was assumed to be 42 kip. This assumes that the connection length effect did not have to be included in this strength calculation because the model should capture any shear lag effects. Assuming an ultimate shear strength of 42 kip meant that the yield of the bolt was 24.3 kip according to the solid model output. The ultimate plastic deformation of the bolt was approximately 0.09 inch, which was considered reasonable compared to the bolt shear results of Moore, Rassati, and Swanson.(8) Finally, the failure criterion for the fastener elements was based on a circular yield surface with isotropic hardening. That is, an individual fastener element had two local directions of in-plane shear, and the hardening model shown in 0 was enforced to the square root sum of the squares (SRSS) of the two in-plane shear forces. The axial stiffness of the fastener was considered purely elastic with a stiffness of 10,000 kip/inches and uncoupled from the shear stiffness.
Modeling the spliced girder with three-dimensional shells and connecting them together with discrete line elements representing high-strength bolts did not fully capture the reality of a physical connection. Slip, bolt tension, and contact were not considered in the model, but rationale for their omission is provided in the following subsections.
Slip
Effectively, the way the fastener elements were defined meant that in a physical sense, each bolt was a perfect pin within a clearance hole, and the plates they connected together had no friction between them. In reality, bolts are installed in oversized holes, and, considering large bolt patterns, some bolts will initially be in bearing, and others may not. There is no good way to model the random variation in bolt hole clearance over a connection with hundreds of bolts. The models were used to investigate strength limit states, so the assumption being made relied on the inherent ductility of steel, and the shear forces on a bolt in a real connection eventually redistribute into the idealization seen in the model at the strength limit state.
Bolt Tension
The fastener definition did not consider that in bridge construction, bolts are fully tensioned. Therefore, no friction could develop between plies of the connection, and all force had to go through the bolts. In reality, there will be some load transfer through friction, so neglecting it should be a lower bound assumption. Additionally, at the strength limit state, it is doubtful whether frictional forces are prevalent.
Contact
The elements defining each ply of the connection had no contact interaction defined. The only thing maintaining separation of connection plies was the axial stiffness of the fastener elements. The ends of the left and right girder sections also did not have a contact interaction defined. Because the results were trying to define the distribution of bolt forces across the connection, contact was not believed to be highly influential.