LRFD Steel Girder SuperStructure Design Example
Bearing Design Example Design Step 6
Table of Contents
Design Step 6.1 - Obtain Design Criteria
Design Step 6.2 - Select Optimum Bearing Typ
Design Step 6.3 - Select Preliminary Bearing Properties
Design Step 6.4 - Select Design Method (A or B)
Design Step 6.5 - Compute Shape Factor
Design Step 6.6 - Check Compressive Stress
Design Step 6.7 - Check Compressive Deflection
Design Step 6.8 - Check Shear Deformation
Design Step 6.9 - Check Rotation or Combined Compression and Rotation
Design Step 6.10 - Check Stability
Design Step 6.11 - Check Reinforcement
Design Step 6.12 - Design for Anchorage
Design Step 6.13 - Design Anchorage for Fixed Bearing
Design Step 6.14 - Draw Schematic of Final Bearing Design
Design Step 6.1 - Obtain Design Criteria
For this bearing design example, an abutment bearing was chosen. It was decided that the abutment would have expansion bearings. Therefore, the bearing design will be for an expansion bearing.
Refer to Design Step 1 for introductory information about this design example. Additional information is presented about the design assumptions, methodology, and criteria for the entire bridge, including the bearing design.
The following units are defined for use in this design example:
![]()

For bearing design, the required design criteria includes:
- Longitudinal and transverse movement
- Longitudinal, transverse, and vertical rotation
- Longitudinal, transverse, and vertical loads
Most of the above information is typically obtained from the superstructure design software output, which is the case for this bearing design (first trial of girder design):
Service I limit state dead load
Service I limit state live load (including dynamic load allowance)
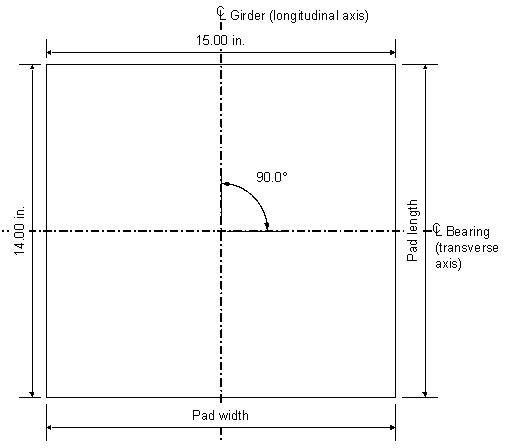
Service I limit state total rotation about the transverse axis (see Figure 6-1)
Strength limit state minimum vertical force due to permanent loads (used in Design Step 6.12)
Design Step 6.2 - Select Optimum Bearing Type
Selecting the optimum bearing type depends on the load, movement capabilities, and economics. Refer to STable 14.6.2-1 and SFigure 14.6.2-1 for guidance on selecting the most practical bearing type. For the abutment bearing design, a steel-reinforced elastomeric bearing was selected. If the loads were considerably larger, pot bearings, which are more expensive than elasomeric bearings, would be an option.
S14.6.2
Design Step 6.3 - Select Preliminary Bearing Properties
Once the most practical bearing type has been selected, the preliminary bearing properties must be defined. The bearing properties are obtained from the Specifications, as well as from past experience. The following preliminary bearing properties were selected:
Bearing Pad Configuration
Pad length (bridge longitudinal direction):
Pad width (bridge transverse direction):
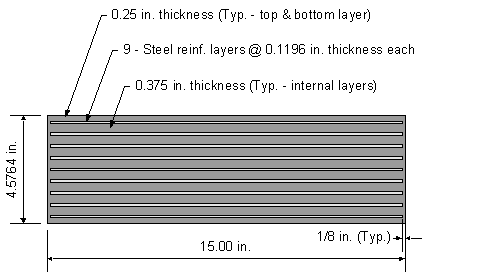
Elastomer cover thickness:
Elastomer internal layer thickness:
Number of steel reinforcement layers:
Steel reinforcement thickness:
Material Properties
S14.7.6.2 & S14.7.5.2
Elastomer hardness:
Elastomer shear modulus:
STable 14.7.5.2-1
Elastomer creep deflection at 25 years divided by the instantaneous deflection:
STable 14.7.5.2-1
Steel reinforcement yield strength:
Design Step 6.4 - Select Design Method (A or B)
For this design example, Method A will be used. Method A usually results in a bearing with a lower capacity than a bearing designed with Method B. However, Method B requires additional testing and quality control. Method A is described in S14.7.6, while Method B is described in S14.7.5.
C14.7.5.1
Design Step 6.5 - Compute Shape Factor
The shape factor for individual elastomer layers is the plan area divided by the area of perimeter free to bulge.
S14.7.6.1 & S14.7.5.1
For steel-reinforced elastomeric bearings, the following requirements must be met prior to calculating the shape factor:
- All internal layers of elastomer must be the same thickness.
- The thickness of the cover layers cannot exceed 70 percent of the thickness of the internal layers.
S14.7.6.1 & S14.7.5.1
From Design Step 6.3, all internal elastomer layers are the same thickness, which satisfies Requirement 1. The following calculation verifies that Requirement 2 is satisfied:
OK
For rectangular bearings without holes, the shape factor for the ith layer is:
S14.7.5.1
The shape factor for the cover layers is then:
The shape factor for the internal layers is then:
Design Step 6.6 - Check Compressive Stress
The compressive stress check limits the compressive stress in the elastomer at the service limit state as follows:
S14.7.6.3.2
and
The compressive stress is taken as the total reaction at one of the abutment bearings for the service limit state divided by the elastomeric pad plan area. The service limit state dead and live load reactions are obtained from the Opis superstructure output. The shape factor used in the above equation should be for the thickest elastomer layer.
Service I limit state dead load:
Service I limit state live load (including dynamic load allowance):
OK
The service average compressive stress due to live load only will also be computed at this time. It will be needed in Design Step 6.11. Again, the service limit state live load value was obtained from Opis superstructure output.
Design Step 6.7 - Check Compressive Deflection
The compressive deflection due to the total load at the service limit state is obtained from the following equation:
S14.7.5.3.3
For this design example, the instantaneous compressive strain was approximated from CTable 14.7.5.3.3-1 for 50 durometer reinforced bearings using a compressive stress of 0.899 ksi and a shape factor of 9.66.
CTable 14.7.5.3.3-1
The instantaneous deflection is then:
S14.7.5.3.3
The effects of creep should also be considered. For this design example, material-specific data is not available. Therefore, calculate the creep deflection value as follows:
STable 14.7.5.2-1
The total deflection is then:
The initial compressive deflection in any layer of a steel-reinforced elastomeric bearing at the service limit state without dynamic load allowance shall not exceed 0.07hri.
S14.7.6.3.3
In order to reduce design steps, the above requirement will be checked using the deflection calculated for the service limit state including dynamic load allowance. If the compressive deflection is greater than 0.07hri, then the deflection without dynamic load allowance would need to be calculated.
OK
Design Step 6.8 - Check Shear Deformation
The shear deformation is checked to ensure that the bearing is capable of allowing the anticipated horizontal bridge movement. Also, the shear deformation is limited in order to avoid rollover at the edges and delamination due to fatigue caused by cyclic expansion and contraction deformations. The horizontal movement for this bridge design example is based on thermal effects only. The thermal movement is taken from Design Step 7.6 for the controlling movement, which is contraction. Other criteria that could add to the shear deformation include construction tolerances, braking force, and longitudinal wind if applicable. One factor that can reduce the amount of shear deformation is the substructure deflection. Since the abutment height is relatively short and the shear deformation is relatively small, the abutment deflection will not be taken into account.
S14.7.6.3.4
C14.7.5.3.4
The bearing must satisfy:
from Design Step 7.6 for thermal contraction
for the service limit state
STable 3.4.1-1 & S3.4.1
OK
Design Step 6.9 - Check Rotation or Combined Compression and Rotation
Since Design Method A was chosen, combined compression and rotation does not need to be checked. The rotation check ensures that no point in the bearing undergoes net uplift and is as follows:
S14.7.6.3.5
(associated with rotation about transverse axis)
S14.7.6.3.5d
and
(associated with rotation about longitudinal axis)
The service rotation due to the total load about the transverse axis was taken from Opis:
S14.7.6.3.5d
 |
Construction Tolerance |
The number of interior layers is:
OK
The service rotation due to the total load about the longitudinal axis is negligible compared to the service rotation about the transverse axis. Therefore, the check about the longitudinal axis will be assumed to be negligible and is not computed in this bearing design example.
Design Step 6.10 - Check Stability
The total thickness of the pad shall not exceed the least of L/3 or W/3.
S14.7.6.3.6

The total thickness of the pad based on the preliminary
dimensions is:
OK
Design Step 6.11 - Check Reinforcement
The thickness of the steel reinforcement must be able to sustain the tensile stresses induced by compression in the bearing. The reinforcement thickness must also satisfy the requirements of the AASHTO LRFD Bridge Construction Specifications.
S14.7.6.3.7
S14.7.5.3.7
For the service limit state:


OK
For the fatigue limit state:
From Design Step 6.6, the service average compressive stress due to live load only is:
STable 6.6.1.2.5-3
OK
Design Step 6.12 - Design for Anchorage
The bearing pad must be secured against transverse horizontal movement if the factored shear force sustained by the deformed pad at the strength limit state exceeds one-fifth of the minimum vertical force due to permanent loads, Psd.
S14.7.6.4
taken from Opis output
The maximum factored shear force sustained by the deformed pad at the strength limit state is obtained from Design Step 7.6, adding wind on superstructure and wind on live load. The maximum shear force will occur when wind is taken at 0 degrees.
The shear force due to wind on superstructure is taken from Table 7-1:
The shear force due to wind on live load is taken from Table 7-2:
The controlling shear force is either from Strength III or Strength V:
Factored shear force per bearing for Strength III:
STable 3.4.1-1
STable 3.4.1-1
Factored shear force per bearing for Strength V:
STable 3.4.1-1
STable 3.4.1-1
Use:
Since the maximum shear force at the strength limit state does not exceed one-fifth of the minimum vertical force due to permanent dead loads, the pad does not need to be secured against horizontal movement.
Design Step 6.13 - Design Anchorage for Fixed Bearings
The abutment bearings are expansion in the longitudinal direction but fixed in the transverse direction. Therefore, the bearings must be restrained in the transverse direction. Based on Design Step 6.12, the expansion bearing pad does not need to be secured against horizontal movement. However, based on S3.10.9.2, the horizontal connection force in the restrained direction cannot be less than 0.1 times the vertical reaction due to the tributary permanent load and the tributary live loads assumed to exist during an earthquake. In addition, since all abutment bearings are restrained in the transverse direction, the tributary permanent load can be taken as the reaction at the bearing. Also, γEQ is assumed to be zero. Therefore, no tributary live loads will be considered. This transverse load will be used to design the bearing anchor bolts for this design example.
S14.8.3.1
S3.10.9.2
C3.4.1
For the controlling girder (interior):
The maximum transverse horizontal earthquake load per bearing is then:
The factored shear resistance of the anchor bolts per bearing is then:
S14.8.3.1 & S6.13.2.7
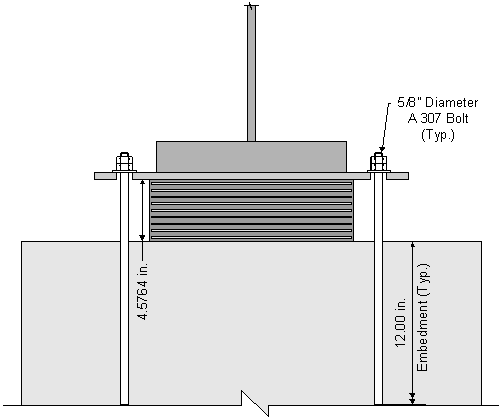
Assume two 5/8" diameter A 307 bolts with a minimum tensile strength of 60 ksi:
S6.4.3
for threads excluded from shear plane
S6.13.2.7
resistance factor for A 307 bolts in shear
S6.5.4.2
(number of bolts)


OK
Once the anchor bolt quantity and size are determined, the anchor bolt length must be computed. As an approximation, the bearing stress may be assumed to vary linearly from zero at the end of the embedded length to its maximum value at the top surface of the concrete. The bearing resistance of the concrete is based on S5.7.5.
S14.8.3.1 & C14.8.3.1
S5.7.5
Assume:
(conservative assumption)
for bearing on concrete
S5.5.4.2.1
The total transverse horizontal load is:
The transverse load per anchor bolt is then:
Using the bearing stress approximation from above, the required anchor bolt area resisting the transverse horizontal load can be calculated.
A1 is the product of the anchor bolt diameter and the length the anchor bolt is embedded into the concrete pedestal/beam seat. Since we know the anchor bolt diameter, we can now solve for the required embedment length.
Individual states and agencies have their own minimum anchor bolt embedment lengths. For this design example, a minimum of 12 inches will be used.
Use:
Design Step 6.14 - Draw Schematic of Final Bearing Design

Figure 6-1 Bearing Pad Plan View

Figure 6-2 Bearing Pad Elevation View

Figure 6-3 Anchor Bolt Embedment
| << previous | Contents | next >> |


