U.S. Department of Transportation
Federal Highway Administration
1200 New Jersey Avenue, SE
Washington, DC 20590
202-366-4000
Federal Highway Administration Research and Technology
Coordinating, Developing, and Delivering Highway Transportation Innovations
| TECHBRIEF |
| This techbrief is an archived publication and may contain dated technical, contact, and link information |
| Publication Number: FHWA-HRT-12-060 Date: October 2012 |
Publication Number: FHWA-HRT-12-060 Date: October 2012 |
PDF files can be viewed with the Acrobat® Reader®
FHWA Publication No.: FHWA-HRT-12-060
NTIS Accession No. of the report covered in this Tech Brief: PB2012-111829
FHWA Contact: Justin Ocel, HRDI-40, (202) 493-3080, justin.ocel@dot.gov
This document is a technical summary of the unpublished Federal Highway Administration (FHWA) report, Feasibility of Nondestructive Crack Detection and Monitoring for Steel Bridges, available through the National Technical Information Service (NTIS) at www.ntis.gov.
FHWA has completed a multiyear study of systems and techniques to identify and characterize cracks in steel bridge structures. The study was conducted by FHWA’s Nondestructive Evaluation (NDE) Laboratory at the Turner-Fairbank Highway Research Center in McLean, VA. The study, called the Steel Bridge Testing Program, was authorized under the 2005 Safe, Accountable, Flexible, Efficient Transportation Equity Act: A Legacy for Users.(1)
Steel bridges account for approximately one-third of the more than 600,000 bridges in the United States. While visual inspection has long been a major component in steel bridge inspection programs, it has limitations. A general objective of the study was to investigate technological options and improvements for steel bridge inspection approaches focused on crack detection and monitoring. Specifically, the legislation dictated the program should, “… test steel bridges using a nondestructive technology that is able to detect growing cracks, including subsurface flaws as small as 0.010 inches in length or depth, in the bridges.”(Title V, Sec. 5202 (d)) (1)
Fatigue cracks in steel bridge structures are generally considered to be either dormant or active. Dormant cracks do not propagate over time under cyclic loadings. These cracks may have already propagated to the point where the applied stress range has been reduced through redistribution to cease crack growth. Active cracks change in length over time as loads are repetitively applied to the bridge structure. Active cracks, if not properly addressed, can grow to a critical size and result in a fracture, which is a sudden extension of a crack that may completely sever a member.
Two types of nondestructive crack inspection technologies were defined for this study: crack detection and crack growth detection. Crack detection technology is able to detect the presence of a crack and define its geometric characteristics in a structure, including its length, depth, and orientation. Crack growth detection technology is able to determine the state of a fatigue crack (dormant or active) in a structure or structural member under common fatigue loadings. Identification of a crack tip via crack detection technology may be a necessary precursor to the engagement of a crack growth detection technology. Crack growth rates can be estimated through either continuous monitoring or discrete measurements made over periodic time intervals.
This study was conducted in three stages: (1) identification and procurement of several commercial or prototypical products for crack detection or crack growth detection, (2) laboratory evaluation of these products, and (3) field evaluation at a bridge site.
Five products were selected during the identification and procurement stage. Two additional products owned by the FHWA NDE Laboratory were later added, but they were evaluated only during the field evaluation stage and not during the laboratory evaluation stage. The seven products represented the following four types of NDE technologies: (1) phased array ultrasonic testing (PAUT) systems, (2) eddy current (EC) systems, (3) electrochemical fatigue sensors (EFSs), and (4) acoustic emission (AE) systems. PAUT and EC systems were categorized as crack detection technologies, although the crack growth detection abilities of one EC system were also evaluated. EFS and AE systems were categorized as crack growth detection technologies. The technology categories, NDE technologies, and generic system identifications are shown in table 1.
There were no notable differences between the two PAUT systems other than their manufacturers. One had more technological features for certain types of scanning not used in this project. As a result, the capabilities of each can be considered equal. As for the three EC systems, EC-2 and EC-3 were very similar to each other, using conventional EC probes, although they each used a specific probe that the other could not. The EC-1 system was much different, using a flexible sensor array, which captured both conducting and magnetic properties at the same time.
It is important to note that the results attained during this study reflect the capabilities of the systems at the time they were acquired. Any technological innovations made by the individual manufacturers to expand or enhance system capabilities after the original system procurement were not incorporated into this study. Also, the focus of this study was not to quantify the probability of detection of the various technologies.
| Category | Technology | Product |
| *These systems were originally not part of the study, but since they were already owned by the FHWA NDE Laboratory, they were evaluated during the field testing phase. |
||
| Crack detection | PAUT | PAUT-1 |
| PAUT-2* | ||
| EC | EC-1 | |
| EC-2 | ||
| EC-3* | ||
| Crack growth detection | EFS | EFS-1 |
| AE | AE-1 | |
| EC | EC-1 | |
The laboratory evaluation stage of the study used several types of test specimens, including modified ASTM E399-90 center-cracked tension specimens (also called C(T) specimens), welded plates with manufactured defects, and a full-scale bridge girder system.(2) The plates with manufactured defects had crack-like flaws, with some being surface-breaking and some subsurface, and had lengths ranging from 0.04 to 1.20 inches and heights ranging from 0.04 to 0.4 inches.
The bridge selected for field evaluations was the eastbound I-70 Antietam Creek bridge near Hagerstown, MD. The bridge is a three-span, continuous, straight, hot-rolled beam structure with six lines of girders that were erected in 1968. The end spans are each 72 ft long, and the middle span is 90 ft long. The bridge has a history of cracking problems, and routine inspections by the Maryland State Highway Administration have identified fatigue cracks at many of the web gap locations. A suspended scaffolding system was constructed at the bridge site to provide periodic access to the bridge without requiring traffic control. The scaffolding system enables easy access to selected fatigue cracks in the middle and west spans. Figure 1 shows the underside of the bridge, particularly the middle span.
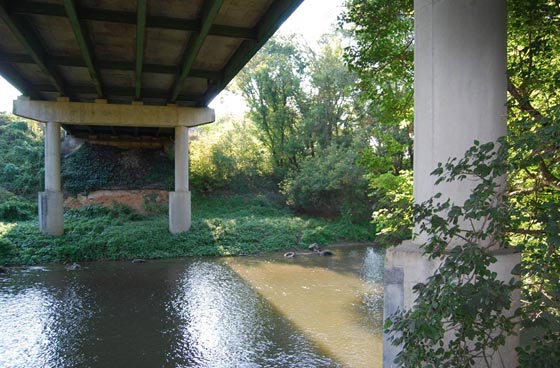
Figure 1. Photo. Underside of middle span of eastbound I-70 Antietam Creek bridge.
PAUT systems are capable of detecting both subsurface and surface cracks in a structural member. They can also detect slag inclusions, porosity, and lack of fusion. Two PAUT systems were tested in the study, although the PAUT-2 system was only used on the Antietam Creek bridge.
PAUT systems are advanced ultrasonic inspection systems that contain arrays of multiple single-element ultrasonic transducers. The array instrumentation pulses individual elements using precalculated time delays that can provide electronic steering and focusing of ultrasonic beams.(3) The use of multiple transducers allows cross sectional images to be assembled to help visualize the flaw. For instance, a schematic illustration of a butt weld showing the orientation of the typical output scan views is shown in figure 2.
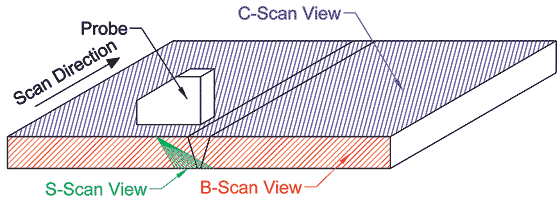
Figure 2. Illustration. Test specimen and the orientation of the different scan output options.
The laboratory evaluation of the PAUT-1 system indicated a practical detection threshold of about 0.04 inches for the instrumentation, transducers, and specimens used. Fabricated flaws with lengths of 0.04 inches were detected, but the accuracy of the estimated length was poor. Cracks with lengths over 0.40 inches were detected with better accuracy, with a few exceptions involving oversized estimates.
Estimates were dependent on the experience of the inspector and his/her ability to clearly distinguish the features of the flaw. The system was moderately sensitive to defect geometry. The detection capability of the PAUT system was not significantly affected by the presence of well-bonded and relatively thin coatings (0.01 to 0.012 inches or less).
In the field tests, the geometry of the cracks encountered at the test bridge posed a challenge in accurately sizing the cracks due to their horseshoe shape. Using either of the two systems (PAUT-1 or PAUT-2), the crack tips could be identified with sectorial scan images. Further development of scan plans is needed to capture and merge the different sections of the horseshoe-shaped cracks to attain a three-dimensional representation of the cracks.
With proper scan planning, field deployment of PAUT systems can be achieved. Those developing scan plans will require advanced qualifications. American Society for Nondestructive Testing level III certification in ultrasonic testing and significant experience in PAUT is recommended. For many of the simpler structural configurations, such as in-plane butt welds and tee joints, scan plans prepared by those with proper qualifications may be implemented by less-trained field personnel.
Three EC systems were tested as a crack detection technology. The EC-2 and EC-3 systems were handheld, single-sensor systems, and the EC-1 system used an advanced multi-channel meandering winding magnetometer (MWM) array sensor.
EC testing uses principles of electromagnetism as the basis for conducting examinations of metallic specimens.(4,5) ECs are alternating electrical currents, usually of high frequency, that can be induced to flow in any metallic section. The change induced in the flow pattern is indicative of the presence of cracks or other discontinuities in the materials. EC testing is not a volumetric technique and can only detect the presence of surface and subsurface defects. Surface defects include fatigue cracks and irregularities from corrosion. Subsurface defects include inclusions, voids, and cracks. The EC technique is usually applied to relatively small localized areas. The size and orientation of the flaws influence the probe selection and scan method.
The conventional handheld EC systems evaluated in this research include an absolute probe and a differential probe. Absolute probes have a single test coil that is used to generate the ECs and sense changes in the EC field. Differential probes have two active coils usually wound in opposition. When the two coils are over a flaw-free area of test sample, there is no differential signal developed between the coils since they are both inspecting identical material. When one coil is over a defect and the other is over a uniform section of the material, a differential signal is produced. Both systems using the handheld single-sensor systems (EC-2 and EC-3) could only detect cracks and could not provide any physical or geometric crack attributes.
In contrast, the EC-1 system with the MWM array sensor and a position encoder could detect and determine crack length. Two different arrays were used in the study, although both were designed to measure properties such as electric conductivity and magnetic permeability of conducting materials.
Figure 3 provides an example permeability contour plot from a scan by the EC-1 system taken at an angle to a specimen butt-weld. The two axes of the plot are in terms of horizontal and vertical locations of each data point provided from the position encoder, and the color scale represents the permeability plotted on a scale of 14 relative units. Indications were highlighted in red by applying a threshold of permeability, which was roughly 4 to 4.5 relative units above the base and weld permeability. Permeability contour plots such as these were able to determine the location and length of the manufactured flaws.
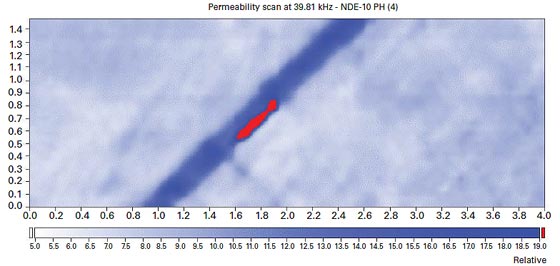
Figure 3. Graph. Permeability scan of butt-weld specimen by EC-1 system.
The EC-2 and EC-3 systems with both absolute and differential probes were used to conduct measurements on laboratory specimens with engineered flaws and on an in-service bridge. The differential probe performed better on laboratory specimens and on in-service bridge measurements when the paint was removed. Both probe types were not effective in bridge locations with rough surfaces or on areas that had a bridge coating, which is a common condition that inspectors face. EC systems are sensitive to how far above the surface the probe is, which is referred to as the “lift-off effect.”
The EC-1 system was able to scan laboratory specimens without any significant lift-off effects. It also performed very well on laboratory specimens with a bridge coating, and the coating had no substantial effect on the detection results. The system could determine crack length for cracks as small as 0.04 inches in laboratory specimens. Due to the equipment size and configuration, the procured EC-1 system was not used in the field testing phase, although the manufacturer has since improved the system by shrinking some of the components to make it easier to use for field deployment.
The EFS-1 system used electrochemical principles to expose microplasticity in the inspected area to determine the presence of actively growing fatigue cracks.(6) At each test location, the installation consisted of a pair of electrolyte-filled sensors, namely a crack measurement (CM) sensor and a reference (R) sensor, which communicate wirelessly with a base station connected to a laptop computer for data acquisition and analysis.
The CM sensor must be placed over the crack tip, and the R sensor must be placed over an area close to the CM sensor in similar or identical stress zones. Therefore, if the fatigue crack is in an area with a high stress range gradient, the system may not be reliable. The sensor containers are filled with an electrolyte through filler and vent tubes, which are then sealed. A constant voltage is applied to each sensor and forms an electrochemical cell for each sensor that confines an enclosed area over the exposed steel surface.
The energy ratio (ER) is the ratio of the area under the frequency domain spectrum curve of the CM sensor to the area under the R sensor frequency domain spectrum curve. According to the manufacturer, an actively growing crack is predicted when ER is greater than 2.0. An ER less than 1.57 indicates neither microplasticity nor crack growth activity. The transition from microplasticity to the potential occurrence of an actively growing crack is predicted quantitatively by ERs in the range of 1.57 to 1.94 and indicates an elevated risk for future crack initiation. The spectrum difference (SD) is a statistically calculated quantity that measures the similarity between the two sensor signals. SD is used to detect crack growth activity in the inspection area when ER is less than 2.0. An indepth analysis of the signal is often required to more precisely determine if the frequency content and the amplitude of the CM sensor signal indicate crack growth behavior; SD often aids in making this determination. Figure 4 shows a typical plot illustrating the data from the monitored growth of a crack using a clip gauge to ascertain the true crack growth and the ER/SD data from the EFS system. The crack tip in the plot was initially 1.2 inches away from the EFS CM sensor, and, at the applied load settings, the crack tip grew into the CM sensor after 25 h. In this particular case, the EFS-1 system predicted a growing crack validated against the clip gauge data; however, the crack tip was not enclosed within the CM sensor through the entire test.
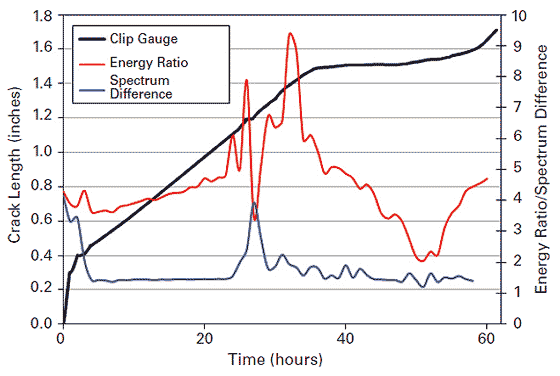
Figure 4. Graph. Typical plot of monitored crack growth, ER, and SD.
For reliable EFS detections, the R sensor must be placed in a region of stress similar to that of the CM sensor and along the direction of expected crack growth. This requirement may often be difficult to assess in real bridge members under field conditions. Conventional visual inspection and other NDE methods are necessary prior to using the technology to identify suspected crack and crack tip locations. Also, the manufacturer’s guidance to mount both sensors along the direction of suspected crack growth was compromised to ensure consistent current levels in the CM and R sensors in the field evaluation stage. Installing EFS sensors requires removing paint and rust, which can be a difficult task around some welded connections. Additionally, the bare metal must be coated after data collection to prevent future corrosion.
Where space permits, EFS sensors can be installed directly on the weld area to identify growing cracks in the weld, either crown or toe. Care must be exercised, however, in identifying unknown fatigue cracks on the weld toe or crown since EFS can incorrectly interpret weld imperfections as growing fatigue cracks, as the system did with weld porosity on one large-scale girder detail. The installation of the sensors over the weld area during bridge field inspection presents challenges. At locations where the crack was retained within the weld toe, it was difficult to install the sensors using just the adhesive on the sensor to ensure the electrolyte did not leak out. The manufacturer recommended using additional sealant or hot glue sticks to confine any leakage of the electrolyte.
In laboratory tests, the EFS system identified growing cracks in cyclic loaded C(T) specimens, provided that the crack tips were correctly enclosed by the CM sensor. However, once the crack propagated through the CM sensor, the system still predicted a growing crack condition. This highlights the sensitivity of the system to proper crack tip identification and CM sensor placement. However, for some C(T) specimens, the system incorrectly predicted crack growth when the stress-intensity range at the crack tip was small and was not likely to overcome crack closure effects. C(T) specimens were tested at varying temperature ranges, and the system correctly predicted growth between 35 and 110 °F. At higher temperatures, the electrolyte gel dried out faster, generally within 1 to 3 days, depending on the ambient temperature and the crack opening status. Thus, in the absence of frequent maintenance, the EFS sensors could not be left in place for long-term monitoring. Test results from the cruciform specimens showed that the EFS system’s predictions of growing cracks were in agreement with visual inspections at the test locations. In the field testing phase, the system predicted growing and not growing conditions at various locations. However, no baseline data using proven measurement methods were available to correlate the predictions in the field.
AE is the rapid release of energy in the form of a transient elastic stress wave generated by an acoustic source, such as crack propagation, crack fretting, and friction.(7) The stress wave can be detected and recorded by AE instrumentation by “hearing” the sound waves generated by the stress-induced events in a material. An entire structure can potentially be monitored from a few locations while the structure is still in service.
A representative test result from the data collected on a cruciform specimen is shown in figure 5. This plot shows the number of AE events recorded on the y-axis relative to the time on the x-axis.
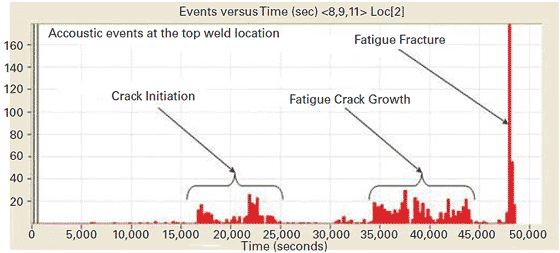
Figure 5. Graph. Distribution of acoustic events over time.
Advantages of the AE-1 system are that it did not require direct access to a crack once the sensors were installed. Additionally, it could be used for continuous monitoring even though it could only estimate crack growth activity. This technology, therefore, has to be used in conjunction with other NDE methods in order to size the defects and obtain other quantitative information.
The results from the tests on the large scale bridge girder system and the cruciform specimens yielded accurate identification on the state of the cracks (active or dormant). The tests on C(T) specimens did not demonstrate an ability to detect fatigue crack growth activity. The instrumentation and data transmission of the AE system required expertise in order to set up the sensors. The wireless transmission of data from the test site to remote servers was successful without any loss of data.
The results from the field tests carried out at the bridge site indicated no major AE activity on any of the monitored locations. The relatively higher AE activity at two locations could be due to the fretting of the existing cracks, although this could not be conclusively determined. Another drawback of AE stemmed from loud service environments that contributed extraneous noise to the signals. For successful applications, signal discrimination and noise reduction are crucial.
The EC-1 system with a different sensor array than that used for crack sizing was evaluated for crack growth detection capabilities, although the evaluation was limited. This sensor includes numerous MWM sensors mounted in a linear array that could be mounted in front of a propagating crack.
Only one C(T) specimen was evaluated for crack growth detection. The sensor was mounted 0.1 inches in front of the crack tip. The expectation was that the sensing elements would sense permeability changes in sequence. The crack growth detection capability of the MWM array appears to be promising but inconclusive since there was only one data point.
In the study, two comparisons between products were discussed. One comparison involved the crack detection technologies of the PAUT and EC systems. The other comparison involved the crack growth detection technologies of the EFS and AE systems.
None of the three crack detection systems that were used to inspect the plates with manufactured defects (PAUT-1, EC-1, and EC-2) could reliably detect surface cracks smaller than 0.04 inches. The PAUT-1 system was able to locate the smaller flaws of 0.04 inches in length but tended to overestimate their size. The presence of a well-bonded bridge coating had a more pronounced effect on the EC-1 system for these small flaws.
All three systems detected surface cracks greater than 0.04 inches in length. Also, the presence of a well-bonded bridge coating did not affect the flaw detection capabilities for these larger cracks. The flaw sizes were typically overestimated. This overestimating tendency was more prominent in results from the PAUT-1 system than from either EC system.
The primary advantage of the PAUT-1 system was its ability to detect subsurface and internal cracks. In addition to the length of the flaws, the depths and heights of the flaws could also be estimated. The EC-1 system could only determine the length of the flaw and could not provide any information on crack height.
Overall, the EFS-1 system was more sensitive to fatigue crack initiation and small crack growth during the early stages of testing (less than 1.5 h) than the AE-1 system. The AE system took almost twice as long before registering major activity.
Conversely, the AE-1 system was capable of tracking the history of crack growth activity over a long period of time as the life of an EFS-1 sensor was on the order of days. Fatigue crack growth is not a continuous phenomenon, and the periods of crack growth activity are better identified by the AE-1 system data compared to the EFS-1 system. Consequently, the AE-1 system appeared to have a potential advantage as a local or global crack growth monitoring tool in steel bridge structures.
|
Researchers—This study was initiated by Wiss, Janney, Elstner Associates, Inc., Northbrook, IL, Contract No. DTFH61-02-C-00045 and was completed by Engineering and Software Consultants, Inc., Chantilly, VA, Contract No. DTFH61-08-D-000014. Distribution—The report covered in this TechBrief is being distributed through the National Technical Information Service at www.ntis.gov. Availability—This TechBrief may be obtained from the FHWA Product Distribution Center by email to report.center@dot.gov, fax to (814) 239-2156, phone to (814) 239-1160, or online at https://www.fhwa.dot.gov/research. Key Words—Nondestructive evaluation, Phased array ultrasonic, Eddy current, Acoustic emission, Electrochemical, Fatigue, Steel bridge. Notice—This document is disseminated under the sponsorship of the U.S. Department of Transportation in the interest of information exchange. The U.S. Government assumes no liability for the use of the information contained in this document. The U.S. Government does not endorse products or manufacturers. Trademarks or manufacturers’ names appear in this TechBrief only because they are considered essential to the objective of the document. Quality Assurance Statement—The Federal Highway Administration provides high-quality information to serve Government, industry, and the public in a manner that promotes public understanding. Standards and policies are used to ensure and maximize the quality, objectivity, utility, and integrity of its information. FHWA periodically reviews quality issues and adjusts its programs and processes to ensure continuous quality improvement. |