U.S. Department of Transportation
Federal Highway Administration
1200 New Jersey Avenue, SE
Washington, DC 20590
202-366-4000
Federal Highway Administration Research and Technology
Coordinating, Developing, and Delivering Highway Transportation Innovations
 |
| This report is an archived publication and may contain dated technical, contact, and link information |
|
Publication Number: FHWA-HRT-06-089
Date: July 2006 |
PBCAT-Pedestrian and Bicycle Crash Analysis ToolVersion 2.0PDF Version (14.7 MB) PDF files can be viewed with the Acrobat® Reader®
CHAPTER 4. APPLICATION PREFERENCES
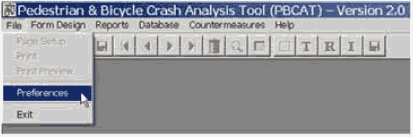
User profiles and database options can be customized to meet the needs of any agency or individual user. Preferences for the application can be accessed from the File menu, as shown in figure 7. Once accessed, the user can create and select databases and data entry forms; select, create, and edit database fields; establish user profiles; and set range parameters for analysis reports involving age and speed variables. The administrator may also create different profiles for different users for management and security purposes. The remainder of this chapter provides detailed instructions for all options associated with each tab on this window.
Figure 7. Image. Set database options and user profiles.
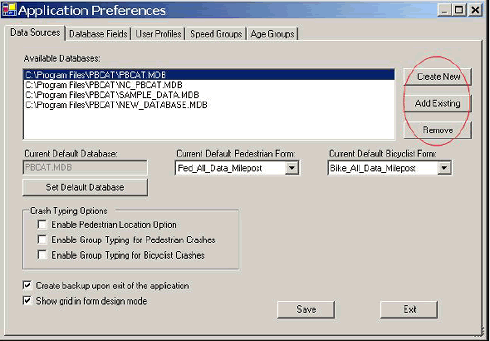
DATA SOURCESThe Data Sources tab includes options for the user to create a new database, add an existing database, or remove a database that is no longer needed. The steps involved in creating a new database were covered in chapter 3 in the section on quick start steps. Also covered in that section were the steps to set the default database and choose default data entry forms for pedestrian and bicyclist crashes. These defaults will be used for data entry when the Pedestrian and Bicyclist buttons are selected on the tool bar. Each database can have more than one form for data entry, so it is important to select the appropriate form in addition to the correct database. More information can be found in chapter 5 on the creation and design of data entry forms.
Figure 8. Image. Create, add an existing, or remove a database.
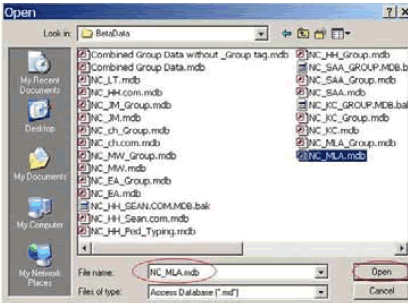
Special Note: PBCAT.MDB is the default database for the application. The text fields in this database, as well as the aliases for all noncrash type fields, can be changed. Once such changes are made, the original default database that is loaded with the application will no longer exist in the PBCAT directory. However, it can be retrieved from the PBCAT Web site at www.walkinginfo.org/pbcat. The Add Existing button is used to add to the list of available databases an existing database that was created in this version (Version 2.0) of the software. A click on this button will open a window to allow the user to browse the computer and select the database to be added. Once the file is selected, click Open to add the database to the list. (See figure 9.) This feature will be useful for adding databases when PBCAT is installed on a new local computer. For example, PBCAT may have been installed on a computer for User A, who created a database for typing local pedestrian crashes and saved it to the network drive. Much of the data entry will be done by a second user on a different computer. When PBCAT is installed on the second computer, User B will need to access this network drive and add this database to the list of available databases by following the steps just described. User B can then set this database as the default database, choose the appropriate data entry forms, and begin entering data.Note, while both users will have access to the same database on the network drive, the application is not designed to allow simultaneous data entry. If there is a need to have multiple data entry personnel, each person can enter data into a unique database. These databases can then be merged within Microsoft Access. Use the Add Existing button to add the merged database to the list of available databases in PBCAT.
Figure 9. Image. Search for and open a database to be added.
Removing a database that is no longer needed or may have been created in error is done by clicking on the database in the list of available databases and then clicking Remove. A confirmation window will appear. A click on Yes will remove the database from the List of Available Databases. However, the Access file will not be deleted. Thus, the database can be added back to the list at a later time. If the file itself needs to be removed, use Windows Explorer to locate and delete the file.
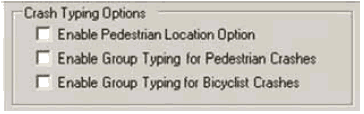
Crash Typing OptionsCrash typing is a part of the data entry process and is accessible after a pedestrian or bicyclist data entry form is opened. Crash typing requires the user to input answers to questions and directives on a series of screens. The number of questions and directives is determined by the crash typing options selected for a particular database. The options available are shown on the Data Sources tab and can be turned on and off by clicking on the adjacent checkboxes, shown in figure 10. Each option is described in more detail in the following sections. Be sure that the database for which options are being set is shown in the Current Default Database window.
Figure 10. Image. Enable or disable pedestrian location option and group typing options.
Pedestrian Location The Pedestrian Location Option provides the user with the ability to add details regarding the specific location of pedestrian crashes at or near intersections. If this option is selected, the crash typing logic includes a series of questions related to the direction and maneuvers of the motorist and pedestrian for intersection and intersection-related crashes. One of the crash typing examples included in chapter 6 makes use of this option. The answers are stored in the following fields in the database and may prove useful for conducting intersection-level analyses:
Drawings illustrating the scenarios are provided in appendix B for reference and use in analyses. Only Motorist_Direction (motorist’s initial travel direction before any turns) and Scenario are needed to identify the precise leg of the intersection and the maneuvers of the motorist and pedestrian. If additional variables are preferred to further define location information, the user can add other fields to the database as discussed later in this chapter. To make use of the pedestrian location data in an analysis involving specific intersections, it will be necessary to sort the data by intersection location, the ease of which will vary depending on the crash referencing system used by an agency. Those localities that use links and nodes will be able to distinguish among intersections by using their node numbers. Others may use a Route-Street Reference system in which intersections may be located by the combination of the principal street name and the reference street name. Still others may use a Route-Milepost system in which the intersections may be located by the route name and the mileposts. If intersections cannot be identified easily within an agency’s existing crash-roadway referencing system, it may be necessary to add a field in the PBCAT database that can be used as an intersection identifier. This field may be a new customized variable or a renaming of one of the existing user-defined variables. For example, the user could add a field named Intersection ID and use either a unique name or number to identify each intersection. More information on adding database fields is provided later in this chapter.
Group Typing The logic for the standard crash typing within PBCAT will produce 56 unique pedestrian crash types and 79 unique bicyclist crash types. Some users may not want the level of detail that is available with these standard crash types;they may select the Group Typing Option for pedestrian and/or bicyclist crashes. If selected, the application will use a different logic that requires the user to answer fewer questions/directives and places each crash into one of 16 pedestrian crash type groups or 20 bicyclist crash type groups. As an example of the differences in these two options, consider a collision involving a motorist overtaking a bicyclist. Within the standard crash typing logic, the crash may be coded as one of four types: 1) Motorist Overtaking—Undetected Bicyclist, 2) Motorist Overtaking—Bicyclist Swerved, 3) Motorist Overtaking—Misjudged Space, or 4) Motorist Overtaking—Other/Unknown. If the group typing option were selected, the crash would be coded as Motorist Overtaking Bicyclist. The four detailed crash types available in the standard application are collapsed into the single choice in the group application. Appendix C includes a complete list of all pedestrian and bicyclist crash groups and the unique standard crash types included in each group.
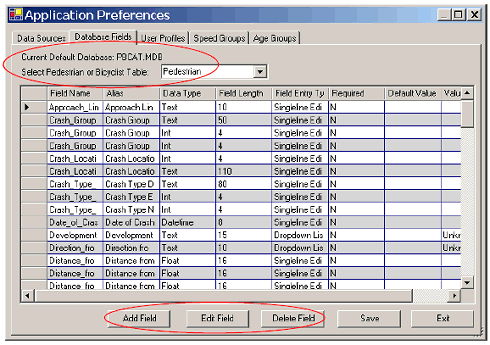
DATABASE FIELDSThe Database Fields tab allows the user to add, delete, or edit fields in the database. (See figure 11.) The data table that will appear on this screen is for the default database, which can be changed on the Data Sources tab. The user will need to select either the pedestrian or bicyclist table within the default database. Changes made in the pedestrian table will not affect the bicyclist table and vice versa. If the user wishes to make a change in the database for a field that is common to both pedestrian and bicyclist crashes, the change needs to be made in both tables. Appendix D includes complete lists of the fields included in the application’s default database (PBCAT.MDB).
Figure 11. Image. Add, delete, or edit fields in the database.
Column widths within the table may be expanded by clicking and dragging the boundary of each column heading. The entire window may be expanded in this same way, both horizontally and vertically. The default order of the fields in the table is alphabetical on the basis of the Alias column. The fields can also be sorted in either alphabetical or numerical order with a click on any of the other columns. Special Note: The user can modify the database fields at any time. However, making changes to the fields before designing data entry forms will make the form design process easier. If a database field is modified after the form is designed, be sure to review and edit the form afterwards to reflect any changes made to the database. A click on Add Field opens the window shown in figure 12 and requests the user to enter the following:
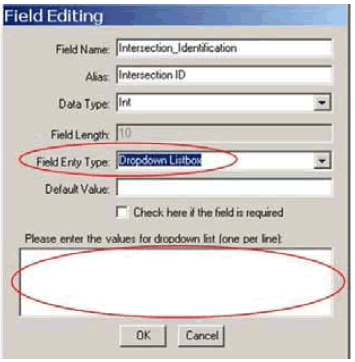
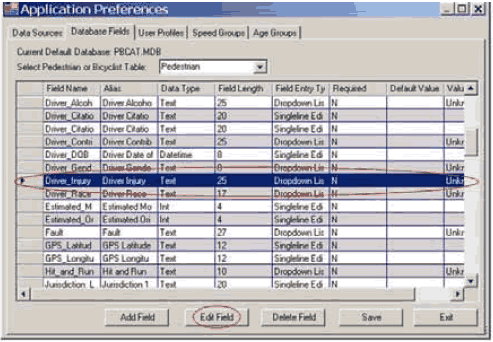
To edit an existing field, select the field by clicking on the appropriate row, and then click Edit Field. (See figure 14.). If the field is currently being used in any data entry form in the default database, a warning message will appear to let the user know an adjustment may need to be made to those forms after editing the field. A click on OK will open the field editing window. An example of when a form adjustment may be required would be if Field Length is changed from 20 to 100. The data entry box will be much larger, and the form may need to be revised to accommodate this larger box. All adjustments are made in Form Design (refer to chapter 5). The arrow keys at the bottom of the field editing window allow the user to move to the prior and next fields and make edits to multiple fields at once.
Figure 14. Image. Edit a field.
To delete a field, select the field in the same way as described for editing. Then click Delete Field. A message will appear indicating that the field and all data for this field will be deleted— are you sure? A click on Yes will remove the field from the database; No will cancel the delete operation.
Crash Typing FieldsThe database fields used for crash typing cannot be edited or deleted. These fields are completed by the software when a crash is typed and a record is saved in the data entry mode. The fields that cannot be changed are listed below. While the information is saved to these fields in the database for each typed crash record, not all fields have to be included on the data entry form. For example, if the only crash type information desired by the user is the crash type description, the pedestrian and bicyclist forms can be designed to include Crash_Type_Description and exclude all other fields. Pedestrian and Bicyclist Fields (present in both data tables)
Pedestrian Fields (not present in the bicyclist table)
Bicyclist Fields (not present in the pedestrian table)
Age FieldsThe fields for driver, pedestrian, and bicyclist age are computational fields that make use of the date of the crash and birth dates to calculate the age of the parties involved in the collision. If a birth date is not available on the crash report form, but an age is indicated, the age may be entered directly into the age field. The age and date fields used in these computations are as follows: Field (alias)
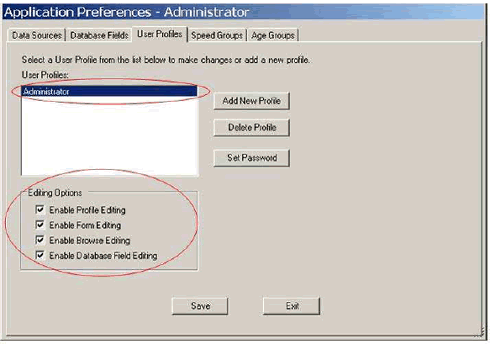
USER PROFILESOn the User Profiles tab, one can add and delete new user profiles, set passwords, and modify the editing options available to different users (See figure 15.). PBCAT is installed with a single profile for the administrator with all editing options enabled. This profile cannot be deleted.However, the editing options can be changed, and a password can be set for the administrator.
Figure 15. Image. Set user profiles, passwords, and editing options.
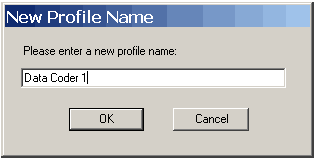
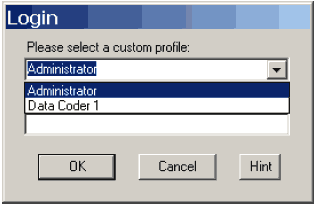
To create a new profile, click Add New Profile. A window will open to allow the profile name to be entered and saved (click OK), as shown in figure 16. Once additional profiles have been added, a Login window will appear when the PBCAT application is launched, and the user can select the appropriate profile from a dropdown list, as shown in figure 17. While it is not necessary to create additional profiles, it may be desirable to do so to limit the editing options available to different users. For example, the administrator will always need access to edit profiles and may be the only person allowed to edit data entry forms. It is desirable to prevent data entry staff from accessing other profiles or the form designer. A profile can be set up for data entry staff to limit their access to these options. (See more on the editing options below.)
Figure 16. Image. Create a new profile.
Figure 17. Image. Select a profile.
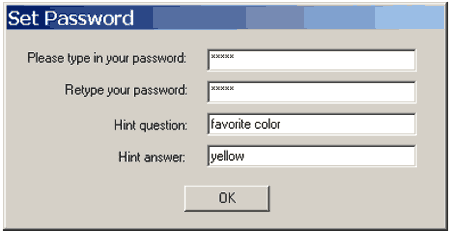
PasswordsA Password can be set for any profile. Click on the profile for which the password is desired, and click Set Password. A window will open where the password, a hint question, and hint answer can be entered. (See figure 18.) Click OK to save the entry. Passwords may be changed or deleted by following these same steps. The new password will be requested on the Login window the next time PBCAT is launched. For profiles that do not have passwords, bypass this field, and click OK to start the program.
Figure 18. Image. Enter a password and hint information.
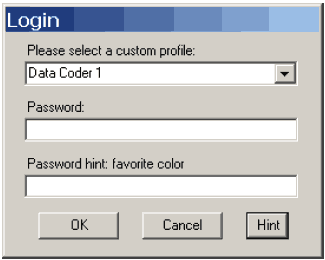
Special Note: A hint should be something that the user will not forget. All password information is encrypted and cannot be accessed. If the user has forgotten the password, click on Hint on the Login window to see the hint that was provided. (See figure 19.) A correct answer in the space below the hint will provide the user with access to the application. The user should return to the User Profiles tab in Preferences to change a forgotten password.
Figure 19. Image. Enter a password.
Editing OptionsThe editing options that may be changed for each user profile are:
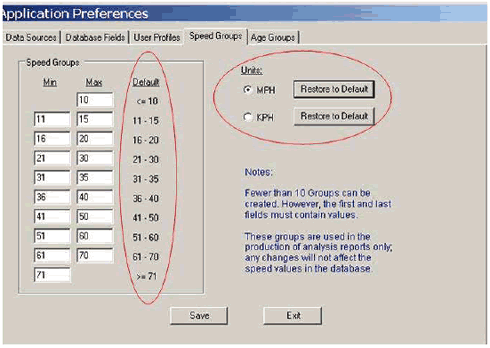
SPEED GROUPSAccessing the Speed Groups tab within the Application Preferences window allows the user to 1) select the preferred units of measurement for speed-related data and 2) establish the speed groupings that will be used in analysis reports. The units of measurement that are used for recording speeds and speed limits can be changed from miles per hour (mi/h) to kilometers per hour (km/h), which will be necessary for some jurisdictions outside the United States. Use the radio buttons beside MPH and KPH to select the units of choice, as shown in figure 20. Click Restore to Default to change the values being applied (shown in the Min and Max columns) for deriving speed groups to the values shown in the Default column.
Figure 20. Image. Set values for speed groups and choose units of measurement.
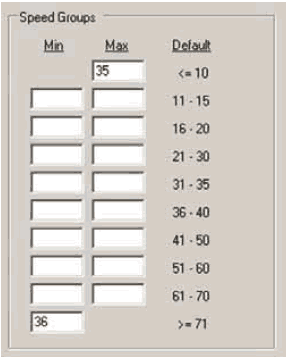
The speed groups can be customized to meet the needs of the user. The groups defined on this tab are only used to specify the category ranges for the variable Speed Group within the reports application of the software. Changing the Min and Max values will not affect the speed data for any of the records in the database. This reporting variable is derived from the data entry field Estimated_Original_Motor_Vehicle_Speed. If this field is not used, or data are not entered for this field, the Speed Group variable will only contain null values when used in reports. The default values are intended to provide the user with a reasonable means of examining the distribution of speeds of motorists involved in collisions with pedestrians and bicyclists. The user can customize the application to produce groups with different value ranges. This task is accomplished by typing the desired minimum and maximum speed values in the appropriate columns for each group. Between 2 and 10 groups can be created in this manner. The first and last fields in this table must be filled. All others can be blank if only two groups are desired, as shown in figure 21. Click Save after entering all values.The application will provide an error message if any value is present in more than one group. Correct any errors and save again.
Figure 21. Image. Establish as few as two groups.
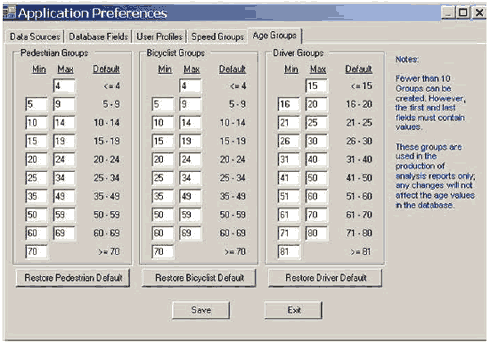
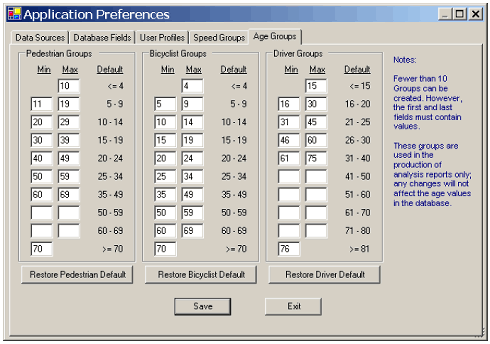
AGE GROUPSThe Age Groups tab allows the user to customize the category ranges for the variables Driver Age Group, Pedestrian Age Group, and Bicyclist Age Group within the reports application of the software. (See figure 22.) Changing the Min and Max values will not affect the age data for any of the records in the database. These reporting variables are derived from the data entry fields Driver Age, Pedestrian Age, and Bicyclist Age. If these fields are not used or data are not entered for these fields, the Group variables will only contain null values when used in reports.
Figure 22. Image. Set values for pedestrian, bicyclist, and motorist age groups.
The default values are intended to provide the user with a reasonable means of examining the distribution of ages of drivers, pedestrians, and bicyclists involved in collisions. The user can customize the application to produce groups with different age ranges. This task is accomplished by typing the desired minimum and maximum ages in the appropriate columns for each group. Between 2 and 10 groups can be created in this manner for each operator type. As shown in figure 23, the first and last fields in this table must be filled. All others can be blank if fewer than 10 groups are desired. Click Save after entering all values. The application will provide an error message if any value is present in more than one group. Correct any errors and save again.
Figure 23. Image. Set values and numbers of groups for three modes.
FHWA-HRT-06-089 |