U.S. Department of Transportation
Federal Highway Administration
1200 New Jersey Avenue, SE
Washington, DC 20590
202-366-4000
Federal Highway Administration Research and Technology
Coordinating, Developing, and Delivering Highway Transportation Innovations
 |
| This report is an archived publication and may contain dated technical, contact, and link information |
|
Publication Number: FHWA-RD-03-031 Date: JUNE 2003 |
|
TABLE
OF CONTENTS
|
|
PROFILE MEASUREMENTS USING THE FACE DIPSTICK® C.1 INTRODUCTION C.2.1 General Procedures C.3 FIELD TESTING C.3.1 General Background C.4 CALIBRATION C.4.1 General Background C.5 EQUIPMENT MAINTENANCE AND REPAIR C.5.1 General Background C.6 RECORD KEEPING C.6.1 Longitudinal Profile Measurements (DS-1 through DS-6) |
The Face Company Dipstick is a manually operated device that collects precision profile measurements at rates greater than traditional rod and level survey procedures. However, the profile obtained from Dipstick measurements may have a shift from the true profile because of systematic cumulative errors in the Dipstick readings. The body of the Dipstick houses an inclinometer (pendulum), liquid crystal display panels, and a battery for power supply. The Dipstick sensor is mounted in such a way that its axis and line passing through footpad contact points are coplanar. The sensor becomes unbalanced as the Dipstick is pivoted from one leg to the other as it is moved down the pavement, causing the display to become blank. After the sensor achieves equilibrium, the difference in elevation between the two points is displayed. Swivel footpads with a diameter of 32 mm should be used for all measurements.
Each LTPP Regional Support Contractor (RSC) has two Dipsticks; a manual Dipstick (Model 1500) and an automated Dipstick (Model 2000). Both these Dipsticks display data in millimeters. The spacing between the two feet of the Dipstick is 305 mm for both models. When the automated Dipstick is used for data collection, it should be used in manual mode, with data recorded manually.
Profile measurements on General Pavement Studies (GPS) and SPS sites that cannot be obtained using the LTPP profiler should be completed using the Dipstick. Decisions with respect to the need for Dipstick measurements at these test sections should be made on a case-by-case basis by responsible RSC personnel.
Dipstick measurements are to be taken by personnel who have been trained in using the device and are familiar with the procedures described in this manual. Data collection using the Dipstick is a two-person operation, with one person operating the Dipstick and the other person recording the data. However, a single person can collect the data if that person uses a voice activated tape recorder to record the readings.
The RSC must coordinate detailed scheduling and traffic control at test sites. Traffic control at test sites will be provided by either the State highway agency (in the United States) or Provincial highway agency (in Canada). Layout of site should not begin until all applicable traffic control equipment is in place.
Record Maintenance: The operator is responsible for forwarding all data collected during testing (see forms at the end of this appendix). In addition, the operator must forward other records related to Dipstick operation, which are described in section C.6, to the RSC.
Equipment Repairs: RSCs are responsible for ensuring that LTPP-owned equipment is properly maintained. Decisions required for proper maintenance and repair should be made based on testing schedule and expedited as necessary to prevent testing disruptions.
Accidents: In the event of an accident, inform the RSC of the incident as soon as possible after the mishap, and provide details of the event in writing to the RSC.
The following sequence of field work tasks and requirements provides an overall perspective of the typical work day at a test section.
Task 1: Personnel Coordination
Task 2: Site Inspection
Task 3: Dipstick Measurements
Task 4: Complete forms DS-1 through DS-7 for longitudinal profile measurements. Complete form DS-8 for transverse profile measurements. These forms are included at the end of this appendix.
When arriving at a site, the operator should plan activities carefully to ensure the most efficient use of time. While many activities can be accomplished only by the operator and/or recorder, it may be necessary to enlist other personnel at the site to mark wheel paths. In general, the RSC should make arrangements for this assistance in advance.
If a manual distress survey also is performed at the site, traffic control typically should be available for 6 to 8 hours. This should provide adequate time for Dipstick measurements in both wheel paths, as well as for the manual distress survey to be completed. Experienced Dipstick operators can obtain approximately 500 readings/hour.
Collecting profile data is the operator's primary responsibility. To ensure that data collected in the four LTPP regions are identical in format, certain guidelines and standards have been established for data acquisition and handling.
The pavement must be clear of ice, snow, and puddles of water before profile measurements can be taken with the Dipstick, as such conditions can affect profile measurements. Pools of water can damage electronics in the Dipstick and must be avoided, either through adjusting profiling trip schedules, or by delaying actual measurements until acceptable conditions exist.
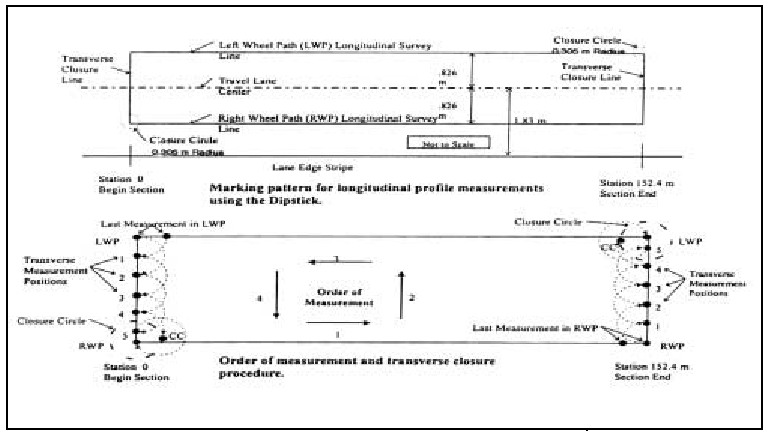
The longitudinal Dipstick measurement procedure consists of performing an elevation survey in each wheel path and using transverse measurements at the section ends to form a closed loop. As illustrated in figure C1, measurements start at Station 0+00 in the right wheel path and proceed in the direction of traffic toward the end of the section. At the end of the section, transverse measurements are made to the end point of the survey line in the left wheel path. A 0.61 m diameter closure circle around this point is used to close transverse measurements on this start location for measurements in the left wheel path. Longitudinal measurements then are performed in the left wheel path back to Station 0+00. Transverse measurements and a closure circle close the survey on the starting point. This procedure is designed for a 152.4 m test section; however, the concept can be applied to test sections of any length.
To begin Dipstick measurements, clean both wheel paths of loose stones and debris to prevent Dipstick footpad slippage during measurements. The first step in the site layout is to locate the wheel paths; each wheel path is located at a distance of 0.826 m from the center of the travel lane. Use the following procedure to locate the center of the travel lane:
Case I: Where wheel paths are easily identified, the midway point between two wheel paths should be used as the lane center.
Case II: If wheel paths are not clearly identifiable, but two lane edges are well-defined, the center of the travel lane is considered to be midway between the two lane edges.
Case III: Where wheel paths are not apparent and only one lane edge can be distinguished clearly, establish the lane center at 1.83 m from that edge.
After the center of the travel lane has been identified, use the following procedure to layout the site:
Checks to be performed on the Dipstick before testing are described in this section.
1. Check condition of footpads and replace, if necessary, with the extra set in the Dipstick case. Clean and lubricate ball and socket joints on the footpads to insure smooth pivoting of instrument. When joint is dirty, pivoting becomes difficult, and the footpad can slip. A cleaning agent such as WD-40 or a light oil for lubrication will work for the ball and socket joint.
2. If using Model 1500 Dipstick, install a fresh set of rechargeable batteries in the instrument and securely close battery compartment. The batteries in this unit have to be taken out in order to recharge them. The Model 2000 Dipstick is equipped with rechargeable batteries that can be charged while the batteries are still within the unit. If the batteries have not been charged overnight, install a fresh set of rechargeable batteries in the instrument and securely close battery compartment. Batteries in either of these units should be changed after 4 hours of usage to insure continuity of measurements. The Model 1500 Dipstick is powered with 9-volt batteries, while the Model 2000 Dipstick is powered with AA-size batteries. An extra set of rechargeable batteries should be kept available for each of these units.
3. Check and if necessary, tighten the handle on the instrument.
4. Perform zero check and calibration check, described below. According to the manufacturer, a calibration check is needed only if adjustments were required during the zero check. However, for LTPP-related measurements, both the zero and calibration checks are required when data collection begins. The Dipstick should be fully assembled, turned on, and allowed to warm up for several minutes before performing these two checks.
Manual Dipstick (Model 1500)
Zero Check (Model 1500)
Form DS-7 should be completed when this test is conducted. This test performs a zero verification. Perform the test on a smooth, clean location where the instrument can be positioned properly (the Dipstick carrying case or a flat board will suffice). After positioning the Dipstick, draw two circles around the footpads and note the reading on the display at the switch end (reading = R1). Then rotate the instrument 180° and place the footpads on the two circles that were drawn earlier; note the reading obtained at the switch end (reading = R2). If readings from the two placements (R1 and R2) add up to within +0.1 mm, the Dipstick has passed the zero check. If they do not fall within these limits, zero adjustment is necessary. The zero adjustment should be performed using the following procedure:
This is the only adjustment the operator is allowed to make on the Dipstick.
Calibration Check (Model 1500)
Dipstick calibration is fixed during manufacturing and cannot be altered by the user. The user can verify calibration against a standard calibration block that is provided with the Dipstick. After zero check and adjustments are performed, device calibration must be checked. Form DS-7 should be completed when this test is conducted. To check calibration, note the Dipstick reading and place the 3.2 mm calibration block under one of the Dipstick footpads. The reading displayed, minus 3.2, should be within +0.1 mm of the previous reading. If this tolerance is not obtained, complete a LTPP Major Maintenance/Repair Activity Report (form DS-10 at the end of this appendix) and contact the manufacturer through the RSC office to repair the Dipstick.
Automated Dipstick (Model 2000)
Zero Check (Model 2000)
This check should be performed on a smooth, clean and stable location (carrying case for the Dipstick or a flat board will suffice) where the instrument can be properly positioned. Draw circles around the two footpads and depress the CAL button once. Then rotate the instrument 180° and place the two footpads in the circles drawn earlier. Depress the CAL button once again. The display will flash "CAL" three times, after which the error is automatically stripped out of the readings. Note the reading at the switch end of Dipstick. Rotate the Dipstick and place two footpads in the circles, and note the reading at the switch end.
If the two readings add up to within +0.1 mm, the Dipstick has passed the zero check. The zero check can be performed only once. If the check is not successful, the Dipstick must be turned off, turned back on, and the zero check repeated. A checkmark should be placed on form DS-7 at the appropriate location to indicate that the zero check was performed.
Calibration Check (Model 2000)
Follow procedure described for the manual Dipstick (Model 1500) to perform this check. Complete form DS-7 when this test is conducted.
Complete header information on form DS-1. Follow these procedures to collect longitudinal profile data using the Dipstick.
1. To start profile measurement, place the Dipstick on the marked survey line in the right wheel path at Station 0+00, with "start" arrow pointed forward in direction of traffic.
2. After the reading stabilizes, record it under the right wheel path column on form DS-2 on the row corresponding to "Reading Number 1." Rotate the Dipstick clockwise to the next measuring point. After the reading has stabilized, record it on the next row of form DS-2 labeled "Reading Number 2." Repeat this procedure for the entire length of the test section. While measuring, follow these precautions and procedures:
3. After the last measurement in right wheel path at Station 152.4 m, compare the location of the front Dipstick foot to the pre-measured end point location. If the front foot is within 152 mm of the marked end point location, proceed with transverse closure measurements as indicated in step 4. If front foot is not within this interval, perform the following:
4. After location of last measurement in right wheel path has been verified, initiate transverse closure measurements by rotating the rear foot of the Dipstick toward the left wheel path and placing it on the pre-marked transverse closure line. Measurements along the transverse closure line should be recorded in the table labeled "Transverse Closure Measurements from Right Wheel Path to Left Wheel Path at Station 152.4 m," located at the bottom of form DS-6. When the Dipstick reaches the point at which the next measurement along the transverse survey line passes the left wheel path's location, rotate the device so that the footpad rests at any point on the closure circle (CC). After recording this measurement in the column labeled "5-CC," rotate the device so that the footpad rests on top of the intersection between the longitudinal survey line in the left wheel path and the transverse closure line. Record this measurement under "CC-LWP." This procedure is illustrated in figure C1.
5. Begin measurements down the longitudinal survey line in the left wheel path, recording them in the column labeled "LWP" on forms DS-6 through DS-2. These measurements will be entered in reverse order from those in the "RWP" column.
6. When the last measurement in the left wheel path is made at Station 0+00, verify that the position of the front Dipstick foot is within 152 mm of the end point. If not, follow procedures for end point verification previously discussed for the measurements in right wheel path. If a problem is found with a missing or skipped measurement or final location of Dipstick in left wheel path, discard measurements in the left wheel path as suspect and restart the survey at the beginning point in the left wheel path.
7. After verifying location of the last measurement in the left wheel path, initiate transverse closure measurements by rotating the rear foot of the Dipstick toward the right wheel path and placing it on the pre-marked transverse closure line. Measurements along the transverse closure line should be recorded in the table labeled "Transverse Closure Measurements from Left Wheel Path to Right Wheel Path at Station 0+00," located at the bottom of form DS-2. When the Dipstick reaches the point in which the next measurement along the transverse survey line passes the right wheel path's location, rotate it so that the footpad rests at any point on the CC. After recording this measurement in the column labeled "5-CC," rotate the device so that the footpad rests on the intersection between the longitudinal survey line in the right wheel path and the transverse closure line. Record this measurement under "CC-RWP." This procedure is illustrated in figure C1.
After completing the survey, the operator must conduct the zero and calibration checks. For the manual Dipstick (Model 1500), obtain readings R1 and R2 as described in "zero check" in section C.3.3.1. Readings from the two placements (R1 and R2) should add up to within + 0.1 mm to pass the zero check. If the addition of the two readings is outside these limits, the device has failed the zero check.
For the automated Dipstick (Model 2000), place the Dipstick on a smooth, clean, and stable location (the Dipstick carrying case or a flat board will suffice) where the instrument can be positioned properly. Draw circles around the two footpads, and note reading at the switch end of the instrument (R1). Then rotate the instrument 180° and place the two footpads in the circles that were drawn earlier. Note the reading at the switch end of the Dipstick (R2). The two readings (R1 and R2) should add up to within + 0.1 mm in order to pass the zero check. If the addition of the two readings is outside these limits, the device has failed the zero check.
For both the manual Dipstick (Model 1500) and automated Dipstick (Model 2000), the calibration check should be performed as described in section C.3.3.1 for the manual Dipstick.
Enter the results from these checks form DS-7. Based on results from these checks, follow one of the applicable procedures presented below:
If Dipstick fails the zero check, but can be adjusted to pass the zero cheek and also passes the calibration check, perform another survey.
Follow these procedures when performing closure error computations.
Pavement must be clear of ice, snow, and puddles of water before profile measurements can be taken with the Dipstick, as such conditions can affect profile measurements. Pools of water can damage electronics in the Dipstick and must be avoided by either adjusting profiling trip schedules or delaying actual measurements until acceptable conditions exist. Layout and mark straight lines for transverse profile measurements. Lines shall be perpendicular to edge of pavement and located at 15.24 m intervals, starting at station 0 and ending at station 152.4 m (or end of section if the test section length is not 152.4 m). For each test section (GPS or SPS), 11 transverse lines will be present. Adjust line locations to avoid pavement markings and other anomalies such as patches and potholes. Record the need for and magnitude of such adjustments on appropriate data sheets. Perform transverse profile measurements when conducting manual surveys on asphalt-surfaced pavements. Transverse profile measurements are not required for rigid pavements.
The operator should check equipment using procedures described in section C.3.3.1. Checks will include both the zero and calibration checks. The operator should complete the LTPP Dipstick Data Collection Form (DS-7).
After performing the pre-operational checks on the equipment, the operator should complete the header information in the Transverse Profile Data Collection Form (DS-8). The header fields that should be completed in this form, as well as guidelines for completing these fields, are provided in this section. As this information is used in ProQual, it is important that the operator follow these guidelines when filling the header information.
State Code: State code of State in which the site is located.
LTPP Section ID: Four-digit LTPP section ID of site.
Date: Current date.
Time: Current time; use military format (e.g., 09:30, 15:30).
Dipstick Serial #: Five-digit serial number on base or side of Dipstick (e.g., 30021).
Dipstick Model #: 1500 for manual model and 2000 for automated model (new unit).
Operator: First and last initials of operator in capital letters (e.g., JD).
Recorder: First and last initials of recorder in capital letters (e.g., AM)
Site Type: GPS or SPS.
Visit: Sequential visit identifier (e.g., A for first visit to site, B for second visit, C for third visit).
Surface Type: A-CC for asphalt-surfaced pavements and P-CC for PCC surfaced pavements. Transverse profile measurements are not usually performed on PCC pavements.
Condition: Enter condition of pavement as either V.GOOD, GOOD, FAIR or POOR (use capital letters). Use the following guidelines to select condition:
V. GOOD—Pavement does not show any distress.
GOOD—Pavement exhibits few visible signs of surface deterioration. Pavement may show low severity cracks.
FAIR—Typical distresses can include the following in a low to medium severity: rutting, transverse and longitudinal cracking, block cracking, fatigue, edge cracking, and patching.
POOR—Typical distresses can include the following in a medium to high severity: rutting, transverse and longitudinal cracking, block cracking, fatigue cracking, patching, and potholes.
Road Name: Highway or route designation in capital letters (e.g., INTERSTATE 57, U.S. 395, S.R. 31).
Lane: Circle either "Outside" or "Inside." The outside lane is the outermost traffic lane. Almost all LTPP sections are located in the outside lane. The inside lane is any lane that is not an outside lane.
Direction: Direction should be NORTH, EAST, WEST, or SOUTH (use capital letters).
Clouds: Valid entries for this field are CLEAR, P. CLOUDY, or CLOUDY (use capital letters). Use the following guidelines to select an appropriate entry to this field:
CLEAR—Sunny sky.
P. CLOUDY—Sun is sometimes covered by clouds.
CLOUDY—Sun cannot be observed.
Temperature: Pavement temperature in Centigrade obtained using an infrared device.
Weather Comment: Any additional comments about the weather conditions at the time of testing. ProQual contains the following predetermined comments, but the crew is not limited to the use of these comments exclusively: CONDITIONS OK, STEADY CROSSWIND, WIND GUSTS, HOT AND HUMID, HAZY, LOW SUN ANGLE. Use capital letters for weather comment.
Collect Dipstick transverse profile measurements at 15.24 m intervals, starting at station 0+00. Measure elevations for each transverse profile location from the outside pavement edge extend over the full lane width, with the actual distance depending on lane width and pavement striping. The starting point should be the junction of the transverse measurement line and the inside edge of the white paint stripe along the outside edge of the lane. If no outside edge stripe is present, or if the outside edge stripe is on the shoulder, then begin at either the shoulder-lane joint or a point approximately 0.91 m from center of the outside wheel path. Enter a comment in the data sheet describing how the starting point was determined. The starting point on subsequent surveys should be the same. The initial elevation is arbitrarily established as "zero," and subsequent readings are recorded relative to this benchmark. The combination of these measurements provide a measure of pavement cross slope.
To begin transverse profile measurements, place the Dipstick at the outside edge of the pavement, beginning at Station 0+00 with the "start" arrow pointed toward the pavement centerline. Record measurements on the Transverse Profile Data Collection Form (DS-8). Complete two runs per transverse profile of each LTPP section; one run up the transverse line and a return along same line to complete a closed-loop survey.
After the last transverse profile measurement is completed, enter any additional comments on the last line of the form. The comment should be entered in capital letters (e.g., NINE DATA POINTS DUE TO HEAVY TRAFFIC).
After completing the survey, the operator must conduct zero and calibration checks. For the manual Dipstick (Model 1500), obtain readings R1 and R2 as described in "zero check" in section C.3.3.1. Readings from two placements (R1 and R2) should add up to within + 0.1 mm to pass the zero check. If the sum of the two readings is outside this limit, the device has failed the zero check.
For the automated Dipstick (Model 2000), place the Dipstick on a smooth, clean, and stable location (the Dipstick carrying case or a flat board will suffice) where the instrument can be positioned properly. Draw circles around the two footpads, and note reading at the switch end of the instrument (R1). Then rotate the instrument 180° and place the two footpads in the circles that were drawn earlier. Note the reading at the switch end of the Dipstick (R2). The two readings (R1 and R2) should add up to within + 0.1 mm to pass the zero check. If the sum of the two readings is outside these limits, the device has failed the zero check.
Enter the results of these checks on form DS-7. Based on results from these checks, follow one of the applicable procedures presented below:
The total accumulated error in a transverse profile is established by a closed loop survey. The forward and return runs along a transverse line are used to compute this error. At each station, add the readings for the forward and return runs separately, and record the values in the "Sum" column of form DS-8. Then at each station, add the values in "Sum" column for the forward and return run, and record the result in the "Closure" column. At each station, for each Dipstick reading, add the reading for the forward and return runs, and record the value in the field "Difference."
To compute the allowable closure error for a transverse profile run, multiply the total number of Dipstick readings (sum of the number of readings for forward and return runs) by 0.076 (0.076 mm is the allowable average error per one Dipstick reading). The allowable closure error for typical lane widths that are encountered are given in table C1.
If the closure error for a transverse profile is outside the allowable range, discard those data and repeat the transverse profile measurement. The value in the "Difference" field at a specific position gives the difference in readings between the forward and return runs at that position. The operator can use this information to identify locations where problem readings may be occurring.
| LANE WIDTH (M) | TOTAL NUMBER OF DIPSTICK READINGS | ALLOWABLE CLOSURE ERROR (MM) |
|---|---|---|
| 3.05 |
20
|
+/-1.5
|
| 3.35 |
22
|
+/-1.7
|
| 3.66 |
24
|
+/-1.8
|
| 3.96 |
26
|
+/-2.0
|
If after several repeat runs at a station(s), a closure error within allowable value is not obtained, and Dipstick passes post-data collection checks, describe why the closure error is outside the allowable value (e.g., ROUGH SURFACE TEXTURE MADE CLOSURE DIFFICULT).
The importance of safeguarding Dipstick data cannot be overstated. Backup copies of the Dipstick data must be made without exception, after completing data collection. Make a minimum of two complete copies of all Dipstick data.
Mail one copy to the RSC office, and keep the second copy in case the first copy is lost in the mail.
To ensure that the Dipstick is operating properly, perform the zero and calibration checks described in section C.3.3.1. If the Dipstick fails the calibration check, return it to the manufacturer for repair. The RSC should ensure that the gauge block used for the calibration check is calibrated annually to an accuracy of 3.18 + 0.03 mm using a local calibration laboratory or a calibration micrometer. Gauge block calibration may need to be performed more frequently, depending on (1) presence of oxidation, (2) evidence of erosion, and (3) possible damage caused by accidental mishandling in field. If the calibration block is not within an accuracy of 3.18 + 0.03 mm, a new block that satisfies the criteria should be obtained. If calibration block (gauge block) thickness is not within 3.18 + 0.03 mm, all data collected since last block check are suspect and may have to be disregarded.
The operator should conduct zero and calibration checks before and after any Dipstick measurements. Procedures for performing pre-operational zero and calibration checks are described in section C.3.3.1. Procedures for performing post-operational zero and calibration checks are described in section C.3.3.3. If the Dipstick fails calibration check, the RSC engineer must approve shipping the equipment to the manufacturer.
Scheduled preventive maintenance will ensure proper equipment operation and help identify potential problems. Timely identification of problems will help avoid costly delays or incomplete data that could result from onsite equipment malfunction. Time constraints on the profile testing program require that maintenance activities be performed before testing mobilization. During testing, the operator must be aware constantly of the proper functioning of the equipment. There will be little time to accomplish more than the required initial checks at site in preparation for the test day. Therefore, it is necessary to perform preventive maintenance routinely at the end of each test day.
Minimizing the equipment deterioration rate is the responsibility of the RSC and individual operators. Specific, detailed maintenance procedures are contained in the manuals provided with each individual piece of equipment, and the operator must become intimately familiar with the maintenance recommendations contained in these manuals. This section reinforces the concept of maximum equipment dependability, which is critical to the LTPP program's effectiveness.
This guide does not supersede the manufacturer's minimum services and service intervals, but rather provides supplementary service requirements. Where there is a conflict between this guide and the manufacturer's instructions, follow the more stringent requirements.
Routine maintenance includes those functions that can be performed easily by the operator with minimal device disassembly. Routine maintenance for the Dipstick includes cleaning and lubrication of ball and socket joints on footpads, replacing batteries, and cleaning battery contacts. These items are basic and easily performed preventive measures, and always should be completed before and after equipment operation.
The following list of pre- and post-operation preventive maintenance items is not complete, but is intended to show the extent and detail required before operation checks are performed. This list of items does not supersede the manufacturer's minimum requirements for warranty compliance.
Scheduled major preventive services include much more than routine checks and will require some equipment disassembly by personnel with technical capabilities beyond the skill of operators or RSC staff. The operator should use the LTPP Major Maintenance/Repair Report (DS-10) to report performance of necessary services. This form will also inform the RSC of the Dipstick's condition on a regular basis. Items such as battery connector replacement fall into the major maintenance category. Appropriate service intervals are outlined in the equipment manufacturer's manual.
Regardless of the quality of the preventive program, there probably will be equipment failures during the LTPP program. When these occur, it is extremely important that items are repaired or replaced quickly. During periods when there is no scheduled testing, these problems are handled easily. However, if they occur during mobilization or while onsite, significant problems in scheduling and coordination could develop. To help minimize the impact of equipment problems, it is essential that the operator immediately notify the RSC and any other agencies or individuals as necessary.
Each RSC is responsible for equipment maintenance/repair activity. However, the RSC should keep LTPP staff informed of any major problems concerning equipment. When repairs are necessary and must be performed by an outside agency, the operator should report this information on the LTPP Major Maintenance Report as an unscheduled maintenance activity. Details of circumstances during field testing related to this maintenance activity should be noted on appropriate data sheets.
The Dipstick operator is responsible for maintaining the following forms/records:
Complete forms DS-1 through DS-6 at every section/project where longitudinal profile measurements are performed with a Dipstick. The "comments" section in these forms should include any downtime and any factors that might affect collected test data. Names and organizations of other personnel present at the site should be included in this form. Names of these personnel will be invaluable if an accident occurs at the test site. The operator should keep the form originals and forward copies to the RSC.
Complete form DS-7 whenever the zero and calibration checks are conducted.
Complete form DS-8 at every section where transverse profile measurements are performed with a Dipstick. Follow the guidelines presented in section C.3.5.2 to complete the header fields in this form. The operator should keep the original form and forward a copy to the RSC.
Complete form DS-10 whenever an outside agency performs any major maintenance or repair.
| LTPP Dipstick Data Collection Form | State Code [ __ __ ] |
| Longitudinal Profile Form DS-1 | LTPP Section [ __ __ __ __ ] |
| Measurement Information and Closure Computation | Date (dd/mm/yy) __ __ / __ __ __ / __ __ |
Operator: __________________________________ Employer: ________________________________
Recorder: __________________________________ Employer: ________________________________
Dipstick Serial Number: _____________________
Start Time (military): __ __ : __ __ Stop Time (military): __ __ : __ __
Weather: ________________________________________________________________________________
Closure Error Computation
|
Right Wheel Path
|
Left
Wheel Path
|
Traffic Control Crew: | ||
|---|---|---|---|---|
| No | Elevation Sum |
No
|
Elevation Sum | |
| O1 |
I1
|
|||
| O2 |
I2
|
|||
| O3 |
I3
|
|||
| O4 |
I4
|
|||
| O5 |
I5
|
|||
| O6 |
I6
|
|||
| O7 |
I7
|
|||
| O8 |
I8
|
|||
| O9 |
I9
|
|||
| O10 |
I10
|
|||
| O11 |
I11
|
|||
| O12 |
I12
|
|||
| O13 |
I13
|
|||
| O14 |
I14
|
Other Personnel At Site: | ||
| O15 |
I15
|
|||
| O16 |
I16
|
|||
| O17 |
I17
|
|||
| O18 |
I18
|
|||
| O19 |
I19
|
|||
| O20 |
I20
|
|||
| Total O1 to O20 |
OA
|
Total I1 to
I20
|
IA
|
|
| Transverse Sum T2 |
OB
|
Transverse Sum T1
|
IB
|
Closure Error |
| Total OA+OB |
OC
|
Total IA +
IB
|
IC
|
OC+IC
|
| LTPP Dipstick Data Collection Form | State Code [ __ __ ] |
| Longitudinal Profile Form DS-2 | LTPP Section ID [ __ __ __ __ ] |
| Reading 1 to 100 | Date (dd/mmm/yy) [ __ __ / __ __ __ / __ __ ] |
| Reading No. | Reading (mm) | Reading No. | Reading (mm) | Reading No. | Reading (mm) | Reading No. | Reading (mm.) | ||||
|---|---|---|---|---|---|---|---|---|---|---|---|
| RWP |
LWP |
RWP |
LWP |
RWP |
LWP |
RWP |
LWP |
||||
| 1 | 26 | 51 | 76 | ||||||||
| 2 | 27 | 52 | 77 | ||||||||
| 3 | 28 | 53 | 78 | ||||||||
| 4 | 29 | 54 | 79 | ||||||||
| 5 | 30 | 55 | 80 | ||||||||
| 6 | 31 | 56 | 81 | ||||||||
| 7 | 32 | 57 | 82 | ||||||||
| 8 | 33 | 58 | 83 | ||||||||
| 9 | 34 | 59 | 84 | ||||||||
| 10 | 35 | 60 | 85 | ||||||||
| 11 | 36 | 61 | 86 | ||||||||
| 12 | 37 | 62 | 87 | ||||||||
| 13 | 38 | 63 | 88 | ||||||||
| 14 | 39 | 64 | 89 | ||||||||
| 15 | 40 | 65 | 90 | ||||||||
| 16 | 41 | 66 | 91 | ||||||||
| 17 | 42 | 67 | 92 | ||||||||
| 18 | 43 | 68 | 93 | ||||||||
| 19 | 44 | 69 | 94 | ||||||||
| 20 | 45 | 70 | 95 | ||||||||
| 21 | 46 | 71 | 96 | ||||||||
| 22 | 47 | 72 | 97 | ||||||||
| 23 | 48 | 73 | 98 | ||||||||
| 24 | 49 | 74 | 99 | ||||||||
| 25 | 50 | 75 | 100 | ||||||||
| Sum | O1 | I1 | O2 | I2 | O3 | I3 | O4 | I4 | |||
Transverse Closure Measurements from Left Wheel Path to Right Wheel Path at Station 0+00
| Transverse Position | Sum | |||||||
|---|---|---|---|---|---|---|---|---|
| LWP-1 | 1-2 | 2-3 | 3-4 | 4-5 | 5 - CC | CC - RWP | ||
|
Reading (mm)
|
T1
|
|||||||
| LTPP Dipstick Data Collection Form | State Code [ __ __ ] |
| Longitudinal Profile Form DS-3 | LTPP Section ID [ __ __ __ __ ] |
| Reading 101 to 200 | Date (dd/mmm/yy) [ __ __ / __ __ __ / __ __ ] |
| Reading No. | Reading (mm) | Reading No. | Reading (mm) | Reading No. | Reading (mm) | Reading No. | Reading (mm.) | ||||
|---|---|---|---|---|---|---|---|---|---|---|---|
| RWP |
LWP |
RWP |
LWP |
RWP |
LWP |
RWP |
LWP |
||||
| 101 | 126 | 151 | 176 | ||||||||
| 102 | 127 | 152 | 177 | ||||||||
| 103 | 128 | 153 | 178 | ||||||||
| 104 | 129 | 154 | 179 | ||||||||
| 105 | 130 | 155 | 180 | ||||||||
| 106 | 131 | 156 | 181 | ||||||||
| 107 | 132 | 157 | 182 | ||||||||
| 108 | 133 | 158 | 183 | ||||||||
| 109 | 134 | 159 | 184 | ||||||||
| 110 | 135 | 160 | 185 | ||||||||
| 111 | 136 | 161 | 186 | ||||||||
| 112 | 137 | 162 | 187 | ||||||||
| 113 | 138 | 163 | 188 | ||||||||
| 114 | 139 | 164 | 189 | ||||||||
| 115 | 140 | 165 | 190 | ||||||||
| 116 | 141 | 166 | 191 | ||||||||
| 117 | 142 | 167 | 192 | ||||||||
| 118 | 143 | 168 | 193 | ||||||||
| 119 | 144 | 169 | 194 | ||||||||
| 120 | 145 | 170 | 195 | ||||||||
| 121 | 146 | 171 | 196 | ||||||||
| 122 | 147 | 172 | 197 | ||||||||
| 123 | 148 | 173 | 198 | ||||||||
| 124 | 149 | 174 | 199 | ||||||||
| 125 | 150 | 175 | 200 | ||||||||
| Sum | O5 | I5 | O6 | I6 | O7 | I7 | O8 | I8 | |||
| LTPP Dipstick Data Collection Form | State Code [ __ __ ] |
| Longitudinal Profile Form DS-4 | LTPP Section ID [ __ __ __ __ ] |
| Reading 201 to 300 | Date (dd/mmm/yy) [ __ __ / __ __ __ / __ __ ] |
| Reading No. | Reading (mm) | Reading No. | Reading (mm) | Reading No. | Reading (mm) | Reading No. | Reading (mm.) | ||||
|---|---|---|---|---|---|---|---|---|---|---|---|
| RWP |
LWP |
RWP |
LWP |
RWP |
LWP |
RWP |
LWP |
||||
| 201 | 226 | 251 | 276 | ||||||||
| 202 | 227 | 252 | 277 | ||||||||
| 203 | 228 | 253 | 278 | ||||||||
| 204 | 229 | 254 | 279 | ||||||||
| 205 | 230 | 255 | 280 | ||||||||
| 206 | 231 | 256 | 281 | ||||||||
| 207 | 232 | 257 | 282 | ||||||||
| 208 | 233 | 258 | 283 | ||||||||
| 209 | 234 | 259 | 284 | ||||||||
| 210 | 235 | 260 | 285 | ||||||||
| 211 | 236 | 261 | 286 | ||||||||
| 212 | 237 | 262 | 287 | ||||||||
| 213 | 238 | 263 | 288 | ||||||||
| 214 | 239 | 264 | 289 | ||||||||
| 215 | 240 | 265 | 290 | ||||||||
| 216 | 241 | 266 | 291 | ||||||||
| 217 | 242 | 267 | 292 | ||||||||
| 218 | 243 | 268 | 293 | ||||||||
| 219 | 244 | 269 | 294 | ||||||||
| 220 | 245 | 270 | 295 | ||||||||
| 221 | 246 | 271 | 296 | ||||||||
| 222 | 247 | 272 | 297 | ||||||||
| 223 | 248 | 273 | 298 | ||||||||
| 224 | 249 | 274 | 299 | ||||||||
| 225 | 250 | 275 | 300 | ||||||||
| Sum | O9 | I9 | O10 | I10 | O11 | I11 | O12 | I12 | |||
| LTPP Dipstick Data Collection Form | State Code [ __ __ ] |
| Longitudinal Profile Form DS-5 | LTPP Section ID [ __ __ __ __ ] |
| Reading 301 to 400 | Date (dd/mmm/yy) [ __ __ / __ __ __ / __ __ ] |
| Reading No. | Reading (mm) | Reading No. | Reading (mm) | Reading No. | Reading (mm) | Reading No. | Reading (mm.) | ||||
|---|---|---|---|---|---|---|---|---|---|---|---|
| RWP |
LWP |
RWP |
LWP |
RWP |
LWP |
RWP |
LWP |
||||
|
301
|
326 | 351 | 376 | ||||||||
|
302
|
327 | 352 | 377 | ||||||||
|
303
|
328 | 353 | 378 | ||||||||
|
304
|
329 | 354 | 379 | ||||||||
|
305
|
330 | 355 | 380 | ||||||||
|
306
|
331 | 356 | 381 | ||||||||
|
307
|
332 | 357 | 382 | ||||||||
|
308
|
333 | 358 | 383 | ||||||||
|
309
|
334 | 359 | 384 | ||||||||
|
310
|
335 | 360 | 385 | ||||||||
|
311
|
336 | 361 | 386 | ||||||||
|
312
|
337 | 362 | 387 | ||||||||
|
313
|
338 | 363 | 388 | ||||||||
|
314
|
339 | 364 | 389 | ||||||||
|
315
|
340 | 365 | 390 | ||||||||
|
316
|
341 | 366 | 391 | ||||||||
|
317
|
342 | 367 | 392 | ||||||||
|
318
|
343 | 368 | 393 | ||||||||
|
319
|
344 | 369 | 394 | ||||||||
|
320
|
345 | 370 | 395 | ||||||||
|
321
|
346 | 371 | 396 | ||||||||
|
322
|
347 | 372 | 397 | ||||||||
|
323
|
348 | 373 | 398 | ||||||||
|
324
|
349 | 374 | 399 | ||||||||
|
325
|
350 | 375 | 400 | ||||||||
|
Sum
|
O13 | I13 | O14 | I14 | O15 | I15 | O16 | I16 | |||
| LTPP Dipstick Data Collection Form | State Code [ __ __ ] |
| Longitudinal Profile Form DS-6 | LTPP Section ID [ __ __ __ __ ] |
| Reading 401 to 500 | Date (dd/mmm/yy) [ __ __ / __ __ __ / __ __ ] |
| Reading No. | Reading (mm) | Reading No. | Reading (mm) | Reading No. | Reading (mm) | Reading No. | Reading (mm.) | ||||
|---|---|---|---|---|---|---|---|---|---|---|---|
| RWP |
LWP |
RWP |
LWP |
RWP |
LWP |
RWP |
LWP |
||||
| 401 | 426 | 451 | 476 | ||||||||
| 402 | 427 | 452 | 477 | ||||||||
| 403 | 428 | 453 | 478 | ||||||||
| 404 | 429 | 454 | 479 | ||||||||
| 405 | 430 | 455 | 480 | ||||||||
| 406 | 431 | 456 | 481 | ||||||||
| 407 | 432 | 457 | 482 | ||||||||
| 408 | 433 | 458 | 483 | ||||||||
| 409 | 434 | 459 | 484 | ||||||||
| 410 | 435 | 460 | 485 | ||||||||
| 411 | 436 | 461 | 486 | ||||||||
| 412 | 437 | 462 | 487 | ||||||||
| 413 | 438 | 463 | 488 | ||||||||
| 414 | 439 | 464 | 489 | ||||||||
| 415 | 440 | 465 | 490 | ||||||||
| 416 | 441 | 466 | 491 | ||||||||
| 417 | 442 | 467 | 492 | ||||||||
| 418 | 443 | 468 | 493 | ||||||||
| 419 | 444 | 469 | 494 | ||||||||
| 420 | 445 | 470 | 495 | ||||||||
| 421 | 446 | 471 | 496 | ||||||||
| 422 | 447 | 472 | 497 | ||||||||
| 423 | 448 | 473 | 498 | ||||||||
| 424 | 449 | 474 | 499 | ||||||||
| 425 | 450 | 475 | 500 | ||||||||
| Sum | O17 | I17 | O18 | I18 | O19 | I19 | O20 | I20 | |||
Transverse Closure Measurements from Right Wheel Path to Left Wheel Path at Station (152.40 m)
| Transverse Position | Sum | |||||||
|---|---|---|---|---|---|---|---|---|
| RWP-1 | 1-2 | 2-3 | 3-4 | 4-5 | 5 - CC | CC - RWP | ||
|
Reading (mm)
|
T1
|
|||||||
| LTPP Dipstick Data Collection Form | State Code [ __ __ ] |
| Longitudinal Profile Form DS-6 | LTPP Section ID [ __ __ __ __ ] |
| Pre/Post Measurement Zero and Calibration Checks | Date (dd/mmm/yy) [ __ __ / __ __ __ / __ __ ] |
Operator: __________________________________ Employer: __________________________________
Dipstick Serial Number: _____________________Diameter of Dipstick Foot Pad: __ . __ __ mm
Pre Measurement Checks
Time (military): __ __ : __ __ Automated Dipstick - Zero Check Performed:
|
Zero Check - Manual Dipstick
|
Calibration Check
|
||
|---|---|---|---|
|
Measurement
|
Reading (mm) | Measurement | Reading (mm) |
|
First Reading
|
First Reading | ||
|
Second Reading after 180° Rotation
|
Second Reading on Calibration Block | ||
|
First + Second Reading
|
A | Second Reading - 3.2 - First Reading | B |
Notes:
Post Measurement Checks
Time (military): __ __ : __ __ Automated Dipstick - Zero Check Performed:
|
Zero Check - Manual Dipstick
|
Calibration Check
|
||
|---|---|---|---|
|
Measurement
|
Reading (mm) | Measurement | Reading (mm) |
|
First Reading
|
First Reading | ||
|
Second Reading after 180° Rotation
|
Second Reading on Calibration Block | ||
|
First + Second Reading
|
A | Second Reading - 3.2 - First Reading | B |
Notes:
Comments: _______________________________________________________________________________________________________________________
_________________________________________________________________________________________________________________________________
_________________________________________________________________________________________________________
|
Diptick® Serial #: [ _ _ _ _ _ ] Dipstick® Model #: [_ _ _ _]
Operator: [_______] Recorder: [_______] Site Type: [_______] Visit: [______] Surface Type: [__-______] Condition: ________________________________ |
|
Road Name: _________________________________________________________________ Lane: Outside / Inside (circle one) Direction: [ ____________ ]
Clouds: ____________________ Temperature: [ _ _ . _ ] Weather Comment: _______________________________________________________________
| Location | Dipstick® Readings | Sum | Closure | |||||||||||||||
|---|---|---|---|---|---|---|---|---|---|---|---|---|---|---|---|---|---|---|
| 1 | 2 | 3 | 4 | 5 | 6 | 7 | 8 | 9 | 10 | 11 | 12 | 13 | 14 | 15 | 16 | |||
| 0.00 | ||||||||||||||||||
| Difference | ||||||||||||||||||
| 15.24 | ||||||||||||||||||
| Difference | ||||||||||||||||||
| 30.48 | ||||||||||||||||||
| Difference | ||||||||||||||||||
| 45.72 | ||||||||||||||||||
| Difference | ||||||||||||||||||
| 60.96 | ||||||||||||||||||
| Difference | ||||||||||||||||||
| 76.20 | ||||||||||||||||||
| Difference | ||||||||||||||||||
| 91.44 | ||||||||||||||||||
| Difference | ||||||||||||||||||
| 106.68 | ||||||||||||||||||
| Difference | ||||||||||||||||||
| 121.92 | ||||||||||||||||||
| Difference | ||||||||||||||||||
| 137.18 | ||||||||||||||||||
| Difference | ||||||||||||||||||
| 152.40 | ||||||||||||||||||
| Difference | ||||||||||||||||||
Comments: _______________________________________________________________________________________________________________________
|
LTPP
Dipstick Operations
LTPP Major Maintenance/Repair Activity Report Form DS-10 |
Region: _________________________________ Date: _______________________________
Make: Face Company Model: ____________________
Serial Number: ________________
Reason for Maintenance Work (Choose only one)
Scheduled: _________ Not Scheduled: _________
Description Of Maintenance And Reason: _________________________________________
______________________________________________________________________________
______________________________________________________________________________
______________________________________________________________________________
______________________________________________________________________________
Agency Performing Maintenance: Cost: _________________
Name: _________________________________________________________________
Street: _________________________________________________________________
City: __________________________________ State: __________ Zip: ___________
Number: _________________________________________________________
Contact Name: __________________________________________________________
Date In:________________________________________________________________
Date Out: ______________________________________________________________