U.S. Department of Transportation
Federal Highway Administration
1200 New Jersey Avenue, SE
Washington, DC 20590
202-366-4000
Federal Highway Administration Research and Technology
Coordinating, Developing, and Delivering Highway Transportation Innovations
 |
| This report is an archived publication and may contain dated technical, contact, and link information |
|
Federal Highway Administration > Publications > Research > Structures > Covered Bridge Manual |
Publication Number: FHWA-HRT-04-098 |
Previous | Table of Contents | Next
The authentic covered bridges that have survived have done so for a combination of reasons. They have not been on heavily traveled roads or in the paths of large floods. They have not been burned or been hit by ice floes. A common factor in their survival, however, has been at least basic, consistent maintenance attention. Most covered bridges that never received attention collapsed long ago or were destroyed when they became unserviceable. Preventive maintenance, if performed regularly, need not be costly, and it provides great short- and long-term benefits.
Establishing a bridge watch practice can help these structures survive. A local person is responsible for ensuring that each covered bridge receives adequate owner maintenance. The program may be organized by a local covered bridge preservation society, by the State Historic Preservation Office, or other agency. Vermont has adopted this practice, and details are presented on the Web site www.vermontbridges.com.
Protecting the main truss members from the elements that cause decay is the most effective way to extend a covered bridge's service life. Properly maintaining the roofing and siding is the most cost-effective component in any covered bridge maintenance program.
When residing the bridge, it is crucial that the details allow good air circulation around the truss members. If there is open space below the eaves and above the siding that enables air to circulate along the length of the bridge, the new siding details should retain that space. If there is no such open space, consider including it with the new siding. Figure 161 provides an example of good siding ventilation details. Note the gap on the far side (more clearly seen than under the eave of the near side) between the top of the siding and underside of the top chord. Also note the use of an inclined top sill board protecting the tops of the vertical siding.
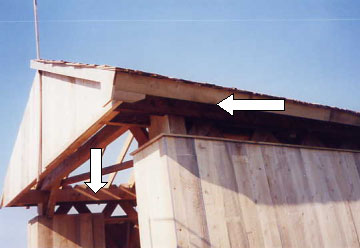
Figure 161. Good siding details-Fitch's Bridge, Delaware County, NY.
Be careful not to nail the siding directly to the truss members. Instead, the siding should be attached to intervening narrow (intermittent) nailers, or wall purlins, to provide good ventilation to both faces of the siding and avoid large areas of direct contact with the main members. These direct contact areas provide an ideal environment for developing and concealing decay. While the siding is light and relatively sacrificial, the truss members are heavy and very difficult and expensive to repair or to replace. Figure 138, presented in chapter 14, depicts a photograph of nailers spaced out from truss elements, consistent with this advice.
Notwithstanding the above advice, it is important to recognize that historical preservationists may often be required by established preservation protocols to insist on repairs consistent with the bridge's original details. The area that is covered by the siding is often of paramount importance to the preservationists. If there was no open zone at the top, they may well disagree with creating one. However, adding a layer of nailers between the truss members and the siding is often an acceptable change, because it improves the service life without markedly altering the look of the bridge. It is vital that those responsible for maintaining the bridges focus on the appearance and durability issues, when educating reviewers about project details.
Windows were often located in covered bridge sidings to both enhance interior illumination and to provide fishing access from within the bridge. The details at the window opening can be critical, in drainage and protection, if they are to avoid premature deterioration in the main truss members near the window opening (see figure 162).

Figure 162. Good siding details around a window-Fitch's Bridge.
A second important regular maintenance activity involves preventing roadway drainage from flowing onto the bridge timbers. An ideal abutment detail situation would incorporate two features: the roadway would ramp up into the bridge, and drainage would be collected at the curbs and piped down the side slopes to avoid eroding the embankment at the abutments. If the approach roadway does not, and cannot, ramp up into the bridge, other measures should be considered to achieve these drainage goals. In some cases, the superstructure can be raised. In other cases, a trench drain can be installed across the roadway to collect runoff and direct it away from the bridge timbers.
The series of photographs presented in figures 163 through 165 depicts issues related to drainage at the entrance of bridges. Figure 163 shows a situation where the roadway slopes directly into the bridge without provision to capture the drainage and channel it away from entering the bridge. Figure 164 presents the long-term consequences of that lack of drainage. When an upgrade ramp into the structure is not possible, good drainage treatment is still possible, by collecting water in a trench drain before it flows into the bridge (see figure 165). This photograph was taken during construction.
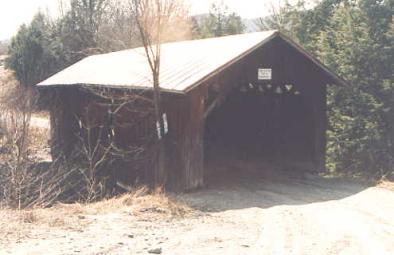
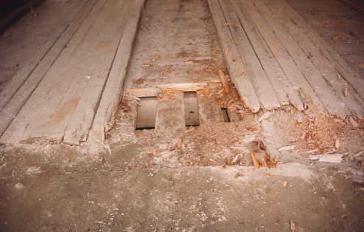
Figure 164. Consequences of the poor entrance drainage in figure 163.
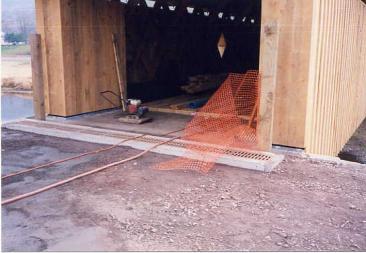
Figure 165. A trench drain at a bridge entrance-Fitch's Bridge, Delaware County, NY.
Most covered bridges have no special provisions for removing the water that can be blown or tracked into the bridge. On bridge decks with tight joints, this water seeks another low spot to escape. On decks with loosely spaced planks, water falls down through the floor system. While the structure would be better off without any moisture at all, a certain amount of water is inevitable. In general, intermittent and irregular wetting of an individual element is not harmful, provided that ventilation is sufficient to allow the moisture to thoroughly evaporate without soaking the timber. However, deterioration is common at interfaces of elements subject to periodic wetting, where evaporation will not occur. The top surfaces of floor beams often are significantly rotted beneath the decking.
Covered bridge timbers will deteriorate wherever they come into direct contact with foundation materials. This can be caused by poorly drained rainwater at the abutments, or condensed dew on the masonry. Therefore, the more critical truss members and end floor beams should be supported on sacrificial timber blocking. The blocking should be pressure treated.
The blocking should be solidly supported by concrete or stone foundations and back walls so that critical structural timbers do not directly contact the earth embankment or masonry. Figure 166 depicts good details of sacrificial timber blocking beneath the main truss components.
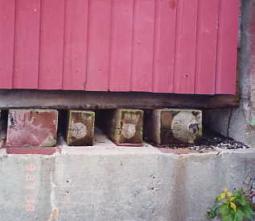
Figure 166. Sacrificial timbers beneath truss elements.
Timber that is in contact with stone or concrete will eventually rot and decay, even if it is pressure treated. However, because the support blocking can still last 20 to 40 years, its replacement does not represent a major investment over the life of the structure. While replacing these bed timbers usually involves raising the bridge from the foundation, it usually is not a problem for a competent contractor.
This support blocking also allows good air circulation around the main truss members. To be effective, the details should provide an air space at least 50 mm (2 inches) wide between the end of the bridge deck and the back wall, completely across the roadway.
In addition to protection against the rot and decay associated with wood in contact with moist earth, keeping a distinct separation between wood and moist earth will decrease the risk of termite infestation. The section "In Situ Chemical Treatment" below deals with chemical treatments to prevent or control insect infestations in wood. Yet, even if evidence of insect activity in or adjacent to a covered bridge is not apparent, the ground surrounding a covered bridge should be treated regularly by a licensed pest control company. The cost of maintenance is minor compared to the serious damage that can be caused in a relatively short period of time by an insect infestation.
Road traffic tracks a surprising amount of dirt into a bridge. Figure 167 shows common accumulations of roadway debris on top of abutment bearing areas and surrounding truss components. In this case, the ends of the trusses and stringers were also embedded in concrete and asphalt. These accumulations can retain moisture that contributes to timber deterioration. To minimize this deterioration, the superstructure and abutments should be cleaned of such material at least annually. The best debris removal methods involve hand tools and air-blast cleaning. Pressurized water blasting can also be very effective, but introducing any additional water into the structural timbers is not desirable and should be avoided.
Figure 167. Accumulation of debris and asphalt encasing timber elements.
Although the deicing salts that commonly are used on roads in northern environments will be tracked in and will concentrate when the water dries, they do not pose the same inherent serious threat to timber bridges that they do to concrete or metal bridges.
Arson continues to claim many covered bridges. Fire retarding material was not even an option or consideration when covered bridges were originally constructed. Spray-on fire retardants have been used recently in some repair projects and on some covered bridges. Because the thinner siding and roofing materials are more vulnerable to fire than are the thicker structural truss components, they have occasionally been replaced with products treated with fire retardants. Some covered bridges have even been fitted with sprinkler systems, and others with alarm systems. There is no single, simple, solution to this fire problem. A site-specific evaluation is necessary, and the resulting recommendations should reflect the needs and desires of the bridge's owner and the bridge specifics. "Fire Retardants" in chapter 10 of this manual discusses this fire protection topic in a more indepth manner.
At the time of the publication of this manual, research was underway to identify new generation fire retardant treatments for use on historic covered bridges.
Another practice that may help preserve covered bridges involves educational programs at local schools about the value and unique nature of covered bridges. Educational programs help discourage vandalism, which often results in bridge fires.
The section "Chemically Treated Wood" in chapter 10 of this manual discusses the evolving topic of chemical treatments that can be applied to bridges to combat infestations of wood-destroying insects, including termites, carpenter ants, and powder post beetles. The treatment regimen will vary according to particular situations, depending on a number of parameters. Chapter 19 of this manual deals with the combined topics of wood preservatives as discussed in this section and of chemical treatment of wood to fight wood-destroying insects.
For bridges that have siding that has been treated with a protective finish (either film-forming paint or penetrating stain), regular treatment is necessary, if only to address aesthetic concerns. See "Protective Finish Treatments" in chapter 10 for further discussion of the issues related to this regular maintenance issue.
Changes in moisture content over time can lead to loose connectors. In addition, highly stressed joints may loosen due to repetitive changes in load. The structure should be inspected periodically (every year or so), and all connectors should be checked and tightened as necessary. This is especially true following a bridge rehabilitation, and even more so if green material has been used. Provisions can be added to the rehabilitation contract to require the contractor to return to the structure for that purpose after approximately 6 months.

