U.S. Department of Transportation
Federal Highway Administration
1200 New Jersey Avenue, SE
Washington, DC 20590
202-366-4000
Federal Highway Administration Research and Technology
Coordinating, Developing, and Delivering Highway Transportation Innovations
 |
| This report is an archived publication and may contain dated technical, contact, and link information |
|
Publication Number: FHWA-HRT-06-115
Date: August 2006 |
||||||||||||||||||||||||||||
Index, Structural Behavior of Ultra-High Performance Concrete Prestressed I-GirdersCHAPTER 4. GIRDER FABRICATION AND EXPERIMENTAL METHODSThe experimental program-from the girder fabrication through the methods used to test the full-scale UHPC girders-is described in this chapter. The girder fabrication process is described first, followed by a discussion of the test matrix and the test setup. The specific details of each girder specimen and the instrumentation plan for each girder are then presented. Finally, the loading procedure implemented in each test is described. 4.1 Girder FabricationTwo AASHTO Type II girders were fabricated at Prestress Services of Kentucky, Inc., in Lexington, KY. Normal AASHTO Type II formwork was used in the casting of the girders. The 24.4-m (80-ft) and the 9.2-m (30-ft) girders were cast end-to-end such that the same strands were stretched through both formworks. These girders did not contain any mild steel reinforcement. The concrete premix was delivered to the fabricator in large bags that contained all of the nonliquid and nonsteel concrete constituents. These constituents then were combined with the water and superplasticizer following the manufacturer's recommendations. During the final stage of mixing, the steel fiber reinforcement was added. The overall mixing procedure was very similar to the procedures discussed within the presentation of the UHPC material characterization study results. The fresh UHPC was transported to the formwork in standard ready-mix concrete trucks and then was poured into the formwork. The 24.4-m (80-ft) girder required approximately 6 m3 (8 yd3) of concrete and was placed in three lifts. The 9.2-m (30-ft) girder required approximately 2.3 m3 (3 yd3) of concrete and was cast in a similar fashion. The placement of the UHPC into the form for the shorter girder was completed in approximately 12 minutes. The girders were externally vibrated on an intermittent basis using a formwork vibrator during the casting. Immediately after casting, the exposed surface on top of the girder was covered with plastic. The curing and steam treatment of the girders was completed during the week after casting. The girders remained covered and were allowed to cure in the ambient atmosphere until they had gained sufficient strength to resist the forces imparted by strand release. After the strands were released, the girders were steam treated for at least 48 hours. The steam treatment was completed through the use of the precast plant's steam generation system, which is integral to each casting bed. After treatment, the girders were ready for shipment. 4.2 Test MatrixAs stated in chapter 1, the objective of this research was to determine the applicability of UHPC to highway bridge superstructure applications. The test matrix, presented in table 6, was developed to address this objective. As shown in the table, four girder specimens were tested, all with different overall spans and shear spans. The girder designations shown in the table will be used throughout this text. These designations provide a general indication of the overall span length (in feet) and whether the test focused on shear or flexural behavior.
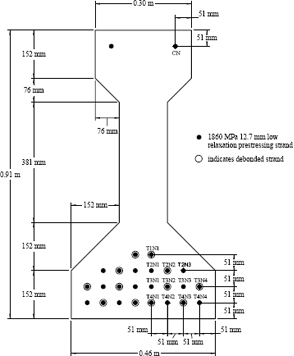
4.3 Test Setup and Specimen DetailsThe test specimens detailed in the test matrix above were not originally four separate specimens. As described in the girder fabrication account, two AASHTO Type II girders with lengths of 24.4 and 9.2 m (80 and 30 ft) were originally cast. The four tests were completed in the same order that the specimens are listed in table 6, thus allowing the broken pieces from the flexure test to be used in the subsequent two shear tests. The final shear test used a portion of the 9.2-m (30-ft) girder. Figure 3 provides a schematic indicating the origin of the four girder specimens from the original two girders. The cross section of an AASHTO Type II girder is shown in figure 4. This AASHTO shape is 0.91 m (36 inches) deep and has a 305-mm-wide (12-inch-wide) top and a 457-mm (18-inches) bottom flange. The girder web is 381 mm (15 inches) deep and is 152 mm (6 inches) thick. These girders each contained twenty-six 12.7-mm (0.5-inch) diameter, 1860-MPa (270-ksi), low-relaxation prestressing strands. Twenty-four of these strands are located in the bottom flange, spaced in a grid pattern on 51-mm (2-inches) spacing. Alternating strands in the bottom flange are debonded for a length of 0.91 m (36 inches) from each end of the original two girders. Generally, AASHTO Type II girders contain significant amounts of mild steel reinforcement, primarily in the form of stirrups and possibly temperature and shrinkage steel. The girders tested in this study contained no mild steel reinforcement. These girders were designed to carry tensile flexural forces primarily via the prestressing strand and to carry tensile shear forces via the fiber-reinforced concrete matrix. Two basic loading configurations were used: One for the flexural test and one for the shear tests. In both configurations, the girder was simply supported and the load was applied vertically downward through the top flange of the girder. Hydraulic jacks applied the loads. Girder 80F was loaded symmetrically by two-point loads each located 0.91 m (3 ft) from midspan. The simple supports, each located 12 m (39.25 ft) from midspan, were rollers that allowed for independent movement of the ends of the girder. The bearings were centered 229 mm (9 inches) from the ends of the girder. Before testing, this girder had a camber of approximately 65 mm (2.5 inches) at midspan.
1 m = 3.3 ft Figure 3. Illustration. Origin of the four girder specimens, with the south elevation of the tested configuration shown.
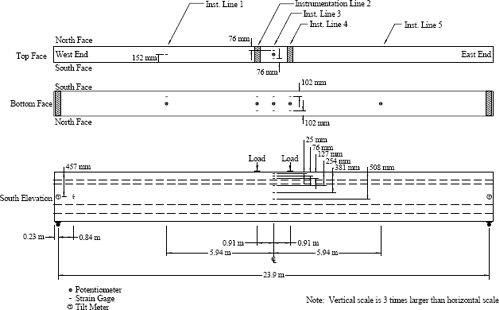
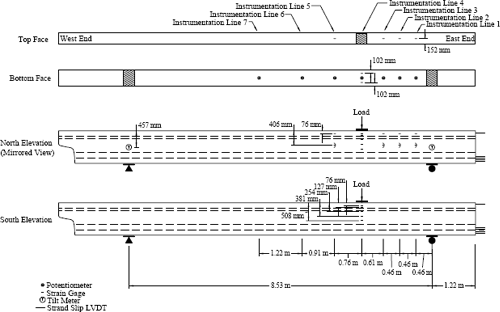
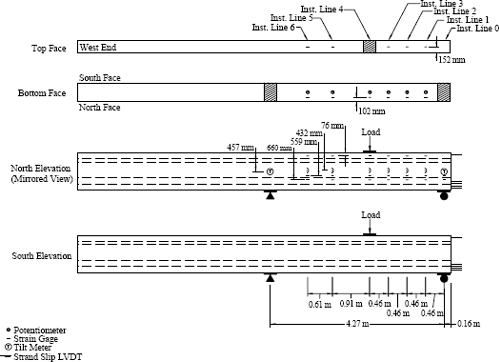
1 m = 3.3 ft Figure 4. Illustration. AASHTO Type II cross section and strand pattern. The three shear tests were each loaded by a point load located closer to the east end of the girder. The simple supports included a roller at the east end and a rocker bearing at the west end. The rocker was implemented to alleviate safety concerns emanating from the nonsymmetric application of load. In girder tests 28S and 24S, the roller bearing was centered 1.22 m (4 ft) from the east end of the girder. In girder test 14S, the roller bearing was centered 152 mm (6 inches) from the east end of the girder. This girder's setup allowed for a determination of the effect of strand debonding on the shear strength of the girder. 4.4 InstrumentationThe instrumentation plan for the four girder tests included five basic types of instrumentation. Electrical resistance strain gages were used to capture the strain behavior on the surface of the concrete girder. Gage lengths of 25.4 and 50.8 mm (1 and 2 inches) were used, depending on application and availability. In general, linear string potentiometers were used to measure girder deflection. Tilt meters were used to measure girder rotation. Linear variable differential transformer (LVDT) displacement transducers were used to measure prestressing strand slippage. Finally, load cells were used to measure the live load applied to the girder at the load point(s). The following discussion describes the instrumentation plan for each girder specimen in detail. 4.4.1 Girder 80FFigure 5 shows the test setup and instrumentation plan for Girder 80F. The majority of the instrumentation was placed on the girder in one of five vertical instrumentation lines. The instrumentation lines (1 through 5) corresponded to the span quarter points (1 and 5), the load points (2 and 4), and the midspan (3). Five potentiometers were attached to the bottom flange to measure vertical deflection of the girder at each instrumentation line. Tilt meters were located above the bearings at girder middepth to measure end rotation. Strain gages were attached to the top and bottom flange to measure compressive and tensile strains, respectively. The gages on the tensile flange were also used as indicators of tensile cracking behavior. Instrumentation Line 3, located at midspan, included six additional strain gages on both the north and south faces. The strain profile in the constant moment region between the load points was captured through these gages. The final strain gages were applied near the west bearing on the south face. A strain rosette was created from three strain gages to capture the shear strain behavior in a region experiencing minimal flexural influence. 4.4.2 Girder 28SFigure 6 shows the test setup and instrumentation plan for Girder 28S. Again, most instrumentation was located along seven vertical instrumentation lines. The instrumentation included seven potentiometers to capture the vertical deflection of the girder. Additionally, two tilt meters were located above the bearings at girder middepth to measure rotation. LVDTs were attached to half of the strands extending from the east end of the girder. The strands to the north of the vertical centerline were monitored and their designations are shown in figure 4.
1 m = 3.3 ft Figure 5. Illustration. Instrumentation plan for Girder 80F.
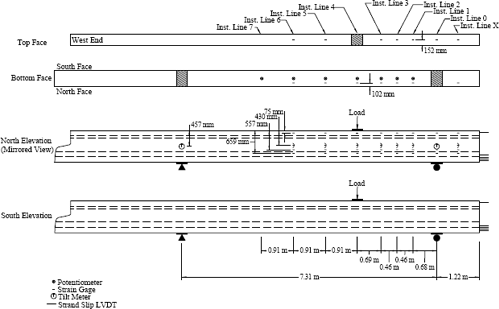
1 m = 3.3 ft Figure 6. Illustration. Instrumentation plan for Girder 28S. 4.4.3 Girder 24SFigure 7 shows the test setup and instrumentation plan for Girder 24S. The instrumentation plan for this test was similar to but more extensive than that implemented for the testing of Girder 28S. This change resulted from the behaviors observed during the testing of Girder 28S. Most instrumentation was located along nine vertical instrumentation lines (Instrumentation Lines X, 0, 1, …, 7). Note that Instrumentation Lines 1 through 7 are in similar locations in the previous test, while lines 0 and X are located above the east support and at midlength of the east end overhang. Strain gages were used at various locations on the surface of the girder to monitor local tensile and compressive strains. Strain gages were applied to the top and bottom flanges to capture similar behaviors to those observed in the testing of Girder 80F. Gages were also applied along the depth of the cross section under the load point to capture the strain profile on the cross section. Four additional strain gages were applied to the north face of the top flange block to capture the compressive strains and to monitor the development of a compression strut as the test progressed. Finally, strain rosettes were created at three locations in the center of the web on the north face. These rosettes allowed for monitoring the principal compressive and tensile stresses in the web in both the shorter and longer shear spans. Seven potentiometers were used to capture the vertical deflection behavior of the girder. Again, two potentiometers captured the rotation of the girder above the support points. In an identical fashion to the setup for the previous test, LVDTs were used to measure the strand slip. Strain gages were placed on the top and bottom of the girder and on the north face to capture the axial and shear strain behavior. Seven rosettes were applied to the web in this test, with the additional rosettes capturing the strain behavior in the east overhang, at the load point, and farther into the longer shear span. Strain gages were again placed on the north face of the compression flange. Additional gages were placed along the transition at the bottom of the web. Cracking along this transition had influenced the girder behavior on the previous test, so these gages were intended to capture localized strain aberrations occurring across this plane at the base of the web. 4.4.4 Girder 14SFigure 8 shows the test setup and instrumentation plan for Girder 14S. This instrumentation plan was very similar to that implemented for Girder 24S. The primary difference is that the 1.22-m (4-ft) overhang on the east end was eliminated, thus so was Instrumentation Line X. In addition, Instrumentation Line 7 was eliminated due to the shorter overall span.
1 m = 3.3 ft Figure 7. Illustration. Instrumentation plan for Girder 24S.
1 m = 3.3 ft Figure 8. Illustration. Instrumentation plan for Girder 14S. 4.5 Loading ProcedureLoads were applied to the girders through their top flange using hydraulically actuated jacks. The loads were applied vertically in the plane of the strong axis of each girder. In the Girder 80F test, the load was applied through two load points, each 0.91 m (3 ft) from midspan. The load point bearing was a pair of back-to-back channels grouted to the surface. The shear tests all were loaded through a single load point. The load point bearing assembly was a steel plate grouted to the surface with a half-round bearing welded to the jack side of the plate. The jack applied a vertical force to this half-round bearing, thus limiting the horizontal forces imparted to the girder. All the data collection instruments described in the instrumentation plan were monitored throughout the test. The test plan was conducted and modified throughout the test based on these values. Initially, each test was conducted under load control. Load was increased in predefined increments, then the loading was stopped and the data were collected. This procedure continued until the girder was observed to be softening. The test control was then shifted to deflection control, wherein the vertical deflection of the girder under the load point was incremented. The hydraulic jacks were instructed to extend until a certain girder deflection was reached, then the loading was stopped and the data were collected. The deflection increments varied from smaller values when the specimen was initially beginning to soften to larger values when the specimen was exhibiting little residual stiffness. At predefined intervals throughout each test, the loading was stopped and unload/reload data were captured. This testing protocol allowed for the capture of the residual elastic response of the girder, regardless of the level of inelastic damage that had already occurred. In general, six to eight unloads were completed and were evenly spaced throughout each test. The unloads usually decreased the load on the specimen to approximately 0.75Pmax, or 75 percent of the current maximum load. The load was then increased and the data were collected at 0.80Pmax, 0.85Pmax, 0.90Pmax, and 0.95Pmax. The load was then increased to Pmax, and the test continued in the same manner as it had before the initiation of the unload/reload protocol. All girders were loaded until they were determined to have failed. Failure was defined as either crushing of the concrete or gross cracking of the concrete accompanied by rupture or significant slippage of prestressing strands.
|