U.S. Department of Transportation
Federal Highway Administration
1200 New Jersey Avenue, SE
Washington, DC 20590
202-366-4000
Federal Highway Administration Research and Technology
Coordinating, Developing, and Delivering Highway Transportation Innovations
 |
| This report is an archived publication and may contain dated technical, contact, and link information |
|
Publication Number: FHWA-HRT-06-089
Date: July 2006 |
PBCAT-Pedestrian and Bicycle Crash Analysis ToolVersion 2.0PDF Version (14.7 MB) PDF files can be viewed with the Acrobat® Reader®
CHAPTER 6. DATA ENTRY AND CRASH TYPINGThe primary purpose of this software product is to allow users to type pedestrian and bicyclist collisions in their community, which may lead to the selection and implementation of countermeasures targeted at specific crash types. This chapter covers the data entry and crash typing aspects of the application and includes several crash typing examples to assist users in understanding the logic of the software. Prior to entering data in the application, the user should set the appropriate parameters in Preferences: (See chapters 3 and 4.)
DATA ENTRY
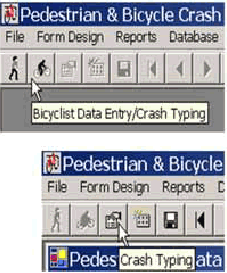
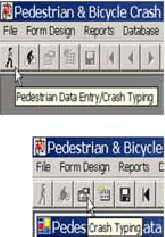
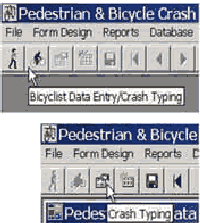
Basic FunctionsEntering data and typing crashes begins by selecting either the Pedestrian or Bicyclist button on the toolbar, as shown in figure 36. A click on either of these buttons will open an empty data entry form and activate the other data entry/crash typing buttons on the toolbar. The form name and the database file name will appear in the header box. The record number will appear in the toolbar at the bottom of the page. The entire data entry form is contained on one scrollable screen. The window can also be maximized to see more fields at once.
Figure 36. Image. Enter pedestrian or bicyclist crash data.
The cursor will appear in the first field to be completed. The order of entry for the data will have been established through the Reindexing function when the form was designed. Proper form design and indexing will enable data entry personnel to tab from field to field in the desired order during data entry. As they become experienced with data entry, it may be more efficient to have a different order of entry. Refer to chapter 5 for instructions on Reindexing within Form Design to make such a change. Error checks will be performed as data are entered for specific fields. The message received will depend on the field, but examples include:
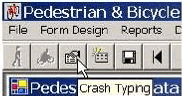
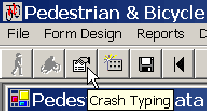
The crash typing function may be accessed at any time during data entry and is done with a click on the Crash Typing button on the toolbar, as shown in figure 37. When the crash typing is completed (i.e., a crash type is accepted after answering the series of questions/directives), the crash typing fields included on the data entry form will be completed. More details on crash typing, including several examples, are provided in a later section of this chapter.
Figure 37. Image. Access the Crash Typing function.
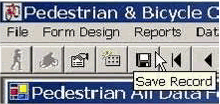
Entries can be saved with a click on the Save Record button in the toolbar, as shown in figure 38. The record can be saved and resaved at any time during data entry. Be sure to save once all data have been entered and the crash typing has been completed. If unsaved changes are made to a record, any attempt to close the data entry window or add a new record will prompt a message asking if the record should be saved.
Figure 38. Image. Save a data entry record.
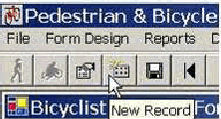
A new record can be added by clicking on the New Record button, which will open an empty data entry form. (See figure 39.) The record number for the new entry will be shown in the bottom left of the screen.
Figure 39. Image. Open a new data entry form.
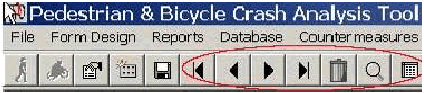
Other FunctionsThe toolbar includes several other functions that may be useful for managing and navigating the database, as shown in figure 40. The arrow key buttons allow the user to navigate to the previous and next records, as well as the first and last records in the database. The Delete button, denoted by the trash can icon, can be used to delete a record. A click on this button will produce a confirmation window requiring a Yes response to delete the record.
Figure 40. Image. Navigate to, delete, search, and browse records in a table.
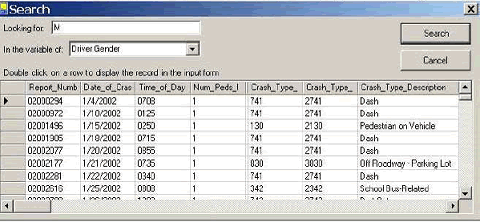
The Search button (magnifying glass) allows the user to search the database for a specific record or records. This feature will be most useful when searching for the record of a specific crash using the Report Number field. A click on this button opens a search window. The user can input the value or text to search for and the variable (field) in which to search. A click on Search will produce a list of records that meet the search criteria. In the example shown in figure 41, records are listed that were coded as "M" for the variable Driver Gender.
Figure 41. Image. Search the database for specific records.
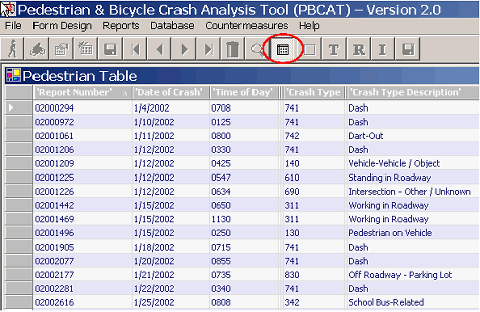
The complete database can also be viewed as a table with a click of the Browse button on the toolbar, as shown in figure 42. Enabling browse editing on the User Profiles tab in Preferences allows the user to edit or delete existing records and create new records. A prompt to save changes will appear when the window is closed or browse mode is exited (another click on the Browse button). If browse editing is not enabled, the table can be viewed but not changed.
Figure 42. Image. Browse all records in the database.
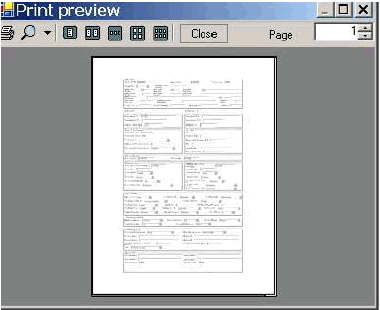
Any record in the database can be printed using the Print command under the File menu. The menu also includes options for Page Setup and Print Preview. The latter will generate the form in a window like the one shown in figure 43. This window can be maximized, and there is a zoom option to preview specific sections of the form.
Figure 43. Image. Preview the data form that can be printed.
CRASH TYPING OPTIONS AND DATABASE FIELDSCrash typing requires the user to input answers to questions and directives on a series of screens. The number of questions and directives is determined by the crash typing options selected for a particular database. The options available are shown on the Data Sources tab in Preferences and are briefly described below. Refer to chapter 4 for more details on each option and instructions for enabling each one.
Pedestrian LocationThe Pedestrian Location Option allows the user to add details regarding the specific location of pedestrian crashes at or near intersections. The answers are stored in the following fields in the database and may prove useful for conducting intersection-level analyses:
Illustrations of the scenarios are provided in appendix B for reference and use in analyses. Only Motorist_Direction (motorist’s initial travel direction before any turns) and Scenario are needed to identify the precise leg of the intersection and the maneuvers of the motorist and pedestrian. If additional variables are preferred to further define location information, the user can add other fields to the database, as discussed later in this chapter. Special Note: To make use of the pedestrian location data in an analysis involving specific intersections, it is necessary to sort the data by intersection location. Refer to chapter 4 for a discussion of this issue.
Standard versus Group TypingThe logic for the standard crash typing within PBCAT will produce 56 unique pedestrian crash types and 79 unique bicyclist crash types. Some users may not want the level of detail that is available with these standard crash types. They may select the group typing option for pedestrian and/or bicyclist crashes on the Data Sources tab within Preferences. (See chapter 4.) If selected, the application will use a different logic that requires the user to answer a lesser number of questions/directives and places each crash into one of 16 pedestrian crash type groups or 20 bicyclist crash type groups. As an example of the differences in these two options, consider a collision involving a motorist overtaking a bicyclist. Within the standard crash typing logic, the crash may be coded as one of four types: 1) Motorist Overtaking–Undetected Bicyclist, 2) Motorist Overtaking–Bicyclist Swerved, 3) Motorist Overtaking–Misjudged Space, or 4) Motorist Overtaking–Other/Unknown. If the group typing option were selected, the crash would be coded as Motorist Overtaking Bicyclist. The four detailed crash types available in the standard application are collapsed into the single choice in the group application. Appendix C includes a complete list of all pedestrian and bicyclist crash groups and the unique standard crash types included in each group.
Database FieldsThe database fields that are completed by the software when a crash is typed and a record is saved in the data entry mode are listed below. These fields cannot be edited or deleted on the Database Fields tab within Preferences. While the information is saved to these fields in the database for each typed crash record, not all fields have to be included on the data entry form. For example, if the only crash type information desired by the user is the crash type description, the pedestrian and bicyclist forms can be designed to include Crash_Type_Description and exclude all other fields. Refer to chapter 5 for more details on customizing data entry forms. Pedestrian and Bicyclist Fields (present in both data tables)
Pedestrian Fields (not present in the bicyclist table)
Bicyclist Fields (not present in the pedestrian table)
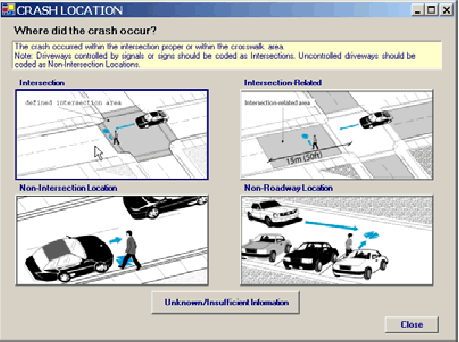
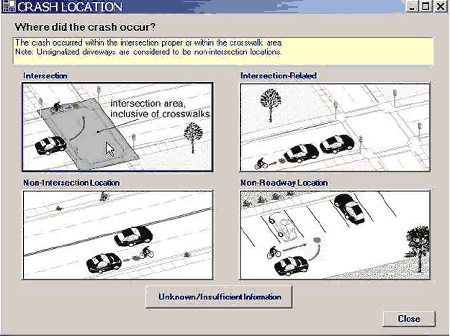
CRASH TYPING SCREENS AND DEFINITIONSCrash typing begins with a click on the Crash Typing button on the toolbar, as shown in figure 44, which opens a window with the first question regarding where the crash occurred. (See example for pedestrian crashes in figure 45.) The graphics on the screens provide examples of the circumstances described in the yellow narration boxes. As the cursor is placed over a graphic and the image is highlighted by a blue border, a narrative describing the details associated with that selection is provided in the box.
Figure 44. Image. Start the crash typing process.
Special Note: The graphic is an example and the text description must be read to interpret the differences (sometime subtle) between the options on the screen. Pay particular attention to the NOTES included in the descriptions. Most of the screens are of the type shown below, with an image as an example of what is being described in the narrative. There are also screens with buttons (like the Unknown/Insufficient Information button below), which also require the user to read the information in the yellow narrative box. In addition, there are some screens that include radio buttons or small rectangular buttons and provide the needed descriptive information next to each button. Each screen also includes a Close button, which if clicked, will ask the user whether they wish to exit crash typing. There is also a Back button on all screens except the first. Clicking this button will allow the user to return to the prior screen and view the response that was provided to the question on that screen. The application retains the answers provided to each question/directive as a crash is being typed, which allows a user to use the Back button to determine the response to any question in the sequence.
Figure 45. Image. Identify where the crash occurred.
Appendix F includes several tables of definitions related to the pedestrian and bicycle crash typing logic. Understanding the subtleties among some of these definitions may assist the user in understanding the choices available in the logic. Also provided in this appendix are definitions associated with other important selections such as crash location and pedestrian or bicyclist position.
CRASH TYPING EXAMPLESAppendix G provides copies of 20 crash reports (10 involving pedestrians and 10 involving bicyclists) and the crash types associated with these reports, as well as the questions/directives and correct responses for the sequence of screens encountered for each crash. Using the program in conjunction with these reports gives the user with the opportunity to practice and sharpen crash typing skills and understand the logic built into the program. These examples may also be used as training materials for someone new to the concept of crash typing. Following are three examples (one pedestrian and two bicyclist crashes) to illustrate the steps involved in typing a crash and the screens that appear in the application. The first two examples use standard crash typing, while the third illustrates the use of the group typing option. The pedestrian example is completed with the pedestrian location option enabled. Before answering any questions, read the entire crash report, paying particular attention to the sketches and narratives and looking at the fields related to location, intersection control, and operator characteristics and condition.
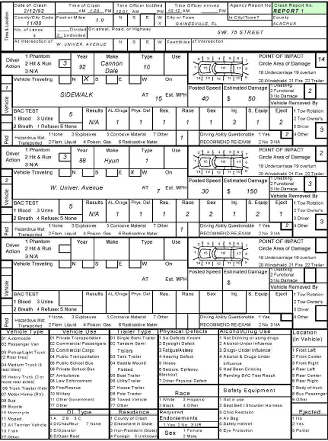
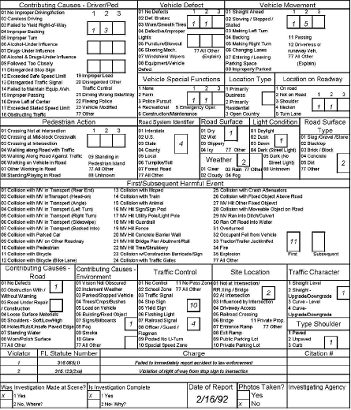
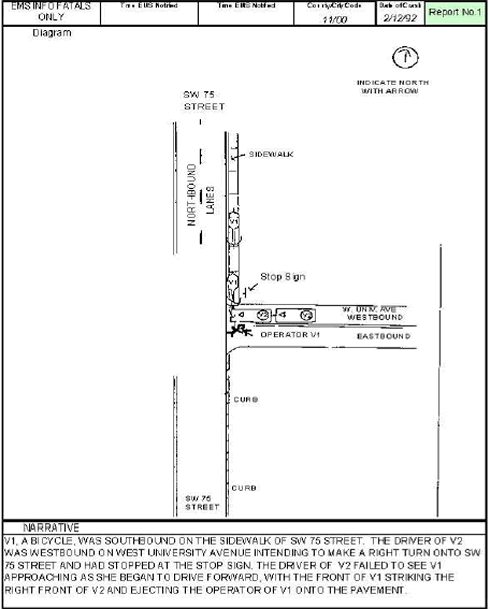
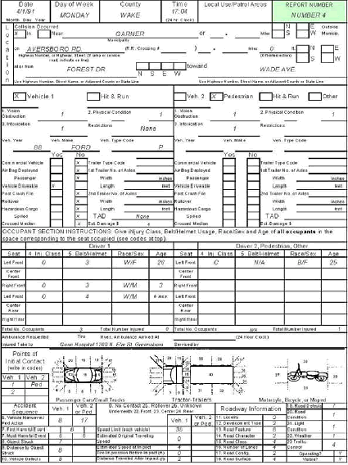
Example 1–Bicyclist Crash (Standard Typing)This example is from a crash in Florida involving a bicyclist and motorist. A 3-page police crash report is shown in figures 46, 47, and 48. The first two pages of the report include a description of the location, operator (bicyclist and driver) information, and a number of completed fields describing aspects of the location (e.g., type of traffic control) and contributing factors. The third page features a drawing of the scene and a narrative describing the sequence of events. Read the narrative, study the drawing, and become familiar with the characteristics of the location and operators involved.
Florida Crash Report
Figure 46. Image. Page 1 of Florida Crash Report for example 1.
Figure 47. Image. Page 2 of Florida Crash Report for example 1.
Figure 48. Image. Page 3 of Florida Crash Report for example 1.
As shown in figure 49, click on the Bicyclist button to open a bicyclist crash data entry form. Click on the Crash Typing button to begin the crash typing process.
Figure 49. Image. Open a bicyclist crash data entry form then begin the crash typing process.
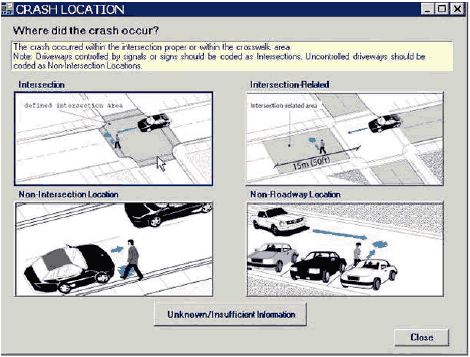
Reminder: The screens that appear in this example are for standard crash typing, which means the group typing option was NOT enabled on the User tab in Preferences. Screen 1–Crash Location In the time and location section of the crash report (on page 1), the location of the crash is given as "SW 75 Street" at the intersection of "W. Univer. Avenue." A review of the descriptions for the location options on the screen leads to the correct choice of Intersection.See figure 50.) Click this graphic to advance to the next screen.
Figure 50. Image. Click on Intersection to indicate where crash occurred.
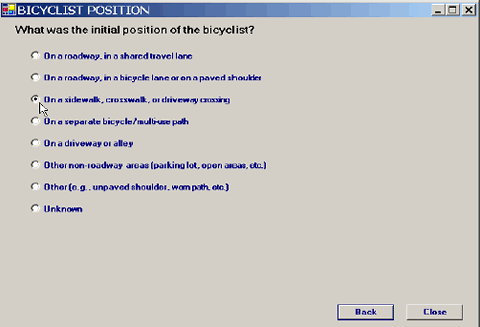
Screen 2–Bicyclist Position The next screen asks for the initial position of the bicyclist. The crash report drawing shows the bicyclist (denoted as V1) on the sidewalk. The narrative also notes that the bicyclist ". . .was southbound on the sidewalk. . ." Finally, it is noted on page 1 of the crash report that vehicle 1 was traveling on the sidewalk. Thus, the correct answer on this screen is "On a sidewalk, crosswalk, or driveway crossing." Click the radio button next to this text, as shown in figure 51.
Figure 51. Image. Indicate where the bicyclist was initially positioned.
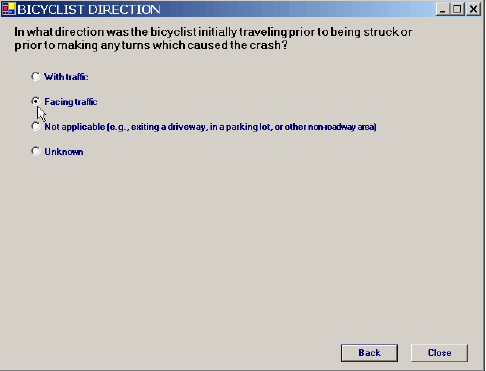
Screen 3–Bicyclist Direction The next screen asks for information related to where the bicyclist was riding just prior to the crash or prior to making a maneuver that caused the crash. From the drawing of the crash, it can be determined that the bicyclist was riding southbound on the sidewalk next to the northbound motor vehicle traffic. Thus, the correct choice on this screen is "Facing traffic."Click the radio button next to this text, as shown in figure 52.
Figure 52. Image. Indicate travel direction of the bicyclist.
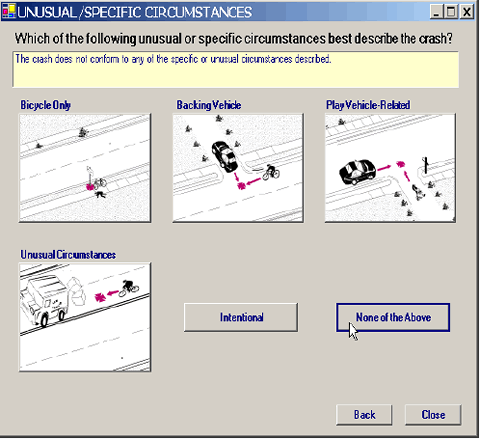
Screen 4–Unusual/Specific Circumstances The next screen asks if the crash was one of several unusual or specific circumstances. After reading the descriptions associated with the five specific crash types on the screen, it is apparent that the correct answer is "None of the Above." As shown in figure 53, click this button to advance to the next screen.
Figure 53. Image. Indicate unusual/specific circumstances.
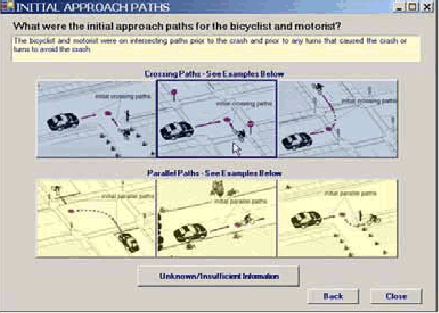
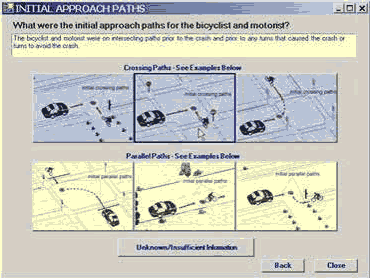
Special Note: In most cases, the answer to this question will be "None of the Above." However, the user should be familiar with each of these unique types of collisions in the event that such a crash does fit the specific circumstances. Screen 5–Initial Approach Paths The approach paths of the two parties is a major decision point in the crash typing logic. The choices are "Crossing Paths" and "Parallel Paths" and are defined as the paths of the two parties prior to the crash and prior to any turns that caused the crash. In this example, the diagram clearly shows the bicyclist and motorist on intersecting paths. As shown in figure 54, click on any of the crossing path graphics (in blue) to advance to the next screen.
Figure 54. Image. Indicate initial approach paths.
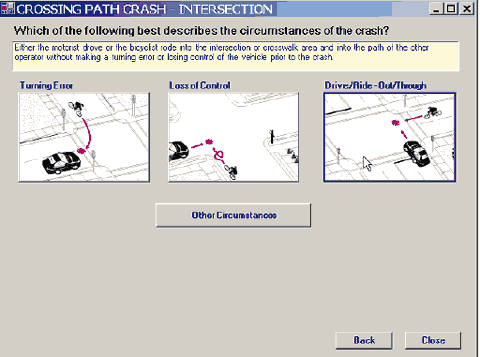
Screen 6–Crossing Path Crash–Intersection The remaining screens prompt the user with a series of questions about the maneuvers of one or both parties involved or about the characteristics of the site of the crash. The question shown here and the choices available are based on prior choices–the fact that the crash occurred at an intersection and that the two parties were on crossing paths. From the narrative and diagram on+ page 3 of the crash report, "Drive/Ride–Out/Through" is the correct choice. Click on this graphic, as shown in figure 55.
Figure 55. Image. Indicate maneuvers made by the parties.
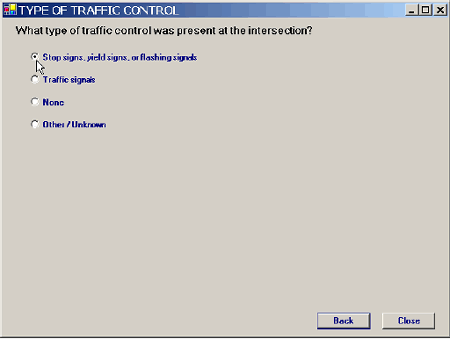
Screen 7–Type of Traffic Control The next screen asks the user to select the type of traffic control present at the intersection. There is a traffic control variable on page 1 of the crash report form; one of the codes entered is for a stop sign. The diagram on the crash also shows a stop sign. Thus, "Stop signs, yield signs, or flashing signals" is the correct choice. Click on the radio button next to that selection, as shown in figure 56.
Figure 56. Image. Indicate type of traffic control at the intersection.
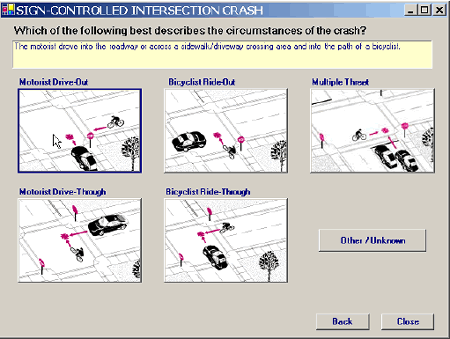
Screen 8–Sign–Controlled Intersection Crash The next screen prompts the user for more details on the basis that the crash occurred at a signcontrolled intersection. After reading all the choices carefully and then reading the narrative of the crash report, the correct choice is "Motorist Drive-Out," as shown in figure 57. The key words in the narrative that lead to this decision are that the motorist ". . .stopped at the stop sign."
Figure 57. Image. Describe the circumstances of a sign-controlled intersection crash.
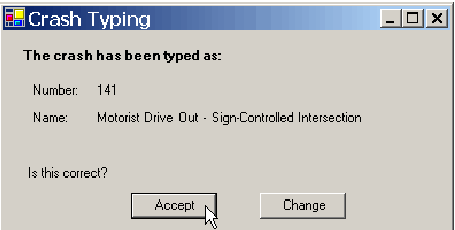
Special Note: This is an example of where care must be taken to read the narrative and review the report sketch, as there are subtle differences in the definitions of "Drive–Out" and Drive–Through." Screen 9–Crash Typing The final screen that will appear when all required questions and directives have been answered is the crash typing window, which will include the name and number of the crash type. In this example, the crash type is a "Motorist Drive–Out Sign–Controlled Intersection" crash. Clicking Change will return the user to the previous screen and allow the answer to be changed on this screen (or other screens by clicking on the Back button).As shown in figure 58, clicking Accept will complete the fields on the data entry form and save the crash typing information in the database.
Figure 58. Image. Enter crash typing data into the entry form.
Completed Crash Typing Fields The values for the crash typing fields in this example that will appear in the database and on the form (for those fields chosen to be included on the form) are shown in table 1:
Table 1. Values for Crash Typing Fields for Example 1
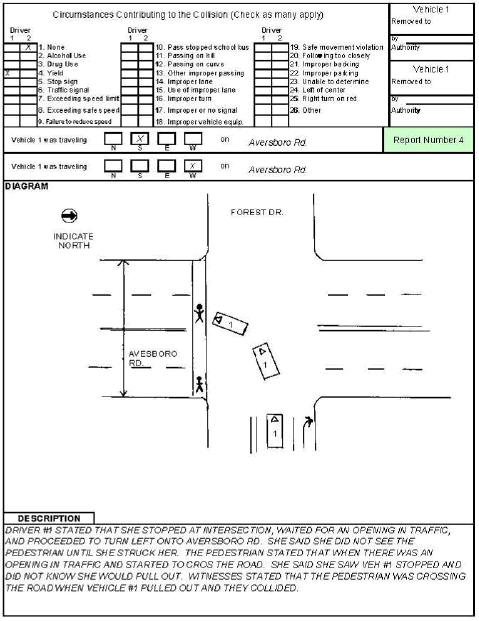
Example 2–Pedestrian Crash (Standard Typing, Location Option Enabled)This example is from a crash in North Carolina involving a pedestrian and motorist. A police crash report is shown in figures 59, 60, and 61. The first page of the report, figure 59, includes a description of the location, operator (pedestrian and driver) information, and a number of completed fields describing aspects of the location (e.g., type of traffic control) and characteristics of the crash. The second page, figure 60, includes contributing factors, a drawing of the scene and a narrative describing the sequence of events. The third page, figure 61, shows the list of codes for the fields used on the report. Read the narrative, study the drawing, and become familiar with the characteristics of the location and operators involved.
North Carolina Crash Report
Figure 59. Image. Page 1 of North Carolina Crash Report for example 2.
Figure 60. Image. Page 2 of North Carolina Crash Report for example 2.
Codes for North Carolina collision Report Forms
Figure 61. Image. Page 3 of North Carolina Crash Report for example 2.
As shown in figure 62, click on the Pedestrian button to open a pedestrian crash data entry form. Then click on the Crash Typing button to begin the crash typing process.
Figure 62. Images. Pedestrian crash data entry forms.
Reminder: The screens that appear in this example are for standard crash typing, which means the group typing option was NOT enabled on the User tab in Preferences. Screen 1–Crash Location In the time and location section of the crash report (page 1), the location of the crash is given as "Aversboro Rd" 0 feet from "Forest Dr." The crash report drawing shows the collision occurred within an intersection. A review of the descriptions for the location options on the screen leads to the correct choice of Intersection, as shown in figure 63. Click this graphic to advance to the next screen.
Figure 63. Image. Indicate where the crash occurred.
Special Note: Pay attention to the notes in the descriptions to correctly assign the location. Screen 2–Pedestrian Position–Intersection or Intersection-Related The next screen asks for the initial position of the bicyclist. The crash report drawing shows the pedestrian in the crosswalk when struck. Thus, the correct answer on this screen is "Within a crosswalk, marked or unmarked." Click the radio button next to this text, as shown in figure 64.
Figure 64. Image. Indicate position of pedestrian when struck.
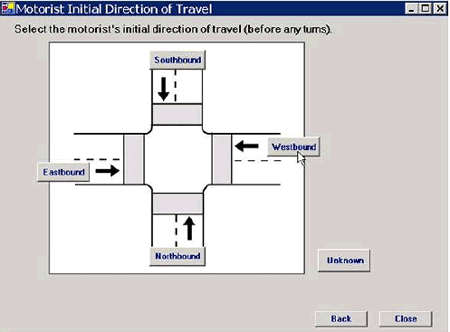
Special Note: The choices shown on this screen are a function of the location selected on the previous screen. Screen 3–Motorist Initial Direction of Travel With the Pedestrian Location option enabled, the next four screens ask for specific information about the travel directions and maneuvers of the motorist and pedestrian. The first directive requires the initial travel direction of the motorist. From the crash report drawing, it can be determined that the motorist was traveling "Westbound." Click this button, as shown in figure 65.
Figure 65. Image. Indicate initial direction of travel of the motorist.
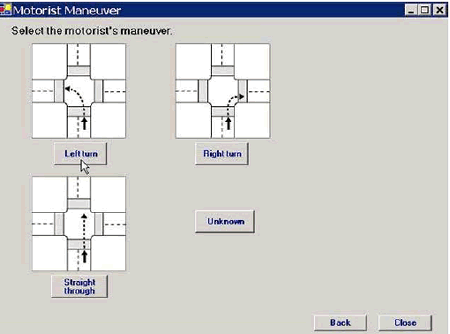
Screen 4–Motorist Maneuver On this screen, select the maneuver being made by the motorist at the time of the collision. The crash report drawing indicates that the motorist was making a left turn. Thus, the correct choice is 7quot;Left turn," as shown in figure 66. Click this button to advance to the next screen.
Figure 66. Image. Indicate the motorist maneuver.
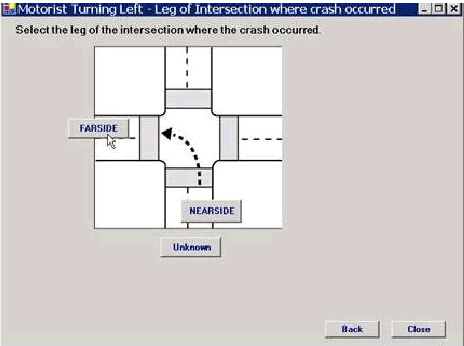
Screen 5–Motorist Turning Left–Leg of Intersection Where Crash Occurred The next directive requires the user to select the correct leg of the intersection where the crash occurred. The choices, regardless of the motorist maneuver, will always be "Nearside" and "Farside.7quot; From the crash report drawing, it is evident that the correct choice in this example is "Farside, as shown in figure 67." Click this button to advance to the next screen.
Figure 67. Image. Indicate where the crash occurred at the intersection.
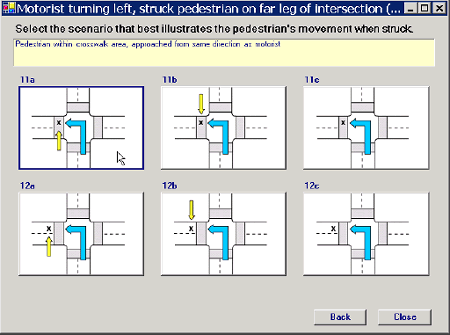
Screen 6–Motorist Turning Left, Struck Pedestrian on Far Leg of Intersection The final screen with the Pedestrian Location option enabled requires the user to select the scenario that best describes the direction of travel of the pedestrian and indicates whether the pedestrian was in or out of the crosswalk. A review of the crash report drawing indicates the best choice is the first graphic (denoted as 11a in figure 68). The pedestrian was traveling in the same direction as the motorist and was in the crosswalk. Click this button to advance to the next screen.
Figure 68. Image. Select the scenario that illustrates the pedestrian’s movement when struck.
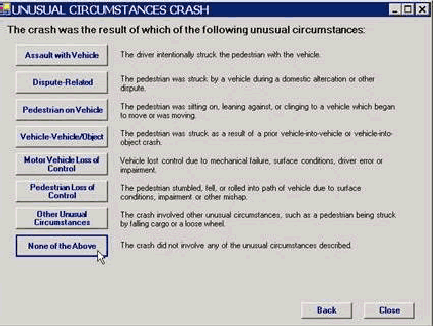
Screen 7–Unusual Circumstances Crash The next screen asks if the crash was one of several unusual circumstances. After reading the descriptions associated with the seven specific crash types on the screen, it is apparent that the correct answer is "None of the Above," as shown in figure 69. Click this button to advance to the next screen.
Figure 69. Image. Indicate no unusual circumstances.
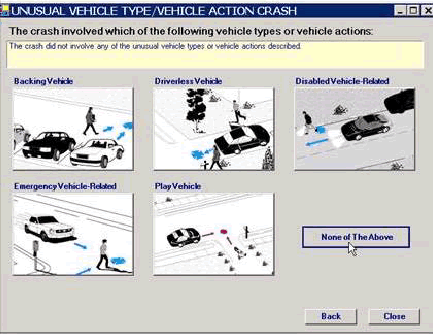
Special Note: This screen and the next two screens ask questions about very unusual circumstances or very specific actions or vehicle types. In most cases, the answers to these questions will be "None of the Above.7quot; However, the user should be familiar with each of these unique types of collisions in the event that such a crash does fit the circumstances described. Screen 8–Unusual Vehicle Type/Vehicle Action Crash The next screen asks whether the crash involved a unique vehicle action (e.g., backing vehicle) or a specific type of vehicle (e.g., disabled vehicle). After reviewing the descriptions, the correct choice is "None of the Above," as shown in figure 70. Click this button to advance to the next screen.
Figure 70. Image. Indicate no unusual vehicle types or vehicle actions.
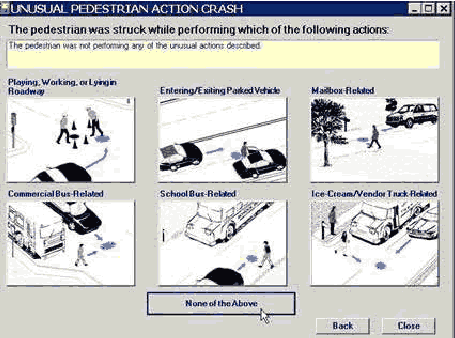
Screen 9–Unusual Pedestrian Action Crash The next screen asks whether the pedestrian was performing one of six unique actions. These actions are very specific and either related to specific type of vehicle (e.g., buses) or a specific maneuver (e.g., crossing to/from a mailbox). In this example, the crossing was a normal street crossing that did not fall into any of these unique categories. Thus, the correct choice is "None of the Above," As shown in figure 71. Click this button to advance to the next screen.
Figure 71. Image. Indicate no unusual pedestrian action.
Screen 10–Intersection Crash–Typical Pedestrian Action The next screen asks about the pedestrian action at the time of the crash. The majority of pedestrian crashes will fall into one of these four actions. The narrative of the crash report includes a statement from the pedestrian that ". . .there was an opening in traffic and [she] started to cross the road." Thus, the correct choice is 7quot;Crossing the Roadway or In the Roadway," as shown in figure 72. Click this graphic to advance to the next screen.
Figure 72. Image. Describe the typical pedestrian action in the crash.
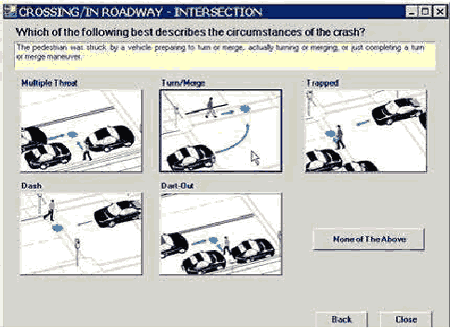
Screen 11–Crossing/In the Roadway–Intersection The next screen describes five specific scenarios involving a crossing pedestrian. Read each one carefully. From the crash report drawing and narrative, it is clear that the motorist was turning at the time of the collision. Thus, the correct choice is "Turn/Merge," as shown in figure 73. Click on this graphic to advance to the next screen.
Figure 73. Image. Describe the circumstances of the crash.
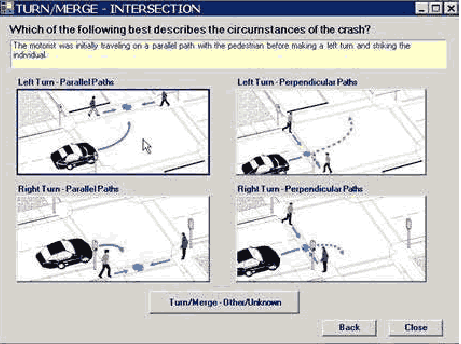
Screen 12–Turn/Merge–Intersection The next screen asks for more detail about the paths of the parties involved in the turn-merge crash. The narrative describes, and the crash report drawing shows, that the parties were on parallel paths prior to the collision. The drawing also shows that the motorist turned left and struck the crossing pedestrian. The correct choice is "Left Turn–Parallel Paths," as shown in figure 74. Click this graphic to advance to the next screen.
Figure 74. Image. Describe the circumstances of the crash in more detail.
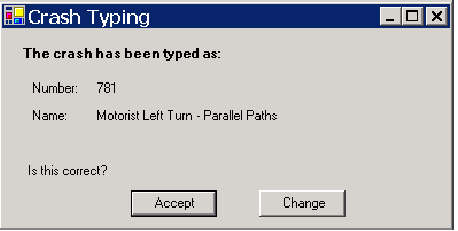
Screen 13–Crash Typing The final screen that will appear when all required questions and directives have been answered is the crash typing window, which will include the name and number of the crash type. (See figure 75.) In this example, the crash type is "Motorist Left Turn–Parallel Paths." Clicking Change will return the user to the previous screen and allow the answer to be changed on this screen (or other screens by clicking on the Back button). Clicking Accept will complete the fields on the data entry form and save the crash typing information in the database.
Figure 75. Image. Enter crash typing data into data entry form.
Completed Crash Typing Fields The values for the crash typing fields in this example that will appear in the database and on the form (for those fields chosen to be included on the form) are shown in table 2.
Table 2. Values for Crash Typing Fields for Example 2
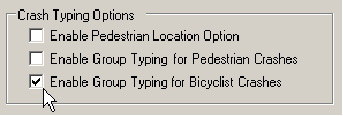
Example 3–Bicyclist Crash (Group Typing)This example makes use of the Florida bicyclist crash report used in example 1, but employs the group typing option. This option is set on the Data Sources tab in Preferences. As shown in figure 76 click on the box next to the text "Enable Group Typing for Bicyclist Crashes" to turn on this option. Save this change and Exit the Preferences window.
Figure 76. Image. Enable group typing for bicyclist crashes.
With the correct options set in Preferences, open a bicyclist crash data entry form with a click on the Bicyclist button. Click on the Crash Typing button to begin the crash typing process. (See figure 77.) These steps are the same regardless of the crash typing options selected.
Figure 77. Image. Open a bicyclist crash data entry form then begin the crash typing process.
The first three screens that appear with group typing enabled are the same as the ones that appear with standard group typing. From reviewing the crash report and the example 1 responses, the correct choices are as follows: Screen 1–Crash Location: Intersection Screen 2–Bicyclist Position: On a Sidewalk,Crosswalk, or Driveway Crossing Screen 3–Bicyclist Direction: Facing Traffic Screen 4–Initial Approach Paths The next screen that appears asks about the approach paths of the two parties involved in the collision. This is the same question that is asked within the standard typing option and is still a major decision point in the crash typing logic. The choices are "crossing paths" and "parallel paths" and are defined as the paths of the two parties prior to the crash and prior to any turns that caused the crash. In this example, the crash report drawing clearly shows the bicyclist and motorist on intersecting paths. As shown in figure 78, click on any of the crossing path graphics (in blue) to advance to the next screen.
Figure 78. Image. Indicate initial approach paths for bicyclist and motorist.
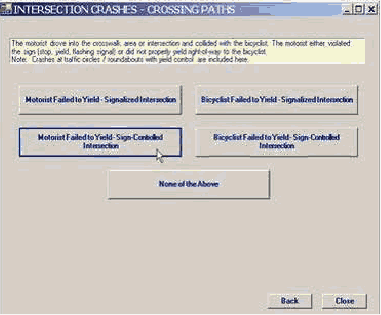
Screen 5–Intersection Crashes–Crossing Paths The next screen presents five options to describe the circumstances of the crash. After reading the options and reviewing the crash report narrative and drawing, the correct choice is determined to be "Motorist Failed to Yield–Sign–Controlled Intersection," as shown in figure 79. Click on this button to advance to the next screen.
Figure 79. Image. Describe the circumstances of the crash in this case.
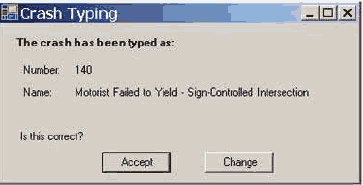
Screen 6–Crash Typing The final screen that will appear when all required questions and directives have been answered is the crash typing window. With group typing enabled, the answer will include the name and number of the crash group. In this example, the crash group is "Motorist Failed to Yield–Sign–Controlled Intersection." (See figure 80.) Clicking Change will return the user to the previous screen and allow the answer to be changed on this screen (or other screens by clicking on the Back button). Clicking Accept will complete the fields on the data entry form and save the crash typing information in the database.
Figure 80. Image. Enter crash typing data into form.
Completed Crash Typing Fields The values for the crash typing fields in this example that will appear in the database and on the form (for those fields chosen to be included on the form) are in table 3.
Table 3. Values for Crash Typing Fields for Example 3
Special Note: Group typing will result in fewer screens and questions or directives that must be answered. In this example, three fewer screens appeared with group typing enabled. The small time savings that result with group typing may not outweigh the advantages of having additional details about crashes that standard crash typing provides. The user needs to be familiar with both options and assess the advantages of each.
FHWA-HRT-06-089 |
|||||||||||||||||||||||||||||||||||||||||||||||||||||||||||||||||||||||||||||||||||||||||||||||||||||||||||||||||||||||||||||||