U.S. Department of Transportation
Federal Highway Administration
1200 New Jersey Avenue, SE
Washington, DC 20590
202-366-4000
Federal Highway Administration Research and Technology
Coordinating, Developing, and Delivering Highway Transportation Innovations
 |
| This report is an archived publication and may contain dated technical, contact, and link information |
|
Publication Number: FHWA-HRT-04-121 Date: February 2005 |
Previous | Table of Contents | Next
The total systems approach that the project team has adopted served as the common methodology and the general philosophy throughout the enhancement of the software guidelines. This unique approach allows for the integration of a number of disconnected concepts into a unified, interconnected entity.
As discussed in chapter 1, the total systems approach allows the various components of the current HIPERPAV system to be integrated easily to work in conjunction with the proposed modules to be developed in this phase. This chapter addresses the technical approach that was taken to enhance the guidelines by incorporating the JPCP long-term module and the CRCP early-age module. In addition, the design of the software user interface and development approach for incorporation of each of the individual modules in HIPERPAV II is described.
The approach in developing the CRCP module for early-age behavior is similar to the current HIPERPAV I system for JPCP. The framework for the CRCP module is illustrated in figure 17. This figure presents the interactions of the models used to predict the development of strength and stresses in the pavement and the resulting cracking behavior.
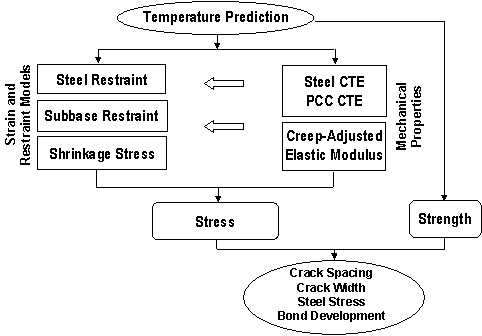
Figure 17. CRCP early-age module.
Like the early-age JPCP module, the CRCP module uses the HIPERPAV core for temperature prediction. The HIPERPAV I core is a two-dimensional FEM model that governs the heat transport in the concrete pavement. HIPERPAV II has been upgraded with a FDM-based model. With the concrete temperature as predicted by the HIPERPAV temperature core, coupled with the maturity model (based on the Arrhenius method), the development of the strength and modulus of elasticity are predicted.
Concrete and steel stresses are predicted in terms of the volumetric changes that accompany the predicted change in concrete temperature under the defined restraint conditions. One of the mechanical properties required for determining stresses is the CTE of both concrete and steel.
Volumetric changes in the concrete are influenced largely by temperature and moisture changes. As these changes are restrained due to steel restraint, friction with the subbase, and the weight of the slab, stresses develop in the concrete. In addition to predicting mechanical properties and concrete temperature, the slab behavior in terms of stress development also is predicted. Modeling the CRCP early-age behavior characterizes the interaction between the steel and the concrete subjected to the various loads and restraints. By computing the stresses and strength along the pavement, the final crack spacings, widths, and steel stresses are solved.
"Early age" in HIPERPAV II includes the first 72 hours after construction for both JPCP and CRCP. However, in the case of CRCP, the cracking behavior continues to change until approximately 1 year after construction. After 1 year, cracking commonly remains constant. HIPERPAV II predicts the cracking behavior of CRCP during the early age and also during the early life (up to 1 year) to realistically assess the behavior of CRCP in service.
This section describes the overall functionality of the JCP long-term performance module. Figure 18 illustrates how each one of the different models is assembled in the HIPERPAV II system. The process is divided in nine different steps:
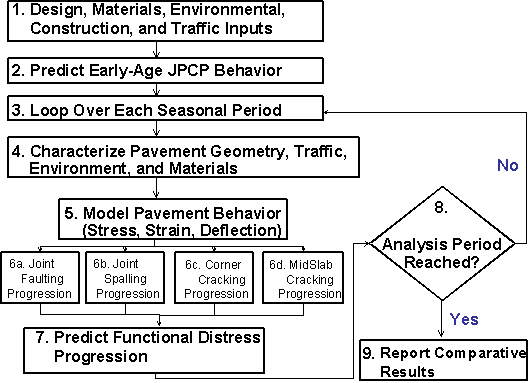
Figure 18. JCP long-term performance modeling.
Step 1-User Inputs
The user inputs for the long-term JCP models generally can be grouped into five categories:
Each of these categories contains a number of variables that can be defined by the user. Due to the number of inputs, guidance is provided in HIPERPAV II via default values, warnings, and tool tips. This also was accomplished by careful and practical engineering of the graphical user interface. As mentioned in chapter 2, the TEP members reviewed the product at various stages of completion to ensure its practicality.
Based on interaction with the TEP, great care was employed in this step. It was recognized that if the software was too data or labor intensive, most practitioners would not use it. However, if it was too simple, it might lack the accuracy for a reliable analysis. Therefore, a balance was made between the accuracy of the software and the complexity of the inputs.
Step 2-Early-Age Behavior
Early-age behavior of the pavement is required to be characterized for the long-term analysis, because it will provide initial information to feed the performance models. For example, initial temperature, moisture conditions, and joint opening are key early-age indicators (box 2 in figure 18). The enhanced early-age behavior models in HIPERPAV II are used for this purpose.
Step 3-Loop Over Each Seasonal Period
The essence of a systems analysis tool is to predict the various paving strategies as realistically as possible. This simulation is done chronologically by looping over each season from the initial construction season up to the last season of the user-defined analysis period.
Step 4-Characterize Pavement Geometry, Traffic, Environment, and Materials
After each seasonal period, the current conditions for the long-term pavement analysis are defined in terms of pavement geometry, traffic, environment, and materials.
a) Characterizing Pavement Geometry
The pavement geometry is characterized in terms of the layer thicknesses, slab configuration, and support conditions.
b) Characterizing Traffic
The traffic for the current period is defined as follows:
To be as compatible as possible with the new guide for pavement structures, which was under development at the time of this writing (National Cooperative Highway Research Program (NCHRP) Project 1-37A), every attempt was made to develop the traffic module using similar logic.(60)
c) Characterizing Environment
Various user inputs are needed to characterize the environmental conditions at the specified location for the design. To minimize the burden to the user, these inputs are extracted using a sophisticated GIS-based interface. When a location for the design is selected using the GIS system, an extensive environmental database is queried for weather data from weather stations in the vicinity of the specified location.
Using an intelligent algorithm, the most relevant weather stations are selected, and the weather information for the specified location is calculated based on a weighted interpolation scheme. The database actually contains mean hourly readings for the entire year (based on 30 years of data) for each of the specified stations. For simplicity, these values are the reduced seasonal means. In addition, the database contains the variances for each of these factors to better characterize the stochastic nature of weather phenomena.
Using the environmental inputs and the materials inputs, the temperature profiles in the pavement system are predicted using the FDM algorithm, similar to that of the integrated climate model (ICM) developed for FHWA.(23) The remaining characterization, behavior, and distress models in HIPERPAV II, in turn, use these profiles.
d) Characterizing Materials
HIPERPAV II uses dynamic values of variables such as temperature, moisture, cumulative damage, and time.
HIPERPAV II uses two unique models to predict the PCC strength and modulus. The first models are based on maturity methods and are used during the early-age analysis (step 2). The second are based on a more general form, and are used for subsequent analysis periods (step 4).
Step 5-Model Pavement Behavior
For each time step, the pavement behavior is evaluated as a function of the early-age conditions and conditions at the current time step to determine the stress, strain, and deflection of the pavement system.
Step 6-Distress Progression
After the pavement behavior is analyzed for the current conditions, individual models are used to predict distress progression. Two key structural distresses are evaluated. These include joint faulting and midslab cracking.
Other distress types, such as materials related distresses, are covered in the written design and construction guidelines (volume II of this report series), but due to the lack of reliable models, are not included in HIPERPAV II.
Step 7-Predict Functional Distress Progression
Functional distresses are a function of the structural distresses and are computed next.
Step 8-Check Analysis Period and Distress Thresholds
This step evaluates the current state of the pavement in the analysis loop. If the simulation has predicted a level of distress that the user denotes as being "terminating" in nature, HIPERPAV II reports it as the end of the service life for that analysis. However, the analysis continues until the analysis period is reached. It is also at this point that the loop advances to the next season to be simulated.
Step 9-Report Results
Depending on the analysis period selected, the long-term performance module in HIPERPAV II proceeds to the next environmental and traffic loop (step 3), or proceeds to report the results of the analysis (step 9).
As the TEP strongly recommends, long-term performance modeling should be used as a means to further optimize early-age pavement design, materials selection, and construction procedures. Long-term performance modeling should examine a relative (strategy comparison), rather than an absolute performance, based on the aforementioned factors. It must not be used for pavement (structural) design purposes.
The software product is a stand-alone Microsoft Windows application. It contains code written in Microsoft Visual Basic® and Compaq® Visual Fortran®. The software displays numerical and graphical outputs for each analysis. The software saves, opens, and prints all inputs and outputs. The software also contains an add-in system to allow simple interoperability with current and future modules.
This section will present the components that make up the HIPERPAV II software in a top-down approach. The remainder of this section is divided into four subsections: Section 4.2.1 contains a list of feature set of HIPERPAV II; section 4.2.2 is an overview of the components that make up the system architecture and the relationships between these components, including the add-in system; section 4.2.3 is an overview of the components of the graphical user interface (GUI) with screenshots; section 4.2.4 will cover the document object model (DOM); section 4.2.5 describes the technical code that implements the models for HIPERPAV II; section 4.2.6 is an indepth look at the steps involved in the process of the software validation and verification; and section 4.2.7 summarizes the overall software project.
The following feature set has been implemented into the GUI.
The flowchart in figure 19 presents a top-level view of the system architecture. All modules use "Errors and Diagnostics." The "Add-In System" is integrated into the system as a whole and is not considered a module.

Figure 19. System architecture flowchart.
The primary components for this project are highlighted in bold boxes in figure 19. These three components contain subcomponents and are examined in table 16.
Table 16. Primary system architecture components.
GUI |
Graphical User Interface (GUI) The GUI component contains the code for the user display and presentation, as well as some validation and preprocessing logic. |
|---|---|
DOM |
Document Object Model (DOM) The DOM component contains the code for logic and processing. The DOM is responsible for tying all the components together. |
Technical |
Technical Code Module The technical code module contains the code for the engineering models and calculations that are used in processing the analysis. |
The secondary components for this project are hexagonal shapes in figure 19. Table 17 identifies those components that are shared libraries, as well as other components that are needed to accomplish secondary functions of the software.
Table 17. Secondary system architecture components.
Tools |
Tools The tools component is a collection of several modules. These additional modules are not necessary to run an analysis, but provide additional features that complement the main software functions, such as input validation. |
|---|---|
Printing |
Print Engine The print engine provides encapsulated functionality for report generation, previewing, and printing. |
Unit Conversion |
Unit Conversion System The unit conversion system consists of several modules that control all measurement unit conversion and storage that takes place in the software. |
File I/O |
File Input and Output (I/O) System The file I/O system is composed of several modules that provide easy and fast access to database functions, importing and exporting data, file conversions, and saving and opening data. |
Errors and Diagnostics |
Error Log and File Checker These two components make up the bulk of the troubleshooting system. They are responsible for logging and viewing errors and ensuring that all of the files that HIPERPAV II requires are present. |
The majority of the communications between the components in the system involve the component object model (COM) and the extensible markup language (XML). All of the components "talk" to each other using COM. Most of the data transfer between components use COM directly or XML. However, Microsoft ActiveX® Data Objects (ADO) is used to load data from the environmental databases.
As stated in the total systems approach, HIPERPAV II is composed of several different modules. It is desirable to possibly add or remove modules after the software is designed and/or produced. To accommodate this, HIPERPAV II was designed with an add-in system. The system defines a standard interface through which modules can define themselves. This eased the development on a module basis. Finally, the add-in system allows for more customization of the software for each subsequent version of HIPERPAV II.
The GUI is the means through which the user will interact with the HIPERPAV II code. Therefore, it was essential to develop a clear, concise, and uncluttered interface. Based on these premises and the feature set that needs to be implemented, the development team designed an interface centered around the idea of a strategy. The GUI is based on forms. A different form is used for each screen of inputs, outputs, tools, etc. Most, if not all, forms are independent of each other, so work can be done on one without affecting the others. The GUI also uses some support classes and modules.
Figure 20 shows the interface for HIPERPAV II. The circled numbers identify key features of the interface and are described below:
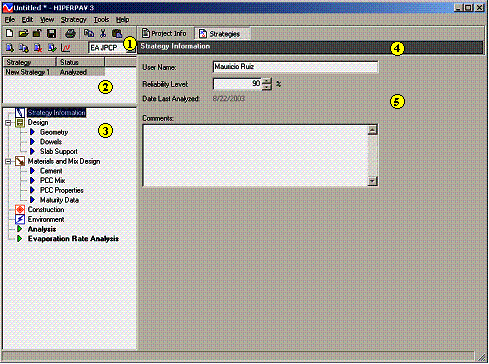
Figure 20. Screenshot of interface for HIPERPAV II.
The user's manual contained in volume II of this report series provides a more detailed description of the HIPERPAV II graphical user interface.
The DOM is the component that handles most of the interactions between components and most of the functions involving the data except for technical analyses. The DOM has many responsibilities, including:
The DOM is a class-based hierarchy. The strategy class is the focus of most of the activity in the DOM. It consists of the following classes: general, design, materials, environment, construction, traffic, and outputs. Not every strategy will make use of all the available classes.
There is also a set of global objects that all classes are able to access. Currently, these objects contain routines for printing, file I/O, strategy comparison, the error log, units' conversion functions, definitions for standards, input validation, and any other support function necessary for the classes.
The objective of this section is to provide a high-level design for the HIPERPAV II software components. This high-level design served as a guideline for the programming of the HIPERPAV II technical code. This section details the structure of each component and interaction among those components. The goal of this guideline was to build a sound base for modularization of the HIPERPAV II software components to facilitate the subsequent software integration.
The algorithm for each technical component (theoretical model) was developed based on its corresponding theoretical background. Calibration and verification of each algorithm was implemented using available data sources. Then, the technical specification for each component was developed based on the calibrated/verified algorithm.
The technical coding followed the technical specifications. Each technical component is a self-contained module. Each module contains the following routines:
Software testing was performed at the technical component level, and overall system testing was conducted after integration of technical components.
As seen in table 18, 6 components were formed for HIPERPAV II. The interaction among the components is illustrated in figure 21. HP_CORE serves as the core program to feed its output to HP_MECH. Then, HP_MECH feeds data to either HP_JCP, HP_BCO, or HP_CRCP for early-age analyses. The HP_JCPLON takes output and interacts with HP_JCP and HP_MECH to perform long-term JCP analysis.
Table 18. List of HIPERPAV II tech components.
No. |
Name |
Description |
|---|---|---|
1 |
HP_CORE |
Predict pavement temperatures, PCC equivalent age, and moisture contents |
2 |
HP_MECH |
Predict fundamental concrete properties such as: modulus, CTE, shrinkage, strength, friction, curling, and warping |
3 |
HP_JCP |
Predict JCP concrete stress and joint width/opening |
4 |
HP_BCO |
Predict BCO delamination (not bundled with HIPERPAV II) |
5 |
HP_CRCP |
Predict crack width, crack spacing, and steel stress for CRCP |
6 |
HP_JCPLON |
Predict JCP long-term performance |
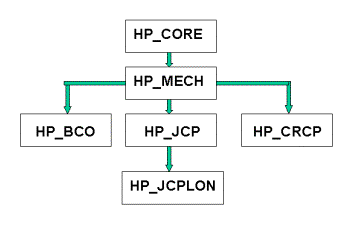
Figure 21. Structure of HIPERPAV II tech components.
The HP_CORE is the core component for the HIPERPAV II technical codes. The component is used to predict pavement temperatures, PCC equivalent age, and moisture profile. The structure of this component is illustrated in figure 22, and each subcomponent is described in table 19.
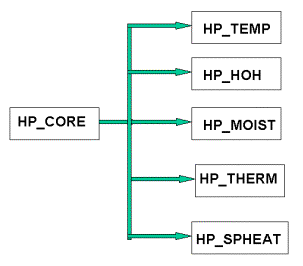
Figure 22. Subcomponents of module HP_CORE.
Table 19. List of HP_CORE subcomponents.
No. |
Name |
Description |
|---|---|---|
1 |
HP_THERM |
Predict thermal conductivity of pavement materials |
2 |
HP_SPHEAT |
Predict specific heat of pavement materials |
3 |
HP_HOH |
Predict heat of hydration of concrete |
4 |
HP_TEMP |
Predict temperature profile through the pavement structure |
5 |
HP_MOIST |
Predict moisture profile through the pavement structure |
The HP_MECH is a supporting component to provide computed/predicted mechanical properties of pavement materials. Its structure is illustrated in figure 23, and a description of each subcomponent is listed in table 20.
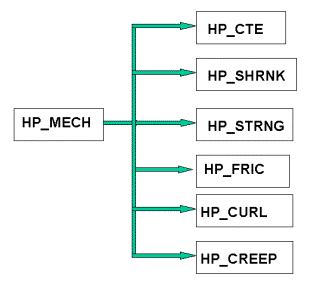
Figure 23. Subcomponents of module HP_MECH.
Table 20. List of HP_MECH subcomponents.
No. |
Name |
Description |
|---|---|---|
1 |
HP_CTE |
Predict CTE of pavement materials |
2 |
HP_SHRNK |
Predict shrinkage of concrete |
3 |
HP_STRNG |
Predict strength of concrete |
4 |
HP_FRIC |
Predict slab-base friction |
5 |
HP_CURL |
Predict curling/warping |
6 |
HP_CREEP |
Predict creep effect of concrete |
The HP_JCP component, as its name implies, is used to perform JCP analysis. The structure of HP_JCP is illustrated in figure 24, and the description of each subcomponent is listed in table 21.
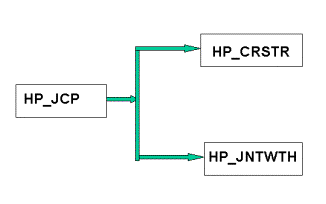
Figure 24. Subcomponents of module HP_JCP.
Table 21. List of HP_JCP subcomponents.
No. |
Name |
Description |
1 |
HP_CRSTRS |
Predict critical stress in concrete slab |
2 |
HP_JNTWTH |
Predict JCP joint width |
The HP_BCO component is used to perform BCO analysis. The HP_BCO component consists of the subcomponent in table 22. This component is included to provide compatibility with the HIPERBOND module developed under a separate effort, but is not included in the HIPERPAV II system at this time.
Table 22. List of HP_BCO subcomponents.
No. |
Name |
Description |
1 |
HP_DELAM |
Predict delamination |
The HP_CRCP component is used to perform CRCP analysis. Its structure is illustrated in figure 25.
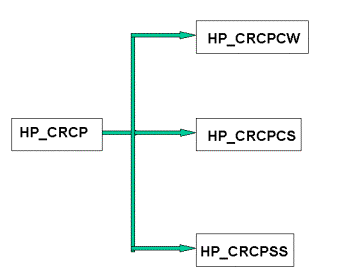
Figure 25. Subcomponents of module HP_CRCP.
The HP_CRCP component consists of the following subcomponents listed in table 23 below:
Table 23. List of HP_CRCP subcomponents.
No. |
Name |
Description |
1 |
HP_CRCPCW |
Predict CRCP crack width |
2 |
HP_CRCPCS |
Predict CRCP crack spacing |
3 |
HP_CRCPSS |
Predict steel stress in CRCP |
The HP_JCPLON component is used to compare alternatives of JCP pavements for their long-term performance, as seen in figure 26.
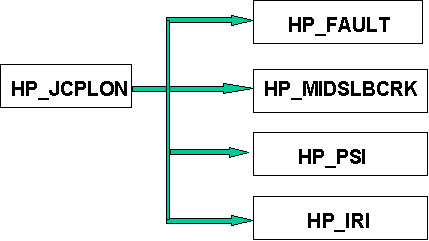
Figure 26. Subcomponents of module HP_JCPLON.
The subcomponents of HP_JCPLON are listed in table 24:
Table 24. List of HP_CRCP subcomponents.
No. |
Name |
Description |
1 |
HP_FAULT |
Predict long-term faulting of JCP |
2 |
HP_MIDSLBCRK |
Predict long-term midslab cracking of JCP |
3 |
HP_PSI |
Predict long-term PSI of JCP |
4 |
HP_IRI |
Predict long-term IRI of JCP |
Each technical model was developed in Microsoft Excel or Mathsoft MathCAD®. Calibration and verification of each algorithm was implemented using available data sources.
The software was integrated one component at a time. For each integration, the components were checked to ensure that they were communicating and functioning correctly with all other modules. The first integration included the GUI and DOM. The file I/O was then checked so that test data files could be loaded for system-level testing of the models. Next, the DOM was connected to the technical code, and I/O communications were tested strenuously to ensure models robustness. The remaining feature development and testing occurred concurrently with the model testing.
The implementation plan included an overall software development plan, development of the software requirement specification, development of the software design specification, coding, and release and debugging. Each of these stages is described in the following sections.
The overall software plan included the software project life cycle illustrated in figure 27. This plan involved the following four steps implemented during execution of the work plan:
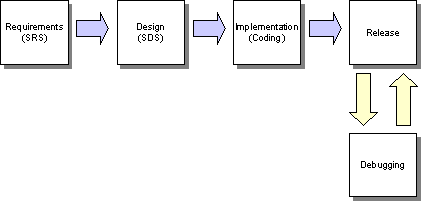
Figure 27. Software project life cycle.
The SRS was based on the requirements that are defined in previous sections in this chapter. The SRS specifies the software requirements (such as features) in general terms, with no discussion of how the features will be implemented. For the technical code, the SRS includes a high-level description of the integration of technical models. Iterations of review/modification are needed to reach the final, well-defined scope.
The SDS is an extension and detailed design based on the SRS documentation. The SDS includes low-level designs (such as properties and functions for each component class) in tables and flowcharts. Iterations of review/modification are needed to reach the final, well-checked design.
During this phase, a nonfunctional prototype of the GUI was developed. This prototype allowed basic navigation among the screens that compose a strategy. This was essentially a proof-of-concept prototype for presentation and obtaining feedback concerning the layout of the GUI. This feedback was used during the iteration process of the SDS for the GUI to better define the specifications.
For the technical code, algorithms for each technical model were developed in technical memorandums, and prototyped in Microsoft Excel/MathCAD files. These prototypes were then calibrated and validated using field data. Sensitivity analyses were performed to check the engineering reasonableness.
The actual coding for the GUI, DOM and technical code were implemented based on the SDS. The coding followed the Microsoft Visual Basic and Fortran coding guidelines to maximize robustness, modularization, reusability, and interoperability.
Upon completing the coding phase, the project team developed an initial beta version of the software for review by the TEP members. Feedback from the TEP on the software was included to enhance its development. Several beta versions of the HIPERPAV II software were then released after the verification and validation. Debugging and enhancement was performed based on the user feedback and the available resources.
During the various TEP meetings for this project, a number of comments and feedback from the FHWA Contracting Officer's Technical Representative (COTR) and TEP members were received. These comments required modifications to the work plan for developing the HIPERPAV II software and are addressed in this section.
It was recognized that, because of the diversity of users, two different versions of HIPERPAV should be developed: a "practical grade" version and a "research grade" version. The practical grade version would be geared toward users that require practical and easy-to-use tools for their application in real construction projects in a regular basis. For this version, the inputs required would be simplified as much as possible without compromising the accuracy of the results. A research grade version would include advanced screens with more detailed inputs. This version would be tailored for academic and experimental applications.
Since the aim of this project is to develop practical tools for use by the engineering community, the emphasis was on developing a practical grade version of HIPERPAV. Before releasing the software, a final assessment of the product should be made to determine if additional simplification is necessary to improve the success of the implementation process.
The panel members' comments were split on the desire for relative versus absolute software value outputs for the long-term performance JCP module. The project team made both options available in the software.
The possibility of obtaining adiabatic calorimeter data for different cement types and compiling it in the technical code of the software was discussed. During the previous HIPERPAV I validation effort, researchers found that the prediction of the pavement temperature relies heavily on the hydration characteristics for the specific mixture in evaluation. It is believed that, although information on the total heat of hydration of the cement (and admixtures) obtained with American Society for Testing and Materials (ASTM) test method ASTM C 186 would be helpful, this information would still have to be complemented with the shape of the hydration curve obtainable only through calorimetry tests. Volume III, appendix B of this report series expands on the database of cements evaluated and hydration models included in HIPERPAV II.
To compare strength types and complement the available information on concrete strength relationships, the research team evaluated a report on modulus of rupture conversion relationships.(61)
It was agreed that incorporating a mix design module in the software would benefit engineers who would be interested in mix design, particularly contractors. This module would facilitate its acceptability and implementation in the future. Incorporation of the COMET module for mix optimization was pursued after this recommendation.
For skip sawing, the preferred approach from FHWA's standpoint was to have the operator "fool" the program, as with HIPERPAV I, by putting in a longer joint spacing as the input. However, after further discussions with the TEP members, it was agreed to provide a skip sawing option and include a comment stating that this is not a recommended practice; however, it can be used to assist the contractor to avoid undesirable situations.
The need to model the use of a double layer of steel as an input option (top and bottom mats) was discussed. As new models that consider the effects on shrinkage and other behaviors as a function of the steel depth and number of bar mats become available, they may be included in subsequent generations of HIPERPAV.
Spalling distress prediction as a function of early-age behavior was very difficult to model due to a number of factors, including lack of data required for model calibration and validation. Since development of a new spalling model was out of the scope of this project, a spalling distress model was not included in HIPERPAV II during this effort.
FHWA suggested incorporating information from the joint FHWA/NIST mixture optimization study, and the COMET module based on this study was incorporated successfully. In addition, at the time of writing this report, a new project under FHWA CPTP Task 64 is further investigating concrete mixture optimization procedures based on the work developed under the FHWA concrete mixture optimization study.(62)
Although the CRCP early-age behavior models and long-term JPCP models selected for use in this project (see table 10 and section 3.3.5) have already undergone extensive validation efforts, modification to some of the models to reflect specific early-age conditions and integrate effectively with the overall system warranted further validation.
Validation focused on determining the reliability of the models. Model reliability determines if the model is a good one or a poor one. If there is significant scatter in the data compared to the prediction, then the model is possibly poor. Less scatter implies that the model is reliable. The reliability of the individual models in the long-term JPCP and early-age CRCP modules in HIPERPAV II was assessed under this concept.
Two levels of validation were undertaken for both the long-term JPCP and early-age CRCP models incorporated into HIPERPAV II. The first level of validation was performed with using databases. The second level of validation consisted of evaluating the accuracy of prediction with information collected from a field investigation performed on select pavement sites. Additional validation was also performed for general early-age behavior enhanced models such as the FDM temperature prediction model and the improved drying shrinkage model. A summary of the validation efforts and findings is presented in the following paragraphs. A detailed description of the field investigation, laboratory testing, and validation efforts is presented in volume III, appendixes C through F of this report series.
The primary databases used for this purpose were the database maintained by LTPP and the CRCP database maintained by the Texas DOT. (See references 63, 64, and 65.) The wider geographical distribution and variety of pavement sections in the LTPP database was a determining factor for its use, while the extensive amount of early-age data for CRCP in the Texas rigid pavement database was a major factor for its selection. Other databases such as the COPES and the RIPPER databases were also investigated.(33, 27) However, lack of early-age information and monitoring records made validation with these databases difficult.
Database validation efforts within this project were limited due to the lack of extensive early-age information on current databases. Information required for validation of JPCP long-term performance prediction includes mix design information, early-age climatic data, construction times and dates, early-age material characterization, initial construction smoothness, history of structural pavement response, and distress information.
Information in the Seasonal Monitoring Program (SMP) pavement database maintained by LTPP was used exclusively to validate the JPCP structural response models. Provided the LTE model has not been previously calibrated as a whole, pavement sections in the LTPP-SMP database were also used for model calibration. The LTPP-SMP program includes monitoring of JPCP sections to observe the effects of temperature and moisture on the pavement structure and pavement's response to loads. It was found during the verification process that, although the LTE model predictions follow the general trends of LTE as computed from FWD tests, further investigation of a number of factors is necessary to be able to predict LTE with more accuracy. For the doweled sections evaluated, it was difficult to determine the level of dowel looseness, because LTE appears to be provided by aggregate interlock with some dowel looseness present for half of the sections, while the remaining sections appear to have very little or no dowel looseness. Therefore, further work is required to verify the dowel looseness models presented. It is recommended that factors such as aggregate characteristics, dowel coatings, and compressive stresses at the dowel location due to curling stresses in the early age be investigated.
Validation of the CRCP early-age behavior models had two objectives: validation of cracking behavior during the early age, and validation of cracking behavior in the long term. Although, as its name implies, the CRCP module in HIPERPAV II should predict cracking behavior at early ages, long-term performance can be estimated better based on the cracking characteristics after the lowest temperature (typically after 1 year). Therefore, validation also was performed on existing CRCP sections with crack spacing information. In addition to information on cracking behavior, information on characterization of the concrete materials used, climatic data, and construction times and dates were needed. This information was available in the Texas rigid pavement database and CRCP field sites investigated.
With the above information, each section was analyzed with the CRCP module in HIPERPAV II to compare the measured crack spacings to the predicted values. Although a slight overprediction of crack spacing was observed, a reasonably good fit of predicted versus measured crack spacing with respect to the 45° line was obtained (r2=0.82).
For the early age, a generally poor prediction of crack spacings was observed. However, similarly poor results had been observed in previous validation efforts with this dataset. Suh et al. had found good predictions for the first few months after construction; however, significant deviations were observed for the first 5 to 10 days.(65) This poor prediction was attributed to the inability to accurately predict early-age temperatures due to lack of curing information. It was also suggested that because the sections were relatively short (70 meters (m) long), and the crack spacings relatively large, it is possible that the data points generated were not sufficient to predict crack spacing with accuracy.
Otero et al. reported crack width measurements 2 years after placement for the SH-6 test sections.(66) The CRCP module in HIPERPAV II was used to predict crack widths at the temperature observed in the concrete during the crack width measurements. Although a positive trend in crack width prediction was observed, all crack widths were largely overpredicted. This overprediction in crack widths had been observed in previous validation efforts.(66) Although Otero et al. proposed a new model for crack width prediction, using this model in this study did not give reasonable results. The overprediction was attributed to the fact that the CRCP-8 model does not account for the time when the crack forms, but it is rather dependent on the predicted crack spacing, PCC thermal properties, and total shrinkage. It is believed that the residual drying shrinkage after the crack forms has a large effect on crack width. In addition, the CRCP-8 model includes a fixed model for the concrete-steel interaction. Later studies have shown crack widths to be very sensitive to this characterization.(67)
Four field sites were investigated for validation of the HIPERPAV II system:
It is believed that the number of field sites evaluated provides the minimum level of information necessary to meet the objectives of this effort successfully. However, additional data from field sites in the future could be used for local customization.
JPCP sites investigated include a section on U.S. 50 in Illinois and a bypass section of a farm-to-market road near Ticuman, Mexico. The selection of both sites was heavily weighted on the fact that extensive early-age and performance information is available for both of these sections. A field investigation and monitoring of both JPCP test sections was performed in the summer of 2001. Extensive information on design, construction, and previous monitoring activities for both pavement sites was collected.
During the current field investigation, the monitoring activities included:
The data collected from these sites was used with early-age information available to validate the long-term JPCP performance models in HIPERPAV II.
The reliability of prediction for these two sites was evaluated. Several factors were considered in validating the long-term JPCP module in HIPERPAV II for each field site. This validation included comparing measured and predicted mechanical properties, LTE, and long-term distresses.
In summary, it can be concluded that reasonable predictions were obtained in terms of long-term performance for both field sites. Although limited, this validation was done with quality data on pavement design, materials, climatic, and construction inputs. Validation of the models should continue, as more information about materials characterization and construction information becomes available for sites.
Besides database validation, the CRCP model in HIPERPAV II was validated with two CRCP construction sites. The first CRCP section instrumented was part of an access road to the Interstate highway (IH)-35/IH-30 interchange located in Fort Worth, TX. The second CRCP section was located on IH-29 near Sioux Falls, SD.
Model inputs were collected for prediction of crack spacing, crack width, steel stress, and bond development length. Information collected included all necessary inputs to feed the prediction model, such as structural design, mix design, slab/subbase restraint, concrete strains, steel strains, and climatic conditions during the first 72 hours after placement. In addition, laboratory testing was performed for material characterization, including splitting tensile strength, elastic modulus, CTE, drying shrinkage, and concrete set time.
The instrumentation procedures consisted in installing embedment gages at midslab, edge, and corner at three different depths. Thermocouples also were installed at seven different depths throughout the slab depth. Resistance type strain gages were also installed on the steel rebar at different distances from the crack. In addition, similar procedures were used to monitor climatic conditions; CTE and free drying shrinkage; slab curling and warping; and cracking behavior in the field. A summary of the validation results is discussed below:
This analysis concludes that reasonably good predictions for the crack spacings observed after 3 days are achieved for both sites. However, further investigation of the bond slip relationships in the CRCP-8 program is recommended to accurately predict steel stresses and crack widths.
In addition to the validation of JPCP long-term performance and CRCP early-age behavior models, improvements to the concrete pavement temperature prediction, drying shrinkage, and creep-relaxation models were also investigated in this study.
Over the course of its development, HIPERPAV has employed two different temperature prediction models (see section 3.3.3.2). Originally, the temperature prediction model was a transient two-dimensional FEM model. However, this procedure had proven to require excessive solution times. The model has since been replaced by a one-dimensional FDM approach, which allows quicker execution without a compromise in accuracy. However, the accuracy of the FDM model needed to be verified by comparison with field data. Verification of the temperature predictions with the improved model is presented in volume III, appendix F of this report series.
Using the field data collected from the five early-age HIPERPAV I field sites, the calibration factor (Deff) for the Bazant-Panula shrinkage model could be determined.(68)
To calibrate the size factor Deff for CRCP, 28-day drying shrinkage predictions from the Bazant-Panula model were matched to the experimentally measured drying shrinkage values taken in concrete placed on State Highway 6 in winter and summer.(65) At 28 days, the drying shrinkage was 171 me in the summer and 165 me in the winter. These values were matched using a Deff of 0.2.
Attempts were made to validate the creep model based on the extended triple power law presented in volume III, appendix B of this report series. However, preliminary sensitivity analyses showed that in some instances, tensile stresses were being significantly overpredicted as compared to results from the previous validation efforts of the current prediction models in HIPERPAV I. Possible reasons for inaccuracy:
Further work is required to validate this method properly. It is believed that, once calibrated and validated, this relaxation-creep model will prove helpful in properly determining creep and relaxation effects for stress prediction, built-in curling prediction, and possibly the curled slab shape.

