U.S. Department of Transportation
Federal Highway Administration
1200 New Jersey Avenue, SE
Washington, DC 20590
202-366-4000
Federal Highway Administration Research and Technology
Coordinating, Developing, and Delivering Highway Transportation Innovations
 |
| This report is an archived publication and may contain dated technical, contact, and link information |
|
Publication Number: FHWA-RD-03-041 |
Previous | Table of Contents | Next
The main purpose of this chapter is to characterize the extent of differences in the layer thickness data between as-designed and as-constructed (measured) thicknesses for the newly constructed SPS layers. Only these new SPS layers have design thicknesses accurately documented.
Data sources for the analysis are discussed first, followed by an overview of as-designed thicknesses for the newly constructed SPS layers. After that, typical thickness deviations from the target thicknesses are summarized, as well as their distribution types. Finally, the results of the statistical analysis are presented.
Two thickness data sources with multiple measurements on a given layer exist in the LTPP database:
According to the SPS construction guidelines [35-40], rod and level survey measurements are to be taken at a minimum of five offset locations (edge, outer wheel path, midlane, inner wheel path, and inside edge of lane) at longitudinal intervals no greater than 15 m (50 ft). Typically, 55 elevation measurements are available for each regular SPS test section.
The number of cores taken at each section depends on experiment and layer type and is defined in the corresponding Sampling and Testing Guide [6-11]. The number of cores per section ranges between 1 and 9.
All sections with available thickness data in either one of these tables are studied to quantify as-designed versus as-constructed variations in layer thickness.
For the section/layer combination, an analysis cell is defined to represent a specific layer in a test section, for which the target thickness was documented. The following fields from TST_L05B or EXPERIMENT_SECTION table in LTPP database along with the design target layer thickness define a unique analysis cell:
For newly constructed SPS layers, the design thicknesses are defined in the corresponding SPS Experimental Designs [12-17]. The design thicknesses are available for the following layer types:
The design thicknesses for all these SPS experiments and layer types are presented in tables 38 through 43.
SHRP_ID |
Design Layer Thickness, mm (in) |
|||
|---|---|---|---|---|
DGAB |
PATB |
DGATB |
SB |
|
0101 |
203 (8) |
178 (7) |
||
0102 |
305 (12) |
102 (4) |
||
0103 |
203 (8) |
102 (4) |
||
0104 |
305 (12) |
178 (7) |
||
0105 |
102 (4) |
102 (4) |
102 (4) |
|
0106 |
102 (4) |
203 (8) |
178 (7) |
|
0107 |
102 (4) |
102 (4) |
102 (4) |
|
0108 |
203 (8) |
102 (4) |
178 (7) |
|
0109 |
305 (12) |
102 (4) |
178 (7) |
|
0110 |
102 (4) |
102 (4) |
178 (7) |
|
0111 |
102 (4) |
203 (8) |
102 (4) |
|
0112 |
102 (4) |
305 (12) |
102 (4) |
|
0113 |
203 (8) |
102 (4) |
||
0114 |
305 (12) |
178 (7) |
||
0115 |
203 (8) |
178 (7) |
||
0116 |
305 (12) |
102 (4) |
||
0117 |
102 (4) |
102 (4) |
178 (7) |
|
0118 |
102 (4) |
203 (8) |
102 (4) |
|
0119 |
102 (4) |
102 (4) |
178 (7) |
|
0120 |
203 (8) |
102 (4) |
102 (4) |
|
0121 |
305 (12) |
102 (4) |
102 (4) |
|
0122 |
102 (4) |
102 (4) |
102 (4) |
|
0123 |
102 (4) |
203 (8) |
178 (7) |
|
0124 |
102 (4) |
305 (12) |
178 (7) |
|
SHRP_ID |
Design Layer Thickness, mm (in) |
|||
|---|---|---|---|---|
DGAB |
PATB |
LC |
PCC |
|
0201 |
152 (6) |
203 (8) |
||
0202 |
152 (6) |
203 (8) |
||
0203 |
152 (6) |
279 (11) |
||
0204 |
152 (6) |
279 (11) |
||
0205 |
152 (6) |
203 (8) |
||
0206 |
152 (6) |
203 (8) |
||
0207 |
152 (6) |
279 (11) |
||
0208 |
152 (6) |
279 (11) |
||
0209 |
102 (4) |
102 (4) |
203 (8) |
|
0210 |
102 (4) |
102 (4) |
203 (8) |
|
0211 |
102 (4) |
102 (4) |
279 (11) |
|
0212 |
102 (4) |
102 (4) |
279 (11) |
|
0213 |
152 (6) |
203 (8) |
||
0214 |
152 (6) |
203 (8) |
||
0215 |
152 (6) |
279 (11) |
||
0216 |
152 (6) |
279 (11) |
||
0217 |
152 (6) |
203 (8) |
||
0218 |
152 (6) |
203 (8) |
||
0219 |
152 (6) |
279 (11) |
||
0220 |
152 (6) |
279 (11) |
||
0221 |
102 (4) |
102 (4) |
203 (8) |
|
0222 |
102 (4) |
102 (4) |
203 (8) |
|
0223 |
102 (4) |
102 (4) |
279 (11) |
|
0224 |
102 (4) |
102 (4) |
279 (11) |
|
SHRP_ID |
Design Layer Thickness, mm (in) |
|---|---|
SB |
|
0501 |
0 |
0502 |
51 (2) |
0503 |
127 (5) |
0504 |
127 (5) |
0505 |
51 (2) |
0506 |
51 (2) |
0507 |
127 (5) |
0508 |
127 (5) |
0509 |
51 (2) |
SHRP_ID |
Design Layer Thickness, mm (in) |
|---|---|
SB |
|
0601 |
0 |
0602 |
0 |
0603 |
102 (4) |
0604 |
102 (4) |
0605 |
0 |
0606 |
102 (4) |
0607 |
102 (4) |
0608 |
203 (8) |
SHRP_ID |
Design Layer Thickness, mm (in) |
|---|---|
PCC |
|
0701 |
0 |
0702 |
76 (3) |
0703 |
76 (3) |
0704 |
76 (3) |
0705 |
76 (3) |
0706 |
127 (5) |
0707 |
127 (5) |
0708 |
127 (5) |
0709 |
127 (5) |
SHRP_ID |
Design Layer Thickness, mm (in) |
||
|---|---|---|---|
DGAB |
PCC |
SB |
|
0801 |
203 (8) |
102 (4) |
|
0802 |
305 (12) |
178 (7) |
|
0803 |
203 (8) |
102 (4) |
|
0804 |
305 (12) |
178 (7) |
|
0805 |
203 (8) |
102 (4) |
|
0806 |
305 (12) |
179 (7) |
|
0807 |
152 (6) |
203 (8) |
|
0808 |
152 (6) |
279 (11) |
|
0809 |
152 (6) |
203 (8) |
|
0810 |
152 (6) |
279 (11) |
|
0811 |
152 (6) |
203 (8) |
|
0812 |
152 (6) |
279 (11) |
|
For both the elevation and core as-constructed thickness measurements, typical mean layer thickness deviations are established by the following:
Descriptive Summary Statistics of the Thickness Deviations
The mean thickness difference between as-designed and as-constructed thicknesses was computed for each layer using both core and elevation thickness measurements.
The following statistical indicators were computed:
The analyses were done separately for the thickness data obtained from core measurements and for the data from elevation measurements.
Layer Thickness Deviation Distribution Type
Mean thickness deviations from layers or sections were analyzed to determine whether they follow typical statistical distributions. Skewness and kurtosis analyses were conducted for this purpose, using the methodology outlined in chapter 5.
Percentage Distribution of the Individual Measurements
To evaluate the variation between as-designed and as-constructed thicknesses, deviations of the individual measurements in relation to the target values are computed for each analysis cell. These deviations are then summarized into three deviation levels: 6.35 mm (0.25 in), 12.7 mm (0.5 in), and 25.4 mm (1 in), for different material types and target thickness values.
This evaluation provides information regarding variations between as-constructed and as-designed thicknesses at individual measurement level.
Statistical Analysis of Sample Measurement Means
Statistical analysis is performed to evaluate variations for each analysis cell. The goal of statistical analysis is to assess deviation of the measurement population means from the target thicknesses. Two types of the thickness comparison are performed for both data sources:
Two-sided t-tests with 95 percent confidence level for each section and layer, to determine whether the differences between as-designed and as-constructed thicknesses are significant.

The null hypothesis for this test is that average of core or elevation thickness data is equal to the target thickness, i.e.: If the null hypothesis is rejected (i.e., the result of the two-sided t-test is significant), then the measured mean thickness is different from the design thickness at the 95 percent confidence level. On the other hand, if the null hypothesis is not rejected or the test result is not significant, then there is no evidence that the measured mean thickness is different from the design value.
One-sided t-tests with 95 percent confidence level for the difference between as-designed thickness and the mean as-constructed thickness and for tolerance level of 6.35 mm (0.25 in), 12.7 mm (0.5 in), and 25.4 mm (1 in). The null hypothesis is that the absolute value of the difference between the mean and target thickness is less than or equal to the tolerance level with the alternative hypothesis being that the absolute value of the difference is greater than the tolerance level. For example, for elevation data, for allowance of 6.35 mm (0.25 in), the null and alternative hypotheses are:

If the null hypothesis is rejected (i.e., the result the one-sided t-test is significant), then the measured mean thickness deviates from the design thickness by more than the specified allowance (in this example 6.35 mm) at a 95 percent confidence level. On the other hand, if the null hypothesis is not rejected or the test result is not significant, then there is no evidence that the measured mean thickness deviates from the designed value by more than the specified allowance value, in other words, that the mean thickness is within the allowance value (in this case 6.35 mm) from the designed thickness.
Descriptive Summary Statistics
Mean layer thickness data for SPS experimental sections with newly constructed layers were obtained from the TST_AC01_LAYER and TST_PC06 tables (core thickness), and from the SPS*_LAYER_THICKNESS tables (elevation thickness), to compute measured thickness deviation from the design value. The analysis was done for the sets of data grouped by target design thickness, material, and layer type. The following statistical indicators were computed:
The analyses were done separately for the thickness data obtained from core measurements and for the data from elevation measurements. Table 44 summarizes layer thickness deviations by different layer and material types based on analysis of elevation measurements. Table 45 summarizes mean core examination layer thickness deviations from their designed values by different layer and material types.
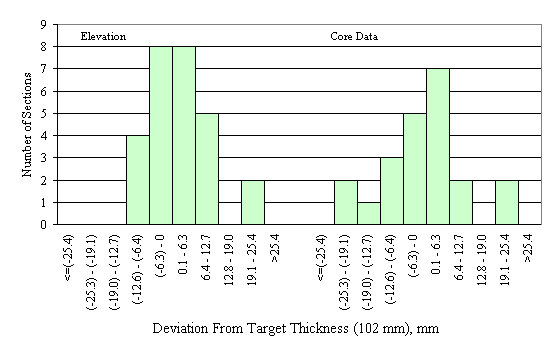
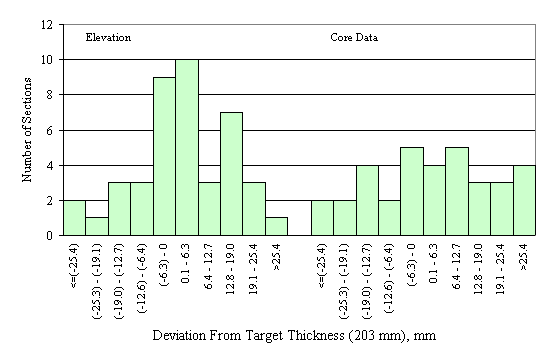
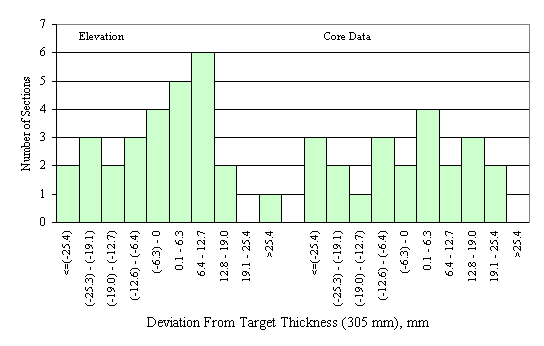
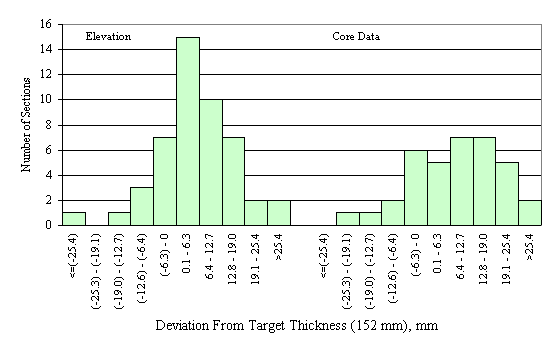
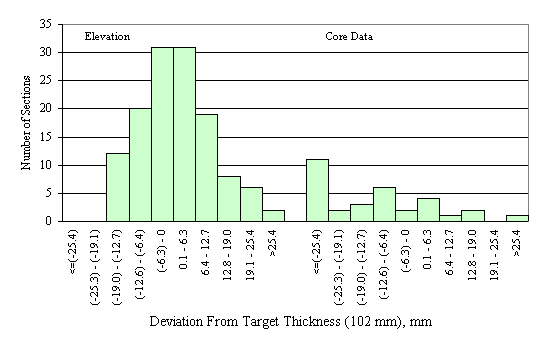
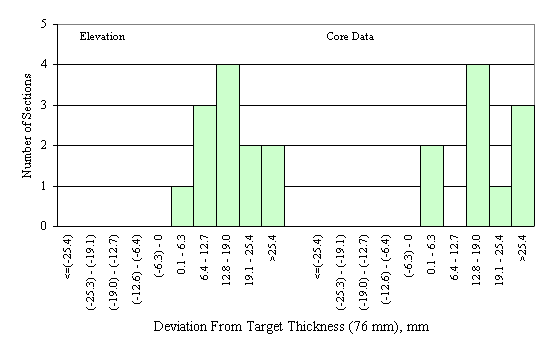
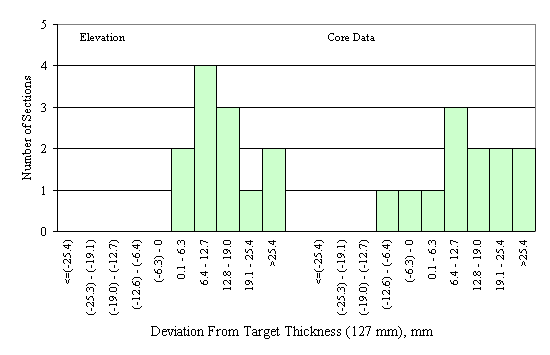
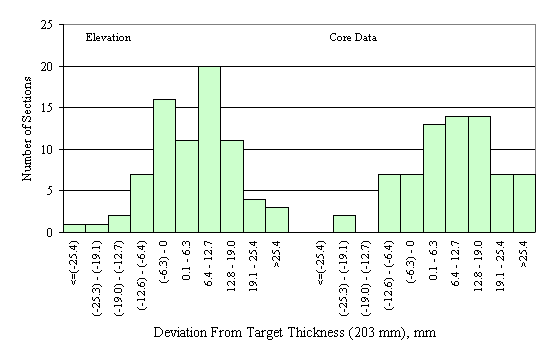
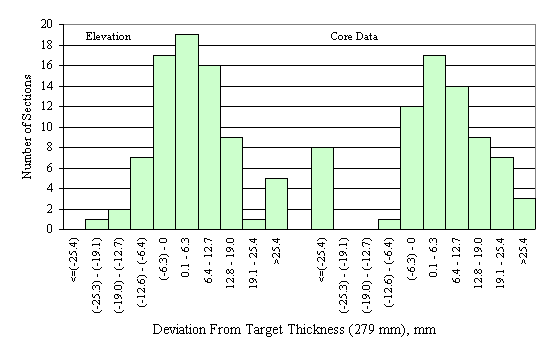
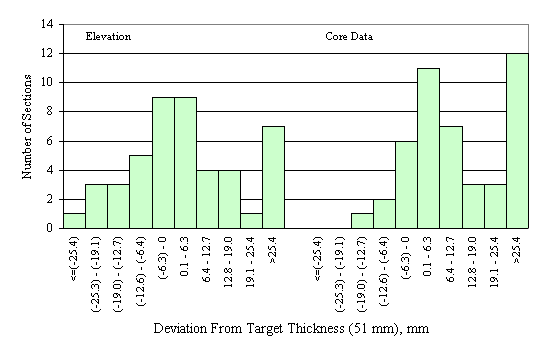
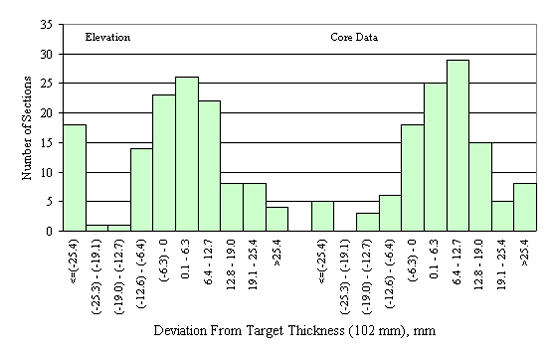
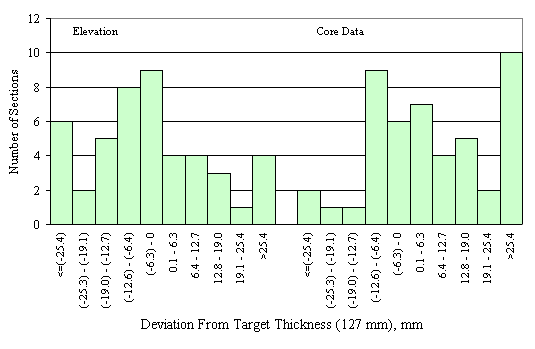
Figures 47 through 61 present the frequency distributions of the thickness deviations for different layer types and target thicknesses for both core and elevation thickness measurements.
The following observations are made based on these summary statistics:
Mat. Type |
Target Thickness |
Total Number of Sections |
Mean Difference |
Standard Deviation |
Min. Difference |
Max. Difference |
|||||
|---|---|---|---|---|---|---|---|---|---|---|---|
mm |
in |
mm |
in |
mm |
in |
mm |
in |
mm |
in |
||
DGAB |
102 |
4 |
84 |
0.4 |
0.01 |
10.3 |
0.40 |
-28.6 |
-1.13 |
33.4 |
1.32 |
152 |
6 |
55 |
-1.2 |
-0.05 |
14.4 |
0.57 |
-51.5 |
-2.03 |
38.2 |
1.51 |
|
203 |
8 |
40 |
0.9 |
0.04 |
12.7 |
0.50 |
-26.8 |
-1.05 |
45.2 |
1.78 |
|
305 |
12 |
40 |
-6.0 |
-0.24 |
30.0 |
1.18 |
-173.3 |
-6.82 |
34.9 |
1.37 |
|
DGATB |
102 |
4 |
27 |
1.8 |
0.07 |
8.0 |
0.31 |
-12.0 |
-0.47 |
21.1 |
0.83 |
203 |
8 |
42 |
0.5 |
0.02 |
16.3 |
0.64 |
-62.5 |
-2.46 |
28.9 |
1.14 |
|
305 |
12 |
28 |
-2.1 |
-0.08 |
15.9 |
0.63 |
-35.1 |
-1.38 |
38.1 |
1.50 |
|
LC |
152 |
6 |
48 |
5.5 |
0.22 |
10.6 |
0.42 |
-25.8 |
-1.02 |
36.9 |
1.45 |
PATB |
102 |
4 |
129 |
1.2 |
0.05 |
10.5 |
0.41 |
-17.1 |
-0.67 |
41.9 |
1.65 |
PCC |
76 |
3 |
12 |
18.2 |
0.72 |
11.5 |
0.45 |
3.4 |
0.13 |
42.6 |
1.68 |
127 |
5 |
12 |
16.5 |
0.65 |
11.6 |
0.46 |
5.1 |
0.20 |
39.0 |
1.53 |
|
203 |
8 |
76 |
5.4 |
0.21 |
12.2 |
0.48 |
-32.6 |
-1.28 |
53.3 |
2.10 |
|
279 |
11 |
77 |
4.7 |
0.18 |
11.0 |
0.43 |
-24.8 |
-0.98 |
39.0 |
1.54 |
|
|
SB |
51 |
2 |
46 |
4.8 |
0.19 |
19.9 |
0.78 |
-27.8 |
-1.10 |
67.9 |
2.67 |
102 |
4 |
125 |
-2.2 |
-0.09 |
18.5 |
0.73 |
-58.9 |
-2.32 |
31.7 |
1.25 |
|
127 |
5 |
46 |
-4.4 |
-0.17 |
20.1 |
0.79 |
-70.6 |
-2.78 |
38.3 |
1.51 |
|
178 |
7 |
95 |
-8.2 |
-0.32 |
23.9 |
0.94 |
-73.3 |
-2.89 |
59.4 |
2.34 |
|
203 |
8 |
7 |
-2.7 |
-0.11 |
22.9 |
0.90 |
-36.9 |
-1.45 |
36.3 |
1.43 |
|
Mat. Type |
Target Thickness |
Total Number of Sections |
Mean Difference |
Standard Deviation |
Min. Difference |
Max. Difference |
|||||
|---|---|---|---|---|---|---|---|---|---|---|---|
mm |
in |
mm |
in |
mm |
in |
mm |
in |
mm |
in |
||
|
DGATB |
102 |
4 |
22 |
-0.9 |
-0.04 |
10.9 |
0.43 |
-22.9 |
-0.90 |
20.3 |
0.80 |
203 |
8 |
34 |
1.1 |
0.04 |
21.5 |
0.85 |
-64.3 |
-2.53 |
38.1 |
1.50 |
|
305 |
12 |
22 |
-5.4 |
-0.21 |
25.1 |
0.99 |
-88.9 |
-3.50 |
21.0 |
0.83 |
|
|
LC |
152 |
6 |
36 |
8.2 |
0.32 |
12.6 |
0.50 |
-19.1 |
-0.75 |
38.9 |
1.53 |
|
PATB |
102 |
4 |
32 |
-19.7 |
-0.78 |
39.4 |
1.55 |
-87.2 |
-3.43 |
113.5 |
4.47 |
|
PCC |
76 |
3 |
10 |
20.3 |
0.80 |
10.7 |
0.42 |
5.9 |
0.23 |
35.9 |
1.41 |
127 |
5 |
12 |
13.4 |
0.53 |
13.5 |
0.53 |
-9.9 |
-0.39 |
37.1 |
1.46 |
|
203 |
8 |
71 |
9.8 |
0.39 |
14.0 |
0.55 |
-22.5 |
-0.89 |
52.3 |
2.06 |
|
279 |
11 |
71 |
-0.7 |
-0.03 |
28.3 |
1.12 |
-94.7 |
-3.73 |
31.8 |
1.25 |
|
|
SB |
51 |
2 |
45 |
16.2 |
0.64 |
21.4 |
0.84 |
-17.1 |
-0.68 |
59.7 |
2.35 |
102 |
4 |
114 |
5.2 |
0.20 |
17.0 |
0.67 |
-63.5 |
-2.50 |
47.0 |
1.85 |
|
127 |
5 |
47 |
9.1 |
0.36 |
23.6 |
0.93 |
-39.4 |
-1.55 |
73.2 |
2.88 |
|
178 |
7 |
94 |
-4.3 |
-0.17 |
21.8 |
0.86 |
-96.5 |
-3.80 |
65.4 |
2.58 |
|
203 |
8 |
6 |
-18.4 |
-0.73 |
51.6 |
2.03 |
-118.1 |
-4.65 |
16.5 |
0.65 |
|
These summary statistics for the differences between as-designed and mean as-constructed layer thicknesses can be used as benchmarks for use in pavement design reliability and other research studies.
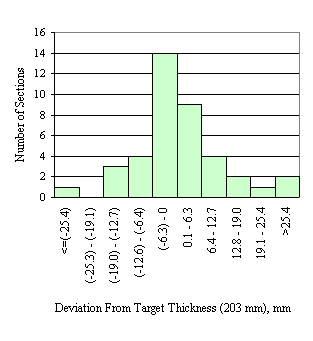
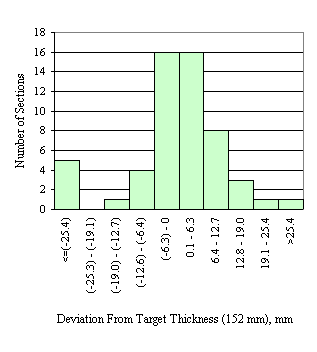
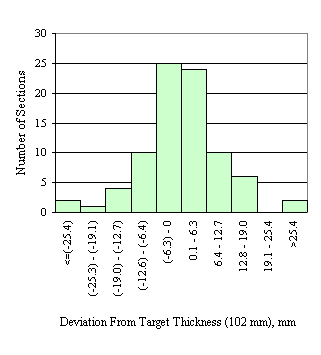
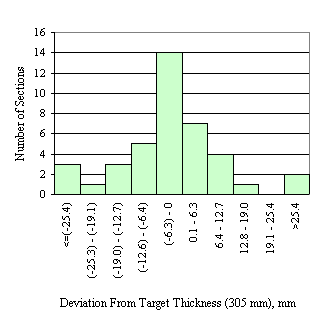
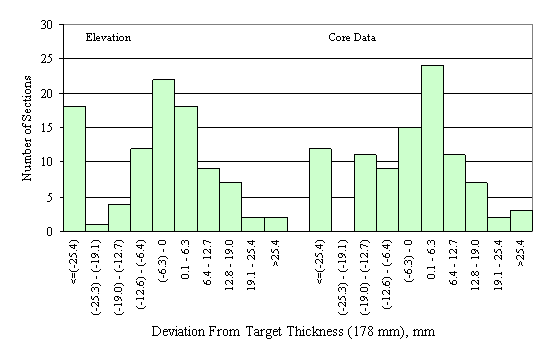
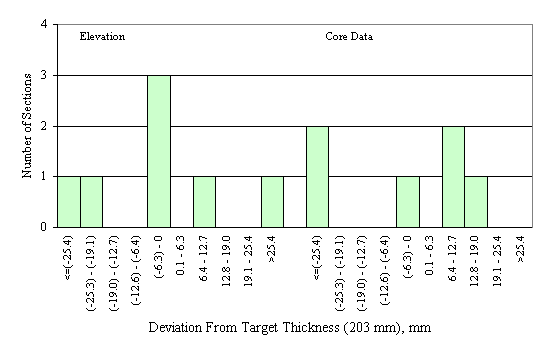
Layer Thickness Deviation Distribution Type
Mean thickness deviations from layers or sections were analyzed to determine whether they follow typical statistical distributions. Skewness and kurtosis analyses were conducted for this purpose. The statistical test results are presented in table 46 for both the elevation and core mean layer thicknesses. Examples of the thickness deviation distributions are shown in figures 62 and 63.
Mat. Type |
Target Thickness |
Elevation Measurement Data |
Core Examination Data |
|||
mm |
in |
No. Layers |
Distribution Type |
No. Layers |
Distribution Type |
|
DGAB |
102 |
4 |
84 |
Normal |
No Data |
|
152 |
6 |
55 |
Wide spread and skewed left |
|||
203 |
8 |
40 |
Wide spread and skewed right |
|||
305 |
12 |
40 |
Wide spread and skewed left |
|||
DGATB |
102 |
4 |
27 |
Normal |
22 |
Normal |
203 |
8 |
42 |
Wide spread and skewed left |
34 |
Normal |
|
305 |
12 |
28 |
Normal |
22 |
Wide spread and skewed left |
|
LC |
152 |
6 |
48 |
Normal |
36 |
Normal |
PATB |
102 |
4 |
129 |
Skewed right |
32 |
Normal |
PCC |
76 |
3 |
12 |
Normal |
10 |
Normal |
127 |
5 |
12 |
Normal |
12 |
Normal |
|
203 |
8 |
76 |
Wide Spread |
71 |
Normal |
|
279 |
11 |
77 |
Normal |
71 |
Wide spread and skewed left |
|
SB |
51 |
2 |
46 |
Skewed right |
45 |
Normal |
102 |
4 |
125 |
Skewed left |
114 |
Wide spread and skewed left |
|
127 |
5 |
46 |
Normal |
47 |
Normal |
|
178 |
7 |
95 |
Skewed left |
94 |
Wide spread and skewed left |
|
203 |
8 |
7 |
Not enough data |
6 |
Not enough data |
|
As shown in table 46, there are some discrepancies between the distribution types drawn from elevation data and core data. For the layers with both elevation and core data, the distribution of the thickness deviation derived from the core data is normal for more layer type and design thicknesses than from the elevation data.
The conclusions drawn from both the descriptive statistics and the kurtosis and skewness tests of their distribution types will be useful for pavement designers and researchers. They will be especially useful in reliability based mechanistic-empirical pavement performance analysis and design.
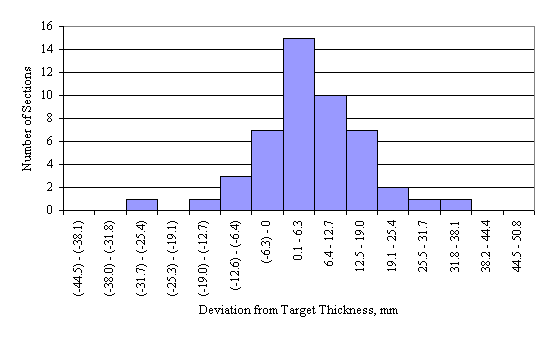
Figure 62: Chart. Example of normally distributed thickness deviations (elevation data, LC, target thickness 152 mm [6 in]).
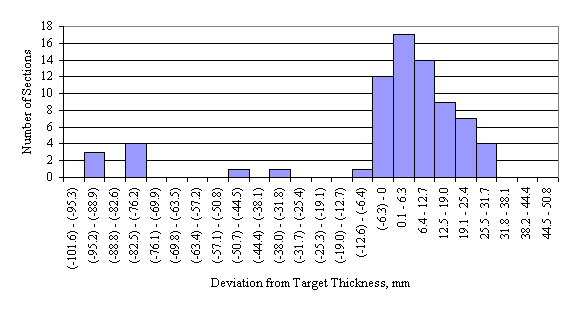
Figure 63: Chart. Example of a skewed distribution for layer thickness deviation (core data, PCC, target thickness 279 mm [11 in]).
Analysis of the Percentage Distribution
The overall percentage distribution of elevation measurements as a function of the three tolerance levels is presented in table 47.
Measured Layer Thickness, t |
Difference Between As-Constructed and As-Designed Thickness |
|||||
|---|---|---|---|---|---|---|
Diff = 6.35 mm (0.25 in) |
Diff = 12.7 mm (0.5 in) |
Diff = 25.4 mm (1.0 in) |
||||
Number of Measurements |
Percent of Measurements |
Number of Measurements |
Percent of Measurements |
Number of Measurements |
Percent of Measurements |
|
|
t < |
15557 | 30.30 | 8481 | 16.52 | 3656 | 7.12 |
|
t within |
17788 | 34.65 | 32542 | 63.38 | 44324 | 86.33 |
|
t > |
17996 | 35.05 | 10318 | 20.10 | 3361 | 6.55 |
|
Total |
51341 | 100 | 51341 | 100 | 51341 | 100 |
| Notes: 1Target value | ||||||
The distribution of measurements by layer type for tolerance levels of 6.35 mm (0.25 in), 12.7 mm (0.5 in), and 25.4 mm (1 in) are presented in tables 48, 49, and 50, respectively.
Layer Type |
Target Thickness |
Thickness |
Thickness Within |
Thickness |
Total Number of Measurem. |
||||
|---|---|---|---|---|---|---|---|---|---|
mm |
in |
Number of Measurem. |
Percent of Measurem. |
Number of Measurem. |
Percent of Measurem. |
Number of Measurem. |
Percent of Measurem. |
||
|
DGAB |
102 |
4 |
1376 |
31.9 |
1686 |
39.0 |
1256 |
29.1 |
4318 |
152 |
6 |
820 |
31.1 |
1046 |
39.7 |
772 |
29.3 |
2638 |
|
203 |
8 |
675 |
32.0 |
679 |
32.2 |
756 |
35.8 |
2110 |
|
305 |
12 |
809 |
37.8 |
722 |
33.7 |
609 |
28.5 |
2140 |
|
|
DGATB |
102 |
4 |
370 |
25.9 |
597 |
41.8 |
461 |
32.3 |
1428 |
203 |
8 |
700 |
30.3 |
700 |
30.3 |
907 |
39.3 |
2307 |
|
305 |
12 |
570 |
37.6 |
499 |
32.9 |
446 |
29.4 |
1515 |
|
|
LC |
152 |
6 |
342 |
13.9 |
1034 |
42.1 |
1082 |
44.0 |
2458 |
|
PATB |
102 |
4 |
2059 |
30.6 |
2554 |
37.9 |
2124 |
31.5 |
6737 |
|
PCC |
76 |
3 |
7 |
1.5 |
96 |
21.0 |
355 |
77.5 |
458 |
127 |
5 |
10 |
2.2 |
85 |
18.5 |
365 |
79.3 |
460 |
|
203 |
8 |
706 |
18.5 |
1296 |
33.9 |
1821 |
47.6 |
3823 |
|
279 |
11 |
713 |
18.3 |
1460 |
37.5 |
1721 |
44.2 |
3894 |
|
|
SB |
51 |
2 |
655 |
27.3 |
810 |
33.8 |
932 |
38.9 |
2397 |
102 |
4 |
2286 |
33.9 |
2203 |
32.6 |
2259 |
33.5 |
6748 |
|
127 |
5 |
1107 |
46.2 |
617 |
25.8 |
671 |
28.0 |
2395 |
|
178 |
7 |
2201 |
42.9 |
1589 |
30.9 |
1345 |
26.2 |
5135 |
|
203 |
8 |
151 |
39.7 |
115 |
30.3 |
114 |
30.0 |
380 |
|
|
Total |
15557 |
30.3 |
17788 |
34.6 |
17996 |
35.1 |
51341 |
||
Layer Type |
Target Thickness |
Thickness <TV-12.7 mm (0.5 in) |
Thickness Within |
Thickness |
Total Number of Measurem. |
||||
|---|---|---|---|---|---|---|---|---|---|
mm |
in |
Number of Measurem. |
Percent of Measurem. |
Number of Measurem. |
Percent of Measurem. |
Number of Measurem. |
Percent of Measurem. |
||
|
DGAB |
102 |
4 |
589 |
13.6 |
2990 |
69.2 |
739 |
17.1 |
4318 |
152 |
6 |
447 |
16.9 |
1796 |
68.1 |
395 |
15.0 |
2638 |
|
203 |
8 |
425 |
20.1 |
1284 |
60.9 |
401 |
19.0 |
2110 |
|
305 |
12 |
560 |
26.2 |
1168 |
54.6 |
412 |
19.3 |
2140 |
|
|
DGATB |
102 |
4 |
104 |
7.3 |
1087 |
76.1 |
237 |
16.6 |
1428 |
203 |
8 |
384 |
16.6 |
1419 |
61.5 |
504 |
21.8 |
2307 |
|
305 |
12 |
370 |
24.4 |
851 |
56.2 |
294 |
19.4 |
1515 |
|
|
LC |
152 |
6 |
168 |
6.8 |
1661 |
67.6 |
629 |
25.6 |
2458 |
|
PATB |
102 |
4 |
790 |
11.7 |
4774 |
70.9 |
1173 |
17.4 |
6737 |
|
PCC |
76 |
3 |
2 |
0.4 |
159 |
34.7 |
297 |
64.8 |
458 |
127 |
5 |
2 |
0.4 |
214 |
46.5 |
244 |
53.0 |
460 |
|
203 |
8 |
323 |
8.4 |
2549 |
66.7 |
951 |
24.9 |
3823 |
|
279 |
11 |
338 |
8.7 |
2745 |
70.5 |
811 |
20.8 |
3894 |
|
|
SB |
51 |
2 |
374 |
15.6 |
1420 |
59.2 |
603 |
25.2 |
2397 |
102 |
4 |
1360 |
20.2 |
4031 |
59.7 |
1357 |
20.1 |
6748 |
|
127 |
5 |
747 |
31.2 |
1241 |
51.8 |
407 |
17.0 |
2395 |
|
178 |
7 |
1380 |
26.9 |
2971 |
57.9 |
784 |
15.3 |
5135 |
|
203 |
8 |
118 |
31.1 |
182 |
47.9 |
80 |
21.1 |
380 |
|
|
Total |
8481 |
16.5 |
32542 |
63.4 |
10318 |
20.1 |
51341 |
||
Layer Type |
Target Thickness |
Mean Thickness |
Mean Thickness Within TV ± 25.4 mm (1in) |
Mean Thickness >TV+25.4 mm (1in) |
Total Number of Measurem. |
||||
|---|---|---|---|---|---|---|---|---|---|
mm |
in |
Number of Measurem. |
Percent of Measurem. |
Number of Measurem. |
Percent of Measurem. |
Number of Measurem. |
Percent of Measurem. |
||
|
DGAB |
102 |
4 |
181 |
4.2 |
3910 |
90.6 |
227 |
5.3 |
4318 |
152 |
6 |
187 |
7.1 |
2310 |
87.6 |
141 |
5.3 |
2638 |
|
203 |
8 |
124 |
5.9 |
1807 |
85.6 |
179 |
8.5 |
2110 |
|
305 |
12 |
260 |
12.1 |
1688 |
78.9 |
192 |
9.0 |
2140 |
|
|
DGATB |
102 |
4 |
9 |
0.6 |
1403 |
98.2 |
16 |
1.1 |
1428 |
203 |
8 |
134 |
5.8 |
2038 |
88.3 |
135 |
5.9 |
2307 |
|
305 |
12 |
170 |
11.2 |
1249 |
82.4 |
96 |
6.3 |
1515 |
|
|
LC |
152 |
6 |
33 |
1.3 |
2228 |
90.6 |
197 |
8.0 |
2458 |
|
PATB |
102 |
4 |
108 |
1.6 |
6378 |
94.7 |
251 |
3.7 |
6737 |
|
PCC |
76 |
3 |
0 |
0.0 |
308 |
67.2 |
150 |
32.8 |
458 |
127 |
5 |
0 |
0.0 |
336 |
73.0 |
124 |
27.0 |
460 |
|
203 |
8 |
64 |
1.7 |
3474 |
90.9 |
285 |
7.5 |
3823 |
|
279 |
11 |
45 |
1.2 |
3593 |
92.3 |
256 |
6.6 |
3894 |
|
|
SB |
51 |
2 |
72 |
3.0 |
1970 |
82.2 |
355 |
14.8 |
2397 |
102 |
4 |
925 |
13.7 |
5512 |
81.7 |
311 |
4.6 |
6748 |
|
127 |
5 |
298 |
12.4 |
1866 |
77.9 |
231 |
9.6 |
2395 |
|
178 |
7 |
983 |
19.1 |
3987 |
77.6 |
165 |
3.2 |
5135 |
|
203 |
8 |
63 |
16.6 |
267 |
70.3 |
50 |
13.2 |
380 |
|
|
Total |
3656 |
7.1 |
44324 |
86.3 |
3361 |
6.5 |
51341 |
||
The graphical presentations of percentage distributions of elevation measurements are shown in figures 64, 65, and 66 for different tolerance levels.
The following conclusions may be drawn based on the percentage distributions of the elevation measurements:
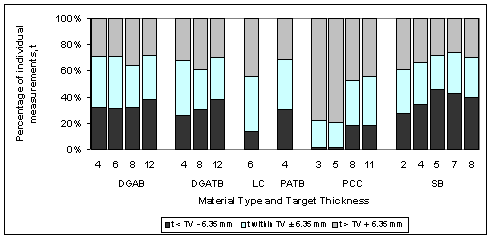
Figure 64: Chart. Percentage distribution of the elevation measurements for a tolerance level of 6.35 mm (0.25 in) for different material types and design thicknesses.
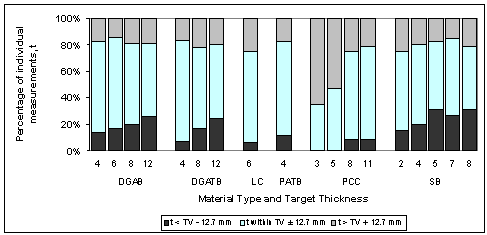
Figure 65: Chart. Percentage distribution of the elevation measurements for a tolerance level of 12.7 mm (0.5 in) for different material types and design thicknesses.
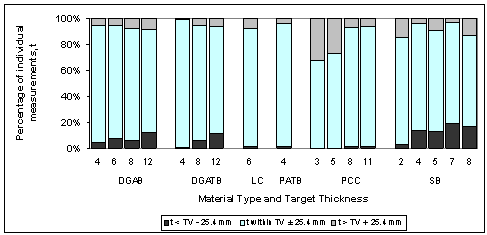
Figure 66: Chart. Percentage distribution of the elevation measurements for a tolerance level of 25.4 mm (1 in) for different material types and design thicknesses.
Statistical Analysis of the Elevation Measurements
Two-sided t-test
After removing the outlying data points (as discussed in chapter 4), t-tests are performed to evaluate whether the mean constructed thicknesses are close to the designed thicknesses. Many of these tests are highly significant, meaning that the mean constructed thickness is significantly different from the designed thickness.
The following notes apply to tables 51 to 56 and tables 61 to 66:
Results of two-sided t-test with 95 percent confidence are presented in table 51. The results of the two-sided t-tests by layer material type and target thickness are given in table 52.
Mean Thickness |
Number of Layers |
Percentage of Layers |
|---|---|---|
|
Significantly lower than the target value |
357 |
36.10 |
|
No significant difference from the target value |
196 |
19.82 |
|
Significantly higher than the target value |
436 |
44.08 |
|
Total |
989 |
100 |
The following observations are based on the results of the two-sided t-test for the elevation measurements:
Layer Type |
Target Thickness |
Significantly Lower than the Target Value |
No Significant Difference |
Significantly Higher than the Target Value |
Total Number of Sections |
||||
mm |
in |
Number of Sections |
Percent of Sections |
Number of Sections |
Percent of Sections |
Number of Sections |
Percent of Sections |
||
|---|---|---|---|---|---|---|---|---|---|
|
DGAB |
102 |
4 |
28 |
33.3 |
27 |
32.1 |
29 |
34.5 |
84 |
152 |
6 |
20 |
36.4 |
14 |
25.5 |
21 |
38.2 |
55 |
|
203 |
8 |
12 |
30.0 |
15 |
37.5 |
13 |
32.5 |
40 |
|
305 |
12 |
16 |
40.0 |
13 |
32.5 |
11 |
27.5 |
40 |
|
|
DGATB |
102 |
4 |
10 |
37.0 |
5 |
18.5 |
12 |
44.4 |
27 |
203 |
8 |
15 |
35.7 |
12 |
28.6 |
15 |
35.7 |
42 |
|
305 |
12 |
14 |
50.0 |
3 |
10.7 |
11 |
39.3 |
28 |
|
|
LC |
152 |
6 |
9 |
18.8 |
11 |
22.9 |
28 |
58.3 |
48 |
|
PATB |
102 |
4 |
48 |
37.2 |
26 |
20.2 |
55 |
42.6 |
129 |
|
PCC |
76 |
3 |
0 |
0.0 |
0 |
0.0 |
12 |
100.0 |
12 |
127 |
5 |
0 |
0.0 |
0 |
0.0 |
12 |
100.0 |
12 |
|
203 |
8 |
20 |
26.3 |
11 |
14.5 |
45 |
59.2 |
76 |
|
279 |
11 |
16 |
20.8 |
21 |
27.3 |
40 |
51.9 |
77 |
|
|
SB |
51 |
2 |
19 |
41.3 |
4 |
8.7 |
23 |
50.0 |
46 |
102 |
4 |
50 |
40.0 |
16 |
12.8 |
59 |
47.2 |
125 |
|
127 |
5 |
29 |
63.0 |
2 |
4.3 |
15 |
32.6 |
46 |
|
178 |
7 |
48 |
50.5 |
14 |
14.7 |
33 |
34.7 |
95 |
|
203 |
8 |
3 |
42.9 |
2 |
28.6 |
2 |
28.6 |
7 |
|
|
Total |
357 |
36.1 |
196 |
19.8 |
436 |
44.1 |
989 |
||
One-sided t-test
Three one-sided t-tests with a confidence level of 95 percent were performed to evaluate whether the absolute differences between as-constructed and as-designed thicknesses are greater than 6.35 mm (0.25 in), 12.7 mm (0.5 in), and 25.4 mm (1 in), respectively. The results of the overall analysis of all data points for all layers are presented in table 53.
The results of the analysis by layer material type for different tolerance levels are presented in tables 54 to 56.
|
Level of Significance (TV - Target Value) |
Difference Between the Mean As-Constructed and As-Designed Thickness |
|||||
6.35 mm (0.25 in) |
12.7 mm (0.5 in) |
25.4 mm (1.0 in) |
||||
Number of Layers |
Percent of Layers |
Number of Layers |
Percent of Layers |
Number of Layers |
Percent of Layers |
|
|---|---|---|---|---|---|---|
|
Significantly lower than TV |
181 |
18.3 |
102 |
10.3 |
50 |
5.1 |
|
No significant difference from the TV |
562 |
56.8 |
760 |
76.8 |
908 |
91.8 |
|
Significantly higher than TV |
246 |
26.9 |
127 |
12.8 |
31 |
3.1 |
|
Total |
989 |
100 |
989 |
100 |
989 |
100 |
Layer Type |
Target Thickness |
Mean Thickness <TV-6.35 mm (0.25 in) |
Mean Thickness Within TV ± 6.35 mm (0.25 in) |
Mean Thickness >TV+6.35 mm (0.25 in) |
Total Number of Sections |
||||
|---|---|---|---|---|---|---|---|---|---|
mm |
in |
Number of Sections |
Percent of Sections |
Number of Sections |
Percent of Sections |
Number of Sections |
Percent of Sections |
||
|
DGAB |
102 |
4 |
12 |
14.3 |
59 |
70.2 |
13 |
15.5 |
84 |
152 |
6 |
9 |
16.4 |
40 |
72.7 |
6 |
10.9 |
55 |
|
203 |
8 |
5 |
12.5 |
28 |
70.0 |
7 |
17.5 |
40 |
|
305 |
12 |
9 |
22.5 |
25 |
62.5 |
6 |
15.0 |
40 |
|
|
DGATB |
102 |
4 |
3 |
11.1 |
20 |
74.1 |
4 |
14.8 |
27 |
203 |
8 |
8 |
19.0 |
22 |
52.4 |
12 |
28.6 |
42 |
|
305 |
12 |
8 |
28.6 |
12 |
42.9 |
8 |
28.6 |
28 |
|
|
LC |
152 |
6 |
3 |
6.3 |
28 |
58.3 |
17 |
35.4 |
48 |
|
PATB |
102 |
4 |
21 |
16.3 |
81 |
62.8 |
27 |
20.9 |
129 |
|
PCC |
76 |
3 |
0 |
0.0 |
2 |
16.7 |
10 |
83.3 |
12 |
127 |
5 |
0 |
0.0 |
3 |
25.0 |
9 |
75.0 |
12 |
|
203 |
8 |
5 |
6.6 |
41 |
53.9 |
30 |
39.5 |
76 |
|
279 |
11 |
8 |
10.4 |
44 |
57.1 |
25 |
32.5 |
77 |
|
|
SB |
51 |
2 |
9 |
19.6 |
24 |
52.2 |
13 |
28.3 |
46 |
102 |
4 |
31 |
24.8 |
65 |
52.0 |
29 |
23.2 |
125 |
|
127 |
5 |
19 |
41.3 |
17 |
37.0 |
10 |
21.7 |
46 |
|
178 |
7 |
29 |
30.5 |
47 |
49.5 |
19 |
20.0 |
95 |
|
203 |
8 |
2 |
28.6 |
4 |
57.1 |
1 |
14.3 |
7 |
|
Total |
181 |
18.3 |
562 |
56.8 |
246 |
24.9 |
989 |
||
Layer Type |
Target Thickness |
Mean Thickness <TV-12.7 mm (0.5 in) |
Mean Thickness Within TV ± 12.7 mm (0.5 in) |
Mean Thickness >TV+12.7 mm (0.5 in) |
Total Number of Sections |
||||
mm |
in |
Number of Sections |
Percent of Sections |
Number of Sections |
Percent of Sections |
Number of Sections |
Percent of Sections |
||
|---|---|---|---|---|---|---|---|---|---|
|
DGAB |
102 |
4 |
5 |
6.0 |
73 |
86.9 |
6 |
7.1 |
84 |
152 |
6 |
6 |
10.9 |
47 |
85.5 |
2 |
3.6 |
55 |
|
203 |
8 |
3 |
7.5 |
33 |
82.5 |
4 |
10.0 |
40 |
|
305 |
12 |
6 |
15.0 |
32 |
80.0 |
2 |
5.0 |
40 |
|
|
DGATB |
102 |
4 |
0 |
0.0 |
25 |
92.6 |
2 |
7.4 |
27 |
203 |
8 |
5 |
11.9 |
29 |
69.0 |
8 |
19.0 |
42 |
|
305 |
12 |
6 |
21.4 |
19 |
67.9 |
3 |
10.7 |
28 |
|
|
LC |
152 |
6 |
1 |
2.1 |
40 |
83.3 |
7 |
14.6 |
48 |
|
PATB |
102 |
4 |
5 |
3.9 |
111 |
86.0 |
13 |
10.1 |
129 |
|
PCC |
76 |
3 |
0 |
0.0 |
7 |
58.3 |
5 |
41.7 |
12 |
127 |
5 |
0 |
0.0 |
6 |
50.0 |
6 |
50.0 |
12 |
|
203 |
8 |
4 |
5.3 |
60 |
78.9 |
12 |
15.8 |
76 |
|
279 |
11 |
2 |
2.6 |
62 |
80.5 |
13 |
16.9 |
77 |
|
|
SB |
51 |
2 |
6 |
13.0 |
29 |
63.0 |
11 |
23.9 |
46 |
102 |
4 |
20 |
16.0 |
88 |
70.4 |
17 |
13.6 |
125 |
|
127 |
5 |
10 |
21.7 |
29 |
63.0 |
7 |
15.2 |
46 |
|
178 |
7 |
21 |
22.1 |
66 |
69.5 |
8 |
8.4 |
95 |
|
203 |
8 |
2 |
28.6 |
4 |
57.1 |
1 |
14.3 |
7 |
|
|
Total |
102 |
10.3 |
760 |
76.8 |
127 |
12.8 |
989 |
||
Layer Type |
Target Thickness |
Mean Thickness <TV-25.4 mm (1in) |
Mean Thickness Within TV ± 25.4 mm (1 in) |
Mean Thickness >TV+25.4 mm (1in) |
Total Number of Sections |
||||
mm |
in |
Number of Sections |
Percent of Sections |
Number of Sections |
Percent of Sections |
Number of Sections |
Percent of Sections |
||
|---|---|---|---|---|---|---|---|---|---|
|
DGAB |
102 |
4 |
0 |
0.0 |
83 |
98.8 |
1 |
1.2 |
84 |
152 |
6 |
4 |
7.3 |
50 |
90.9 |
1 |
1.8 |
55 |
|
203 |
8 |
0 |
0.0 |
39 |
97.5 |
1 |
2.5 |
40 |
|
305 |
12 |
2 |
5.0 |
38 |
95.0 |
0 |
0.0 |
40 |
|
|
DGATB |
102 |
4 |
0 |
0.0 |
27 |
100.0 |
0 |
0.0 |
27 |
203 |
8 |
2 |
4.8 |
39 |
92.9 |
1 |
2.4 |
42 |
|
305 |
12 |
1 |
3.6 |
26 |
92.9 |
1 |
3.6 |
28 |
|
|
LC |
152 |
6 |
0 |
0.0 |
46 |
95.8 |
2 |
4.2 |
48 |
|
PATB |
102 |
4 |
0 |
0.0 |
127 |
98.4 |
2 |
1.6 |
129 |
|
PCC |
76 |
3 |
0 |
0.0 |
10 |
83.3 |
2 |
16.7 |
12 |
127 |
5 |
0 |
0.0 |
10 |
83.3 |
2 |
16.7 |
12 |
|
203 |
8 |
1 |
1.3 |
73 |
96.1 |
2 |
2.6 |
76 |
|
279 |
11 |
0 |
0.0 |
75 |
97.4 |
2 |
2.6 |
77 |
|
|
SB |
51 |
2 |
0 |
0.0 |
41 |
89.1 |
5 |
10.9 |
46 |
102 |
4 |
18 |
14.4 |
104 |
83.2 |
3 |
2.4 |
125 |
|
127 |
5 |
4 |
8.7 |
39 |
84.8 |
3 |
6.5 |
46 |
|
178 |
7 |
17 |
17.9 |
76 |
80.0 |
2 |
2.1 |
95 |
|
203 |
8 |
1 |
14.3 |
5 |
71.4 |
1 |
14.3 |
7 |
|
Total |
50 |
5.1 |
908 |
91.8 |
31 |
3.1 |
989 |
||
The results of the one-sided t-tests for the elevation measurements are shown in figures 67, 68, and 69 for the three different tolerance levels.
The following observations are drawn based on the results of the one-sided t-test for the elevation measurements:
Figure 67: Chart. Results of one-sided t-tests for the differences between mean elevation and design thicknesses for a tolerance level of 6.35 mm (0.25 in).
Figure 68: Chart. Results of one-sided t-tests for the differences between mean elevation and design thicknesses for a tolerance level of 12.7 mm (0.5 in).
Figure 69: Chart. Results of one-sided t-tests for the differences between mean elevation and design thicknesses for a tolerance level of 25.4 mm (1 in).
Analysis of the Percentage Distribution
The percentage distribution of core data as a function of different tolerance levels is presented in table 57.
Measured Layer Thickness t |
Difference Between As-Constructed and As-Designed |
|||||
Diff = 6.35 mm (0.25 in) |
Diff = 12.7 mm (0.5 in) |
Diff = 25.4 mm (1.0 in) |
||||
Number of Measurements |
Percent of Measurements |
Number of Measurements |
Percent of Measurements |
Number of Measurements |
Percent of Measurements |
|
|---|---|---|---|---|---|---|
|
t <
|
617 |
19.04 |
368 |
11.35 |
179 |
5.52 |
|
t within |
1117 |
34.46 |
2026 |
62.51 |
2720 |
83.92 |
|
t > |
1507 |
46.50 |
847 |
26.13 |
342 |
10.55 |
|
Total |
3241 |
100 |
3241 |
100 |
3241 |
100 |
| Notes: 1Target value | ||||||
The distributions of measurements by layer type for tolerance levels of 6.35 mm (0.25 in), 12.7 mm (0.5 in), and 25.4 mm (1 in) are presented in tables 58, 59, and 60 for different layer types and target thickness values.
Layer Type |
Target Thickness |
Thickness <TV-6.35 mm (0.25 in) |
Thickness Within TV ± 6.35 mm (0.25 in) |
Thickness >TV+6.35 mm (0.25 in) |
Total Number of Cores |
||||
|---|---|---|---|---|---|---|---|---|---|
mm |
in |
Number of Cores |
Percent of Cores |
Number of Cores |
Percent of Cores |
Number of Cores |
Percent of Cores |
||
|
DGATB |
102 |
4 |
23 |
25.0 |
46 |
50.0 |
23 |
25.0 |
92 |
203 |
8 |
42 |
29.6 |
46 |
32.4 |
54 |
38.0 |
142 |
|
305 |
12 |
36 |
40.4 |
20 |
22.5 |
33 |
37.1 |
89 |
|
|
LC |
152 |
6 |
24 |
13.2 |
50 |
27.5 |
108 |
59.3 |
182 |
|
PATB |
102 |
4 |
86 |
60.6 |
39 |
27.5 |
17 |
12.0 |
142 |
|
PCC |
76 |
3 |
5 |
6.8 |
68 |
93.2 |
73 |
||
127 |
5 |
11 |
6.8 |
26 |
16.1 |
124 |
77.0 |
161 |
|
203 |
8 |
48 |
10.2 |
159 |
33.8 |
263 |
56.0 |
470 |
|
279 |
11 |
67 |
15.2 |
182 |
41.4 |
191 |
43.4 |
440 |
|
|
SB |
51 |
2 |
10 |
6.0 |
63 |
38.0 |
93 |
56.0 |
166 |
102 |
4 |
63 |
11.8 |
213 |
39.9 |
258 |
48.3 |
534 |
|
127 |
5 |
64 |
22.1 |
85 |
29.4 |
140 |
48.4 |
289 |
|
178 |
7 |
134 |
30.5 |
180 |
41.0 |
125 |
28.5 |
439 |
|
203 |
8 |
9 |
40.9 |
3 |
13.6 |
10 |
45.5 |
22 |
|
|
Total |
617 |
19.0 |
1117 |
34.5 |
1507 |
46.5 |
3241 |
||
Layer Type |
Target Thickness |
Thickness <TV-12.7 mm (0.5 in) |
Thickness Within TV ± 12.7 mm (0.5 in) |
Thickness >TV+12.7 mm (0.5 in) |
Total Number of Cores |
||||
|---|---|---|---|---|---|---|---|---|---|
mm |
in |
Number of Cores |
Percent of Cores |
Number of Cores |
Percent of Cores |
Number of Cores |
Percent of Cores |
||
|
DGATB |
102 |
4 |
8 |
8.7 |
76 |
82.6 |
8 |
8.7 |
92 |
203 |
8 |
22 |
15.5 |
90 |
63.4 |
30 |
21.1 |
142 |
|
305 |
12 |
28 |
31.5 |
40 |
44.9 |
21 |
23.6 |
89 |
|
|
LC |
152 |
6 |
15 |
8.2 |
105 |
57.7 |
62 |
34.1 |
182 |
|
PATB |
102 |
4 |
69 |
48.6 |
63 |
44.4 |
10 |
7.0 |
142 |
PCC |
76 |
3 |
0 |
0.0 |
25 |
34.2 |
48 |
65.8 |
73 |
127 |
5 |
8 |
5.0 |
66 |
41.0 |
87 |
54.0 |
161 |
|
203 |
8 |
24 |
5.1 |
300 |
63.8 |
146 |
31.1 |
470 |
|
279 |
11 |
38 |
8.6 |
315 |
71.6 |
87 |
19.8 |
440 |
|
|
SB |
51 |
2 |
4 |
2.4 |
96 |
57.8 |
66 |
39.8 |
166 |
102 |
4 |
29 |
5.4 |
387 |
72.5 |
118 |
22.1 |
534 |
|
127 |
5 |
22 |
7.6 |
166 |
57.4 |
101 |
34.9 |
289 |
|
178 |
7 |
93 |
21.2 |
290 |
66.1 |
56 |
12.8 |
439 |
|
203 |
8 |
8 |
36.4 |
7 |
31.8 |
7 |
31.8 |
22 |
|
|
Total |
368 |
11.4 |
2026 |
62.5 |
847 |
26.1 |
3241 |
||
Layer Type |
Target Thickness |
Thickness |
Thickness Within |
Thickness |
Total |
||||
|---|---|---|---|---|---|---|---|---|---|
mm |
in |
Number of Cores |
Percent of Cores |
Number of Cores |
Percent of Cores |
Number of Cores |
Percent of Cores |
||
|
DGATB |
102 |
4 |
2 |
2.2 |
90 |
97.8 |
0 |
0.0 |
92 |
203 |
8 |
10 |
7.0 |
123 |
86.6 |
9 |
6.3 |
142 |
|
305 |
12 |
15 |
16.9 |
70 |
78.7 |
4 |
4.5 |
89 |
|
|
LC |
152 |
6 |
2 |
1.1 |
171 |
94.0 |
9 |
4.9 |
182 |
|
PATB |
102 |
4 |
45 |
31.7 |
90 |
63.4 |
7 |
4.9 |
142 |
|
PCC |
76 |
3 |
0 |
0.0 |
51 |
69.9 |
22 |
30.1 |
73 |
127 |
5 |
0 |
0.0 |
123 |
76.4 |
38 |
23.6 |
161 |
|
203 |
8 |
10 |
2.1 |
419 |
89.1 |
41 |
8.7 |
470 |
|
279 |
11 |
32 |
7.3 |
387 |
88.0 |
21 |
4.8 |
440 |
|
|
SB |
51 |
2 |
0 |
0.0 |
123 |
74.1 |
43 |
25.9 |
166 |
102 |
4 |
13 |
2.4 |
476 |
89.1 |
45 |
8.4 |
534 |
|
127 |
5 |
7 |
2.4 |
205 |
70.9 |
77 |
26.6 |
289 |
|
178 |
7 |
37 |
8.4 |
379 |
86.3 |
23 |
5.2 |
439 |
|
203 |
8 |
6 |
27.3 |
13 |
59.1 |
3 |
13.6 |
22 |
|
Total |
179 |
5.5 |
2720 |
83.9 |
342 |
10.6 |
3241 |
||
The graphical presentation of the percentage distributions of core thickness measurements is shown in figures 70, 71, and 72 for the three different tolerance levels.
The following are observed based on the percentage distributions of the individual core thickness measurements:
Figure 70: Chart. Percentage distribution of core measurements by layer type and design thickness for a tolerance level of 6.35 mm (0.25 in).
Figure 71: Chart. Percentage distribution of core measurements by layer type and design thickness for a tolerance level of 12.7 mm (0.5 in).
Figure 72: Chart. Percentage distribution of core measurements by layer type and design thickness for a tolerance level of 25.4 mm (1 in).
Statistical Analysis of the Core Data
Two-sided t-test
The results of the two-sided t-tests with 95 percent confidence are presented in table 61. The distribution of differences by different surface type and target thickness is presented in table 62.
Difference |
Number of Layers |
Percentage of Layers |
|---|---|---|
|
Significantly lower than the target value |
90 |
15.38 |
|
No significant difference from the target value |
268 |
45.81 |
|
Significantly higher than the target value |
227 |
38.80 |
|
Total |
585 |
100 |
Layer Type |
Target Thickness |
Significantly Lower than the Target Value |
No Significant Difference |
Significantly Higher than the Target Value |
Total Number of Sections |
||||
|---|---|---|---|---|---|---|---|---|---|
mm |
in |
Number of Sections |
Percent of Sections |
Number of Sections |
Percent of Sections |
Number of Sections |
Percent of Sections |
||
|
DGATB |
102 |
4 |
3 |
15.8 |
15 |
78.9 |
1 |
5.3 |
19 |
203 |
8 |
5 |
16.1 |
16 |
51.6 |
10 |
32.3 |
31 |
|
305 |
12 |
3 |
15.8 |
11 |
57.9 |
5 |
26.3 |
19 |
|
|
LC |
152 |
6 |
2 |
5.7 |
13 |
37.1 |
20 |
57.1 |
35 |
|
PATB |
102 |
4 |
13 |
41.9 |
15 |
48.4 |
3 |
9.7 |
31 |
|
PCC |
76 |
3 |
0 |
0.0 |
2 |
20.0 |
8 |
80.0 |
10 |
127 |
5 |
1 |
8.3 |
2 |
16.7 |
9 |
75.0 |
12 |
|
203 |
8 |
6 |
8.5 |
21 |
29.6 |
44 |
62.0 |
71 |
|
279 |
11 |
12 |
17.1 |
32 |
45.7 |
26 |
37.1 |
70 |
|
|
SB |
51 |
2 |
3 |
7.7 |
18 |
46.2 |
18 |
46.2 |
39 |
102 |
4 |
13 |
11.8 |
49 |
44.5 |
48 |
43.6 |
110 |
|
127 |
5 |
11 |
23.9 |
15 |
32.6 |
20 |
43.5 |
46 |
|
178 |
7 |
17 |
19.8 |
54 |
62.8 |
15 |
17.4 |
86 |
|
203 |
8 |
1 |
16.7 |
5 |
83.3 |
0 |
0.0 |
6 |
|
|
Total |
90 |
15.4 |
268 |
45.8 |
227 |
38.8 |
585 |
||
The following are observed based on the results of the two-sided t-test for the core thickness measurements:
One-sided t-test
Three one-sided t-tests (95 percent confidence level) were performed to check whether the difference between as-constructed and as-designed thickness is lower than 6.35 mm (0.25 in), 12.7 mm (0.5 in), and 25.4 mm (1 in), respectively. The results of the overall analysis of all data points for all layers are summarized in table 63.
The results of the analysis by layer type for different tolerance levels are presented in tables 64 through 66.
|
Level of Significance |
Difference Between As-Constructed and As-Designed Thickness |
|||||
|---|---|---|---|---|---|---|
6.35 mm (0.25 in) |
12.7 mm (0.5 in) |
25.4 mm (1.0 in) |
||||
Number of Layers |
Percent of Layers |
Number of Layers |
Percent of Layers |
Number of Layers |
Percent of Layers |
|
|
Significantly lower than the target value |
58 |
9.91 |
34 |
5.81 |
22 |
3.76 |
|
No significant difference from the target value |
378 |
64.62 |
473 |
80.85 |
533 |
91.11 |
|
Significantly higher than the target value |
149 |
25.47 |
78 |
13.33 |
30 |
5.13 |
|
Total |
585 |
100 |
585 |
100 |
585 |
100 |
Layer Type |
Target Thickness |
Mean Thickness <TV-6.35 mm (0.25 in) |
Mean Thickness Within TV ± 6.35 mm (0.25 in) |
Mean Thickness >TV+6.35 mm (0.25 in) |
Total Number of Sections |
||||
|---|---|---|---|---|---|---|---|---|---|
mm |
in |
Number of Sections |
Percent of Sections |
Number of Sections |
Percent of Sections |
Number of Sections |
Percent of Sections |
||
|
DGATB |
102 |
4 |
1 |
5.3 |
17 |
89.5 |
1 |
5.3 |
19 |
203 |
8 |
4 |
12.9 |
20 |
64.5 |
7 |
22.6 |
31 |
|
305 |
12 |
3 |
15.8 |
12 |
63.2 |
4 |
21.1 |
19 |
|
|
LC |
152 |
6 |
2 |
5.7 |
22 |
62.9 |
11 |
31.4 |
35 |
PATB |
102 |
4 |
13 |
41.9 |
16 |
51.6 |
2 |
6.5 |
31 |
|
PCC |
76 |
3 |
0 |
0.0 |
2 |
20.0 |
8 |
80.0 |
10 |
127 |
5 |
0 |
0.0 |
5 |
41.7 |
7 |
58.3 |
12 |
|
203 |
8 |
2 |
2.8 |
40 |
56.3 |
29 |
40.8 |
71 |
|
279 |
11 |
6 |
8.6 |
50 |
71.4 |
14 |
20.0 |
70 |
|
|
SB |
51 |
2 |
1 |
2.6 |
20 |
51.3 |
18 |
46.2 |
39 |
102 |
4 |
7 |
6.4 |
75 |
68.2 |
28 |
25.5 |
110 |
|
127 |
5 |
5 |
10.9 |
27 |
58.7 |
14 |
30.4 |
46 |
|
178 |
7 |
12 |
14.0 |
68 |
79.1 |
6 |
7.0 |
86 |
|
203 |
8 |
2 |
33.3 |
4 |
66.7 |
0 |
0.0 |
6 |
|
|
Total |
58 |
9.9 |
378 |
64.6 |
149 |
25.5 |
585 |
||
Layer Type |
Target Thickness |
Mean Thickness <TV-12.7 mm (0.5 in) |
Mean Thickness Within TV ± 12.7 mm (0.5 in) |
Mean Thickness >TV+12.7 mm (0.5 in) |
Total Number of Sections |
||||
|---|---|---|---|---|---|---|---|---|---|
mm |
in |
Number of Sections |
Percent of Sections |
Number of Sections |
Percent of Sections |
Number of Sections |
Percent of Sections |
||
|
DGATB |
102 |
4 |
0 |
0.0 |
18 |
94.7 |
1 |
5.3 |
19 |
203 |
8 |
0 |
0.0 |
27 |
87.1 |
4 |
12.9 |
31 |
|
305 |
12 |
2 |
10.5 |
14 |
73.7 |
3 |
15.8 |
19 |
|
|
LC |
152 |
6 |
0 |
0.0 |
27 |
77.1 |
8 |
22.9 |
35 |
|
PATB |
102 |
4 |
10 |
32.3 |
20 |
64.5 |
1 |
3.2 |
31 |
|
PCC |
76 |
3 |
0 |
0.0 |
4 |
40.0 |
6 |
60.0 |
10 |
127 |
5 |
0 |
0.0 |
6 |
50.0 |
6 |
50.0 |
12 |
|
203 |
8 |
1 |
1.4 |
58 |
81.7 |
12 |
16.9 |
71 |
|
279 |
11 |
6 |
8.6 |
59 |
84.3 |
5 |
7.1 |
70 |
|
|
SB |
51 |
2 |
0 |
0.0 |
29 |
74.4 |
10 |
25.6 |
39 |
102 |
4 |
5 |
4.5 |
97 |
88.2 |
8 |
7.3 |
110 |
|
127 |
5 |
1 |
2.2 |
33 |
71.7 |
12 |
26.1 |
46 |
|
178 |
7 |
7 |
8.1 |
77 |
89.5 |
2 |
2.3 |
86 |
|
203 |
8 |
2 |
33.3 |
4 |
66.7 |
0 |
0.0 |
6 |
|
|
Total |
34 |
5.8 |
473 |
80.9 |
78 |
13.3 |
585 |
||
Layer Type |
Target Thickness |
Mean Thickness <TV-25.4 mm (1 in) |
Mean Thickness Within TV ± 25.4 mm (1 in) |
Mean Thickness >TV+25.4 mm (1 in) |
Total Number of Sections |
||||
|---|---|---|---|---|---|---|---|---|---|
mm |
in |
Number of Sections |
Percent of Sections |
Number of Sections |
Percent of Sections |
Number of Sections |
Percent of Sections |
||
|
DGATB |
102 |
4 |
0 |
0.0 |
19 |
100.0 |
0 |
0.0 |
19 |
203 |
8 |
0 |
0.0 |
31 |
100.0 |
0 |
0.0 |
31 |
|
305 |
12 |
1 |
5.3 |
18 |
94.7 |
0 |
0.0 |
19 |
|
LC |
152 |
6 |
0 |
0.0 |
34 |
97.1 |
1 |
2.9 |
35 |
|
PATB |
102 |
4 |
7 |
22.6 |
23 |
74.2 |
1 |
3.2 |
31 |
|
PCC |
76 |
3 |
0 |
0.0 |
8 |
80.0 |
2 |
20.0 |
10 |
127 |
5 |
0 |
0.0 |
10 |
83.3 |
2 |
16.7 |
12 |
|
203 |
8 |
0 |
0.0 |
68 |
95.8 |
3 |
4.2 |
71 |
|
279 |
11 |
6 |
8.6 |
64 |
91.4 |
0 |
0.0 |
70 |
|
|
SB |
51 |
2 |
0 |
0.0 |
32 |
82.1 |
7 |
17.9 |
39 |
102 |
4 |
3 |
2.7 |
103 |
93.6 |
4 |
3.6 |
110 |
|
127 |
5 |
0 |
0.0 |
37 |
80.4 |
9 |
19.6 |
46 |
|
178 |
7 |
4 |
4.7 |
81 |
94.2 |
1 |
1.2 |
86 |
|
203 |
8 |
1 |
16.7 |
5 |
83.3 |
0 |
0.0 |
6 |
|
|
Total |
22 |
3.8 |
533 |
91.1 |
30 |
5.1 |
585 |
||
The graphical presentations of one sided t-test results of core thickness measurements are shown in figures 73, 74, and 75 for the three different tolerance levels.
The following conclusions may be drawn based on results of the t-test for the core thickness measurements:
Figure 73: Chart. Results of one-sided t-tests for the differences between core measurements and design thicknesses for tolerance level of 6.35 mm (0.25 in).
Figure 74: Chart. Results of one-sided t-tests for the differences between mean core and design thicknesses by layer type and design thickness for tolerance level of 12.7 mm (0.5 in).
Figure 75: Chart. Results of one-sided t-tests for the differences between mean core and design thickness by layer type and design thickness for tolerance level of 25.4 mm (1 in).
In this chapter, the as-constructed core and elevation grid layer thickness measurements were compared to the design thicknesses for newly constructed SPS layers.
The mean thickness difference between as-designed and as-constructed thicknesses was computed for each layer using both core and elevation thickness measurements and typical thickness deviations from the target thicknesses are summarized, as well as their distribution types.
For both data sources, two types of comparisons are made in relation to their as-designed thicknesses or target values. First, both data sources were evaluated for the percentage of individual measurements either within or outside specific values from the target thickness. Second, a statistical analysis was performed to compare the measured mean thickness values with the designed values. Two types of the thickness comparisons are performed for both data sources. The two-sided t-test with 95 percent confidence level was used for each section and layer to determine whether differences between as-designed and as-constructed thicknesses are significant. One-sided t-tests with 95 percent confidence level were used for each layer to determine if the difference between as-designed thickness and the mean as-constructed thickness had significant allowances of more than 6.35 mm (0.25 in), 12.7 mm (0.5 in), and 25.4 mm (1 in), respectively.
Based on the analysis of both data sources, the following conclusions can be made:
A comparison between analysis results from the elevation and core thickness measurements shows that the percentage of measurements within the selected limits is approximately the same for all three tolerance levels. However, the percentage of measurements lower than the target value is consistently higher for core measurements than for elevation grid measurements.
Based on elevation measurements, it is observed that more than 70 percent of sections with DGAB have as-constructed thickness within ±6.35 mm (0.25 in) from the design value.