U.S. Department of Transportation
Federal Highway Administration
1200 New Jersey Avenue, SE
Washington, DC 20590
202-366-4000
Federal Highway Administration Research and Technology
Coordinating, Developing, and Delivering Highway Transportation Innovations
 |
| This report is an archived publication and may contain dated technical, contact, and link information |
|
Publication Number: FHWA-RD-99-059 Date: FEBRUARY 1999 |
After a specification has been defined, and the corresponding preconstruction output has been generated, the specification may then be used to accept as-constructed JPCP lots. Actual AQC data may be entered into PaveSpec using the program’s Use Specification section. This chapter describes all aspects of the Use Specification section of the program, including entering actual AQC field data, generating and viewing PRS lot pay factors and pay adjustments, and viewing project summary reports.
Each Use Specification document is developed in reference to a previously simulated specification. A new Use Specification document may be created using one of the following three methods:
An existing Use Specification document may be edited using one of the following methods:
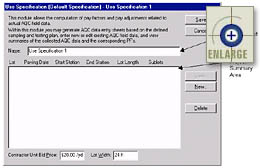
When you create a new Use Specification document, the dialogue box shown in figure 33 will appear. This dialogue box consists of two parts: a Name input box and a project summary area.
 |
Figure 33.
Example of the Use Specification document main screen. |
You may change the name of the Use Specification document by entering a new name in the Name input box. The name you enter will show up as the Use Specification document name in the Specifications tab of the Database Control dialogue box.
The project summary area contains general information about the user-defined as-constructed lots. This information consists of the lot number, paving date, starting and ending stations, computed lot length, and the number of sublots contained in each lot. When you first begin to create a new Use Specification document, this area will be blank (as shown in figure 33).
Finally, you must also enter the actual Contractor Unit Bid Price (note that a selected average bid price was used to develop the specification) and final Lot Width to be used in determining the actual contractor pay adjustments. Although the lot width is defined in the specification development steps, the actual value used for computing pay adjustments is required here to avoid any confusion.
To
define a new lot in an open Use Specification document, click on
the ![]() button. This action will
add a new lot to the end of the list in the project summary area. Clicking
on the
button. This action will
add a new lot to the end of the list in the project summary area. Clicking
on the ![]() button will also bring up the View/Edit
Lot dialogue box.
button will also bring up the View/Edit
Lot dialogue box.
To
edit an existing lot, first select the lot in the project summary area,
then click the ![]() button. This
action will activate the View/Edit Lot dialogue box. (Note that
double-clicking on a lot description will also bring up the View/Edit
Lot dialogue box.)
button. This
action will activate the View/Edit Lot dialogue box. (Note that
double-clicking on a lot description will also bring up the View/Edit
Lot dialogue box.)
To
delete an existing lot, first select the lot in the project summary area.
Next, click the ![]() button. This action will remove the selected
lot from the list in the project summary area.
button. This action will remove the selected
lot from the list in the project summary area.
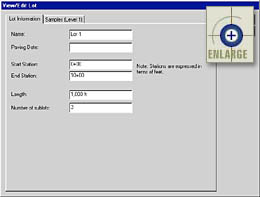
Actual AQC field data are entered into PaveSpec using the View/Edit Lot dialogue box. This dialogue can contain up to three different tabs: Lot Information, Samples (Level 1), and Samples (Level 2). The Samples (Level 2) tab will only be available if you chose to simulate a Level 1 and Level 2 specification at the same time. (Note: The input fields under the Samples (Level 1) and Samples (Level 2) tabs are identical.) An example of the View/Edit Lot dialogue box is presented in figure 34.
 |
Figure 34. Example of the View/Edit Lot dialogue box. |
When you are creating or editing a lot, the general lot information is contained in the Lot Information tab of the View/Edit Lot dialogue box. The inputs defined within this tab are used to describe the lot in the project summary area of the Use Specification document main screen.
When you choose to create a new lot, the default lot Name will automatically be set to the next consecutive lot number (i.e., if the previous new lot name was Lot 4, the next new default lot Name will be Lot 5). You can rename the lots if you choose to do so.
The Start Station, End Station, and Lot Length inputs all have default metric units of "m" and default English units of "ft". Note: For the Lot Length, you may toggle between metric and English units using the " ` " key.
Obviously, you will not know the final Number of Sublots prior to the paving of a lot; therefore, when defining a new lot, you should input your best estimate of the number of sublots expected to be included in that lot.
Actual AQC Sampling and Testing Data
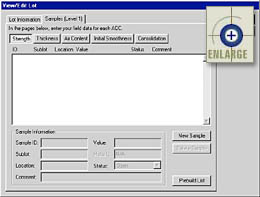
Actual Level 1 and Level 2 AQC sampling and testing data are input for Level 1 and Level 2 specifications in the Samples (Level 1) and Samples (Level 2) tabs, respectively. If you are creating a new lot, the Level 1 or Level 2 sample input tab would appear mostly blank, as shown in figure 35.
 |
Figure 35.
Example of a Samples tab in the View/Edit Lot dialogue box. |
These tabs allow you to enter AQC sampling and testing data for all the user-chosen AQC’s. Clicking on the buttons across the top of the data input screen (labeled by AQC name) allows you to toggle between data input screens for each chosen AQC.
Prebuilding a Sample List
The easiest means of getting started entering actual field data is by using the Prebuild List on each AQC data input screen. As mentioned previously, when you are defining an actual lot for the first time, the sample list within each AQC data input screen will be blank. You can prebuild an AQC sample list that reflects your choices for the estimated number of sublots per lot and the previously chosen AQC sampling and testing plan. For example, if you had estimated four sublots per lot, and you defined your strength sampling plan to include five strength samples per sublot, then the strength sample list would be prebuilt to include 4 * 5 = 20 samples.
To
use the Prebuild List option, simply click on the ![]() button on the AQC data input screen.
Use the vertical scroll bar to view the complete list of samples.
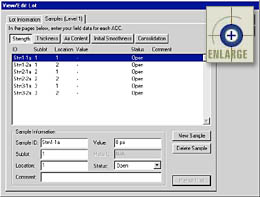
An example of the View/Edit dialogue box showing a prebuilt list
is shown in figure 36.
button on the AQC data input screen.
Use the vertical scroll bar to view the complete list of samples.
An example of the View/Edit dialogue box showing a prebuilt list
is shown in figure 36.
 |
Figure 36. Example of a prebuilt list in the View/Edit Lot dialogue box. |
When you use the Prebuild List command, PaveSpec assigns default sample ID’s to each of the AQC samples. Each default ID is made up of the following parts:
Adding a Sample Manually
Instead
of using the Prebuild List option, you may choose to input the
AQC sample information manually (one sample at a time). To insert
one new AQC sample at the end of the current AQC sample list, click on
the ![]() button on the chosen AQC data input screen.
This function may be used to create a new sample list or to add samples
to an existing list.
button on the chosen AQC data input screen.
This function may be used to create a new sample list or to add samples
to an existing list.
Deleting a Sample
To
delete an AQC sample, first select the sample by clicking on it in the
AQC sample list. Then click the ![]() button.
button.
Defining Sample Characteristics
AQC sample characteristics are defined using the input fields grouped into the Sample Information area of the AQC data input screens. To change the characteristics defining an AQC sample, first select the sample from the AQC sample list. The currently defined sample characteristics will be reflected in the data input fields in the sample information area. The different AQC sample characteristics are defined below:
Sample ID
The sample ID is used to differentiate between samples. It consists of any combination of letters and numbers unique to one sample.
Sublot
The Sublot input is used to define the sublot from which the current sample was taken. You may define the sublot in terms of any combination of numbers or letters.
Location
The Location input box is used to identify the location of the current sample. This input is typically defined as the longitudinal station number where the sample was taken; however, any appropriate description may be used to define the sample location.
Status
The Status list box identifies how the current sample is to be used by PaveSpec in the computation of the lot pay factor. The three different status types are defined as follows:
Value
The measured field value for the current AQC sample is input into the Value box. Acceptable units for each AQC are as follows:
Maturity
The Maturity input box is only available within the strength AQC data input screen, and is only required when strength testing is conducted at less than 28 days of age. When appropriate, the sample maturity at the time of testing may be recorded in this input box. Metric values for the Maturity input box are "ºC-hrs", while English values are expressed in terms of "ºF-hrs".
Comment
Finally, a text input box is provided to allow you to type a comment corresponding to a particular sample value.
Exiting the View/Edit Lot Dialogue Box
When
you are finished defining sample data for the current lot, click on the ![]() button to save your changes.
If you would like to exit the View/Edit Lot dialogue box without
saving your changes, click on the
button to save your changes.
If you would like to exit the View/Edit Lot dialogue box without
saving your changes, click on the ![]() button. Clicking either button will
return you to the Use Specification document main window.
button. Clicking either button will
return you to the Use Specification document main window.
Once you are finished
making changes or defining a new Use Specification document, click
on the ![]() button to save your named document. If
you would like to exit the Use Specification Document without saving
your changes, click on the
button to save your named document. If
you would like to exit the Use Specification Document without saving
your changes, click on the ![]() button. Clicking either button will return
you to the PaveSpec main window.
button. Clicking either button will return
you to the PaveSpec main window.