

LRFD Steel Girder SuperStructure Design Example
Concrete Deck Design Example Design Step 2
Table of Contents
Design Step 2.1 - Obtain Design Criteria
Design Step 2.2 - Determine Minimum Slab Thickness
Design Step 2.3 - Determine Minimum Overhang Thickness
Design Step 2.4 - Select Slab and Overhang Thickness
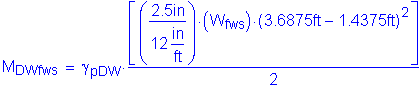
Design Step 2.5 - Compute Dead Load Effects
Design Step 2.6 - Compute Live Load Effects
Design Step 2.7 - Compute Factored Positive and Negative Design Moments
Design Step 2.8 - Design for Positive Flexure in Deck
Design Step 2.9 - Check for Positive Flexure Cracking under Service Limit State
Design Step 2.10 - Design for Negative Flexure in Deck
Design Step 2.11 - Check for Negative Flexure Cracking under Service Limit State
Design Step 2.12 - Design for Flexure in Deck Overhang
Design Step 2.13 - Check for Cracking in Overhang under Service Limit State
Design Step 2.14 - Compute Overhang Cut-off Length Requirement
Design Step 2.15 - Compute Overhang Development Length
Design Step 2.16 - Design Bottom Longitudinal Distribution Reinforcement
Design Step 2.17 - Design Top Longitudinal Distribution Reinforcement
Design Step 2.18 - Design Longitudinal Reinforcement over Piers
Design Step 2.19 - Draw Schematic of Final Concrete Deck Design
Design Step 2.1 - Obtain Design Criteria
The first design step for a concrete bridge deck is to choose the correct design criteria. The following concrete deck design criteria are obtained from the typical superstructure cross section shown in Figure 2-1 and from the referenced articles and tables in the AASHTO LRFD Bridge Design Specifications (through 2002 interims).
Refer to Design Step 1 for introductory information about this design example. Additional information is presented about the design assumptions, methodology, and criteria for the entire bridge, including the concrete deck.
The next step is to decide which deck design method will be used. In this example, the equivalent strip method will be used. For the equivalent strip method analysis, the girders act as supports, and the deck acts as a simple or continuous beam spanning from support to support. The empirical method could be used for the positive and negative moment interior regions since the cross section meets all the requirements given in S9.7.2.4. However, the empirical method could not be used to design the overhang as stated in S9.7.2.2.
S4.6.2
 |
Overhang Width The overhang width is generally determined such that the moments and shears in the exterior girder are similar to those in the interior girder. In addition, the overhang is set such that the positive and negative moments in the deck slab are balanced. A common rule of thumb is to make the overhang approximately 0.35 to 0.5 times the girder spacing. |
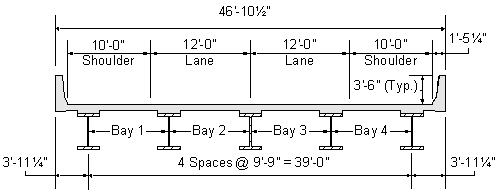
Figure 2-1 Superstructure Cross Section
The following units are defined for use in this design example:
![]()


Deck properties:
| Girder spacing: | ||
| Number of girders: | ||
| Deck top cover: | STable 5.12.3-1 | |
| Deck bottom cover: | STable 5.12.3-1 | |
| Concrete density: | STable 3.5.1-1 | |
| Concrete 28-day compressive strength: | S5.4.2.1 | |
| Reinforcement strength: | S5.4.3 & S6.10.3.7 | |
| Future wearing surface: | STable 3.5.1-1 |
Parapet properties:
| Weight per foot: | ||
| Width at base: | ||
| Moment capacity at base*: | ||
| Parapet height: | ||
| Critical length of yield line failure pattern*: | SA13.3.1 | |
| Total transverse resistance of the parapet*: | SA13.3.1 |
* Based on parapet properties not included in this design example. See Publication Number FHWA HI-95-017, Load and Resistance Factor Design for Highway Bridges, Participant Notebook, Volume II (Version 3.01), for the method used to compute the parapet properties.
Deck top cover - The concrete top cover is set at 2.5 inches since the bridge deck may be exposed to deicing salts and/or tire stud or chain wear. This includes the 1/2 inch integral wearing surface that is required.
STable 5.12.3-1
Deck bottom cover - The concrete bottom cover is set at 1.0 inch since the bridge deck will use reinforcement that is smaller than a #11 bar.
STable 5.12.3-1
Concrete 28-day compressive strength - The compressive strength for decks shall not be less than 4.0 KSI. Also, type "AE" concrete should be specified when the deck will be exposed to deicing salts or the freeze-thaw cycle. "AE" concrete has a compressive strength of 4.0 KSI.
S5.4.2.1
STable C5.4.2.1-1
Future wearing surface density - The future wearing surface density is 0.140 KCF. A 2.5 inch thickness will be assumed.
STable 3.5.1-1
Design Step 2.2 - Determine Minimum Slab Thickness
The concrete deck depth cannot be less than 7.0 inches, excluding any provision for grinding, grooving, and sacrificial surface.
S9.7.1.1
Design Step 2.3 - Determine Minimum Overhang Thickness
For concrete deck overhangs supporting concrete parapets or barriers, the minimum deck overhang thickness is:
S13.7.3.1.2
Design Step 2.4 - Select Slab and Overhang Thickness
Once the minimum slab and overhang thicknesses are computed, they can be increased as needed based on client standards and design computations. The following slab and overhang thicknesses will be assumed for this design example:
and
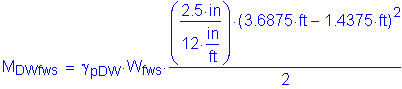
Design Step 2.5 - Compute Dead Load Effects
The next step is to compute the dead load moments. The dead load moments for the deck slab, parapets, and future wearing surface are tabulated in Table 2-1. The tabulated moments are presented for tenth points for Bays 1 through 4 for a 1-foot strip. The tenth points are based on the equivalent span and not the center-to-center beam spacing.
STable 3.5.1-1
After the dead load moments are computed for the slab, parapets, and future wearing surface, the correct load factors must be identified. The load factors for dead loads are:
STable 3.4.1-2
For slab and parapet:
Maximum
Minimum
For future wearing surface:
Maximum
Minimum
| DISTANCE | SLAB DEAD LOAD | PARAPET DEAD LOAD | FWS DEAD LOAD | |||||||||
|---|---|---|---|---|---|---|---|---|---|---|---|---|
| BAY 1 | BAY 2 | BAY 3 | BAY 4 | BAY 1 | BAY 2 | BAY 3 | BAY 4 | BAY 1 | BAY 2 | BAY 3 | BAY 4 | |
| 1.0 | -0.71 | -0.72 | -0.71 | -0.74 | 0.43 | -0.23 | 0.47 | -1.66 | -0.24 | -0.18 | -0.24 | -0.06 |
| 0.9 | -0.30 | -0.31 | -0.30 | -0.33 | 0.22 | -0.16 | 0.40 | -1.45 | -0.11 | -0.07 | -0.12 | 0.04 |
| 0.8 | 0.01 | 0.01 | 0.02 | -0.01 | 0.02 | -0.09 | 0.33 | -1.24 | 0.00 | 0.01 | -0.02 | 0.11 |
| 0.7 | 0.24 | 0.24 | 0.24 | 0.22 | -0.19 | -0.02 | 0.26 | -1.03 | 0.08 | 0.07 | 0.05 | 0.15 |
| 0.6 | 0.37 | 0.38 | 0.38 | 0.36 | -0.40 | 0.05 | 0.19 | -0.82 | 0.14 | 0.10 | 0.09 | 0.17 |
| 0.5 | 0.41 | 0.42 | 0.42 | 0.41 | -0.61 | 0.12 | 0.12 | -0.61 | 0.17 | 0.11 | 0.11 | 0.17 |
| 0.4 | 0.36 | 0.38 | 0.38 | 0.37 | -0.82 | 0.19 | 0.05 | -0.40 | 0.17 | 0.09 | 0.10 | 0.14 |
| 0.3 | 0.22 | 0.24 | 0.24 | 0.24 | -1.03 | 0.26 | -0.02 | -0.19 | 0.15 | 0.05 | 0.07 | 0.08 |
| 0.2 | -0.01 | 0.02 | 0.01 | 0.01 | -1.24 | 0.33 | -0.09 | 0.02 | 0.11 | -0.02 | 0.01 | 0.00 |
| 0.1 | -0.33 | -0.30 | -0.31 | -0.30 | -1.45 | 0.40 | -0.16 | 0.22 | 0.04 | -0.12 | -0.07 | -0.11 |
| 0.0 | -0.74 | -0.71 | -0.72 | -0.71 | -1.66 | 0.47 | -0.23 | 0.43 | -0.06 | -0.24 | -0.18 | -0.24 |
Table 2-1 Unfactored Dead Load Moments (K-FT/FT)
Design Step 2.6 - Compute Live Load Effects
Before the live load effects can be computed, the following basic parameters must be defined:
The minimum distance from the center of design vehicle wheel to the inside face of parapet = 1 foot
S3.6.1.3.1
The minimum distance between the wheels of two adjacent design vehicles = 4 feet
S3.6.1.3.1
Dynamic load allowance, IM
STable 3.6.2.1-1
Load factor for live load - Strength I
STable 3.4.1-1
Multiple presence factor, m:
With one lane loaded, m = 1.20
With two lanes loaded, m = 1.00
With three lanes loaded, m = 0.85STable 3.6.1.1.2-1
Fatigue does not need to be investigated for concrete deck design.
S9.5.3 & S5.5.3.1
Resistance factors for flexure:
Strength limit state
S5.5.4.2
Service limit state
S1.3.2.1
Extreme event limit state
S1.3.2.1
Based on the above information and based on S4.6.2.1, the live load effects for one and two trucks are tabulated in Table 2-2. The live load effects are given for tenth points for Bays 1 through 4. Multiple presence factors are included, but dynamic load allowance is excluded.
| DISTANCE | SINGLE TRUCK(MULTIPLE PRESENCE FACTOR OF 1.20 INCLUDED) | TWO TRUCKS(MULTIPLE PRESENCE FACTOR OF 1.00 INCLUDED) | ||||||||||||||
|---|---|---|---|---|---|---|---|---|---|---|---|---|---|---|---|---|
| MAX. MOMENT | MIN. MOMENT | MAX. MOMENT | MIN. MOMENT | |||||||||||||
| BAY 1 | BAY 2 | BAY 3 | BAY 4 | BAY 1 | BAY 2 | BAY 3 | BAY 4 | BAY 1 | BAY 2 | BAY 3 | BAY 4 | BAY 1 | BAY 2 | BAY 3 | BAY 4 | |
| 1.0 | 4.55 | 5.82 | 4.07 | 3.62 | -28.51 | -27.12 | -28.37 | -0.44 | 2.28 | -2.87 | 2.28 | 2.66 | -29.39 | -27.94 | -28.83 | -0.27 |
| 0.9 | 5.68 | 6.01 | 7.84 | 17.03 | -15.11 | -15.84 | -19.10 | -2.08 | 2.06 | 7.19 | 8.04 | 12.49 | -18.32 | -17.37 | -14.44 | -1.26 |
| 0.8 | 18.10 | 18.35 | 20.68 | 30.43 | -13.48 | -13.63 | -16.39 | -3.70 | 4.50 | 15.14 | 16.98 | 22.32 | -8.18 | -8.01 | -2.10 | -2.25 |
| 0.7 | 27.13 | 27.20 | 25.39 | 36.64 | -11.84 | -11.41 | -13.68 | -5.33 | 14.00 | 20.48 | 19.15 | 26.46 | -7.19 | -5.74 | -1.44 | -3.24 |
| 0.6 | 32.48 | 28.00 | 29.28 | 36.62 | -10.22 | -9.20 | -10.97 | -6.96 | 21.21 | 19.58 | 21.30 | 25.84 | -6.20 | -4.62 | -2.68 | -4.22 |
| 0.5 | 31.20 | 28.26 | 28.14 | 31.10 | -8.59 | -8.57 | -8.27 | -8.59 | 21.01 | 21.72 | 21.64 | 20.93 | -5.21 | -3.51 | -3.92 | -5.21 |
| 0.4 | 36.76 | 29.09 | 28.14 | 26.14 | -6.96 | -11.38 | -9.20 | -10.22 | 25.93 | 21.19 | 19.41 | 17.96 | -4.23 | -2.40 | -5.17 | -6.20 |
| 0.3 | 36.44 | 25.56 | 27.37 | 16.19 | -5.33 | -14.18 | -11.42 | -11.84 | 26.35 | 19.26 | 16.71 | 10.48 | -3.24 | -1.29 | -6.41 | -7.19 |
| 0.2 | 30.53 | 20.88 | 18.22 | 11.66 | -3.70 | -17.00 | -13.63 | -13.48 | 22.36 | 17.10 | 7.73 | 4.59 | -2.71 | -8.53 | -8.02 | -8.18 |
| 0.1 | 22.94 | 7.73 | 6.22 | 5.56 | -14.45 | -19.81 | -15.85 | -15.11 | 17.44 | 7.98 | 7.32 | 2.30 | -12.09 | -16.92 | -17.38 | -18.33 |
| 0.0 | 5.62 | 4.07 | 6.04 | 4.55 | -25.75 | -28.38 | -27.13 | -28.51 | 4.36 | 2.04 | -2.92 | 2.55 | -21.47 | -29.36 | -27.92 | -29.40 |
Table 2-2 Unfactored Live Load Moments (Excluding Dynamic Load Allowance) (K-FT)
Design Step 2.7 - Compute Factored Positive and Negative Design Moments
For this example, the design moments will be computed two different ways. For Method A, the live load portion of the factored design moments will be computed based on the values presented in Table 2-2. Table 2-2 represents a continuous beam analysis of the example deck using a finite element analysis program. For Method B, the live load portion of the factored design moments will be computed using STable A4.1-1. In STable A4.1-1, moments per unit width include dynamic load allowance and multiple presence factors. The values are tabulated using the equivalent strip method for various bridge cross sections. The values in STable A4.1-1 may be slightly higher than the values from a deck analysis based on the actual number of beams and the actual overhang length. The maximum live load moment is obtained from the table based on the girder spacing. For girder spacings between the values listed in the table, interpolation can be used to get the moment.
STable A4.1-1
Based on Design Step 1, the load modifier eta (η) is 1.0 and will not be shown throughout the design example. Refer to Design Step 1 for a discussion of eta.
S1.3.2.1
Factored Positive Design Moment Using Table 2-2 - Method A
Factored positive live load moment:
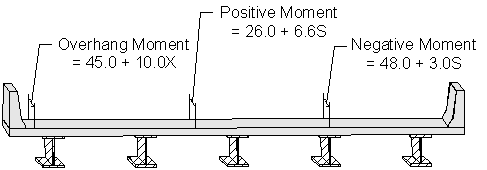
The positive, negative, and overhang moment equivalent strip equations are presented in Figure 2-2 below.
STable 4.6.2.1.3-1
Figure 2-2 Equivalent Strip Equations for Various Parts of the Deck
The width of the equivalent strip for positive moment is:
STable 4.6.2.1.3-1
For
or
Based on Table 2-2, the maximum unfactored positive live load moment is 36.76 K-ft, located at 0.4S in Bay 1 for a single truck. The maximum factored positive live load moment is:
Factored positive dead load moment:
Based on Table 2-1, the maximum unfactored slab, parapet, and future wearing surface positive dead load moment occurs in Bay 2 at a distance of 0.4S. The maximum factored positive dead load moment is as follows:

The total factored positive design moment for Method A is:
It should be noted that the total maximum factored positive moment is comprised of the maximum factored positive live load moment in Bay 1 at 0.4S and the maximum factored positive dead load moment in Bay 2 at 0.4S. Summing the factored moments in different bays gives a conservative result. The exact way to compute the maximum total factored design moment is by summing the dead and live load moments at each tenth point per bay. However, the method presented here is a simpler and slightly conservative method of finding the maximum total factored moment.
Factored Positive Design Moment Using STable A4.1-1 - Method B
Factored positive live load moment:
For a girder spacing of 9'-9", the maximum unfactored positive live load moment is 6.74 K-ft/ft.
STable A4.1-1
This moment is on a per foot basis and includes dynamic load allowance. The maximum factored positive live load moment is:
Factored positive dead load moment:
The factored positive dead load moment for Method B is the same as that for Method A:
The total factored positive design moment for Method B is:
Comparing Methods A and B, the difference between the total factored design moment for the two methods is:
 |
Method A or Method B It can be seen that the tabulated values based on STable A4.1-1 (Method B) are slightly greater than the computed live load values using a finite element analysis program (Method A). For real world deck design, Method B would be preferred over Method A due to the amount of time that would be saved by not having to develop a finite element model. Since the time was spent to develop the finite element model for this deck design, the Method A values will be used. |
Factored Negative Design Moment Using Table 2-2 - Method A
Factored negative live load moment:
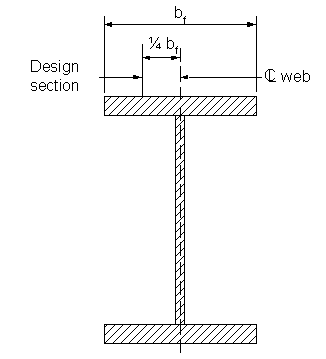
The deck design section for a steel beam for negative moments and shear forces is taken as one-quarter of the top flange width from the centerline of the web.
S4.6.2.1.6
S4.6.2.1.6
Figure 2-3 Location of Design Section
Assume
The width of the equivalent strip for negative moment is:
STable 4.6.2.1.3-1
or
Based on Table 2-2, the maximum unfactored negative live load moment is -29.40 K-ft, located at 0.0S in Bay 4 for two trucks. The maximum factored negative live load moment is:
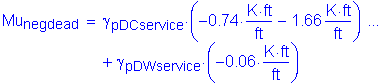
Factored negative dead load moment:
From Table 2-1, the maximum unfactored negative dead load moment occurs in Bay 4 at a distance of 1.0S. The maximum factored negative dead load moment is as follows:
The total factored negative design moment for Method A is:
Factored Negative Design Moment Using STable A4.1-1 - Method B
Factored negative live load moment:
For a girder spacing of 9'-9" and a 3" distance from the centerline of girder to the design section, the maximum unfactored negative live load moment is 6.65 K-ft/ft.
STable A4.1-1
If the distance from the centerline of the girder to the design section does not match one of the distances given in the table, the design moment can be obtained by interpolation. As stated earlier, these moments are on a per foot basis and include dynamic load allowance.
The maximum factored negative live load moment is:
Factored negative dead load moment:
The factored negative dead load moment for Method B is the same as that for Method A:
The total factored negative design moment for Method B is:
Comparing Methods A and B, the difference between the total factored design moment for the two methods is:
 |
Method A or Method B It can be seen that the tabulated values based on STable A4.1-1 (Method B) are slightly greater than the computed live load values using a finite element analysis program (Method A). For real world deck design, Method B would be preferred over Method A due to the amount of time that would be saved by not having to develop a finite element model. Since the time was spent to develop the finite element model for this deck design, the Method A values will be used. |
Design Step 2.8 - Design for Positive Flexure in Deck
The first step in designing the positive flexure steel is to assume a bar size. From this bar size, the required area of steel (As) can be calculated. Once the required area of steel is known, the required bar spacing can be calculated.
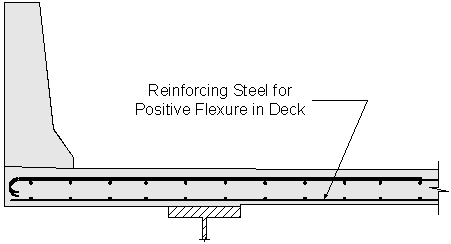
Figure 2-4 Reinforcing Steel for Positive Flexure in Deck
Assume #5 bars:
Effective depth, de = total slab thickness - bottom cover - 1/2 bar diameter - top integral wearing surface
Solve for the required amount of reinforcing steel, as follows:
S5.5.4.2.1
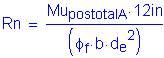

Note: The above two equations are derived formulas that can be found in most reinforced concrete textbooks.

Required bar spacing = ![]()
Use #5 bars @ ![]()
Once the bar size and spacing are known, the maximum reinforcement limit must be checked.
S5.7.3.3.1


S5.7.2.2

S5.7.2.2
where
S5.7.3.3.1
OK
Design Step 2.9 - Check for Positive Flexure Cracking under Service Limit State
The control of cracking by distribution of reinforcement must be checked.
S5.7.3.4
For members in severe exposure conditions: ![]()
Thickness of clear cover used to compute dc should not be greater than 2 inches:
Concrete area with centroid the same as transverse bar and bounded by the cross section and line parallel to neutral axis:
The equation that gives the allowable reinforcement service load stress for crack control is:
where

Use ![]()
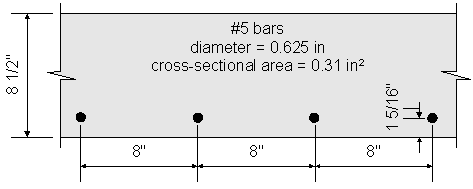
Figure 2-5 Bottom Transverse Reinforcement
S5.4.3.2
S5.4.2.4

Use ![]()
Service positive live load moment:
Based on Table 2-2, the maximum unfactored positive live load moment is 36.76 K-ft, located at 0.4S in Bay 1 for a single truck. The maximum service positive live load moment is computed as follows:
Service positive dead load moment:
From Table 2-1, the maximum unfactored slab, parapet, and future wearing surface positive dead load moment occurs in Bay 2 at a distance of 0.4S. The maximum service positive dead load moment is computed as follows:
STable 3.4.1-1
STable 3.4.1-1

The total service positive design moment is:
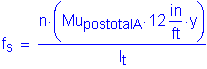
To solve for the actual stress in the reinforcement, the transformed moment of inertia and the distance from the neutral axis to the centroid of the reinforcement must be computed:
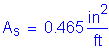

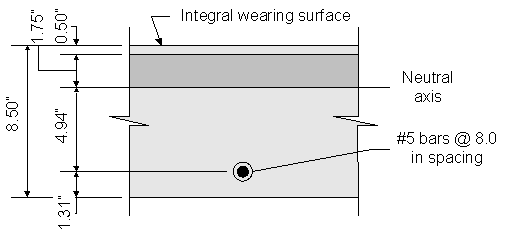
Figure 2-6 Crack Control for Positive Reinforcement under Live Loads
Once kde is known, the transformed moment of inertia can be computed:

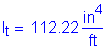
Now, the actual stress in the reinforcement can be computed:


OK
Design Step 2.10 - Design for Negative Flexure in Deck
The negative flexure reinforcing steel design is similar to the positive flexure reinforcing steel design.
S4.6.2.1
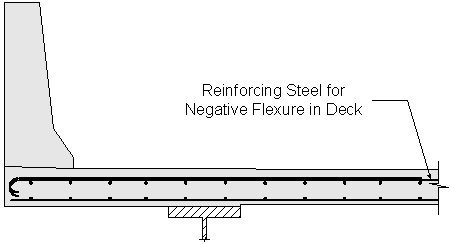
Figure 2-7 Reinforcing Steel for Negative Flexure in Deck
Assume #5 bars:
Effective depth, de = total slab thickness - top cover - 1/2 bar diameter
Solve for the required amount of reinforcing steel, as follows:
S5.5.4.2.1


Required bar spacing = ![]()
Use #5 bars @ ![]()
Once the bar size and spacing are known, the maximum reinforcement limit must be checked.
S5.7.3.3.1
S5.7.2.2

S5.7.2.2
where
S5.7.3.3.1
OK
Design Step 2.11 - Check for Negative Flexure Cracking under Service Limit State
Similar to the positive flexure reinforcement, the control of cracking by distribution of reinforcement must be checked.
S5.7.3.4
Note: clear cover is greater than 2.0 inches; therefore, use clear cover equals 2.0 inches.
S5.7.3.4


where

Use ![]()
Service negative live load moment:
From Table 2-2, the maximum unfactored negative live load moment is -29.40 K-ft, located at 0.0S in Bay 4 for two trucks. The maximum service negative live load moment is:
STable 3.4.1-1
Service negative dead load moment:
From Table 2-1, the maximum unfactored negative dead load moment occurs in Bay 4 at a distance of 1.0S. The maximum service negative dead load moment is computed as follows:

STable 3.4.1-1
The total service negative design moment is:


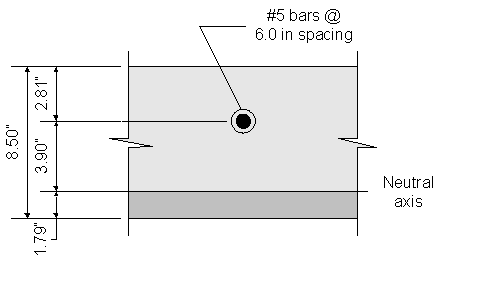
Figure 2-8 Crack Control for Negative Reinforcement under Live Loads
Once kde is known, the transformed moment of inertia can be computed:

Now, the actual stress in the reinforcement can be computed:


OK
Design Step 2.12 - Design for Flexure in Deck Overhang
Bridge deck overhangs must be designed to satisfy three different design cases. In the first design case, the overhang must be designed for horizontal (transverse and longitudinal) vehicular collision forces. For the second design case, the overhang must be designed to resist the vertical collision force. Finally, for the third design case, the overhang must be designed for dead and live loads. For Design Cases 1 and 2, the design forces are for the extreme event limit state. For Design Case 3, the design forces are for the strength limit state. Also, the deck overhang region must be designed to have a resistance larger than the actual resistance of the concrete parapet.
SA13.4.1
CA13.3.1
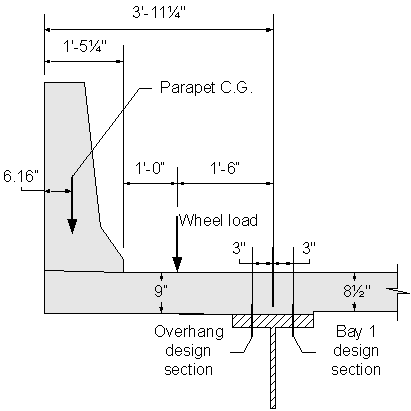
Figure 2-9 Deck Overhang Dimensions and Live Loading
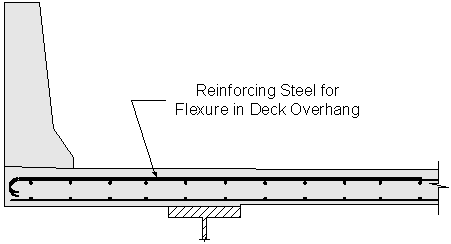
Figure 2-10 Reinforcing Steel for Flexure in Deck Overhang
Design Case 1 - Design Overhang for Horizontal Vehicular Collision Force
SA13.4.1
The horizontal vehicular collision force must be checked at the inside face of the parapet, at the design section in the overhang, and at the design section in the first bay.
Case 1A - Check at Inside Face of Parapet
The overhang must be designed for the vehicular collision plus dead load moment acting concurrently with the axial tension force from vehicular collision.
For the extreme event limit state:
S1.3.2.1
STable 3.4.1-2
(see parapet properties)
The axial tensile force is:
SA13.4.2
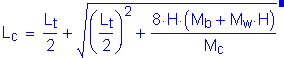
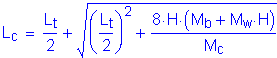
Before the axial tensile force can be calculated, the terms Lc and Rw need to be defined.
Lc is the critical wall length over which the yield line mechanism occurs:
SA13.3.1
Since the parapet is not designed in this design example, the variables involved in this calculation are given below:
longitudinal length of distribution of impact force Ft
SATable 13.2-1

* additional flexural resistance of beam in addition to Mw, if any, at top of wall *

flexural resistance of the wall about an axis parallel to the longitudinal axis of the bridge

* flexural resistance of the wall about its vertical axis
height of parapet
* Based on parapet properties not included in this design example. See Publication Number FHWA HI-95-017, Load and Resistance Factor Design for Highway Bridges, Participant Notebook, Volume II (Version 3.01), for the method used to compute the parapet properties.
Lc is then:
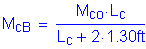
Rw is the total transverse resistance of the railing and is calculated using the following equation for impacts within a wall segment:
SA13.3.1
use

Now, the axial tensile force is:
SA13.4.2
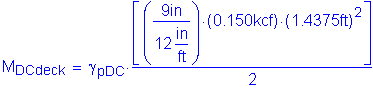
The overhang slab thickness is: ![]()
For #5 bars: ![]()
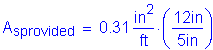
The required area of reinforcing steel is computed as follows:


(2 - #5 bars bundled at 6.0 in)


Once the required area of steel is known, the depth of the compression block must be checked:


OK

S5.7.2.2
where
S5.7.3.3.1
OK
Case 1B - Check at Design Section in Overhang
The collision forces are distributed over a distance Lc for moment and Lc + 2H for axial force. When the design section is moved to 1/4bf away from the girder centerline in the overhang, the distribution length will increase. This example assumes a distribution length increase based on a 30 degree angle from the face of the parapet.
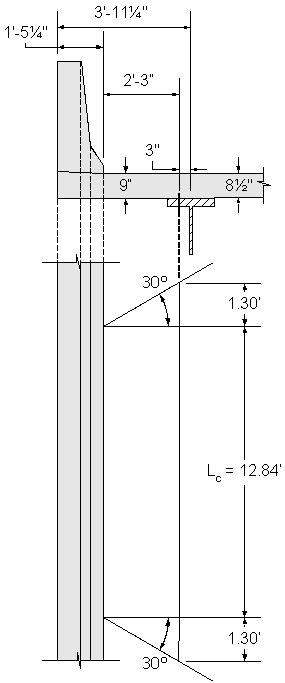
Figure 2-11 Assumed Distribution of Collision Moment Load in the Overhang
For the extreme event limit state:
S1.3.2.1
STable 3.4.1-2
STable 3.4.1-2
(see parapet properties)
(see parapet properties)
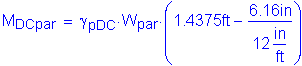
Factored dead load moment:

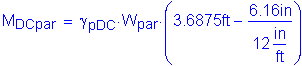
The axial tensile force is:
SA13.4.2
The overhang slab thickness is: ![]()
For #5 bars: ![]()
The required area of reinforcing steel is computed as follows:


The above required reinforcing steel is less than the reinforcing steel required for Case 1A.
Case 1C - Check at Design Section in First Span
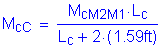
The total collision moment can be treated as shown in Figure 2-12. The moment ratio, M2/M1, can be calculated for the design strip. One way to approximate this moment is to set it equal to the ratio of the moments produced by the parapet self-weight at the 0.0S points of the first and second bay. The collision moment per unit width can then be determined by using the increased distribution length based on the 30 degree angle distribution (see Figure 2-11). The dead load moments at this section can be obtained directly from Table 2-1.
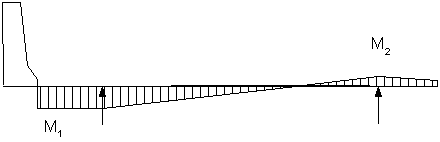
Figure 2-12 Assumed Distribution of the Collision Moment Across the Width of the Deck
Collision moment at exterior girder:
Parapet self-weight moment at Girder 1 (0.0S in Bay 1):
Parapet self-weight moment at Girder 2 (0.0S in Bay 2):
Collision moment at 1/4bf in Bay 1:
By interpolation for a design section at 1/4bf in Bay 1, the total collision moment is:
As in Case 1B, the 30 degree angle distribution will be used:
S1.3.2.1
STable 3.4.1-2
STable 3.4.1-2
Factored dead load moment (from Table 2-1):
The axial tensile force is:
SA13.4.2
Use a slab thickness equal to: ![]()
For #5 bars: ![]()
The required area of reinforcing steel is computed as follows:


The above required reinforcing steel is less than the reinforcing steel required for Case 1A.
Design Case 2 - Design Overhang for Vertical Collision Force
SA13.4.1
For concrete parapets, the case of vertical collision force never controls. Therefore, this procedure does not need to be considered in this design example.
Design Case 3 - Design Overhang for Dead Load and Live Load
SA13.4.1
Case 3A - Check at Design Section in Overhang
The resistance factor for the strength limit state for flexure and tension in concrete is:
S5.5.4.2.1
The equivalent strip for live load on an overhang is:
STable 4.6.2.1.3-1
Use a multiple presence factor of 1.20 for one lane loaded.
STable 3.6.1.1.2-1
Use a dynamic load allowance of 0.33.
STable 3.6.2.1-1
Design factored overhang moment:
STable 3.4.1-1
STable 3.4.1-2
STable 3.4.1-2


Calculate the required area of steel:
For #5 bars:


The above required reinforcing steel is less than the reinforcing steel required for Cases 1A, 1B, and 1C.
Case 3B - Check at Design Section in First Span
Use a slab thickness equal to: ![]()
The dead and live load moments are taken from Tables 2-1 and 2-2. The maximum negative live load moment occurs in Bay 4. Since the negative live load moment is produced by a load on the overhang, compute the equivalent strip based on a moment arm to the centerline of girder.
Design factored moment:
STable 3.4.1-1
STable 3.4.1-2
STable 3.4.1-2


Calculate the required area of steel:
For #5 bars:


The above required reinforcing steel is less than the reinforcing steel required for Cases 1A, 1B, and 1C.
The required area of reinforcing steel in the overhang is the largest of that required for Cases 1A, 1B, 1C, 3A, and 3B.
Case 1A controls with: 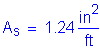
The negative flexure reinforcement provided from the design in Steps 2.10 and 2.11 is:
#5 bars at 6.0 inches: ![]()
![]()
Since the area of reinforcing steel required in the overhang is greater than the area of reinforcing steel required in the negative moment regions, reinforcement must be added in the overhang area to satisfy the design requirements.
Bundle one #5 bar to each negative flexure reinforcing bar in the overhang area.
The new area of reinforcing steel is now:

Once the required area of reinforcing steel is known, the depth of the compression block must be checked. The ratio of c/de is more critical at the minimum deck thickness, so c/de will be checked in Bay 1 where the deck thickness is 8.5 inches.


S5.7.2.2
where
S5.7.3.3.1
OK
Design Step 2.13 - Check for Cracking in Overhang under Service Limit State
Cracking in the overhang must be checked for the controlling service load (similar to Design Steps 2.9 and 2.11). In most deck overhang design cases, cracking does not control. Therefore, the computations for the cracking check are not shown in this deck overhang design example.
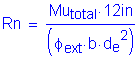
Design Step 2.14 - Compute Overhang Cut-off Length Requirement
The next step is to compute the cut-off location of the additional #5 bars in the first bay. This is done by determining the location where both the dead and live load moments, as well as the dead and collision load moments, are less than or equal to the resistance provided by #5 bars at 6 inch spacing (negative flexure steel design reinforcement).
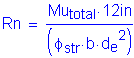
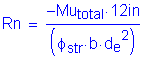
Compute the nominal negative moment resistance based on #5 bars at 6 inch spacing:

Use


Compute the nominal flexural resistance for negative flexure, as follows:
Based on the nominal flexural resistance and on interpolation of the factored design moments, the theoretical cut-off point for the additional #5 bar is 3.75 feet from the centerline of the fascia girder.
The additional cut-off length (or the distance the reinforcement must extend beyond the theoretical cut-off point) is the maximum of:
S5.11.1.2
The effective depth of the member:
15 times the nominal bar diameter:
1/20 of the clear span:

The total required length past the centerline of the fascia girder into the first bay is:
Design Step 2.15 - Compute Overhang Development Length
The basic development length is the larger of the following:
S5.11.2.1.1
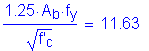
The following modification factors must be applied:
S5.11.2
Epoxy coated bars:
S5.11.2.1.2
Bundled bars:
S5.11.2.3
Spacing > 6 inches with more than 3 inches of clear cover in direction of spacing:
S5.11.2.1.3


The required length past the centerline of the fascia girder is:
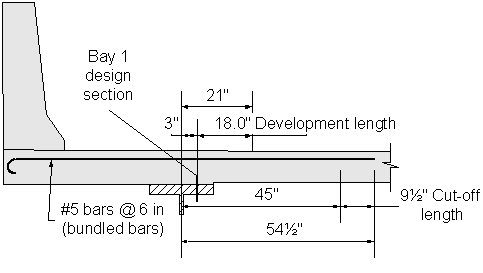
Figure 2-13 Length of Overhang Negative Moment Reinforcement
Design Step 2.16 - Design Bottom Longitudinal Distribution Reinforcement
The bottom longitudinal distribution reinforcement is calculated based on whether the primary reinforcement is parallel or perpendicular to traffic.
S9.7.3.2
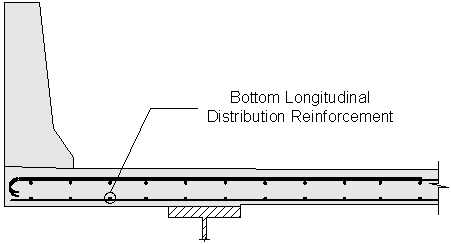
Figure 2-14 Bottom Longitudinal Distribution Reinforcement
For this design example, the primary reinforcement is perpendicular to traffic.
For this design example, #5 bars at 8 inches were used to resist the primary positive moment.
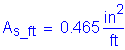
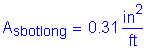
Calculate the required spacing using #5 bars:
Use #5 bars at 10 inch spacing for the bottom longitudinal reinforcement.
Design Step 2.17 - Design Top Longitudinal Distribution Reinforcement
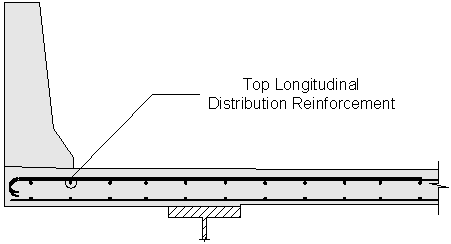
Figure 2-15 Top Longitudinal Distribution Reinforcement
The top longitudinal temperature and shrinkage reinforcement must satisfy:
S5.10.8.2
When using the above equation, the calculated area of reinforcing steel must be equally distributed on both concrete faces. In addition, the maximum spacing of the temperature and shrinkage reinforcement must be the smaller of 3.0 times the deck thickness or 18.0 inches.
The amount of steel required for the top longitudinal reinforcement is:
Check #4 bars at 10 inch spacing:
OK
Use #4 bars at 10 inch spacing for the top longitudinal temperature and shrinkage reinforcement.
Design Step 2.18 - Design Longitudinal Reinforcement over Piers
If the superstructure is comprised of simple span precast girders made continuous for live load, the top longitudinal reinforcement should be designed according to S5.14.1.2.7. For continuous steel girder superstructures, design the top longitudinal reinforcement according to S6.10.3.7. For this design example, continuous steel girders are used.
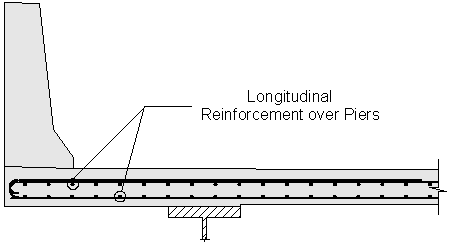
Figure 2-16 Longitudinal Reinforcement over Piers
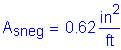
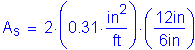
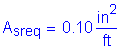
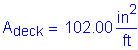
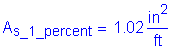
The total longitudinal reinforcement should not be less than 1 percent of the total slab cross-sectional area. These bars must have a specified minimum yield strength of at least 60 ksi. Also, the bar size cannot be larger than a #6 bar.
S6.10.3.7
Deck cross section:
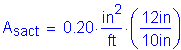
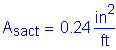
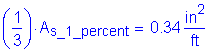
Two-thirds of the required longitudinal reinforcement should be placed uniformly in the top layer of the deck, and the remaining portion should be placed uniformly in the bottom layer. For both rows, the spacing should not exceed 6 inches.
S6.10.3.7
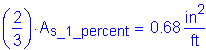
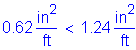
Use #5 bars at 5 inch spacing in the top layer.
>
OK
Use #5 bars at 5 inch spacing in the bottom layer to satisfy the maximum spacing requirement of 6 inches.
>
OK

Design Step 2.19 - Draw Schematic of Final Concrete Deck Design
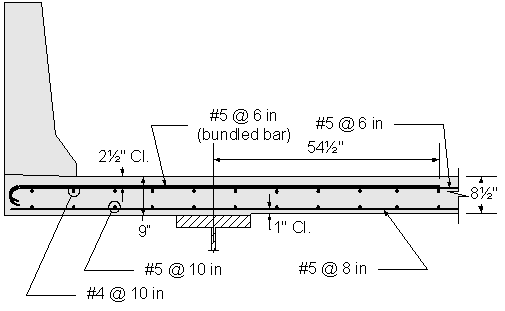
Figure 2-17 Superstructure Positive Moment Deck Reinforcement
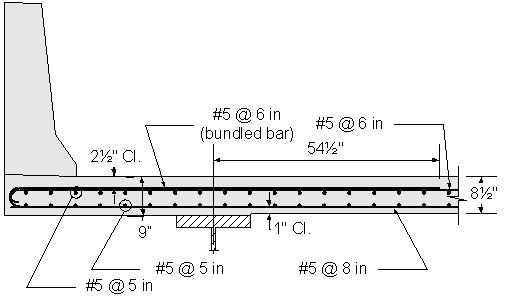
Figure 2-18 Superstructure Negative Moment Deck Reinforcement
| << previous | Contents | next >> |