

Comprehensive Design Example for Prestressed Concrete (PSC) Girder Superstructure Bridge
Design Step 5 Design of Superstructure
Design Step 5.6 - Flexure Design
Design Step 5.6.1 - Flexural stress at transfer
Design Step 5.6.1.1 - Stress limits at transfer
Compression stress:
The allowable compression stress limit for pretensioned concrete components is calculated according to S5.9.4.1.1.
| fCompression | = -0.60(f′ci) = -0.60(4.8 ksi) = -2.88 ksi |
Tension stress:
From Table S5.9.4.1.2-1, the stress limit in areas with bonded reinforcement sufficient to resist 120% of the tension force in the cracked concrete computed on the basis of an uncracked section is calculated as:
| ftension | = 0.48 ksi |
Design Step 5.6.1.2 - Stress calculations at transfer
Table 5.6-1 - Stresses at Top and Bottom of Beam at Transfer
| Location (ft.) (1) |
Girder self weight moment (k-ft) (2) |
Fps at transfer (kips) (3) |
Stress at transfer | |
|---|---|---|---|---|
| Top of beam (ksi) |
Bottom of beam (ksi) | |||
| 0 | 47 | 277.3 | 0.135 | -0.654 |
| 1.75 | 153 | 924.4 | 0.451 | -2.183 |
| 5.5 | 368 | 924.4 | 0.326 | -2.055 |
| 11.0 | 656 | 993.7 | 0.209 | -2.065 |
| 16.5 | 909 | 1,097.7 | 0.123 | -2.171 |
| 22.0 | 1,128 | 1,097.7 | -0.005 | -2.040 |
| 27.5 | 1,313 | 1,271.0 | -0.009 | -2.358 |
| 33.0 | 1,464 | 1,271.0 | -0.097 | -2.269 |
| 38.5 | 1,580 | 1,271.0 | -0.155 | -2.209 |
| 44.0 | 1,663 | 1,271.0 | -0.203 | -2.160 |
| 49.5 | 1,711 | 1,271.0 | -0.231 | -2.132 |
| 54.5 | 1,725 | 1,271.0 | -0.240 | -2.120 |
| 55.0 | 1,725 | 1,271.0 | -0.240 | -2.123 |
| 60.5 | 1,705 | 1,271.0 | -0.228 | -2.135 |
| 66.0 | 1,650 | 1,271.0 | -0.196 | -2.168 |
| 71.5 | 1,562 | 1,271.0 | -0.144 | -2.220 |
| 77.0 | 1,439 | 1,271.0 | -0.083 | -2.284 |
| 82.5 | 1,282 | 1,271.0 | 0.009 | -2.377 |
| 88.0 | 1,091 | 1,097.7 | 0.017 | -2.063 |
| 93.5 | 865 | 1,097.7 | 0.149 | -2.197 |
| 99.0 | 606 | 924.4 | 0.197 | -1.923 |
| 104.5 | 312 | 924.4 | 0.358 | -2.105 |
| 107.25 | 153 | 924.4 | 0.451 | -2.200 |
| 109.0 | 47 | 277.3 | 0.135 | -0.660 |
Notes:
- Distance measured from the centerline of the bearing of the simple span girder
- See Section 5.3, based on 110.5 ft. length
- See Section 5.5 for prestressing forces
Sample Calculations for Flexural Stresses at Transfer
Definitions:
| Pt | = Initial prestressing force taken from Table 5.5-1 (kips) |
| Ag | = Gross area of the basic beam (in2) |
| e | = Distance between the neutral axis of the noncomposite girder and the center of gravity of the prestressing steel (in.) |
| St | = Section moduli, top of noncomposite beam (in3) |
| Sb | = Section moduli, bottom of noncomposite beam (in3) |
| Mg | = Moment due to the girder self weight only (k-ft) |
See Section 2.2 for section properties.
Sample Calculations at 1 ft. - 9 in. From CL of Bearing (2 ft. - 6 in. From Girder End)
Girder top stress:
| ftop | = -Pt/Ag + Pte0'/St - Mg/St = 0.451 ksi < Stress limit for tension (0.48 ksi) OK |
Girder bottom stress:
| fbottom | = -Pt/Ag - Pte0'/Sb + Mg/Sb = -2.183 ksi < Stress limit for compression (-2.88 ksi) OK |
Sample Calculations at 11 ft. From the CL of Bearing (11 ft. - 9 in. From Girder End)
Girder top stress:
| ftop | = -Pt/Ag + Pte11'/St - Mg/St = 0.209 ksi < Stress limit for tension (0.48 ksi) OK |
Girder bottom stress:
| fbottom | = -Pt/Ag - Pte11'/Sb + Mg/Sb = -2.064 ksi < Stress limit for compression (-2.88 ksi) OK |
Sample Calculations at 54 ft. - 6 in. From the CL of Bearing (55 ft. - 3 in. From Girder End) - Midspan of Noncomposite Beam
Girder top stress:
| ftop | = -Pt/Ag + Pte54.5'/St - Mg/St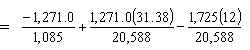 = -0.239 ksi < Stress limit for compression (-2.88 ksi) OK |
Girder bottom stress:
| fbottom | = -Pt/Ag - Pte54.5'/Sb + Mg/Sb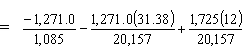 = -2.123 ksi < Stress limit for compression (-2.88 ksi) OK |
Design Step 5.6.2 - Final flexural stress under Service I limit state
Maximum compression is checked under Service I limit state and maximum tension is checked under Service III limit state. The difference between Service I and Service III limit states is that Service I has a load factor of 1.0 for live load while Service III has a load factor of 0.8.
As indicated in Section 5.3, many jurisdictions do not include creep and shrinkage effects in designing a pretensioned girder bridge. The calculations presented herein do not include creep and shrinkage moments. If creep and shrinkage are required by a specific jurisdiction, then their effects should be included. See Section 5.3 and Appendix C for calculations and values of creep and shrinkage effects for the example bridge.
Design Step 5.6.2.1 - Stress limits
Compression stress:
From Table S5.9.4.2.1-1, the stress limit due to the sum of the effective prestress, permanent loads, and transient loads and during shipping and handling is taken as 0.6φwf′c (whereφw is equal to 1.0 for solid sections).
For prestressed concrete beams (f′c = 6.0 ksi)
fComp, beam1 = -0.6(6.0 ksi) = -3.6 ksi
For deck slab (f′c = 4.0 ksi)
| fComp, slab | = -0.6(4.0 ksi) = -2.4 ksi |
From Table S5.9.4.2.1-1, the stress limit in prestressed concrete at the service limit state after losses for fully prestressed components in bridges other than segmentally constructed due to the sum of effective prestress and permanent loads shall be taken as:
| fComp, beam 2 | = -0.45(f′c) = -0.45(6.0) = -2.7 ksi |
From Table S5.9.4.2.1-1, the stress limit in prestressed concrete at the service limit state after losses for fully prestressed components in bridges other than segmentally constructed due to live load plus one-half the sum of the effective prestress and permanent loads shall be taken as:
| fComp, beam 3 | = -0.40(f′c) = -0.40(6.0) = -2.4 ksi |
Tension stress:
From Table S5.9.4.2.2-1, the stress limit in prestressed concrete at the service limit state after losses for fully prestressed components in bridges other than segmentally constructed, which include bonded prestressing tendons and are subjected to not worse than moderate corrosion conditions shall be taken as the following:
| ftension | = 0.465 ksi |
Table 5.6-2 - Stresses in the Prestressed Beam
| Location (ft.) (1) |
Girder noncomposite moment (k-ft) (2) |
Fps after losses (kips) (3) |
Composite dead load moment (k-ft) (2) |
Live load positive moment (k-ft) (2) |
|---|---|---|---|---|
| 0 | 0 | 239.0 | 0 | 0 |
| 1.75 | 217 | 797.2 | 36 | 170 |
| 5.5 | 661 | 797.0 | 108 | 476 |
| 11.0 | 1,252 | 857.0 | 199 | 886 |
| 16.5 | 1,776 | 946.7 | 276 | 1,230 |
| 22.0 | 2,230 | 946.7 | 337 | 1,509 |
| 27.5 | 2,616 | 1,092.1 | 384 | 1,724 |
| 33.0 | 2,933 | 1,092.1 | 414 | 1,882 |
| 38.5 | 3,181 | 1,096.2 | 429 | 1,994 |
| 44.0 | 3,360 | 1,096.2 | 429 | 2,047 |
| 49.5 | 3,471 | 1,096.2 | 414 | 2,045 |
| 54.5 | 3,512 | 1,096.2 | 387 | 2,015 |
| 55.0 | 3,511 | 1,096.2 | 384 | 2,010 |
| 60.5 | 3,456 | 1,096.2 | 338 | 1,927 |
| 66.0 | 3,333 | 1,096.2 | 277 | 1,794 |
| 71.5 | 3,141 | 1,096.2 | 201 | 1,613 |
| 77.0 | 2,880 | 1,096.2 | 108 | 1,388 |
| 82.5 | 2,551 | 1,096.2 | 2 | 1,124 |
| 88.0 | 2,152 | 946.7 | -121 | 825 |
| 93.5 | 1,686 | 946.7 | -258 | 524 |
| 99.0 | 1,150 | 797.2 | -452 | 297 |
| 104.5 | 546 | 797.2 | -580 | 113 |
| 107.25 | 217 | 797.2 | -670 | 58 |
| 109.0 | 0 | 239.0 | -729 | 15 |
Table 5.6-2 - Stresses in the Prestressed Beam (cont.)
| Location (ft.) (1) |
Final stress under PS & DL | Stress under 1/2 (DL + P/S) + live load (ksi) (4) |
Final stress under all loads | |||
|---|---|---|---|---|---|---|
| Top of beam (ksi) (4) |
Bottom of beam (ksi) (4) |
Top of beam (ksi) (4) |
Bottom of beam (ksi) (5) |
Top of slab (ksi) (4) | ||
| 0 | 0.140 | -0.588 | 0.070 | 0.140 | -0.588 | 0.000 |
| 1.75 | 0.333 | -1.816 | 0.136 | 0.303 | -1.755 | -0.041 |
| 5.5 | 0.061 | -1.519 | -0.054 | -0.023 | -1.349 | -0.116 |
| 11.0 | -0.255 | -1.283 | -0.285 | -0.412 | -0.966 | -0.215 |
| 16.5 | -0.521 | -1.158 | -0.479 | -0.739 | -0.719 | -0.298 |
| 22.0 | -0.796 | -0.861 | -0.666 | -1.064 | -0.321 | -0.365 |
| 27.5 | -0.943 | -0.969 | -0.777 | -1.249 | -0.353 | -0.417 |
| 33.0 | -1.133 | -0.767 | -0.900 | -1.467 | -0.094 | -0.454 |
| 38.5 | -1.270 | -0.631 | -0.988 | -1.623 | 0.081 | -0.479 |
| 44.0 | -1.374 | -0.525 | -1.050 | -1.737 | 0.207 | -0.490 |
| 49.5 | -1.436 | -0.465 | -1.081 | -1.799 | 0.266 | -0.487 |
| 54.5 | -1.455 | -0.453 | -1.085 | -1.812 | 0.267 | -0.475 |
| 55.0 | -1.454 | -0.455 | -1.083 | -1.810 | 0.263 | -0.474 |
| 60.5 | -1.414 | -0.508 | -1.049 | -1.756 | 0.180 | -0.448 |
| 66.0 | -1.331 | -0.609 | -0.984 | -1.649 | 0.032 | -0.410 |
| 71.5 | -1.206 | -0.757 | -0.889 | -1.492 | -0.181 | -0.359 |
| 77.0 | -1.046 | -0.945 | -0.769 | -1.292 | -0.449 | -0.296 |
| 82.5 | -0.835 | -1.189 | -0.617 | -1.034 | -0.787 | -0.223 |
| 88.0 | -0.670 | -1.112 | -0.481 | -0.816 | -0.817 | -0.139 |
| 93.5 | -0.374 | -1.450 | -0.280 | -0.467 | -1.263 | -0.053 |
| 99.0 | -0.116 | -1.487 | -0.111 | -0.169 | -1.381 | 0.031 |
| 104.5 | 0.250 | -1.910 | 0.105 | 0.230 | -1.870 | 0.092 |
| 107.25 | 0.458 | -2.146 | 0.219 | 0.448 | -2.125 | 0.121 |
| 109.0 | 0.269 | -0.918 | 0.132 | 0.266 | -0.913 | 0.141 |
Notes:
- Distance measured from the centerline of the bearing of the end abutment
- See Section 5.3 for load effects
- See Section 5.5 for prestressing forces
- Service I limit state for compression
- Service III limit state for tension
Definitions:
| Pt | = Final prestressing force taken from Design Step 5.4 (kips) |
| Stc | = Section moduli, top of the beam of the composite section - gross section (in3) |
| Sbc | = Section moduli, bottom of the beam of the composite section - gross section (in3) |
| Stsc | = Section moduli, top of slab of the composite beam (in3) |
| MDNC | = Moment due to the girder, slab, haunch and interior diaphragm (k-ft) |
| MDC | = Total composite dead load moment, includes parapets and future wearing surface (k-ft) |
| MLLC | = Live load moment (k-ft) |
All tension stresses and allowables use positive sign convention. All compression stresses and allowables use negative sign convention. All loads are factored according to Table 3.4.1-1 in the AASHTO LRFD Specifications for Service I and Service III limit states as applicable.
Design Step 5.6.2.2
Sample Calculations at 11 ft. From the CL of Bearing (11 ft. - 9 in. From Girder End)
Girder top stress after losses under sum of all loads (Service I):
| ftop | = -Pt/Ag + Pte11'/St - MDNC/St - MDC/Stc - MLLC/Stc = -0.790 + 1.300 - 0.730 - 0.035 - 0.157 = -0.412 ksi < Stress limit for compression under full load (-3.6 ksi) OK |
Girder top stress under prestressing and dead load after losses:
| ftop | = -Pt/Ag + Pte11'/St - MDNC/St - MDC/Stc = -0.790 + 1.300 - 0.730 - 0.035 = -0.255 ksi < Stress limit for compression under permanent load (-2.7 ksi) OK |
Girder top stress under LL + ½(PS + DL) after losses:
| ftop | = -Pt/Ag + Pte11'/St - MDNC/St - MDC/Stc - MLL/Stc = -0.395 + 0.650 - 0.365 - 0.018 - 0.157 = -0.285 ksi < Stress limit for compression under LL + ½(DL + PS) load (-2.4 ksi) OK |
Girder bottom stress under all loads (Service III):
| fbottom | = -Pt/Ag - Pte11'/Sb + MDNC/Sb + MDC/Sbc + MLLC/Sbc = -0.790 - 1.327 + 0.745 + 0.089 + 0.317 = -0.966 ksi < Stress limit for compression under full load (-2.7 ksi) OK |
Notice that the gross concrete composite section properties are typically used for the stress calculations due to all load components. However, some jurisdictions use the transformed section properties in calculating the stress due to live load. The transformed section properties are listed in Section 2. In this example, the gross section properties are used for this calculation.
Girder bottom stress under prestressing and dead load after losses:
| fbottom | = -Pt/Ag - Pte11'/Sb + MDNC/Sb + MDC/Sbc = -0.790 - 1.327 + 0.745 + 0.089 = -1.283 ksi < Stress limit for compression under prestress and permanent loads (-2.7 ksi) OK |
Sample Calculations at 54 ft. - 6 in. From the CL of Bearing (55 ft. - 3 in. From Girder End) - Midspan of Noncomposite Girder
Girder top stress after losses under sum of all loads (Service I):
| ftop | = -Pt/Ag + Pte54.5'/St - MDNC/St - MDC/Stc - MLLC/Stc = -1.010 + 1.671 - 2.047 - 0.069 - 0.357 = -1.812 ksi < Stress limit for compression under full load (-3.6 ksi) OK |
Girder top stress after losses under prestress and permanent loads:
| ftop | = -Pt/Ag + Pte54.5'/St - MDNC/St - MDC/Stc = -1.010 + 1.671 - 2.047 - 0.069 = -1.455 ksi < Stress limit for compression under prestress and permanent loads (-2.7 ksi) OK |
Girder top stress under LL + ½(PS + DL) after losses:
| ftop | = -Pt/Ag + Pte54.5'/St - MDNC/St - MDC/Stc - MLL/Stc = -0.505 + 0.835 - 1.024 - 0.034 - 0.357 = -1.085 ksi < Stress limit for compression under LL + ½(DL + PS) load (-2.4 ksi) OK |
Girder bottom stress (Service III):
| fbottom | = -Pt/Ag - Pte54.5'/Sb + MDNC/Sb + MDC/Sbc + MLLC/Sbc = -1.010 - 1.707 + 2.091 + 0.173 + 0.720 = 0.267 ksi < Stress limit for tension (0.465 ksi) OK |
Notice that the stresses are calculated without including creep and shrinkage. Jurisdictions that do not include creep and shrinkage typically design the girders for a reduced tensile stress limit or for zero tension at final condition. Including creep and shrinkage would normally result in additional tensile stress at the bottom of the beam at the midspan section.
Girder bottom stress after losses under prestress and dead load:
| fbottom= | -Pt/Ag - Pte54.5'/Sb + MDNC/Sb + MDC/Sbc = -1.010 - 1.707 + 2.091 + 0.173 = -0.453 ksi < Stress limit for compression (-2.7 ksi) OK |
Deck slab top stress under full load:
| ftop slab | = (-MDC/Stsc - MLLC/Stsc)/modular ratio between beam and slab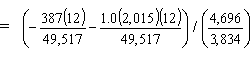 = (-0.094 - 0.488)/1.225 = -0.475 ksi < Stress limit for compression in slab (-2.4 ksi) OK |
Stresses at service limit state for sections in the negative moment region
Sections in the negative moment region may crack under service limit state loading due to high negative composite dead and live loads. The cracking starts in the deck and as the loads increase the cracks extend downward into the beam. The location of the neutral axis for a section subject to external moments causing compressive stress at the side where the prestressing force is located may be determined using a trial and error approach as follows:
- Assume the location of the neutral axis.
- Assume a value for the compressive strain at the extreme compression fiber (bottom of the beam). Calculate the tensile strain in the longitudinal reinforcement of the deck assuming the strain varies linearly along the height of the section and zero strain at the assumed location of the neutral axis.
- Calculate the corresponding tension in the deck reinforcement based on the assumed strain.
- Calculate the compressive force in the concrete.
- Check the equilibrium of the forces on the section (prestressing, tension in deck steel and compression in the concrete). Change the assumed strain at the bottom of beam until the force equilibrium is achieved.
- After the forces are in equilibrium, check the equilibrium of moments on the section (moment from prestressing, external moment and moment from internal compression and tension).
- If moment equilibrium is achieved, the assumed location of the neutral axis and strains are correct. If the moments are not in equilibrium, change the assumed location of the neutral axis and go to Step 2 above.
- After both force and moment equilibriums are achieved, calculate the maximum stress in the concrete as the product of the maximum concrete strain and the concrete modulus of elasticity.
Notice that when additional compression is introduced into the concrete due to external applied forces, the instantaneous stress in the prestressing steel is decreased by the modular ratio multiplied by the additional compressive stress in the surrounding concrete. The change in the prestressing steel force is typically small and was ignored in the following calculations.
Sample Calculations for a Section in the Negative Moment Region Under Service Limit State, Section at 107 ft. - 3 in. From the CL of End Bearing (108 ft. From Girder End)
From Table 5.3-1,
| Location (ft.) |
Noncomposite | Composite | Live Load + IM | |||||
|---|---|---|---|---|---|---|---|---|
| Girder* (k-ft) |
Slab and Haunch (k-ft) |
Exterior Diaphragm (k-ft) |
Total Noncomp. (k-ft) |
Parapet (k-ft) |
FWS (k-ft) |
Positive HL-93 (k-ft) |
Negative HL-93 (k-ft) | |
| 04.5 | 266 | 268 | 11 | 546 | -248 | -332 | 113 | -1,663 |
| 08.0 | 61 | 62 | 3 | 125 | -297 | -398 | 33 | -1,921 |
* Based on the simple span length of 109 ft.
| Maximum negative moment at the section at 104.5 ft | = 546 - 248 - 332 - 1,663 = -1,697 k-ft |
| Maximum negative moment at the section at 108.0 ft | = 125 - 297 - 398 - 1,921 = -2,491 k-ft |
By interpolation, the maximum Service I negative moment at the section under consideration is:
| Mneg | = -2,491 - (-2,491 + 1,697)[(108 - 107.25)/(108 - 104.5)] = -2,321 k-ft |
Trial and error approach (see above) was applied to determine the location of the neutral axis. The calculations of the last cycle of the process are shown below.
Referring to Figure 5.6-1:
Assume neutral axis at 32.5 inches from the bottom of beam
Assume maximum concrete compressive strain = 0.00079 in./in.
Tensile strain in deck reinforcement = 0.00079(75.52 - 32.5)/32.5 = 0.001046 in./in.
Modulus of elasticity of concrete beam = 4,696 ksi (see Section 2)
Concrete stress at bottom of beam = 0.00079(4,696) = 3.71 ksi
Area of deck longitudinal reinforcement = 14.65 in2 (see Section 5.6.5.1 for calculation)
Force in deck steel = 14.65(0.001046)(29,000) = 444.4 k
Force in prestressing steel = 797.2 k (see Table 5.5-1)
Compressive forces in the concrete:
Considering Figure 5.6-1, by calculating the forces acting on different areas as the volume of the stress blocks for areas A1, A2 and A3 as the volume of a wedge, prism or pyramid, as appropriate, the forces in Table 5.6-3 may be calculated. Recall that the centers of gravity of a wedge, a prism with all rectangular faces, a prism with a triangular vertical face and a pyramid are at one-third, one-half, one-third and one-quarter the height, respectively. The location of the centers of gravity shown in the figure may also be calculated. The moment from internal compressive concrete forces shown in Table 5.6-3 is equal to the force multiplied by the distance from the neutral axis to the location of the force.
Table 5.6-3 - Forces in Concrete Under Service Load in Negative Moment Regions (Section at 107'-3" from the end bearing)
| Area designation |
Force designation |
Area (in2) |
Stress (ksi) |
Force (kips) |
Distance from bot. of beam (in) |
Distance to N/A (in) |
Moment at N/A (k-ft) |
|---|---|---|---|---|---|---|---|
| A1 | P1 | 260 | 3.71 | 482.3 | 10.83 | 21.67 | 871.0 |
| A2 | P2 a | 160 | 2.80 | 448.0 | 4.00 | 28.50 | 1,064.0 |
| A2 | P2 b | 160 | 0.91 | 72.8 | 2.67 | 29.83 | 181.0 |
| A3 * | P3 a | 100 | 1.66 | 166.0 | 11.33 | 21.17 | 292.9 |
| A3 * | P3 b | 100 | 1.14 | 76.0 | 10.50 | 22.00 | 139.3 |
| Total | 1,245.1 | 2,548.2 |
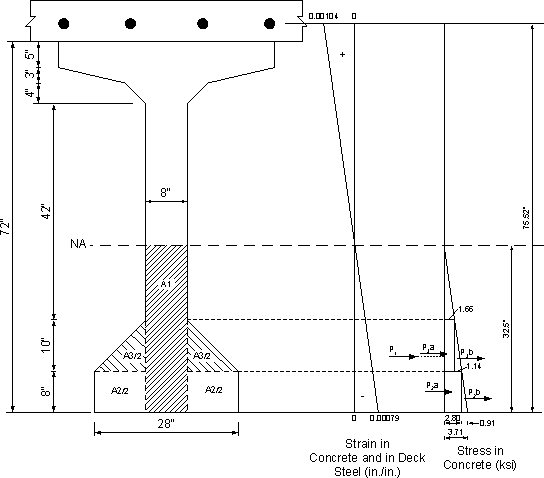
Figure 5.6-1 - Compressive Force in the Concrete
 a) Rectangular Stress Distribution |
 b) Triangular Stress Distribution |
*Figure 5.6-1a - Shapes Used in Determining Forces for A3
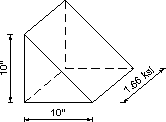
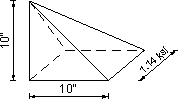
Sample force calculations for area A3.
Two components of stress act on area A3. The first component is a rectangular stress distribution with an intensity of 1.66 ksi. The second component is a triangular stress distribution with an intensity of 1.14 ksi.
Force due to the rectangular stress distribution:
| Frectangular | = 2[0.5(10)(10)](1.66) = 166.0 k |
The volume used to determine the effect of the triangular stress distribution is calculated using geometry of a pyramid.
| Ftriangular | = 2 triangles(1/3 pyramid base)(pyramid height) = 2(1/3)(10)(1.14)(10) = 76.0 k |
Check force equilibrium:
| Net force on section | = P/S steel force + concrete compressive force + deck steel force = 797.2 + (-1,245.1) + 444.4 = -3.5 kips ≈ 0 OK |
Check moment equilibrium:
| Net M on the section | = external moment + prestressing force moment + deck slab force moment + concrete compression moment = 2,321 + 797.2(32.5 - 5.375)/12 - 444.4(75.52 - 32.5)/12 - 2,548.2 = -18.4 k-ft ≈ 0 OK |
From Table 5.6-3, the maximum stress in the concrete is 3.71 ksi. The stress limit for compression under all loads (Table S5.9.4.2.1-1) under service condition is 0.6f′c (where f′c is the compressive strength of the girder concrete). For this example, the stress limit equals 3.6 ksi.
The calculated stress equals 3.71 ksi or is 3% overstressed. However, as explained above, the stress in the prestressing steel should decrease due to compressive strains in the concrete caused by external loads, i.e., prestressing steel force less than 797.2 k and the actual stress is expected to be lower than the calculated stress, and the above difference (3%) is considered within the acceptable tolerance.
Notice that the above calculations may be repeated for other cases of loading in Table S5.9.4.2.1-1 and the resulting applied stress is compared to the respective stress limit. However, the case of all loads applied typically controls.
Design Step 5.6.3 - Longitudinal steel at top of girder
The tensile stress limit at transfer used in this example requires the use of steel at the tension side of the beam to resist at least 120% of the tensile stress in the concrete calculated based on an uncracked section (Table S5.9.4.1.2-1). The sample calculations are shown for the section in Table 5.6-1 with the highest tensile stress at transfer, i.e., the section at 1.75 ft. from the centerline of the end bearing.
By integrating the tensile stress in Figure 5.6-2 over the corresponding area of the beam, the tensile force may be calculated as:
| Tensile force | = 5(42)(0.451 + 0.268)/2 + 7.33(8.0)(0.268 + 0.0)/2 + 2[4(3)](0.268 + 0.158)/2 + 2[4(4)/2][0.012 + (0.158 - 0.012)(2/3)] + 2[3(13)/2][0.158 + (0.268 - 0.158)(2/3)] = 99.2 k |
| Required area of steel | = 1.2(99.2)/fy = 119.0/60 = 1.98 in2 |
| Required number of #5 bars | = 1.98/0.31 = 6.39 bars |
Minimum allowable number of bars = 7 #5 bars
Use 8 #5 bars as shown in Figure 5.6-3
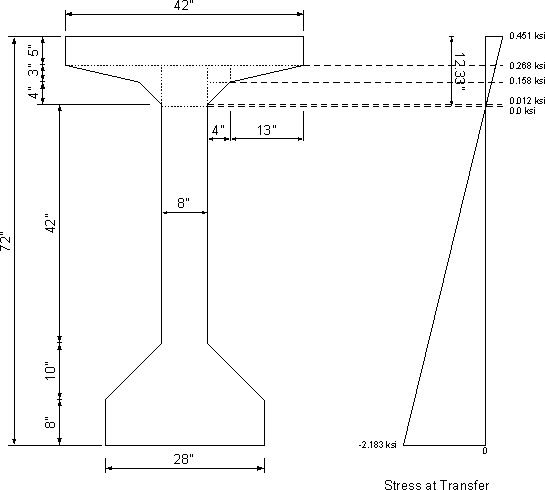
Figure 5.6-2 - Stress at Location of Maximum Tensile Stress at Transfer
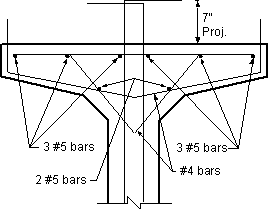
Figure 5.6-3 - Longitudinal Reinforcement of Girder Top Flange
Design Step 5.6.4 - Flexural resistance at the strength limit state in positive moment region (S5.7.3.1)
Sample calculations at midspan
| c | = distance between the neutral axis and the compressive face at the nominal flexural resistance (in.) |
| c | = 5.55 in., which is less than the slab thickness, therefore, the neutral axis is in the slab and section is treated as a rectangular section. (See Design Step 5.5.1 for commentary explaining how to proceed if "c" is greater than the deck thickness.) |
| fps | = stress in the prestressing steel at the nominal flexural resistance (ksi) |
| fps | = 264.4 ksi |
The factored flexural resistance, Mr, shall be taken as φMn, where Mn is determined using Eq. S5.7.3.2.2-1.
Factored flexural resistance in flanged sections (S5.7.3.2.2)
Mn = Apsfps(dp - a/2) + Asfy(ds - a/2) - A′sf′y(d′s - a/2) + 0.85f′c(b - bw)β1hf(a/2 - hf/2) (S5.7.3.2.2-1)
The definition of the variables in the above equation and their values for this example are as follows:
| Aps | = area of prestressing steel (in2) = 6.73 in2 |
| fps | = average stress in prestressing steel at nominal bending resistance specified in Eq. S5.7.3.1.1-1 (ksi) = 264.4 ksi |
| dp | = distance from extreme compression fiber to the centroid of prestressing tendons (in.) = 74.5 in. |
| As | = area of nonprestressed tension reinforcement (in2) = 0.0 in2 |
| fy | = specified yield strength of reinforcing bars (ksi) = 60 ksi |
| ds | = distance from extreme compression fiber to the centroid of nonprestressed tensile reinforcement (in.), NA |
| A′s | = area of compression reinforcement (in2) = 0.0 in2 |
| f′y | = specified yield strength of compression reinforcement (ksi), NA |
| d′s | = distance from the extreme compression fiber to the centroid of compression reinforcement (in.), NA |
| f′c | = specified compressive strength of concrete at 28 days, unless another age is specified (ksi) = 4.0 ksi (slab) |
| b | = width of the effective compression block of the member (in.) = width of the effective flange = 111 in. (See Design Step 5.5.1 for commentary for the determination of the effective width, b, when the calculations indicate that the compression block depth is larger than the flange thickness.) |
| bw | = web width taken equal to the section width "b" for a rectangular section (in.), NA |
| β1 | = stress block factor specified in S5.7.2.2, NA |
| hf | = compression flange depth of an I or T member (in.), NA |
| a | = β1c; depth of the equivalent stress block (in.) = 0.85(5.55) = 4.72 in. |
The second, third and fourth terms in Eq. S5.7.3.2.2-1 are equal to zero for this example.
Substituting,
| Mn | = 6.73(264.4)[74.5 - (4.72/2)] = 128,367/12 = 10,697 k-ft |
Therefore, the factored flexural resistance, Mr, shall be taken as:
Mr = φMn (S5.7.3.2.1-1)where:
φ = resistance factor as specified in S5.5.4.2 for flexure in prestressed concrete = 1.0 Mr = 1.0(10,697 k-ft)
= 10,697 k-ft
The maximum factored applied moment for Strength I limit state is 8,456 k-ft (see Table 5.3-2)
Mr = 10,697 k-ft > Mu = 8,456 k-ft OK
Design Step 5.6.4.1 - Check if section is over-reinforced
Limits for reinforcing (S5.7.3.3)
The maximum amount of prestressed and nonprestressed reinforcement must be such that:
| c/de | ≤ 0.42 (S5.7.3.3.1-1) |
| where: | |
| c = 5.55 in. (see Section 5.5.1) de = 74.5 in. (same as dp since no mild steel is considered) |
|
| c/de | = 5.55/74.5 = 0.074 < 0.42 OK |
Design Step 5.6.4.2 - Check minimum required reinforcement (S5.7.3.3.2)
Critical location is at the midspan of the continuous span = 55 ft. from the end bearing.
All strands are fully bonded at this location.
According to S5.7.3.3.2, unless otherwise specified, at any section of a flexural component, the amount of prestressed and nonprestressed tensile reinforcement shall be adequate to develop a factored flexural resistance, Mr, at least equal to the lesser of:
1.2 times the cracking strength determined on the basis of elastic stress distribution and the modulus of rupture, fr, on the concrete as specified in S5.4.2.6.
OR
1.33 times the factored moment required by the applicable strength load combinations specified in Table 3.4.1-1.
The cracking moment, Mcr, is calculated as the total moment acting on the beam when the maximum tensile stress equals the modulus of rupture.
fr = -Pt/Ag - Pte/Sb + MDNC/Sb + MDC/Sbc + M/Sbc
where:
| MDNC | = factored using Service I limit state, see Table 5.3-1 = 3,511 k-ft |
| MDC | = factored using Service I limit state, see Table 5.3-1 = 384 k-ft |
| Pt | = fpfAstrandNstrands = 1,096.2 k (from Table 5.6-2) |
| Ag | = 1,085 in2 |
| e54.5' | = 31.38 in. |
| Sb | = 20,157 in3 |
| Sbc | = 26,855 in3 |
| fr | = 0.587 ksi (S5.4.2.6) |
Solving for M, the additional moment required to cause cracking, in this equation:
| M | = 27,983/12 2,332 k-ft |
| Mcr | = MDNC + MDC + M = 3,511 + 384 + 2,332 = 6,227 k-ft |
| 1.2Mcr | = 1.2(6,227) = 7,472 k-ft |
The applied factored moment, Mu, taken from Table 5.3-2 is 8,456 k-ft (Strength I)
1.33(8,456) = 11,246 k-ft
Mr has to be greater than the lesser of 1.2Mcr and 1.33Mu, i.e.,7,472 k-ft.
Mr also has to be greater than the applied factored load Mu = 8,456 k-ft (strength requirement)
Mr = 10,697 k-ft, therefore, both provisions are OK
Design Step 5.6.5 - Continuity connection at intermediate support
Design Step 5.6.5.1 - Negative moment connection at the Strength limit state
Determine the deck steel at the intermediate pier.
Based on preliminary calculations, the top and bottom longitudinal reinforcement of the deck are assumed to be #6 bars at 5.5 in. spacing and #6 bars at 8.5 in. spacing, respectively (see Figure 5.6-5).
Calculate the total area of steel per unit width of slab:
| As | = Abar/spacing (in2/in.) | |
| For top row of bars: | As top | = 0.44/5.5 = 0.08 in2/in. |
| For bottom row of bars: | As bot | = 0.44/8.5 = 0.052 in2/in. |
| Therefore, | As | = 0.08 + 0.052 = 0.132 in2/in. |
Calculate the center of gravity of the slab steel from the top of the slab. Calculations are made from the top of the total thickness and include the integral wearing surface in the total thickness of slab. (See Figure 4-16)
| Top mat (B1): | CGStop | = Covertop + Dia#5 main rein. + ½ Dia#6 = 2.5 + 0.625 + ½ (0.75) = 3.5 in. |
| Bot. mat (B2): | CGSbot | = tslab - Coverbot - Dia#5 main rein. - ½ Dia#6 = 8 - 1 - 0.625 - ½ (0.75) = 6 in. |
Center of gravity of the deck longitudinal reinforcement from the top of the deck:
| CGS | = [As top(CGStop) + As bot(CGSbot)]/As = [0.08(3.5) + 0.052(6)]/0.132 = 4.48 in. from the top of slab (3.98 in. from the top of the structural thickness) |
Calculate the depth to the slab steel from the bottom of the beam. The haunch depth is ignored in the following calculations.
| ds | = girder + slab - CGS = 72 + 8 - 4.4 75.52 in. |
The specification is silent about the strength of the concrete in the connection zone. Many jurisdictions use the girder concrete strength for these calculations. This reflects observations made during girder tests in the past. In these tests, the failure always occurred in the girder. This behavior is due to the confinement of the diaphragm concrete in the connection zone provided by the surrounding concrete. This confinement increases the apparent strength of the diaphragm concrete compared to the unconfined strength measured during typical testing of concrete cylinders.
Assume the neutral axis is in the bottom flange (rectangular behavior), therefore,
| f′c | = f′c, beam | = 6.0 ksi |
| β1 | = β1, beam | = 0.75 (corresponds to the 6.0 ksi concrete, S5.7.2.2) |
| b | = width of section | = width of girder bottom flange = 28 in. |
Calculate c,
c = Asfy/0.85β1f′cb (S5.7.3.1.1-4, modified)
where:
As = area of reinforcement within the effective flange width of 111 in. (in2)
= Asbslab
= (0.132)(111)
= 14.65 in2fy = 60 ksi f′c = 6.0 ksi β1 = 0.75 b = 28 in.
| c | = 14.65(60)/[0.85(0.75)(6.0)(28)] = 8.21 in., which is approximately equal to the thickness of the bottom flange of the beam (8 in.), therefore, the section is checked as a rectangular section. If "c" was significantly larger than the thickness of the bottom flange, a reduction in the section width should be considered. |
Calculate the nominal flexural resistance according to S5.7.3.2.1 and the provisions for a rectangular section.
Mn = Asfy(ds - a/2)
where:
a = β1c
= 0.75(8.21)
= 6.16 in.ds = 75.52 in.
| Mn | = 14.65(60)[75.52 - (6.16/2)]/12 = 5,306 k-ft |
The factored flexural resistance, Mr, is
Mr = φfMn (S5.7.3.2.1-1)
where:
φf = 0.9 for flexure in reinforced concrete (S5.5.4.2.1)
| Mr | = 0.9(5,306) = 4,775 k-ft |
Check moment capacity versus the maximum applied factored moment at the critical location
Critical location is at the centerline of pier.
Strength I limit state controls.
|Mu| = 4,729 k-ft (see Table 5.3-2) < Mr = 4,775 k-ft OK
Check service crack control (S5.5.2)
Actions to be considered at the service limit state are cracking, deformations, and concrete stresses, as specified in Articles S5.7.3.4, S5.7.3.6, and S5.9.4, respectively. The cracking stress is taken as the modulus of rupture specified in S5.4.2.6.
Components shall be so proportioned that the tensile stress in the mild steel reinforcement at the service limit state does not exceed fsa, determined as:
fsa = Z/(dcA)1/3 ≤ 0.6fy = 0.6(60) = 36 ksiwhere:
Z = crack width parameter (kip/in.)
= 170 kip/in. (for members in moderate exposure conditions; the example bridge is located in a warm climate (Atlanta) where the use of deicing salts is possible, but not likely)dc = depth of concrete measured from extreme tension fiber to center of bar or wire located closest thereto (in.); for calculation purposes, the thickness of clear cover used to compute dc shall not be taken to be greater than 2.0 in.
= concrete cover + ½ secondary rein.
= 2.0 + ½ (0.75) = 2.375 in. (see Figure 5.6-4)A = area of concrete having the same centroid as the principal tensile reinforcement and bounded by the surfaces of the cross-section and a straight line parallel to the neutral axis, divided by the number of bars or wires (in2); for calculation purposes, the thickness of clear concrete cover used to compute "A" shall not be taken to be greater than 2.0 in.
= [2(2.0) + 0.75]5.5/1 bar = 26.125 in2/bar (see Figure 5.6-4)
Figure 5.6-4 - Dimensions for Calculation of the Area, A
| fsa | = 170/[2.375(26.125)]1/3 = 42.94 ksi > 0.6fy = 36 ksi, therefore, use fsa = 36 ksi |
Connection moment at Service I limit state is 2,858 k-ft (see Table 5.3-2)
| Assuming: | Section width is equal to beam bottom flange width = 28 in Modular ratio = 6 for 6 ksi concrete Area of steel = 14.65 in2 |
At service limit state, the depth of the neutral axis and the transformed moment of inertia under service loads may be calculated using the same procedure used earlier in the example (Section 4). The neutral axis is 18.86 in. from the bottom of the beam.
Maximum service stress in the steel = 33.74 ksi < 36 ksi OK
Design Step 5.6.5.2 - Positive moment connection
For jurisdictions that consider creep and shrinkage in the design, it is likely that positive moment will develop at intermediate piers under the effect of prestressing, permanent loads and creep and shrinkage. These jurisdictions provide reinforcement at the bottom of the beams at intermediate diaphragms to resist the factored positive moment at these locations.
For jurisdictions that do not consider creep and shrinkage in the design, it is unlikely that live load positive moments at intermediate supports will exceed the negative moments from composite permanent loads at these locations. This suggests that there is no need for the positive moment connection. However, in recognition of the presence of creep and shrinkage effects, most jurisdictions specify some reinforcement to resist positive moments.
Two forms of the connection have been in use:
Figure 5.6-5 shows one alternative that requires extending some of the prestressing strands at the end of the girder into the intermediate diaphragm. Due to the small space between girders, these strands are bent upwards into the diaphragm to provide adequate anchorage. Only strands that are fully bonded are used for the positive moment connection.
The second alternative requires adding mild reinforcement bars as shown in Figure 5.6-6. This alternative may lead to congestion at the end of the beam due to the presence of the prestressing strands at these locations.
Typical details of the top of the pier cap for expansion and fixed bearings are shown schematically in Figures 5.6-7 and 5.6-8.
Figure 5.6-5 - Continuity Connection Alternative 1: Strands Used for Positive Moment Connection
Figure 5.6-6 - Continuity Connection Alternative 2: Reinforcement Bars Used for Positive Moment Connection
Figure 5.6-7 - Typical Diaphragm at Intermediate Pier (Expansion Bearing)
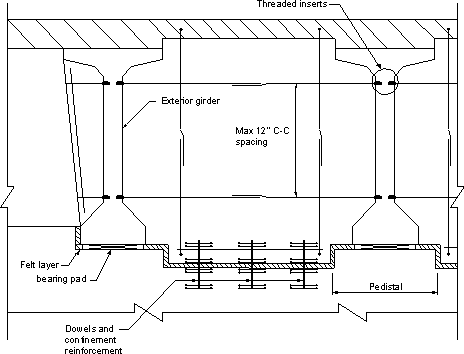
Figure 5.6-8 - Typical Diaphragm at Intermediate Pier (Fixed Bearing)
Design Step 5.6.6 - Fatigue in prestressed steel (S5.5.3)
Article S5.5.3 states that fatigue need not be checked when the maximum tensile stress in the concrete under Service III limit state is taken according to the stress limits of Table S5.9.4.2.2-1. The stress limit in this table was used in this example and, therefore, fatigue of the prestressing steel need not be checked.
Design Step 5.6.7 - Camber (S5.7.3.6)
The provisions of S2.5.2.6 shall be considered.
Deflection and camber calculations shall consider dead load, live load, prestressing, erection loads, concrete creep and shrinkage, and steel relaxation. For determining deflection and camber, the provisions of Articles S4.5.2.1, S4.5.2.2, and S5.9.5.5 shall apply.
Instantaneous deflections are computed using the modulus of elasticity for concrete as specified in S5.4.2.4 and taking the gross moment of inertia, Ig,as allowed by S5.7.3.6.2.
Deflection values are computed based on prestressing, girder self-weight, slab, formwork, exterior diaphragm weight, and superimposed dead load weight. Camber values are computed based on initial camber, initial camber adjusted for creep, and final camber. Typically, these calculations are conducted using a computer program. Detailed calculations are presented below.
Deflection due to initial prestressing is computed as:
ΔP/S = -(PtesL2)/(8EciIg) (for straight bonded strands)
ΔP/S = -Ptes[L2 - (Lt + 2Lx)2]/(8EciIg) (for debonded strands)
where:
Pt = applied load acting on the section (kips) es = eccentricity of the prestressing force with respect to the centroid of the cross section at the midspan of the beam (in.) L = span length (ft.) Lt = transfer length of the strands (in.) Lx = distance from end of beam to point where bonding commences (in.) Eci = modulus of elasticity of concrete at transfer (ksi) Ig = moment of inertia (in4)
The negative sign indicates upward deflection.
Computer software is generally used to determine the deflections due to each loading. However, sample calculations are provided for this example.
See Table 5.5-1 for prestressing forces.
| Group 1 strands: | 32 fully bonded strands Initial prestressing force = 924.4 k |
Distance from bottom of the beam to the neutral axis = 36.38 in.
Distance from the bottom of the beam to the centroid of Group 1 strands = 5.375 in.
Deflection due to Group 1 strands:
| ΔP/S 1 | = -(PtesL2)/(8EciIg) = -[924.4(36.38 - 5.375)[109(12)]2]/[8(4,200)(733,320)] = -1.99 in. (upward deflection) |
| Group 2 strands: | 6 strands debonded for 10 ft. from centerline of bearings Transfer length = 30 in. Initial prestressing force = 173.3 k |
From Figures 2-5 and 2-6, the distance from the bottom of the beam to the centroid of Group 2 is 4.0 in.
Deflection due to Group 2 strands:
| ΔP/S 2 | = -Ptes[L2 - (Lt + 2Lx)2]/(8EciIg) = -173.3(36.38 - 4.0)[[109(12)]2 - [30 + 2(10)(12)]2]/[8(4,200)(733,320)] = -0.37 in. (upward deflection) |
| Group 3 strands: | 6 strands debonded for 22 ft. from centerline of bearings Transfer length = 30 in. Initial prestressing force = 173.3 k |
From Figures 2-5 and 2-6, the distance from the bottom of the beam to the centroid of Group 3 is 4.0 in.
Deflection due to Group 3 strands:
| ΔP/S 3 | = -Ptes[L2 - (Lt + 2Lx)2]/(8EciIg) = -173.3(36.38 - 4.0)[[109(12)]2 - [30 + 2(22)(12)]2]/[8(4,200)(733,320)] = -0.32 in. (upward deflection) |
Total initial deflection due to prestressing:
| ΔP/S Tot | = -1.99 - 0.37 - 0.32 = -2.68 in. (upward deflection) |
Notice that for camber calculations, some jurisdictions assume that some of the prestressing force is lost and only consider a percentage of the value calculated above (e.g. Pennsylvania uses 90% of the above value). In the following calculations the full value is used. The user may revise these values to match any reduction required by the bridge owner's specification.
Using conventional beam theory to determine deflection of simple span beams under uniform load or concentrated loads and using the loads calculated in Section 5.2, using noncomposite and composite girder properties for loads applied before and after the slab is hardened, respectively, the following deflections may be calculated:
| Δsw | = deflection due to the girder self-weight = 1.16 in. |
| Δs | = deflection due to the slab, formwork, and exterior diaphragm weight = 1.12 in. |
| ΔSDL | = deflection due to the superimposed dead load weight = 0.104 in. |
All deflection from dead load is positive (downward).
Design Step 5.6.7.1 - Camber to determine bridge seat elevations
Initial camber, Ci:
| Ci | = ΔP/S Tot + Δsw = -2.68 + 1.16 = -1.52 in. (upward deflection) |
Initial camber adjusted for creep, CiA:
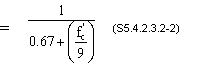
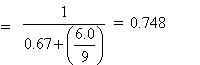
| Cr | = constant to account for creep in camber (S5.4.2.3.2) |
| kc | = factor for the effect of the volume-to-surface area ratio of the component as specified in Figure S5.4.2.3.2-1. |
In order to determine kc, the volume-to-surface area ratio needs to be calculated. See Figure 2-3 for girder dimensions.
Beam area = 1,085 in2 Beam volume = 1,085(12)
= 13,020 in3/ftSurface area = 2,955.38 in2/ft (V/S)b = 13,020/2,955.38
= 4.406 in.Using Figure S5.4.2.3.2-1 or SC5.4.2.3.2-1, the correction factor, kc, is taken to be approximately 0.759.
kf = factor for the effect of concrete strength
H = relative humidity from Figure S5.4.2.3.3-1
= 70%ti = age of concrete when load is initially applied
= 1 dayt = maturity of concrete
= infiniteCr = 3.5(0.759)(0.748)[1.58 - (70/120)](1)-0.118
= 1.98
Therefore, the initial camber, CiA is:
| CiA | = -1.52(1.98) = -3.01 in. (upward deflection) |
Final camber, CF:
| CF | = CiA + Δs + ΔSDL = -3.01 + 1.12 + 0.104 = -1.79 in. (upward deflection) |
This camber is used to determine bridge seat elevation.
Design Step 5.6.7.2 - Haunch thickness
The haunch thickness is varied along the length of the girders to provide the required roadway elevation. For this example, the roadway grade is assumed to be 0.0. Therefore, the difference between the maximum haunch thickness at the support and the minimum haunch thickness at the center of the beam should equal the final camber, i.e., 1.79 in. in this example. Minimum haunch thickness is not included in the specifications and is typically specified by the bridge owner. Figure 5.6-9 shows schematically the variation in haunch thickness. Haunch thickness at intermediate points is typically calculated using a computer program.
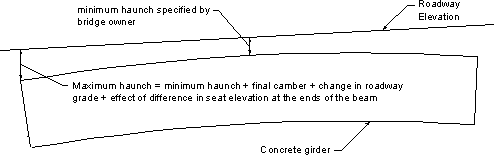
Figure 5.6-9 - Schematic View of Haunch
Design Step 5.6.7.3 - Camber to determine probable sag in bridge
To eliminate the possibility of sag in the bridge under permanent loads, some jurisdictions require that the above calculations for CF be repeated assuming a further reduction in the initial P/S camber. The final CF value after this reduction should show upward deflection.
Design Step 5.6.8 - Optional live load deflection check
Service load deformations may cause deterioration of wearing surfaces and local cracking in concrete slabs and in metal bridges which could impair serviceability and durability, even if self limiting and not a potential source of collapse.
As early as 1905, attempts were made to avoid these effects by limiting the depth-to-span ratios of trusses and girders, and starting in the 1930's, live load deflection limits were prescribed for the same purpose. In a study of deflection limitations of bridges ASCE (1958), an ASCE committee, found numerous shortcomings in these traditional approaches and noted them. For example:
"The limited survey conducted by the Committee revealed no evidence of serious structural damage that could be attributed to excessive deflection. The few examples of damaged stringer connections or cracked concrete floors could probably be corrected more effectively by changes in design than by more restrictive limitations on deflection. On the other hand, both the historical study and the results from the survey indicate clearly that unfavorable psychological reaction to bridge deflection is probably the most frequent and important source of concern regarding the flexibility of bridges. However, those characteristics of bridge vibration which are considered objectionable by pedestrians or passengers in vehicles cannot yet be defined."
Since that time, there has been extensive research on human response to motion, and it is now generally agreed that the primary factor affecting human sensitivity is acceleration as opposed to deflection, velocity, or the rate of change of acceleration for bridge structures, but the problem is a difficult subjective one. Thus, to this point in history there are no simple definitive guidelines for the limits of tolerable static deflection or dynamic motion. Among current specifications, the Ontario Highway Bridge Design Code of 1983 contains the most comprehensive provisions regarding vibrations tolerable to humans.
The deflection criteria in S2.5.2.6.2 is considered optional. The bridge owner may select to invoke this criteria if desired. If an Owner chooses to invoke deflection control, the following principles may apply:
- when investigating the maximum absolute deflection, all design lanes should be loaded, and all supporting components should be assumed to deflect equally,
- for composite design, the design cross-section should include the entire width of the roadway and the structurally continuous portions of the railings, sidewalks and median barriers
- when investigating maximum relative displacements, the number and position of loaded lanes should be selected to provide the worst differential effect,
- the live load portion of load combination Service I of Table S3.4.1-1 should be used, including the dynamic load allowance, IM
- the live load shall be taken from S3.6.1.3.2,
- the provisions of S3.6.1.1.2 should apply,
- for skewed bridges, a right cross-section may be used; for curved and curved skewed bridges a radial cross-section may be used.
If the Owner invokes the optional live load deflection criteria, the deflection should be taken as the larger of:
- That resulting from the design truck alone, or
- That resulting from 25 percent of the design truck taken together with the design lane load.
According to S2.5.2.6.2, the deflection criteria for vehicular live load limits deflection to L/800.
110(12)/800 = 1.65 in.
The calculated live load deflection determined by using computer software is 0.324 in.
0.324 in. < 1.65 in. OK