U.S. Department of Transportation
Federal Highway Administration
1200 New Jersey Avenue, SE
Washington, DC 20590
202-366-4000
Federal Highway Administration Research and Technology
Coordinating, Developing, and Delivering Highway Transportation Innovations
| REPORT |
| This report is an archived publication and may contain dated technical, contact, and link information |
|
| Publication Number: FHWA-HRT-14-066 Date: September 2014 |
Publication Number: FHWA-HRT-14-066 Date: September 2014 |
In total, 20 coupons were tested, five from each set of galvanized and bare specimens. Table 1 and table 2 show the results of testing for each of the fabrication sources. The averages for each set of specimens are shown in the bolded line. Fabricator 1 had average 0.2-percent yield strengths of 51.5 and 48.7 ksi for the respective galvanized and bare coupons. Fabricator 2 had average 0.2-percent yield strengths of 69.3 and 64.7 ksi for the respective galvanized and bare coupons.
Table 1 . Fabricator 1 material data.
Specimen ID |
0.2% Offset Yield Stress |
Static Yield Stress |
Tensile Strength |
Elongation |
Area Reduction |
|---|---|---|---|---|---|
Galv1 |
50.5 |
48.7 |
63.6 |
22 |
59 |
Galv2 |
52.5 |
49.8 |
64.8 |
20 |
64 |
Galv3 |
50.4 |
48.3 |
62.4 |
23 |
63 |
Galv4 |
51.3 |
49.2 |
63.7 |
22 |
62 |
Galv5 |
52.8 |
50.7 |
64.8 |
23 |
66 |
Average |
51.5 |
49.3 |
63.9 |
22 |
63 |
Bare1 |
47.2 |
45.6 |
58.9 |
23 |
58 |
Bare2 |
48.8 |
47.3 |
58.9 |
26 |
57 |
Bare3 |
49.3 |
47.7 |
60.3 |
26 |
62 |
Bare4 |
49.3 |
47.9 |
61.5 |
27 |
56 |
Bare5a |
43.1 |
42.8 |
61.2 |
26 |
61 |
Averageb |
48.7 |
47.1 |
59.9 |
25 |
58 |
a Indicates specimens where fracture occurred outside the original gauge length marks or was
located less than 25 percent of the elongated gauge length from either of the original gauge
length marks.
b Specimens failing ASTM acceptance criteria were not included in statistical analysis.
Table 2 . Fabricator 2 material data.
Specimen ID |
0.2% Offset Yield Stress |
Static Yield Stress |
Tensile Strength |
Elongation |
Area Reduction |
|---|---|---|---|---|---|
Galv1a |
69.1 |
67.5 |
76.0 |
14 |
55 |
Galv2 |
68.2 |
65.5 |
76.3 |
14 |
76 |
Galv3 |
66.7 |
64.7 |
73.5 |
15 |
73 |
Galv4 |
73.1 |
70.6 |
80.6 |
14 |
69 |
Galv5a |
72.9 |
70.5 |
79.9 |
15 |
85 |
Averageb |
69.3 |
66.9 |
76.8 |
14 |
73 |
Bare1 |
65.4 |
62.5 |
75.6 |
16 |
74 |
Bare2 |
65.9 |
64.5 |
74.6 |
12 |
76 |
Bare3 |
63.3 |
61.4 |
74.0 |
15 |
71 |
Bare4 |
65.6 |
63.4 |
76.3 |
16 |
72 |
Bare5 |
63.5 |
61.9 |
74.3 |
15 |
76 |
Average |
64.7 |
62.7 |
75.0 |
15 |
74 |
Neither of the specimen fabricators would provide the chemistry of their zinc baths, pleading it was proprietary information. Therefore, a core plug was removed from four randomly selected specimens, two from each manufacturer. The core plugs were sent to a lab for chemical analysis of the zinc coating. Table 3 shows the results of the chemistry in terms of percent by weight. No conclusions will be drawn on the chemistry results, although elevated levels of some elements have been known to cause cracking. They are presented here for information purposes only.
Table 3 . Galvanized coating chemistries.
Element |
1G5 |
1G6 |
2G6 |
2G5 |
|---|---|---|---|---|
Copper |
0.015 |
0.013 |
0.018 |
0.018 |
Cadmium |
0.001 |
0.001 |
0.004 |
0.005 |
Aluminum |
0.081 |
0.081 |
0.080 |
0.080 |
Magnesium |
0.003 |
0.003 |
0.003 |
0.003 |
Lead |
0.35 |
0.31 |
0.56 |
0.55 |
Tin |
<0.001 |
<0.001 |
0.011 |
0.013 |
Iron |
1.24 |
1.23 |
0.65 |
0.73 |
Nickel |
0.016 |
0.017 |
0.078 |
0.077 |
Zinc |
Balance |
Balance |
Balance |
Balance |
For this research, failure was considered a 12-inch-long crack around the perimeter of the tube. The UT-Austin researchers defined failure as a 10-percent decrease in the stiffness of the system. For this research the stiffness criterion was evaluated, but it was not believed to be accurate, since only one pole would fail at a time, while during the UT-Austin tests, poles would always fail in pairs. Generally once the crack was 12 inches long (21 percent of the perimeter), the remaining life was small in comparison to the cycles to reach failure. In addition, once the crack became that long, the stress range in each anchor rod around the intact portions of the pole would increase, thus increasing the risk that they could develop fatigue cracks themselves. The 12-inch crack length criterion was not strictly followed, particularly in the beginning of the testing with fabricator 1 specimens when the 10-percent stiffness reduction criteria was being evaluated. Initially the 10-percent stiffness decrease rule was used, but it was determined to be not working after the fourth specimen; then the 12-inch-long crack rule was adopted.
Table 4 and table 5 outline the fatigue data for the 24 socket connections tested. Specimens were assigned a 3-character, alphanumeric naming designation xyz where:
Therefore, specimen 2G5 represents the fifth galvanized specimen from fabricator 2. Table 4 and table 5 also show the length of the crack on each tube's perimeter at failure. The appendix contains photos of each fracture surface showing the crack's shape, length, and area reported (figure 11 through figure 33).
An anomaly in the fatigue data requires further explanation. At one point in the program, Specimen 1U6 was being fatigue cycled along with Specimen 1G1. Specimen 1U6 had existing cracks from previous cycling, and Specimen 1G1 was virgin. After 616,158 cycles, there was an accidental overload applied to the system and evidence that the actuator applied approximately 32 kips of load to the system based on the peak/valley indicator on the controller. This overload destroyed the 1U6 specimen but caused no visible damage to the 1G1 specimen. The fact that Specimen 1G1 accumulated more than 15 million cycles with no cracks is not coincidental considering that the overload must have plastically deformed the tube at the weld toe, thus erasing the residual stresses from the welding and enhancing fatigue life.
Figure 4 and figure 5 plot the fatigue data along with the AASHTO S-N curves for fabricators 1 and 2, respectively. The colored, dashed lines represent the lower bound limit of the two data sets as the mean minus two standard deviations from linear regression analysis and an assumed slope of -3 to 1 on the log-log scale. The dashed blue line represents the ungalvanized specimens, and the dashed red line signifies the galvanized specimens.
For fabricator 1 the data are highly scattered for both the galvanized and ungalvanized specimens. For both specimen types, the lower bound resistance is similar and much less than Category E'. The scatter in the data can be explained by considering the preparation and quality of the socket weld from fabricator 1. Specimens with fatigue lives of more than 2 million cycles had welds with a low entry angle into the tube. In addition, evidence indicated that the weld toes were peened.
Figure 6 shows the peened surface of the weld from Specimen 1U3. (Note that the white line at the weld toe is residual developer from dye penetrant testing.) The speckled surface on the weld suggests that it was needle peened, and in some cases the weld toe was also treated. All of the fabricator 1 welds appear to have been needle peened, but the weld toes were not treated in all cases. The specimens with the lowest lives had equal leg welds and bad undercutting in some instances with cracks developing at multiple locations at each undercut.
The data from fabricator 2 are much more pronounced, showing the difference in fatigue strength between galvanized and ungalvanized specimens, with two distinct scatter bands for each specimen type. The lower bound of the ungalvanized specimens did plot slightly above Category E'; whereas, the galvanized specimens were much below Category E', similar in strength to the specimens made by fabricator 1.
Table 4 . Fatigue results of fabricator 1 specimens.
Specimen |
Finish |
Stress Range |
Cycles to Failure |
Crack Length on Tube Perimeter |
|---|---|---|---|---|
1U1 |
Unfinished |
5.85 |
2167227 |
6.90 |
1U2 |
Unfinished |
5.85 |
1602406 |
7.59 |
1U3 |
Unfinished |
5.85 |
3846508 |
6.19 |
1U4 |
Unfinished |
5.85 |
8555356 |
8.59 |
1U5 |
Unfinished |
5.85 |
924948 |
12.10 |
1U6 |
Unfinished |
5.85 |
3835237b |
8.06 |
1G1 |
Galvanized |
5.85 |
15015310c |
No crack |
1G2 |
Galvanized |
5.85 |
4461772 |
6.72 |
1G3 |
Galvanized |
5.85 |
3067630 |
10.86 |
1G4 |
Galvanized |
5.85 |
1229060 |
11.25 |
1G5 |
Galvanized |
5.85 |
1360291 |
12.09 |
1G6 |
Galvanized |
5.85 |
2928887 |
12.00 |
Table 5 . Fatigue results of fabricator 2 specimens.
Specimen |
Finish |
Stress Range |
Cycles to Failure |
Crack Length on Tube Perimeter |
|---|---|---|---|---|
2U1 |
Unfinished |
5.73 |
3738417 |
13.99 |
2U2 |
Unfinished |
5.73 |
4873910 |
12.58 |
2U3 |
Unfinished |
5.73 |
7000983 |
11.63 |
2U4 |
Unfinished |
5.73 |
4411691 |
14.06 |
2U5 |
Unfinished |
5.73 |
3409173 |
11.76 |
2U6 |
Unfinished |
5.73 |
5631182 |
12.61 |
2G1 |
Galvanized |
5.73 |
1171624 |
13.77 |
2G2 |
Galvanized |
5.73 |
878218 |
12.68 |
2G3 |
Galvanized |
5.73 |
639952 |
13.56 |
2G4 |
Galvanized |
5.73 |
1864066 |
12.48 |
2G5 |
Galvanized |
5.73 |
700310 |
12.64 |
2G6 |
Galvanized |
5.73 |
748184 |
11.42 |
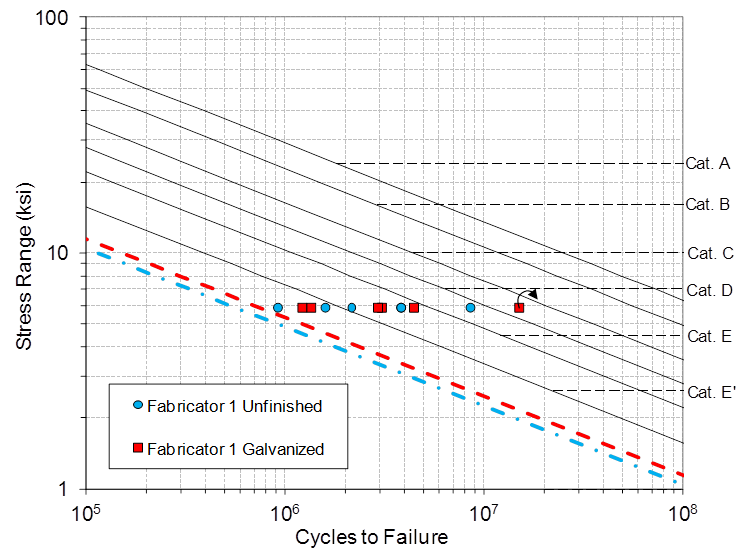
Figure 4. Graph. S-N plot of fabricator 1 fatigue data.
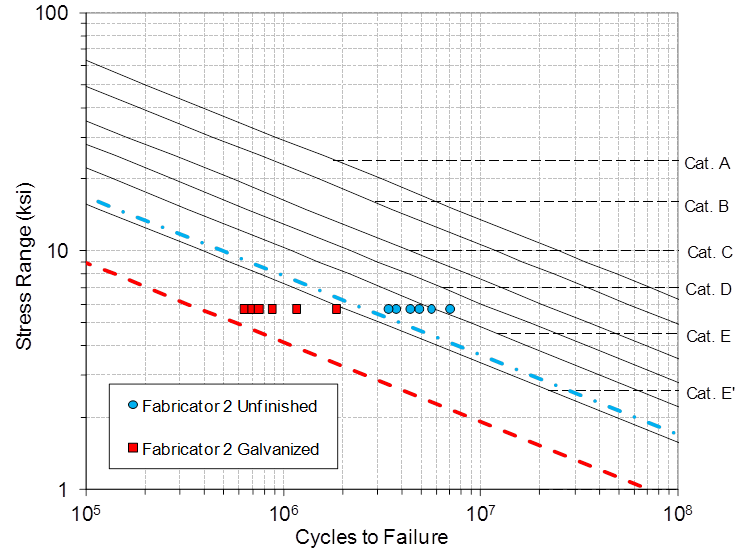
Figure 5. Graph. S-N plot of fabricator 2 fatigue data.
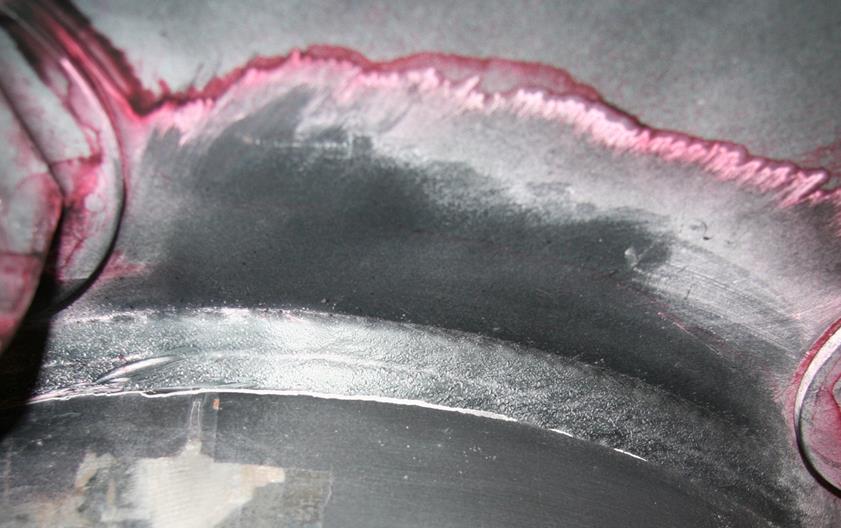
Figure 6. Photo. Peening evidence on Specimen 1U3.
The static tests were meant to be conducted to two different loading rates and two different temperatures. The two loading rates were meant to be extremely slow to represent static loading, and the faster rate was intended to represent a strain rate from a dynamic wind event. During the duration of the project, however, a new actuator control system was set up, and a mix-up occurred in interpreting the loading rates from one system to the next. Therefore, the rates do not necessarily represent the intention of the testing. Two temperatures were investigated: room temperature (approximately 70 °F) and the AASHTO Zone 2 lowest anticipated service temperature for fracture assessment (-30 °F).
Table 6 shows the matrix of tests together with the fatigue crack length, measured loading rate, and the peak moment attained for each test. For the mode of failure, in the two room temperature tests, the fatigue cracks extended in a ductile manner with through-thickness yielding of the tube. The two tests conducted at the cold temperature exhibited stable and ductile extension of the existing fatigue cracks with one exception. In test 3, one tube had a pop-in fracture where the fatigue crack suddenly extended 2 inches at a 45-degree angle relative to the fatigue crack propagation.
Figure 7 through figure 10 show the moment versus displacement plots for each of the four tests. In each plot, dashed and dotted lines indicate the plastic moments of the uncracked and cracked sections using the measured yield strength of the tube. The cracked section plastic modulus was calculated assuming a 12-inch-long crack on the outside perimeter of the tube. On average, the beginning crack lengths were 12 inches for the eight specimens tested. No attempt was made to calculate the cracked plastic section modulus for each tube individually.
The peak moments attained for each set of tubes were very close to the theoretical cracked section plastic moment capacity. This would indicate that if an owner did have a cracked pole in service, and could accurately assess the shape and length of the crack, a cracked plastic section analysis could be performed to determine if the pole was susceptible to collapse under design loads.
It should also be noted that this project did not attempt to measure the fracture resistance of the tube. Since each of the tests was able to attain the cracked plastic moment capacity, the tube must have had adequate fracture resistance to the approximately 12-inch-long fatigue cracks.
Table 6 . Static testing matrix.
Test |
Specimen Designations |
Crack Length Estimate |
Temperature (°F) |
Loading Rate |
Peak Moment |
1 |
2G4 |
12.48 |
70 |
0.002 |
3,311a |
2G6 |
11.42 |
||||
2 |
2G2 |
12.68 |
70 |
0.04 |
3,410a |
2G1 |
13.77 |
||||
3 |
2G5 |
12.64 |
-30 |
0.02 |
3,342a |
2G3 |
13.56 |
||||
4 |
2B5 |
11.76 |
-30 |
0.2 |
3,566b |
2B6 |
12.61 |
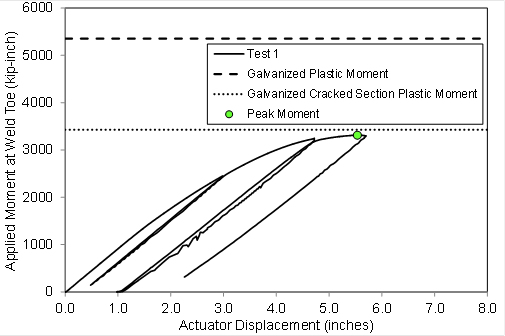
Figure 7. Graph. Moment versus displacement of test 1.
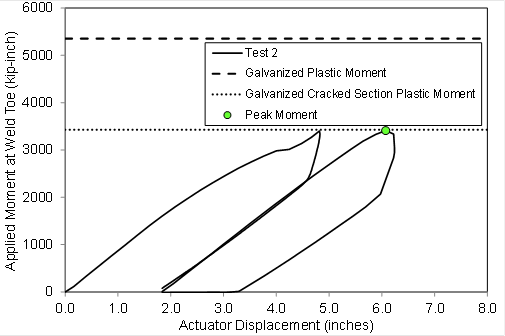
Figure 8. Graph. Moment versus displacement of test 2.