U.S. Department of Transportation
Federal Highway Administration
1200 New Jersey Avenue, SE
Washington, DC 20590
202-366-4000
Federal Highway Administration Research and Technology
Coordinating, Developing, and Delivering Highway Transportation Innovations
| TECHBRIEF |
| This techbrief is an archived publication and may contain dated technical, contact, and link information |
| Publication Number: FHWA-HRT-17-119 Date: December 2017 |
Publication Number: FHWA-HRT-17-119 Date: December 2017 |
PDF Version (524 KB)
PDF files can be viewed with the Acrobat® Reader®
Publication No. FHWA-HRT-17-119 - December 2017
FHWA Contact: Ahmad Ardani, HRDI-10, 202-493-3422, ahmad.ardani@dot.gov
This TechBrief provides an executive summary of a study that was conducted by the Federal Highway Administration’s Concrete Laboratory at Turner-Fairbank Highway Research Center (TFHRC) related to miniaturization of flexural strength test specimen size. The study was conducted in two separate phases; the first examined the feasibility of miniaturizing modulus of rupture (MR) specimen size, with the main goal of making the test safer and easier to conduct simply through reduction in geometry and associated mass. The second phase of the study commenced as a collaborative effort with ASTM and 22 laboratories in conducting a comprehensive interlaboratory study to determine the test precision.
Flexural strength, also known as modulus of rupture, is an important parameter in the design of concrete pavement. As shown in figure 1, MR is measured by applying load to an unreinforced concrete beam with the intention of inducing failure in accordance with American Association of State Highway and Transportation Officials (AASHTO) and ASTM standards for third-point loading (T97 and C78/C78M) and center-point loading (T177 and C293/C293M), respectively.(1) The focus of this study was on the third-point loading since it is the most prevalent method used by practitioners.
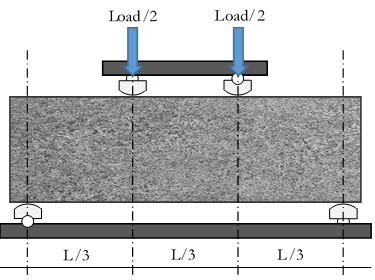
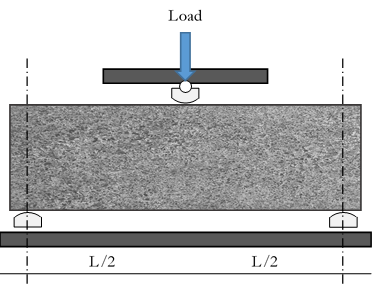
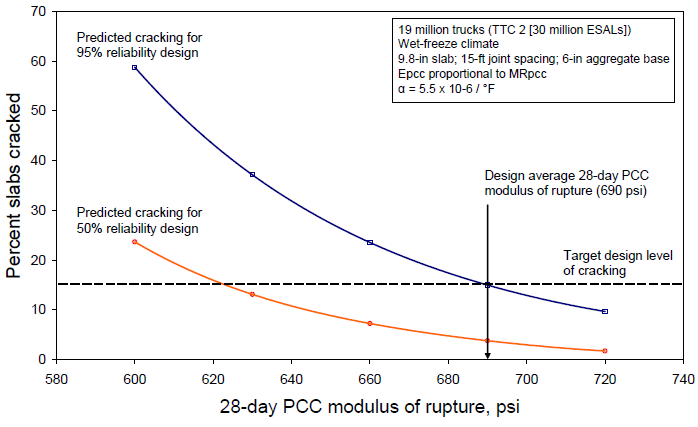
Figure 2 shows the relationship between MR and degree of predicted cracking for a typical jointed plain concrete pavement using the AASHTO mechanistic-empirical pavement design guide (MEPDG).(2) As shown, predicted cracking dramatically increases once the MR falls below 690 psi. For a 95 percent design reliability, when the flexural strength drops from 690 to 600 psi (a 13 percent decrease), the estimated cracking changes from 15 to 60 percent (a 300-percent-increase in cracking. This shows how critical flexural strength is to concrete’s ability to resist bending stresses due to load.
Because of the size and heavy weight of the standard beams, some State departments of transportation (DOTs) try to avoid using them for quality assurance (QA) purposes and instead, replace flexural strength testing with compressive strength testing, i.e., establishing a correlation between compressive and flexural strength test results for their specific concrete mixture. But flexural strength and compressive strength are affected by different factors. Changes in aggregate gradation, mineralogy, or water-to-cement ratios during construction could lead to unconservative estimation of the flexural strength.(3,4) In addition, and more importantly, concrete pavements primarily fail in bending (as occurs in flexural strength testing) and not in compression (as in compressive strength testing).
Standard size concrete specimens cast in 6- by 6- by 21-inch (152- by 152- by 533-mm) molds in accordance with AASHTO or ASTM procedures weigh approximately 65 lb (30 kg), assuming a concrete density of 150 lb/ft3 (2400 kg/m3). When metal molds are used, the combined total mass of the beams can exceed 100 lb (45 kg). A specimen of this size and weight is hard to handle, cumbersome, and can become a safety hazard to the testing personnel.
To make the concrete flexural strength determination safer for the testing personnel and to streamline quality assurance testing, this study proposed the use of smaller, 4- by 4- by 14-inch (100- by 100- by 355-mm) beams. A 4- by 4- by 14-inch concrete beam weighs approximately 19 lb (8.5 kg), with a concrete density of 150 lb/ft3 (2400 kg/m3).
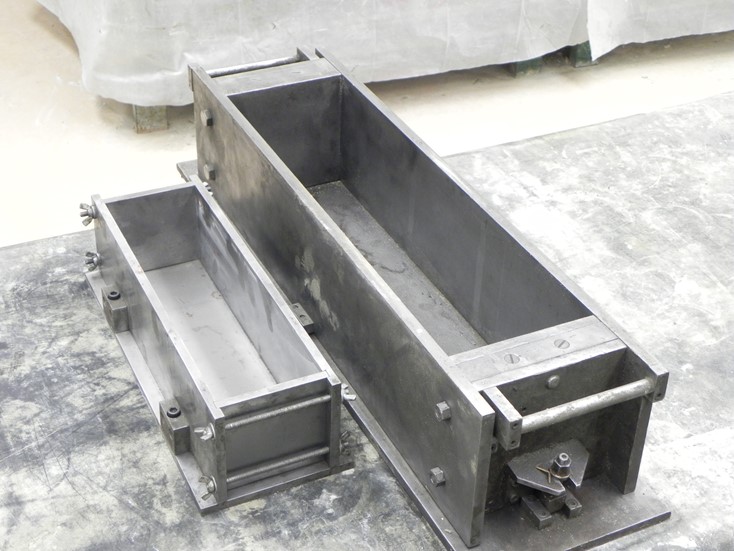
In this case, the combined mass of the concrete specimen and the mold is approximately 45 lb (20.5 kg), i.e. less than 50 percent of the total mass of the standard size beam. This is a dramatic reduction in total mass and makes the smaller size specimens much easier and safer to use. Figure 3 visually compares the mold for both beam sizes. For the sake of brevity, the two sizes will be referred to as standard beams and small beams for the rest of this TechBrief.
The primary objectives of the first phase of the study were to examine the feasibility of using small beams for flexural strength testing in the laboratory and in the field, and to recommend changes for the current AASHTO and ASTM standards (see reference 5 for more details).
A total of 22 concrete mixtures were prepared with water-to-binder ratios varying from 0.37 to 0.47. The cementitious content ranged from 521 to 643 lb/yd3 (309 to 381 kg/m3), the coarse aggregate content ranged from 1699 to 1823 lb/yd3 (1008 to 1082 kg/m3), and the fine aggregate content ranged from 1089 to 1581 lb/yd3 (646 to 938 kg/m3). Concrete constituents were comprised of portland cement type I/II and natural sand; type F fly ash was used in one of the mixtures. Four different coarse aggregates were used; these included gravel, limestone, granite, and diabase, with nominal maximum size varying from ¾ to 1½ inches (19 to 38 mm). A variety of air-entraining admixtures and water-reducing agents were used.(5)
For each of the 22 mixtures, 6 standard beams, 6 small beams, and 3 cylinders of 4 by 8 inches (100 by 200 mm) were cast for a 28-day compressive strength test. Overall, a total of 264 beams were cast, of which 132 were small beams and 132 were standard beams. The flexural strength for six specimens was determined in accordance with ASTM C78/C78M and individual test results were averaged. The compressive strength measurements are the average of three specimens.
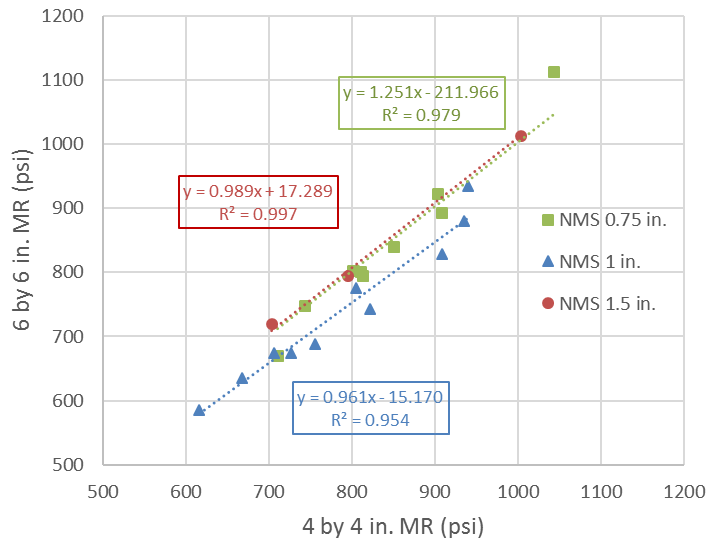
Figure 4 shows the relationship between the flexural strength of small and standard beams. Although there is a very good correlation between the flexural strength of the two beam sizes, the ratio between the MR of the standard beams and the MR of the small beams is not constant. It depends on the nominal maximum size (NMS) of the aggregate, as shown by the different line slopes in figure 4 and confirmed by other studies.(6,7)
This study examined the feasibility of using smaller size concrete beam specimens for conducting flexural strength of concrete testing, using simple beam with third-point loading, according to AASHTO T97 and ASTM C78/C78M procedures. The use of the small beam proved viable. Analysis of the test data revealed a very good correlation between the smaller and standard size beams.
Since the correlations in figure 4 are not mixture dependent, they can be used by the practitioner or a relationship specific to the job mixture can be determined.
Because of this study, in 2014 both AASHTO T23 and AASHTO T97 standards were modified to accommodate the use of the small beams for flexural strength testing.(8,9) In the following year, ASTM correspondent standards C31/C31M and C78/C78M were also modified.(10,11)
During the balloting process for these changes, it was observed that the precision statement in the previous versions of AASHTO T97 and ASTM C78/C78M was based on a study that involved a single brand and model of the testing machine and two specimen sizes: 6 by 6 by 20 inches (150 by 150 by 508 mm) and 4.5 by 4.5 by 15.5 inches (114 by 114 by 394 mm).(7) The use of a single model and brand equipment could have resulted in nonrepresentative precision and no precision statement was available for the smaller 4- by 4-inch (100- by 100-mm) beam size—therefore, an ASTM interlaboratory study (ILS # 1265) was initiated. TFHRC led this study, also known as phase II.
Phase II consisted of an interlaboratory study with the main objective of providing data to establish a precision for the Standard Test Method for Flexural Strength of Concrete (using simple beam with third-point loading).
Precision refers to the closeness of agreements between independent test results obtained under stipulated conditions, in this case a standard test method. Precision measurement can have profound consequences for the industry.(12)
Many factors contribute to variability. In the case of the modulus of rupture of concrete, variability can be inherent to the testing procedure and can relate to casting, preparing, and curing samples. The interlaboratory study (ILS #1265) tried to avoid the variability caused by these other factors that are not addressed in ASTM C78/C78M.(11) Accuracy relates to bias and not to precision. Accuracy measures the difference between a mean and a reference value, which doesn’t exist for ASTM C78/78M.(11)
There are two types of precision: within laboratory (i.e., repeatability) and between laboratories (i.e., reproducibility). From a State DOT perspective, repeatability is important to:
Precision between laboratories, on the other hand, can be used to determine if the differences in the test results obtained by the DOT or third party laboratory compared with the producer’s or contractor’s test results are within an acceptable range.
This interlaboratory study (ILS) commenced as a collaborative effort between TFHRC and ASTM. TFHRC provided most of the funding, with partial funding provided by ASTM. In addition, TFHRC provided technical expertise, made and prepared the samples, delivered or shipped the beams to other laboratories, and was responsible for: all coordination with the laboratories involved, data analysis, report preparation, precision statement preparation, and balloting.
Laboratories were selected based on their experience in running Test Method C78/C78M and their testing machines. Various brands and models were considered, so that a wide range of equipment manufacturers could be included in the program. A total of 22 laboratories were selected, representing government agencies (3 Federal agency labs and 4 State DOTs), industry, associations, and commercial laboratories. See reference 13 for details.
The testing plan and data analysis for this study were based on ASTM Practice C802 and Practice C670.(14,15) Three mixtures with different flexural strengths (covering the range found in practice) were prepared at a Vulcan Materials ready-mix facility; then samples were transported by a transit concrete truck and cast and cured at a laboratory at the same facility. The targeted flexural strength for these mixtures were 450, 600, and 800 psi (3.0, 4.0, and 5.5 MPa) at 56 days.
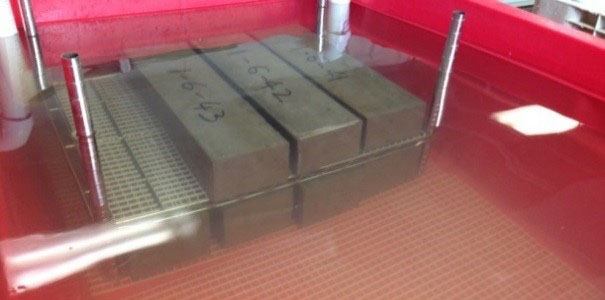
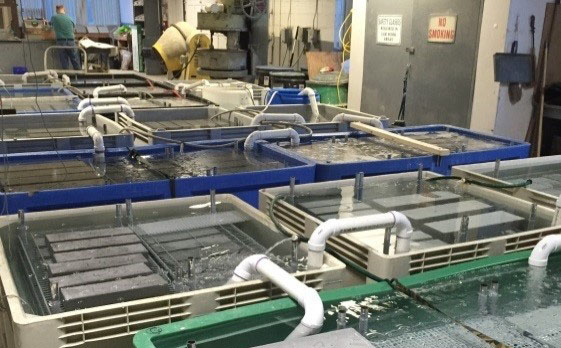
Four standard beams and four small beams were cast per laboratory per mixture. All the samples of a specific mixture were cast from a single batch of concrete to minimize the variability unrelated to the test method. To accommodate the 658 beams prepared for this project, beams were cured in 14 lime water curing tanks with 3 or 4 tier shelves, as shown in figures 5 and 6. Tanks were interconnected so that the same curing temperature was maintained for all the samples, avoiding variability not related to the test method.
Each laboratory was asked to test three replicates per size per mixture, using the same testing machine and the same American Concrete Institute (ACI)-certified technician.
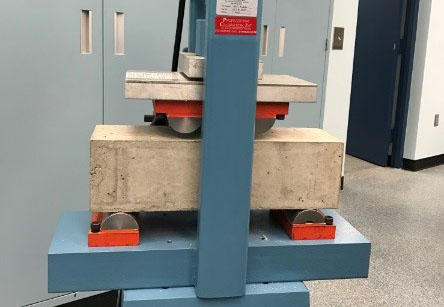
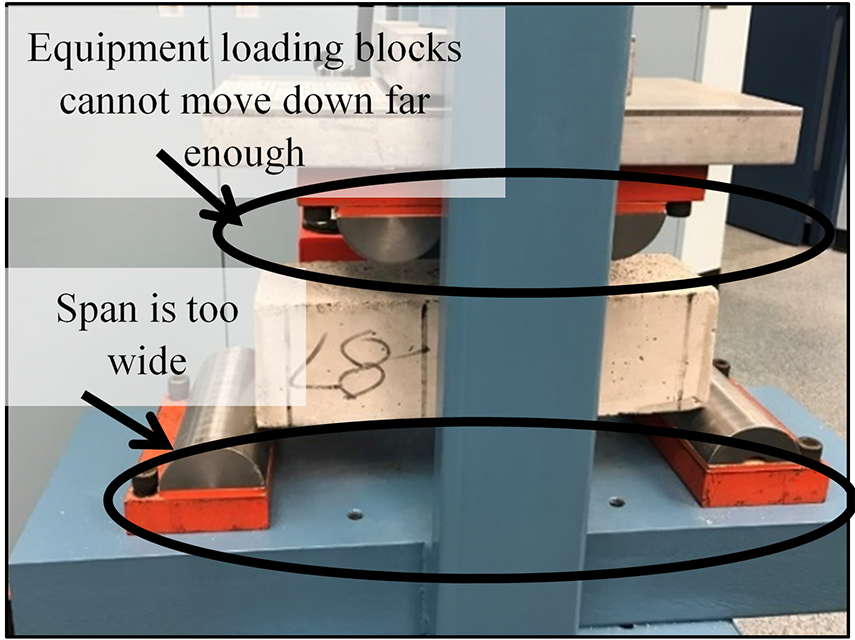
Testing was carried out on a variety of testing machines with different brands, models, and loading capacities. The use of small beams was only recently included in the AASHTO and ASTM standards (see
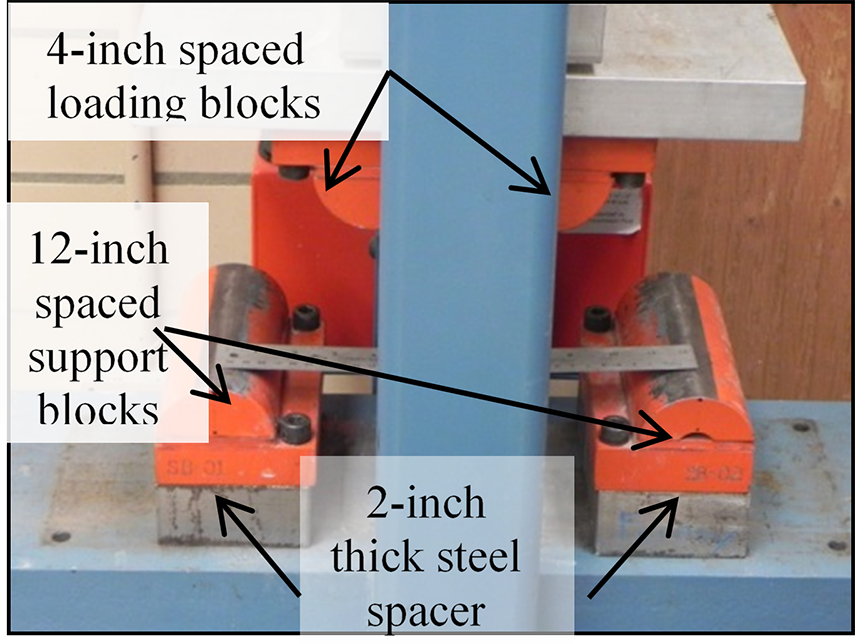
references 8, 9, 10, and 11). Therefore, most of these commercial testing machines required modifications of spans and distance between loading head and supports, to accommodate these smaller specimens (figure 7). TFHRC built parts and prepared tutorial videos on how to install these parts for 15 of the participating laboratories. For instructions on the equipment modification, contact Ahmad.Ardani@dot.gov. [1]
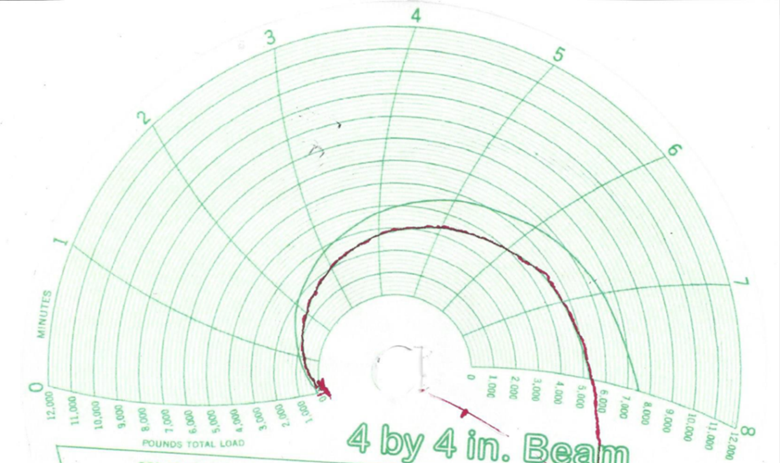
Rainhart beam testers are hand operated testing machines with chart papers. These testers required the most significant modifications of all brands in this study.
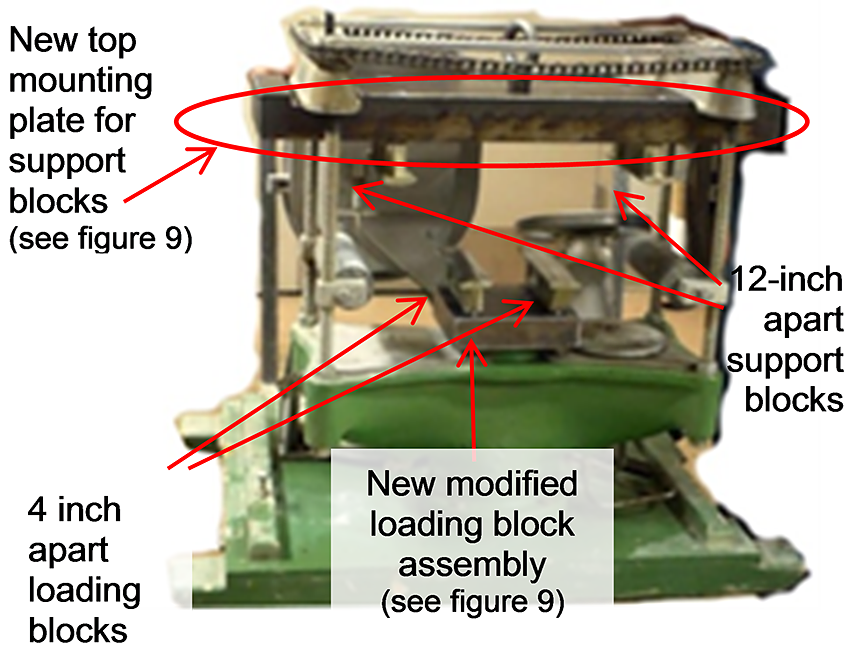
The modifications included installation of new modified blocks, a top mounting assembly for the support blocks, and recording charts.
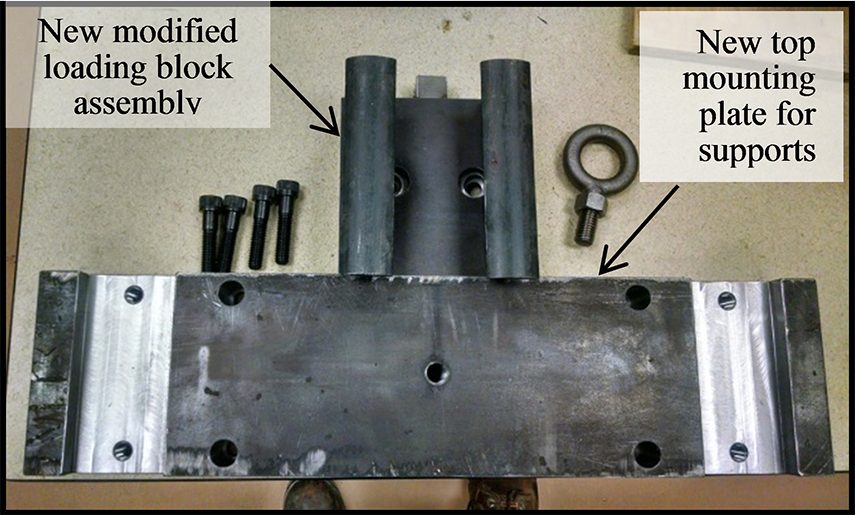
Modified top mounting plates were necessary to decrease the distance between the loading blocks and the support blocks, as well as to move the support blocks closer together to accommodate the smaller span (figures 8 and 9).
Regardless of the model, all Forney testing machines used in this study required the same kind of modification: (a) drilling extra holes on lower and upper platens for positioning the loading support fixtures and (b) installation of 2-inch (50-mm) thick spacers (figures 10 and 11). The Test Mark CM-3000 used by one of the laboratories was modified the same way as the Forney units.
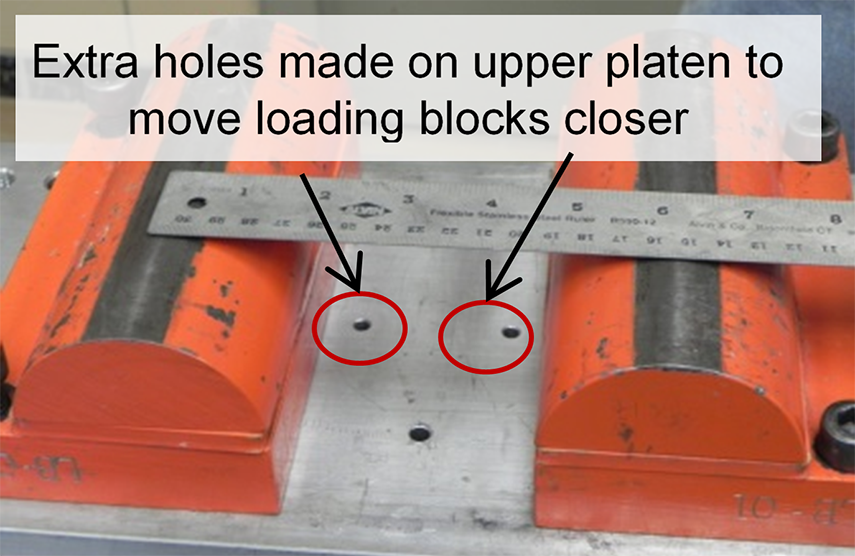
Each laboratory was responsible for modifications to the other testing machines.
The data consistency of each individual laboratory was checked in accordance with Practice C802 in terms of the average, using the h-value statistic, and the dispersion of the results, using the k-value statistic.(14) If the h-value or the k-value calculated in accordance with Practice C802 surpassed the critical h- value or the critical k-value obtained from Practice E691, laboratory data was considered as an outlier and removed from the final statistical analysis.(12)
In addition, laboratories were removed from analysis when the maximum applied load during testing was lower than the laboratory’s testing machines’ capability to provide accurate load readings (1 percent of the maximum equipment load capacity) or when the maximum applied load during testing surpassed the laboratory’s testing machines’ rated capacity.
The calculated statistics were checked by also carrying out an analysis of variance (ANOVA), as described in an appendix of the ASTM Practice C802.(14) Tables 1 and 2 show summaries of the test results for the small and standard beams, respectively.
In addition to the analysis described above, a Bartlett test of homogeneity of variances, with a 95 percent confidence level, was carried out. This test allows the comparison of variance of two or more samples to determine whether they are drawn from populations with equal variance.(16) This test was used to establish whether the pooled single-operator standard deviations listed in tables 1 and 2 are statistically different.
| Mixture | Average MR (psi) | MR standard Deviation (psi) | Comparison of Variability (COV) (%) | ||
|---|---|---|---|---|---|
| Single operator | Multi-laboratory | Single operator | Multi-laboratory | ||
| A | 986 | 37 | 112* | 3.8 | 11.4 * |
| B | 816 | 44 | 49 | 5.4 | 5.9 |
| C | 609 | 39 | 39 | 6.4 | 6.3 |
| Average | 40 | 44 | 5.2 | 6.1 | |
| d2s | 112 | 314** | 14.6 | 31.8 ** | |
| 123† | 17.1 † | ||||
1,000 psi = 6.9 MPa |
|||||
| Mixture | Average MR (psi) | MR standard Deviation (psi) | COV (%) | ||
|---|---|---|---|---|---|
| Single operator | Multi- laboratory | Single operator | Multi- laboratory | ||
| A | 943 | 38 | 67 | 4.3 | 7.1 |
| B | 785 | 35 | 52 | 4.5 | 6.6 |
| C | 580 | 30 | 39 | 5.1 | 6.7 |
| Average | 34 | 53 | 4.6 | 6.9 | |
| d2s | 95 | 149 | 12.9 | 19.3 | |
| 1,000 psi = 6.9 MPa | |||||
Because the calculated t value obtained was lower than the critical Chi-square value, the variance for the different mixtures and specimen sizes can be considered equal. The combined single-operator standard deviation was calculated as 37 psi (0.26 MPa). Thus, the modulus of rupture from two properly conducted determinations by the same operator on the same material is not expected to differ by more than 104 psi (0.73 MPa), independently of the beam size used and the modulus of rupture of the concrete.
But the multilaboratory coefficient of variation was different for the two beams sizes. The multilaboratory coefficient of variation for the standard beams was found to be 6.7 percent for mixtures with an MR between 600 and 1000 psi (4.1 to 6.9 MPa), close to the 7 percent obtained by Carrasquillo and Carrasquillo using only Rainhart Beam testers.(7) So, the difference between two test results (an average of three determinations) obtained by two different laboratories should not exceed 18.7 percent of the average value.
On the other hand, for the small beams, the multilaboratory coefficient of variation varied with the range of modulus of rupture measured. For concretes with modulus of rupture between 600 and 800 psi (4.1 and 5.5 MPa), the coefficient of variation was found to be 6.0 percent, which is lower than what was obtained with the standard beams. Thus, the difference between two test results (average of three determinations) obtained by two different laboratories should not exceed 16.7 percent of the average value. For concretes with modulus of rupture of 1,000 psi (6.9 MPa), the multilaboratory coefficient of variation was found to be 11.4 percent. Consequently, the difference between two test results (average of three determinations) obtained by two different laboratories should not exceed 31.8 percent of the average value.
This high multilaboratory coefficient of variation obtained for the small beams with 1,000 psi MR is believed to be a consequence of the inclusion of laboratories that used hand-operated testing machines with chart papers. Table 3 shows that these testing machines presented much higher single-operator variability and multilaboratory variability for all three mixtures. Some of the reasons include:
A comprehensive interlaboratory study (ILS #1265) was carried out in collaboration between TFHRC, ASTM, State DOTs and the industry. A total of 22 laboratories participated and a wide range of testing machines were included in the program. The results obtained in this ILS will provide the basis for the adoption of the new precision statements for both ASTM C78/C78M and AASHTO T97. For a copy of the full report contact ResearchReports@astm.org.
The precision statements have been balloted and approved by ASTM C09 and the AASHTO sub-committee on materials.
| All labs not using hand-operated testing machines with paper charts | Only Labs using hand-operated testing machines with paper charts | ||||||||||||
|---|---|---|---|---|---|---|---|---|---|---|---|---|---|
| Mix | # of labs | MR (psi) | Single operator | Multi- laboratory | # of labs | MR (psi) | Single operator | Multi- laboratory | |||||
| Standard deviation (psi) | COV (%) | Standard deviation (psi) | COV (%) | Standard deviation (psi) | COV (%) | Standard deviation (psi) | COV (%) | ||||||
| A | 12 | 971 | 36.7 | 3.8 | 85.4 | 8.8 | 5 | 1021 | 38.5 | 3.8 | 166.2 | 16.3 | |
| B | 11 | 811 | 40.6 | 5.0 | 47.0 | 5.8 | 4 | 830 | 52.1 | 6.3 | 52.3 | 6.3 | |
| C | 8 | 611 | 32.1 | 5.3 | 33.2 | 5.4 | 2 | 603 | 58.1 | 9.6 | 58.1 | 9.3 | |
| Average COV (%) | 4.7 | 6.7 | Average COV (%) | 6.6 | 10.7 | ||||||||
| d2s (%) | 13.1 | 18.7 | d2s (%) | 18.4 | 30.1 | ||||||||
TFHRC would like to thank ASTM for partnering in the ILS program. The assistance of Nick Carino on the statistical analysis is greatly appreciated. The participation of the following laboratories is greatly acknowledged: Amec Foster Wheeler, American Engineering Testing, Braun Intertec, EBA Engineering, ECS Mid-Atlantic, Engineering and Materials Technologies, Falcon Engineering, NextGen Pavement Materials Laboratory (FAA), Mobile Concrete Trailer (FHWA), GET Solutions, Martin Marietta Materials Laboratory, Minnesota DOT, National Ready Mixed Concrete Association, North Carolina DOT, Oklahoma DOT, Specialized Engineering, WDP & Associates Consulting Engineers, Wisconsin DOT, and Wiss, Janney, Elstner Associates.
Researchers—This study was performed by J. Tanesi and J. Leavitt, SES Group and Associates and A. Ardani, FHWA.
Distribution—This TechBrief is being distributed according to a standard distribution. Direct distribution is being made to the Divisions and Resource Center.
Availability—This TechBrief may be obtained from the FHWA Product Distribution Center by e-mail to report.center@fhwa.dot.gov, by fax to (814) 239–2156, phone to (814) 239–1160, or online at http://www.fhwa.dot.gov/research.
Key Words—flexural strength, modulus of rupture, specimen size, precision.
Notice—This document is disseminated under the sponsorship of the U.S. Department of Transportation in the interest of information exchange. The U.S. Government assumes no liability for the use of the information contained in this document. The U.S. Government does not endorse products or manufacturers. Trademarks or manufacturers’ names appear in this report only because they are considered essential to the objective of the document.
Quality Assurance Statement—The Federal Highway Administration (FHWA) provides high-quality information to serve Government, industry, and the public in a manner that promotes public understanding. Standards and policies are used to ensure and maximize the quality, objectivity, utility, and integrity of its information. FHWA periodically reviews quality issues and adjusts its programs and processes to ensure continuous quality improvement.
[1] In addition, some testing machine manufacturers already sell the necessary loading and support blocks for testing smaller specimens.