U.S. Department of Transportation
Federal Highway Administration
1200 New Jersey Avenue, SE
Washington, DC 20590
202-366-4000
Federal Highway Administration Research and Technology
Coordinating, Developing, and Delivering Highway Transportation Innovations
 |
| This report is an archived publication and may contain dated technical, contact, and link information |
|
Publication Number: FHWA-RD-02-034
Date: September 2005 |
||||||||||||||||||||||||||||||||||||||||||||||||||||||||||||||||||||||||||||||||||||||||||||||||||||||||||||||||||||||||||||||||||||||||||||||||||||||||||||||||||||||||||||||||||||||||||||||||||||||||||||||||||||||||||||||||||||||||||||||||||||||||||||||||||||||||||||||||||||||||||||||||||||||||||||||||||||||||||||||||||||||||||||||||||||||||||||||||||||||||||||||||||||||||||||||||||||||||||||||||||||||||||||||||||||||||||||||||||||||||||||||||||||||||||||||||||||||||||||||||||||||||||||||||||||||||||||||||||||||||||||||||||||||||||||||||||||||||||||||||||||||||||||||||||||||||||||||||||||||||||||||||||||||||||||||||||||||||||||||||||||||||||||||||||||||||||||||||||||||||||||||||||||||||||||||||||||||||||||||||||||||||||||||||||||||||||||||||||||||||||||||||||||||||||||||||||||||||
Long-Term Pavement Performance Materials Characterization Program: Verification of Dynamic Test Systems With An Emphasis On Resilient ModulusChapter 4. CALIBRATION CHECK AND OVERALL SYSTEM PERFORMANCE VERIFICATION PROCEDUREINTRODUCTIONA typical dynamic testing procedure requires many pieces of equipment, including: load frame, load cells, hydraulic system, deformation devices, triaxial pressure chamber, computer, signal processor. For the testing procedure, elements of the overall test setup are first checked to verify that their operation produces the expected responses. Checking the individual components first helps ensure that many problems that would be encountered during actual testing can be identified and eliminated prior to checking the system’s proficiency. The following sections detail the procedures to be used for checking each of the eight individual test system components:
DEFORMATION MEASUREMENT DEVICESBackgroundOne of the most critical aspects of a dynamic materials testing system is the strain (or deformation) transducers used to measure movement of the sample. These can consist of LVDTs, extensometers, strain gauges, and other devices. The purpose of this experiment is to verify that the deformation measurement device is properly calibrated and performing acceptably. This procedure has primarily been developed for LDVTs or extensometers; however, a similar approach can be used for other types of deformation measurement equipment. For deformation measurement devices that are internal to the dynamic testing apparatus or practically inaccessible to the user (such as an LVDT used to measure movement of the loading piston), other techniques for verifying deformation response can be used as explained in subsequent portions of this document. The deformation measurement device must be matched to the application. For a more detailed explanation of the types of deformation measurement devices and their application, the user is referred to the dynamic test system manufacturer or various deformation measurement device manufacturers. Much of this information can be obtained from the manufacturer’s Web site. Dynamic System ConfigurationThe test system should be turned on and warmed up according to the manufacturer’s specifications. The hydraulic system does not need to be turned on for these experiments. ApproachInspect the deformation device to ensure it is in good working order and not damaged in any manner. If possible, the deformation device should be manually exercised (do not exceed full- scale travel) to ensure proper working condition. For example, an LVDT can be moved to determine whether any components stick, or to check for excessive friction in the housing. If the deformation device is in satisfactory condition, the procedure may proceed. If it is not in proper working order, it should be repaired or replaced. Verification of the deformation measurement transducers is performed using a micrometer head-based calibrator capable of accurate calibration of ±2.5 mm deformation movement. The calibration should be performed for all ranges required for the test being performed. A minimum of a nine-point calibration should be conducted starting with the zero offset (0 V = 0 mm). Begin by reading the zero measurement. Proceed in equal increments to the full upper range of the deformation device, then proceed to the full lower range of the device in equal increments to the zero point. For each increment, register the values of the micrometer reading and the voltage reading (or, alternatively, read the deformation output by the system). Be careful not to extend the deformation device past its normal operating range. For a deformation device with a maximum stroke of ±2.54 mm, the calibration verification is performed as in table 4.
Data AnalysisDivide the total positive travel of the deformation transducer by 100. This value will be used as one of the acceptance criteria. Subtract the deformation device reading from the micrometer reading to determine the difference in the readings. Plot the deformation device displacement readings versus the micrometer displacement readings. If voltage is used, the deformation voltage readout must be multiplied by the proper calibration factor for the deformation device to obtain deformation in the appropriate units. Perform a linear regression of the data to obtain the zero intercept and coefficient of determination (R2). This is easily performed in a spreadsheet computer program. If the deformation device fails any of the acceptance criteria, a second verification must be performed. If it fails both tests, the device should be repaired or replaced. Acceptance Criteria
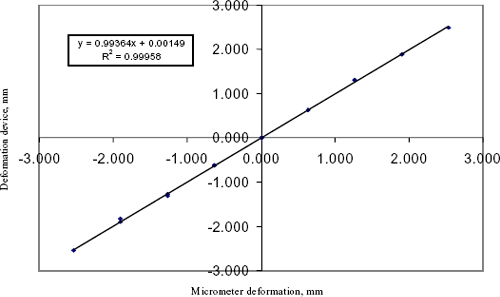
DiscussionIn a production testing mode, it is recommended that the LVDTs be verified every 2 weeks or after every 50 resilient modulus tests, whichever comes first. In addition, it is highly recommended that the micrometer used to check the calibration be NIST calibrated or calibrated using NIST traceable gauge blocks. ExampleThe deformation device (in this case an LVDT) was manually exercised. It was visually inspected and found to be in good working order with no obvious signs of damage. The spring-mounted device was manually exercised and no sticking was found. Using the previous example, the total travel of the deformation device is 2.54 mm. Therefore the 1 percent criterion would be 2.54 mm / 100 = 0.0254 mm. Referring to table 4, the difference between the two readings is calculated. Referring to figure 2, a plot of micrometer deformation versus deformation device readings is displayed. The results of the linear regression are also shown on this figure. The calculated y-intercept is 0.0015 mm and the R2 value is 0.999.
Figure 2. Chart. Example of micrometer reading versus displacement. Using the acceptance criteria, this example transducer would pass both manual inspection and linear regression criteria. The y-intercept is 0.0015 mm, well within the tolerance of zero ±0.0254 mm, and the R2 value is 0.999, which is greater than the 0.99 requirement. However, the device does not pass the micrometer-versus-deformation check. As shown in table 4, this check fails at four locations. Depending on the necessary accuracy of the contemplated test procedure, this can cause substantial errors. In this example, the transducer is marginal for use in certain applications and consideration would need to be given to replacing the device. LOAD CELL ZEROBackgroundIt is not uncommon in a laboratory to overload a load cell. Overloading can occur by accidentally exceeding the rated capacity of the load cell, or by dropping it. In addition, if a cell is loaded to near its rated capacity, and the sample fails, then the dynamic stress wave that passes through the device can also overstress the cell. Such overloading needs to be evaluated periodically. It is often erroneously thought that the cell need only be recalibrated in the event of an overload. In some cases of mild overloading, this approach may be acceptable, but often the only recourse is to dispose of the load cell. An overloaded load cell can acquire some very undesirable characteristics. The zero of the load cell will usually shift due to the overloading. This is the most obvious sign of an overloaded cell. Again, it is commonly believed that one can just re-zero the cell and continue testing. Unfortunately, by overloading the cell, a portion of the sensing membrane in the cell has gone into plasticity. This permanent deformation changes the elastic behavior of the sensing member in the cell. In addition to the zero offset, the cell may now have a different calibration factor and, more important, it may well exhibit hysteresis and creep. Thus the loading curve (of load cell voltage versus known load) will not follow the unloading curve. The creep behavior is manifested by not returning to zero after being unloaded, and then gradually settling down to a zero reading. Or after a large load is applied, the cell will slowly drift to a steady reading. These traits are unacceptable for any transducer, and such an overloaded cell should be repaired or replaced. When a load cell is fabricated and set up at the factory, the Wheatstone bridge is balanced, either using laser-trimmed strain gauges or additional resistors, to read near-zero volts when the bridge is excited. When the cell is overloaded, this balance is destroyed. This state of balance can be evaluated either with a precision voltmeter or a strain gauge box. For a precision voltmeter, one applies a supply voltage to the cell, and simply reads the output voltage. A strain gauge box is essentially the same device, but with a built-in power supply, and is read in micro strain instead of voltage. For purposes of this procedure, it is assumed a strain gauge box is used, as they are usually readily available in the laboratory. This procedure should be used for all load cells that will be used in the testing process. Dynamic System ConfigurationThe dynamic test system is not used for this verification. In fact, machine may be turned off. To perform this procedure, the load cell is removed from the machine. For obvious reasons, it is extremely important that no load be applied to the cell during conduct of this procedure. Approach
Record the results on the load cell zero reading check form (figure 15 in appendix A) . Data Analysis
Acceptance CriterionThe load cell zero reading should be within 1.5 percent of its full-scale, factory-indicated sensitivity. DiscussionIf the load cell zero reading exceeds 1.5 percent of its full-scale, factory-indicated sensitivity, then it should be returned to the manufacturer for evaluation. If the load cell meets the specifications using the manufacturers test equipment, then the load cell is considered suitable for use. If it does not meet the manufacturer's specifications, then it should be repaired or replaced. It is recommended that the load cell zero check be conducted on all load cells at least yearly or whenever a suspected overload has occurred. ExampleTable 5 contains several examples of this procedure. Note that load cell example 1 fails based on the raw zero value reading; however, when the strain box error is applied, the load cell meets the criterion.
LOAD CELL CALIBRATIONBackgroundLoad cell calibration is equally important as the load cell zero check. As part of any standard laboratory QC plan, load cells should be evaluated at least yearly either in-house, by trained staff using NIST traceable standards, or using a calibration service with an NIST traceable cell. In either case, the calibration should be conducted using the latest version of the American Society for Testing and Materials (ASTM) E4 standard. The calibration should be performed for the entire load cell operating range. The loading device should be verified annually and/or immediately after any repair or any relocation of the testing machine regardless of the time interval since the last verification. During this portion of the procedure, the load cell calibration certificates are simply reviewed to determine if this calibration has occurred within the past 12 months. Dynamic System ConfigurationThe dynamic test system is not used for this verification. ApproachThe reviewer should view the load cell calibration certificate for each load cell used for dynamic testing and note the date of the last calibration. Data AnalysisNo data analysis (except for a simple date comparison) is needed for this procedure. Acceptance CriterionThe load cell must have been calibrated within one year of the inspection. A missing certificate is cause for rejection of the load cell for testing until the necessary calibration has taken place. VERIFICATION OF LOAD CELL CALIBRATION (STATIC)BackgroundThe verification of the load cell static calibration is conducted with the system fully assembled as if a production test were going to be performed. In this experiment, a proving ring (specimen with known properties), or other suitable device, is used. This procedure does not take the place of the NIST traceable calibration mentioned previously. It is simply a check of the entire system versus a specimen of known properties. The load cell calibration is verified for two reasons: (1) to ensure that the load cell is performing as expected in the system, and (2) to check for unwanted deformations in the system. Two methods may be used to perform this procedure depending on the user’s test requirements. If verification of the static calibration is all that is required, then a proving ring or external load cell can be used. If, as in the case of LTPP Protocol P46, the deformation transducers are mounted outside the test chamber, then the user would want to measure the difference between the deformation measured inside the system versus that measured outside the system to check for unwanted friction or deformations in the system. In this case, a proving ring with an internally mounted dial gauge or digital readout is preferred for the deformation comparisons. Several types of equipment and/or procedures can be used to accomplish these objectives; for this procedure, the proving ring approach will be emphasized. Many proving rings are on the market today. If the aim is to perform an inside deformation versus outside deformation check using a proving ring, a high-quality proving ring that consists of one solid piece of metal is recommended, rather than the type that has separate units for the top boss, ring, and bottom boss. Experience has shown that these multipiece rings are unsuitable for this application as they contain many metal-to-metal interfaces that can add to the measured outside deformation, thus making the results difficult to interpret. Single-piece rings do not have these extra interfaces, which minimizes errors due to the extraneous ring deformations. If only load verification is desired, a multipiece proving ring is adequate. The equipment used to accomplish this procedure depends entirely on the user’s goals. To perform this procedure, the proving ring or other load measurement device must be matched to the application. Many proving rings are only guaranteed to be linear from 10 to 100 percent of their rated capacity. Therefore, if the test procedure contemplated results in loads up to 4.5 kN, the proving ring should be matched to this requirement. The user should verify the load cell calibration for all loads anticipated for a particular test application. For this experiment, specially machined proving ring mounting blocks are usually required. The proving ring should be rigidly mounted in the test apparatus to ensure proper seating of the ring and to minimize lateral movement of the proving ring while under test. This procedure is based on the LTPP Protocol P46 and Protocol P07 tests but it can be modified for other test procedures as applicable. Dynamic System ConfigurationAll test systems should be turned on and the machine should be warmed up according to the manufacturer’s specifications. ApproachThe steps for checking the load cell are described below:
A sample loading specification is shown in table 6.
Note 1: Ramp and de-ramp rate is expressed in percent difference
in load per second. Therefore, if proceeding between 45 N and 223
N, the ramp rate would equal 17.8 kN per second (223–45 = 178;
178*0.1 = 17.8). Data Analysis
Acceptance Criteria
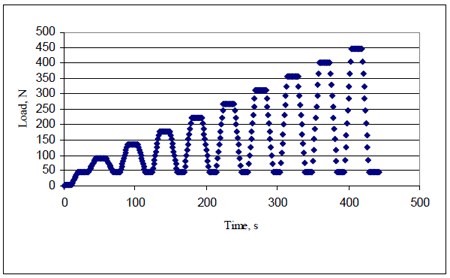
DiscussionIf, using the acceptance criteria, the system fails this check, repeat the procedure. If the system fails the second test, the system fails the check. If the system passes the second test, then a third test should be run to determine acceptance or failure. The apparatus should be disassembled and re-assembled between each test. If the system fails this check, the load cell should be recalibrated, or a new load cell should be installed on the test system and the process repeated. If the system does not pass the deformation criteria, check the system for friction in the triaxial piston, misalignment, loose triaxial cell, loose deformation devices, etc. 4 This process can be modified depending on the test procedure. For example, if verifying a machine for a creep type test, the user may want to hold the load constant for 100 s to ensure that the system is stable at the desired load. Similar acceptance criteria (e.g., load must be held for 100 s and remain within 5 percent of the target load) can be used for this test. ExampleA user is interested in performing this procedure for LTPP Protocol P46 for a type 2 (thinwall tube) sample. The anticipated load range for this test is from 45 N to 267 N. The user has a test system with a 445 N load cell and is performing displacement measurements outside the triaxial chamber. Therefore, the user has decided to use a proving ring with an internally mounted dial gauge so that inside and outside deformations can be measured. The user selects a 445 N proving ring to perform the verification. The proving ring is only guaranteed to be linear from 45 to 445 N; however, this is within the testing tolerance and thus a good choice. To perform the test, the user then develops a loading scheme based on the requirements stated herein. The loading patterns are shown in table 7 and figure 3.
Figure 3. Graph. Sample 445 N proving ring loading pattern. Tables 8 and 9 and figures 4 and 5 contain the results from this test. In this particular example, the system passes both sets of checks.
Figure 4. Graph. Example of proving ring versus load cell check.
Figure 5. Graph. Example of proving ring versus LVDT check. LOAD VERSUS DEFORMATION RESPONSE CHECK (DYNAMIC)BackgroundTo properly evaluate the suitability of a particular test system to a given application, it is essential that the machine be compared against a specimen of known properties. This comparison will allow the user to assess the performance of the equipment in near-test conditions without the repeatability and accuracy limitations imposed by testing a real sample. Therefore, the purpose of this experiment is to simulate an actual test as closely as possible and ensure system performance meets the anticipated needs of the user. This experiment is designed to provide a benchmark performance standard that can be repeated in the future to ensure the system is performing in a consistent manner. The conduct of this experiment depends entirely on the test procedure. Because of the wide variety of potential applications, it is impractical to include all variations here. This procedure will focus primarily on the resilient modulus test. The fundamentals of this experiment can be applied to other test procedures in a similar manner. To perform this procedure, a proving ring with an internally mounted deformation device is required. Alternatively, if measuring deformation on the outside of a triaxial cell (for a soils resilient modulus test), the deformation can be monitored using the external deformation devices (assuming the system has passed the external versus internal deformation test presented previously). Similar requirements regarding proving rings as presented earlier apply to this test. It is assumed that the proving rings used for this test have the capacity to perform testing in a similar manner as the test requires. Never overload the proving ring or load cells when performing these procedures. Dynamic System ConfigurationAll test systems should be turned on and the machine should be warmed up per the manufacturer’s specifications. Approach
Data AnalysisData analysis for this experiment is a very involved process. The user first analyzes the “raw” data to determine acceptability. Raw data are the load and deformation traces recorded by the system. The raw data are reduced to determine the overall acceptability of the system to perform these tests. The following analyses are discussed in more detail in following sections:
Raw Data AnalysisLoadPlot the load values (readings from the load cell) versus time for a representative cycle(s) at each load. Superimpose an ideal load over this typical load pulse. Compare the actual load pulse with the ideal load pulse. For resilient modulus testing, this criterion is as follows: Construct a theoretical ideal loading pulse for each load sequence from the maximum load and the 0.1 s loading duration specified in the LTPP P07 or P46 protocol. The peak theoretical load is matched in time with the peak recorded load of a given sequence. An acceptance tolerance band is then created around the theoretical load pulse, which is used to flag suspect data falling outside of the band. The development of the minimum and maximum values of the acceptance band are based on the following considerations:
For each time step in the load curve, the tolerance range from all of these components is computed. The maximum value of these three components is selected as the upper tolerance limit, while the minimum value is used for the lower limit at each time step. Over the entire range of loading, five points are allowed to be out of tolerance before the load cycle is considered failed. If pulse duration and shape are not improved within a reasonable number of iterations, problems such as friction in the servoram piston, inadequate servovalve size, problems with software controlling the load, etc., should be investigated. Also, review the time history data for each load pulse. Ensure that one load cycle consists of 500 points. If the load cycle does not have 500 points, the system fails this check. The experiment should be repeated using a data acquisition rate of 500 points per second. DeformationPlot the deformation values (readings from the deformation device) versus time for a representative cycle(s) at each load level. Superimpose an ideal deformation response over this typical deformation pulse. Compare the actual deformation pulse with the ideal deformation pulse. For resilient modulus testing, this criterion is as follows:
Perform this test for all deformation devices. Load versus Deformation Time LagDetermine the maximum load point for a given cycle and extract the corresponding time stamp. Determine the maximum deformation for the same cycle and extract the corresponding time stamp. Subtract the maximum deformation point time stamp from the maximum load point time stamp. This value should be positive and less than 0.008 s. If the time delay is greater than 0.008 s, most likely there is a problem with the system electronics or software. If the time delay is negative, it means that the maximum deformation is occurring before the maximum load, a practical impossibility. This again would lead to the suspicion that there is a problem with the system electronics or software. Perform this analysis for each deformation device used for this experiment. Calculated Data AnalysisLoad ValueFor a given load cycle, extract the maximum load value. Average the load from point 125 to 500 (last 75 percent of the cycle). This is the contact load. Subtract the maximum value from this minimum value. The maximum and cyclic values must be within 5 percent of the target values. The contact load must be within 10 percent of the target value. If the system fails this check, the operator should try to adjust the machine settings to achieve the proper load. Also, the load cell should be checked to ensure that it is compatible with the desired loading regime. For example, a load cell with a very large capacity should generally not be used for a test that requires a very low load unless the load cell can be scaled to an appropriate range. Deformation ResponseThis test is only conducted if more than one deformation device is mounted on the system. All deformation devices used for this comparison should be mounted in approximately the same location in the system, such as on top of the triaxial chamber or on either side of the test specimen. In this analysis, the balance of the deformation devices is evaluated. If deformation devices are mounted in approximately the same location on the sample or in the system, it can be reasonably expected that the devices would experience similar deformation measurements. For a given deformation cycle, extract the maximum deformation value. Average the deformation from point 125 to 500 (last 75 percent of the cycle). This is the minimum deformation. Subtract the maximum value from this minimum value. Perform this analysis for each deformation transducer. The collected deformation readings will be checked to ensure that acceptable vertical deformation ratios are being measured. Acceptable vertical deformation ratios (Rv) are defined as Rv = Ymax/Ymin < 1.10, where Ymax equals the larger of the two vertical deformations and Ymin equals the smaller of the two vertical deformations. This analysis should be performed for each deformation device in order. If more than one deformation device is used, deformation transducer 1 should be used as the reference deformation value. If unacceptable vertical deformations are obtained (i.e., Rv > 1.10), then the test should be discontinued and proving ring placement, alignment difficulties, and slippage of the deformation holders should be investigated and alleviated. Load versus Deformation ComparisonPlot the mean applied load versus mean applied deformation for each load level. Using the static load/deformation calibration equation (usually supplied with the proving ring), it is possible to determine the ring deformation for a given load. Plot the theoretical load versus displacement line using the ring calibration equation. Calculate and plot +5 percent and -5 percent of the theoretical load versus deformation. Plot the actual average load versus average deformation results derived from the deformation device(s). The deformation device readings should be within the ±5 percent lines at all load levels. Calculate the R2 of the best fit line connecting the actual data points. This value should be greater than 0.99. Acceptance CriteriaFor this experiment, the user is looking for the following eight criteria:
DiscussionIf, using the acceptance criteria, the system fails this test, repeat the procedure. If the system fails the second test, the system fails the check. If the system passes the second test, then a third test should be run to determine acceptance or failure. The apparatus should be disassembled and re-assembled between each test.
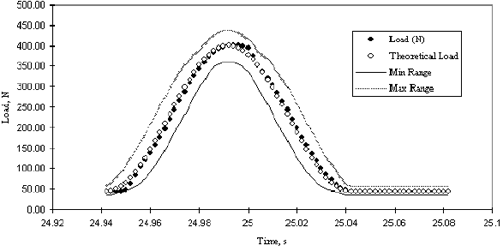
ExampleA laboratory is interested in performing the dynamic verification for LTPP Protocol P46, type 2 testing. The specimen diameter is 71 mm and the deformation devices are mounted on the top of the triaxial chamber. A 445 N load cell are used. To perform this test, the same 445 N proving ring as used in the static verification is procured to match the capacity of the load cell. An LVDT deformation device is mounted in the proving ring to measure deformation. Using the table presented previously for P46 type 2 testing (table 7), the loading is established. The test is conducted and raw load and deformation data are obtained from the system. The first step in the analysis procedure is to analyze the data file for the last five load cycles at each load level. For each cycle, the user would plot the loading curve and visually examine the output. One cycle should be exactly 500 points of data. Therefore, for 5 cycles, the data file should contain 2,500 points. Next the user would develop the load acceptance bands described previously. An example of the outcome of this analysis is shown in figure 6. A similar analysis should be conducted for each load cycle at each load level.
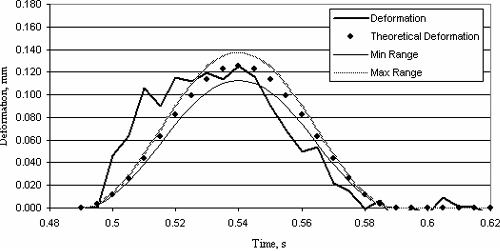
Figure 6. Graph. Example of load pulse analysis. The user would then develop the deformation acceptance bands described previously. An example of the outcome of this analysis is shown in figure 7. A similar analysis should be conducted for each deformation trace at each load level and for each deformation device.
Figure 7. Graph. Example of deformation response analysis. At this point in the analysis, the user should review the results. If the load and deformation pulses do not pass the criteria, a decision must be made as to the validity of proceeding further. It is recommended that if the system does not pass these checks, then adjustments should be made to the system to rectify the problems encountered. The user then conducts the load versus deformation time lag test. To perform this test, the user selects the maximum load point for a given load cycle. The time at this point is read by the user. The user then selects the maximum deformation value for the same load cycle and reads the time that this event occurs. Subtract the maximum load time from the maximum deformation time. Compare it to the acceptance criteria. This function can be performed manually using the raw data, or the data can be imported into a spreadsheet and the process conducted using a simple macro. In this analysis, the user scales the spreadsheet so that the peaks of the load and deformation are clear. The user then manually picks the points and performs the analysis. In this case, the maximum load occurs at time, t = 1.000 s; the maximum deformation occurs at t = 1.004s. Performing a simple calculation, the user determines that the deformation peak is occurring 0.004 s after the load peak. Also, because the number is positive, it is obvious that the peak deformation is occurring after the peak load (this would also be obvious from the graph). These values are well within the acceptance criteria. This check is subsequently conducted for all load/deformation combinations. A summary of the results for this experiment is shown in table 15. Next, the user analyzes the load results to determine the maximum, contact, and cyclic loads. Table 16 contains the results of this analysis. As can be seen from this analysis, the maximum and cyclic loads all meet the 5 percent criterion. The contact loads, on the other hand, are out of tolerance by a substantial margin. This is actually a common occurrence at the lower contact loads due to the system’s inability to control to a very tight low load. In this case, the operator should adjust the settings to attempt to make the system respond at the lower loads. To perform the deformation analysis, the maximum, contact, and cyclic deformations are calculated in a similar manner as the load. These values will be used in a subsequent analysis as well. Perform this calculation for all deformation cycles. For each load and deformation cycle, the user calculates the balance of the deformation devices per the procedure. For this example, the following results are contained in table 17. Note in the table that the deformations for all 5 cycles are averaged prior to performing the comparison. In this example, the deformation devices appear to be well balanced with respect to each other.
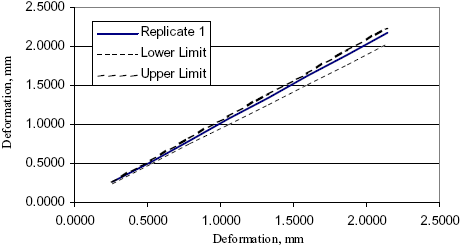
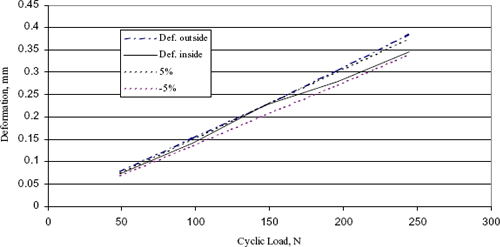
The final check of the results of this experiment is the load versus deformation check. For this check, the proving ring calibration equation is needed and is given as follows: Using this equation, and the cyclic loads calculated from the previous analysis, the theoretical deformation response shown in table 18 is calculated.
Using these values, a graph such as that shown in figure 8 can be generated to determine the acceptability of the load versus deformation curve. By evaluating these results, it can be determined that the outside deformation transducers are measuring a greater deformation than allowed. In this case, the entire system should be investigated to determine the cause for the extraneous deformations. Also, one can determine that the internal LVDT is measuring deformations within the ±5 percent criterion. This is another indication that the system is performing as expected; however, there is an extraneous deformation occurring between the proving ring and the top of the triaxial cell. This example would fail the acceptance criteria, and a subsequent investigation would need to be conducted to determine the cause of the problem.
Figure 8. Graph. Sample results of dynamic haversine check, 445 N load cell. SYSTEM DYNAMIC RESPONSE CHECKBackgroundTo investigate the system dynamic response and investigate the possibility of excessive frictional forces, triaxial fixture misalignment, and machine-induced time lag between load and displacement, a series of frequency sweep sinusoidal dynamic loading experiments is conducted. To perform this test, cyclic load and deformation readings are acquired from the DAS using the load cell and the deformation device mounted on the proving ring. The deformation can also be obtained from deformation devices located elsewhere on the system, such as on the top of the triaxial cell. The purpose of this test is to ascertain the time delay between the load and deformation device channel(s) and to check for attenuation of the load and deformation values over a range of loading frequencies. This check not only re-verifies the electronics checks, but it also identifies friction in the system, misalignment, and overall system function. This experiment cannot take the place of the electronics checks, as it does not fully characterize the electronics system. However, it can be used as a rough check of the system electronics. Caution is advised if this process is used to check the electronics of the system; other causal factors such as friction and misalignment can cause the results to fail this check. Therefore, a more indepth evaluation would have to be undertaken to determine the cause of failure than if the electronics procedure and the system dynamic response check were run independently. Dynamic System ConfigurationAll test systems should be turned on and the machine should be warmed up per the manufacturer’s specifications. ApproachPosition the proving ring in the test system so that the chamber piston rod is in contact with the proving ring mounting block. If the proving ring is too big to fit inside the test apparatus (e.g., triaxial cell), remove the chamber (perform the steps without the chamber) and fabricate special rods to hold the top plate of the chamber in place. Note that the proving ring must be bolted down or otherwise rigidly attached to the test apparatus to perform the test. Furthermore, the bottom of the test apparatus must be bolted down (or tightly fastened) to the bottom loading platen of the load frame. 7 A similar configuration as used for the load versus deformation response check can be used for this procedure. Place the deformation devices in their appropriate positions. Generally, a deformation device is mounted inside the proving ring as in previous test procedures. If outside deformation devices are used, then it is not necessary to use a deformation device mounted in the proving ring unless the user prefers that. To conduct this test properly, the deformation device used should be connected to the appropriate deformation data channel of the system. This test is conducted using the same proving ring as used for previous checks. Using the system controls, apply 100 cycles of a sinusoidal dynamic load with a peak-to-peak amplitude between 25 percent and 75 percent of proving ring capacity and a mean compression load of 50 percent of proving ring capacity at 1 Hz, 5 Hz, and 10 Hz frequencies. Record load and deformation measurements for the last five cycles at: 200 data points per period at 1 Hz (200 points/s) and 200 data points per period at 5 Hz (1,000 points/s). At 10 Hz, collect 200 data points per period (2,000 points/s) if possible; otherwise collect 100 data points per period (1,000 points/s). Repeat the procedure so that all deformation device channels are represented. Data AnalysisCalculate the phase angle between load and displacement using the digitized data (a sample method to calculate the phase angle is contained in appendix B of this document). The phase angle measurement should remain consistent for all 5 periods at a given frequency (within ±0.5 degree). The maximum average phase angle (average of the 5 periods) observed should be less than 2.8 degrees at each of the three frequencies. If the phase angle value is greater than 2.8 degrees, the system should be checked for discrepancies such as mechanical misalignment (of triaxial cell, triaxial piston, specimen), frictional forces, and machine-induced phase angle (due to factors such as an accidental change in filter setting). Then the dynamic experiments should be repeated. The 2.8-degree criterion was chosen based on a desired phase angle of less than 1 degree in addition to the electronics tolerance phase shift of 1.8 degrees. Note that using different equipment than stated in this procedure may result in more (or less) measurement uncertainty. Acceptance Criteria
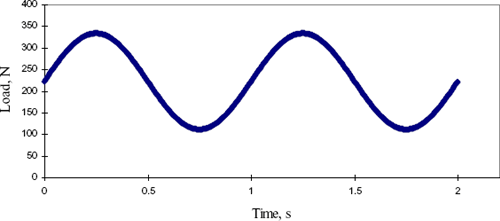
DiscussionIf, using the acceptance criteria, the system fails this test, repeat the procedure. If the system fails the second test, the system fails the check. If the system passes the second test, then a third test should be run to determine acceptance or failure. The apparatus should be disassembled and re-assembled between each test. If the system fails this check, the system electronics and software should be evaluated to determine the cause of the time delay. Also, check the system for such problems as friction in the triaxial piston, misalignment, loose connections, and loose deformation devices. ExampleUsing a similar example as before, a 445 N proving ring is used to conduct the experiment. Therefore, the sinusoidal loading pattern is determined by the following:
The loading waveform would be similar to that shown in figure 9. The test is conducted and the raw load and deformation data are obtained from the system. In this example, two deformation devices are used on the outside of the triaxial chamber. Therefore the test is performed twice, once for each deformation device channel. The results are analyzed using the process described in appendix B. Table 19 contains the results from this example test procedure.
Figure 9. Graph. Example of system dynamic response check of 445 N proving ring, 1 Hz.
As can be seen from these results, the device passed the check at 1 Hz but failed the checks at 5 and 10 Hz (acceptance criteria = 2.8 degrees). As shown, the test was repeated a second time to ensure that the results were accurate. In this example, the problem was caused by faulty system electronics. The filter settings were of a design that imparted a large time delay in the deformation channel. In this example, after a complete and thorough trouble-shooting session, a complete electronic system upgrade was recommended. TRIAXIAL PRESSURE CHAMBERBackgroundEach triaxial pressure chamber to be used for testing should be able to maintain pressure in accordance with testing parameters. It is also very important that test results report the actual pressure used for the test. In several instances, it has been found that users report the nominal pressure, or the pressure that was programmed for the test. For some test systems, the pressure used for the test may vary from that specified. In this case, use of the nominal pressure can cause errors in the test results when compared with other test results. To perform this test procedure, a separate NIST traceable pressure gauge or transducer is necessary to perform an independent check of the system. Also, it is very important that the cell pressure be zero before applying the system command to pressurize the chamber. The pressures used for this experiment should be similar to those used for the actual test procedure. This experiment can be conducted during proficiency testing as well if that is deemed more efficient than running the experiment independently. Dynamic System ConfigurationAll test systems should be turned on and the machine should be warmed up per the manufacturer’s specifications. ApproachThe pressure should remain constant for a period of 5 minutes for each pressure level. Checking of the triaxial chamber should follow the steps listed below:
Data Analysis
Acceptance Criteria
DiscussionThis check is critically important to the achievement of repeatable, accurate test values. The seals used in the triaxial chamber should be clean and free of grit, dirt, etc. Due to the dusty conditions in a soils laboratory, it is very important that foreign matter on the triaxial seals be kept to a minimum. As with other portions of a servohydraulic system, selection of a system pressure system is extremely important. If a pressure transducer is used, it is very important that the transducer be matched to the test system as closely as possible. It may not be advisable to use a 1034 kPa pressure transducer to perform LTPP Protocol P46 testing unless it can be scaled to a suitable range without loss of accuracy. Contact the system manufacturer for assistance in selecting a suitable pressure transducer for use in a particular test procedure. If, using the acceptance criteria, the system fails this test, repeat the procedure. If the system fails the second test, the system fails the check. If the system passes the second test, then a third test should be run to determine acceptance or failure. The apparatus should be disassembled and reassembled between each test. If problems are found with the system pressure, the manufacturer should be contacted to assist in determining probable causes and efficient solutions. ExampleA user is interested in determining the ability of his or her triaxial cells to perform LTPP Protocol P46 type 1 and type 2 testing. Therefore, the user reviews the test procedure and finds that 8 different pressure settings are used for the procedure: 13.8, 20.7, 27.6, 34.5, 41.3, 68.9, 103.4, and 137.8 kPa. The user conducts the test procedure using these pressure settings and an independent NIST traceable pressure gauge. Table 20 contains the results.
Shaded cells: Out-of-specification or otherwise undesirable results. In reviewing these results, it can be seen that the system was slow to respond to the command to pressurize to 20.7 and 27.6 kPa, respectively. In this case, the solution was to scale the pressure transducer to a lower pressure range?from 103.4 kPa full range to 172.2 kPa full range. This allowed the system to achieve more stable pressure readings. The system to target readings (comparison of the system monitored pressure reading versus the target pressure) were all within specifications. This is an indication that the system is achieving pressure readings very close to those specified by the controller. The reference to target values (comparison of secondary NIST pressure cell to target reading) were out of specification for 13.8 and 20.7 kPa, respectively. A result like this usually means that the calibration of the pressure transducer should be checked because, although the system is coming very close to the target pressures, it is still not reading close to the “true” pressure. Finally, the system to reference (comparison of pressure transducer to secondary NIST traceable gauge) check illustrates that the system gauge is not measuring pressures very close to the secondary NIST traceable gauge. This is usually the result of poor calibration of the system pressure device. In this example, several troubleshooting activities would be conducted as the results do not meet the acceptance tolerances for this procedure. ENVIRONMENTAL CHAMBERBackgroundSome test procedures, such as LTPP Protocol P07, utilize an environmental chamber to control the temperature of the test specimen. This experiment has been developed to ensure that the chamber can maintain temperature in accordance with testing parameters. In this test procedure, the temperature should remain constant for a period of 10 minutes for each temperature. To perform this test procedure, a separate NIST traceable temperature measuring device is necessary. This gauge is used to perform an independent check of the system. The temperatures used for this procedure should be comparable to those used for the testing process. This experiment can be conducted during proficiency testing as well if it is deemed more efficient than running the experiment independently. Dynamic System ConfigurationAll test systems should be turned on and the machine should be warmed up per the manufacturer’s specifications. ApproachChecking the environmental chamber should follow the steps listed below:
Data Analysis
Acceptance Criteria
DiscussionThis check is critically important to the achievement of repeatable, accurate test values. As with other portions of a servohydraulic system, selection of a system temperature control system is extremely important. It is very important that the temperature control system be matched to the test system as closely as possible. Contact the system manufacturer for assistance in selecting a suitable temperature control system for use in a particular test procedure. If, using the acceptance criteria, the system fails this test, repeat the procedure. If the system fails the second test, the system fails the check. If the system passes the second test, then a third test should be run to determine acceptance or failure. If problems are found with temperature control, the manufacturer should be contacted to assist in determining probable cause(s) and efficient solutions. ExampleA user is interested in determining the ability to control the temperature to perform LTPP Protocol P07 testing. The user conducts the test procedure using the three temperature settings required for the test procedure and an independent temperature gauge. The results are contained in table 21. The results show that the system was performing as expected. The difference between the target and the system readings were within specifications at all temperatures. In addition, the difference between the reference and target values was zero. This response is indicative of a well-calibrated, well-controlled test system.
|