U.S. Department of Transportation
Federal Highway Administration
1200 New Jersey Avenue, SE
Washington, DC 20590
202-366-4000
Federal Highway Administration Research and Technology
Coordinating, Developing, and Delivering Highway Transportation Innovations
 |
| This report is an archived publication and may contain dated technical, contact, and link information |
| breadcrumb |
Publication Number: FHWA-HRT-04-042
Date: July 2004 |
||||||||||||||||||||||||||||||||||||||||||||||||||||||||||
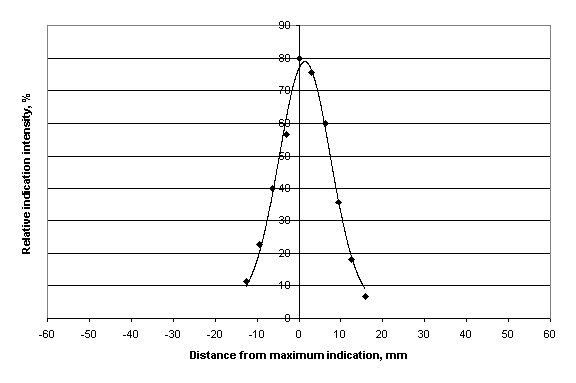
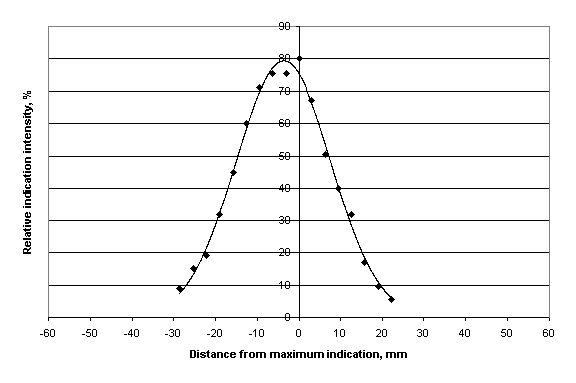
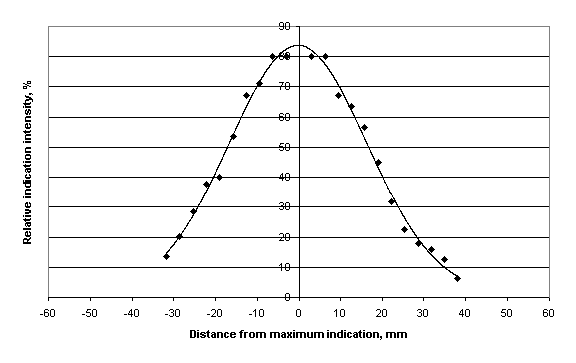
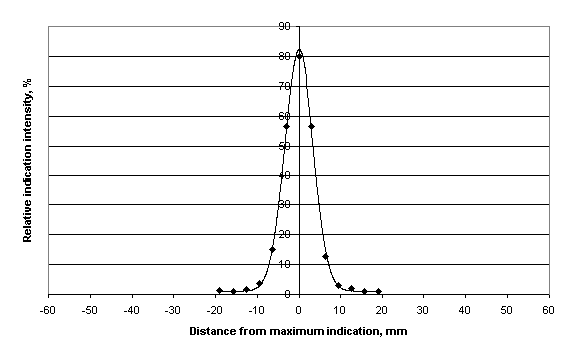
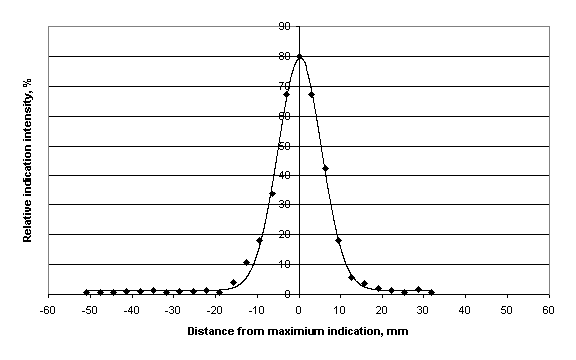
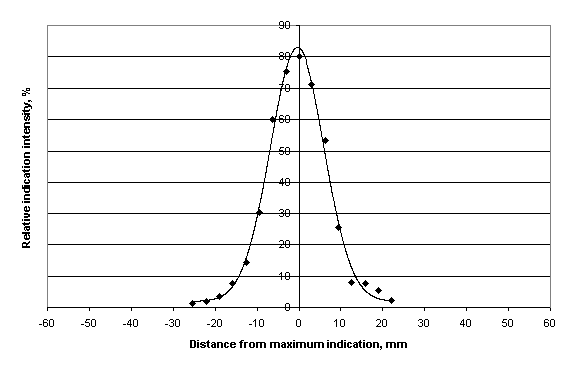
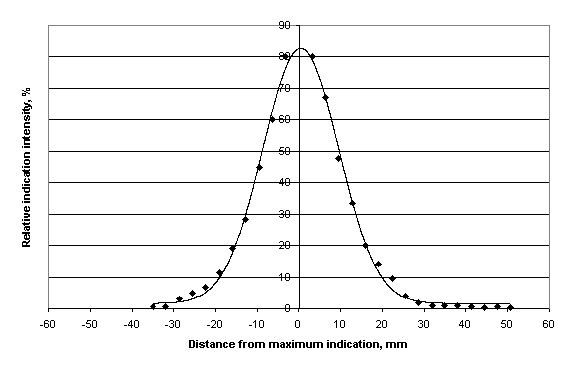
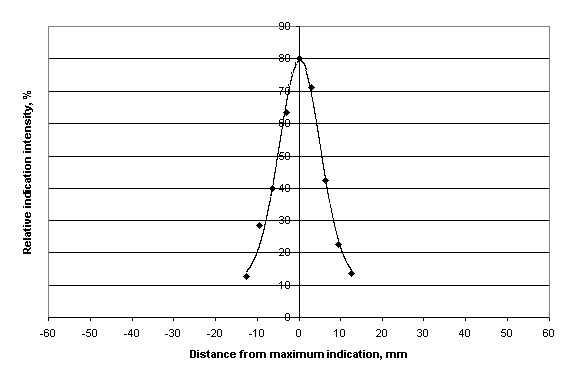
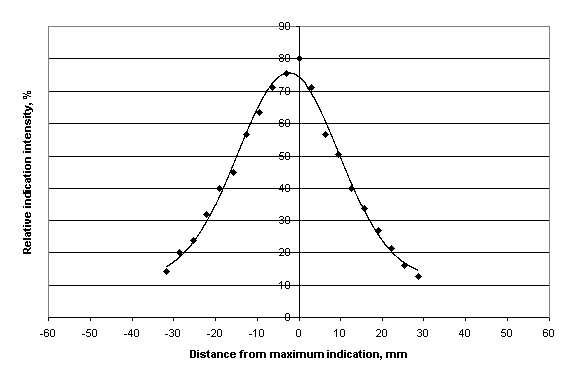
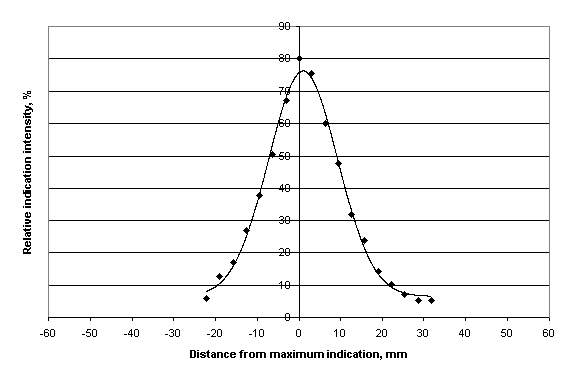
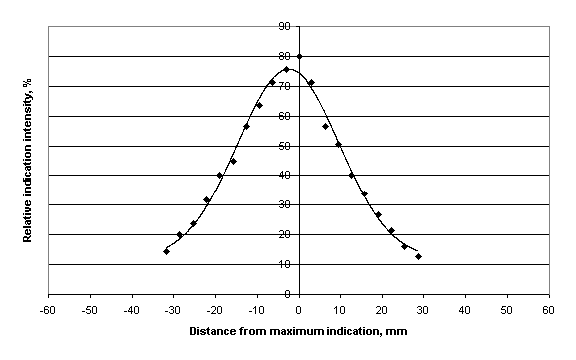
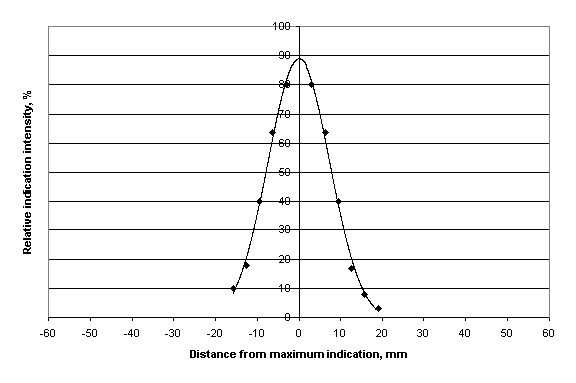
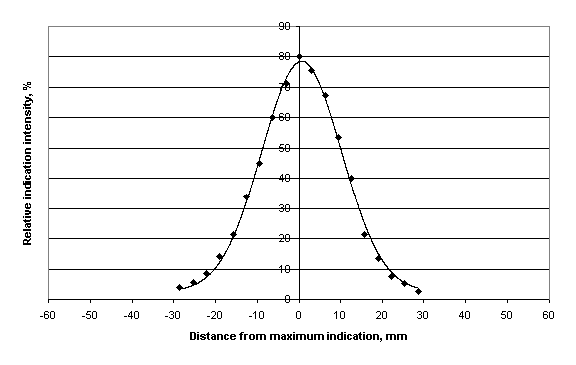
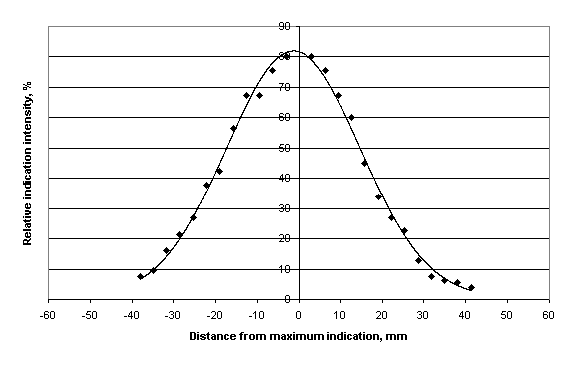
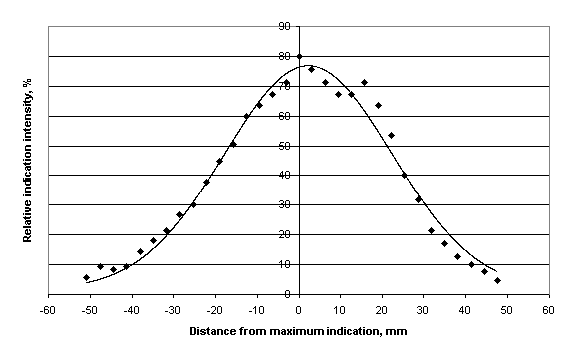
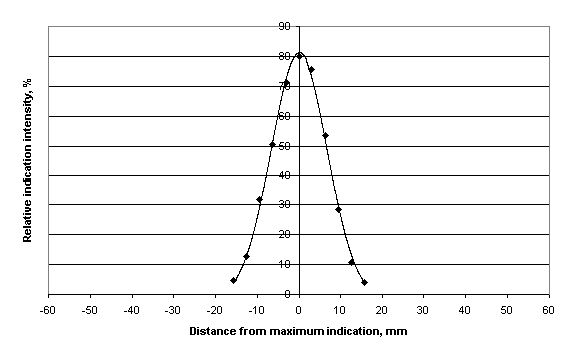
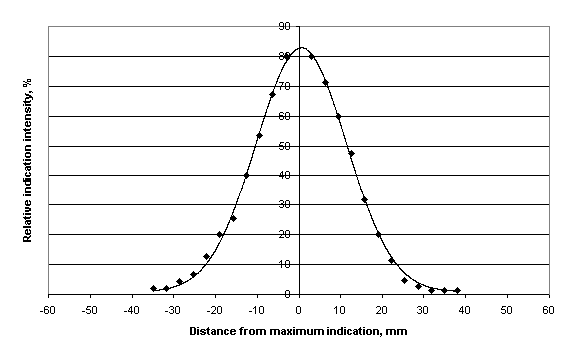
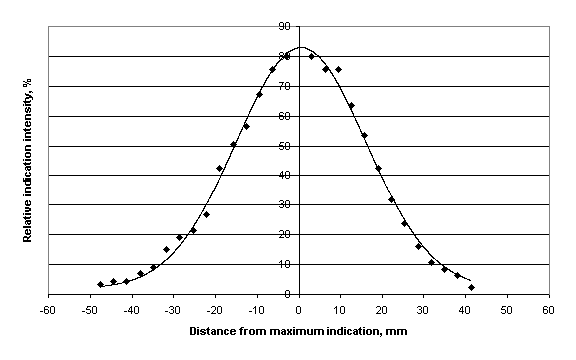
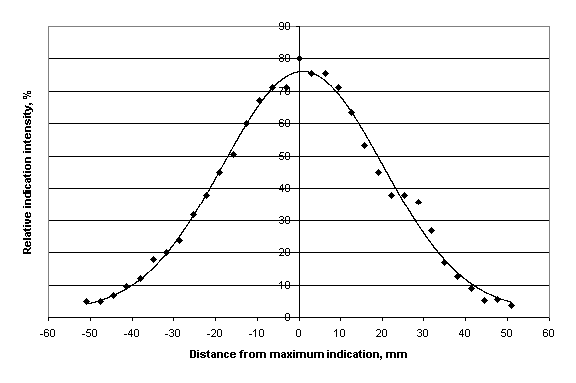
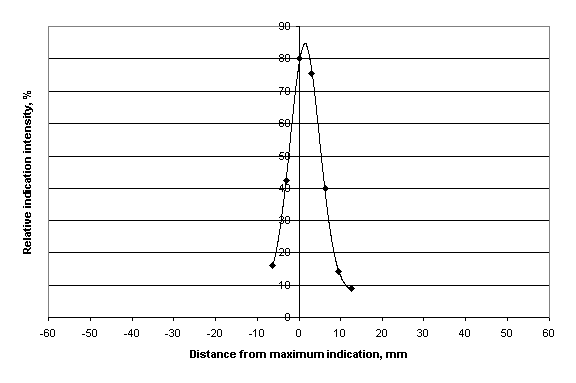
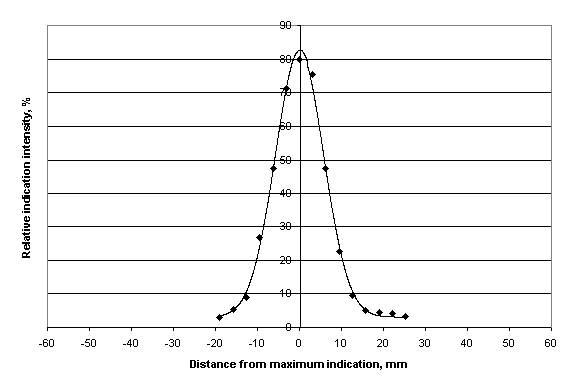
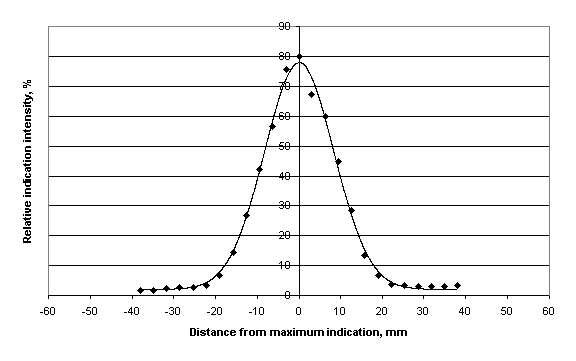
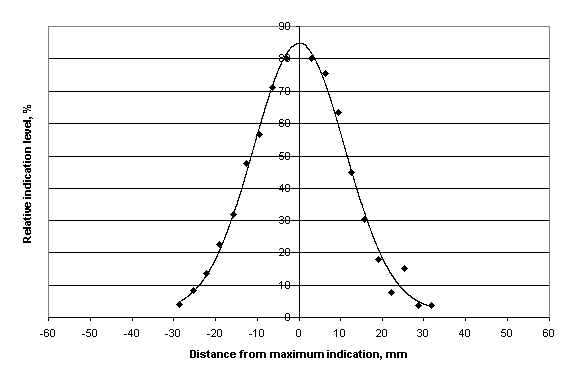
Guidelines for Ultrasonic Inspection of Hanger Pins4. EXPERIMENTAL RESULTSThe following sections summarize the results from the experimental portion of this investigation. Results will be presented in five sections. First, the results from testing related to beam diffraction will be summarized. Next, results from the distance amplitude correction testing will be presented. Third, results from testing related to angle and straight beam sensitivity to cracks will be presented. Fourth, results from the defect sizing testing will be presented. Finally, testing related to the acoustic coupling phenomenon will be summarized. 4.1. BEAM DIFFRACTION Six transducers were used in the beam diffraction study and represent typical transducers that might be used during a pin/hanger inspection. An indication level at 80 percent screen height was collected for each transducer at each penetration depth. Figures 30 through 35 summarize the experimental beam diffraction testing results. In addition, a best-fit Gaussian distribution is also shown for each test.As can be seen from these data, as the depth of penetration increases, so does the breadth of the beam diffraction, which would be expected given the nature of ultrasonics. Note the good agreement, within the sensitivity of the test, between the Gaussian distribution and the experimental data.Again, this is expected, given the manner in which ultrasonic waves propagate through a test specimen.Note, however, that the secondary acoustic lobes known to exist in ultrasonic signals could not be identified consistently during this testing. This is most likely because these lobes are often very small, and the sensitivity of this testing was such that these could not be monitored.
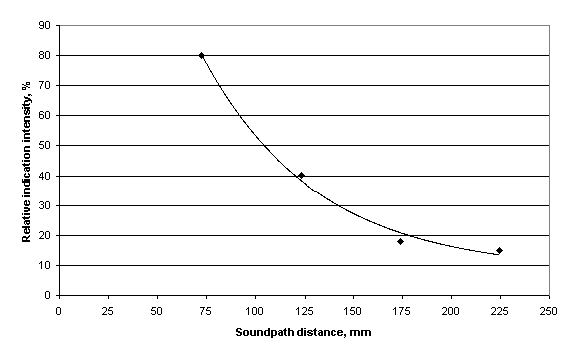
Figure 30. Beam diffraction results for 8-degree, 5-MHz, 12.7-mm diameter transducer.
Figure 30. (Continued) Beam diffraction results for 8-degree, 5-MHz, 12.7-mm diameter transducer.
Figure 31. Beam diffraction results for 0-degree, 5-MHz, 12.7-mm diameter transducer.
Figure 31. (Continued) Beam diffraction results for 0-degree, 5-MHz, 12.7-mm diameter transducer.
Figure 32. Beam diffraction results for 0-degree, 2.25-MHz, 25.4-mm diameter transducer. Figure 32. (Continued) Beam diffraction results for 0-degree, 2.25-MHz, 25.4-mm diameter transducer.
Figure 33. Beam diffraction results for 11-degree, 2.25-MHz, 12.7-mm diameter transducer.
Figure 33. (Continued) Beam diffraction results for 11-degree, 2.25-MHz, 12.7-mm diameter transducer.
Figure 34. Beam diffraction results for 14-degree, 2.25-MHz, 12.7-mm diameter transducer.
Figure 34. (Continued) Beam diffraction results for 14-degree, 2.25-MHz, 12.7-mm diameter transducer.
Figure 35. Beam diffraction results for 8-degree, 2.25-MHz, 19-mm square transducer.
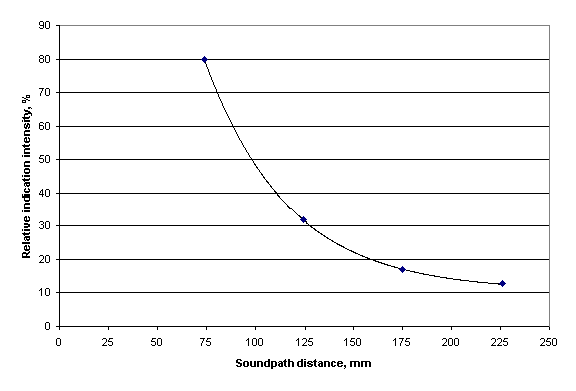
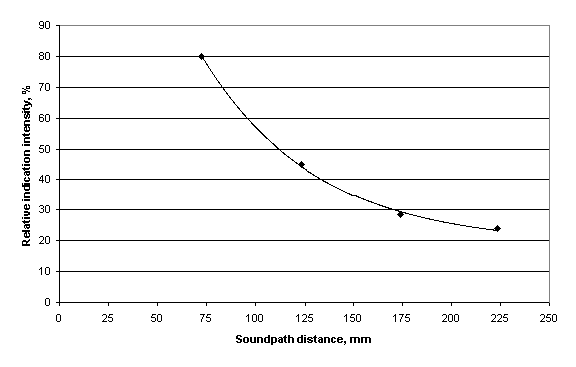
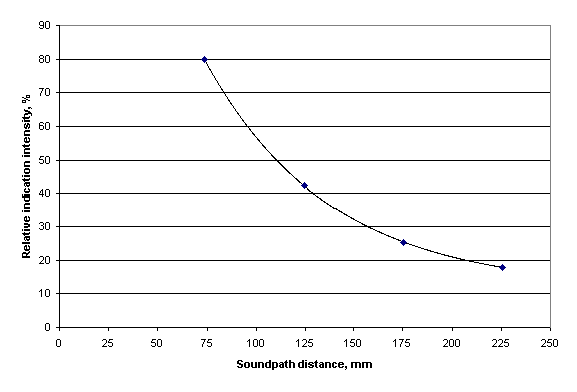
Figure 35. (Continued) Beam diffraction results for 8-degree, 2.25-MHz, 19-mm square transducer. 4.2. DISTANCE AMPLITUDE CORRECTION Six transducers were again used in the distance amplitude correction testing portion of this study. These transducers represent typical transducers that might be used during a pin/hanger inspection.An indication level at 80 percent screen height was collected for each transducer at each sound path distance.Figures 36 through 41 summarize the experimental distance amplitude correction results. In addition, a best-fit exponential curve is also shown for each test. As can be seen from the data in figures 36 through 41, there is really very little difference in the distance amplitude correction curve for the various transducers. This would indicate that the loss of signal strength is primarily dependent upon the material being tested and less so on the characteristics of the ultrasonic transducer. Also note the good agreement, within the sensitivity of the test, between the exponential curve and the experimental data.Again, this would be expected, given the manner in which the ultrasonic signal is introduced into the test specimen.
Previous | Table of Contents | Next
|