U.S. Department of Transportation
Federal Highway Administration
1200 New Jersey Avenue, SE
Washington, DC 20590
202-366-4000
Federal Highway Administration Research and Technology
Coordinating, Developing, and Delivering Highway Transportation Innovations
| REPORT |
| This report is an archived publication and may contain dated technical, contact, and link information |
|
| Publication Number: FHWA-HRT-09-040 Date: May 2014 |
Publication Number: FHWA-HRT-09-040 Date: May 2014 |
On August 1, 2007, the I-35W bridge over the Mississippi River in Minneapolis, MN, collapsed in the middle of rush hour. The collapse killed 13 people and revealed to engineers the United States’ failing infrastructure. Part of this study proposes that a catastrophe such as this may be prevented through the use of remote monitoring systems with the capability to alert users when certain structural members reach a predetermined level of stress. In order to fully understand the forces induced into a structure such as a bridge, the Minnesota Department of Transportation (MnDOT), FHWA, the USF Geotechnical Research Group, and Foundation & Geotechnical Engineering (FGE), LLC teamed to provide a remote monitoring system that would provide much of this information. As MnDOT rebuilt I-35W, a number of substructural members provided real-time information about the stresses on the bridge. Figure 45 shows the pier selected to demonstrate the monitoring system.
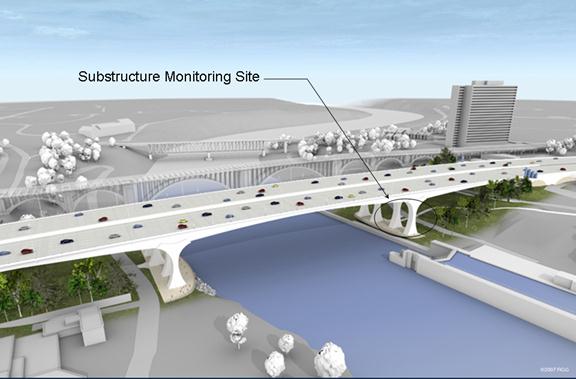
Figure 45. Illustration. I-35W bridge over the Mississippi River.
This study was broken into three phases: (1) real-time monitoring of the mass concrete effects in the drilled shaft foundation elements, (2) real-time monitoring of construction loads transmitted first into the drilled shafts and second into the columns as they came into play, and (3) long-term monitoring of the bridge loads and performance.
The first phase occurred during the construction of the concrete drilled shafts or caissons and the pier footing that ties the drilled shafts together. TCs were placed in the rebar cages of the shafts and throughout the pier footing and were used to determine the core temperatures of the mass concrete elements. This part of the study was similar to the voided shaft study that was discussed in chapter 3.
The second phase of the study slightly overlapped the first phase in that it involved the drilled shafts, but it also branched upward to the columns. Two different types of strain gauges were placed in the rebar cages of the shafts and at the center height of the columns. These were used to more accurately determine the load induced in the shafts by the pier footing, columns, superstructure, and the loads induced in the columns by the bridge superstructure during the bridge construction. Furthermore, as each new section of the concrete box-girder superstructure was added to the columns, the added weights of the sections were correlated to the strain in the columns measured by the installed gauges. This provided more accurate calibrations that were used in the ongoing health monitoring of the bridge, which was the third phase of the project.
The third phase uses the same strain gauges that were embedded in the shafts and columns, including the strain gauges that will be installed in the superstructure components of the bridge. The final phase of the project will monitor the loads on the bridge throughout its service life, which can be used to determine the structural health of the bridge and provide MnDOT and FHWA with real-time strain and load data from the bridge (see figure 46).

Figure 46. Illustration. Event schedule and overlap of I-35W bridge project phases.
As stated previously, in phase I, researchers monitored the internal temperatures of the mass concrete elements (drilled shafts and pier footing). While the overall procedure of the thermal monitoring was similar to the voided shaft study, there were some major differences. First, the shafts were solid and not voided. Second, the ambient temperature at the site was much different. As seen in figure 43 and °f = 1.8(°c) + 32 figure 44, in the Tampa Bay, FL, area during the monitoring period, the air temperature ranged from approximately 99.86 to 64.94 °F (37.7 to 18.3 °C). During the construction and thermal monitoring period in Minnesota, the temperature ranged from approximately 34.88 to -10 °F (1.6 to -23.3 °C). This was expected to have a significant effect on the temperatures reached by the mass concrete elements.
Construction and Instrumentation
Prior to construction and installation of the drilled shafts, the instrumentation for the thermal monitoring was put into place. The first step of the placement was the instrumentation of the reinforcement cage for the drilled shafts. The reinforcement cage was built using high-strength longitudinal steel and mild stirrup steel. The cage had 2.48-inch (20.63-mm) threaded longitudinal bars with #6 bar circular ties at 5 inches (127 mm ) on the center. Locking wheel cage spacers were placed along the reinforcement cage to maintain 6 inches (152.4 mm) of clear cover (see figure 47).
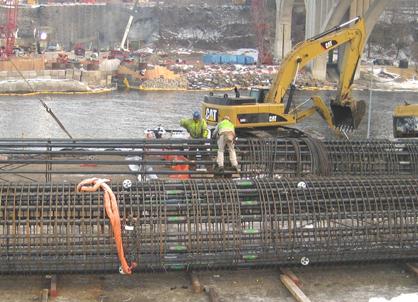
Figure 47. Photo. I-35W bridge shaft reinforcement cage construction.
After the reinforcement cages were assembled, they were instrumented with TCs and strain gauges. The strain gauges are discussed in the section on phase II. The TCs were installed in pairs at 4 levels along the shafts, later named GL1, GL2, GL3, and GL4, for a total of 10 TCs per shaft (2 TCs were installed in the center of the shaft near the top on a 20-ft (6.1-m) rebar placed after concreting). GL4 was located at the bottom of the shaft, GL3 was located at the top of competent rock, GL2 was located at the bottom of the permanent casing (top of weak rock), and GL1 was located at the top of the shaft (see figure 48). The wires from the TCs were bundled with the wires from the strain gauges and run to the top of the shafts in two groups (see figure 49).
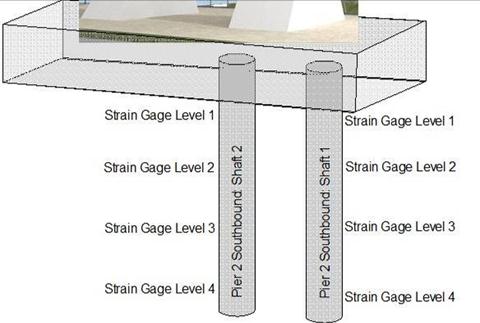
Figure 48. Illustration. I-35W bridge gauge levels on drilled shafts.
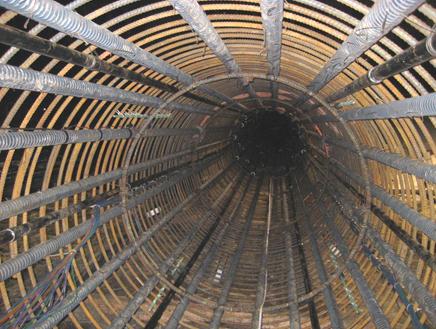
Figure 49. Photo. Cable bundles in reinforcement cage for I-35W bridge.
After the cages were fully instrumented, the excavations for the shafts were made. The shafts were drilled with two distinct sections. The top section was 7 ft (2.1 m) in diameter with a 0.50-inch (12.7-mm)-thick permanent steel casing surrounded by soil (see figure 50). The casing was necessary to keep the excavation clear. The casing ran approximately 3 ft (0.92 m) below the level of bedrock. The lower section was 6.5 ft (1.9 m) in diameter with no steel casing. GL2, GL3, and GL4 were located in this lower section of the shaft. After the excavation was created, the reinforcement cages were lifted and lowered into the excavation (see figure 51). After reinforcement cage placement, the concrete for the shafts was poured with a single tremie. Upon removal of the tremie after concrete placement, a rebar instrumented with two additional TCs was inserted down the center of the shaft. The wires from all the TCs and strain gauges were run out through a 1.5-inch (38.1-mm)-diameter schedule 40 PVC conduit that was placed running out through the top of the shaft, underneath the future pier footing that would be constructed, and out to the DASs that were installed on site (see figure 52).
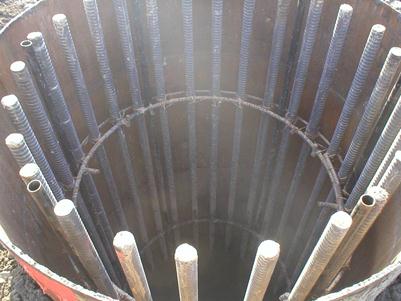
Figure 50. Photo. Top section of drilled shaft for I-35W bridge.
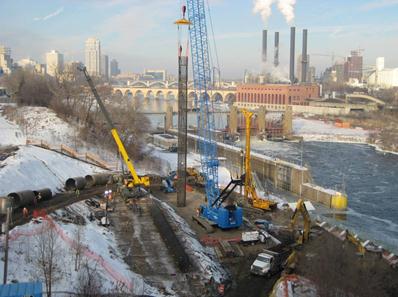
Figure 51. Photo. Placement of reinforcement cage for I-35W bridge shaft.
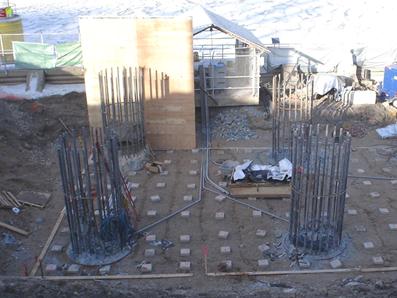
Figure 52. Photo. Conduits running from shafts to DAS boxes.
Two of the eight shafts were instrumented (see figure 52), and when all eight shafts were finished, time was alotted for the concrete to cure, the installation of the formwork, and reinforcement for the pier footing. The pier 2 footing was 81.02 ft (24.7 m) long by 34 ft (10.4 m) wide by 14 ft (4.8 m) tall (see figure 53) and was designed to support two columns (one for each concrete box girder section). It was reinforced with three layers of #18 bars at the bottom of the footing and three layers of #18 bars at the top. Along the top, W-shaped steel was used to support the reinforcing bars to prevent excess bending. TCs were installed at the base, the center, and the top of the footing. These TC wires were run out through a 2-inch (50.8-mm)-diameter schedule 40 PVC conduits down and out of the footing to the DAS boxes alongside the conduits from the shafts. The massive footing was equipped with PVC cooling tubes cast into the footing to help mitigate the mass concrete effects (see figure 54).
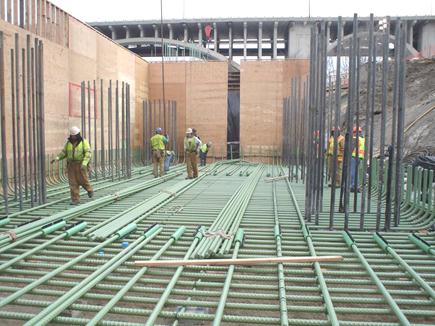
Figure 53. Photo. Lower layer of pier footing reinforcement for I-35W bridge.
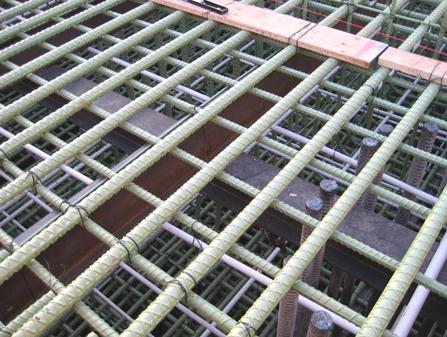
Figure 54. Photo. Upper layer of pier footing reinforcement for I-35W bridge.
Monitoring Setup and Procedure
For phase I of the study, the data collection was split into two subphases: the first phase consisted of the thermal monitoring of the shaft, and the second phase consisted of the thermal monitoring of the pier footing. The two phases were done similarly, and the setup for the thermal monitoring system was similar to the setup used in the voided shaft study discussed in chapter 3. The system was made up of the following pieces: a Campbell Scientific, Inc. ® CR1000 data logger, an AM25T 25-channel multiplexer, a Campbell Scientific, Inc. ® Raven100 CDMA AirLink cellular modem, PS100 12-V power supply and 7-Ahr rechargeable battery, and a large environmental enclosure to protect all the materials from the elements (see figure 55). From the voided shaft study, it was discovered that a larger solar panel was needed to provide power to the system. As a result, a 35-W solar cell panel was utilized (see figure 56).
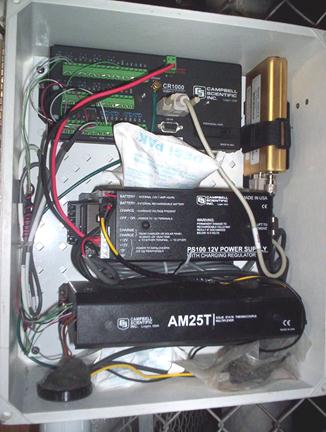
Figure 55. Photo. Thermal monitoring DAS for I-35W bridge shafts.
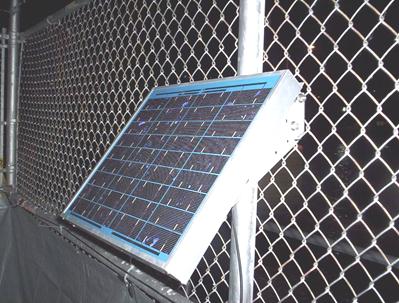
Figure 56. Photo. 35-W solar cell panel for I-35W bridge monitoring system.
The thermal monitoring procedure was identical to that of the voided shaft study. A thermal data sample was taken every 15 min and stored to the data logger at the same interval. Every hour, the Raven modem sent the collected data to the host computer at USF for data analysis. Once this data were received, they were automatically interpreted and plotted for use on the USF Geotechnical Research Web site. This thermal data from the shafts were collected from January 9 through January 21, 2008. At this time, the TC wires from the shaft were disconnected; however, the vibrating wire strain gauges (discussed in phase II) came with a thermistor. This thermistor was used to continue the thermal data from the shafts. The thermal data from the pier footing were collected from February 6 through February 25, 2008. No strain gauges were installed in the pier footing, so the only thermal data collected were stopped after this date. As with the voided shaft study, the battery voltage for the data logger was also monitored so that the logger did not lose power.
Along with the thermal monitoring setup, a CC640 camera was set up to take hourly photographs of the construction site (figure 57 and figure 58). (Note that the black bars in figure 57 are pointing to the camera.) It was powered by the same solar panel as the thermal monitoring system. The photos taken by the camera were sent back with the data collected from the TCs by the CR1000. The camera was useful for the thermal monitoring phase, but it was really installed as an aid in the construction load monitoring phase, which is discussed later.
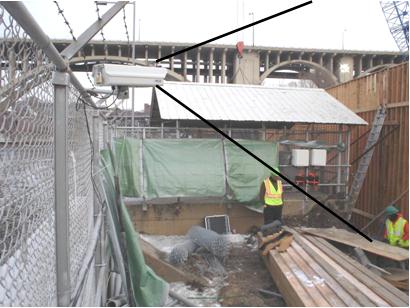
Figure 57. Photo. CC640 jobsite camera with perspective outlines.
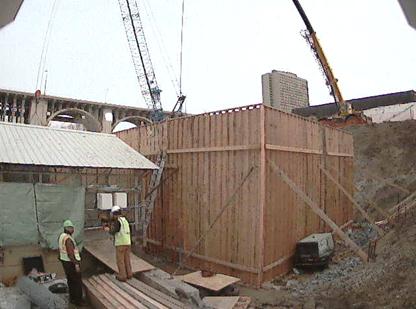
Figure 58. Photo. Sample camera shot from close-up camera on I-35W bridge.
System Results and Conclusions
The thermal monitoring procedure fared well. From the information gathered from the voided shaft study about the power consumption, the 35-W solar cell panel worked much better, and the battery voltage never dipped below 12V (see figure 59). Twice during the thermal monitoring phase, the system lost and then regained cellular communication with the host server. These occurrences seemed to correspond with the use of a large electric power plant directly adjacent the system’s cellular modem. This type of EMF is known to adversely affect such systems and is therefore a reasonable explanation. Other than these interferences, the thermal monitoring system worked as planned.
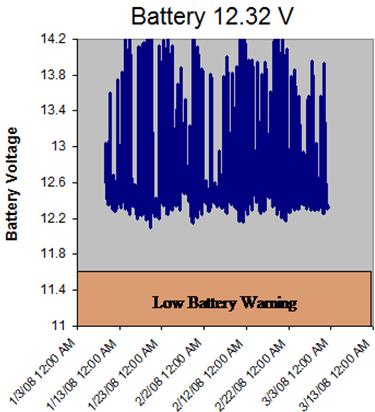
Figure 59. Graph. Data logger battery voltage from I-35W bridge monitoring system.
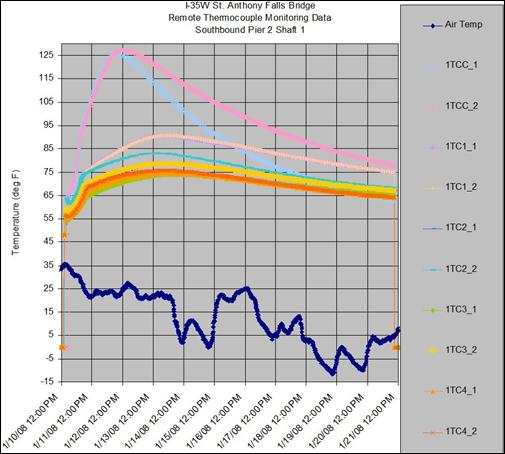
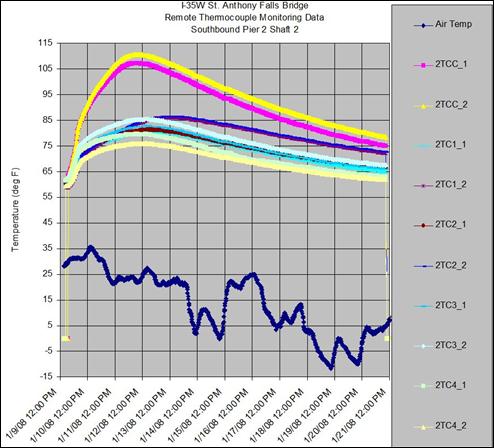
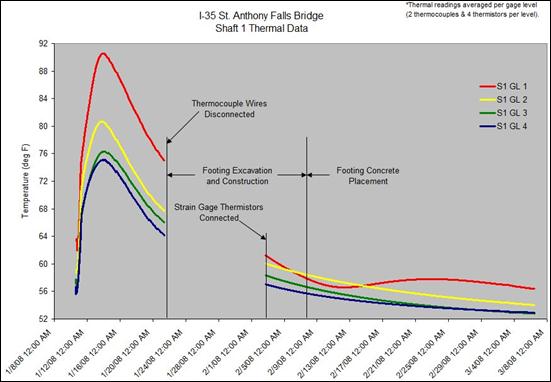
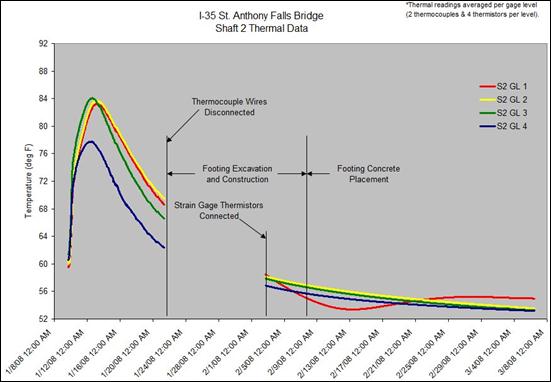
The concrete mix that was used was self-consolidating concrete that was designed to have a lower heat of hydration (see figure 60). Therefore, the temperature traces were expected to be lower than that of the voided shaft study. The thermal data from shaft 1 showed that the general average temperature attained in the concrete was 89.96 °F (32.2 °C) in the cage, and the two TCs at the core recorded higher temperatures of 125.96 °F (52.2 °C), which was a 36-°F (20-°C) difference (see °f = 1.8(°c) + 32 figure 61). Similarly, in shaft 2, the TCs mounted in the cage recorded an average temperature of 84.92 °F (29.4 °C), while the two TCs at the core recorded a higher temperature of 109.94 °F (43.3 °C), which was a 25-°F (13.9-°C) difference (see figure 62).

Figure 60. Diagram. Concrete mix design for drilled shafts on I-35W bridge.
°F = 1.8(°C) + 32
Figure 61. Graph. I-35W bridge southbound pier 2 shaft 1 thermal data.
°F = 1.8(°C) + 32
Figure 62. Graph. I-35W bridge southbound pier 2 shaft 2 thermal data.
As discussed in the monitoring procedure, the TC wires from the shafts were cut on January 21, 2008, and the thermal data were no longer collected. Upon connection of the vibrating wire gauges from the shafts, the thermistors started to collect thermal data again. These thermal data were analyzed and compiled with the data from the TCs, and the continuation of the thermal curves were plotted (see figure 63 and figure 64).
°F = 1.8(°C) + 32
Figure 63. Graph. I-35W bridge shaft 1 thermal data from TCs and thermistors.
°F = 1.8(°C) + 32
Figure 64. Graph. I-35W bridge shaft 2 thermal data from TCs and thermistors.
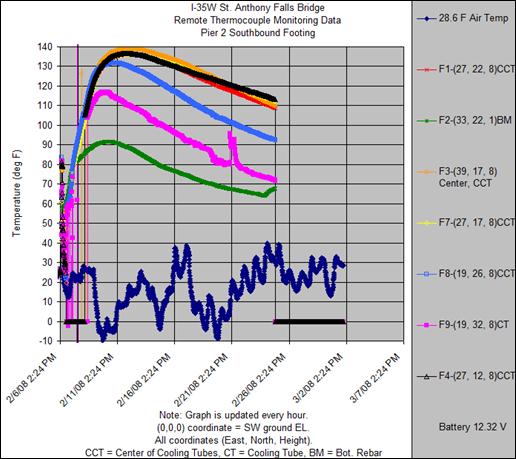
As stated previously, the thermal data from the pier footing was collected from February 6 through February 25, 2008 (see figure 65). As seen on the plot of the temperature over time, the TC in the extreme center of the footing recorded a maximum temperature of approximately140 °F (60 °C), while the TC at the center bottom of the footing only reached a temperature of approximately 90 °F (32.2 °C). The same concrete mix was used throughout the pier footing, so it should all have been roughly the same temperature; however, the ambient temperature, which ranged from 40 to -10 °F (4.4 to -23.3 °C), caused the temperatures to drop drastically closer to the outside edges of the footing.
°F = 1.8(°C) + 32
Figure 65. Graph. Pier 2 southbound footing thermal data from TCs.
PHASE II-CONSTRUCTION LOAD MONITORING
This phase of the study expands from the voided shaft study. In phase II, the loads placed on the shafts by the pier footing, columns, and segments of the superstructure were monitored. As shown in figure 46, this phase actually began at the start of the footing construction, but no data were expected until the shaft cured and the footing concrete was poured.
For the section on construction and instrumentation, there was obviously an overlap with the construction sequence. Therefore, this section of the report does not go into detail about the construction of the drilled shafts nor of the pier footing. However, more emphasis is placed on the strain gauges that were installed in the drilled shafts. For the pier columns, however, the construction and instrumentation is explained. Focus is provided to the construction phases of the column and how it affected the construction loads placed on the drilled shafts.
Construction and Instrumentation
The strain gauges used in this study were provided by Geokon, Inc.™. They were model 4911 “sister bars” and were specifically made for ease of installation (see 1 inch = 25.4 mm figure 66). They came with the strain gauge preinstalled on a 54.25-inch (1,377.95-mm) length of #4 bar. This bar was then tied to the existing reinforcement in the shaft or column. Since the gauge was on a #4 bar, it did not provide enough extra steel area that the cross section of the element was altered (providing the element was quite large). Therefore, it only minimally affected the calculations of converting strain to load. The strain gauges in the shafts were installed at the same four levels as the TCs: GL1, GL2, GL3, and GL4 (see figure 48). However, two types of strain gauges were used. At each level, 4 vibrating wire (VW) strain gauges and 2 resistance (RT) strain gauges were installed, which made for a total of 16 VW gauges and 8 RT gauges per shaft. The VW gauges were installed at a 90-degree separation (see figure 67), with the RT gauges at 180-degree separation coupled with the VW gauges (see figure 68). The VW gauges, as explained in phase I, came equipped with a thermistor. These gauges were not capable of recording strains at high rates (for dynamic measurements), which was why RT gauges were also installed.

1 inch = 25.4 mm
Figure 66. Illustration. Detail of Geokon, Inc.TM 4911 sister bar strain gauges.
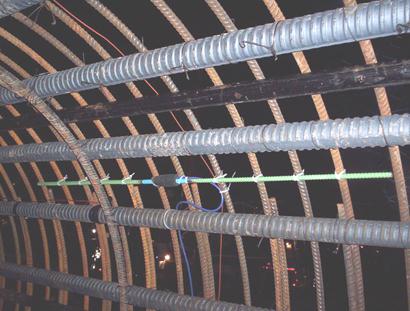
Figure 67. Photo. VW gauge installed in shaft reinforcement cage.
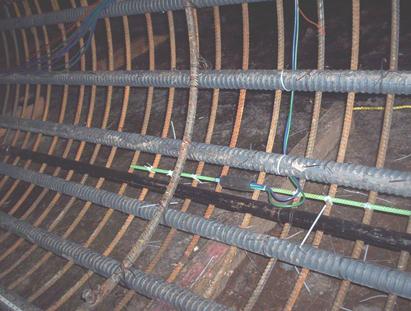
Figure 68. Photo. Coupled VW (blue cable) and RT (green cable) gauges.
At each main pier, two reinforced concrete columns sat on top of the footing to support the superstructure for one direction of traffic. The columns were constructed with a varying cross section (see figure 45). The critical cross section was at the midheight of the columns where the strain gauges were placed. The columns were cast in three separate pours.
First, the longitudinal bars running up through the columns were spliced to the longitudinal bars embedded in the pier footing (see figure 69). Then, the formwork for the lower half of the column was set in place. The first pour was a small 200-yd3 (182.8-m3) pour to get the column started. After that, the horizontal reinforcement was set inside the formwork up to the midheight of the column. After the horizontal steel was in place, the next level of longitudinal steel was spliced to the first level so that the bottom of the bars were embedded in the lower half of the column. After the reinforcement up to midheight was installed, the second pour occurred. This second pour placed the concrete up to midheight of the column (see figure 70). During the next phase of construction, the formwork for the top half of the column was placed, and the horizontal steel in the column was installed. The column midheight strain gauge installation also took place at this time. The critical section of the column was 8 by 16 ft (2.44 by 4.88 m) with reinforcement that consisted of 44 #20 bars (see figure 71).
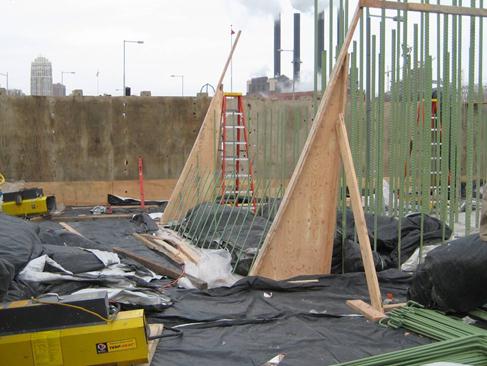
Figure 69. Photo. Reinforcement for first column pour for I-35W bridge columns.
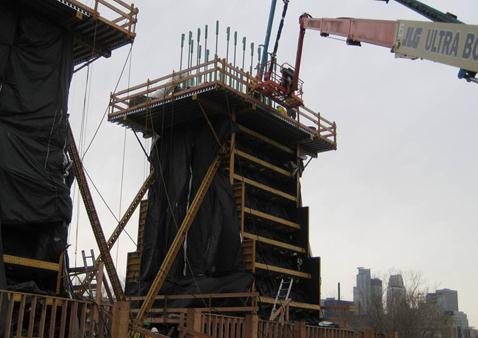
Figure 70. Photo. Reinforcement at midsection of columns for I-35W bridge.
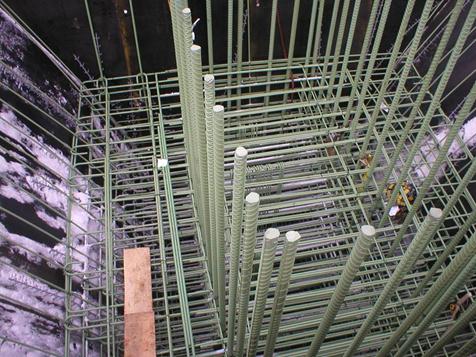
Figure 71. Photo. Longitudinal and horizontal column reinforcement.
The total instrumentation for each column consisted of four vibrating wire strain gauges and four resistance-type strain gauges. The same coupled gauges that were installed in the shafts were used in the columns (one VW gauge and one RT gauge per sister bar). One sister bar unit was installed at each corner of the column in the critical section (see figure 72). By placing the gauges in the corners of the cross section, the strain at the extreme fiber of the column could be measured. Once the gauge installation units were tied and secured in place (see figure 73), the wires were run out of the top of the column formwork so that the cables could be bundled together. Then, the wires were brought back down to the midsection of the column and were run out through the 2-inch (50.8-mm) schedule 40 PVC conduit that extended up to the midheight of the columns (see figure 74). The wires ran through the conduit, down the column and shaft cap, and out to the temporary DAS that was installed on site. In addition to these strain gauges, the University of Minnesota Department of Civil Engineering also placed five strain gauges in each column that was installed in the same locations as those done by the FHWA team, but with an additional gauge located in the center of the column. The wires for these gauges were bundled with the wires from the FHWA gauges and pulled out to the DAS at the same time. These cables were grey (as opposed to blue and green used by FHWA) and can be seen clearly in figure 74. No presentation or analysis of the University of Minnesota gauges is presented herein.
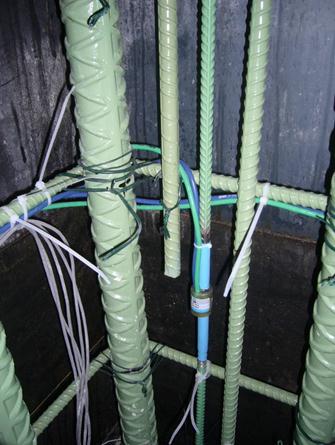
Figure 72. Photo. Coupled gauge installed in corner of column of I-35W bridge.
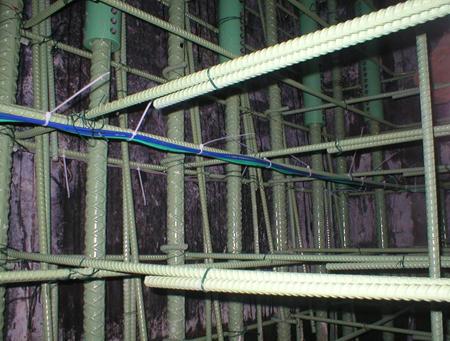
Figure 73. Photo. Gauge wires tied and secured in column of I-35W bridge.
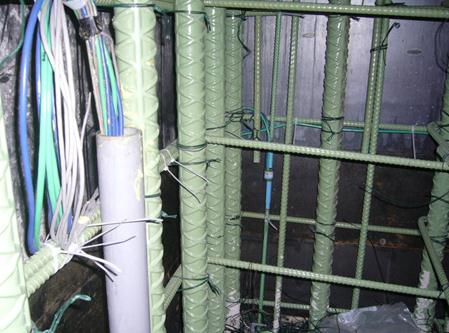
Figure 74. Photo. Wires exiting through conduit.
Monitoring Setup and Procedure
For phase II of the study, the data collection was split into two subphases: the load monitoring of the shaft and the load monitoring of the columns. The reason for this split was that a large amount of dead load on the shaft came from the construction of the pier footing and the columns. Furthermore, if the loads on the shafts were monitored first, checking that the measured loads were correct was much easier because the load was simply the dead load of the footing and columns. Each phase of monitoring was carried out in the same way. The monitoring setup and procedure is explained through a discussion of the three different systems that were installed and used during this phase of the study.
System 1 was the same thermal monitoring system that was used in phase I of the study as well as the voided shaft study discussed in chapter 3. It was reused during this phase of the study as the monitoring and transmission system for the CC640 field camera. The camera was set up to take a picture every hour and then transmit that picture back to the host computer via the cellular modem. During the thermal monitoring phase of the study, system 1 was powered by the installed solar cell panel with a backup deep cycle battery. During phase II, the system was moved to alternating current (A/C) power, but a deep cycle battery was kept in reserve in case the A/C power was disrupted. This A/C power was provided by the U.S. Army Corps of Engineers who had an A/C power source adjacent the site.
The second and third systems were installed at almost the same time, but they had different capabilities and assignments. System 2 was designated to collect data from the vibrating wire gauges installed in shafts 1 and 2 as well as those in the interior and exterior columns. This system also recorded the gauge temperatures via changes in thermistor resistance. A total of 50 vibrating wire gauges and 50 thermistors were connected to this logger via two AVW200 two-channel spectrum analyzers. Each channel of the AVW200 units was connected to a low-power multiplexer (MUX) 16/32B (four in all). MUX 1 was connected to shaft 2 (16 gauges), MUX 2 was connected to shaft 1 (16 gauges), MUX 3 was connected to the interior column (10 gauges), and MUX 4 was connected to the exterior column (10 gauges) (see figure 75). The true value of the AVW200 data was unused because many pieces of data quality were recorded along with the raw strain and temperature values of interest. These additional measures of data quality (e.g., signal-to-noise ratio, etc., four total) were intended to provide insight into the health of the gauge and triple the required storage space and to significantly reduce the overall duration of monitoring without remote collection from the circular data buffer. At the rate of storage, the number of channels monitored, and amount of on-board memory, only a 2-week period could be stored before circular overwrite. However, with hourly collections, this was never a problem.
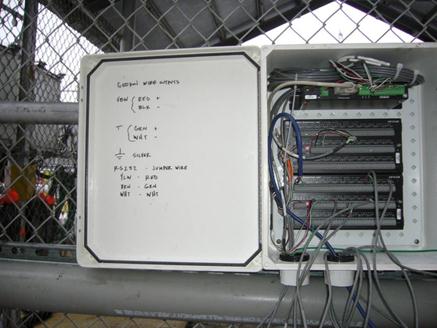
Figure 75. Photo. Wire connection to system 2.
The system monitoring the VW gauges (system 2) used a Campbell Scientific, Inc. ® CR1000 data logger, while the system monitoring the RT gauges (system 3) used a Campbell Scientific, Inc. ® CR9000 data logger. System 2 worked similarly to the thermal monitoring system. A sample was taken and stored to the data logger every 15 min. Every hour, this stored information was sent back to the host computer at USF to be compiled and analyzed. System 3 took a sample at a rate of 100 Hz (100 samples per second). However, all of the data were not stored. Rather, the mean, maximum, and minimum of these samples were stored every 15 min. Then, every hour, the stored data points were sent back to the host computer similar to the data from system 2. This provided the user with a better idea of the strain in the system because of the high sampling rate. However, this method used a large amount of power. The monitoring system sampling and storage rates and other information are provided in table 2. Due to differences in the two DAS board configurations, each system had a dedicated Campbell Scientific, Inc. ® Raven100 CDMA AirLink cellular modem. Three large environmental enclosures were used to house and protect the DAS units and wire connections from the elements (see figure 76).
Table 2. Summary of monitoring systems for I-35W bridge monitoring study.
System Parameter |
System 1 |
System 2 |
System 3 |
|---|---|---|---|
Gauge type |
TCs |
VW strain gauges thermistors |
RT strain gauges |
Data logger |
CR1000 |
CR1000 |
CR9000 |
Sampling rate |
15 min |
15 min |
100 Hz |
Storage rate |
15 min |
15 min |
15 min (sample mean, sample max, and standard deviation) |
Transmit rate |
1 h |
1 h |
1 h |
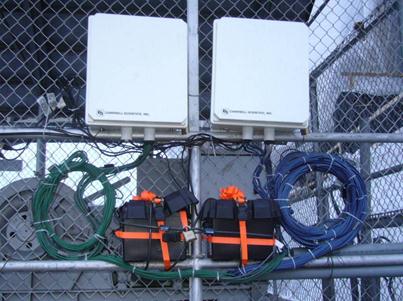
Figure 76. Photo. Construction load monitoring systems (VW = blue (right) and RT = green (left)).
For this phase, it was known that a large amount of power would be consumed by the monitoring systems. Therefore, it was necessary to provide the systems with enough backup power to prevent power problems similar to the voided shaft study. Each system was integrated with a deep cell battery that provided power in case of a power failure (see figure 76). However, there was a problem with this system; the PS100 12-V power supply that recharges the 7-Ahr battery could only receive power from either an A/C source or the solar panel but not both. Therefore, a battery manager was installed to bypass this limitation.
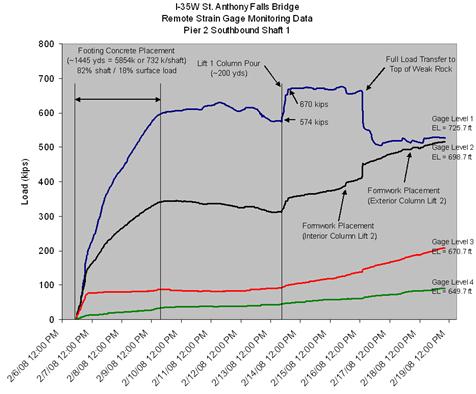
As with the thermal data from the shafts, once these data were received and reviewed, researchers plotted the data online at http://geotech.eng.usf.edu/I35.html. The strain in the shafts at the four different levels was monitored beginning on February 6, 2008, with the pier footing concrete placement. The strain data from the shafts were computed into construction loads, and an annotated graph was updated online (see 1 kip = 454 kg, 1 yd = 0.914 m, 1 ft = 0.305 m, figure 77). Along with this graph, pictures from these events were captured using the CC640 field camera, and they could be related to the points of interest on the graph. This aided in verifying the loading event and the amount of load that was calculated in the shaft (see figure 78 through figure 81).
1 kip = 454 kg
1 yd = 0.914 m
1 ft = 0.305 m
Figure 77. Graph. Shaft construction loads and events.
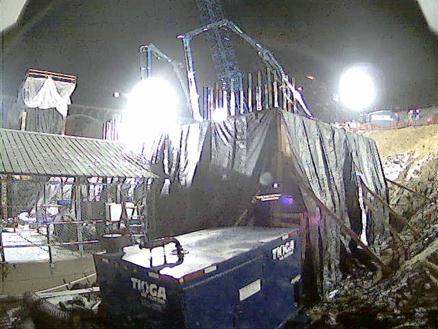
Figure 78. Photo. Pier footing concrete placement.
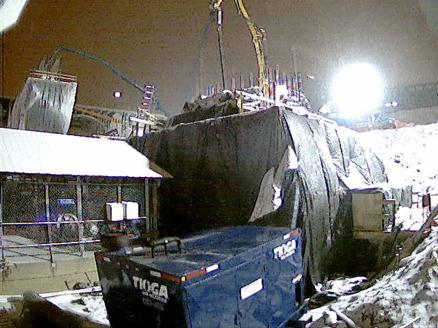
Figure 79. Photo. Lift 1 column concrete placement.
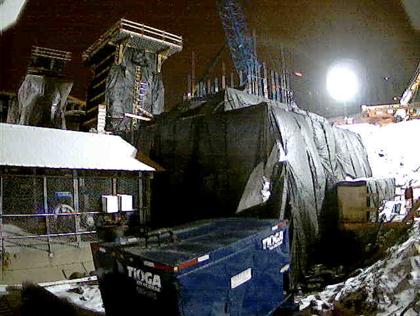
Figure 80. Photo. Interior column lift 2 formwork placement.
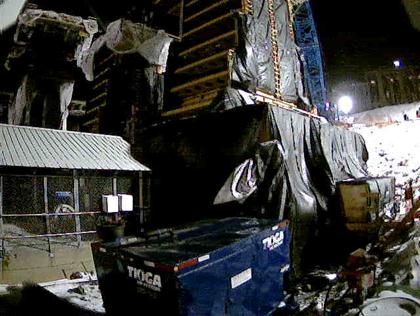
Figure 81. Photo. Exterior column lift 2 formwork placement.
As seen in figure 81, the column foundation became too large to view in its entirety by the close-up camera location. Therefore, the CC640 field camera was moved to a new location on top of the University of Minnesota BOBMAIN building on the southwest bank of the river. This new position afforded oversight of the entire project from end bent to end bent and was used to dovetail recorded strains to construction events (see figure 82).
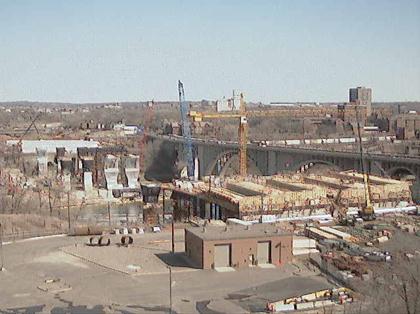
Figure 82. Photo. New perspective from CC640 field camera.
The three monitoring systems used during the construction load monitoring phase fared well. System 1 lost and then regained communication with the host server twice. These occurrences seemed to correspond with the use of a large electric power plant directly adjacent the system’s cellular modem. This type of EMF was known to adversely affect such systems and was therefore a reasonable explanation. As stated in the monitoring procedure, system 1 was repositioned in early March 2008. This system worked without issues from March 5, 2008, to March 19, 2008, when communication between the camera and logger failed. Review of the system revealed the camera was still recording images to its internal compact flash card, but images were not transferred to the logger for scheduled collection. Subsequent baud rate reduction cleared the problem.
As stated in the monitoring procedure, power consumption was a large concern for this phase of monitoring. The power of system 1 was stable throughout this phase. The system was originally completely powered by solar energy, and a deep cycle battery was used as a backup. In early March 2008, the power source was switched to constant A/C (with battery backup) and provided the system with more stabile voltage (see figure 83). At no time did the voltage approach the critical logger shutdown voltage. Results of both the close-up pictures and the overview pictures are shown in figure 78 through figure 82.
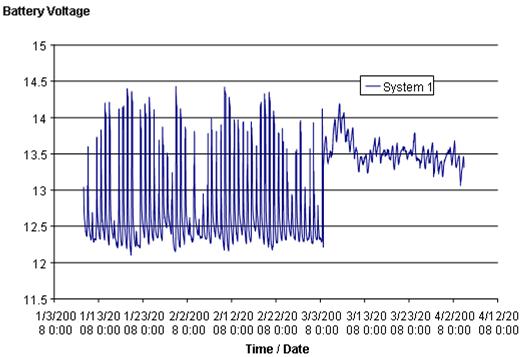
Figure 83. Graph. System 1 battery voltage over time.
The results of system 2 were a little less desirable. The cellular communication with this system became somewhat of a concern with regards to reliability. This system, which was similar to system 1, logged data that were collected without issue from February 5 through March 26, 2008. For a short period following this time frame, no collections were possible. It was unclear whether the system was still powered and logging; however, up until the last collection, the power cycles were regular (see figure 84). Since the critical threshold voltage of 11.2V was not approached at any time, it was unlikely that power interruption was the cause of the communication errors. The concern with the intermittent communication was resolved, but the data collected from one of the four multiplexing units responsible for monitoring nine of the vibrating wire gauges were unintelligible. An onsite visit was required to find a partially cut wire between the MUX unit and AVW-200, and it had started as intermittent and ultimately resulted in complete failure. Simple repair of this connection resumed full operation; data from this time period were not obtained from those gauges.
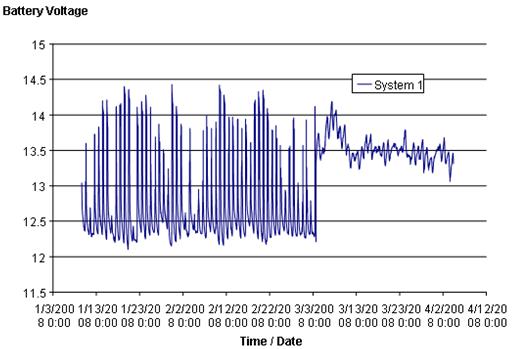
Figure 84. Graph. System 2 battery voltage over time.
The results of system 3 were better than those of system 2 because communication never faltered. The primary difference between this system and the other two was the logger type, CR9000 versus CR1000, the latter of which had not been consistent. The battery voltage of system 3 varied less than the battery voltage of system 2, yet neither system exhibited a power disruption (see figure 85).
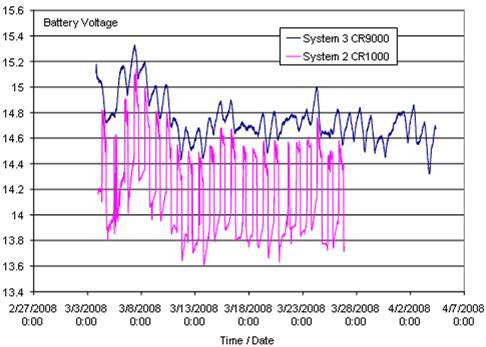
Figure 85. Graph. System 2 versus system 3 battery voltage.
Once a sufficient amount of data were collected, the host Web site for the data review was modified to include hover points associated with pathways to videos or data locations (see figure 86). The link to the south camera perspective takes the user to a page that shows a video made of time lapse photos taken by the CC640 field camera in its altered position atop the University of Minnesota building. The link to the west camera allows users to navigate to a page that shows a video made of time lapse photos taken from the Web camera set up by MnDOT. The pier 2 close-up camera link shows a video made of time lapse photos taken by the CC640 field camera in its original close-up position. All of these videos provide a quick look at the construction progress of the bridge from different vantage points and were used to relate the strain data to specific construction events. The FHWA SSHM site link (http://geotech.eng.usf.edu/I35.html) takes users to a separate page with a close-up view of the site with more hover points (see figure 87). Each link takes users to a plot of the strain of that subject over time (see figure 88 through figure 91). These graphs were broken down into daily increments as shown by the dotted lines running vertically on the graphs. The spaces between these dotted lines are links that take users to the pages with the Web cameras showing the construction progress up to that date. This way, the strain data can be more accurately related to construction events. Negative values on the graphs indicate compression.
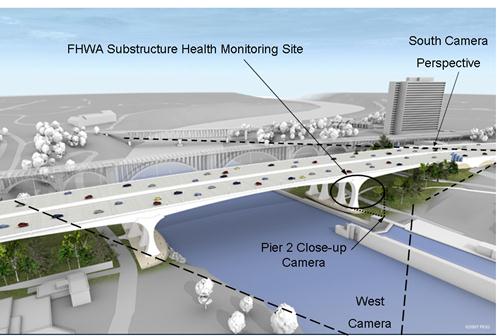
Figure 86. Illustration. Hover points on the main page of St. Anthony Falls Bridge health monitoring Web site.(9)
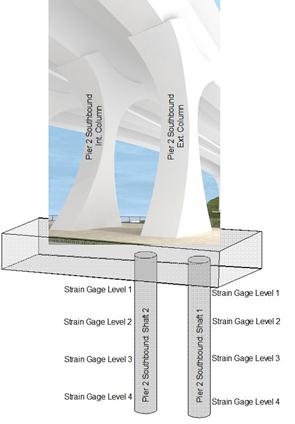
Figure 87. Illustration. Instrumentation scheme for the St. Anthony Falls Bridge health monitoring project.
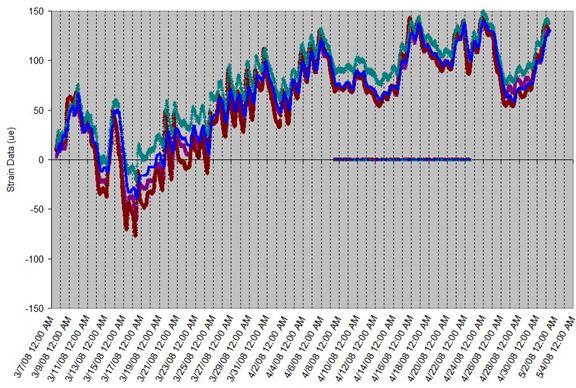
Figure 88. Graph. Pier 2 interior column strain.
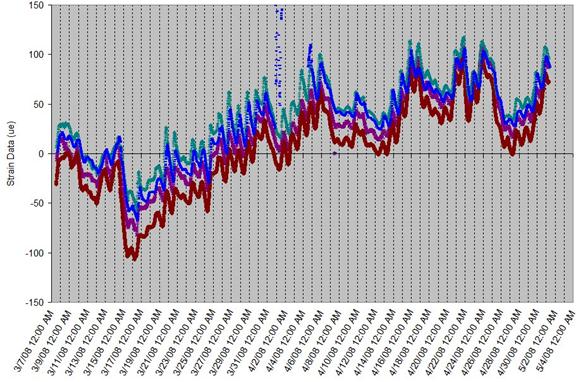
Figure 89. Graph. Pier 2 exterior column strain.
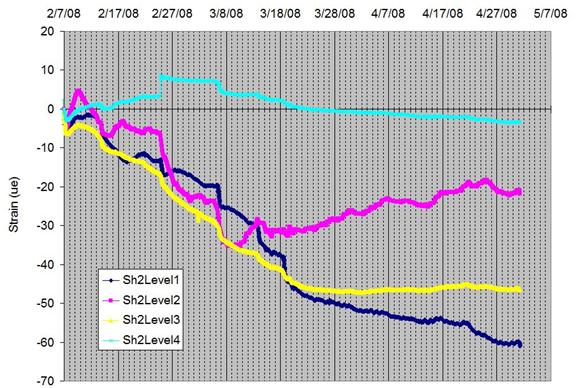
Figure 90. Graph. Pier 2 shaft 2 all levels strain.
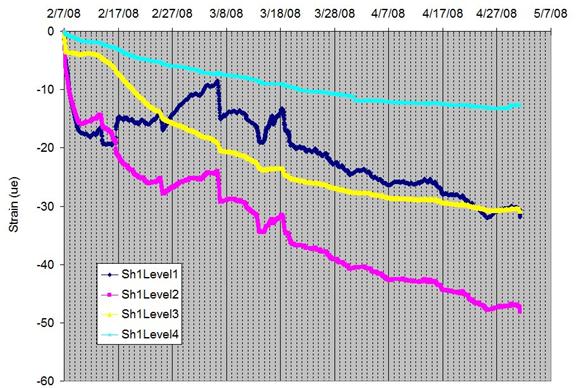
Figure 91. Graph. Pier 2 shaft 1 all levels strain.
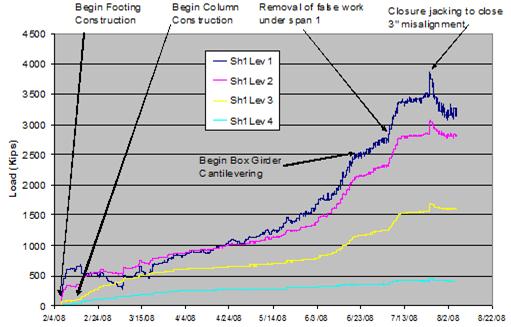
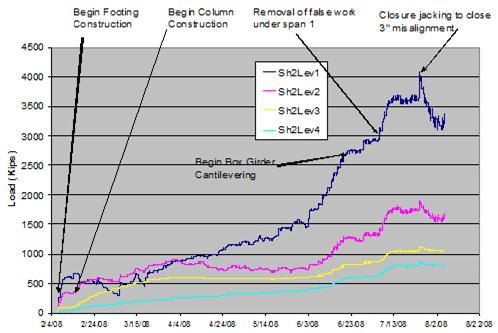
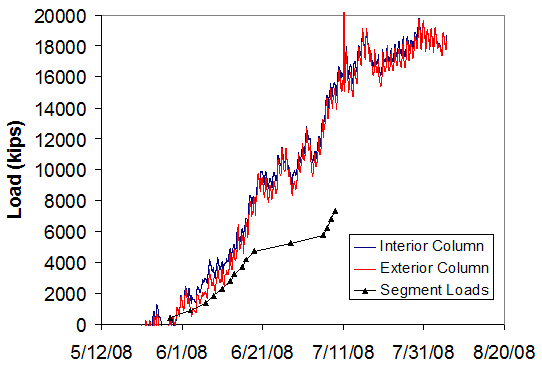
The load on pier 2 was somewhat complicated by indeterminate reactions from false work used to support the cast-in-place span 1 box girders (from end bent 1 to pier 2). As a result, the total load from span 1 was not felt by pier 2 until the bridge was almost completed and as the false work was removed. Precast box girder sections (timeline indicated in figure 92 and figure 93) were installed almost daily, extending from pier 2 toward pier 3 and cantilevered out over the Mississippi River. However, by correlating the number of box sections and their respective weights to the measured strain in each column, the column strain gauges were calibrated with increased confidence. Figure 94 shows the computed load from strain, concrete modulus, area as a function of the logging, and the theoretical reaction due to the known concrete box girder weights using lever arm.
1 kip = 454 kg
Figure 92. Graph. Shaft 1 loads throughout the entire construction sequence.
1 kip = 454 kg
Figure 93. Graph. Shaft 2 loads throughout the entire construction sequence.
1 kip = 454 kg
Figure 94. Graph. Column loads compared with segment placement.
Unlike the shaft gauges located beneath the footing, column loads were subject to daily temperature fluctuations, which can be seen in figure 94. Additionally, the stark difference between the calculated segment load effects on the overall column load was caused by relaxation of the false work support as the cantilevering load provided uplift throughout span 1.
Construction Phase Monitoring Completion
Recall that only two shafts out of the eight in pier 2 (southbound) were instrumented; both were on the south edge of the footing, providing similar responses to the construction loads when considering column bending effects. Unfortunately, the load carried by the other six shafts was not monitored, and the response therein could only be estimated based on engineering principles. Figure 92 and figure 93 show the loads (as converted from measured strains, positive compression) detected in shafts 1 and 2. These figures are annotated to show several significant points in the construction sequence that help explain changes in the load versus time relationship.
By looking at both the shaft response and the column strains, a clearer picture of the loading can be obtained. Figure 95 and figure 96 show the strains recorded for both the interior and exterior columns found on the same eight shafts beneath pier 2 southbound. The increased compressive loads (positive sign) shown in shafts 1 and 2 correspond to expansion required to obtain the necessary tolerances followed by jacking closure at the center span misalignment. This is shown by the increased compression strain on the south edge of the columns that correspond to decreased compression strain (of similar magnitude) on the north edges followed by a reversal upon closure jacking.
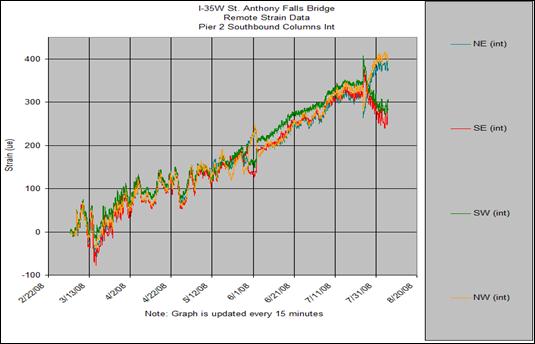
Figure 95. Graph. Strains measured in the interior column of pier 2 southbound.
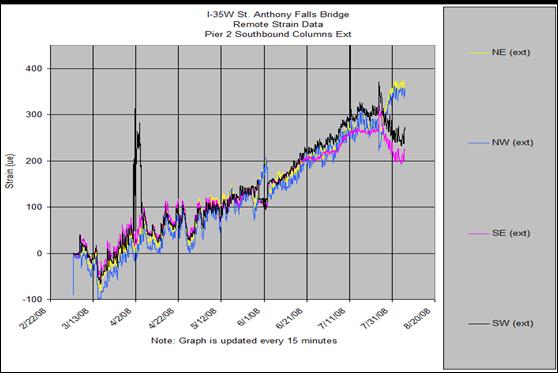
Figure 96. Graph. Strains measured in the exterior column of pier 2 southbound.
Upon further review of these data with the structural engineer, the drastic reduction in strains which resulted in returning to the somewhat normal values was a result of the internal prestressing of the entire section. The ±75-100 µe values shown in the columns were a direct result of a pier movement (away from midspan) of approximately 0.75 inches (19.05 mm) (from field observations). Subsequent prestressing must therefore have resulted in a permanent net movement (toward midspan) of a similar magnitude or approximately 0.75 inches (19.05 mm).
All temporary DAS boxes were again removed to allow the construction of a public viewing platform beneath pier 2 (adjacent to the river). At the time of removal, it was thought that the permanent DAS would be installed within the week in a vault cast aside the northwest corner of the footing (pier 2 southbound). Ultimately, nearly 1 month of data were lost during this disconnection period. Furthermore, it was not clear at that time whether the substructure gauges would be online for the truck tests series scheduled for the following month.
PHASE III-LONG-TERM HEALTH MONITORING
The third and final phase of SSHM for the St. Anthony Falls Bridge Monitoring Project was the long-term health monitoring of the substructure, which was synchronized with the superstructure system. In phase III, the loads induced on the entire bridge by the ongoing daily use of the bridge were monitored as well as those effects caused by diurnal and seasonal temperature variations. The timeline shown in figure 46 indicates that long-term monitoring should have commenced upon completion of the bridge which opened on September 18, 2008, more than 3 months early. However, no live load, diurnal, or seasonal data were available at the time of this report (6 months after the bridge opening), with the exception of several days of monitoring that included live load truck tests.
The long-term monitoring program also included numerous superstructural instrumentation regimes involving deck corrosion, box girder vibrations, box girder strains, etc., which were outside the scope of the SSHM program. SSHM was incorporated into the overall health monitoring of the bridge via an onsite DAS building located east of the north end of the bridge. Therein, various systems were housed to monitor the various gauge types used throughout the bridge. For the SSHM components, two systems are presently being used that replaced the temporary DAS systems described previously. Both systems act as repeaters, whereby the data are collected and transmitted via Ethernet or similar communication to the far end of the bridge (over 1,000 ft (305 m)).
Live load testing of the completed bridge using weighed trucks was conducted 4 days prior to the bridge opening. Although the intention was to have data collected from both the substructural and superstructural instrumentation by the permanent DAS, it became clear 2 days prior to the test that the substructure gauges would not be connected to any unit (temporary or permanent). To that end, FGE, LLC sent personnel to the I-35W bridge site the day before the testing to reconnect to the temporary DAS units, assuring this valuable information was not lost.
Figure 97 shows the temporary DAS being reconnected to the southbound pier 2 footing. The vault in which the permanent repeater DAS units are to be housed is formed with plywood just behind the temporary DAS units shown. The units were reconfigured to record at higher rates(one sample/minute for resistive gauges and two samples/minute for the vibration wire gauges). The 2-min sampling rate for the vibrating wire gauges was the limiting (high-end) rate dictated by the number of gauges, the multiplexers, and the basic physics of the gauge type. The faster resistive gauges were recorded at a 1-min logging rate, but the DAS was sampling at 100 Hz. As before, logging of this device incorporated maximum, minimum, average, and instantaneous readings as accumulated over the 1-min logging interval.
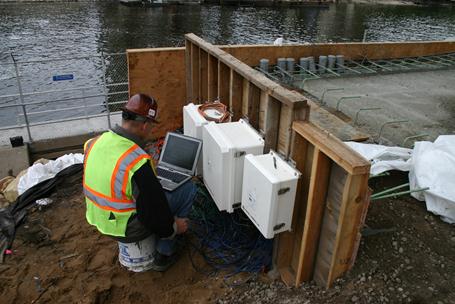
Figure 97. Photo. Temporary DAS system reconnected, reconfigured, and reattached in new location adjacent to the permanent DAS subpanel vault.
Truck testing involved eight fully loaded dump trucks (50,000 lb (22,700 kg) each) driven in a series of patterns across the bridge. Starting with a side-by-side configuration (eight abreast), the trucks began at pier 3 (north side of the river) on the southbound structure and moved systematically across to the south, stopping at prescribed locations (e.g., pier 3, quarter points, midpoint, pier 2, etc.). Figure 98 shows one such truck configuration.
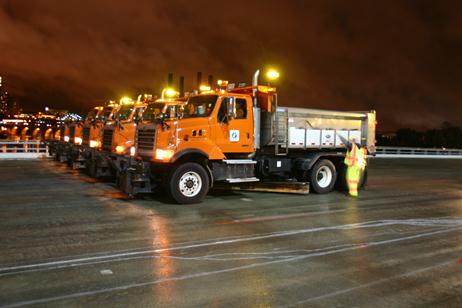
Figure 98. Photo. Trucks (400-kip (181,436.95-kg) total load) staged at predetermined location.
One of the many convenient features of the temporary DAS was the wireless/remote reconfiguration options that allowed onsite or in-office access to the system. While onsite during the afternoon before the truck test, both the vibrating wire and resistive gauge systems were reconfigured via cellular internet access to the host computer in Tampa, FL. Although the host was remotely accessed from the field, all data were being logged to the secure site on 5-min intervals.
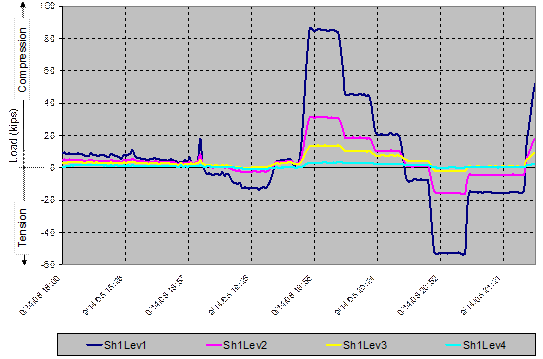
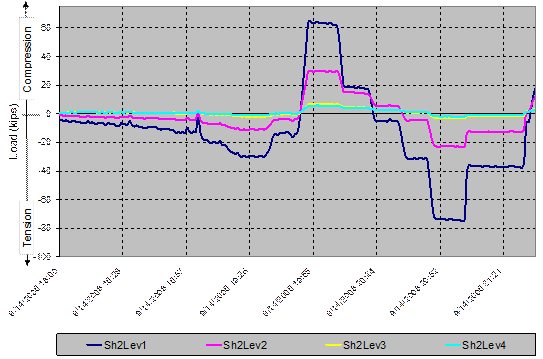
The first series of truck tests were conducted over a 10-h period beginning at 7 p.m. on September 14, 2008, and concluding at 5 a.m. on September 15, 2008. Figure 99 shows the raw data as updated on the host Web site every 5 min. All strains were zeroed once the DAS units were reconnected, which represented live load measurements and showed minute changes in strain due to the truck loads. Figure 100 through figure 102 show a single load cycle for the columns, shaft 1, and shaft 2, respectively. Given the calibration and understanding of the column strain magnitudes afforded by the closure pour strains (±75-100 µe represented a 0.75-inch (19.05-mm) top of column movement), it is clear that as the trucks approached mid-span at approximately 8:30 p.m., the columns moved outward approximately 0.05-0.07 inches (1.27-1.78 mm). This was caused by a slight loss of camber from the centrally located concentrated load. The steps in the data were congruous to the times in which the trucks were either stopped at a given location (10-15-min holds) or moving to the next location. It can also be seen that multiple load cycles were conducted up until the time at which the contractor took over to complete other aspects of the bridge in the early morning hours of that day. This set of tests was denoted as the static truck tests due to the long holding periods. Figure 101 and figure 102 clearly show live load effects all the way down to the toe of each shaft.
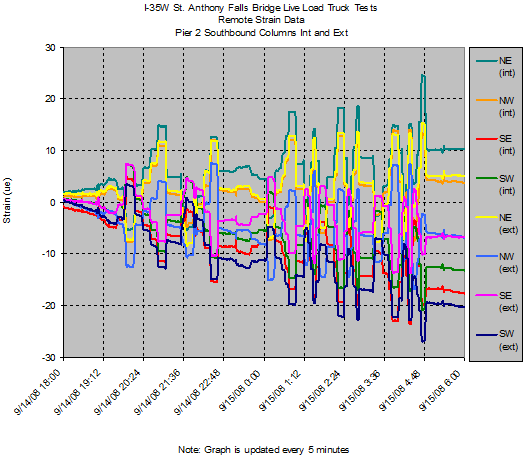
Figure 99. Graph. Column strains during 10-h truck tests (positive compression).
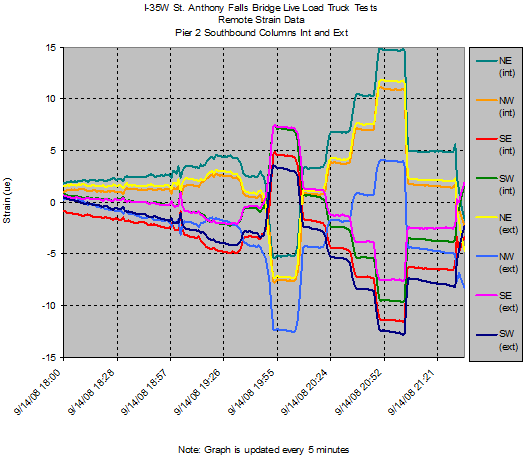
Figure 100. Graph. Truck load test results for both columns for one cycle of truck positions.
1 kip = 454 kg
Figure 101. Graph. Truck load test results for shaft 1 for one cycle of truck positions.
1 kip = 454 kg
Figure 102. Graph. Truck load test results for shaft 2 for one cycle of truck positions.
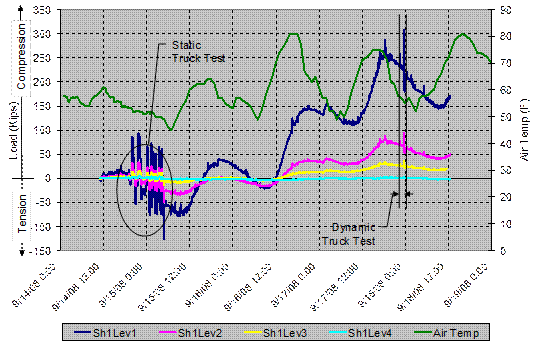
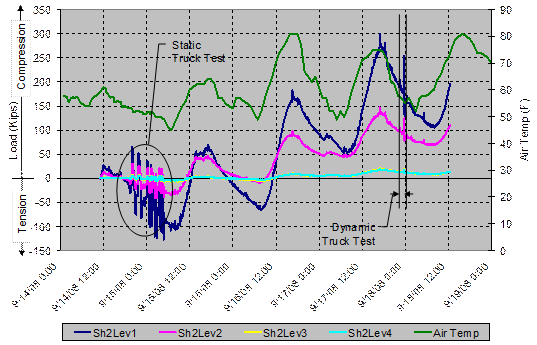
The temporary DAS was left in place for several days in hopes of capturing data from a series of 45-mi/h (72.45-km/h) dynamic truck loadings scheduled later in the week (but prior to the bridge opening at 5 a.m. on September 18, 2008). Figure 103 through figure 106 show a 4.5-day data window starting with the static truck tests on September 14, 2008, and show the effect of diurnal temperature variations through this period. In each of these graphs, the reported temperature for Minneapolis, MN, over that same timeframe is superimposed and virtually mimics the overall strain trends (with the exception of the truck test strains) for four of the eight column gauges. The other four show an opposite effect. Those gauges on the column face closest to the main span (north side) and should experience tension with increased temperature of the main span girders due to thermal expansion. Shaft loads increased as the bridge warmed and expanded, thereby pushing down on the south edge of the footing, which corresponds to the locations of shafts 1 and 2.
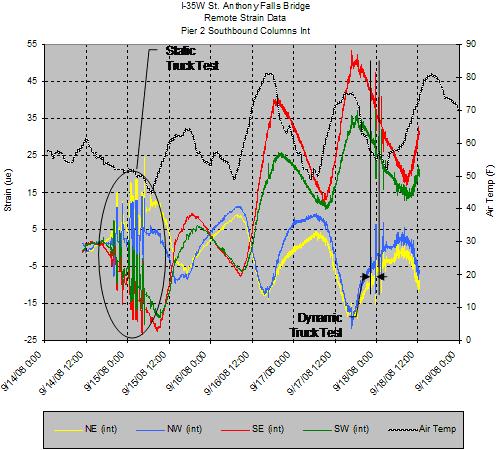
Figure 103. Graph. Live load effects on the interior column over 4.5-day period.
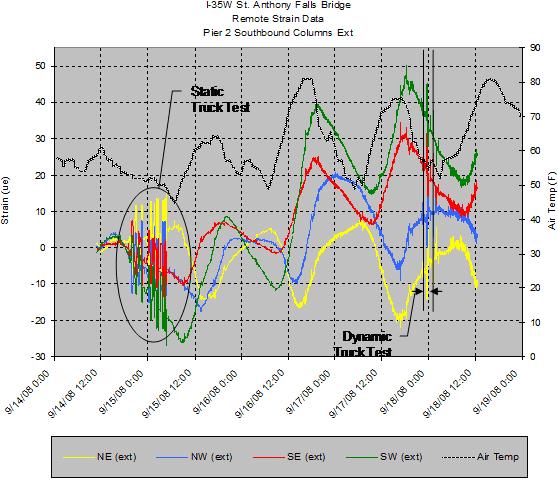
Figure 104. Graph. Live load effects on the exterior column over 4.5-day period.
1 kip = 454 kg
°F = 1.8(°C) + 32
Figure 105. Graph. Live load effects on shaft 1 over 4.5-day period.
1 kip = 454 kg
°F = 1.8(°C) + 32
Figure 106. Graph. Live load effects on shaft 2 over 4.5-day period.
As subsequent dynamic truck tests were scheduled for later that week, the temporary DAS units were left in place in hopes of obtaining the data or until the last possible moment after which the wooded forms to which the units were attached needed to be stripped (see figure 97). Although details of the exact loading event were not available at the time of reporting, the effects of the events were captured, as indicated in figure 103 through figure 106.
System Results and Conclusions
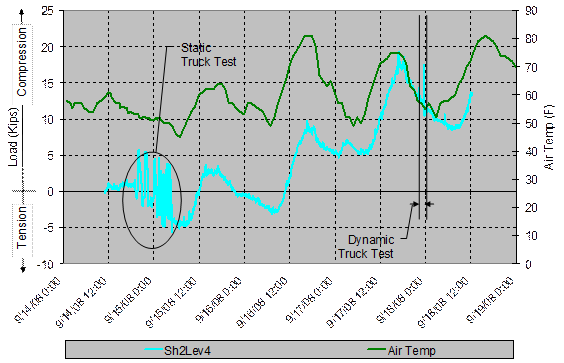
In the absence of long-term monitoring data for the last 6 months, it was difficult to demonstrate the full benefit of the system as it is presently equipped. However, from the small window of available information shown in figure 99 through figure 107, it is clear that the equipment has tremendous capability to detect subtle loading throughout the substructure. Figure 107 shows a scale-enhanced version of figure 106 wherein the moderate daily temperature fluctuations of 20 °F (-6.67 °C) induced axial load variations of approximately 10 kips (4,535.92 kg) at the toe of shafts. Interestingly, the Minneapolis, MN, area can see annual temperature fluctuations of over 100 °F (37.78 °C), which should be easily captured with the SSHM system. Furthermore, the data show live load effects caused by truck loading with magnitudes as much as 5 kips (2,270 kg). It should be noted that these effects are caused by lever arm effects from forces acting horizontally at the top of the column. These are the exact types of forces that typically control foundation design.
1 kip = 454 kg
°F = 1.8(°C) + 32
Figure 107. Graph. Diurnal temperature and truck load effects at the toe of shaft 2.
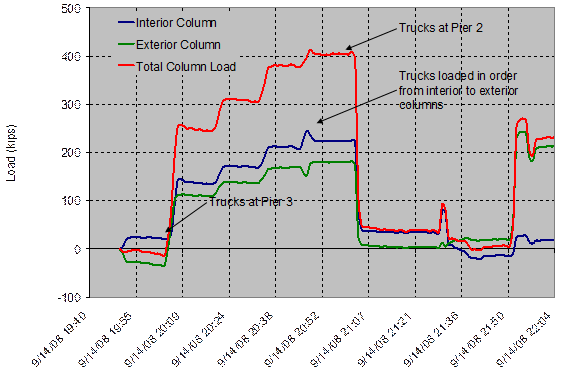
Finally, the results of the truck load tests (although incomplete at the time of this report) served to calibrate the column strain measurements over the entire cross section by taking the sum of the individual average column strains and applying a known concrete modulus. Figure 108 shows the force computed from strain, column cross sectional area, and modulus during the truck load tests where the 400-kip (181,600-kg) total truck loads are corroborated. This also shows that as the trucks were loaded directly over pier 2 (the SSHM project site), some torsion of the box girders and deck assembly caused a slight uplift on the exterior column as trucks were lined up starting from the opposite interior column (east) side of the deck. A similar increased load was observed on the interior column corresponding to the cantilevered loading from that edge of the deck.
1 kip = 454 kg
Figure 108. Graph. Column gauge calibration from known truck loads.