U.S. Department of Transportation
Federal Highway Administration
1200 New Jersey Avenue, SE
Washington, DC 20590
202-366-4000


Skip to content
Facebook iconYouTube iconTwitter iconFlickr iconLinkedInInstagram

Federal Highway Administration Research and Technology
Coordinating, Developing, and Delivering Highway Transportation Innovations

 
REPORT
This report is an archived publication and may contain dated technical, contact, and link information
Back to Publication List        
Publication Number:  FHWA-HRT-17-042    Date:  November 2017
Publication Number: FHWA-HRT-17-042
Date: November 2017


Behavior of a Steel Girder Bolted Splice Connection

Results

This chapter presents the data from the five loading scenarios that were explored. For every loading scenario, the same data plots are shown in the same order as a means to provide easy context for how things change from one loading scenario to another. Additionally, every data plot shows a side-by-side output of the current and new design methods, with the size of the web splice plate being the identifying difference. For each scenario, contour plots are presented for the step that achieves the factored design forces, and, for a later step, that was either the last step or the step where the analysis could no longer converge to a solution. To assist in decoding the contour outputs, the following list defines the six types of stress/strain/force contours that are presented:

Pure Positive Moment

0 shows the moment versus rotation plot for the left support. The current design method results are plotted with circle data points, and the new design method results plotted with square data points. The overall response of the two models does not differ much between the two methods other than a slight reduction in moment strength after yielding. Contour plots present the results for the step with approximately Mu = 8,016 kip-ft applied (see 0 through 0) and for the last step in each analysis (see 0 through 0).
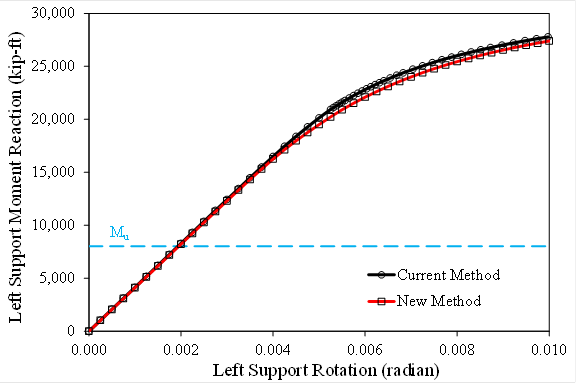
This graph shows the moment versus rotation of the left support under pure positive moment for the splice designed using the current and new methods. The x-axis shows left support rotation and ranges from 0 to 0.010 radians. The y-axis shows left support moment reaction and ranges from 0 to 30,000 kip-ft. A horizontal dashed line annotated M subscript u is situated at 8,016 kip-ft. Two lines are shown on the plot: one is labeled current method and uses circular data points, and the other is labeled new method uses square data points. Each line is identically linear from the origin up to about 17,000 kip-ft and 0.00425 radians. After this point, both plots begin to round over nonlinearly and end at approximately 27,500 kip-ft and 0.010 radians.

Source: FHWA
Figure 15. Graph. Moment versus rotation of the left support under pure positive moment for the splice designed using the current and new methods.
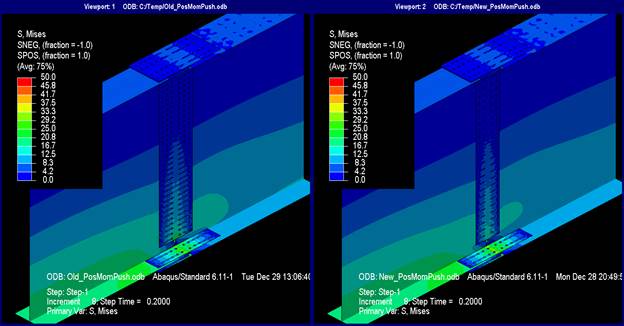
This illustration shows the Mises stresses at pure positive M subscript u. the Mises stresses are indistinguishable between the models designed with the new and current splice design philosophy. The stresses at the top flange are between 0 and 4.0 ksi and linearly increase toward the bottom flange that has stresses ranging between 16 and 25 ksi in the left girder and 8 and 12 ksi in the right girder. The bottom flange splice plates have a peak stress of 25 ksi at the location of the splice. The stresses in the web splice plate are about the same as in the girder webs.

Source: FHWA
Figure 16. Illustration. Mises stresses at pure positive Mu (deck not shown for clarity).
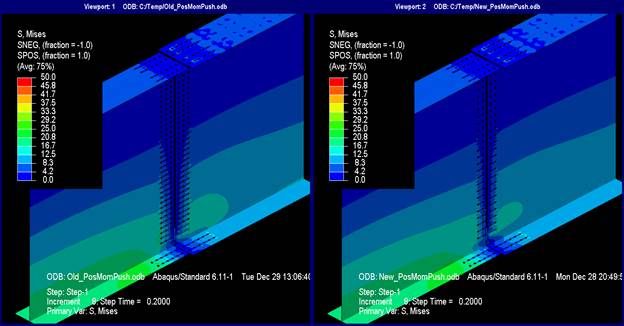
This illustration shows the Mises stresses at pure positive M subscript u. The Mises stresses are indistinguishable between the models designed with the new and current splice design philosophy. The stresses at the top flange are between 0 and 4 ksi and linearly increase toward the bottom flange that has stresses ranging from 16 to 25 ksi in the left girder and 8 to 12 ksi in the right girder. The bottom flange splice plates have a peak stress of 25 ksi at the location of the splice. The stresses in the web splice plate are about the same as in the girder webs. With the splice plates not shown, the stress patterns in the girder covered by the splice plates only show a linear degradation of stress from the lead fastener in the direction of force to the actual free edge of the splice within each girder.

Source: FHWA
Figure 17. Illustration. Mises stresses at pure positive Mu (splice plates and deck not shown for clarity).

This illustration shows the longitudinal stresses at pure positive M subscript u. The longitudinal stresses are indistinguishable between the models designed with the new and current splice design philosophy. The stresses at the top flange are approximately 0 ksi and linearly increase toward the bottom flange that has stresses ranging from 16 to 25 ksi in the left girder and 8 to 16 ksi in the right girder. The bottom flange splice plates have a peak stress at their center ranging between 25 and 33 ksi, though the length of plate this stress is distributed over is slightly longer in the splice designed by the new method. The stresses in the web splice plate are about the same as in the girder webs; however, stress in the web splice plate is largest at its bottom. For the current design method, that stress is approximately 25 ksi, and for the new design method, it is approximately 16 ksi.

Source: FHWA
Figure 18. Illustration. Longitudinal stresses at pure positive Mu (deck not shown for clarity).
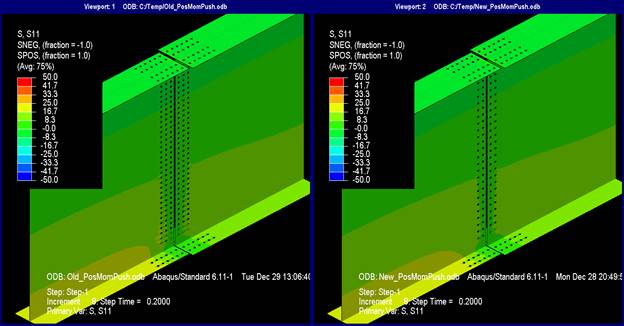
This illustration shows longitudinal stresses at pure positive M subscript u. The longitudinal stresses are indistinguishable between the models designed with the new and current splice design philosophy. The stresses at the top flange are approximately 0 ksi and linearly increase toward the bottom flange that has stresses ranging from 16 to 25 ksi in the left girder and 8 to 16 ksi in the right girder. The bottom flange splice plates have a peak stress at their center ranging between 25 and 33 ksi, though the length of plate this stress is distributed over is slightly longer in the splice designed by the new method. The stresses in the web splice plate are about the same as in the girder webs; however, stress in the web splice plate is largest at its bottom. For the current design method, that stress is approximately 25 ksi, while it is approximately 16 ksi for the new design method. With the splice plates not shown, the stress patterns in the girder covered by the splice plates only show a linear degradation of stress from the lead fastener in the direction of force to the actual free edge of the splice within each girder.

Source: FHWA
Figure 19. Illustration. Longitudinal stresses at pure positive Mu (splice plates and deck not shown for clarity).
This illustration shows the resultant forces on bold shear planes at pure positive M subscript u. The shear forces in the bolts in the top flange splice are nearly 0 kip for all bolts in both scenarios. For both cases, the bolts at the top of the web splice have bolt shears of approximately 0 kip and linearly increase moving toward the bottom of the web splice. For the current design method, the bottom bolt shears at the bottom of the web splice range from 7 to 10 kip. For the splice designed with the new method, the bolt shear ranges from 10.5 to 17.5 kip. For the bottom flange splice bolts in both design cases, the bolt shears range from 7 to 17.5 kip, with lower magnitude shears near the interior of the flange splice and the higher forces at the lead fasteners in the direction of flange force.

Source: FHWA
Figure 20. Illustration. Resultant forces on bolt shear planes at pure positive Mu.

This graph shows web splice bolt shear vectors at pure positive M subscript u. The x-axis shows the X-coordinate from -20 to 20 inches, and the y-axis shows the Y-coordinate from 0 to 120 inches. The bolt shear direction vectors in both design cases are barely perceivable in each design case and can only be perceived in the lower third of bolt rows in the web splice. For the splice designed with the current method, the bolt shear vectors are horizontal and peak between 8 and 12 kip. For the splice designed with the new method, the bolt shear vectors are also horizontal and peak between 12 and 16 kip.

Source: FHWA
Figure 21. Graph. Web splice bolt shear vectors at pure positive Mu.

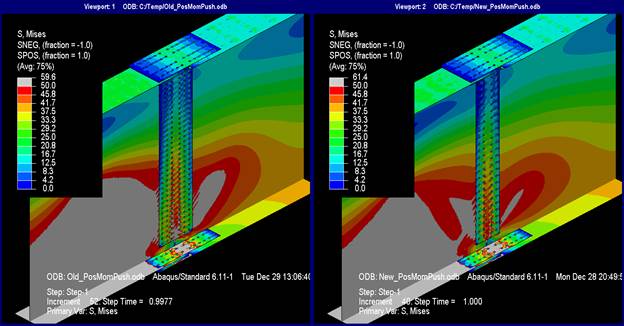
This illustration shows the Mises stresses at the last step of pure positive moment. At the step of loading, yielding occurs in both models. For the splice designed with the current method, the left girder is yielded over its lower half, while in the right girder, yielding is isolated to the web starting at the bottom corner of the web splice plate and extending diagonally upward to about one-third of the depth of the web. The bottom flange splice plates are yielded at the location of the splice, and the web splice plate has yielded at the bottom three rows of bolts and nearly yielded to almost its half depth. For the model designed with the new method, the left girder is yielded over its lower half, while in the right girder, yielding is isolated to the web starting at the bottom corner of the web splice plate and extending diagonally upward to about the quarter depth of the web. The bottom flange splice plates are yielded at the location of the splice, and the web splice plate has not yielded at all despite the web being yielded to almost one-third of its depth.

Source: FHWA
Figure 22. Illustration. Mises stresses at last step of pure positive moment (deck not shown for clarity).

This illustration shows the Mises stresses at the last step of pure positive moment. At the step of loading, yielding occurs in both models. For the splice designed with the current method, the left girder is yielded over its lower half, while in the right girder, yielding is isolated to the web starting at the bottom corner of the web splice plate and extending diagonally upward to about one-third of the depth of the web. The bottom flange splice plates are yielded at the location of the splice, and the web splice plate has yielded at the bottom three rows of bolts and nearly yielded to almost about one-half of its depth. For the model designed with the new method, the left girder is yielded over its lower half, while in the right girder, yielding is isolated to the web starting at the bottom corner of the web splice plate and extending diagonally upward to about the quarter depth of the web. The bottom flange splice plates are yielded at the location of the splice, and the web splice plate has not yielded at all, despite the web being yielded to almost one-third of its depth. With the splice plates not shown, the stress patterns in the girder covered by the splice plates only show a linear degradation of stress from the lead fastener in the direction of force to the zero stress at the free edge of the splice within each girder.

Source: FHWA
Figure 23. Illustration. Mises stresses at last step of pure positive moment (splice plates and deck not shown for clarity).

This illustration shows the longitudinal stresses at the last step of pure positive moment. At the step of loading, there are instances where areas of both models have longitudinal stresses exceeding 50 ksi. For the splice designed with the current method, the left girder has stresses exceeding 50 ksi over its lower half, and in the right girder, stresses exceeding yield are isolated to a portion of the web between the fourth and twelfth rows of the web splice. The bottom flange splice plates exceed 50 ksi at the location of the splice, and the web splice plate has exceeded 50 ksi at the bottom six rows of bolts and nearly 50 ksi to almost its half-depth. For the model designed with the new method, the left girder is yielded over its lower half, while in the right girder, yielding is isolated to the web between the second and sixth rows of bolts in the web. The bottom flange splice plates exceed yield at the location of the splice, and the web splice plate has stresses at nearly 50 ksi from the bottom up to about its half-depth.

Source: FHWA
Figure 24. Illustration. Longitudinal stresses at last step of pure positive moment (deck not shown for clarity).
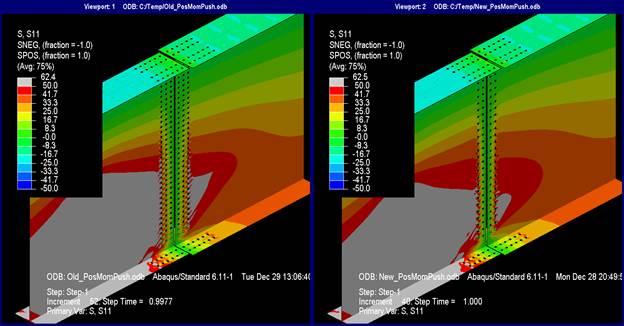
This illustration shows the longitudinal stresses at the last step of pure positive moment. At the step of loading, there are instances where areas of both models have longitudinal stresses exceeding 50 ksi. For the splice designed with the current method, the left girder has stresses exceeding 50 ksi over its lower half, while in the right girder, stresses exceeding yield are isolated to a portion of the web between the 4th and 12th rows of the web splice. The bottom flange splice plates exceed 50 ksi at the location of the splice, and the web splice plate has exceeded 50 ksi at the bottom six rows of bolts and nearly 50 ksi to almost its half-depth. For the model designed with the new method, the left girder is yielded over its lower half, while in the right girder, yielding is isolated to the web between the second and sixth rows of bolts in the web. The bottom flange splice plates exceed yield at the location of the splice, and the web splice plate has stresses at nearly 50 ksi from the bottom up to about its half-depth. With the splice plates not shown, the stress patterns in the girder covered by the splice plates only show a linear degradation of stress from the lead fastener in the direction of force to the zero stress at the free edge of the splice within each girder. The stresses exceeding 50 ksi in the girder sections do not penetrate into the fastener patterns in the girders.

Source: FHWA
Figure 25. Illustration. Longitudinal stresses at last step of pure positive moment (splice plates and deck not shown for clarity).
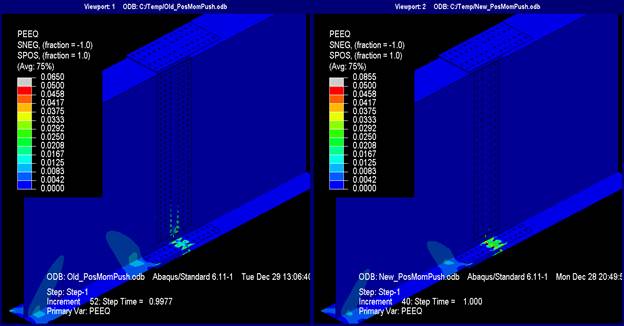
This illustration shows the plastic strain equivalent (PEEQ) at the last step of pure positive moment. In both models, visible plastic strains are present in the bottom flange of the left girder at the end of the flange splice plate. Also, the plastic strains range up to about 1.2 percent. However, in the model designed with the current method, the zone of plastic strain is a little larger. The plastic strain in the bottom flange splice plates is about 2 percent at the location of the splice, and a small zone of plastic strain can be seen in isolated pockets around bolt holes in the web splice plate for the bottom five rows of bolts. In the model designed with the new method, the plastic strain in the bottom flange splice plates is about 3 percent at the location of the splice, and no plastic strain is visible in the web splice plate.

Source: FHWA
Figure 26. Illustration. PEEQ at last step of pure positive moment (deck not shown for clarity).
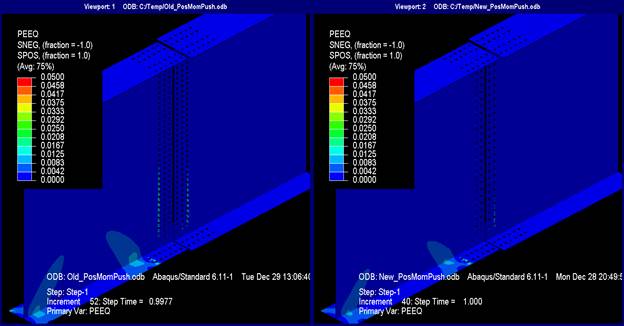
This illustration shows the plastic strain equivalent (PEEQ) at the last step of pure positive moment. In both models, visible plastic strains are present in the bottom flange of the left girder at the end of the flange splice plate. Also, the plastic strains range up to about 1.2 percent. However, in the model designed with the current method, the zone of plastic strain is a little larger. Also, the plastic strain in the bottom flange splice plates is about 2 percent at the location of the splice, and a small zone of plastic strain can be seen in isolated pockets around bolt holes in the web splice plate for the bottom five rows of bolts. In the model designed with the new method, the plastic strain in the bottom flange splice plates is about 3 percent at the location of the splice, and no plastic strain is visible in the web splice plate. Without the web splice plate in the model designed with the current method, isolated plastic strains of 1 percent can be seen at the lead fasteners on the web splice in the bottom third of the girder. No additional plastic strain can be seen in the model designed with the new method.

Source: FHWA
Figure 27. Illustration. PEEQ at last step of pure positive moment (splice plates and deck not shown for clarity).
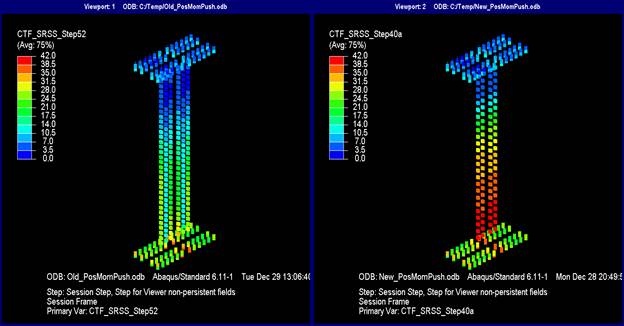
This illustration shows the resultant forces on bolt shear planes at the last step of pure positive moment. In the model designed with the current method, the bolt shears in the top flange splice range from 0 to 10.5 kip. In the web splice plate, the bolt shears at the top of the splice are approximately 0 kip and linearly increase toward the bottom of the plate, where they peak between 28 and 31.5 kip. The bottom flange splice bolts range from 17.5 to 38.5 kip, with the higher forces isolated to the lead fasteners. In the model designed with the new method, the bolt shears in the top flange splice range from 0 to 10.5 kip. In the web splice plate, the bolt shears at the top of the splice are approximately 0 kip and linearly increase toward the bottom of the plate, where they peak between 38.5 and 42 kip. The bottom flange splice bolts range from 24.5 to 38.5 kip, with the higher forces isolated to the lead fasteners.

Source: FHWA
Figure 28. Illustration. Resultant forces on bolt shear planes at last step of pure positive moment.

This graph shows the web splice bolt shear vectors at the last step of pure positive moment. The x-axis shows the X-coordinate and ranges from -20 to 20 inches. The y-axis shows the Y-coordinate and ranges from 0 to 120 inches. In the model designed with the current method, the bolt shear vectors at the top of the web splice are all less than 4 kip. The vectors increase in magnitude toward the bottom of the web splice, where they peak between 32 and 36 kip, although that is isolated to the corner bolt. In the model designed with the new method, the bolt shear vectors at the top of the web splice are all less than 4 kip. The vectors increase in magnitude toward the bottom of the web splice, where they have magnitudes in excess of 40 kip. In each design case, the vectors are all nearly horizontal.

Source: FHWA
Figure 29. Graph. Web splice bolt shear vectors at last step of pure positive moment.

At the design moment, the results in terms of Mises and longitudinal stresses (see 0 though 0) do not differ much between the two methods. The only noticeable difference is that the splice designed by the new method had fewer bolts in the web, which resulted in a higher demand over the splice designed by the current method. However, the shear forces were well within the limits of the bolts (see 0 and 0).

Analysis of the plots from the last step show that the rounding over of the moment/rotation curve presented in 0 was due to plastic hinging of the left girder section. At 0.01 radians of rotation, about half the depth of the left girder has yielded at this point (see 0 through 0). The larger web splice in the splice designed by the current method also transferred more moment than the web splice designed by the new method, as is evident from the increased yielding in the left girder section (see 0). The PEEQ also shows that the splice designed by the current method attracted more plasticity into the web splice, although the splice designed by the new method led to flange splices with a higher demand (see 0 and 0). However, the web bolt demands were also higher for splice designed by the new method (see 0 and 0), with the largest bolt force being 41.5 kip. It is likely that any additional moment would effectively start fracturing bolts in the splice designed by the new method. However, the limit state of bolt fracture occurred at three times the design moment, and this would not have controlled the design. The vector plots in 0 show the web’s participation in transferring moment because the vectors are horizontal (i.e., no shear in web) with a linear variation in magnitude increasing toward the tension flange.

Pure Negative Moment

0 shows the moment versus rotation plot for the left support with the current method results plotted with circular data points and the new method results plotted with square data points. The overall responses of the two models are nearly equal, and it is obvious that negative moment controlled the design of this connection because the connection did not have a tremendous reserve in strength beyond the design negative moment. Contour plots are presented for the step with approximately Mu = 15,185 kip-ft applied (see 0 through 0) and for the last step in each analysis (see 0 through 0).
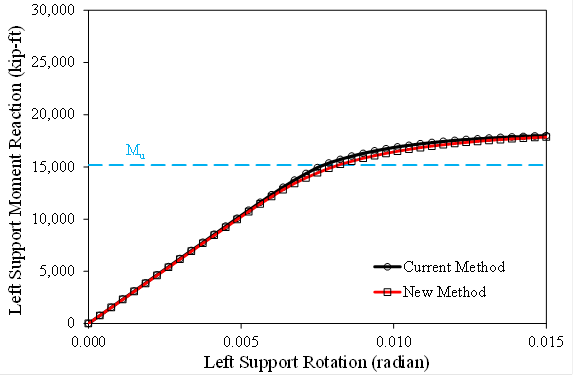
This graph shows the moment versus rotation of the left support under pure negative moment for the splice designed using the current and new methods. The x-axis shows left support rotation and ranges from 0 to 0.015 radians. The y-axis shows left support moment reaction and ranges from 0 to 30,000 kip-ft. A horizontal dashed line annotated M subscript u is shown at 15,185 kip-ft. Two lines are shown: one for the current method uses circular data points, and one for the new method uses square data points. Each line is identically linear from the origin up to about 14,000 kip-ft and 0.0063 radians. After this point, both plots begin to round over nonlinearly and end at approximately 17,800 kip-ft and 0.015 radians.

Source: FHWA
Figure 30. Graph. Moment versus rotation of the left support under pure negative moment for the splice designed using the current and new methods.
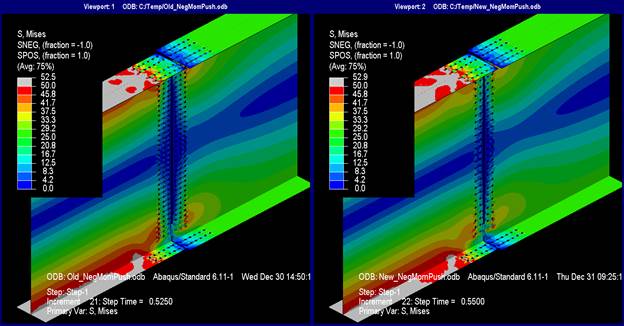
This illustration shows the Mises stresses are pure negative M subscript u. The Mises stresses are indistinguishable between the models designed with the new and current splice design philosophies. The stresses in the top and bottom flanges of the left girder have exceeded yield, while in the right girder, they are approximately 25 ksi. In both girder sections, the mid-depth of the webs are at a stress of 0 ksi. Both the top and bottom flange splice plates have exceeded yield at the point of the splice. The web splice plates at their top and bottom extremes are nearly at yield.

Source: FHWA
Figure 31. Illustration. Mises stresses at pure negative Mu.

This illustration shows the Mises stresses at pure negative M subscript u where the splice plates are not shown. The Mises stresses are indistinguishable between the models designed with the new and current splice design philosophies. The stresses in the top and bottom flanges of the left girder have exceeded yield, while in the right girder, they are approximately 
25 ksi. In both girder sections, the mid-depth of the webs are at a stress of 0 ksi. Both top and bottom flange splice plates have exceeded yield at the point of the splice. The web splice plates at their top and bottom extremes are nearly at yield. Without the splice plates in the view, it can be seen that any yielding in the girders does not extend into the bolt patterns beneath the splice plates. The stresses within the fastener pattern of the girder sections linearly decrease from the lead fasteners to 0 ksi stress at the free edges of the girders.

Source: FHWA
Figure 32. Illustration. Mises stresses at pure negative Mu (splice plates not shown for clarity).
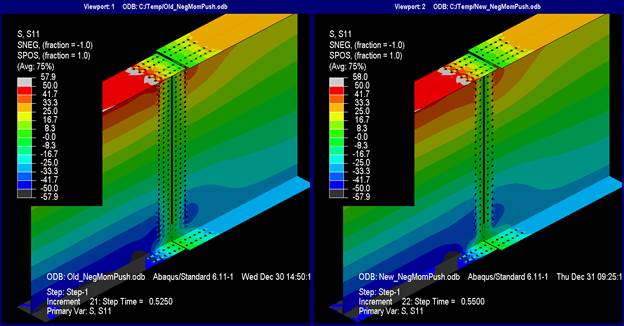
This illustration shows longitudinal stresses at pure negative M subscript u. The longitudinal stresses are indistinguishable between the models designed with either the current or new methods. In both cases, the top flange of the left girder exceeds 50 ksi at the edge of the flange splice, and the remainder of the top flange is nearly at 50 ksi. The bottom flange of the left girder mostly exceeds -50 ksi. As for the right girder, the top flange stresses are between 25 and 33.3 ksi, and the bottom flange is between -25 and -33.3 ksi. The stress in the web varies linearly and reaches 0 ksi at the mid-depth. The top and bottom flange splice plates have exceeded yield at the location of the splice. The web splice plates are nearly at 50 ksi at the top and nearly at -50 ksi at the bottom.

Source: FHWA
Figure 33. Illustration. Longitudinal stresses at pure negative Mu.

This illustration shows longitudinal stresses at pure negative M subscript u where splice plates are not shown. The longitudinal stresses are indistinguishable between the models designed with either the current or new methods. In both cases, the top flange of the left girder exceeds 50 ksi at the edge of the flange splice, and the remainder of the top flange is nearly at 50 ksi. The bottom flange of the left girder mostly exceeds -50 ksi. As for the right girder, the top flange stresses are between 25 and 33.3 ksi, and the bottom flange is between -25 and -33.3 ksi. The stress in the web varies linearly and reaches 0 ksi at the mid-depth. The top and bottom flange splice plates exceed yield at the location of the splice. The web splice plates are nearly at 50 ksi at the top and nearly at -50 ksi at the bottom. Without the splice plates in the view, it can be seen that any yielding in the girders does not extend into the bolt patterns beneath the splice plates. The stresses within the fastener pattern of the girder sections linearly decrease from the lead fasteners to 0 ksi stress at the free edges of the girders.

Source: FHWA
Figure 34. Illustration. Longitudinal stresses at pure negative Mu (splice plates not shown for clarity).
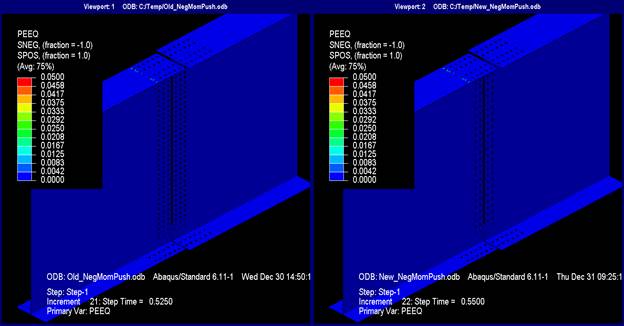
This illustration shows plastic strain equivalent (PEEQ) at pure negative M subscript u. In the model for the current design method, there is limited plasticity to the edges of holes in the top and bottom flange splice plates and only for the lead fasteners. This plasticity is 1 percent. In the model for new design method, the strain appears to be about 1.6 percent, although it is distributed along the net section of the lead fastener line in both the top and bottom flange splice plates.

Source: FHWA
Figure 35. Illustration. PEEQ at pure negative Mu.

This illustration shows plastic strain equivalent (PEEQ) at pure negative M subscript u where splice plates are not shown. In the model for the current design method, there is limited plasticity to the edges of holes in the top and bottom flange splice plates and only for the lead fasteners. This plasticity is 1 percent. In the model for new design method, the strain appears to be about 1.6 percent, although it is distributed along the net section of the lead fastener line in both the top and bottom flange splice plates. Without the splice plates, there is no identifiable plasticity in the girder sections.

Source: FHWA
Figure 36. Illustration. PEEQ at pure negative Mu (splice plates not shown for clarity).
This illustration shows the resultant forces on bolt shear planes at pure negative M subscript u. In the model designed with the current method, the bolt shears in the top and bottom flange splice range from 14 to 31.5 kip each, with the lead fasteners being the highest. In the web splice plate designed with the current method, the bolt shears at the extremes of the web splice plate are between 17.5 and 21 kip and decrease to 0 kip at the center. In the model designed with the new method, the bolt shears in the top and bottom flange splice range from 14 to 35 kip each, with the lead fasteners being the highest. In the web splice plate designed with the new method, the bolt shears at the extremes of the web splice plate are between 31.5 and 35 kip and decrease to 0 kip at the center.

Source: FHWA
Figure 37. Illustration. Resultant forces on bolt shear planes at pure negative Mu.

This illustration shows the web splice bolt shear vectors at pure negative M subscript u. In the model designed with the current method, the bolt shear vectors are symmetric about the center of the web splice with magnitudes between 24 and 28 kip at the extremes and linearly decrease to magnitudes less than 4 kip at the center. In the model designed with the new method, the bolt shear vectors are symmetric about the center of the web splice with magnitudes between 32 and 36 kip at the extremes and linearly decrease to magnitudes less than 4 kip at the center. All bolt shear vectors in both designed scenarios are horizontal in direction.

Source: FHWA
Figure 38. Graph. Web splice bolt shear vectors at pure negative Mu.

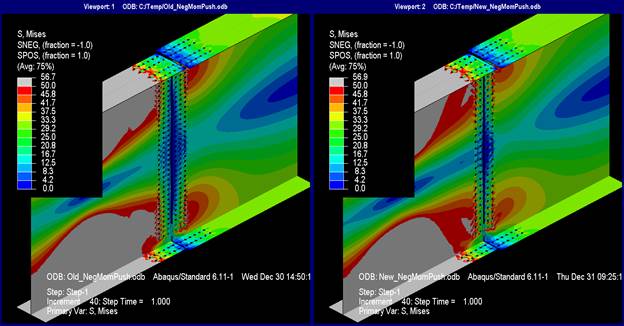
This illustration shows the Mises stresses at the last step of pure negative moment. In the model designed with the current method, the yielding pattern is symmetric about the centerline of the girders. The left girder section has each flange entirely yielded, and one-quarter of the web adjacent to the flange yielded. The yielding in the web extends all the way to the edge of the web splice plate. The top and bottom flange splice plates are fully yielded at the section of the splice. The right girder has no visible yielding. The extreme ends of the web splice plates are yielded at the section of the splice for only two rows of bolts. For the model designed with the new method, the only difference is that the yielding in the left girder web does not extend to the edge of the web splice plate, and the web splice plate itself has not yielded.

Source: FHWA
Figure 39. Illustration. Mises stresses at last step of pure negative moment.

This illustration shows the Mises stresses at the last step of pure negative moment with the splice plates not shown. In the model designed with the current method, the yielding pattern is symmetric about the centerline of the girders. The left girder section has each flange entirely yielded and one-quarter of the web adjacent to the flange yielded. The yielding in the web extends all the way to the edge of the web splice plate. The top and bottom flange splice plates are fully yielded at the section of the splice. The right girder has no visible yielding. The extreme ends of the web splice plates are yielded at the section of the splice for only two rows of bolts. For the model designed with the new method, the only difference is that the yielding in the left girder web does not extend to the edge of the web splice plate, and the web splice plate itself has not yielded. Without the splice plates in the view, it can be seen that any yielding in the girders does not extend into the bolt patterns beneath the splice plates. The stresses within the fastener pattern of the girder sections linearly decrease from the lead fasteners to zero stress at the free edges of the girders.

Source: FHWA
Figure 40. Illustration. Mises stresses at last step of pure negative moment (splice plates not shown for clarity).
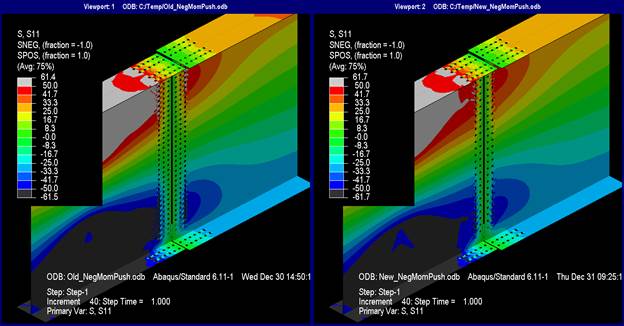
This illustration shows the longitudinal stresses at the last step of pure negative moment. In the model designed with the current method, the top flange of the left girder and one-quarter of the web beneath it have stress in excess of 50 ksi, and the bottom flange and one-quarter of the web above it have stress in excess of -50 ksi. The left girder section has a top flange stress in the range of 25 to 33.3 ksi, and the bottom flange ranges from -25 to -33 ksi. It varies linearly in the web between the stress values in the flanges. The top flange splice plates and the top three rows of fasteners in the web splice have stress in excess of 50 ksi at the section of the splice, and the bottom flange splice plates and three rows of holes in the web splice over it have stress in excess of -50 ksi at the location of the splice. In the model designed with the new method, the left girder top flange and one-quarter of the web beneath it have stress in excess of 50 ksi, and the bottom flange and one-quarter of the web above it have stress in excess of -50 ksi. The left girder section has a top flange stress in the range of 25 to 33.3 ksi, and the bottom flange ranges from -25 to -33 ksi. It varies linearly in the web between the stress values in the flanges. The top flange splice plates have stress in excess of 50 ksi at the section of the splice, and the bottom flange splice plates have stresses in excess of -50 ksi at the location of the splice.

Source: FHWA
Figure 41. Illustration. Longitudinal stresses at last step of pure negative moment.

This illustration shows the longitudinal stresses at the last step of pure negative moment with the splice plates not shown. In the model designed with the current method, the top flange of the left girder and one-quarter of the web beneath it have stress in excess of 50 ksi, and the bottom flange and one-quarter of the web above it have stress in excess of -50 ksi. The left girder section has a top flange stress in the range of 25 to 33.3 ksi, and the bottom flange ranges from -25 to -33 ksi. It varies linearly in the web between the stress values in the flanges. The top flange splice plates and the top three rows of fasteners in the web splice have stress in excess of 50 ksi at the section of the splice, and the bottom flange splice plates and three rows of holes in the web splice over it have stress in excess of -50 ksi at the location of the splice. In the model designed with the new method, the left girder top flange and one-quarter of the web beneath it have stress in excess of 50 ksi, and the bottom flange and one-quarter of the web above it have stress in excess of -50 ksi. The left girder section has a top flange stress in the range of 25 to 33.3 ksi, and the bottom flange ranges from -25 to -33 ksi. It varies linearly in the web between the stress values in the flanges. The top flange splice plates have stress in excess of 50 ksi at the section of the splice, and the bottom flange splice plates have stresses in excess of -50 ksi at the location of the splice. Without the splice plates in the view, it can be seen that any yielding in the girders does not extend into the bolt patterns beneath the splice plates. The stresses within the fastener pattern of the girder sections linearly decrease from the lead fasteners to zero stress at the free edges of the girders.

Source: FHWA
Figure 42. Illustration. Longitudinal stresses at last step of pure negative moment (splice plates not shown for clarity).
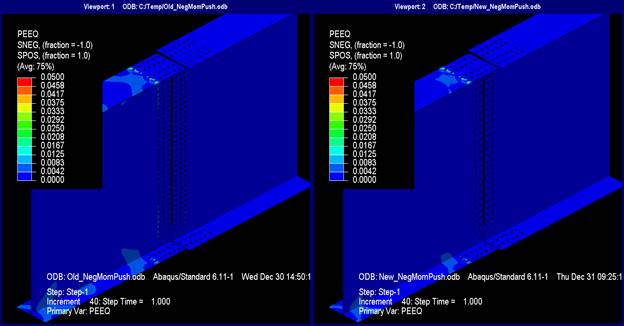
This illustration shows plastic strain equivalent (PEEQ) at the last step of pure negative moment. In both models, localized plastic strain with a magnitude of approximately 0.4 percent can be seen in the top and bottom flanges of the left girder near the flange splice plates. In the model designed by the current method, plastic strains is about 1 percent in the net section of the top and bottom flange splice plates and around the first four holes of fasteners on the web splice plate. In the model designed with the new method, top and bottom flange splice plates have plastic strains of 2.5 percent in the gross section, although there is no plastic strain in the web splice plate.

Source: FHWA
Figure 43. Illustration. PEEQ at last step of pure negative moment.

This illustration shows plastic strain equivalent (PEEQ) at the last step of pure negative moment where splice plates are not shown. In both models, localized plastic strain with a magnitude of approximately 0.4 percent can be seen in the top and bottom flanges of the left girder near the flange splice plates. In the model designed by the current method, plastic strains is about 1 percent in the net section of the top and bottom flange splice plates and around the first four holes of fasteners on the web splice plate. In the model designed with the new method, top and bottom flange splice plates have plastic strains of 2.5 percent in the gross section, although there is no plastic strain in the web splice plate. Without the splice plates in the view, it can be seen that there is no plastic straining in the girder fastener patterns.

Source: FHWA
Figure 44. Illustration. PEEQ at last step of pure negative moment (splice plates not shown for clarity).
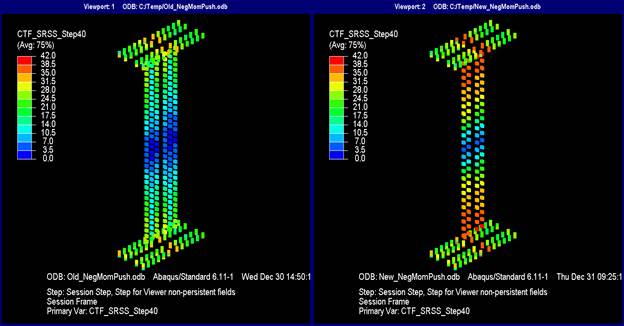
This illustration shows the resultant forces on bolt shear planes at the last step of pure negative moment. In the model designed with the current method, the bolt shears in the top and bottom flange splice range from 10.5 to 35 kip each, with the lead fasteners being the highest. In the web splice plate designed with the current method, the bolt shears at the extremes of the web splice plate are between 24.5 and 28 kip and decrease to 0 kip at the center. In the model designed with the new method, the bolt shears in the top and bottom flange splice range from 14 to 42 kip each with the lead fasteners being the highest. In the web splice plate designed with the new method, the bolt shears at the extremes of the web splice plate are between 38.5 and 42 kip and decrease to 0 kip at the center.

Source: FHWA
Figure 45. Illustration. Resultant forces on bolt shear planes at last step of pure negative moment.

This graph shows the web splice bolt shear vectors at the last step of pure negative moment. The x-axis shows the X-coordinate and ranges from -20 to 20 inches, and the y-axis shows the Y-coordinate and ranges from 0 to 120 inches. In the model designed with the current method, the bolt shear vectors are symmetric about the center of the web splice with magnitudes between 28 and 32 kip at the extremes and linearly decreasing to magnitudes of less than 4 kip at the center. In the model designed with the new method, the bolt shear vectors are symmetric about the center of the web splice with magnitudes between 36 and 40 kip at the extremes and linearly decreasing to magnitudes of less than 4 kip at the center. All bolt shear vectors in both designed scenarios are horizontal in direction.

Source: FHWA
Figure 46. Graph. Web splice bolt shear vectors at last step of pure negative moment.

At the design moment, the Mises stresses show that the flanges of the left girder have just yielded along with the flange splice plates (see 0 and 0). The same can be said for the longitudinal stresses (see 0 and 0), which indicate, not surprisingly, that these stresses dominated the Mises failure criterion. The PEEQ plot in 0 shows that the splice designed by the new method had a slightly higher demand on the flange splice plates than the splice designed by the current method. Though the demands on the flange bolts were nearly the same between the two methods, there was an expected higher demand on the web bolts in the splice designed with the new method (see 0 and 0).

Analysis of the plots from the last step shows that the rounding over of the moment/rotation curve presented in 0 was from plastic hinging of the left girder section (see 0 and 0). At 0.015 radians of rotation, nearly the entire depth of the left girder had yielded. The stress contours between the two scenarios only differed in regards to the splice designed by the current method, which transferred more stress across the web splice than the splice designed by the new method. There was more yielding in the girder webs and web splice in the splice designed by the current method. However, the demands on the flange splices in the splice designed by the new method were higher (mostly evident on the PEEQ plot in 0). This resulted in higher demands on the bolts in the flange splices designed by the new method (with the highest shear forces being 39.4 kip) approaching their fracture strength (see 0 and 0). The vector plots in 0 show the web’s participation in transferring moment as the vectors were horizontal (i.e., no shear in web) with a linear variation in magnitude increasing away from the girder centroid.

High Shear Loading

0 shows a force versus displacement plot for the left support with the circular data points indicating the results from the current method and the square data points indicating the results from the new method. The plots are identical, which is the first indication that the design method is insensitive to shear loading. The plateau response of each of the curves in 0 is primarily from hinging in the left girder section at the interface between the elastic and inelastic elements.
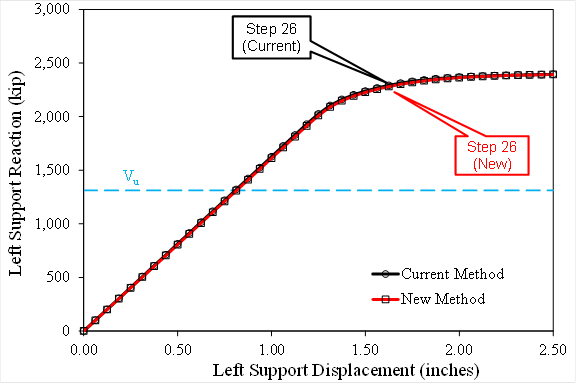
This graph shows force versus displacement at the left support under high shear loading for the splice designed using the current and new methods. The x-axis shows left support displacement and ranges from 0 to 2.5 inches. The y-axis shows left support reaction and ranges from 0 to 3,000 kip. A horizontal dashed line annotated V subscript u is shown at 1,312 kip. Two lines are shown on the plot: one for the current method that uses circular data points and one for the new method that uses square data points. Each line is identically linear from the origin up to about 2,090 kip and 1.30 inch. After this point, both lines begin to round over nonlinearly and end at approximately 2,390 kip and 2.50 inches. Annotations are provided highlighting step 26, which is at a point of 2,280 kip and 1.625 inch.

Source: FHWA
Figure 47. Graph. Force versus displacement at the left support under high shear loading for the splice designed using the current and new methods.

Contour plots are presented for the step with Vu = 1,312 kip (see 0 through 0). The system is still elastic (see 0 and 0), although the shear stresses were at about 80 percent of their yield value (see 0 and 0). The bolt demands were low; the bolts were only at about one-third of their design capacity although slightly higher in the splice designed by the new method (see 0 and 0).
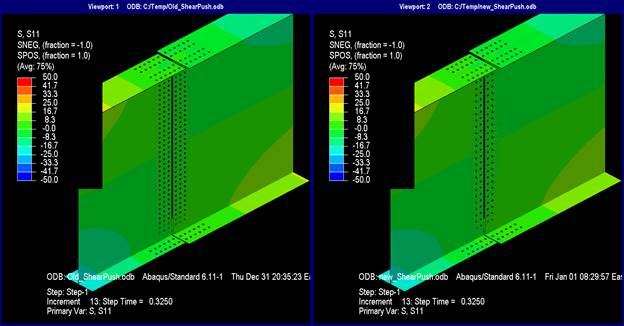
This illustration shows the Mises stresses at V subscript u. The Mises stress patterns in both designed scenarios for the current and new methods are indistinguishable, and no parts of the models are at yield.

Source: FHWA
Figure 48. Illustration. Mises stresses at Vu.

This illustration shows the Mises stresses at V subscript u where the splice plates are not shown. The Mises stress patterns in both designed scenarios for the current and new methods are indistinguishable, and no parts of the models are at yield. Without the splice plates in view, it can be seen that the stress patterns in the girder covered by the splice plates only show a linear degradation of stress from the lead fastener in the direction of force to the actual free edge of the splice within each girder.

Source: FHWA
Figure 49. Illustration. Mises stresses at Vu (splice plates not shown for clarity).

This illustration shows the longitudinal stresses at V subscript u. The longitudinal stress patterns in each of the scenarios for the current and new methods are indistinguishable between the two design methods. In the region of the bolted splice, there are no longitudinal stresses.

Source: FHWA
Figure 50. Illustration. Longitudinal stresses at Vu.

This illustration shows the longitudinal stresses at V subscript u where the splice plates are not shown. The longitudinal stress patterns in each of the scenarios for both the current and new methods are indistinguishable between the two design methods. In the region of the bolted splice, there are no longitudinal stresses. Without the splice plates in the view, it can be seen that there are no longitudinal stresses in the girder fastener pattern covered by the splice plates.

Source: FHWA
Figure 51. Illustration. Longitudinal stresses at Vu (splice plates not shown for clarity).

This illustration shows shear stresses at V subscript u. The shear stress patterns between the two scenarios for both the current and new methods are indistinguishable. Neither the top and bottom flanges of the left and right girders nor the flange splice plates have shear stress. The web of the left girder has shear stresses ranging from 9.7 to 19.3 ksi, and the web of the right girder has shear stresses ranging from -9.7 to -19.3 ksi. The web splice plates at the section of the splice have shear stresses in the range of -9.7 to -19.3 ksi.

Source: FHWA
Figure 52. Illustration. Shear stresses at Vu.

This illustration shows the shear stresses at V subscript u where the splice plates are not shown. The shear stress patterns between the two scenarios for both the current and new methods are indistinguishable. Neither the top and bottom flanges of the left and right girders nor the flange splice plates have shear stress. The web of the left girder has shear stresses ranging from 9.7 to 19.3 ksi, and the web of the right girder has shear stresses ranging from -9.7 to -19.3 ksi. The web splice plates at the section of the splice have shear stresses in the range of -9.7 to -19.3 ksi. Without the splice plates in the view, the left girder web fastener pattern has shear stresses ranging from 4.8 to 9.7 ksi. In the right girder web fastener pattern, the shear stresses range from -4.8 to -9.7 ksi.

Source: FHWA
Figure 53. Illustration. Shear stresses at Vu (splice plates not shown for clarity).

This illustration shows the resultant forces on bolt shear planes at V subscript u. In both models shown, there is no recognizable force in any flange splice bolts. In the model designed with the current method, the bolt shears in the web splice are uniformly distributed with values between 3.5 and 7 kip, although some bolts near the center of the web and top and bottom rows in the web splice have some bolts between 7 and 10.5 kip. In the model designed with the new method, the bolt shears in the web splice are uniformly distributed with values between 10.5 and 14 kip, although the some bolts near the center of the web have forces ranging from 14 to 17.5 kip.

Source: FHWA
Figure 54. Illustration. Resultant forces on bolt shear planes at Vu.

This graph shows the web splice bolt shear vectors at V subscript u. The x-axis shows the X-coordinate and ranges from -20 to 20 inches. The y-axis shows the Y-coordinate and ranges from 0 to 120 inches. In the model designed with the current method, the vector lengths are almost indistinguishable based on the legend scale. However, all the vectors are vertically oriented. In the model designed with the new method, most force vectors have a length in the range of 12 to 16 kip and are oriented perfectly vertical. Only the top and bottom row of fasteners have vector directions slightly off the y-axis.

Source: FHWA
Figure 55. Graph. Web splice bolt shear vectors at Vu.

Step 26 was chosen as the second interrogation level because it began just after yielding had started. Contour plots are shown in 0 through 0. The subsequent steps resulted in excessive straining at the plastic hinge in the left girder, not within the spliced region. In both models, the majority of both webs were yielding, and the middle portion of the web splice plates was also approaching yield (see 0 and 0). Not surprisingly, the yielding response was dominated by the shear stresses as the contour plot showed most of the web at or approaching 29 ksi (see 0 and 0). The most telling plots were the PEEQ contours in 0 and 0, which were each plotted with a maximum strain of 0.015. The differences were minor between the splices created via the two design methods; each showed a nearly equal level of plastic straining, which indicates that the design method was insensitive to shear response. The resultant bolt forces (0 and 0) were uniform under shear (though expectedly larger in the splice designed via the new method because of lesser bolts) but still well within their design limits. The vectors in 0 were mostly vertical under this scenario of primarily shear loading; however, the corner bolts were slightly rotated, which indicates that some effect of moment was being taken by those bolts.
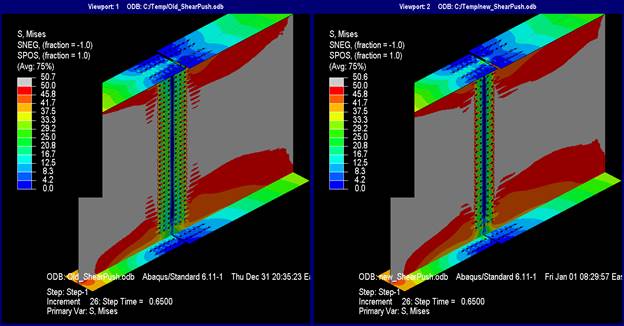
This illustration shows the Mises stresses at step 26. The two contour plots between the models are indistinguishable. The Mises stresses in the top and bottom flanges are symmetric, and, at the actual splice, the flange stresses are nearly 0 ksi. The flange splice plates at the gross section of the splice have stresses ranging from 12.5 to 25 ksi. Most of the web on both the left and right girders has stress in excess of 50 ksi. The web splice plates have reached nearly 50 ksi at the gross spliced section for nearly the full depth of the plate.

Source: FHWA
Figure 56. Illustration. Mises stresses at step 26.

This illustration shows the Mises stresses at step 26 where the splice plates are not shown. The two contour plots between the models are indistinguishable. The Mises stresses in the top and bottom flanges are symmetric, and, at the actual splice, the flange stresses are nearly 0 ksi. The flange splice plates at the gross section of the splice have stresses ranging from 12.5 to 25 ksi. Most of the web on both the left and right girders has stress in excess of 50 ksi. The web splice plates have reached nearly 50 ksi at the gross spliced section for nearly the full depth of the plate. Without the splice plates in the view, it can be seen that the stress patterns in the girder covered by the splice plates only show a linear degradation of stress from the lead fastener in the direction of force to the actual free edge of the splice within each girder.

Source: FHWA
Figure 57. Illustration. Mises stresses at step 26 (splice plates not shown for clarity).
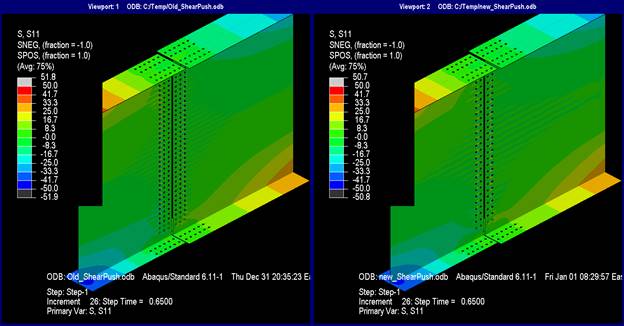
This illustration shows the longitudinal stresses at step 26. The longitudinal stresses are indistinguishable between the models designed with the current and new methods. The stresses are nearly 0 ksi in the entire web and web splice. The top flange stresses change from tension in the left girder to compression in the right girder with splice location being approximately at 0 ksi of stress. However, the top flange outer splice plate gross section stress is between -8.3 and -16.7 ksi. The bottom flange stresses transition from compression in the left girder to tension in the right girder with the splice section being approximately at 0 ksi of stress. However, the bottom flange inner splice plate gross section has stress between 8.3 and 16.7 ksi.

Source: FHWA
Figure 58. Illustration. Longitudinal stresses at step 26.

This illustration shows the longitudinal stresses at step 26 where the splice plates are not shown. The longitudinal stresses are indistinguishable between the models designed with the current and new methods. The stresses are nearly 0 ksi in the entire web and web splice. The top flange stresses change from tension in the left girder to compression in the right girder with splice location being approximately at 0 ksi of stress. However, the top flange outer splice plate gross section stress is between -8.3 and -16.7 ksi. The bottom flange stresses transition from compression in the left girder to tension in the right girder with the splice section being approximately at 0 ksi of stress. However, the bottom flange inner splice plate gross section has stress between 8.3 and 16.7 ksi. Without the splice plates in the view, it can be seen that the stress patterns in the girder covered by the splice plates only show a state of zero stress.

Source: FHWA
Figure 59. Illustration. Longitudinal stresses at step 26 (splice plates not shown for clarity).
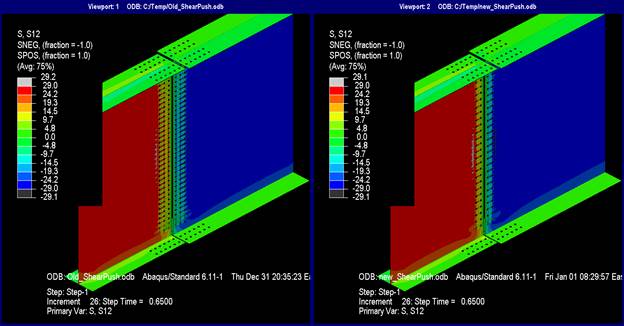
This illustration shows shear stresses at step 26. The stress contours presented for each model for both the current and new methods have indistinguishable differences. Both models show the top and bottom flanges and their associated splice plates at nearly 0 ksi. The web of the left girder has stresses between 24.2 and 29 ksi. The web of the right girder has stresses ranging from -24.2 to -29 ksi. The web splice plate gross section has stress ranging from -24.2 to 29 ksi.

Source: FHWA
Figure 60. Illustration. Shear stresses at step 26.

This illustration shows the shear stresses at step 26 where the splice plates are not shown. The stress contours presented for each model for both the current and new methods have indistinguishable differences. Both models show the top and bottom flanges and their associated splice plates at nearly 0 ksi. The web of the left girder has stresses between 24.2 and 29 ksi. The web of the right girder has stresses ranging from -24.2 to -29 ksi. The web splice plate gross section has stress ranging from -24.2 to 29 ksi. Without the splice plates in the view, it can be seen that the stress patterns in the girder covered by the splice plates only show a linear degradation of stress in the webs from the lead fastener in the direction of force to the actual free edge of the web in each girder.

Source: FHWA
Figure 61. Illustration. Shear stresses at step 26 (splice plates not shown for clarity).
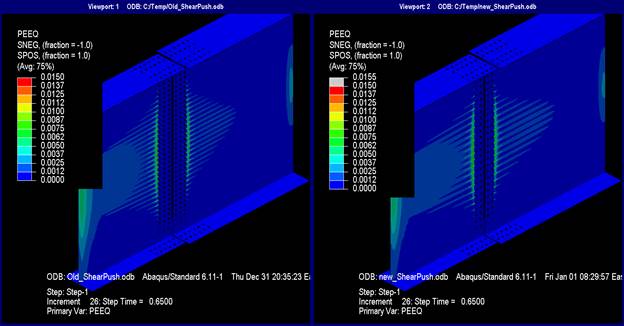
This illustration shows plastic strain equivalent (PEEQ) at step 26 plotted with maximum of 0.05. Both models show almost no plastic strain. In the model designed with the current method, the central portion of the left girder web where it intersects the web splice plate appears to have plastic strains around 1 percent. Plastic strains in the web splice plate bridging the gross section between bolt holes also appear to be about 1 percent. In the model designed with the new method, plastic strain is the same as with the current method except that no identifiable strain is seen in the web splice plate.

Source: FHWA
Figure 62. Illustration. PEEQ at step 26 (plotted with maximum of 0.05).

This illustration shows plastic strain equivalent (PEEQ) at step 26 plotted with maximum of 0.015. Both models show almost no plastic strain. In the model designed with the current method, the central portion of the left girder web where it intersects the web splice plate appears to have plastic strains around 0.75 percent. Plastic strains in the web splice plate bridging the gross section between bolt holes also appear to be about 0.75 percent. In the model designed with the new method, plastic strain is the same as with the current method except that no identifiable strain is seen in the web splice plate.

Source: FHWA
Figure 63. Illustration. PEEQ at step 26 (plotted with maximum of 0.015).

This illustration shows plastic strain equivalent (PEEQ) at step 26 plotted with maximum of 0.015 with splice plates not shown. Both models show almost no plastic strain. In the model designed with the current method, the central portion of the left girder web where it intersects the web splice plate appears to have plastic strains around 0.75 percent. Plastic strains in the web splice plate bridging the gross section between bolt holes also appear to be about 0.75 percent. In the model designed with the new method, plastic strain is the same as with the current method except that no identifiable strain is seen in the web splice plate. Without the splice plates in the view, it can be seen that there is no plastic strain in the girders beneath the splice plates.

Source: FHWA
Figure 64. Illustration. PEEQ at step 26 (plotted with maximum of 0.015; splice plates not shown for clarity).

This illustration shows resultant forces on bolt shear planes at step 26. In both models, the top and bottom flange splice bolts have shear forces between 0 and 3.5 kip, although the lead fasteners in the direction of force range between 3.5 and 7 kip. In the model designed with the current method, the web splice bolts have a symmetric shear force distribution about the girder centroid. Near the flanges, the bolt shear forces range from 7 to 14 kip. In the mid-depth of the girder, the bolt forces are 14 to 17.5 kip, although the interior column of bolts in this vicinity range from 3.5 to 7 kip. For the model designed with the new method, all of the web bolts have a shear force ranging from 21 to 28 kip.

Source: FHWA
Figure 65. Illustration. Resultant forces on bolt shear planes at step 26.

This graph shows the web splice bolt shear vectors at step 26. The x-axis shows the X-coordinate from -20 to 20 inches. The y-axis shows the Y-coordinate from 0 to 120 inches. In the model designed with the current method, the web bolt shear vectors are mostly vertical except that the vectors for the extreme top and bottom rows are inclined about 45 degrees. The magnitude of the vectors range from 0 to 16 kip except that the extreme top and bottom bolt rows are between 16 and 20 kip. In the model designed with the new method, the web bolt shear vectors are mostly vertical except that the vectors for the extreme top and bottom rows are inclined about 30 degrees off the vertical. The magnitude of all the vectors range from 20 to 24 kip.

Source: FHWA
Figure 66. Graph. Web splice bolt shear vectors at step 26.

Proportional Positive Moment and Shear

0 shows a force versus displacement plot for the left support. Circular data points indicate the results from the current method, and square data points indicate the results from the new method. In this scenario, the load was applied to a cantilever beam, so the plateau response demonstrated in each of the methods was not representative of behavior in the bolted connection. The response was due to hinging at the interface between the elastic and inelastic elements in the right girder. However, throughout the loading, the responses were identical. Results in 0 through 0 are presented for step 20, in which Vu = 1,312 kip, while results in 0 through 0 are presented for step 34 just before the plastic hinge formed in the right girder.
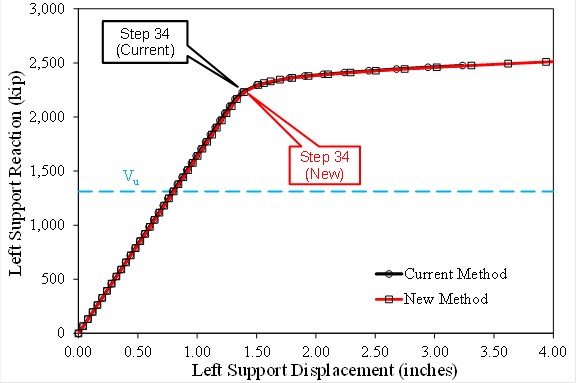
This graph shows force versus displacement at the left support under proportional positive moment for the splice designed using the current and new methods. The x-axis shows left support displacement and ranges from 0 to 4.00 inches. The y-axis shows left support reaction and ranges from 0 to 3,000 kip. A horizontal dashed line annotated V subscript u is shown at 1,312 kip. Two lines are shown on the plot: one for the current method that uses circular data points and the one for the new method that uses square data points. Each line is identically linear from the origin up to about 2,230 kip and 1.39 inch, and this point is annotated as step 34 for each design method. After this point, both lines begin to round over nonlinearly and end at approximately 2,509 kip and 4.00 inches for the new method and 2,476 kip and 3.24 inches for the current method.

Source: FHWA
Figure 67. Graph. Force versus displacement at left support under proportional positive moment for the splice designed using the current and new methods.
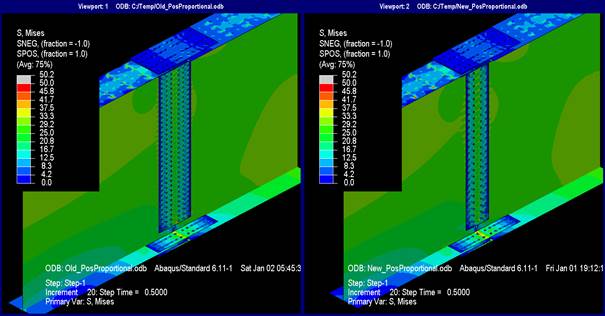
This illustration shows Mises stresses at proportional positive moment loading at V subscript u where the deck is not shown. The difference between the two models using the current and new methods is indistinguishable. In each model, the top flange stresses ranges from 0 to 8.3 ksi, although at the areas around the shear studs, the stresses increase and range from 8.3 to 20.8 ksi. The top flange splice plates are mostly stressed less than 4.2 ksi, although in the gross section, the stress is between 4.2 and 8.3 ksi. The bottom flange stresses linearly increase from left to right across the model; however, in the vicinity of the bottom flange splice plate, the stresses are between 12.5 and 20.8 ksi in both the left and right girders. The bottom flange splice plates in their gross section have stress ranging from 25 to 33.3 ksi. Both girder webs have a uniform stress distribution ranging from 25 to 33.3 ksi. The web splice plates in their gross section have a uniform stress ranging between 25 and 29.2 ksi.

Source: FHWA
Figure 68. Illustration. Mises stresses at proportional positive moment loading at Vu (deck not shown for clarity).
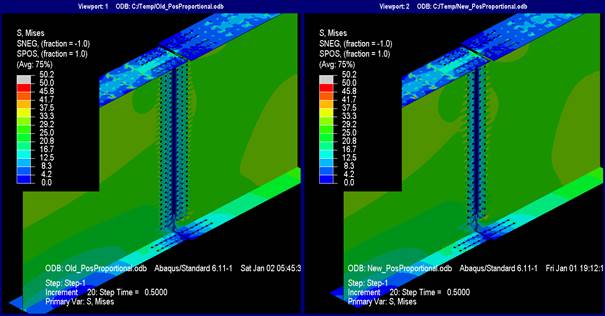
This illustration shows Mises stresses at proportional positive moment loading at V subscript u where the splice plates and deck are not shown. The difference between the two models using the current and new methods is indistinguishable. In each model, the top flange stresses ranges from 0 to 8.3 ksi, although at the areas around the shear studs, the stresses increase and range from 8.3 to 20.8 ksi. The top flange splice plates are mostly stressed less than 4.2 ksi, although in the gross section, the stress is between 4.2 and 8.3 ksi. The bottom flange stresses linearly increase from left to right across the model; however, in the vicinity of the bottom flange splice plate, the stresses are between 12.5 and 20.8 ksi in both the left and right girders. The bottom flange splice plates in their gross section have stress ranging from 25 to 33.3 ksi. Both girder webs have a uniform stress distribution ranging from 25 to 33.3 ksi. The web splice plates in their gross section have a uniform stress ranging between 25 and 29.2 ksi. Without the splice plates in the view, it can be seen that the stress patterns in the girder covered by the splice plates only show a linear degradation of stress from the lead fastener in the direction of force to the actual free edge of the splice within each girder.

Source: FHWA
Figure 69. Illustration. Mises stresses at proportional positive moment loading at Vu (splice plates and deck not shown for clarity).
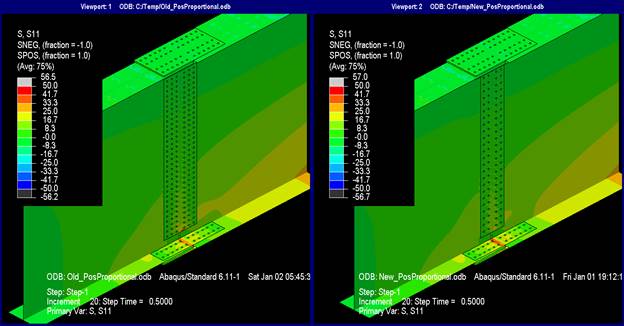
This illustration shows the longitudinal stresses at proportional positive moment loading at V subscript u where the deck is not shown. In both models, the longitudinal stresses in the top flange and splices plates are nearly 0 ksi. The bottom flange stresses near the splice plates are between 8.3 and 16.7 ksi. The girder web and web splice stresses are near 0 ksi from girder mid-depth to the top flange; from the mid-depth to bottom flange, they range from 0 to 8.3 ksi. In the model designed with the current method, the bottom flange splice plate gross section stress ranges from 16.7 to 33.3 ksi. In the model designed with the new method, the gross section stresses range from 33.3 to 41.7 ksi.

Source: FHWA
Figure 70. Illustration. Longitudinal stresses at proportional positive moment loading at Vu (deck not shown for clarity).

This illustration shows the longitudinal stresses at proportional positive moment loading at V subscript u where the deck is not shown. In both models, the longitudinal stresses in the top flange and splices plates are nearly 0 ksi. The bottom flange stresses near the splice plates are between 8.3 and 16.7 ksi. The girder web and web splice stresses are near 0 ksi from girder mid-depth to the top flange; from the mid-depth to bottom flange, they range from 0 to 8.3 ksi. Without the splice plates in the view, it can be seen that the stress patterns in the girder covered by the splice plates have nearly zero stress.

Source: FHWA
Figure 71. Illustration. Longitudinal stresses at proportional positive moment loading at Vu (splice plates and deck not shown for clarity).
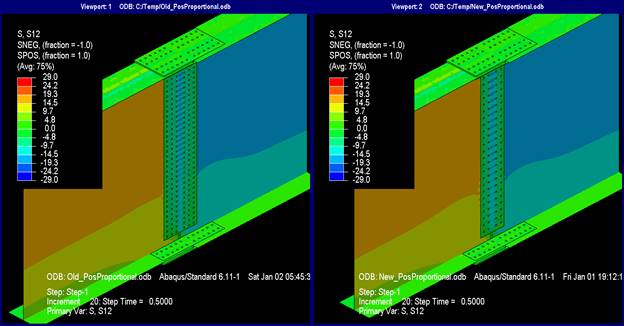
This illustration shows shear stresses at proportional positive moment loading at V subscript u where the deck is not shown. The stress contours between the two models using the current and new methods are indistinguishable. In both cases, the girder flanges and associated splice plates have zero shear stress. The lower third of the left girder web has stress ranging from 9.7 to 14.5 ksi, and the stress for the upper two-thirds ranges from 14.5 to 19.3 ksi. The lower third of the right girder web has stress ranging from -9.7 to -14.5 ksi, and the stress for the upper two-thirds ranges from -14.5 to -19.3 ksi. The lower third of the web splice plates have stress ranging from -9.7 to -14.5 ksi, and the stress for the upper two-thirds ranges from -14.5 to -19.3 ksi.

Source: FHWA
Figure 72. Illustration. Shear stresses at proportional positive moment loading at Vu (deck not shown for clarity).
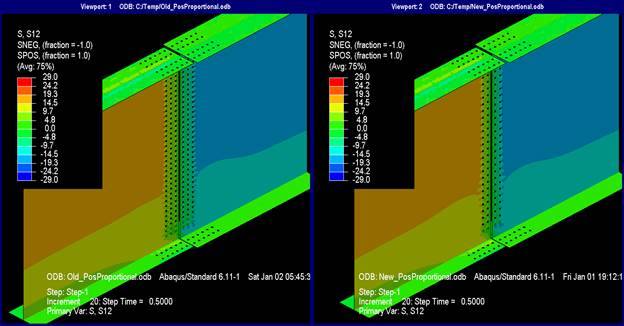
This illustration shows the shear stresses at proportional positive moment loading at V subscript u where the splice plates and deck are not shown. The stress contours between the two models using the current and new methods are indistinguishable. In both cases, the girder flanges and associated splice plates have 0 shear stress. The lower third of the left girder web has stress ranging from 9.7 to 14.5 ksi, and the stress for the upper two-thirds ranges from 14.5 to 19.3 ksi. The lower third of the right girder web has stress ranging from -9.7 to -14.5 ksi, and the stress for the upper two-thirds ranges from -14.5 to -19.3 ksi. The lower third of the web splice plates have stress ranging from -9.7 to -14.5 ksi, and the stress for the upper two-thirds ranges from -14.5 to -19.3 ksi. Without the splice plates in the view, it can be seen that the stress patterns in the girder covered by the web splice plates only show a linear degradation of stress from the lead fastener in the direction of force to the actual free edge of the each girder web.

Source: FHWA
Figure 73. Illustration. Shear stresses at proportional positive moment loading at Vu (splice plates and deck not shown for clarity).
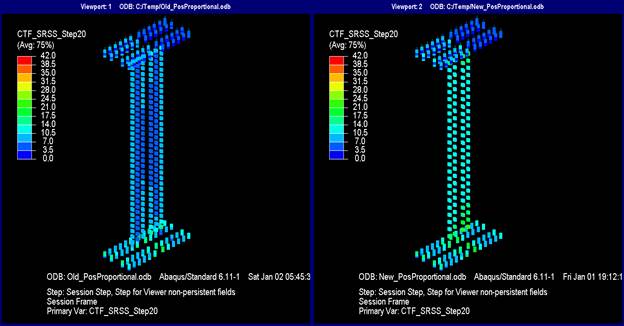
This illustration shows the resultant forces on bolt shear planes at proportional positive moment loading at V subscript u. In the model designed with the current method, the top flange splice bolts on the left girder range in force between 0 and 10.5 kip. In the right girder, they range from 0 to 3.5 kip. The lower flange splice plate bolts mainly range from 7 to 14 kip, although the lead fasteners range from 17.5 to 21 kip. In the web splice, the bolt shears range from 3.5 to 10.5 kip, although the middle column of bolts only range from 3.5 to 7 kip. In the model designed with the new method, the top flange splice bolts on the left girder range in force between 0 and 10.5 kip, and in the right girder, they range from 0 to 3.5 kip. The lower flange splice plate bolts mainly range from 7 to 14 kip, although the lead fasteners range from 17.5 to 21 kip. In the web splice, the bolt shears range from 14 to 17.5 kip, although the extreme four rows of bolts range from 17.5 to 21 kip.

Source: FHWA
Figure 74. Illustration. Resultant forces on bolt shear planes at proportional positive moment loading at Vu.
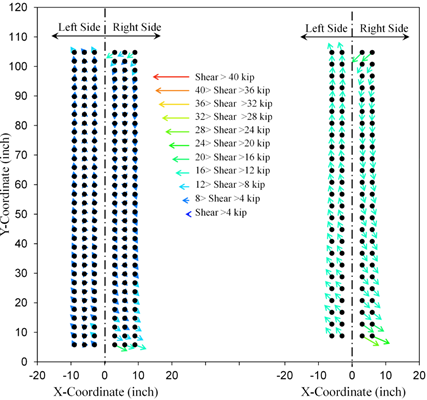
This graph shows the web splice bolt shear vectors at proportional positive moment loading at V subscript u. The X-axis shows the X-coordinate and ranges from -20 to 20 inches. The Y-axis shows the Y-coordinate and ranges from 0 to 120 inches. In the splice designed with the current method, most web bolts have force vector less than 4 kip, although the extreme four rows of bolts have vector magnitudes ranging from 4 to 16 kip. Most of the vectors are directed vertically, although the extreme four rows of fasteners are pointed 30 degrees off the X-axis. In the splice designed by the new method, the majority of bolts have vertically oriented vectors with a magnitude ranging from 12 to 16 kip. In the extreme two rows of fasteners, the vectors are oriented about 30 degrees off the X-axis with magnitudes ranging from 16 to 24 kip.

Source: FHWA
Figure 75. Graph. Web splice bolt shear vectors at proportional positive moment loading at Vu.
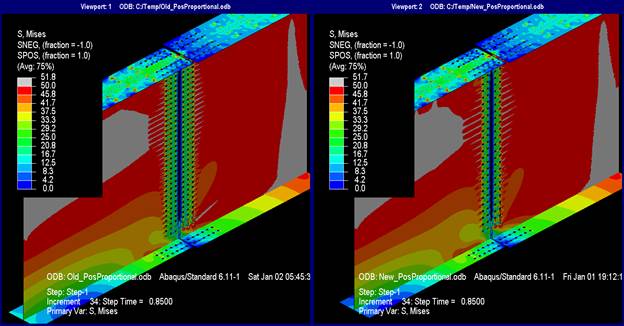
This illustration shows the Mises stresses at step 34 where the deck is not shown. The stress patterns in the models using the current and new methods are indistinguishable from each other. In each model, the upper half of the left girder web is nearing or has exceed the yield stress, whereas in the right girder, the entire web is nearing the yield stress. The top flange splice plates have stresses ranging from 0 to 16.7 ksi. The lower flange splice plate stresses range exceeds yield in their net section, but the gross section ranges from 41.7 to 50 ksi. The web splice plates have stress in their gross section between 37.5 and 50 ksi over the entire depth.

Source: FHWA
Figure 76. Illustration. Mises stresses at step 34 (deck not shown for clarity).

This illustration shows the Mises stresses at step 34 where the splice plates and deck are not shown. The stress patterns in the models using the current and new methods are indistinguishable from each other. In each model, the upper half of the left girder web is nearing or has exceed the yield stress, whereas in the right girder, the entire web is nearing the yield stress. The top flange splice plates have stresses ranging from 0 to 16.7 ksi. The lower flange splice plate stresses range exceeds yield in their net section, but the gross section ranges from 41.7 to 50 ksi. The web splice plates have stress in their gross section between 37.5 and 50 ksi over the entire depth. Without the splice plates in the view, it can be seen that the stress patterns in the girder covered by the splice plates only show a linear degradation of stress from the lead fastener in the direction of force to the actual free edge of the splice within each girder.

Source: FHWA
Figure 77. Illustration. Mises stresses at step 34 (splice plates and deck not shown for clarity).
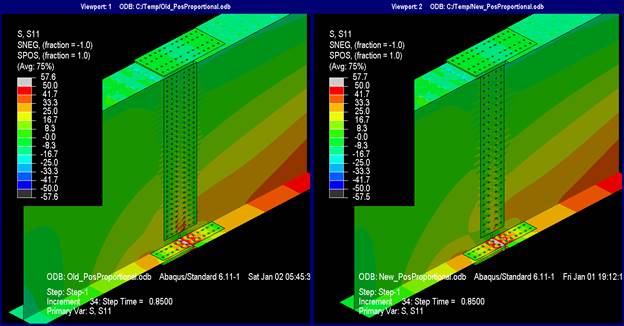
This illustration shows the longitudinal stresses at step 34 where the deck is not shown. The longitudinal stress patterns are identical between the two models. The top flange stresses range from 0 to -16.7 ksi, and the splice plate gross section stress ranges from -8.3 to -16.7 ksi. The bottom flange stresses vary from left to right across both girders from -16.7 to 50 ksi, although in the vicinity of the splice plates, the stress ranges from 25 to 33.3 ksi. The gross section of the bottom flange splice plate stress ranges from 41.7 to 50 ksi, although the net section does have some yielding. The web splice plate linearly increases in stress from 0 ksi at the top to a maximum 50 ksi at the bottom.

Source: FHWA
Figure 78. Illustration. Longitudinal stresses at step 34 (deck not shown for clarity).

This illustration shows the longitudinal stresses at step 34 where the splice plates and deck are not shown. The longitudinal stress patterns are identical between the two models using the current and new methods. The top flange stresses range from 0 to -16.7 ksi, and the splice plate gross section stress ranges from -8.3 to -16.7 ksi. The bottom flange stresses vary from left to right across both girders from -16.7 to 50 ksi, although in the vicinity of the splice plates, the stress ranges from 25 to 33.3 ksi. The gross section of the bottom flange splice plate stress ranges from 41.7 to 50 ksi, although the net section does have some yielding. The web splice plate linearly increases in stress from 0 ksi at the top to a maximum 50 ksi at the bottom. Without the splice plates in the view, it can be seen that the stress patterns in the girder covered by the splice plates only show a linear degradation of stress from the lead fastener in the direction of force to the actual free edge of the splice within each girder.

Source: FHWA
Figure 79. Illustration. Longitudinal stresses at step 34 (splice plates and deck not shown for clarity).
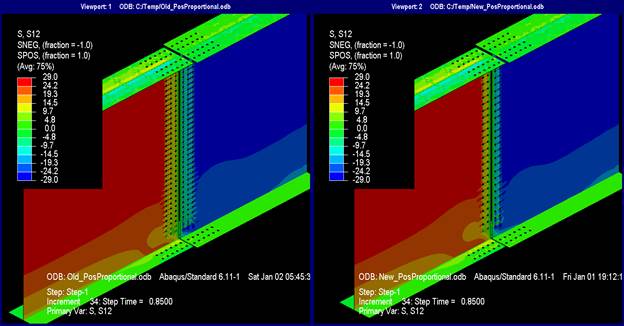
This illustration shows the shear stresses at step 34 where the deck is not shown. The shear stress patterns are identical between the two models using the current and new methods. Both top and bottom flanges and their associated splice plates are at nearly at 0 ksi. The upper two-thirds of the left girder web has stresses ranging from 24.2 to 29 ksi, and the lower third has stresses ranging from 19.3 to 14.5 ksi. The upper two-thirds of the right girder web has stresses ranging from -24.2 to -29 ksi, and the lower third has stresses ranging from -19.3 to -24.2 ksi. The web splice plate gross section has uniformly distributed stresses ranging between -24.2 and -29 ksi.

Source: FHWA
Figure 80. Illustration. Shear stresses at step 34 (deck not shown for clarity).

This illustration shows the shear stresses at step 34 where the splice plates and deck are not shown. The shear stress patterns are identical between the two models using the current and new methods. Both top and bottom flanges and their associated splice plates are nearly at 0 ksi. The upper two-thirds of the left girder web has stresses ranging from 24.2 to 29 ksi, and the lower third has stresses ranging from 19.3 to 14.5 ksi. The upper two-thirds of the right girder web has stresses ranging from -24.2 to -29 ksi, and the lower third has stresses ranging from -19.3 to -24.2 ksi. The web splice plate gross section has uniformly distributed stresses ranging between -24.2 and -29 ksi. Without the splice plates in the view, it can be seen that the stress patterns in the girder covered by the splice plates only show a linear degradation of stress from the lead fastener in the direction of force to the actual free edge of the splice within each girder.

Source: FHWA
Figure 81. Illustration. Shear stresses at step 34 (splice plates and deck not shown for clarity).
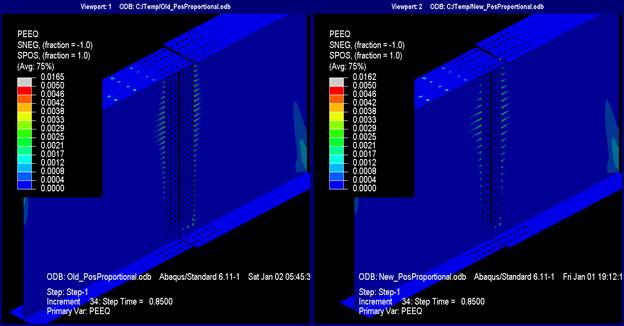
This illustration shows plastic strain equivalent (PEEQ) at step 34 where the deck is not shown. The plastic strain patterns are identical between the two models, and the models mostly have no plasticity forming. However, a horizontal line of plasticity originating from each web bolt can be seen in the upper half of each girder web; the magnitude is about 0.2 percent. Likewise, within the web splice plate, a line of plasticity spans between bolt holes over the gross section with the same magnitude. The lower flange splice plate show about 0.2 percent plasticity in the net section.

Source: FHWA
Figure 82. Illustration. PEEQ at step 34 (deck not shown for clarity).

This illustration shows plastic strain equivalent (PEEQ) at step 34 where the splice plates and deck are not shown. The plastic strain patterns are identical between the two models using the current and new methods, and they mostly have no plasticity forming. However, a horizontal line of plasticity originating from each web bolt can be seen in the upper half of each girder web; the magnitude is about 0.2 percent. Likewise, within the web splice plate, a line of plasticity spans between bolt holes over the gross section with the same magnitude. The lower flange splice plate show about 0.2 percent plasticity in the net section. Without the splice plates in the view, it can be seen there is no plasticity in the fastener pattern beneath the splice plates.

Source: FHWA
Figure 83. Illustration. PEEQ at step 34 (splice plates and deck not shown for clarity).

This illustration shows the resultant forces on bolt shear planes at step 34. In the model designed with the current method, the top flange splice bolts on the left girder range in force between 10.5 and 24.5 kip. In the right girder, they range from 0 to 10.5 kip. The lower flange splice plate bolts mostly range from 10.5 to 24.5 kip. In the web splice, the bolt shears on each side of the splice are 10.5 to 14 kip for the outer two columns of bolts and between 7 and 10.5 kip for the interior column of bolts. In the model designed with the new method, the top flange splice bolts on the left girder range in force between 0 and 21 kip, and in the right girder, they range from 0 to 7 kip. The lower flange splice plate bolts mostly range from 14 to 24.5 kip on both sides of the splice. In the web splice, the bolt shears on each side of the splice range from 21 to 24.5 kip for all bolts except the lower four on the right girder, which range from 28 to 35 kip.

Source: FHWA
Figure 84. Illustration. Resultant forces on bolt shear planes at step 34.

This graph shows the direction of the force vectors at step 34. The X-axis shows the X-coordinate and ranges from -20 to 20 inches. The Y-axis shows the Y-coordinate and ranges from 0 to 120 inches. In the splice designed with the current method, the vast majority of the force vectors are oriented vertically except at the extreme top and bottom of the splice. In the left girder, the top row of bolts and the lower third of the bolts have vectors pointing upward and to the left and are inclined about 20 degrees off the vertical. In the right girder, the majority of the vectors are oriented vertically, although they are inclined in the upper and lower parts about 30 degrees off the vertical in counterclockwise rotation about the girder centroid. For the splice designed with the new method, the vectors in the lower half of the left girder are inclined to the upper left at about 45 degrees; the rest are vertical. For the right girder, there is counterclockwise rotation of all the vectors; they have rotated 45 degrees at the top and bottom of the splice and are mostly vertical in the middle.

Source: FHWA
Figure 85. Graph. Web splice bolt shear vectors step 34.

At the design force level, the system was elastic (see 0 and 0). Bolt forces were slightly higher for the splice designed using the new method but were well within their design limits (see 0 and 0).

At step 34, the applied shear was 2,230 kip, which was 70 percent higher than the design shear. The Mises stresses showed yielding in the upper portion of the left girder and yielding over nearly the full depth at the interface between the elastic and inelastic elements on the right girder (see 0 and 0). It may seem odd to see the left girder yield near the top flange in a positive proportional moment scenario; however, as seen in 0, in this scenario, a negative moment had to be applied at the left support to attain a positive design moment at the bolted splice. Further analysis of the longitudinal and shear stress plots showed that the yielding was dominated by the shear stresses as they were closest to their yielding limit (see 0 and 0). The PEEQ plots in 0 and 0 showed similar response in the web, although slightly higher demands existed on the flange splice plates in the splice designed using the new design methodology. The bolt forces shown in 0 were within their design limits, although the forces were expectedly larger in the splice designed using the new method. The bolt force vectors in 0 were primarily vertical, indicating that the shear in the girder was dominating the force in the bolts. However, the vectors for bolts closest to the flanges had horizontal components, and there was a characteristic rotation of all the vectors around a point near the girder neutral axis, indicating that the web splice did carry some moment.

Proportional Negative Moment and Shear (no deck)

0 shows a force versus displacement plot for the left support. Circular data points indicate the results from the current method, and square data points indicate the results from the new method. Elastically, the behaviors were similar, although once inelasticity started, the splice designed using the new method demonstrated slightly lower strength. There was also a difference in where the analysis terminated. For the splice designed by the current method, the analysis was terminated after step 36 because the strength was not appreciably increasing. However, for the splice designed by the new method, the analysis could not converge to a solution beyond step 32, which was a result of some bolts reaching their capacity.
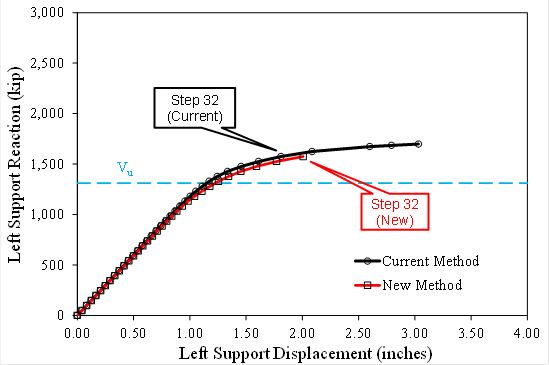
This graph shows force versus displacement at the left support under proportional negative moment for the splice designed using the current and new methods. The X-axis shows left support displacement and ranges from 0 to 4.00 inches. The Y-axis shows left support reaction and ranges from 0 to 3,000 kip. A horizontal dashed line annotated V subscript u is shown at 1,312 kip. Two lines are shown on the plot: one for the current method that uses circular data points and one for the new method that uses square data points. Each line is identically linear from the origin up to about 1,180 kip and 1.04 inch. After this point, both plots begin to round over nonlinearly and end at 1,697 kip and 3.03 inches for the current method and 1,574 kip and 2.00 inches for the new method. Annotations are provided that highlight step 32, which is at 1,574 kip and 2.00 inches for the new method and 1,574 kip and 1.81 inches for the current method.

Source: FHWA
Figure 86. Graph. Force versus displacement at the left support under proportional negative moment for the splice designed using the current and new methods.

Contour plot data are presented in 0 through 0 at the design loading (i.e., step 27 in 0). The splice plates, a small portion of the right girder web near the top and bottom of the web splice, and the web splice had started to yield in the splice designed with both methods (see 0 and 0). The longitudinal stress plot indicates that most of the yielding was dominated by the longitudinal stresses generated from the moment (see 0 and 0). The PEEQ plots show that any significant yielding was primarily isolated to just the flange splice plates and was slightly greater in the splice designed using the new method (see 0 and 0). The resultant bolt forces show that the lead bolts on the flange splices had shear forces in the low 30-kip range in the splices designed by each method. The corner web bolts in the splice designed using the new method had bolt forces in the upper 30-kip range (see 0) versus the mid-20 kip for the current design method. This is more easily seen in 0 where the corner bolts on the right girder section were the most highly loaded, and the bolt forces were obviously lower in the splice designed using the current method because twice as many bolts were provided. The bolt vectors were primarily horizontal, indicating that the moment in the girders was controlling the forces in the bolts.
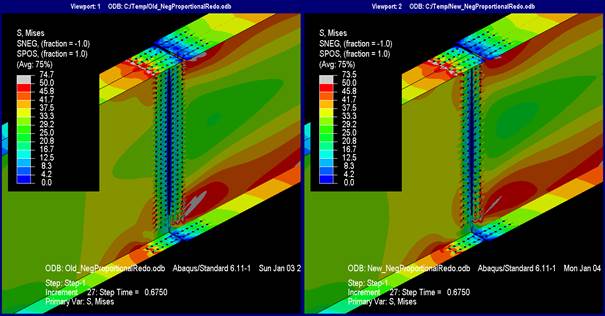
This illustration shows the Mises stresses at proportional negative moment at V subscript u. The stress contours between each of the scenarios using the current and new methods are nearly identical, and, in each case, they are symmetric about the centerline of the web. The flange splice plates have zero stress at their ends, and in the middle at the actual splice, they have exceeded the yield strength in the gross section. The gross section of the web splice plate has about 25 ksi of stress in most of the plate, although in the extreme four rows of bolts, the stresses ranges from 45.8 to 50 ksi. In the right girder web, near the extremes of the web splice bolt pattern, the web stresses have exceeded yield along a diagonal portion of web inclined 45 degrees off horizontal and pointing towards the web centerline.

Source: FHWA
Figure 87. Illustration. Mises stresses at proportional negative moment at Vu.

This illustration shows the Mises stresses at proportional negative moment at V subscript u where splice plates are not shown. The stress contours between each of the scenarios using the current and new methods are nearly identical, and, in each case, they are symmetric about the centerline of the web. The flange splice plates have 0 stress at their ends, and in the middle at the actual splice, they have exceeded the yield strength in the gross section. The gross section of the web splice plate has about 25 ksi of stress in most of the plate, although in the extreme four rows of bolts, the stresses ranges from 45.8 to 50 ksi. In the right girder web, near the extremes of the web splice bolt pattern, the web stresses have exceeded yield along a diagonal portion of web inclined 45 degrees off horizontal and pointing towards the web centerline. Without the splice plates in the view, it can be seen that the stress patterns in the girder covered by the splice plates only show a linear degradation of stress from the lead fastener in the direction of force to the actual free edge of the splice within each girder. However, in the left girder flange, it can now be seen that the net section of the lead line of bolts in the flanges has begun to yield.

Source: FHWA
Figure 88. Illustration. Mises stresses at proportional negative moment at Vu (splice plates not shown for clarity).
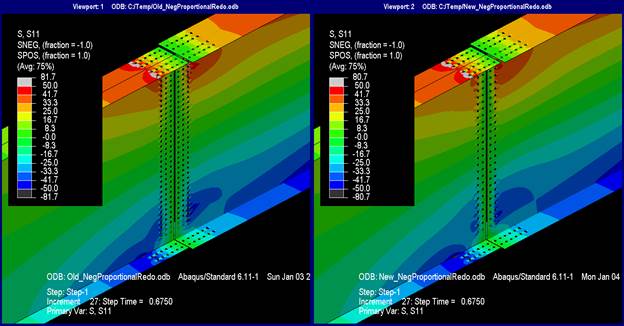
This illustration shows longitudinal stresses at proportional negative moment at V subscript u. The stress contours between each of the scenarios using the current and new methods are nearly identical. The longitudinal stress profile shows a linear gradation of longitudinal stresses ranging from -41.7 to -50 ksi in the bottom flange up to 41.7 to 50 ksi in the top flange. The stress contours are mostly continuous across the spliced section except near the flange splices and extremes of the web splice. The discontinuous contours in the girder flanges are from shedding into the flange splice plates and, likewise, discontinuous in the web from shedding into the web splice plates. The flange splice plates have exceeded yield in their gross section as have the web splice at the extreme four rows of bolts.

Source: FHWA
Figure 89. Illustration. Longitudinal stresses at proportional negative moment at Vu.

This illustration shows the longitudinal stresses at proportional negative moment at V subscript u where the splice plates are not shown. The stress contours between each of the scenarios using the current and new methods are nearly identical. The longitudinal stress profile shows a linear gradation of longitudinal stresses ranging from -41.7 to -50 ksi in the bottom flange up to 41.7 to 50 ksi in the top flange. The stress contours are mostly continuous across the spliced section except near the flange splices and extremes of the web splice. The discontinuous contours in the girder flanges are from shedding into the flange splice plates and, likewise, discontinuous in the web from shedding into the web splice plates. The flange splice plates have exceeded yield in their gross section as have the web splice at the extreme four rows of bolts. Without the splice plates in the view, it can be seen that the stress patterns in the girder covered by the splice plates only show a linear degradation of stress from the lead fastener in the direction of force to the actual free edge of the splice within each girder. However, in the left girder flanges, it can be seen that the net section of the lead line of bolts in the flanges has begun to yield. Also, the net section in the web of the right girder near the extreme four rows of bolts has also started to exceed yield.

Source: FHWA
Figure 90. Illustration. Longitudinal stresses at proportional negative moment at Vu (splice plates not shown for clarity).
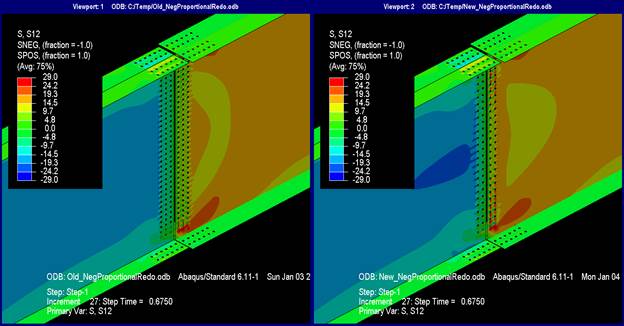
This illustration shows shear stresses at proportional negative moment at V subscript u. In both scenarios using the current and new methods, the top and bottom flanges and flange splice plates have zero shear stress. In the model designed with the current method, the left girder web has shear stresses ranging from -14.5 to -19.3 ksi, although close to the flanges, the stresses increase to -9.7 to -14.5 ksi. In the right girder section, the web mostly has shear stresses ranging from 14.5 to 19.3 ksi. However, near the bottom two rows of bolts, there is a small section that ranges from 19.3 to 24.2 ksi. Also, there is a crescent shaped stress profile arcing away from the web splice from about the lower third of the web splice to the upper third of the web splice with smaller stresses ranging from 9.7 to 14.5 ksi. In the model designed with the current method, the left girder web has shear stresses ranging from -14.5 to -19.3 ksi, although close to the flanges, the stresses increase to -9.7 to -14.5 ksi. There is also a narrow band at the center of the web near the splice plate that has lower stresses ranging from -19.3 to -24.2 ksi. In the right girder section, the web mostly has shear stresses ranging from 14.5 to 19.3 ksi. However, near the bottom two rows of bolts, there is a small section that ranges from 19.3 to 24.2 ksi. Also, there is a half-circle shaped stress profile arcing away from the web splice from about the lower third of the web splice to the upper third of the web splice with smaller stresses ranging from 9.7 to 14.5 ksi.

Source: FHWA
Figure 91. Illustration. Shear stresses at proportional negative moment at Vu.

This illustration shows shear stresses at proportional negative moment at V subscript u where the splice plates are not shown. In both scenarios, the top and bottom flanges and flange splice plates have 0 shear stress. In the model designed with the current method, the left girder web has shear stresses ranging from -14.5 to -19.3 ksi, although close to the flanges, the stresses increase to -9.7 to -14.5 ksi. In the right girder section, the web mostly has shear stresses ranging from 14.5 to 19.3 ksi. However, near the bottom two rows of bolts, there is a small section that ranges from 19.3 to 24.2 ksi. Also, there is a crescent-shaped stress profile arcing away from the web splice from about the lower third of the web splice to the upper third of the web splice with smaller stresses ranging from 9.7 to 14.5 ksi. In the model designed with the current method, the left girder web has shear stresses ranging from -14.5 to -19.3 ksi, although close to the flanges, the stresses increase to -9.7 to -14.5 ksi. There is also a narrow band at the center of the web near the splice plate that has lower stresses ranging from -19.3 to -24.2 ksi. In the right girder section, the web mostly has shear stresses ranging from 14.5 to 
19.3 ksi. However, near the bottom two rows of bolts, there is a small section that ranges from 19.3 to 24.2 ksi. Also, there is a half-circle shaped stress profile arcing away from the web splice from about the lower third of the web splice to the upper third of the web splice with smaller stresses ranging from 9.7 to 14.5 ksi. Without the splice plates in the view, it can be seen that the stress patterns in the girder covered by the splice plates only show a linear degradation of stress from the lead fastener in the direction of force to the actual free edge of the splice within each girder.

Source: FHWA
Figure 92. Illustration. Shear stresses at proportional negative moment at Vu (splice plates not shown for clarity).
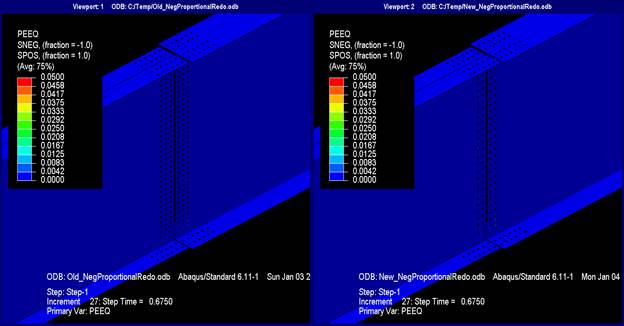
This illustration shows plastic strain equivalent (PEEQ) at proportional negative moment at V subscript u. In both scenarios using the current and new methods, the vast majority of the models have no plastic strain. In each of the modeled scenarios, the net sections in the flange splices indicate limited plastic straining not exceeding 0.02 percent. In the model designed with the new method, more of the net section has plastic strain, although in neither case does it indicate gross section plasticity.

Source: FHWA
Figure 93. Illustration. PEEQ at proportional negative moment at Vu.

This illustration shows plastic strain equivalent (PEEQ) at proportional negative moment at V subscript u where the splice plates are not shown. In both scenarios using the current and new methods, the vast majority of the models have no plastic strain. In each of the modeled scenarios, the net sections in the flange splices indicate limited plastic straining not exceeding 0.02 percent. In the model designed with the new method, more of the net section has plastic strain, although in neither case does it indicate gross section plasticity. Without the splice plates in the view, it can be seen that neither of the girder sections in either of the modeled scenarios has any plastic strain.

Source: FHWA
Figure 94. Illustration. PEEQ at proportional negative moment at Vu (splice plates not shown for clarity).
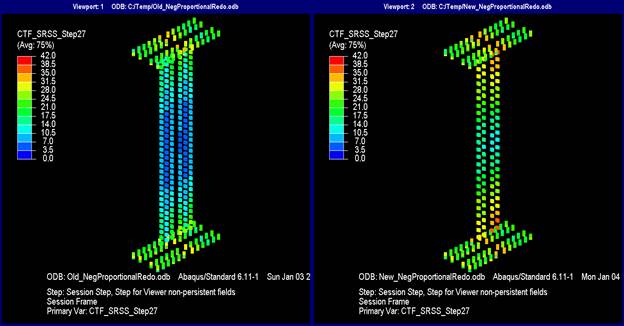
This illustration shows the resultant forces on bolt shear planes at proportional negative moment at V subscript u. In the model designed with the current method, the flange splice bolts have forces ranging from 14 to 24.5 kip. However, the lead fasteners have higher forces ranging from 28 to 35 kip. For the web splice bolts, there is a clear trend that bolts in the center of the web have forces between 0 and 10.5 kip, although increase toward the flanges where the forces range from 17.5 to 24.5 kip. In the model designed with the new method, the flange splice bolts have forces ranging from 17.5 to 31.5 kip. However, the lead fasteners have higher forces ranging from 31.5 to 35 kip. For the web splice bolts, there is a clear trend that bolts in the center of the web have forces between 10.5 and 17.5 kip, though increase toward the flanges where the forces in the left girder range from 28 to 31.5 kip, and the forces in the right girder range from 31.5 to 38.5 kip.

Source: FHWA
Figure 95. Illustration. Resultant forces on bolt shear planes at proportional negative moment at Vu.

This graph shows the direction of the force vectors at proportional negative moment at V subscript u, which are the same between the two scenarios. The X-axis shows the X-coordinate and ranges from -20 to 20 inches. The Y-axis shows the Y-coordinate and ranges from 0 to 120 inches. The vectors in the left girder are inclined about 30 degrees off the X-axis and show counterclockwise rotation about the girder centroid. In the right girder, the vectors are also inclined about 30 degrees off the X-axis and show clockwise rotation about the girder centroid.

Source: FHWA
Figure 96. Graph. Web splice bolt shear vectors at proportional negative moment at Vu.

At the higher level of interrogation, the response from step 32 was examined for each method, and contour plot data are presented in 0 through 0. At step 32, the shear in the girder was 1,574 kip. The Mises stress plots at this level show that yielding was primarily continuing in the right girder section only as a plastic hinge was developing, which was mainly driven by the longitudinal stresses (see 0 through 0). The PEEQ plots faintly show yielding in the right girder web, although most of the yielding was concentrated in the flange splice plate (see 0 and 0). There was also additional yielding in the web splice in the splice designed using the current method. The largest difference between the two methods can be seen in the bolt force results. In the splice designed using the new method, the force in the lead bolt in the flange splices varied from 38 to 40 kip depending on the bolt (see 0). This was reduced slightly in the splice designed using the current method, although the forces were in the mid-30 kip range. The web splice bolts were also loaded more heavily in the splice designed using the new method; in fact, the two corner bolts on the right girder section reached the 42-kip limit, which terminated the analysis. The force vectors in the web splice shown in 0 had large horizontal components in bolts closer to the flanges with a characteristic rotation of all vectors around the girder centroid, indicating that the web splice was contributing to moment transfer.
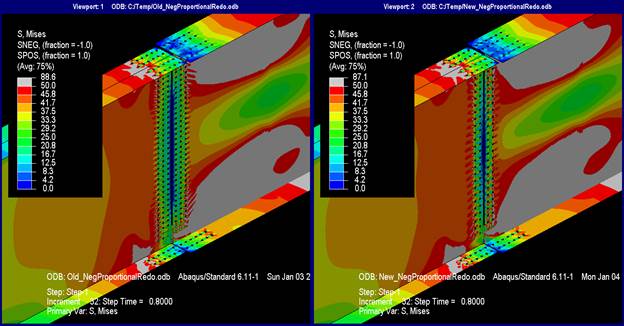
This illustration shows the Mises stresses at step 32. The stress contours between the two scenarios using the current and new methods show little difference between themselves. In both scenarios, the stresses are symmetric about the center of the web. In the left girder, the flanges have exceeded yield at the edge of the splice plate and for a small portion of the web plate in the same vicinity. The rest of the web has stresses ranging from 41.7 to 45.8 ksi. In the right girder, the flanges near the splice have stresses ranging from 37.5 to 41.7 ksi, and the web has mostly exceeded yield except for near the mid-depth. The flange splice plates have exceeded yield in their gross section. The differences between the two models is only apparent in the web splice plates. In the model designed with the current method, the gross section near the extreme four rows of bolts has exceeded yield, and that decreases toward the middle of the web splice where stresses decrease to values between 33.3 and 37.5 ksi. In the model designed with the new method, the gross section throughout the entire web splice ranges from 45.8 to 50 ksi.

Source: FHWA
Figure 97. Illustration. Mises stresses at step 32.

This illustration shows the Mises stresses at step 32 where the splice plates are not shown. The stress contours between the two scenarios using the current and new methods show little difference between themselves. In both scenarios, the stresses are symmetric about the center of the web. In the left girder, the flanges have exceeded yield at the edge of the splice plate and for a small portion of the web plate in the same vicinity. The rest of the web has stresses ranging from 41.7 to 45.8 ksi. In the right girder, the flanges near the splice have stresses ranging from 37.5 to 41.7 ksi, and the web has mostly exceeded yield except for near the mid-depth. The flange splice plates have exceeded yield in their gross section. The differences between the two models is only apparent in the web splice plates. In the model designed with the current method, the gross section near the extreme four rows of bolts has exceeded yield, and that decreases toward the middle of the web splice where stresses decrease to values between 33.3 and 37.5 ksi. In the model designed with the new method, the gross section throughout the entire web splice ranges from 45.8 to 50 ksi. Without the splice plates in the view, it can be seen that the stress patterns in the girder covered by the splice plates only show a linear degradation of stress from the lead fastener in the direction of force to the actual free edge of the splice within each girder.

Source: FHWA
Figure 98. Illustration. Mises stresses at step 32 (splice plates not shown for clarity).
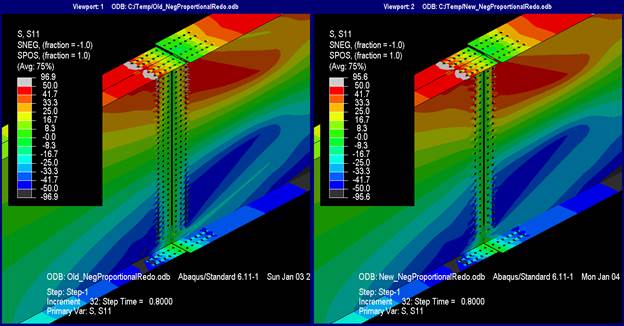
This illustration shows the longitudinal stresses at step 32. In both scenarios using the current and new methods, the top flange splice plate gross section has exceeded tension yield, and the left girder flange at the lead fastener has also exceeded yield. The bottom flange splice plates have exceeded compression yield as has the bottom flange at the lead row of fasteners at the splice plate. In both scenarios, the web splice plates have gross section stresses between -41.7 and -50 ksi at the bottom and linearly vary through the height of the splice plate to range from 41.7 to 50 ksi at the top of the splice. In the scenario designed with the current methods, the net section of the web splice extremes have limited stresses exceeding yield, whereas no yielding is seen in the model designed with the new scenario.

Source: FHWA
Figure 99. Illustration. Longitudinal stresses at step 32.

This illustration shows the longitudinal stresses at step 32 where the splice plates are not shown. In both scenarios using the current and new methods, the top flange splice plate gross section has exceeded tension yield, and the left girder flange at the lead fastener has also exceeded yield. The bottom flange splice plates have exceeded compression yield as has the bottom flange at the lead row of fasteners at the splice plate. In both scenarios, the web splice plates have gross section stresses between -41.7 and -50 ksi at the bottom and linearly vary through the height of the splice plate to range from 41.7 to 50 ksi at the top of the splice. In the scenario designed with the current methods, the net section of the web splice extremes have limited stresses exceeding yield, whereas no yielding is seen in the model designed with the new scenario. Without the splice plates in the view, it can be seen that the stress patterns in the girder covered by the splice plates only show a linear degradation of stress from the lead fastener in the direction of force to the actual free edge of the splice within each girder. No other information can be gleaned with the splice plate absent from the view.

Source: FHWA
Figure 100. Illustration. Longitudinal stresses at step 32 (splice plates not shown for clarity).

This illustration shows shear stresses at step 32. In both scenarios using the current and new methods, the top and bottom flanges and flange splice plates have zero shear stress. The left girder webs have shear stresses ranging from -19.3 to -24.2 ksi in the middle of the web, although near the flanges, the range of stresses decreases to -9.7 to -19.3. In the right girder webs, the middle of the web has stresses ranging from 14.5 to 19.3 ksi, and this stress pattern extends to the corners of the web near the splice. There is a semi-circular portion of web at the center of the splice that has higher stresses ranging from 19.3 to 24.3 ksi. There are differences in the web splices between the two design scenarios. In the model designed with the current method, the gross section stresses range from 9.7 to 24.2 ksi over most of the splice depth, although in the model designed with the new method, the stresses at the center of the splice range from 19.3 to 24.2 ksi. At the extremes of the splice, the range of stresses lowers to 9.7 to 19.3 ksi.

Source: FHWA
Figure 101. Illustration. Shear stresses at step 32.

This illustration shows shear stresses at step 32 where splice plates are not shown. In both scenarios using the current and new methods, the top and bottom flanges and flange splice plates have zero shear stress. The left girder webs have shear stresses ranging from -19.3 to -24.2 ksi in the middle of the web, although near the flanges, the range of stresses decreases to -9.7 to -19.3 ksi. In the right girder webs, the middle of the web has stresses ranging from 14.5 to 19.3 ksi, and this stress pattern extends to the corners of the web near the splice. There is a semi-circular portion of web at the center of the splice that has higher stresses ranging from 19.3 to 24.3 ksi. There are differences in the web splices between the two design scenarios. In the model designed with the current method, the gross section stresses range from 9.7 to 24.2 ksi over most of the splice depth, although in the model designed with the new method, the stresses at the center of the splice range from 19.3 to 24.2 ksi. At the extremes of the splice, the range of stresses lowers to 9.7 to 19.3 ksi. Without the splice plates in the view, it can be seen that the stress patterns in the girder covered by the splice plates only show a linear degradation of stress from the lead fastener in the direction of force to the actual free edge of the splice within each girder. No other information can be gleaned with the splice plate absent from the view.

Source: FHWA
Figure 102. Illustration. Shear stresses at step 32 (splice plates not shown for clarity).

This illustration shows plastic strain equivalent (PEEQ) at step 32. In both scenarios using the current and new methods, there is no plastic strain in the left girder, although the right girder has two diagonal areas of plasticity originating at the extremes of the web splice that are angled about 45 degrees towards the web center. These plastic strains appear to range from 0.004 to 0.012. In the model designed with the current method, the gross section of the flange splice plates has completely plasticized with plastic strains ranging from 0.02 to 0.03. The web splice plate shows limited plastic strain around the extreme four rows of fasteners and the strains are about 0.015. In the model designed with the new method, the gross section of the flange splice plates is also plasticized and the strains range from 0.02 to 0.03, though the net section strains are nearing 0.05.

Source: FHWA
Figure 103. Illustration. PEEQ at step 32.

This illustration shows plastic strain equivalent (PEEQ) at step 32 where the splice plates are not shown. In both scenarios using the current and new methods, there is no plastic strain in the left girder, although the right girder has two diagonal areas of plasticity originating at the extremes of the web splice that are angled about 45 degrees towards the web center. These plastic strains appear to range from 0.004 to 0.012. In the model designed with the current method, the gross section of the flange splice plates has completely plasticized with plastic strains ranging from 0.02 to 0.03. The web splice plate shows limited plastic strain around the extreme four rows of fasteners and the strains are about 0.015. In the model designed with the new method, the gross section of the flange splice plates is also plasticized and the strains range from 0.02 to 0.03, though the net section strains are nearing 0.05. Without the splice plates in the view, it can be seen in the left girder that the net section in the flange has a small amount of plastic strain not exceeding 0.01.

Source: FHWA
Figure 104. Illustration. PEEQ at step 32 (splice plates not shown for clarity).

This illustration shows the resultant forces on bolt shear planes at step 32. In the model designed with the current method, the flange splice bolts have forces ranging from 17.5 to 31.5 kip. However, the lead fasteners have higher forces ranging from 35 to 38.5 kip. For the web splice bolts, there is a clear trend that bolts in the center of the web have forces between 0 and 10.5 kip, although increase towards the flanges where the forces are as high as 21 kip in the left girder and 35 kip in the right girder. In the model designed with the new method, the flange splice bolts have forces ranging from 17.5 to 31.5 kip. However, the lead fasteners have higher forces ranging from 38.5 to 
42 kip. For the web splice bolts, there is a clear trend that bolts in the center of the web have forces between 17.5 and 21 kip, though increase towards the flanges where the forces are as high as 38.5 kip in the left girder and 42 kip in the right girder.

Source: FHWA
Figure 105. Illustration. Resultant forces on bolt shear planes at step 32.

This graph shows the direction of the force vectors at step 32, which are the same between the two scenarios. The X-axis shows the X-coordinate and ranges from -20 to 20 inches. The Y-axis shows the Y-coordinate and ranges from 0 to 120 inches. The vectors in the left girder are inclined about 30 degrees off the X-axis and show counterclockwise rotation about the girder centroid. In the right girder, the vectors are also inclined about 30 degrees off the X-axis and show clockwise rotation about the girder centroid.

Source: FHWA
Figure 106. Graph. Web splice bolt shear vectors at step 32.

Federal Highway Administration | 1200 New Jersey Avenue, SE | Washington, DC 20590 | 202-366-4000
Turner-Fairbank Highway Research Center | 6300 Georgetown Pike | McLean, VA | 22101