U.S. Department of Transportation
Federal Highway Administration
1200 New Jersey Avenue, SE
Washington, DC 20590
202-366-4000
Federal Highway Administration Research and Technology
Coordinating, Developing, and Delivering Highway Transportation Innovations
 |
| This techbrief is an archived publication and may contain dated technical, contact, and link information |
|
Publication Number: FHWA-HRT-07-048
|
||||||||||||||||||||||||||||||||||||||||||||||||||||||||||||||||||||||||||||
Drivers' Evaluation of the Diverging Diamond InterchangeFHWA Contacts: Joe G. Bared, Task Manager 202-493-3314; PDF Version (809 KB)
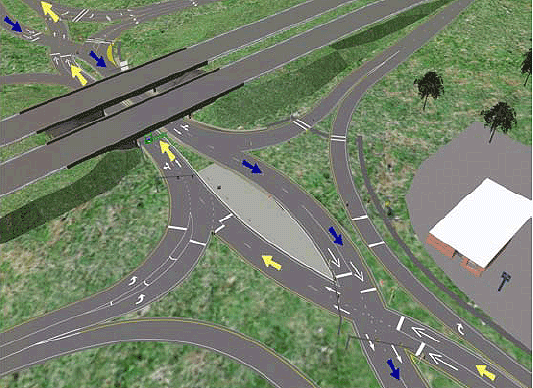
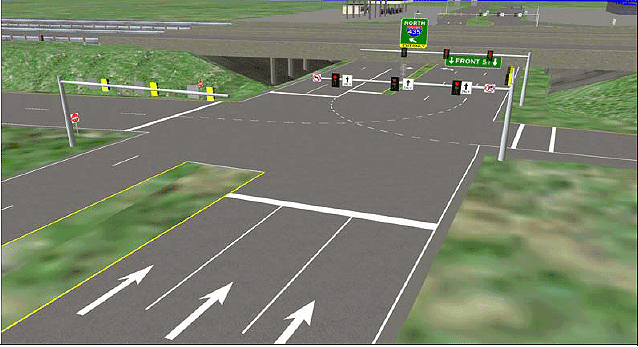
PDF files can be viewed with the Acrobat® Reader® ObjectiveIn recent years, the Federal Highway Administration (FHWA) has been advocating novel intersection designs as a way to promote intersection safety while meeting the often conflicting demands for increasing capacity, decreasing congestion, and minimizing the cost of new infrastructure. One of these novel designs is the diverging diamond interchange (DDI).(1) (2) (3) The DDI design accommodates left-turning movements at signalized, grade-separated interchanges of arterials and limited-access highways while eliminating the need for left-turn phasing. On the arterial, traffic crosses over to the left side of the roadway between the nodes of the interchange. Two-phase traffic signals are installed at the crossovers. Once on the left side of the arterial roadway, vehicles can turn left onto limited-access ramps without stopping and without conflicting with through traffic. Figure 1 provides a bird's eye view of the DDI simulation used in this study. Colored arrows have been added to emphasize the direction of travel on the arterial. Figure 1. Aerial view of a simulated DDI. Yellow and blue arrows indicate the direction of travel on the arterials.
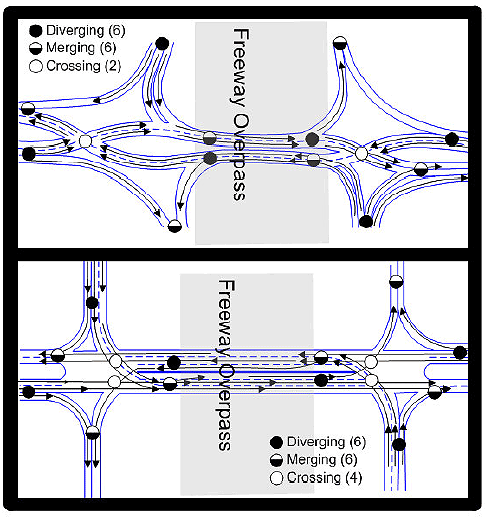
The DDI design provides a theoretical safety benefit because it reduces the number of potential conflict points through the elimination of potential crossing conflicts between vehicles turning left onto the highway and opposing arterial traffic. Figure 2 shows conflict points for a 4-lane DDI interchange in the upper panel and for a conventional diamond interchange in the lower panel. As shown in the figure, DDIs have two crossing conflicts, whereas the conventional diamond interchange has four crossing conflicts. Both designs have the same number of merging and diverging conflicts. In general, reducing the number of conflict points reduces the number of crashes.(4) Although traffic signals are used to separate conflicts between vehicles, and other roadway design features, such as signs and markings, are intended to reduce the probability of driver errors that may result in crashes, safety performance generally is better when the number of conflict points is minimized. However, because the DDI design is new to drivers in the United States, there is some concern that human errors due to unfamiliarity might result in an increase in crashes, despite the reduction in conflict points. In addition, it has been suggested(2) that DDI arterial approaches should include reverse curvature to make the crossovers somewhat perpendicular. Although this reverse curvature is intended to reduce speed and make the crossover more intuitive, more research is needed on the overall safety effects of the reverse curvature. Besides the potential safety benefits of the DDI, the design also offers operational and cost benefits over alternatives at grade-separated interchanges. The proposed DDI in Kansas City, MO, provides one example of these benefits. The Missouri Department of Transportation (MoDOT) estimates that the Kansas City DDI will cost half as much as a conventional diamond interchange retrofit because the additional lanes required by a conventional diamond interchange would require excavation under the existing underpass. Furthermore, traffic modeling suggests that the DDI will be at 60 percent of capacity when completed, while the more expensive diamond interchange option with added turn lanes, when completed, would be at 95 percent of capacity.(5) MoDOT estimated that with a conventional diamond having eight lanes in the underpass, levels of service during peak travel periods would vary from C to F given current demand. With four lanes in the underpass in the DDI design, levels of service during peak demand are forecast to vary between A and C. Figure 2. Conflict diagrams for a DDI (above) and a conventional diamond interchange (below).
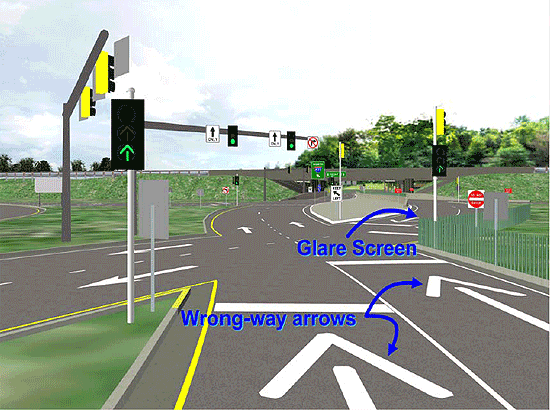
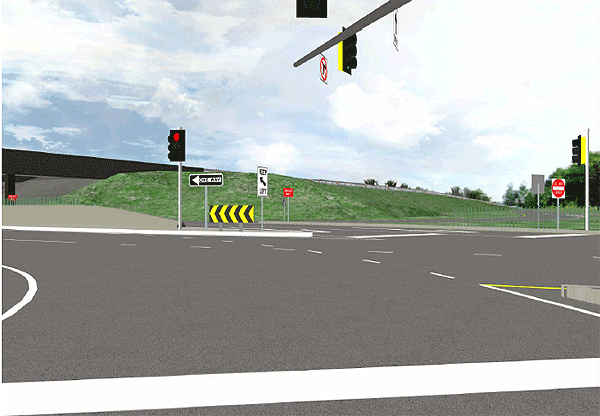
The proposed DDI at the interchange of Interstate 435 (I-435) and Front Street in Kansas City will be the first such interchange in the United States. To assist MoDOT in ensuring a successful implementation of the DDI, FHWA built a simulation of the proposed DDI in its Highway Driving Simulator. This simulation enabled MoDOT engineers to drive through their design using real-time, three-dimensional software. To evaluate the performance of drivers unfamiliar with the DDI design, FHWA's Human Centered Systems team observed more than 70 volunteer participants driving through the simulated interchange. This document describes the initial drive-throughs by the engineering team and the subsequent human factors research Development of the SimulationWhen FHWA was informed of MoDOT's interest in considering a DDI, discussions turned to how the MoDOT design could be evaluated before construction with respect to human factors. A decision was made to build the intersection in the Highway Driving Simulator so that engineers, members of the Human Centered Systems team, and drivers would have first-hand experience with the proposed design. MoDOT provided engineering drawings, which were imported into the Highway Driving Simulator design software along with MoDOT's initial signing and marking plans. Figures 3 and 4 show the results of the intersection modeling effort. Figure 3 shows a driver's view of the approach to the crossover on the west side of the interchange. Prominent features of the design seen in this figure include green arrows in the near-side signal heads, wrong-way arrows, and a 1.2-meter (4-foot) glare screen that is intended to mask headlights of opposing traffic at the crossover. Figure 3. The approach to the crossover on the west side of the interchange
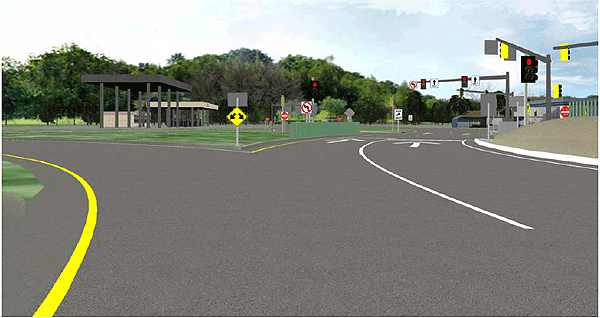
Figure 4. View of the crossover on the east side of the interchange.
Figure 4 shows the crossover back to the right side of the roadway on the east side of the interchange. This figure illustrates the extensive use of signage to guide drivers through the intersection. The interchange also features regulatory signage, including lane restriction, left- and right-turn restriction, keep right, do not enter, and wrong-way signs The SimulatorFHWA's Highway Driving Simulator consists of hardware and software components that together comprise a relatively high fidelity research simulator. Hardware components visible to participants included a 1998 Saturn SL1 chassis, three projectors, and a cylindrical screen to show the images from the projectors. The images on the screen wrapped 180 degrees around the forward view. Under the vehicle chassis was a 3 degree-of-freedom motion system. In addition, a sound system provided engine, wind, and tire noise and other environmental sounds. The projection screen was 2.7 meters (m) (9 feet (ft)) from the driver design eye point. FHWA calibrated the vehicle dynamics model to approximate the characteristics of a small passenger sedan and synchronized the data capture to the frame rate of the graphics cards. FHWA also recorded variables from the vehicle dynamics model, such as speed, longitudinal acceleration, lateral acceleration, throttle position, and brake force, with each frame. In addition, researchers recorded the vehicle's virtual positioning and heading with each frame. FHWA invited representatives of its Missouri Division Office and MoDOT to visit the Turner-Fairbank Highway Research Center to preview their proposed design. MoDOT and the Division Office accepted the invitation, and a 3-day period of testing and evaluation followed. During that period, MoDOT engineers requested and FHWA made modifications to the traffic signal placement and navigation and warning signage. These changes were intended to enhance traffic signal conspicuity and driver understanding of the interchange. At the conclusion of the visit, all parties agreed that the modified DDI design was intuitive and easy to negotiate from the driver's perspective. One feature of the design was a concrete barrier topped by glare shields. The 1.2-meter (4-foot) height of the barrier, combined with the 0.9-meter (3-foot) height of the glare shields, helped to prevent automobile drivers from seeing oncoming traffic to their immediate right and to prevent headlight glare problems at night. However, these visual barriers, combined with the roadway curvature, partially blocked sightlines to the far-side traffic signals. To overcome this sightline problem, MoDOT engineers suggested adding a traffic signal on top of the barrier in advance of the stopline by 7.6 m (25 ft). Subsequent testing showed several drivers stopped at the advance signal rather than at the stopline. To encourage drivers to stop closer to the stopline, FHWA moved the added signal assembly to the stopline and positioned it so that it could still be seen above the visual barriers. With the near-side signal at the stopline, drivers traveling straight through the interchange stopped nearer to the stopline. However, some drivers who intended to turn left onto the freeway onramp mistakenly thought the near-side signal applied to them and stopped before entering the ramp. Figure 5 shows a driver's view of the point where some northbound drivers stopped in response to the near-side signal. Unnecessary stops at this location could increase the risk of rear-end collisions. Advanced warning flashers with a "prepare to stop when flashing" placard may be an alternative solution to address the occlusion of the far-side signals. Another possible solution would be to design the near-side signal so that the red indication cannot be seen from angles where there are no longer obstructions to the far-side signals. On the east side of the underpass, the original design had the nose of the median extending such that when turning left off of the northbound offramp, drivers could see a path to the far-side opposing traffic lanes. Figure 6 shows this view. As a result of viewing this potential errant path in the simulator, MoDOT redesigned the crossover so that the median extended further and drivers turning left could not cross to the opposing lanes. FHWA, however, did not implement this change in the final MoDOT design in the simulator. Figure 5. The approach to the free left-turn onto the northbound onramp is shown.
Figure 6. The crossover on the eastern node of the interchange where drivers on the northbound offramp could see a path to the opposing eastbound lanes.
Figure 7. Alternative keep left signs from the Manual on Uniform Traffic Control Devices (MUTCD).
MoDOT engineers also recommended replacing the keep left (R4-8) signs at the heads of the crossover medians with the optional R4-8b signs.(6) Figure 7 shows these signs. Because the symbolic sign (R4-8) is most commonly used in the keep right configuration, the MoDOT engineers feared that drivers would fail to notice the reversal and might be induced to keep right instead. Instead, MoDOT believed that the alternative sign, which included the words "keep left" and a left pointing arrow (R4-8b), would better convey the desired message, especially to drivers that do not closely study the sign or do not pay close attention to the driving task. Subsequent to visiting TFHRC, the engineers from MoDOT presented videos recorded during the simulation at public meetings concerning the proposed interchange. Evaluation ExperimentMany questions remained even following the visualization drive-though by MoDOT engineers. Among these were:
To address these and other questions, the Human Centered Systems team at TFHRC designed and conducted an experiment in the Highway Driving Simulator. The purpose of the experiment was to observe drivers who had no previous DDI exposure as they negotiated DDIs and a comparable diamond interchange. To avoid providing cues that might be afforded by other vehicles, the team did not present any other vehicles in the simulated interchanges. MethodFHWA implemented three simulated interchanges in the Highway Driving Simulator:
Table 1 summarizes the differences in signing and markings between the three simulated interchanges. There were no other differences between the DDI and DDI-M interchanges. Where appropriate, the diamond interchange included signs from the DDI version of the interchange. The diamond design was included to provide a baseline performance in an intersection design with which the participants were likely to be familiar. Figure 8 shows a picture of the western approach to the conventional diamond interchange that FHWA used in the evaluation experiment. The posted speed limit on the arterial was 56 kilometers per hour (km/h) (35 miles per hour (mi/h)). The posted speed on the limited-access road was 88 km/h (55 mi/h). The advisory speed on the freeway ramps was 48 km/h (30 mi/h). The advisory speed on approach to the DDI and DDI-M crossovers was 40 km/h (25 mi/h). ParticipantsThe Human Centered Systems team recruited 74 licensed drivers from the Washington, DC, metropolitan area for the experiment. Of those recruited, 33 participants were over the age of 65 (mean = 72), and 41 participants were younger than the age of 65 (mean = 40). The age groups were balanced for gender.
Figure 8. The conventional diamond interchange that was used in the evaluation experiment is shown.
ProcedureEach participant traveled through each interchange six times for a total of 18 trials. A different path was assigned for each trial. These assignments were accomplished by providing participants with instructions to drive toward a particular destination. The six paths and instructions were:
The six paths consisted of all four possible left-turn movements through the interchange and the two straight-through movements on the arterial. Because right-turning movements do not pass through the interchanges, they were not included in the study. The research team modeled the three interchange designs on squares of 1,207 m (0.75 mi) per side, with the intersection of I-435 and Front Street at the center of each square. The squares on which the interchange was modeled were laid side to side in the simulation, such that when drivers reached the edge of one square they continued seamlessly into another square. The squares were rotated so that the drivers would enter each square from the direction that was appropriate for the instructions assigned to the trial. Measures of EffectivenessThe purpose of this experiment was to observe drivers as they negotiate the DDI interchanges without having any prior introduction about the designs. The participant's vehicle was the only vehicle on the roadway. The chief concern with the DDI design was that drivers might erroneously bear to the right at the crossovers, and thus drive against the intended traffic flow. The research team also evaluated other variables that might reflect the safety performance of the interchanges. The measures of effectiveness were
FindingsWrong-Way ViolationsNo participants were observed bearing right at the crossovers or turning into an oncoming traffic lane in either DDI configuration. There were 1,041 opportunities for this to occur. This sample size, however, is too small to support a conclusion that the additional signage in the DDI, compared to the DDI-M, will have no effect in preventing driver errors. Nor was the intent of the experiment to determine whether wrong-way or do not enter signs are necessary. Rather, the purpose of the experiment was to test the robustness of the overall interchange design to driver comprehension. The finding of no substantial difference in performance between the DDI and DDI-M configurations is reassuring in that with the suggested geometric design, the crossover design is intuitive to most drivers, even with the minimum signing and marking. This finding does not support use of less than the complete positive guidance exemplified by the DDI configuration. Although there were no wrong-way errors at the crossovers, there were five wrong-way incidents in other parts of the interchanges. Three incidents involved the same elderly female. All five errors occurred in scenarios that required a left-turn. In four of the five errors, the participant turned left off the arterial and onto a freeway offramp. That is, the participant turned left before crossing under the freeway overpass. One elderly female made this error three times, once with each interchange design. The remaining two wrong-way errors were in the diamond interchange design: another early left-turn off the arterial and onto an offramp, and a left turn from a diamond interchange offramp into an opposing arterial left-turn lane. The wrong-way errors onto the offramps are partially attributable to incorrect signing. The green overhead navigation sign for I-435, which was hung from the overpass and could be seen on the approach to the interchange from either arterial approach, had a straight arrow that pointed to the left at a 45-degree angle (see figure 9a). The participants who turned left on the approach to the interchange evidently interpreted this arrow as indicating an immediate left. The arrow was above the left-turn lane for the ramp and 37 m (120 ft) beyond the center of the offramp at the junction with the arterial. The arrow would have been less ambiguous if it had pointed down to the appropriate lane as in figure 9c, or alternatively, had a hooked arrow with a vertical segment at its base as seen in figure 9b. This hooked style sign is in the design plan for the Kansas City DDI, but was inadvertently replaced in this study. Figure 9. The figure shows three types of overhead navigation signs. The sign labeled A was used above the underpass, although B or C would have been more appropriate for a turn beyond the underpass.
Navigation ErrorsA navigation error was scored when a participant followed a path to a destination other than the one he or she was asked to follow. Wrong-way violations were not scored as navigation errors. Regardless of the geometric design, navigational signage, and pavement markings, navigation errors were rare. Participants followed the incorrect path on only 2.3 percent of opportunities. There was no significant trend in navigation errors as a function of interchange design, Χ2(2) = 0.48, p > 0.78. Table 2 shows the number of correct path choices (excluding turns into oncoming lanes).
Red-Light ViolationsThe simulation scenarios were designed such that half the drivers would come upon red signals in one direction, and half would come upon red signals when traveling in the other. Because the two signal timing plans were fixed, whether a signal was red when the driver arrived depended in part on vehicle speed, which was controlled by the driver. Therefore, the analysis of signal compliance was based on the state of each traffic signal when the vehicle was within 30 m (98 ft) upstream of the respective stopline. There were 886 instances in which a signal was red or turned red while the participant was within 30 m (98 ft) upstream of the stopline. Of these, in 757 instances the participant stopped at or before the stopline. In 92 instances, the driver made a stop after the front bumper reached the stopline. In 37 red-signal instances, no stop was recorded. In 24 of these instances, however, the light changed back to green before the driver crossed the stopline. Therefore, only 13 drivers violated the red and failed to stop. Table 3 shows the responses to the red signal as a function of interchange design. Most of the instances that are classified as compliant were the result of a full stop upstream of the stopline. Forty-one instances included in the compliant category were a stop within 1 m (3 ft) beyond the stopline. The violation category included the 13 instances when the driver proceeded through the intersection on red without stopping, and 2 instances when the driver came to a stop more than 6 m (20 ft) beyond the stopline. There were no statistically reliable differences among interchange designs in the proportion of drivers complying. There were, however, considerably more chances to violate signals with the diamond interchange design.
The increased exposure to red signals with the diamond design was due to two factors: (1) the diamond design included a protected left-turn phase, whereas the DDI design had a free left-turn off of the arterial, and (2) the signal timing used in this study resulted in participants getting a red signal for all left-turns off the arterial in the diamond design. The results suggest that red-light violations may occur at similar relative frequencies with either the diamond or DDI designs, with the result that the absolute number of red-light violations will be lower with the DDI design. The mean speed of violators was lower in the DDI designs. On the through movements in the DDI designs, the reverse curvature in the road forces drivers to slow down. The mean speed of the violators on the DDI and DDI-M was 34 km/h (21 mi/h), whereas the mean speed of the violators in the diamond design was 56 km/h (35 mi/h). SpeedAlthough reverse curvature at the crossovers, which can be seen in figures 2 and 4, is not required to achieve a crossover, it is recommended for at least three reasons:
As can be seen in Table 4, the speed reduction with the DDI designs was not limited to red-light violators. Mean speed at the crossovers was about 13 km/h (8 mi/h) less for the DDI designs than for the diamond interchange. The difference in speed between DDI and DDI-M designs also was statistically reliable (p < 0.005) but relatively small 2.3 km/h (1.4 mi/h). It should be noted that a horizontal alignment warning sign (MUTCD, W1-4) with a 40 km/h (25 mi/h) speed advisory placard was used on the arterial approaches to the interchange.
Conclusions and RecommendationsThe driving simulator proved to be a valuable tool for evaluating the novel DDI design. It revealed sight distance problems that might not have been noticed otherwise. It also revealed unintended driver behaviors that resulted from the first attempt to mitigate the sight distance problem at traffic signals. One of the greatest safety concerns with this novel design was the possibility that drivers would persist in bearing to the right at the crossovers, despite geometric, marking, and signage cues to induce them to bear left. The simulation suggests that this concern is not warranted. No drivers stayed to the right at the crossovers. Other types of driver errors were no more likely with the DDI and DDI-M configurations than with the conventional diamond interchange. The speed reduction associated with the geometric design of the DDI suggests that should drivers make errors that result in crashes, the severity of those crashes is likely to be less than crashes in conventional diamond interchanges. This speed reduction, lack of increase in driver errors, and reduction in crossing conflict points combine to suggest that properly designed DDIs will prove to be considerably safer than properly designed conventional diamond interchanges. Indeed, Edara and Bared(7) reported that a DDI in Versailles, France, which has been in operation for 25 years, had experienced only 11 minor injury crashes in the preceding 5 years, whereas the expected number of injury/fatal crashes of comparable diamond interchanges in the United States would be between 21 and 23. FHWA and the MoDOT have an evaluation in place to assess the safety and operations of the planned Kansas City DDI, which is anticipated to be completed in fall 2008. This study suggests that, where it is adopted, the DDI will deliver safety benefits. The prospective safety benefit combined with predicted operational benefits and reduced roadway width requirements for overpasses or underpasses should make the DDI an attractive interchange design alternative. References
| ||||||||||||||||||||||||||||||||||||||||||||||||||||||||||||||||||||||||||||