LRFD Steel Girder SuperStructure Design Example
Miscellaneous Steel Design Example Design Step 5
Table of Contents
Design Step 5.1 - Design Shear Connectors
Design Step 5.2 - Design Bearing Stiffeners
Design Step 5.3 - Design Welded Connections
Design Step 5.4 - Design Cross-frames 21
(It should be noted that Design Step 5.4 presents a narrative description rather than design computations.)
Design Step 5 consists of various design computations associated with the steel girder but not necessarily required to design the actual plates of the steel girder. Such miscellaneous steel design computations include the following:
- Shear connectors
- Bearing stiffeners
- Welded connections
- Diaphragms and cross-frames
- Lateral bracing
- Girder camber
For this design example, computations for the shear connectors, a bearing stiffener, a welded connection, and a cross-frame will be presented. The other features must also be designed, but their design computations are not included in this design example.
The following units are defined for use in this design example:
![]()


Refer to Design Step 1 for introductory information about this design example. Additional information is presented about the design assumptions, methodology, and criteria for the entire bridge, including the design features included in this design step.
Design Step 5.1 - Design Shear Connectors
Since the steel girder has been designed as a composite section, shear connectors must be provided at the interface between the concrete deck slab and the steel section to resist the interface shear. For continuous composite bridges, shear connectors are normally provided throughout the length of the bridge. In the negative flexure region, since the longitudinal reinforcement is considered to be a part of the composite section, shear connectors must be provided.
Studs or channels may be used as shear connectors. For this design example, stud shear connectors are being used throughout the length of the bridge. The shear connectors must permit a thorough compaction of the concrete to ensure that their entire surfaces are in contact with the concrete. In addition, the shear connectors must be capable of resisting both horizontal and vertical movement between the concrete and the steel.
S6.10.7.4.1
The following figure shows the stud shear connector proportions, as well as the location of the stud head within the concrete deck.
S6.10.7.4.1a
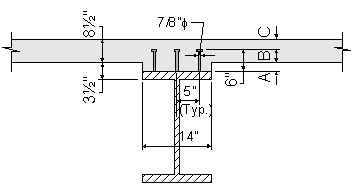
Figure 5-1 Stud Shear Connectors
| Shear Connector Embedment | |||
| Flexure Region | A | B | C |
| Positive | 2.875" | 3.125" | 5.375" |
| Intermediate | 2.25" | 3.75" | 4.75" |
| Negative | 1.00" | 5.00" | 3.50" |
Table 5-1 Shear Connector Embedment
 |
Shear Connector Layout It is common to use several stud shear connectors per transverse row along the top flange of the girder. The number of shear connectors per transverse row will depend on the top flange width. Refer to S6.10.7.4.1c for transverse spacing requirements. |
 |
Shear Connector Length The stud shear connector length is commonly set such that its head is located near the middle of the deck slab. Refer to S6.10.7.4.1d for shear connector embedment requirements. |
The ratio of the height to the diameter of a stud shear connector must not be less than 4.0. For this design example, the ratio is computed based on the dimensions presented in Figure 5-1, as follows:
S6.10.7.4.1a
OK
The pitch of the shear connectors must be determined to satisfy the fatigue limit state as specified in S6.10.7.4.2 and S6.10.7.4.3, as applicable. The resulting number of shear connectors must not be less than the number required to satisfy the strength limit states as specified in S6.10.7.4.4.
The pitch, p, of the shear connectors must satisfy the following equation:
S6.10.7.4.1b
The parameters I and Q are based on the short-term composite section and are determined using the deck within the effective flange width.
In the positive flexure region:
(see Figure 5-1)
(see Table 3-4)
S6.10.3.1.1b
In the positive flexure region, the maximum fatigue live load shear range is located at the abutment. The factored value is computed as follows:
(see live load analysis computer run)
S6.10.7.4.2
(see Design Step 3.14 at location of maximum positive flexure)
S6.6.1.2.5
in

Therefore,

In the negative flexure region:
(see Figure 5-1)
In the negative flexure region, the parameters I and Q may be determined using the reinforcement within the effective flange width for negative moment, unless the concrete slab is considered to be fully effective for negative moment in computing the longitudinal range of stress, as permitted in S6.6.1.2.1. For this design example, I and Q are assumed to be computed considering the concrete slab to be fully effective.
SC6.10.7.4.1b
(see Table 3-5)
(see Table 3-1 and live load analysis computer run)
S6.10.7.4.2
(see previous computation)

Therefore, based on the above pitch computations to satisfy the fatigue limit state, use the following pitch throughout the entire girder length:
 |
Shear Connector Pitch The shear connector pitch does not necessarily have to be the same throughout the entire length of the girder. Many girder designs use a variable pitch, and this can be economically beneficial. However, for this design example, the required pitch for fatigue does not vary significantly over the length of the bridge. Therefore, a constant shear connector pitch of 10 inches will be used. |
In addition, the shear connectors must satisfy the following pitch requirements:
S6.10.7.4.1b
OK

OK
For transverse spacing, the shear connectors must be placed transversely across the top flange of the steel section and may be spaced at regular or variable intervals.
Stud shear connectors must not be closer than 4.0 stud diameters center-to-center transverse to the longitudinal axis of the supporting member.
S6.10.7.4.1c
(see Figure 5-1) OK
In addition, the clear distance between the edge of the top flange and the edge of the nearest shear connector must not be less than 1.0 inch.
(see Figure 5-1)
OK
S6.10.7.4.1d
The clear depth of concrete cover over the tops of the shear connectors should not be less than 2.0 inches, and shear connectors should penetrate at least 2.0 inches into the deck. Based on the shear connector penetration information presented in Table 5-1, both of these requirements are satisfied.
For the strength limit state, the factored resistance of the shear connectors, Qr, is computed as follows:
S6.10.7.4.4
S6.10.7.4.4a
S6.5.4.2
The nominal shear resistance of one stud shear connector embedded in a concrete slab is computed as follows:
S6.10.7.4.4c

(see Design Step 3.1)
S5.4.2.1
(see Design Step 3.3)
S5.4.2.4
S6.4.4
K
K
Therefore,
Therefore,
The number of shear connectors provided between the section of maximum positive moment and each adjacent point of 0.0 moment or between each adjacent point of 0.0 moment and the centerline of an interior support must not be less than the following:
S6.10.7.4.4a
The total horizontal shear force, Vh, between the point of maximum positive moment and each adjacent point of 0.0 moment is equal to the lesser of the following:
S6.10.7.4.4b
or
where
(see Design Step 3.1)
S5.4.2.1
(see Design Step 3.3)
(see Design Step 3.1)
(see Design Step 3.1)
STable 6.4.1-1
(see Design Step 3.18)
(see Design Step 3.18)
(see Design Step 3.1)
STable 6.4.1-1
(see Design Step 3.18)
(see Design Step 3.18)
(see Design Step 3.1)
STable 6.4.1-1
(see Design Step 3.18)
(see Design Step 3.18)
Therefore,
Therefore, the number of shear connectors provided between the section of maximum positive moment and each adjacent point of 0.0 moment must not be less than the following:
S6.10.7.4.4a
The distance between the end of the girder and the location of maximum positive moment is approximately equal to:
(see Table 3-7)
Similarly the distance between the section of the maximum positive moment and the point of dead load contraflexure is approximately equal to:
(see Table 3-7)
Using a pitch of 10 inches, as previously computed for the fatigue limit state, and using the minimum length computed above, the number of shear connectors provided is as follows:

OK
For continuous span composite sections, the total horizontal shear force, Vh, between each adjacent point of 0.0 moment and the centerline of an interior support is equal to the following:
S6.10.7.4.4b
where
(see Design Step 3.3)
(see Design Step 3.1)
Therefore, the number of shear connectors provided between each adjacent point of 0.0 moment and the centerline of an interior support must not be less than the following:
S6.10.7.4.4a
The distance between the point of dead load contraflexure and the centerline of the interior support is approximately equal to:
(see Table 3-7)
Using a pitch of 10 inches, as previously computed for the fatigue limit state, the number of shear connectors provided is as follows:

OK
Therefore, using a pitch of 10 inches for each row, with three stud shear connectors per row, throughout the entire length of the girder satisfies both the fatigue limit state requirements of S6.10.7.4.1 and S6.10.7.4.2 and the strength limit state requirements of S6.10.7.4.4.
Therefore, use a shear stud spacing as illustrated in the following figure.
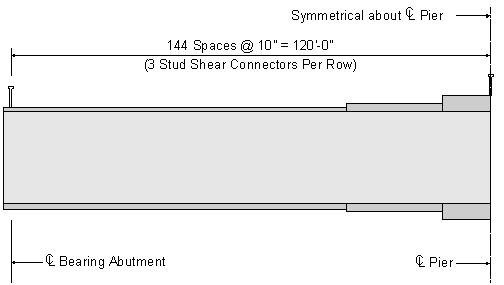
Figure 5-2 Shear Connector Spacing
Design Step 5.2 - Design Bearing Stiffeners
Bearing stiffeners are required to resist the bearing reactions and other concentrated loads, either in the final state or during construction.
For plate girders, bearing stiffeners are required to be placed on the webs at all bearing locations and at all locations supporting concentrated loads.
Therefore, for this design example, bearing stiffeners are required at both abutments and at the pier. The following design of the abutment bearing stiffeners illustrates the bearing stiffener design procedure.
The bearing stiffeners in this design example consist of one plate welded to each side of the web. The connections to the web will be designed to transmit the full bearing force due to factored loads and is presented in Design Step 5.3.
S6.10.8.2.1
The stiffeners extend the full depth of the web and, as closely as practical, to the outer edges of the flanges.
Each stiffener will either be milled to fit against the flange through which it receives its reaction or attached to the flange by a full penetration groove weld.
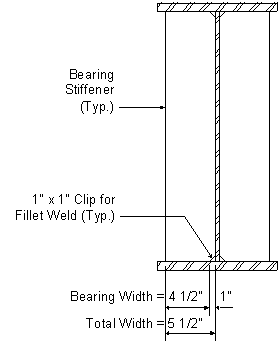
The following figure illustrates the bearing stiffener layout at the abutments.
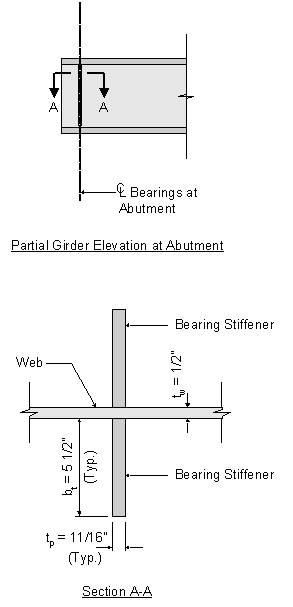
Figure 5-3 Bearing Stiffeners at Abutments
 |
Bearing Stiffener Plates Bearing stiffeners usually consist of one plate connected to each side of the web. This is generally a good starting assumption for the bearing stiffener design. Then, if this configuration does not provide sufficient resistance, two plates can be used on each side of the web. |
The projecting width, bt, of each bearing stiffener element must satisfy the following equation. This provision is intended to prevent local buckling of the bearing stiffener plates.
S6.10.8.2.2
(see Figure 5-3)
S6.4.1
STable 6.4.1-1
(see Figure 5-3) OK
The bearing resistance must be sufficient to resist the factored reaction acting on the bearing stiffeners. The factored bearing resistance, Br, is computed as follows:
S6.10.8.2.3
S6.5.4.2
Part of the stiffener must be clipped to clear the web-to-flange weld. Thus the area of direct bearing is less than the gross area of the stiffener. The bearing area, Apn, is taken as the area of the projecting elements of the stiffener outside of the web-to-flange fillet welds but not beyond the edge of the flange. This is illustrated in the following figure:
Figure 5-4 Bearing Width


The factored bearing reaction at the abutment is computed as follows, using load factors as presented in STable 3.4.1-1 and STable 3.4.1-2 and using reactions obtained from a computer analysis run:
Therefore, the bearing stiffener at the abutment satisfies the bearing resistance requirements.
The final bearing stiffener check relates to the axial resistance of the bearing stiffeners. The factored axial resistance is determined as specified in S6.9.2.1. The radius of gyration is computed about the midthickness of the web, and the effective length is taken as 0.75D, where D is the web depth.
S6.10.8.2.4
S6.10.8.2.4a
For stiffeners consisting of two plates welded to the web, the effective column section consists of the two stiffener elements, plus a centrally located strip of web extending not more than 9tw on each side of the stiffeners. This is illustrated in the following figure:
S6.10.8.2.4b
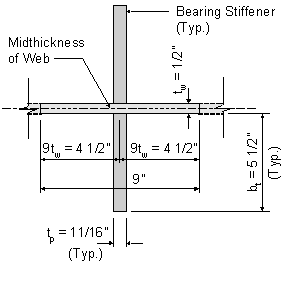
Figure 5-5 Bearing Stiffener Effective Section

S6.9.2.1
S6.5.4.2
S6.9.4.1
S6.10.8.2.4a
S6.10.8.2.4b
S6.10.8.2.4b
S6.9.4.1
Therefore,
Therefore,
S6.9.4.1
S6.9.2.1
Therefore, the bearing stiffener at the abutment satisfies the axial bearing resistance requirements.
The bearing stiffener at the abutment satisfies all bearing stiffener requirements. Therefore, use the bearing stiffener as presented in Figures 5-3 and 5-4.
Design Step 5.3 - Design Welded Connections
Welded connections are required at several locations on the steel superstructure. Base metal, weld metal, and welding design details must conform to the requirements of the ANSI/AASHTO/AWS Bridge Welding Code D1.5.
For this design example, two fillet welded connection designs will be presented using E70 weld metal:
- Welded connection between the bearing stiffeners and the web.
- Welded connection between the web and the flanges.
For the welded connection between the bearing stiffeners and the web, the fillet weld must resist the factored reaction computed in Design Step 5.2.
S6.13.3
Assume a fillet weld thickness of 1/4 inches.
 |
Fillet Weld Thickness In most cases, the minimum weld thickness, as specified in Table 5-2, provides a welded connection that satisfies all design requirements. Therefore, the minimum weld thickness is generally a good starting point when designing a fillet weld. |
The resistance of the fillet weld in shear is the product of the effective area and the factored resistance of the weld metal. The factored resistance of the weld metal is computed as follows:
S6.13.3.2.4b
S6.5.4.2
SC6.13.3.2.1
S6.13.3.2.4b
The effective area equals the effective weld length multiplied by the effective throat. The effective throat is the shortest distance from the joint root to the weld face.
S6.13.3.3
The resistance of the fillet weld is then computed as follows:
S6.13.3.2.4b
OK
For material 0.25 inches or more in thickness, the maximum size of the fillet weld is 0.0625 inches less than the thickness of the material, unless the weld is designated on the contract documents to be built out to obtain full throat thickness.
S6.13.3.4
For the fillet weld connecting the bearing stiffeners to the web, the bearing stiffener thickness is 11/16 inches and the web thickness is 1/2 inches. Therefore, the maximum fillet weld size requirement is satisfied.
The minimum size of fillet welds is as presented in Table 5-2. In addition, the weld size need not exceed the thickness of the thinner part joined.
S6.13.3.4
| Minimum Size of Filet Welds | |
| Base Metal Thickness of Thicker Part Joined(T) (inches) |
Minimum Size of Filet Weld (inches) |
| T ≤ 3/4 | 1/4 |
| T > 3/4 | 5/16 |
STable 6.13.3.4-1
Table 5-2 Minimum Size of Fillet Welds
In this case, the thicker part joined is the bearing stiffener plate, which is 11/16 inches thick. Therefore, based on Table 5-2, the minimum size of fillet weld is 1/4 inch, and this requirement is satisfied.
The minimum effective length of a fillet weld is four times its size and in no case less than 1.5 inches. Therefore, this requirement is also satisfied.
Since all weld design requirements are satisfied, use a 1/4 inch fillet weld for the connection of the bearing stiffeners to the web.
S6.13.3.5
For the welded connection between the web and the flanges, the fillet weld must resist a factored horizontal shear per unit length based on the following equation:
S6.13.3
This value is greatest at the pier, where the factored shear has its highest value.
The following computations are for the welded connection between the web and the top flange. The welded connection between the web and the bottom flange is designed in a similar manner.
The shear is computed based on the individual section properties and load factors for each loading, as presented in Design Steps 3.3 and 3.6:
For the noncomposite section, the factored horizontal shear is computed as follows:

For the composite section, the factored horizontal shear is computed as follows:

Based on the above computations, the total factored horizontal shear is computed as follows:
Assume a fillet weld thickness of 5/16 inches.
The resistance of the fillet weld in shear is the product of the effective area and the factored resistance of the weld metal. The factored resistance of the weld metal was previously computed as follows:
S6.13.3.2.4b
The effective area equals the effective weld length multiplied by the effective throat. The effective throat is the shortest distance from the joint root to the weld face. In this case, the effective area is computed per unit length, based on the use of one weld on each side of the web.
S6.13.3.3
The resistance of the fillet weld is then computed as follows:
S6.13.3.2.4b
OK
For material 0.25 inches or more in thickness, the maximum size of the fillet weld is 0.0625 inches less than the thickness of the material, unless the weld is designated on the contract documents to be built out to obtain full throat thickness.
S6.13.3.4
For the fillet weld connecting the web to the flanges, the web thickness is 0.5 inches, the minimum flange thickness is 0.625 inches, and the maximum flange thickness is 2.75 inches. Therefore, the maximum fillet weld size requirement is satisfied.
The minimum size of fillet welds is as presented in Table 5-2. In addition, the weld size need not exceed the thickness of the thinner part joined.
S6.13.3.4
In this case, the thicker part joined is the flange, which has a minimum thickness of 0.625 inches and a maximum thickness of 2.75 inches. Therefore, based on Table 5-2, the minimum size of fillet weld is 5/16 inch, and this requirement is satisfied.
The minimum effective length of a fillet weld is four times its size and in no case less than 1.5 inches. Therefore, this requirement is also satisfied.
Since all weld design requirements are satisfied, use a 5/16 inch fillet weld for the connection of the web and the top flange. The welded connection between the web and the bottom flange is designed in a similar manner.
S6.13.3.5
Load-induced fatigue must be considered in the base metal at a welded connection. Fatigue considerations for plate girders may include:
- Welds connecting the shear studs to the girder.
- Welds connecting the flanges and the web.
- Welds connecting the transverse intermediate stiffeners to the girder.
The specific fatigue considerations depend on the unique characteristics of the girder design. Specific fatigue details and detail categories are explained and illustrated in STable 6.6.1.2.3-1 and in SFigure 6.6.1.2.3-1.
S6.6.1.2.5
In Design Step 3.14 for the positive moment region, the fatigue check is illustrated for the fillet-welded connection of the transverse intermediate stiffeners to the girder. This procedure must be considered for the base metal at welded connections.
Additional weld connection requirements are presented in S6.13.3 and in ANSI/AASHTO/AWS Bridge Welding Code D1.5.
Design Step 5.4 - Design Cross-frames
Diaphragms and cross-frames may be placed at the following locations along the bridge:
- At the end of the structure
- Across interior supports
- Intermittently along the span
S6.7.4.1
 |
Diaphragm or Cross-frame Spacing A common rule of thumb, based on previous editions of the AASHTO Specifications, is to use a maximum diaphragm or cross-frame spacing of 25 feet. Based on C6.7.4.1, the arbitrary requirement for a 25 foot maximum spacing has been replaced by a requirement for a rational analysis that will often result in the elimination of fatigue-prone attachment details. For this design example, cross-frames are used at a spacing of 20 feet. The 20-foot spacing in this design example facilitates a reduction in the required flange thicknesses in the girder section at the pier. |
The need for diaphragms or cross-frames must be investigated for:
- All stages of assumed construction procedures
- The final condition
 |
Difference Between Diaphragms and Cross-frames The difference between diaphragms and cross-frames is that diaphragms consist of a transverse flexural component, while cross-frames consist of a transverse truss framework. Both diaphragms and cross-frames connect adjacent longitudinal flexural components. |
When investigating the need for diaphragms or cross-frames and when designing them, the following must be considered:
- Transfer of lateral wind loads from the bottom of the girder to the deck and from the deck to the bearings
- Stability of the bottom flange for all loads when it is in compression
- Stability of the top flange in compression prior to curing of the deck
- Distribution of vertical dead and live loads applied to the structure
Diaphragms or cross-frames can be specified as either:
- Temporary - if they are required only during construction
- Permanent - if they are required during construction and in the bridge's final condition
At a minimum, the Specifications require that diaphragms and cross-frames be designed for the following:
- Transfer of wind loads according to the provisions of S4.6.2.7
- Applicable slenderness requirements in S6.8.4 or S6.9.3
In addition, connection plates must satisfy the requirements of S6.6.1.3.1.
 |
Cross-frame Types K-type cross-frames are as shown in Figure 5-6, while X-type cross-frames have an X-shape configuration of angles or structural tees rather than a K-shape configuration of angles or structural tees. A common rule of thumb is to use K-type cross-frames when the aspect ratio (that is, the ratio of the girder spacing to the girder depth) is greater than about 1.5 to 1 and to use X-type cross-frames when the aspect ratio is less than 1.5 to 1. |
For this design example, cross-frames will be used.
Girder spacing:
(see Figure 3-2)
Girder depth:
(see Figure 3-15)
(maximum value)
Aspect ratio:
Therefore, use K-type cross-frames.
The geometry of a typical K-type cross-frame for an intermediate cross-frame is illustrated in Figure 5-6.
As illustrated in Figure 5-6, the intersection of the centroidal axes of the two diagonals coincides with the centroidal axis of the bottom strut. In addition, the intersection of the centroidal axis of each diagonal and the centroidal axis of the top strut coincides with the vertical centerlines of the girders.
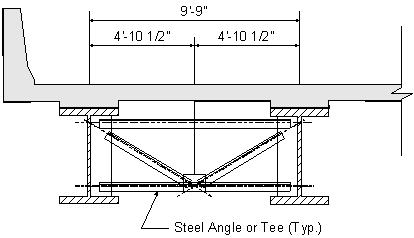
Figure 5-6 K-Type Cross-frame
Based on previous computations in Design Step 3.17 for the negative moment region, the unfactored wind load is computed as follows:

C4.6.2.7.1
S1.3
(for Strength III Limit State)
STable 3.4.1-1
(see Design Step 3.17)
(maximum value)

The horizontal wind force applied to the brace point may then be computed as specified in C4.6.2.7.1, as follows:
C4.6.2.7.1

For the design of the cross-frame members, the following checks should be made using the previously computed wind load:
- Slenderness
- Axial compression
- Flexure about the major axis
- Flexure about the minor axis
- Flexure and axial compression
| << previous | Contents | next >> |


