U.S. Department of Transportation
Federal Highway Administration
1200 New Jersey Avenue, SE
Washington, DC 20590
202-366-4000
Federal Highway Administration Research and Technology
Coordinating, Developing, and Delivering Highway Transportation Innovations
 |
| This report is an archived publication and may contain dated technical, contact, and link information |
|
Publication Number: FHWA-RD-01-164 Date: March 2002 |
Previous | Table of Contents | Next
As part of FHWA Project No. DTFH61-96-C-00073 entitled Detection, Analysis, and Treatment of Materials-Related Distress in Concrete Pavements, the following three guidelines have been developed to provide pavement engineers and field and laboratory personnel with a systematic procedure for the identification, evaluation, treatment, and prevention of materials-related distresses (MRD) in portland cement concrete (PCC) pavements:
These guidelines have been prepared with the practitioner in mind. Detailed background information used in the development of these guidelines can be found in the project Final Report.
It is expected that the application of a standardized, systematic approach to the overall data collection, analysis, and interpretation process will provide an accurate assessment of the type of distress(es) present and their cause(s). Furthermore, information collected in accordance with the guidelines will prove useful as additional research and investigations are conducted on MRD- affected pavements.
Unfortunately, the complexity of the physical and chemical interactions involved in the development and manifestations of some types of MRD, as well as gaps in the current knowledge base, can often prevent absolute identification of the primary mechanism of distress. Also, it is not uncommon that more than one distress mechanism may be at work, a condition that further complicates the identification process. Nevertheless, it is expected that these systematic data collection and analysis processes will assist in building a knowledge base that does not currently exist, and which in turn can be used by future researchers to address questions that are currently unanswered.
The performance of PCC pavements can be adversely affected by the concrete’s inability to maintain its integrity in the environment in which it was placed. This loss of integrity, commonly referred to as a lack of durability, occurs even when the structural design is sound. The distresses are generally manifested as cracking or other degradation of the concrete such as scaling or spalling, often accompanied by some type of staining or exudate. Depending upon the type of problem and the environment to which the pavement is exposed, these distresses can occur as soon as the first few years following initial construction of the pavement.
Pavement distresses that are directly related to the interaction between the concrete materials used to construct the pavement and the environment are herein referred to as MRD. Severe climatic conditions (such as freeze-thaw cycling and excess moisture levels, etc.) generally play a significant role in the development of the MRD.
MRD has received greater attention in recent years, in part because of an increased recognition of the importance of durability in the long-term performance of concrete pavements. Contrary to popular belief, durability is not an intrinsic property of the concrete. Instead, “durable concrete is concrete that in the particular environment of service resists the forces in that environment that tend to cause it to disintegrate…” [Transportation Research Board (TRB) 1999]. Whereas previously it was assumed that concrete of sufficient strength ensured durability, it is now recognized that concrete mixtures must be designed for both strength and durability. In addition, advancements in and more widespread use of sophisticated equipment for examining the microstructure of concrete has increased the ability to accurately identify mechanisms of MRD. As a result, there is a greater awareness in the pavement industry that concrete is not an inert material, and that care must be exercised when selecting materials to avoid durability problems.
Types of MRDThere are several different types of MRD, and subsets of each in some cases. The occurrence of MRD in a particular pavement is a function of many factors, including the constituent materials (aggregate, cement, admixtures, etc.) and their proportions, the pavement’s location (maritime or inland), the climatic conditions (temperature, moisture, and their variation) to which it is subjected, and the presence of external aggressive agents (e.g., roadway deicing chemicals). In general, the development of MRD can be attributed to either physical or chemical mechanisms, although the two types of mechanisms often act together to bring about the development of distress. Furthermore, MRD due to multiple causes may develop together, thereby complicating the determination of the exact cause(s) of material failure.
The MRD types considered in this series of guidelines are grouped as those caused by physical mechanisms and those cause by chemical mechanisms. Table I-1 summarizes these distresses, along with general information on their causes, appearance, and prevention; a description of these distresses is provided below.
Deterioration Due to Physical Mechanisms
Freeze-Thaw Deterioration of Hardened Cement Paste is caused by the deterioration of saturated cement paste under repeated freeze-thaw cycles. Currently, there is no consensus on the exact mechanisms responsible for internal damage resulting from freeze-thaw action. The most widely accepted theories consider the development of internal tensile stress as a result of either hydraulic pressures, osmotic pressures, or a combination of the two during freezing.
Table I-1. Summary of key MRDs.
|
Type of MRD |
Surface Distress Manifestations and Locations |
Causes/Mechanisms |
Time of Appearance |
Prevention or Reduction |
|---|---|---|---|---|
|
MRD Due to Physical Mechanisms |
||||
|
Freeze-Thaw Deterioration of Hardened Cement Paste |
Scaling, spalling or map-cracking, generally initiating near joints or cracks; possible internal disruption of concrete matrix. |
Deterioration of saturated cement paste due to repeated freeze-thaw cycles. |
1 to 5 years |
Addition of air-entraining agent to establish protective air-void system. |
|
Deicer Scaling/Deterioration |
Scaling or crazing of the slab surface with possible alteration of the concrete pore system and/or the hydrated cement paste leading to staining at joints/cracks. |
Deicing chemicals can amplify freeze-thaw deterioration and may interact chemically with cement hydration products. |
1 to 5 years |
Provide minimum cement content of 335 kg/m3, limit water–cement ratio to no more than 0.45, and provide a minimum 30-day “drying” period after curing before allowing the use of deicers. |
|
Freeze-Thaw Deterioration of Aggregate |
Cracking parallel to joints and cracks and later spalling; may be accompanied by surface staining. |
Freezing and thawing of susceptible coarse aggregates results in fracturing and/or excessive dilation of aggregate. |
10 to 15 years |
Use of non-susceptible aggregates or reduction in maximum coarse aggregate size. |
|
MRD Due to Chemical Mechanisms |
||||
|
Alkali–Silica Reactivity (ASR) |
Map cracking over entire slab area, usually with exudate, and accompanying expansion-related distresses (joint closure, spalling, blowups). |
Reaction between alkalis in the pore solution and reactive silica in aggregate resulting in the formation of an expansive gel and the degradation of the aggregate particle. |
5 to 15 years |
Use of nonsusceptible aggregates, addition of pozzolans to mix, limiting total alkalis in concrete, minimizing exposure to moisture, addition of lithium compounds. |
|
Alkali–Carbonate Reactivity (ACR) |
Map cracking over entire slab area and accompanying pressure-related distresses (spalling, blowups). |
Expansive reaction between alkalis in pore solution and certain carbonate/dolomitic aggregates which commonly involves dedolomitization and brucite formation. |
5 to 15 years |
Avoid susceptible aggregates, significantly limit total alkalis in concrete, blend susceptible aggregate with quality aggregate or reduce size of reactive aggregate. |
|
External Sulfate Attack |
Fine cracking near joints and slab edges or map cracking over entire slab area, ultimately resulting in joint or surface deterioration. |
Expansive formation of ettringite that occurs when external sources of sulfate (e.g., groundwater, deicing chemicals) react with the calcium sulfoaluminates. |
3 to 10 years |
Use w/c below 0.45, minimize tricalcium aluminate content in cement, use blended cements, use pozzolans. |
|
Internal Sulfate Attack |
Fine cracking near joints and slab edges or map cracking over entire slab area. |
Formation of ettringite from internal sources of sulfate that results in either expansive disruption in the paste phase or fills available air-voids, reducing freeze-thaw resistance. |
1 to 5 years |
Minimize internal sources of slowly soluble sulfates, minimize tricalcium aluminate content in cement, avoid high curing temperatures. |
|
Corrosion of Embedded Steel |
Spalling, cracking, and deterioration at areas above or surrounding embedded steel with rust present. |
Chloride ions penetrate concrete, resulting in corrosion of embedded steel, which in turn results in expansion. |
3 to 10 years |
Reduce the permeability of the concrete, provide adequate concrete cover, protect steel, or use corrosion inhibitor. |
In early efforts to understand freeze-thaw action in concrete, Powers (1945) attributed freeze-thaw damage to excessive hydraulic pressures produced from the expansion during the transition from water to ice. It was proposed that as ice forms in the pore system, the resulting 9 percent volume expansion causes the surrounding unfrozen water to be expelled from the freezing sites. Depending on the nature of the pore system, excessive internal stresses can develop from hydraulic pressures that are incurred due to resistance to this flow.
More recent theories (Powers 1975) consider osmotic potential to be the primary cause of excess internal stress. As pure water in the larger pores freezes, the liquid remaining in the pores becomes a more concentrated ionic solution. To maintain thermodynamic equilibrium, the less concentrated solution in the surrounding paste is drawn to the freezing sites. If adequate air-void space is available, all of the freezable water will eventually diffuse to the freezing sites inside the air voids, reaching a state of equilibrium. If the air-void space is inadequate, equilibrium cannot be reached, and osmotic pressures sufficient to fracture the paste can result.
Deterioration of the cement paste due to freeze-thaw damage manifests itself in the form of scaling, map cracking, or severe cracking, spalling, and deterioration, commonly initiating at joints and free edges where moisture is more readily available. The addition of an air-entraining agent (an admixture that stabilizes a system of microscopic bubbles in the concrete) is an effective means of preventing this deterioration. This is commonly a top-down distress with fractures running nominally parallel with the pavement surface, decreasing in number with depth.
Deicer Scaling/Deterioration is typically observed as scaling or crazing of the slab surface due to the repeated application of deicing chemicals. Although the exact causes of deicer scaling are not known, it is commonly believed to be primarily a physical attack. The primary mechanisms considered in the physical deterioration models are high thermal strains produced when a deicer melts ice and/or high osmotic pressures induced when relatively pure surface water attempts to equalize highly concentrated salt solutions present in the concrete (Mindess and Young 1981; Pigeon and Plateau 1995). It has also been speculated that pressure exerted by salt crystallization in voids is a contributing factor (Hansen 1963). Recent studies suggest that chemical alteration of the cement paste may also be occurring, resulting in dissolution of calcium hydroxide, coarsening of the concrete pore system and, potentially, the formation of deleteriously expansive compounds. This occurrence is commonly observed as staining and deterioration in the vicinity of joints.
Deicer scaling/deterioration is more likely to occur in concrete that has been over-vibrated or improperly finished, actions that create a weak layer of paste or mortar either at or just below the surface (Mindess and Young 1981). This weakened layer is more susceptible to hydraulic pressures. Even adequately air-entrained concrete can be susceptible to the development of salt scaling. Recommendations for the prevention of salt scaling include providing a minimum cement content of 335 kg/m3, limiting the water–cement ratio (w/c) to a maximum of 0.45, providing adequate curing, and providing an absolute minimum of 30 days of environmental exposure before allowing the application of deicing chemicals [American Concrete Pavement Association (ACPA) 1992].
Freeze-Thaw Deterioration of Aggregate is a distress associated with the freezing and thawing of susceptible coarse aggregate particles in the concrete. This phenomenon is commonly referred to as D-cracking in pavements [Strategic Highway Research Program (SHRP) 1993], and aggregates are identified as being D-cracking susceptible. Such aggregates either fracture and/or dilate as they freeze, resulting in cracking of the surrounding mortar. It has also been hypothesized in some cases that the expulsion of water during freezing contributes to dissolution of soluble paste components, such as calcium hydroxide, in the interfacial zone. Key aggregate properties related to susceptibility are composition, pore structure, sorption, and size (Schwartz 1987). Most susceptible aggregates are of sedimentary origin and are most commonly composed of limestone, dolomite, or chert (Stark 1976).
Freeze-thaw deterioration of aggregate is initially visible as a series of fine cracks generally running parallel to joints, cracks, or free edges in the slab. Deterioration commonly starts near the bottom of the concrete slab where excess moisture accumulates. As the number of freeze-thaw cycles increases, spalling and deterioration of the cracks will occur. A dark staining due to calcium hydroxide or calcium carbonate residue generally precedes and accompanies the cracking, often in an hourglass shape on the pavement surface at affected joints and cracks.
Air entrainment of the cement paste does not prevent the development of D-cracking. The best means of preventing this distress is by prohibiting the use of susceptible aggregate, although reducing the maximum size of the susceptible coarse aggregate has been shown to be effective in reducing freeze-thaw deterioration of aggregate in many instances.
Deterioration Due to Chemical MechanismsAlkali–Silica Reactivity (ASR) is most commonly associated with undesirable chemical reactions between alkalis in the cement paste (commonly reported as percent Na2O plus 0.658 x percent K2O) and the reactive siliceous components of susceptible aggregates. It is the concentration of the hydroxyl ion in the concrete pore solution that is of interest, which is related to the alkali-content [American Concrete Institute (ACI) 1998]. The product of the reaction is a gel that significantly expands in the presence of moisture, destroying the integrity of the weakened aggregate particle and the surrounding cement paste. An irregular, map-like cracking ultimately develops, most often over the entire slab area (with cracks generally less than 50 mm deep). ASR can also lead to internal horizontal cracks at greater depths within the slab. Upon continued expansion, joint spalling, blowups, shoving of fixed structures, and other pressure-related distresses in the pavement can occur. A handbook depicting ASR distress in pavements and highway structures is available to aid in its identification (Stark 1991).
The chemical reactions occurring during the development of ASR are very complex, but three basic conditions are needed in order for ASR to occur (Farny and Kosmatka 1997):
The concrete pore solutions are primarily alkali hydroxide solutions of high concentration, which react readily with reactive forms of silica (Stark et al. 1993). As the aggregate reactivity increases, gel reaction products can be formed with lesser concentrations of alkali (Farny and Kosmatka 1997). As the alkalinity (and the pH) of the pore solution increases, the potential for alkali-silica reaction increases as even more stable forms of silica become susceptible to attack. The presence of moisture allows migration of alkali ions to reaction sites and the resulting gel absorbs moisture, leading to expansion (Stark et al. 1993) Relative humidity levels above 80 percent indicate that moisture is sufficiently available for absorption by ASR gel, and recent research has shown that pavement concrete in all climates likely will be sufficiently damp to continuously support expansive ASR (Stark et al. 1993).
Other factors influencing the development of ASR include the total alkali content of the concrete, the presence of external sources of alkalies (e.g., chemical deicers), repeated cycles of wetting and drying, and temperature (Farny and Kosmatka 1997; ACI 1998). A more detailed description of the ASR reaction process is provided by Helmuth (1993).
The gel that is produced through the reaction appears as a glassy-clear or white powdery deposit within reacted aggregate particles, although it is not always visible to the naked eye (Stark et al. 1993). The presence of the reaction product (which is an alkali–calcium–silica–hydrate gel) does not always coincide with distress, and thus gel presence by itself does not necessarily indicate destructive ASR (Farny and Kosmatka 1997).
Common aggregate types containing reactive silica components include opaline or chalcedonic cherts, siliceous limestones, rhyolites and rhyolitic tuffs, dacites and dacite tuffs, andesites and andesite tuffs, and phyllites (Dolar-Mantuani 1982; Neville 1996). An excellent summary of alkali–silica reactive aggregates is presented in the ACI State-of-the-Art Report on Alkali-Aggregate Reactivity (ACI 1998). The rate of the reaction will vary considerably among aggregates, with some undergoing a complete reaction within a matter of weeks and others requiring many years to produce noticeable effects (Helmuth 1993).
A variety of approaches have been tried to prevent or minimize the development of ASR, with mixed success. In new concrete designs, low-alkali portland cement (with an alkali content less than 0.60 percent Na2O equivalent) has been used successfully on slightly to moderately reactive aggregates (Farny and Kosmatka 1997). Some international agencies limit the alkali content of the concrete, accounting for the cement factor and other internal sources of alkalis (ACI 1998). The addition of fly ash has also been shown to control ASR, although this is strongly dependent upon the type of fly ash, its alkali content, chemical composition, and dosage rate (Farny and Kosmatka 1997). Other types of finely divided materials can also be effective including ground granulated blast furnace slag (GGBFS), silica fume, and natural pozzolans (ACI 1998). Finally, the addition of ASR-inhibiting compounds (e.g., lithium hydroxide) has been shown to be effective on highly reactive aggregates (Stark et al. 1993).
For inservice concrete displaying ASR, no definitive method has been identified that is completely successful in stopping the distress mechanisms. The application of silane sealers, methacrylate, and lithium hydroxide have all been tried. The monitoring of the effectiveness of these procedures is ongoing (Stark et al. 1993).
Alkali–Carbonate Reactivity (ACR) is another distress caused by an undesirable chemical reaction between the pore solution and aggregate; in this case, the reaction is between the alkalis in the pore solution and certain dolomitic carbonate aggregates containing a characteristic reactive texture of dolomite rhombs in a clayey fine-grained matrix. Although the mechanisms for ACR are not as well understood as those for ASR, it has been established that dedolomization occurs, that is, the decomposition of dolomite into calcium carbonate and magnesium hydroxide, which is accompanied by expansion. This expansion may be due to a combination of migration of alkali ions and water molecules into the restricted space of the fine-grained matrix surrounding the dolomite crystal, migration of these materials into the crystal, and the growth and arrangement of the dedolomitization products, especially brucite (Farny and Kosmatka 1997, ACI 1998). Other factors influencing the development of ACR include maximum size of the reactive aggregate (rate/degree of expansion decreases with decreasing aggregate size) and pore solution alkalinity (increasing pH levels increases the potential for alkali–carbonate reactions) (Farny and Kosmatka 1997; ACI 1998).
Similar to the expansive pressures that are developed in ASR distress, the expansive pressures developed by ACR also result in map-like cracking on the pavement surface and accompanying expansion-related distresses (spalling, blowups). Avoiding the use of susceptible aggregates is the one sure way of avoiding ACR, but either diluting susceptible aggregates with nonsusceptible aggregates or reducing the maximum size of susceptible aggregates can minimize the deleterious effect of the reaction (ACI 1998). Limiting the alkali content in the cement is another method employed to prevent ACR, but the alkali content must be lower than that typically used to prevent ASR (ACI 1998). However, unlike ASR, pozzolans are not effective in controlling alkali–carbonate reaction (Farny and Kosmatka 1997; ACI 1998).
External Sulfate Attack (ESA) can occur due to the penetration of external sulfate ions (present in groundwater, soil, deicing chemicals, etc.) into the concrete. Although the mechanism of sulfate attack is complex, it is primarily thought to be caused by two chemical reactions: 1) the formation of gypsum through the combination of sulfate and calcium ions, and 2) the formation of ettringite through the combination of sulfate ions and hydrated calcium aluminate (ACI 1992). In either case, the formation of the reaction product leads to an increase in solid volume. In hardened paste, the expansive pressures exerted, especially by ettringite formation, can be very destructive.
In concrete pavements, deterioration due to external sulfate attack typically first appears as cracking near joints and slab edges, generally within a few years of construction. Fine longitudinal cracking may also occur parallel to longitudinal joints. Steps taken to prevent the development of distress due to external sulfate attack include minimizing the tricalcium aluminate content in the cement or reducing the quantity of calcium hydroxide in the hydrated cement paste through the use of pozzolanic materials. It is also recommended that a w/c ratio less than 0.45 will help mitigate external sulfate attack (ACI 1992).
Internal Sulfate Attack (ISA) is a potential pavement distress similar in many ways to external sulfate attack, except that the source of the sulfate ions is internal. Internal sources of sulfate include slowly soluble sulfate contained in clinker, aggregate, and admixtures (such as fly ash) or as a result of decomposition of primary ettringite due to high curing temperatures. This particular distress has elicited considerable debate among concrete material experts regarding the specific mechanisms of distress and the precise role of ettringite in its development. Sometimes called delayed ettringite formation (DEF) distress or secondary ettringite formation (SEF) distress, it is referred to here as internal sulfate attack to distinguish the source of sulfate ions. For consistency and clarification, the following definitions are offered regarding the various forms of ettringite (based on Erlin 1996):
Ettringite—a high-sulfate calcium sulfoaluminate mineral (3CaO • Al2O3 • 3CaSO4 • 32H2O).
Primary Ettringite—ettringite formed by reaction of sulfate and aluminate ions during early hydration of hydraulic cement either as a normal process for portland cement or as the expansive process for expansive cement.
Secondary Ettringite—ettringite commonly formed in available void space by precipitation from solution of either primary or delayed ettringite.
Delayed Ettringite—ettringite formed by reaction of sulfate and aluminum ions in concrete, mortar, or grout that has hardened and developed its intended strength; the source of the sulfate ions is from within the concrete.
It is believed that both SEF and DEF are forms of internal sulfate attack, but result for different reasons. SEF is commonly a product of concrete degradation, characterized by the dissolution and subsequent precipitation of ettringite into available void space and in pre-existing microcracks. SEF is possible if the concrete is sufficiently permeable and saturated, allowing the dissolution and precipitation process to occur. Although most experts agree that secondary ettringite formation will not generate sufficient expansive pressures to fracture healthy cement paste or mortar, its presence in the air-void structure may limit the ability of the paste to resist freeze-thaw deterioration (Ouyang and Lane 1999). Thus, concrete that appears to be suffering paste freeze-thaw deterioration may have originally had a sufficient air-void system that has been affected by SEF. Yet there remains considerable debate as to whether the SEF is the cause of distress or only present as a result of another deterioration mechanism that disrupted the paste sufficiently to encourage dissolution and precipitation of the ettringite.
DEF, on the other hand, can lead to destructive expansion within the paste, resulting in microcracking and separation of the paste from aggregate particles. DEF is most often associated with steam curing. At elevated temperatures (current research suggests a minimum temperature of 65°C to 80°C, with many citing 70°C [Scrivner 1996; Thaulow et al. 1996; Klemm and Miller 1999]), primary ettringite will not properly form. After the concrete has cured and temperatures are reduced to ambient conditions, sulfates and aluminate phases in the paste may then react to form expansive ettringite, disrupting the concrete matrix. Because this phenomenon is most closely associated with steam curing, it is still speculative whether cast-in-place pavements can experience the temperatures necessary to produce DEF. It has also been suggested that internal sulfate attack might occur due to internal sources of sulfate that become available after the paste has hardened. Possible sources include either slowly soluble sulfates or sulfur compounds in the clinker or fly ash that only become available during continued long-term hydration. Another internal source of sulfates might be from aggregates (Johansen and Thaulow 1999). In these cases, the internal sulfate attack is not from DEF, but instead from excess sulfates in the concrete mixture, which result in paste expansion along similar lines as external sulfate attack.
The manifestation of internal sulfate attack in many concrete structures is characterized by a series of closely spaced, tight map cracks with wide cracks appearing at regular intervals. Microscopically, paste expansion due to DEF can be identified by a uniform separation of the paste from the coarse aggregate particles of similar size along the interfacial zone.
Only recently have researchers started investigating internal sulfate attack as a potential pavement distress mechanism, and possible means of prevention are still being explored. Recommendations from a recently completed study indicate that limiting the sulfate content of cement and fly ash may assist in preventing ISA, but that it is impossible to recommend a specification at this time (Gress 1997). Other studies suggest that limiting sulfate content is only an issue if high curing temperatures are to be expected (Scrivener and Lewis 1999). The extent of the problem in pavements appears to be small at this point, but additional research is necessary to determine both the extent of internal sulfate attack and feasible strategies to prevent its occurrence in new pavements.
Corrosion of Embedded Steel appears as rust colored staining, spalling, cracking, and associated deterioration of the concrete above or surrounding the areas affected by active corrosion. Steel corrosion is accelerated in the presence of chloride ions (which can come from a calcium chloride accelerator added to the mix, deicing salts, or seawater) that penetrate the concrete and break down the passivity film that protects embedded steel from corrosion.
Corrosion of embedded steel is controlled by minimizing the permeability of the concrete, providing adequate concrete cover, coating steel with a protective layer, applying a protective coating on the concrete surface to prevent penetration of chlorides and moisture, and suppressing the electrochemical process at the steel surface.
Development of Advisory Guidelines
These guidelines have been prepared to assist pavement engineers and field and laboratory personnel in the identification, evaluation, treatment, and prevention of MRD in concrete pavements. Investigations of concrete pavement deterioration have been conducted for years by numerous agencies, laboratories, and institutions, each with their own set of guidelines and testing procedures. Some State highway agencies (SHAs) have studied MRD in great detail, establishing unique testing protocols and material specifications. However, other agencies are not familiar with these procedures. In summary, there is a lack of information on the subject and, where information exists, there is little standardization regarding nomenclature, test methods, and identification procedures. The lack of standardization in test methods and data collection procedures makes it difficult to reach consensus on diagnoses and to analyze the performance of concrete pavements on a national basis.
Purpose and Objectives of Guidelines
The overall purpose of these guidelines is to provide a standardized approach
for field evaluation, sampling and handling, and laboratory procedures for use
in identifying MRD in pavements. Furthermore, these guidelines will provide
useful information on effective measures for the economical preservation of
PCC pavements identified as suffering MRD and guidance for the construction
of long-lasting PCC pavements. It is expected that these guidelines will assist
in the free flow of information among various agencies, laboratories, and institutions
so that all benefit from the findings of each. Figure I-1 illustrates the flow
of the three guidelines involved in the identification, treatment, and prevention
of MRD.
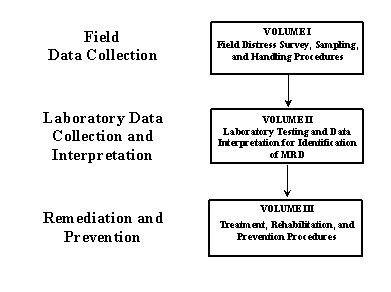
Figure I- 1. Guidelines for identification, treatment, and prevention of MRD.
A standardized, systematic, and comprehensive field data collection effort is required on PCC pavements exhibiting MRD in order to aid in the overall identification of the distress mechanisms. A variety of activities are involved in this effort, including the collection of historical pavement design and construction information, the selection of representative pavement inspection sites, the conduct of the actual distress surveys, the characterization of the MRD, and the photographic documentation of the pavement. This overall process is depicted in figure I-2.
This section of this guideline presents information on the conduct of distress surveys and associated field testing of concrete pavements that are suspected of exhibiting MRD. It presents a step-by-step approach for conducting distress surveys of such pavements (largely following the SHRP Long-Term Pavement Performance [LTPP] survey procedures) as well as techniques and field procedures for characterizing the various MRD types.
The following sections describe the approach for the various field data collection activities to be conducted as part of the pavement field evaluation. These are intended primarily as a guide for assisting in examining and identifying the manifestations of MRD in an existing PCC pavement, but if conducted at regular intervals during the pavement’s service life, they are useful in establishing the rate of deterioration. The results of this survey will be used to determine if the observed distress is the likely result of an MRD and whether coring and laboratory analysis is justified. The field survey process is summarized in table I-2.
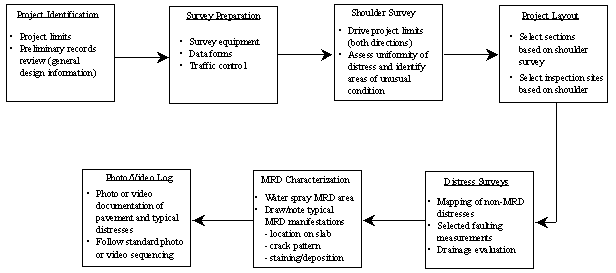
Figure I-2. Flow of field data collection activities.
|
Field Testing Component |
Purpose |
|---|---|
|
Project Identification and Records Review |
|
|
Survey Preparation |
|
|
Shoulder Survey |
|
|
Project Layout |
|
|
Pavement Distress Surveys |
|
|
MRD Characterization |
|
|
Photo/Video Documentation |
|
Project Identification and Records Review
Prior to any fieldwork, a review of the design and construction records must be conducted on the project to be evaluated. The general information sought is needed to identify the limits of the project, and to establish some basic climatic information that is important in determining what MRD might be at work. Structural design, shoulder, and foundation information are needed to assist in the distress survey mapping and evaluation.
This information must be collected for each project being evaluated. A project is defined as that length of pavement over which the structural design, date and method of construction, and paving and foundation materials are the same. This helps to ensure that the causes of distress can be more reliably determined. If significant changes in design or materials occurs (for example, if a different type of aggregate source was used), then these areas should be broken out as separate projects for evaluation. If considerable differences in the type or quantity of distress are noted within a given project, the project should be divided into different sections, each of which is subsequently evaluated. If the distress is more or less uniformly distributed over the entire project, only a single section will be evaluated. Figure I-3 presents a form that can be used to record this information. A reproducible copy of this form, like all field data collection forms discussed in this guideline, is provided in appendix A of this guideline.
The PCC mix design information is useful in assessing the factors that contributed to the MRD and in selecting locations for sampling and testing. Figure I-4 can be used to record this information. Relevant properties of the fine and coarse aggregate are recorded in figures I-5 and I-6, respectively. Finally, relevant construction information can be recorded in figure I-7. By obtaining these data prior to any fieldwork, an effective and efficient field-testing program can be developed.
In order to ensure that the field surveys proceed smoothly and efficiently, adequate planning and preparation must be made for their conduct. This planning and preparation includes assembling the necessary equipment, preparing the data collection forms, and organizing the required traffic control arrangements. These items are discussed below.
Field Survey Equipment
A checklist of basic equipment required for the field surveys is provided in table I-3. Additional equipment may be needed if more intensive field data collection will be conducted.
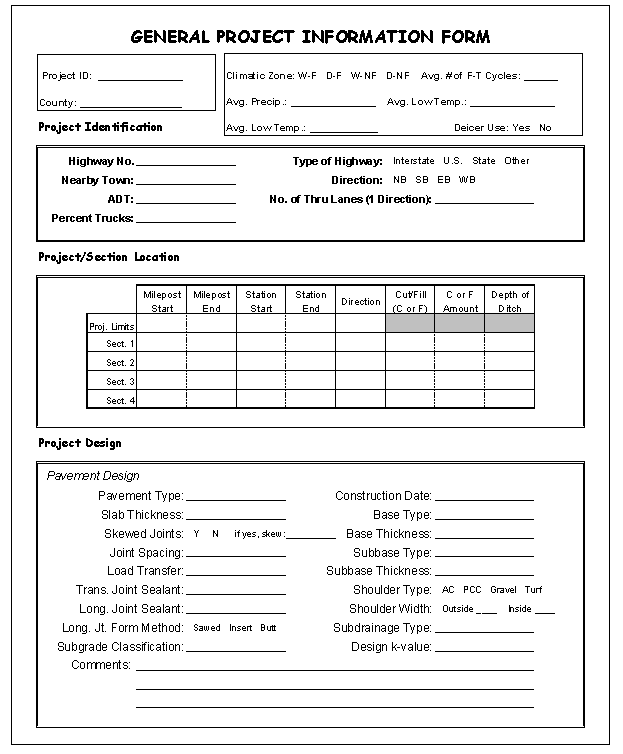
Figure I-3. General project information form.
Table I-3. Field survey equipment checklist.
Item |
|
|---|---|
|
Measuring Wheel |
|
|
Marking Paint |
|
|
Faultmeter |
|
|
Ruler/Scale |
|
|
Pocket Knife |
|
|
Clipboard/Pencils/Survey Forms |
|
|
Water Spray Bottle |
|
|
Magnifying Glass |
|
|
Camera or Camcorder (with extra film/tapes) |
|
|
Flashing Warning Light |
|
|
Safety Vests and Hard Hats |
|
|
LTPP Distress Identification Manual |
|
|
Project Location |
|
|
Local Contact Name/Number |

Figure I-4. Concrete mixture design information form.
Figure I-5. Concrete fine aggregate information form.

Figure I-6. Concrete coarse aggregate information form. 
Figure I-7. Construction information form.
Several different data collection forms are needed to conduct the pavement distress surveys. The first data collection form is the field distress survey form, illustrated in figure I-8. This form is adapted from the form used in the data collection activities of the LTPP program (SHRP 1993). All pavement distresses are to be recorded on this form, in addition to the general area of occurrence of the MRD on the pavement. The purpose of this form is to document the overall performance of the pavement, which may be helpful in the diagnosis of the MRD type and mechanisms. The overall pavement distress data are tabulated later on the distress summary form shown in figure I-9, which again is adopted from the LTPP program (SHRP 1993).
Two forms are used in the field data collection activities to characterize the MRD observed on the pavement surface. Figure I-10 is used to draw in detail the typical MRD occurring on a single slab (or several forms can be filled out to depict the range of conditions), including the crack pattern and the presence of staining and any exudation. Figure I-11 is then used to categorize the MRD in terms of its cracking pattern (location, extent, size), staining (location, color), material deposits or exudation (presence, color, extent), spalling, and scaling.
For each project evaluation, different numbers of each form are required:
A planning meeting should be held by the survey team, the traffic control crew, and representatives of the local highway agency to discuss the scope of work, general locations of the pavement test sections, schedules, duties and responsibilities, permits (if any), safety regulations and requirements, legal requirements, emergency actions, and other concerns (SHRP 1990). Requirements for traffic control, permits, insurance and other legal requirements related to field work vary between governing agencies, so the exact requirements should be determined early on. Names, addresses, and phone numbers of appropriate personnel should be exchanged to facilitate future communication.
Traffic Control ArrangementsThe provision of adequate traffic control is extremely important for the safe conduct of the field surveys. Although some of the work can be performed from the shoulder, the pavement evaluator must be allowed on the pavement with the freedom to closely inspect the entire pavement surface. In addition, later sampling and testing activities will require complete access to the pavement; additional information on traffic control requirements for field sampling is described later in this guideline.
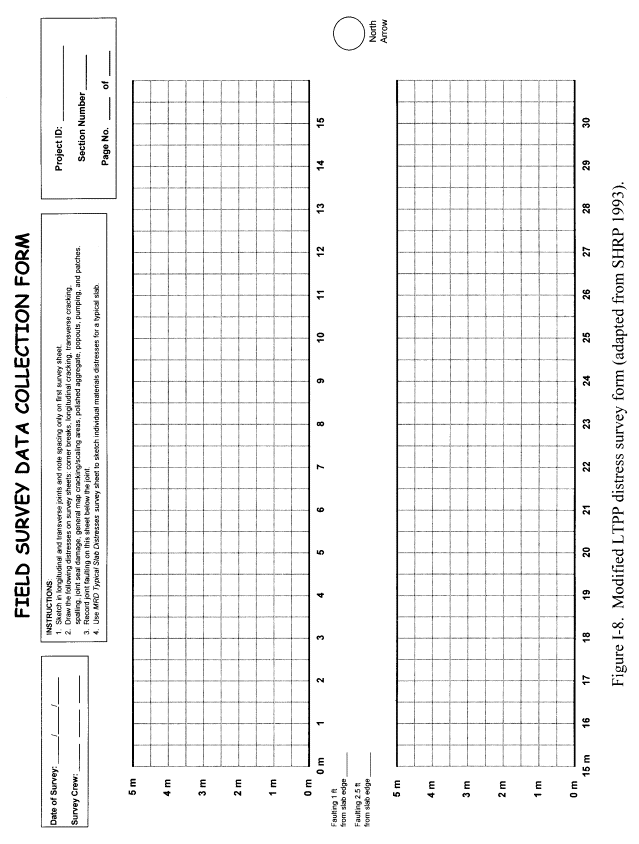
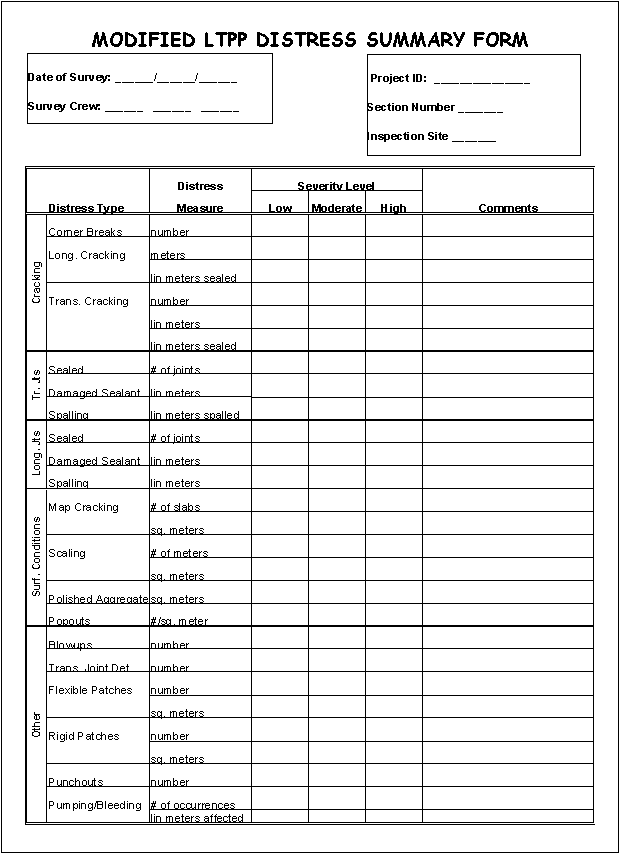
Figure I-9. Modified LTPP distress summary form.
The pavement survey work will require only one lane being closed, and on multilane facilities this is generally the outer traffic lane. However, if significant differences are observed between lanes, consideration may be given to evaluating multiple lanes. The direction to be evaluated will need to be selected for both multilane and two-lane roadways. If deemed important, both directions can be evaluated. All traffic control arrangements should be scheduled as far in advance as possible and should adhere to the guidelines provided in the Manual on Uniform Traffic Control Devices (MUTCD) [Federal Highway Administration (FHWA) 1993] or the agency’s governing requirements.
Prior to the set up of the traffic control and the conduct of the pavement distress surveys, it is useful to first drive the limits of the project to assess the overall pavement condition and the uniformity of distress levels, topography, and traffic volumes. This can be done by a crew of two while driving along the shoulder at slow speeds (8 to 16 km/h), noting general pavement conditions by reference post or by distance as measured from the beginning of the project with the vehicle’s odometer. In addition, any prevailing roadway characteristics that might have an effect on the performance of the pavement (e.g., areas of cuts/fills, topography, traffic volume/loading) should be noted.
Shoulder surveys should be conducted in both directions when both directions represent the same project (structural design, mix design, construction, and so on). Any directional differences in performance or distress manifestations should be noted by location to assist later in dividing the project into multiple sections, if needed. If the distress is more or less uniformly distributed over the entire project, only a single section will be evaluated.
Other features that should be noted during the shoulder surveys include the location of bridges, on/off ramps, sharp vertical or horizontal curves, and any other factors that might affect the safe conduct of a pavement survey at that location.
After the shoulder survey has been conducted, the project must be divided into sections if distinctly different distress manifestations are evident. This is unnecessary if the distress is more or less uniformly distributed over the entire project. Within each section, one or more inspection sites are selected for field surveys and sampling. Inspection sites are short segments (typically 150 m in length) that are selected for the conduct of the field studies. As such, they are intended to be representative of the overall section, which may be several kilometers long.
Selecting Inspection Sites
The selection of appropriate inspection sites is an important part of the field survey investigation. It is desirable that the selected inspection sites reflect the typical conditions of the section and that they are fully accessible so that the required fieldwork can be conducted.
A great deal of information is expected to become available from the evaluation of the inspection sites, but because of the time and effort involved, it is desirable to minimize the number of sites while still maintaining an adequate representation of the project. Therefore, the number and location of inspection sites will depend largely on the consistency of the project. Generally, if the shoulder survey indicates that the extent and severity of MRD are fairly uniform throughout the length of the project, then a single inspection site is selected at a representative location for extensive testing and evaluation. If, however, the shoulder survey indicates a range of MRD severity levels, or areas where there is no distress and other areas where there is severe distress, the project should be divided into multiple sections if possible. If the MRD varies in such a way that it is impossible to identify distinct sections, multiple inspection sites should be selected that represent the variability observed. This will assist in determining why one area is performing differently than another. Possible reasons for differences in performance might be:
The possibility of any of the above factors affecting the performance of the pavement should be considered and noted as the various inspection sites are evaluated.
During the selection of the inspection site to be surveyed, it is desirable to avoid areas that are unrepresentative of the overall conditions, and also areas that might compromise the safety of the survey crew. For example, an area exhibiting extensive transverse cracking because of settlement of an underlying culvert is not considered representative of the MRD or the performance of the entire project. Other areas to avoid are those:
Inspection Site Length
To ensure consistency with the LTPP program, a nominal inspection site length of 150 m is recommended. This provides a sufficiently long site to provide reasonable insight into the performance of the pavement while maintaining some degree of “conciseness” to the field operations. However, the actual inspection site length may need to be adjusted so that entire slab lengths are included. For example, if the joint spacing of a project is 5 m, then the inspection site will consist of 30 (150/5) slabs. On the other hand, if the joint spacing is 4.5 m, then the inspection site will consist of 33.3 slabs (150/4.5), which is rounded up to 34 slabs. In this case, the actual inspection site length will be 153 m. The number of slabs is always rounded up to ensure that a minimum length of 150 m is achieved.
Additional Inspection Sites
Occasionally, there may be a need to include additional inspection sites as part of the evaluation of a project. This may occur for a number of reasons, including:
Despite the identification of appropriate inspection sites and the possible evaluation of additional sites, it is still possible that specific follow-up surveys or field testing may be needed as information comes back from the results of the laboratory testing. This underscores the ability to return to the correct location of the inspection sites so that the follow-up tests can be accurately tied to the actual field location.
Pavement Distress Surveys
The conduct of the pavement distress surveys is a critical aspect of the overall evaluation of the project. Prior to the conduct of any pavement surveys, it is expected that suitable traffic control has been established in accordance with local guidelines so that the entire inspection site can be freely accessed. The distress survey to be conducted shall be performed in general accordance with the procedures and distress definitions found in the SHRP LTPP Distress Identification Manual for the Long-Term Pavement Performance Project (SHRP 1993).
It should be recognized that the purpose of conducting an LTPP-type distress survey is to provide a broad overview of the condition of the pavement by recording the presence and severity of such distresses as linear cracking, spalling, and faulting. However, it is not required to collect faulting for most MRD surveys. In addition, it is not the intent of an MRD survey to draw every crack associated with the distress acting on a pavement. Such documentation is time consuming and does not necessarily contribute to the identification of the distress. Instead, the general area of MRD will be noted on the LTPP forms and its physical manifestations characterized later on the MRD survey form.
Overview of Distress Surveys
This section provides a brief description of the LTPP pavement distress surveys that are to be conducted. Critical aspects of the distress survey procedures are described, with detailed information on conducting a pavement distress survey found in the Distress Identification Manual (SHRP 1993).
The survey process first begins with laying out the inspection site. This is accomplished by selecting the beginning point of the site (usually right at a reference post, station number, or other permanent marker or fixture to facilitate locating the inspection site in the future) and marking with paint its beginning at the transverse joint nearest the marker. The beginning point should be noted with a line and with a station number of “0+00”; by defining this starting location as station 0+00, all stationing along the inspection site can then be made relative to the beginning point.
Once the beginning point has been established, a distance of 150 m is wheeled off in the direction of traffic to the end of the inspection site. The end of the inspection site is marked at the far end of the slab in which the 150-m mark was encountered. While the inspection site length is being measured, it is helpful to make marks and station numbers at 15-m intervals (e.g., 0+15, 0+30, 0+45, and so on) to aid in conducting the distress surveys. This stationing is also useful in noting the locations of samples retrieved, photos taken, and any other testing performed within the inspection site.
After the section is laid out, the distress survey proceeds from the beginning of the site. All distresses occurring within the inspection site are noted and, where appropriate, drawn approximately to scale using the modified LTPP distress survey form (figure I-8).
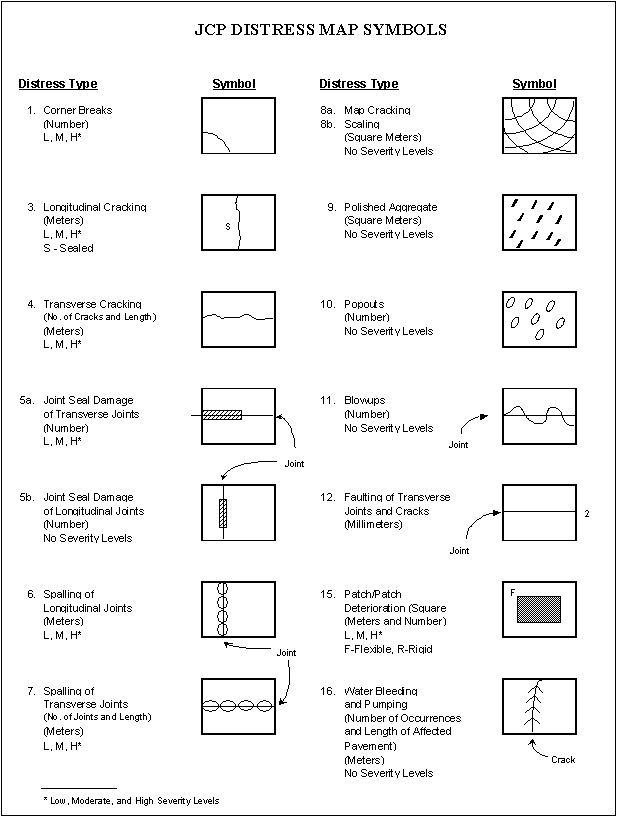
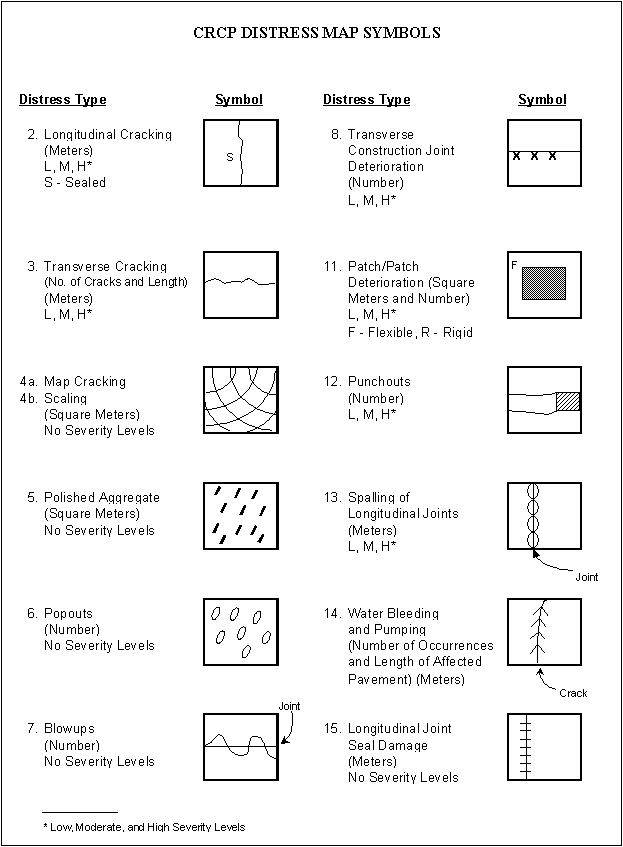
To facilitate the recording of the various distresses, the distress map symbols shown in figure I-12 [for jointed concrete pavements (JCP)] and figure I-13 [for continuously reinforced concrete pavements (CRCP)] are provided. These are modified from the LTPP Distress Identification Manual, as attempts have been made to focus on key distress types and also to reduce the distress survey to a recording of pavement distress as opposed to a diagnosis of pavement distress. The most significant modification is that the LTPP Distress Identification Manual includes D-cracking as a distress, but this characterization assumes a field diagnosis of an MRD, which is in conflict with the goals and objectives of these guidelines. Therefore, for the purposes of this procedure, D-cracking has been removed as a distress type, but is instead recorded based on its cracking and staining pattern. The primary distresses that are to be evaluated during the distress surveys are listed in table I-4.
Again, it is noted that the many individual cracks associated with MRD are not drawn in on the LTPP survey distress form, but rather the approximate areas or limits of the MRD are recorded. If the MRD occurs over an entire slab or an entire area, then this is noted in the margin of the distress form.
It is generally most useful to have two raters involved in conducting the pavement distress surveys. One serves as the recorder and is responsible for completing the data forms, including the drawing and recording of all pavement distresses. The second rater is responsible for obtaining measurements where needed (e.g., joint faulting, joint widths, areas, and so on) and also to help in detecting the various pavement distresses.
The primary distress survey will generally be conducted in only one lane (e.g., the outer lane of a multilane facility or one direction of a two-lane roadway). However, in viewing the adjacent lane from the primary lane, any distresses that are clearly visible should be marked on the distress forms to provide some overall indication of the presence of distress in those lanes. Because the adjacent lanes most generally will still be under traffic, no attempts should be made to enter those lanes.
Table I-4. Distresses to be evaluated during pavement distress surveys.
|
JCP Distresses |
CRCP Distresses |
|---|---|
|
Corner Breaks |
Linear Cracking (longitudinal and deteriorated transverse) |
|
Linear Cracking (longitudinal and transverse) |
Map Cracking |
|
Joint Seal Damage (longitudinal and transverse) |
Scaling |
|
Joint Spalling (longitudinal and transverse) |
Polished Aggregate |
|
Map Cracking |
Popouts |
|
Scaling |
Blowups |
|
Polished Aggregate |
Transverse Construction Joint Deterioration |
|
Popouts |
Patch/Patch Deterioration |
|
Blowups |
Punchouts |
|
Faulting of Transverse Joints |
Spalling of Longitudinal Joints |
|
Patch/Patch Deterioration |
Water Bleeding and Pumping |
|
Water Bleeding and Pumping |
Longitudinal Joint Seal Damage |
After the completion of the distress survey, the results can be tabulated in the office using the distress summary form (figure I-9).
The goal of the field surveys is to provide information on the identification of the MRD type and causes. However, because of the similarity in the physical manifestations of many of the different MRD types, it is very difficult to positively identify the MRD during the conduct of the field survey. Indeed, it is believed that misidentification of various MRD types is a frequent occurrence because the diagnosis was based on the visual manifestations only. Thus, although strong indications of the type of MRD are possible from the field surveys, absolute identification is based on detailed laboratory analysis. It should be further noted that in some cases positive identification of the MRD type is not possible even after laboratory testing.
Although identification of the MRD will not be made during the field surveys, attempts will be made to characterize to the greatest extent possible the visible signs, or manifestations, of MRD. These manifestations include:
Alternative Text for Figure I-12
Figure I-12. Distress map symbols for jointed concrete pavements (adapted from SHRP 1993).
Alternative Text for Figure I-13
Figure I- 13. Distress map symbols for CRCP (adapted from SHRP 1993).
By recording these factors during the field surveys, and then comparing them to the results of later laboratory analyses, it may be determined that certain visible signs are strong indicators of a specific MRD type, which will prove useful in future diagnoses. Figure I-11, presented previously, is used to record these critical factors.
The typical MRD cracking pattern will also be recorded during the field surveys using figure I-10. This is done for only a single typical slab to illustrate the prevailing distress pattern. Again it is noted that to facilitate the field survey, the MRD cracking is not drawn on the LTPP distress survey forms (only the general areas of distress are noted).
In observing the MRD crack patterns on the pavement, it may be helpful to spray the surface using a water bottle. This serves to make the fine cracking pattern much more visible as the pavement surface dries, while water still remains in the cracks.
At the conclusion of the distress surveys, a complete photo or video summary of the inspection site is performed. The purpose of this photo summary is to document the condition of the pavement, as well as to record the prevailing foundation and drainage characteristics of the roadway. Either a photo log or video log may be conducted, although the best documentation may be captured using both technologies: the photo log for conveying pavement condition in reports and presentations, and the video log for providing a more complete record of the overall pavement condition. The standard set of photographs shown in table I-5 should be taken of each project, but some variation is acceptable depending on the extent of distress. If the project is videotaped instead of photographed, the video should follow the same sequence of shots.
Table I-5. Standard photographs to be taken for each project.
|
Photo Number |
Depiction |
|---|---|
|
1 |
General Information Form (for project identification) |
|
2 |
Overview of project from section start |
|
3–10 |
Typical pavement features (slab, transverse joint, longitudinal joint, shoulder joint, ditchline, visible drainage features) |
|
11–20 |
Typical pavement distresses (spalling, cracking, MRD, and so on) |
|
21 |
Overview of overall shoulder condition |
|
22 |
Backshot of project from section end |