U.S. Department of Transportation
Federal Highway Administration
1200 New Jersey Avenue, SE
Washington, DC 20590
202-366-4000
Federal Highway Administration Research and Technology
Coordinating, Developing, and Delivering Highway Transportation Innovations
| REPORT |
| This report is an archived publication and may contain dated technical, contact, and link information |
|
| Publication Number: FHWA-HRT-13-085 Date: October 2013 |
Publication Number: FHWA-HRT-13-085 Date: October 2013 |
Two nonlinear acoustic test setups—NRUS and NIRAS—were developed and compared with one another, using an existing set of concrete prism samples (ASR-01, ASR-02, and ASR-03) that had experienced varying amounts of expansion (see figure 14). The following sections describe the setups for NRUS and NIRAS. The three existing concrete prism samples examined using these methods had been subjected to 2 years of ASTM C1293 testing and subsequently stored for approximately 1 year at ambient conditions. All of these concrete samples contained a reactive sand from El Paso, TX (Jobe) but with different binder compositions. Figure 14, the expansion plot, shows expansions at the end of the 2-year test, but prior to storage in the laboratory. Table 4 shows the binder compositions for these three mixtures, along with the expansion measured after 2 years of testing.
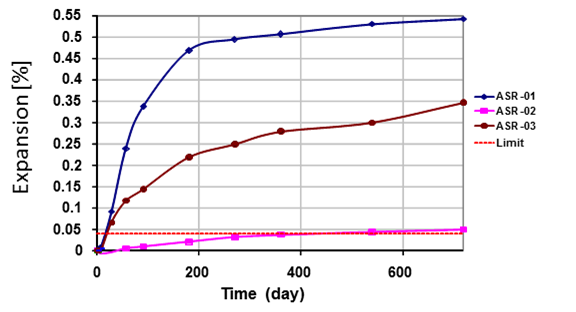
Figure 14. Graph. ASTM C1293 expansions of concrete prisms used in prior project
Table 4. Mix designs and expansions for Jobe concrete prism samples used for comparison between NRUS and NIRAS
Sample |
Mix Design |
ASTM C1293 |
|---|---|---|
ASR-01 |
No SCMs |
0.543 |
ASR-02 |
8% metakaolin |
0.048 |
ASR-03 |
25% Class C FA |
0.347 |
The original proposal considered using the NRUS method, and the initial set of measurements used the NRUS method for nonlinear parameter measurements. Figure 15 shows a representative schematic of the NRUS test setup, and figure 16 shows the physical test setup.
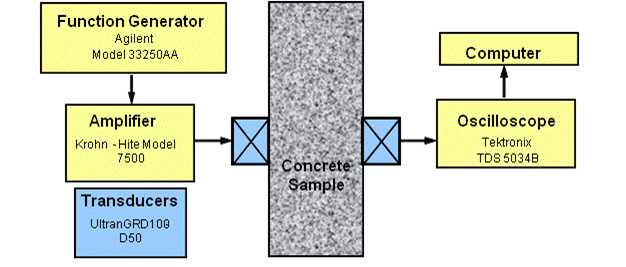
Figure 15. Illustration. NRUS setup schematic
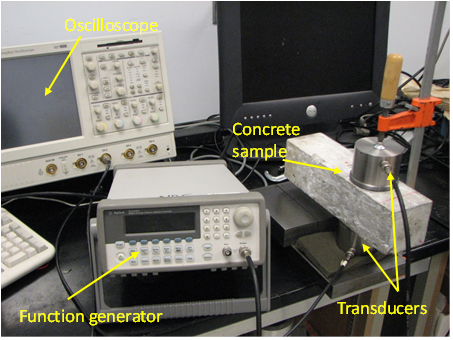
Figure 16. Photo. NRUS test setup
A function generator is used to create a sinusoidal input signal with 10-second duration. The sinusoidal signal is swept in frequency in a user-specified range around an expected resonance frequency of the sample. The input signal is fed through an amplifier and then transmitted through an ultrasonic longitudinal transducer (Ultran® GRD100-D50) to the concrete sample. The transmitted signal is then received by an identical ultrasonic transducer connected to an oscilloscope (Tektronix® TDS 5034B) and sampled at a rate of 125 kiloSamples/second (kSa/s). In addition, vacuum grease is used on the surfaces of both transducers to improve the transmission and reception of the signal. To ensure the same contact force during the measurement each time, the transducers are clamped to the sample. Data recorded using the oscilloscope is then analyzed using a developed analysis code, based on the software package Matlab®, on a computer.
With this setup, the first compressional wave resonance mode is excited, which can be calculated using the measured compressional wave speed (or the time of flight). The time of flight can be measured using a single transducer that sends a compressional wave through the thickness of the specimen. The time it takes for the signal to travel to the specimen boundary and reflect back to the source is the time of flight, t. Assuming a free surface boundary, the equation in figure 17 gives the linear resonance frequency.
![]()
Figure 17. Equation. Linear resonance frequency
However, because of the attenuation in the relatively large CPT specimens, there is no clear reflection of the source wave. Alternatively, two transducers are employed, and the time of arrival of the signal at the receiving transmitter is used to measure the first compressional resonance frequency, as shown in the equation in figure 18.
![]()
Figure 18. Equation. First compressional resonance frequency
Using the time of arrival, the resonance frequency was determined to be about 23 to 25 kilocycles per second (23 to 35 kHz), but when the frequency sweep was performed in this range, there was no clear peak in signal amplitude as expected for resonance. Therefore, the frequency was progressively increased until a significant increase in signal amplitude was detected. In other words, a sinusoid at a constant amplitude (voltage) and frequency was used as an input, and the amplitude of the transmitted signal was monitored as the input frequency was increased. The frequency at the observed amplitude increase was assumed to correspond to the first compressional resonance mode. The frequency sweep was then set to the range around this frequency, and the input voltage was progressively increased from about 10 to 190 volts. (All the measured data fall in this range but the same voltages are not used for different specimens.) The signal in the time domain was then analyzed with a fast Fourier transform (FFT) to obtain the frequency spectrum.
The results of the FFT analysis for ASR-01, ASR-02, and ASR-06 are shown in figure 19, figure 20, and figure 21, respectively. The amplitude in the frequency domain is representative of the input signal amplitude, in volts, at a given frequency. The frequency at which the largest amplitude magnitude is measured ("output"), when applying a voltage varying from 10 to 190 volts, is then assumed to be the resonance frequency. The resonance frequency at the lowest excitation is assumed to be the linear resonance frequency, f0. The left side of the equation shown in figure 3 is then calculated by taking the difference between the linear resonance frequency and the frequency at the current excitation level, f0 - f, as shown in figure 19. Further details can be found in Reference 10.
The calculated difference, f0 - f, is then normalized by the linear resonance frequency and plotted against amplitude, as shown in figure 22. The nonlinear parameter, η , is then the slope of the data as dictated by the equation in figure 3 and illustrated in figure 22.
Figure 23 presents the results for the three specimens tested together, along with the expansion recorded at 720 days and measured nonlinearity. Using the nonlinear parameter, each sample is clearly differentiated, showing distinguishable nonlinearity levels. Surprisingly, comparing NRUS results with the expansion values last recorded at 720 days, there is a discrepancy. The ASR-01 sample had more expansion at 720 days compared with ASR-06 but the measured ASR‑06 nonlinearity is higher.
However, it is important to consider that the expansion results were not obtained at the same time as the nonlinearity measurements. Even though both ASR-01 and ASR-06 were well beyond the 0.04-percent expansion limit at 2 years of CPT, it is not clear how any further development of damage has progressed in the samples over this last year of ambient storage. Therefore, a comparison of expansion values from the end of the CPT test with nonlinearity measured by NRUS may not be valid.
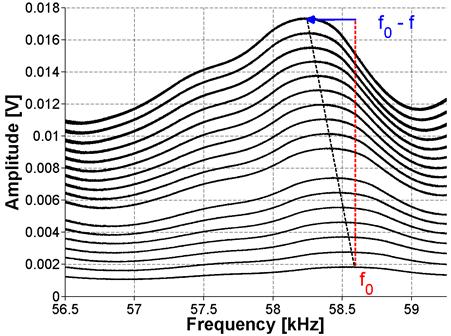
Figure 19. Graph. FFT for ASR-01 sample using NRUS
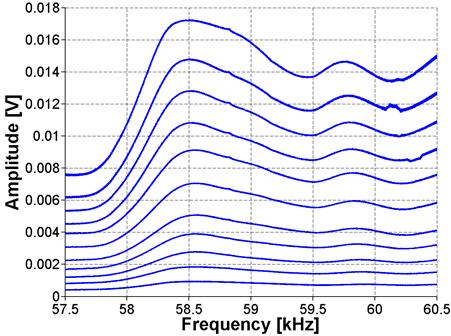
Figure 20. Graph. FFT for ASR-02 sample using NRUS
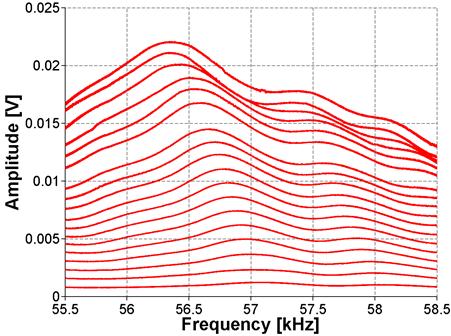
Figure 21. Graph. FFT for ASR-06 sample using NRUS
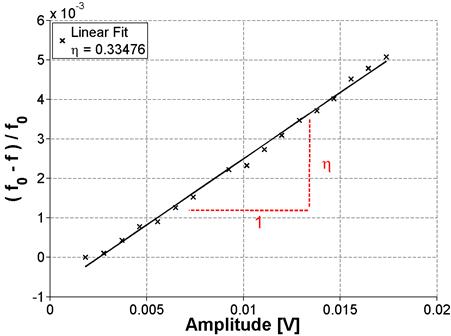
Figure 22. Graph. Results of frequency sweep for ASR-01 (NRUS)
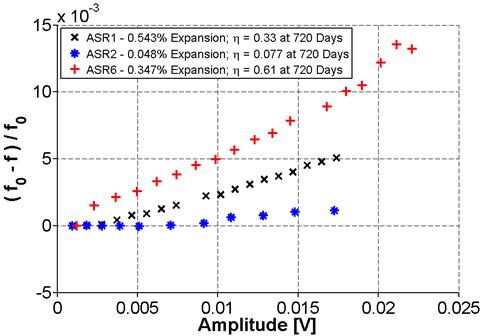
Figure 23. Graph. Results of frequency sweep with increasing voltage (NRUS) for ASR-01, ASR-02, and ASR-06
While the NRUS method distinguished between the different concrete mixtures, the peak assumed to be a resonance mode had a higher frequency than expected based on time of flight measurements. This local peak could not be confirmed to correspond to resonance frequencies or their harmonics. Because it is unclear where this local peak in the frequency domain originated, there is a question of robustness and reliability of the technique. In addition, there were difficulties with consistency in the measurements, as illustrated in figure 24. Measurements for the ASR-02 sample were repeated by reassembling the setup between measurements. Between each measurement trial, the transducers were removed from the specimen, the specimen and transducers were cleaned, and the specimen was again coupled to the transducers using vacuum grease. It was found that the results were not consistent when the setup was reassembled, producing considerable scatter. It is speculated that this could result from changes in the boundary (transducer to sample coupling) conditions caused by reassembling the test setup.
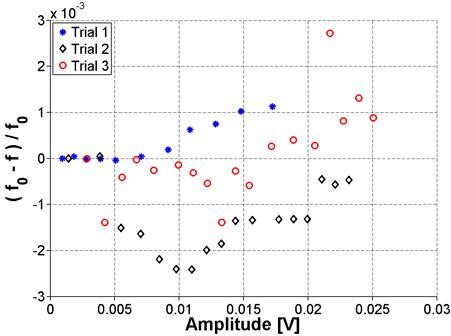
Figure 24. Graph. Frequency shift variation for ASR-02 sample using NRUS
Because of inconsistent results obtained with the NRUS technique, an alternate method of excitation was attempted. The new technique uses the natural vibration of the specimen as the probing signal and is termed NIRAS, first introduced for assessment of alkali reactivity of aggregates by Chen et al.(9) Instead of using a frequency sweep employing transducers in ultrasonic frequency range, the sample is excited with a low amplitude impact. The setup is similar to the ASTM C215 procedure for the measurement of the transverse resonance frequency.(18) The specimen is placed on a 1.5-inch (38 mm) thick support mat to allow free vibration. A 5-oz. (140-g) hammer is used to strike the sample in the center of the specimen, as shown in figure 25. An accelerometer (PCB 353B13) is attached using super glue to one end of the specimen, at the center, where the response is at a maximum for the transverse mode. The sample is tested 1 minute after the attachment of the accelerometer, and the signal is then captured using a Tektronix™ TDS5034B oscilloscope and analyzed using Matlab®. The schematic for this setup is shown in figure 26. The signal duration captured by the oscilloscope is 0.4 seconds, which allows a complete decay of the response signal, with a sampling rate of 500 kSa/s. The signal is then "zero-padded" and analyzed in Matlab® using the FFT. The "zero-padding" increases the signal duration by appending trailing zeros at the end of the signal. This increases the apparent resolution in the frequency domain, allowing more accurate identification of the resonance peak frequency. The signal processing for both the NRUS and NIRAS techniques is essentially the same, and both rely on the same nonlinear resonance theory. However, as is demonstrated throughout this chapter, the NIRAS technique proves to be much more repeatable and robust.
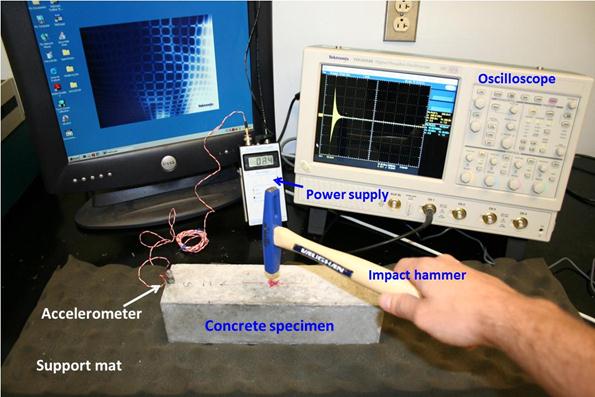
Figure 25. Photo. NIRAS test setup
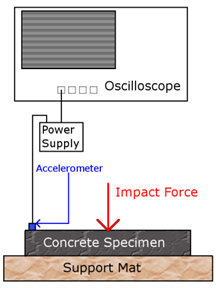
Figure 26. Illustration. NIRAS setup schematic
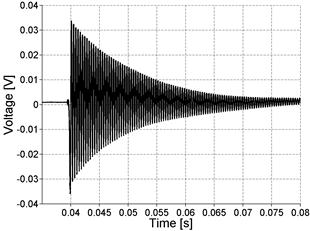
The NIRAS technique was also initially applied to the Jobe aggregate concrete prism samples (see table 4) to assess the performance of the technique. The impact excites the specimen's natural vibration. Figure 27 shows the typical signal captured by the accelerometer in both the time and frequency domains (for ASR-01 in this case). Notice that the signal is a simple decaying oscillation. Figure 27 also shows that the captured signal has a high signal-to-noise ratio (SNR) and that the frequency spectrum has a clearly defined resonance peak. The high SNR can be seen in the time domain signal, which has significantly higher amplitude than the noise before the impact (i.e., before 0.04 seconds).
 |
 |
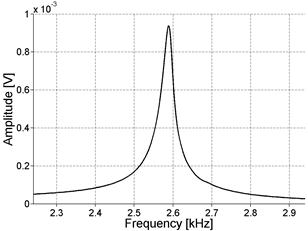 |
Figure 27. Graph. Typical NIRAS signal in time and frequency domains
Figure 28 shows a larger portion of the spectrum, demonstrating that the fundamental resonance mode is the only mode excited with this technique. The spectrum is shown up to 10 kHz because this is the maximum frequency that can be excited with the impact hammer. There is some low-frequency content at the beginning of the signal, which can be induced by the vibration of the support or equipment near the testing area. However, these low frequencies will not affect the results because the resonance occurs at considerably higher frequencies. For testing of nonlinearity, the procedure is repeated 10 times, with progressive increases in the strength of the impact. Figure 29 shows the result for the concrete prism ASR 1. Just as in the NRUS measurements, the lowest amplitude resonance frequency is assumed to be the linear resonance frequency, f0. The difference between this linear resonance frequency and the frequency at a higher amplitude impact,f0-f, is normalized by the linear frequency and plotted against the recorded signal amplitude in figure 30. A linear fit is used for the data in this plot to find the nonlinearity parameter, which is simply the slope. The results, in the frequency domain, of applying the technique to the ASR-02 and ASR-06 samples are also shown in figure 31 and, figure 32, respectively.
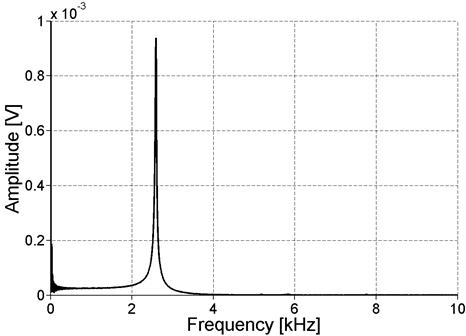
Figure 28. Graph. Frequency spectrum for recorded acceleration signal
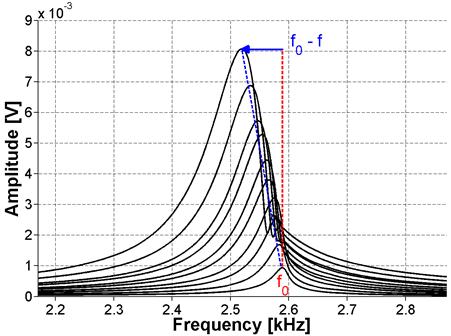
Figure 29. Graph. FFT for ASR-01 sample using NIRAS
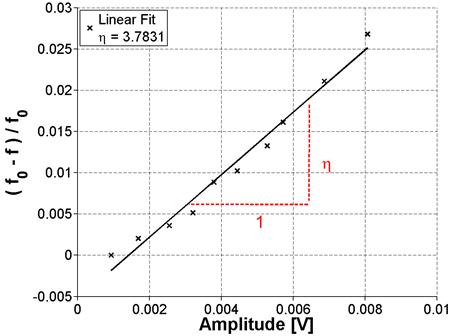
Figure 30. Graph. Normalized frequency versus amplitude for ASR-01 sample (a linear fit to the data produces results in a measured nonlinearity of 3.7831)
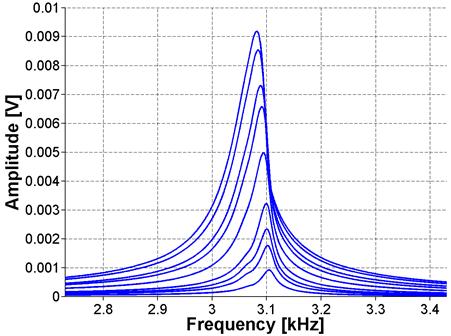
Figure 31. Graph. FFT for ASR-02 sample using NIRAS
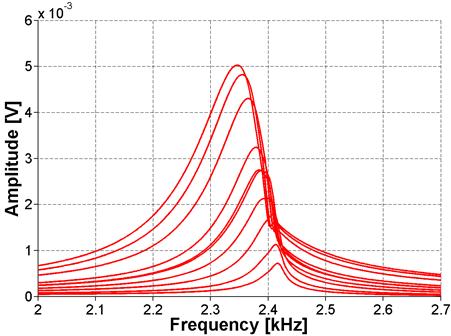
Figure 32. Graph. FFT for ASR-06 sample using NIRAS
Figure 33 plots the normalized frequency against amplitude for all three samples. These results show that the sample with the least expansion, ASR-02, is well-differentiated from the more expansive mixes, ASR-01 and ASR-06. However, contrary to expansion results, the results from both the NRUS and NIRAS techniques suggest that the ASR-06 sample is more damaged than ASR-01 because the nonlinearity of ASR-06 is greater. However, as previously mentioned, the comparison may not be valid because the samples may have experienced further damage during 1 year of ambient storage after conclusion of the ASTM C1293 exposure and testing.
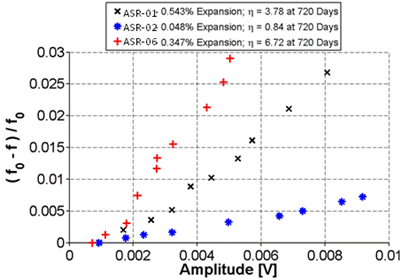
Figure 33. Graph. Normalized frequency shift versus amplitude for ASR-01, ASR-02, and ASR-06 samples using NIRAS
To ensure that the measured nonlinearity is solely due to the material behavior, the linearity of the entire experimental measurement setup, which includes a few electronic devices, was confirmed using a linear elastic material. By convention, the test set up was validated through measurements of a linear elastic aluminum (6061) prism. This prism is of similar dimensions, 3 by 3 by 12 inches (76.3 by 76.3 by 304 mm) to the concrete samples. The results in figure 34 and figure 35 illustrate that for an undamaged and isotropic sample, there is no detectable change in the resonance frequency.
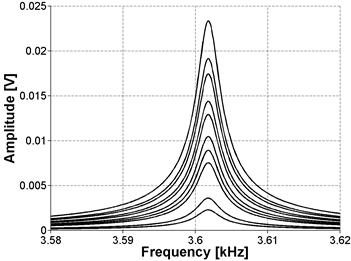
Figure 34. Graph. FFT for aluminum sample
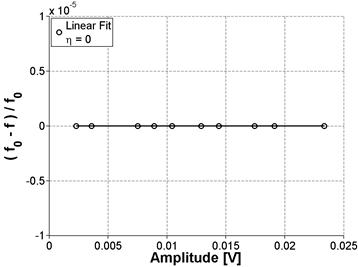
Figure 35. Graph. Normalized frequency shift versus amplitude for aluminum sample
This also shows that there are no spurious nonlinear effects from the instrumentation. Also, note that the resonance peak for aluminum is significantly sharper than broad peaks recorded for concrete caused by lower attenuation. In addition, because of the lower attenuation, the natural vibration takes longer to decay, so the window was extended to 2 seconds with a 250 kSa/s sampling rate.
To confirm the resonance peak measurements taken using the impact testing method, the equation (see figure 36) provided in ASTM E1876 was used to calculate the modulus of elasticity with the measured resonance frequency.(19)

Figure 36. Equation. Modulus of elasticity
where
E = Young's modulus of elasticity, Pa
m = mass of the bar, g
b = width of bar, mm
L = length of bar, mm
t = thickness of bar, mm
ff = fundamental resonant frequency of bar in flexure, Hz
T1 = correction factor for fundamental flexural mode given by the equation in figure 37

Figure 37. Equation. Correction factor for fundamental flexural mode
where μ is Poisson's ratio.
These calculations were performed for aluminum, whose modulus of elasticity is well known to be close to 10152.64 ksi (70 GPa). The calculation with the measured weight and resonance frequency yielded a modulus of elasticity of 10075.77 ksi (69.47 GPa). This result shows the accuracy of determining the resonance frequency of a material with the impact method. Taking 10152.64 ksi (70 GPa) as an accepted value yields less than 1-percent error using the impact testing method. If these calculations are applied to CPT samples, making reasonable assumptions about the Poisson's ratio and dynamic modulus, the calculated resonance frequencies are in the same range as the measured ones. Note that the standard ASTM C215 has similar equations for calculating the dynamic modulus of elasticity using resonance frequency. The difference between ASTM C215 and ASTM E1876 is in the calculation of a correction factor. The correction factor in ASTM C215 is specific to concrete while the correction factor in ASTM E1876 is more general and can be used with higher values of Poisson's ratio. In fact, using the properties of the concrete prism and the correction factor from ASTM E1876 yields a similar result to following the procedure described in ASTM C215.
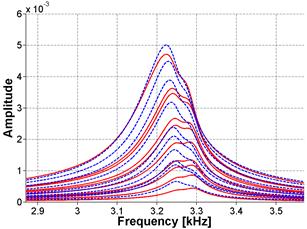
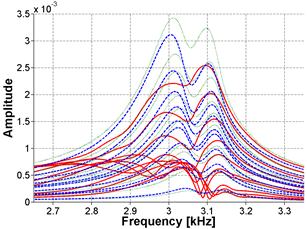
Alternative attachment techniques have been explored in an effort to improve robustness of the NIRAS technique. Casting a screw attachment into the sample was investigated to test whether improvements in consistency could be achieved. The very reactive Las Placitas aggregate was used in this assessment. The casting of the screw attachment was achieved using a bracket, which held the attachment during the casting, as shown in figure 38. Inconsistencies were noted in the embedment depth and bonding of the cast screw attachment to the concrete for the three samples, as shown in figure 39, figure 40, and figure 41. Consequently, the results were also varied. Figure 42 and figure 43 show the FFT and frequency shift for sample 1 at an early age, where the standard deviation (SD) is about 29 percent from the mean, but for a later age, shown in figure 44 and figure 45, the SD from the mean is only about 2 percent. Also, note that the accelerometer could not be attached using an adhesive in the same spot as the cast attachment, and this can also be a source of variability between the attachment methods.
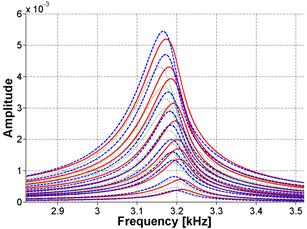
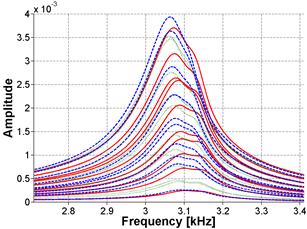
Because the screw attachment was steel and could also be used as an attachment for a magnet, this coupling technique was also investigated. Figure 46 through figure 51 show the results at 65 days for all three samples with all three coupling techniques. The SD is 26.51 percent for figure 46 and figure 47, 19.92 percent for figure 48 and Figure 49, and 20.03 percent for figure 50 and figure 51.
Based on the current results, there does not seem to be an apparent advantage to casting a screw/magnet attachment into the specimens. In fact, looking at figure 50 and figure 51, some irregularities in the FFT signal are noticeable for the screw attachment that are not seen for the magnet or adhesive attachment. Consequently, for the remainder of the project, the focus will to increase the robustness of using an adhesive attachment; the adhesive attachment also has the advantage of being semi-permanent and can be readily applied to concrete cores.
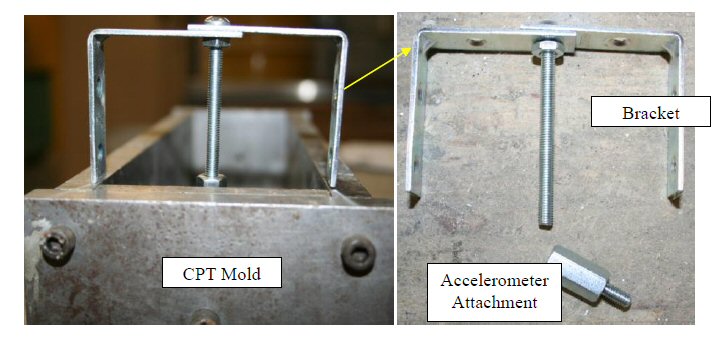
Figure 38. Photo. Bracket used for casting accelerometer attachment
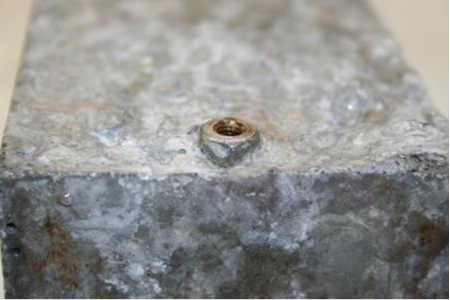
Figure 39. Photo. Cast accelerometer attachment for Sample 1
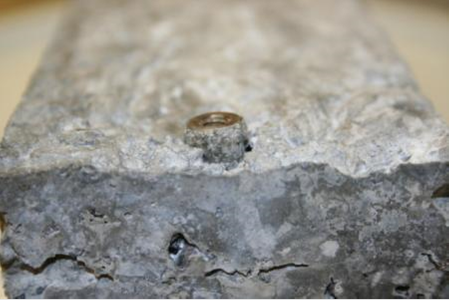
Figure 40. Photo. Cast accelerometer attachment for Sample 2
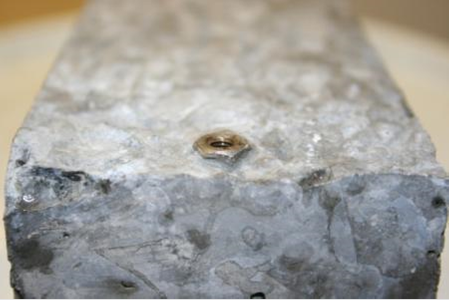
Figure 41. Photo. Cast accelerometer attachment for Sample 3
Key — = Screw Linear Ft where η = 2.65
--- = Adhesive Linear Fit where η = 1.75
Figure 42. Graph. FFT and frequency shift in the frequency domain for Sample 1 at 23 days of age
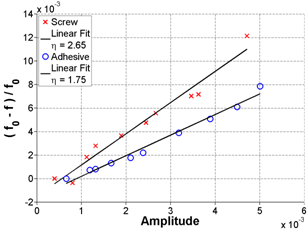
Figure 43. Graph. FFT and frequency shift in linear format for Sample 1 at 23 days of age
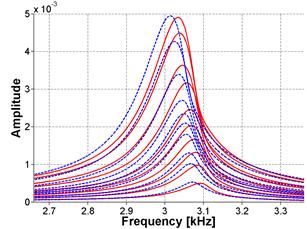
Key — = Screw Linear Ft where η = 4.271
--- = Adhesive Linear Fit where η = 4.1487
Figure 44. Graph. FFT and frequency shift in the frequency domain for Sample 1 at 30 days of age
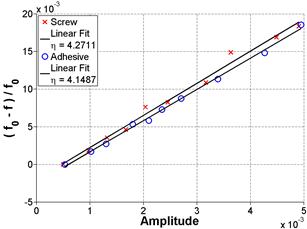
Figure 45. Graph. FFT and frequency shift in linear format for Sample 1 at 30 days of age
Key — = Screw Linear Ft where η = 6.4684
--- = Adhesive Linear Fit where η = 4.5441
Figure 46. Graph. FFT and frequency shift in the frequency domain for Sample 1 at 65 days of age
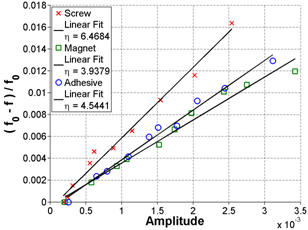
Figure 47. FFT and frequency shift in linear format for Sample 1 at 65 days of age
Key — = Screw Linear Ft where η = 2.6125
--- = Adhesive Linear Fit where η = 1.8657
Figure 48. Graph. FFT and frequency shift in the frequency domain for Sample 2 at 65 days of age
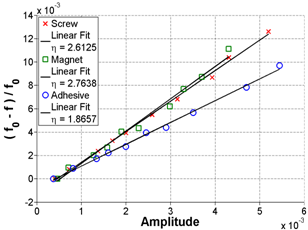
Figure 49. Graph. FFT and frequency shift in linear format for Sample 2 at 65 days of age
Key — = Screw Linear Ft where η = 2.9783
--- = Adhesive Linear Fit where η = 2.1516
Figure 50. Graph. FFT and frequency shift in the frequency domain for Sample 3 at 65 days of age
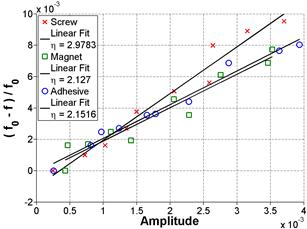
Figure 51: Graph. FFT and frequency shift in linear format for Sample 3 at 65 days of age
The consistency of the NIRAS setup was also tested by repeating measurements on the same sample 10 times on mature specimens in a brief time span, removing the accelerometer and re-gluing it each time the slope, which represents nonlinearity, was recorded. The sample tested was one of the Mix 1 reference samples (see table 2). The result is shown in figure 52, which demonstrates about 10-percent SD from the mean nonlinearity (ηAVG).
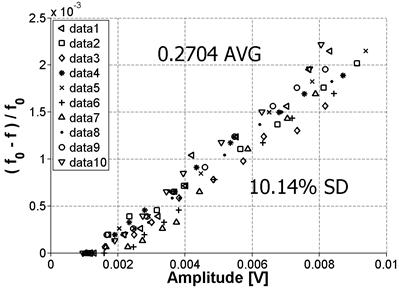
Figure 52. Graph. Variability of NIRAS measurements
This procedure was repeated on a second sample from the Mix 1 reference batch at four positions; a schematic is shown in figure 53. Figure 54 and figure 55 show the results for Positions 1 and 2, respectively, and the results for Positions 3 and 4 are shown in figure 56 and figure 57, respectively.
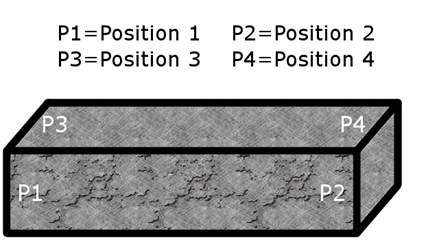
Figure 53. Illustration. Schematic showing tested positions
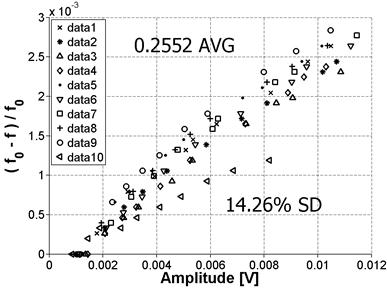
Figure 54. Graph. Variability for Position 1
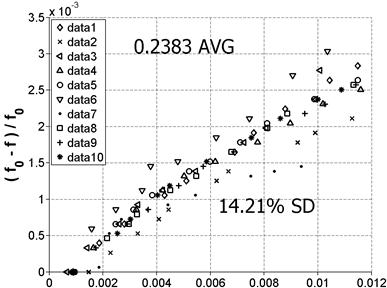
Figure 55. Graph. Variability for Position 2
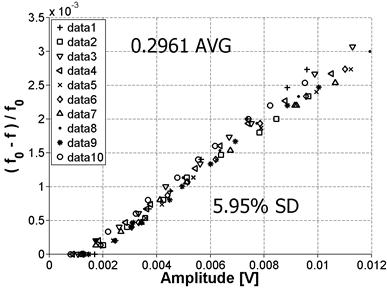
Figure 56. Graph. Variability for Position 3

Figure 57. Graph. Variability for Position 4
Note that the mean values for Positions 1 and 2 are very close together. This makes sense because these positions are on the same prism surface but at opposite ends, so the same vibration mode is being measured. The SD for these positions is also practically the same. However, this SD is higher than the previously reported 10 percent shown in figure 52. This may be because these positions had been previously tested very frequently and a debonder (e.g., acetone) was not always used to remove the old adhesive. This resulted in a deteriorated surface at those positions, which may explain the higher SD. Positions 3 and 4 were tested for the first time, so the surface condition was relatively smooth, and the results show a markedly improved SD. Also, as before, the mean value is very close for the two positions because they are on the same surface of the prism. The average nonlinearity for the 10 data sets for Positions 3 and 4 is higher than the nonlinearity for Positions 1 and 2. This result is expected because both the material itself and the damage are not perfectly isotropic so these modes will not be purely symmetric. As a result, the excitation of a different surface can result in the vibration of a different cross-section property, which can cause measurement variability.
The samples used for these measurement variability experiments were undamaged samples with relatively low nonlinearity; therefore, a set of measurements was also made on a damaged sample with relatively high nonlinearity. The result, shown in figure 58, gives a linear relationship and an SD in measurements that are comparable to results for the sample with low nonlinearity. (Note that the y-axis scale for figure 58 is different than for figure 54 through figure 57.)
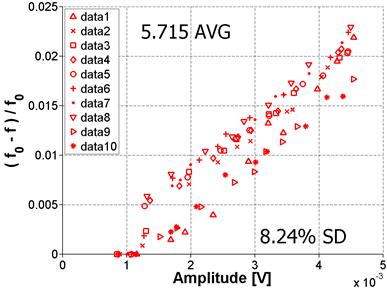
Figure 58. Graph. Variability for damaged sample
(note difference in y-axis scale)
As noted in the theoretical background section of this report, the nonlinear parameter used in this study is extracted by assuming a linear relationship between frequency shift and strain amplitude. This is thought to hold true for low levels of strain amplitude. A question that arises from that assumption concerns the limit to which that statement holds true. This limit was tested on samples with relatively high (ASR-06) and low nonlinearity (Mix 4 reference, stored at ambient conditions). The results demonstrate that the limit is not the same for both samples. The highly nonlinear sample shown in figure 59 deviates from the linear relationship at a relatively low amplitude but there is no deviation for the sample with low nonlinearity, shown in figure 60. Note that both samples were excited to the same level of impact excitation but the response of a highly nonlinear specimen has lower amplitude than that of one with low nonlinearity owing to peak broadening (greater damping). These results demonstrate that for a highly nonlinear sample, the relationship between frequency shift and amplitude is linear for amplitudes lower than 5 x 10⁻³ volts The relationship remained linear for all levels of excitation for the sample with low nonlinearity. In all other measurements in this project, the impact excitation was kept low enough to avoid a nonlinear relationship between frequency shift and amplitude.
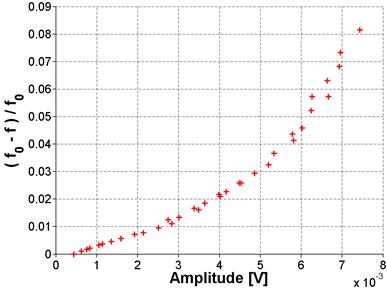
Figure 59. Graph. Results for higher amplitude excitation for ASR-06
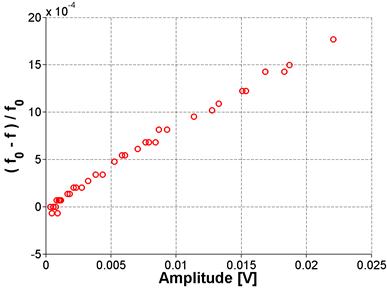
Figure 60. Graph. Results for higher amplitude excitation for Mix 4 reference stored at ambient conditions
These results show the ability of the nonlinear resonance techniques to distinguish the less damaged (i.e., lower slope) samples from the highly damaged (i.e., higher slope) samples and suggest the potential of this approach for damage assessment in concrete. Because the results of NIRAS are clear and consistent, the NIRAS technique has been applied to all the mixtures listed in table 3.