U.S. Department of Transportation
Federal Highway Administration
1200 New Jersey Avenue, SE
Washington, DC 20590
202-366-4000
Federal Highway Administration Research and Technology
Coordinating, Developing, and Delivering Highway Transportation Innovations
| REPORT |
| This report is an archived publication and may contain dated technical, contact, and link information |
|
| Publication Number: FHWA-HRT-15-034 Date: June 2015 |
Publication Number: FHWA-HRT-15-034 Date: June 2015 |
In this study, 12 of the 19 AASHTO M43 gradations are tested and selected because of their common use in geotechnical applications as well as the limitations of the testing equipment available (table 4). The 12 unique samples ranged from an AASHTO No. 10 to an AASHTO No. 5. For the No. 8 aggregate, five different samples were tested to investigate the effect of source; four were from various quarries around the Commonwealth of Virginia, and one was from Defiance County, OH. In total, 16 aggregates were tested in this study.
Table 4. Selected AASHTO M43-05 (ASTM D448) aggregate designations.
Sieve No. |
Percent Passing Through Sieve |
|||||||||||
|---|---|---|---|---|---|---|---|---|---|---|---|---|
No. 5 |
No. 56 |
No. 57 |
No. 6 |
No. 67 |
No. 68 |
No. 7 |
No. 78 |
No. 8 |
No. 89 |
No. 9 |
No. 10 |
|
1.5 inches |
100 |
100 |
100 |
|||||||||
1 inch |
90-100 |
90-100 |
95-100 |
100 |
100 |
100 |
||||||
0.75 inches |
20-55 |
40-85 |
90-100 |
90-100 |
90-100 |
100 |
100 |
|||||
0.50 inches |
0-10 |
10-40 |
25-60 |
20-55 |
90-100 |
90-100 |
100 |
100 |
||||
0.375 inches |
0-5 |
0-15 |
0-15 |
20-55 |
30-65 |
40-70 |
40-75 |
85-100 |
90-100 |
100 |
100 |
|
4 |
0-5 |
0-10 |
0-5 |
0-10 |
5-25 |
0-15 |
5-25 |
10-30 |
20-55 |
85-100 |
85-100 |
|
8 |
0-5 |
0-5 |
0-10 |
0-5 |
0-10 |
0-10 |
5-30 |
10-40 |
||||
16 |
0-5 |
0-5 |
0-5 |
0-10 |
0-10 |
|||||||
50 |
0-5 |
0-5 |
||||||||||
100 |
10-30 |
|||||||||||
There are two geologic materials for the series of aggregates tested in this study: diabase and limestone (table 5). All of the aggregates tested are diabase except for the No. 89 and various No. 8 samples, which are limestone (Nos. 8A, 8B, 8C, and 8D). Diabase is an igneous rock, whereas limestone is a sedimentary rock. Typically, igneous rocks will be harder/stronger than sedimentary rocks. The limestone in Defiance County, OH, is from the Devonian period, while the limestone found in Virginia is from the Triassic period.(63, 64) Pictures of each sample tested are shown in appendix A.
AASHTO Gradation |
Rock Source |
Location |
|---|---|---|
No. 5 |
Diabase |
Ashburn, VA |
No. 56 |
Diabase |
Ashburn, VA |
No. 57 |
Diabase |
Sterling, VA |
No. 6 |
Diabase |
Ashburn, VA |
No. 67 |
Diabase |
Ashburn, VA |
No. 68 |
Diabase |
Sterling, VA |
No. 7 |
Diabase |
Ashburn, VA |
No. 78 |
Diabase |
Sterling, VA |
No. 8A |
Limestone (Devonian) |
Defiance County, OH |
No. 8B |
Limestone (Triassic) |
Staunton, VA |
No. 8C |
Limestone (Triassic) |
Harrisonburg, VA |
No. 8D |
Limestone (Triassic) |
Stafford, VA |
No. 8E |
Diabase |
Ashburn, VA |
No. 89 |
Limestone (Devonian) |
Defiance County, OH |
No. 9 |
Diabase |
Sterling, VA |
No. 10 |
Diabase |
Ashburn, VA |
Because the AASHTO manufactured OG aggregates had not been fully characterized, a suite of tests was conducted, including gradation, minimum and maximum density, repose angle, angularity, texture, and strength.
The first step with each aggregate was to perform a sieve analysis on oven-dried samples to ensure that the gradation of the sample met the appropriate AASHTO M43 specifications (figure 4). The sieve analysis was conducted according to the AASHTO T27 test method.(65) Particle sizes of interest, the coefficient of uniformity (Cu) and coefficient of curvature (Cc), and the Unified Soil Classification System classification are presented in table 6. The fine content for the aggregates (percent passing the No. 200 sieve) is less than 3 percent, except for the No. 10 aggregate, which has about 11 percent (appendix A). Aggregates larger than a No. 9 are classified as poorly graded gravels; No. 9 and No. 10 are both poorly graded sands.
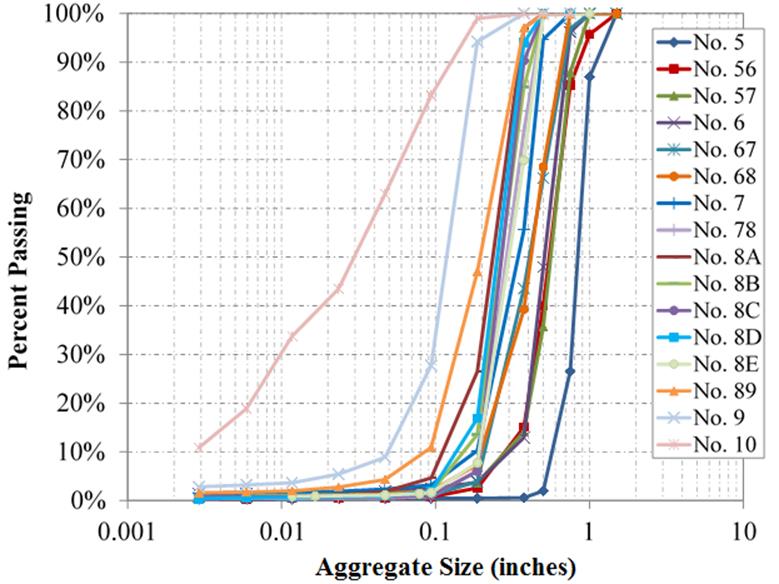
Figure 4. Graph. Sieve analysis results of tested aggregates
In addition, the fineness modulus (FM) was estimated for each aggregate. The FM is typically used in pavement and concrete materials. According to the manual for concrete practice, the FM is a factor obtained by adding the total percentages by weight of an aggregate sample retained on each of a specified series of sieves and dividing the sum by 100; in the United States, the standard sieve sizes are No. 100, No. 50, No. 30, No. 16, No.8, No.4, 0.375 inches, 0.75 inches, and 1.5 inches.(66) The FM was shown analytically to be proportional to the average of the logarithmic particle size distribution (the higher the value, the more coarse the aggregate). In the standard specification for concrete aggregates (ASTM C33), the FM for fine aggregate must be between 2.3 and 3.1.(67)
The minimum and maximum dry unit weight for the aggregates were determined using the funnel (Method A of ASTM D4254) and vibratory table (Method 1A of ASTM D4253) methods, respectively.(68,69) This information is useful in calculating the weight of the material for geotechnical applications and in determining relative compaction and relative density for laboratory testing requirements. In the field, compaction control for OGAs is typically a method-based specification, such as compact to non-movement or no appreciable displacement and assess with visual inspection.(70) Other methods of compaction control have included the use of a nuclear density gauge and soil stiffness gauge.(71)
Table 6. Aggregate gradation and classification.
Sample |
dmax |
d85 |
d60 |
d50 |
d30 |
d10 |
Cu |
Cc |
FM |
USCS |
|---|---|---|---|---|---|---|---|---|---|---|
No. 5 |
1.5 |
0.992 |
0.888 |
0.847 |
0.764 |
0.582 |
1.53 |
1.13 |
7.71 |
GP |
No. 56 |
1.5 |
0.748 |
0.61 |
0.555 |
0.45 |
0.299 |
2.04 |
1.11 |
6.95 |
GP |
No. 57 |
1 |
0.736 |
0.616 |
0.569 |
0.467 |
0.301 |
2.05 |
1.18 |
6.88 |
GP |
No. 6 |
1 |
0.692 |
0.563 |
0.511 |
0.436 |
0.315 |
1.79 |
1.07 |
6.78 |
GP |
No. 67 |
1 |
0.653 |
0.466 |
0.41 |
0.311 |
0.216 |
2.16 |
0.96 |
6.51 |
GP |
No. 68 |
0.75 |
0.631 |
0.434 |
0.421 |
0.32 |
0.202 |
2.15 |
1.17 |
6.46 |
GP |
No. 7 |
0.75 |
0.469 |
0.389 |
0.352 |
0.269 |
0.184 |
2.11 |
1.01 |
6.23 |
GP |
No. 78 |
0.75 |
0.423 |
0.332 |
0.305 |
0.251 |
0.197 |
1.69 |
0.96 |
6.15 |
GP |
No. 8A |
0.5 |
0.343 |
0.276 |
0.250 |
0.196 |
0.117 |
2.36 |
1.19 |
5.68 |
GP |
No. 8B |
0.5 |
0.38 |
0.31 |
0.283 |
0.23 |
0.16 |
1.78 |
1.18 |
5.96 |
GP |
No. 8C |
0.5 |
0.36 |
0.31 |
0.29 |
0.24 |
0.20 |
1.57 |
0.96 |
5.99 |
GP |
No. 8D |
0.5 |
0.35 |
0.29 |
0.268 |
0.22 |
0.14 |
1.86 |
1.24 |
5.85 |
GP |
No. 8E |
0.5 |
0.438 |
0.345 |
0.315 |
0.254 |
0.194 |
1.78 |
0.96 |
6.19 |
GP |
No. 89 |
0.5 |
0.33 |
0.236 |
0.198 |
0.143 |
0.087 |
2.71 |
1.00 |
6.35 |
GP |
No. 9 |
0.375 |
0.174 |
0.139 |
0.125 |
0.097 |
0.05 |
2.78 |
1.35 |
4.64 |
SP |
No. 10 |
0.375 |
0.1045 |
0.0433 |
0.031 |
0.0102 |
0.0029 |
14.93 |
0.83 |
2.98 |
SP |
FM = Fineness modulus.
GP = Poorly graded gravel.
SP = Poorly graded sand.
USCS = Unified Soil Classification System.
Because of the wide range of aggregate sizes tested, two cylindrical molds were used: a 0.1-ft3 mold for aggregates with a maximum diameter less than or equal to 0.75 inches, and a 0.5-ft3 mold for aggregates larger than 0.75 inch (figure 5). For the minimum density test, a scoop was used to place all aggregates, except the No. 9 and No. 10 aggregates, for which a pouring device with a 1-inch diameter spout was used for placement. Three sets of tests were performed for each aggregate, and the average minimum index density is reported in table 7.
For the maximum density tests, double amplitude of vertical vibration of 0.013 inch at 60 Hz was set. A digital linear variable differential transformer (LVDT) was used to measure the sample displacement during vibratory testing (figure 6). Two tests were performed on each aggregate, and the average maximum index density was reported (table 7). The No. 10 aggregate was the heaviest, weighing as much as a conventional well-graded aggregate, but it also has the highest coefficient of uniformity (Cu).
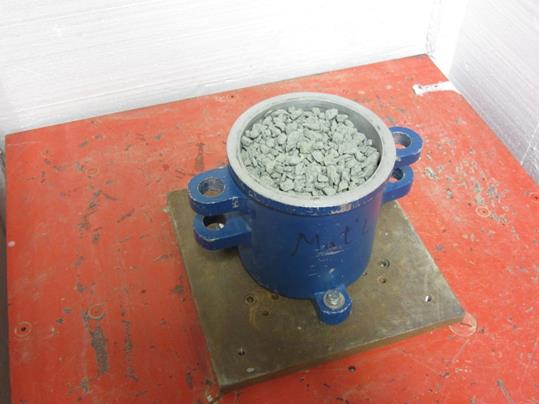
Figure 5. Photo. Mold (0.1 ft3) for funnel and vibratory table tests
Table 7. Unit weight of aggregates.
Sample |
Minimum (pcf) |
Maximum (pcf) |
|---|---|---|
No. 5 |
94.9 |
109.6 |
No. 56 |
100.6 |
103.8 |
No. 57 |
95.4 |
108.7 |
No. 6 |
101.0 |
110.3 |
No. 67 |
106.2 |
124.10 |
No. 68 |
96.9 |
115.9 |
No. 7 |
103.3 |
120.9 |
No. 78 |
92.3 |
109.6 |
No. 8A |
85.7 |
101.3 |
No. 8B |
- |
- |
No. 8C |
- |
- |
No. 8D |
- |
- |
No. 8E |
97.9 |
112.8 |
No. 89 |
88.4 |
108.2 |
No. 9 |
92.3 |
110.7 |
No. 10 |
115.8 |
146.3 |
- = Not measured.
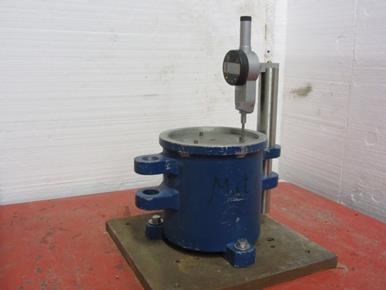
Figure 6. Photo. LVDT and mold set-up for vibratory table tests
The angle of repose is the maximum angle relative to the horizontal direction that a material can naturally sustain. Various methods are available to measure the repose angle; the one adopted by the authors consists of scooping the aggregate into a 6-inch diameter hollow cylinder resting vertically on a level platform and then slowly raising the cylinder to allow the aggregate to naturally fall into a conical pile (figure 7 and figure 8). The repose angle was then measured using an average of two methods: (1) protractor device tilted to match the slope of the pile in five locations, and (2) string method whereby the circumference of the stockpile was measured three times and compared with the volume of the aggregate to determine the height and corresponding angle (table 8).
The full set of results is provided in appendix A. Because the No. 8 aggregate study was started after initiation of the strength characterization, the repose angle was not tested for the various source locations because the results indicated no correlation. In any case, a general trend is found where the repose angle increases with increasing mean grain size, as expected (figure 9).(72)
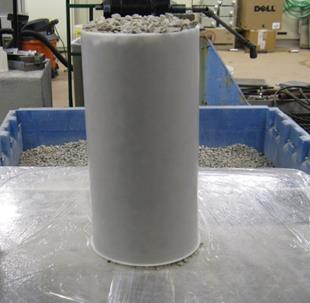
Figure 7. Photo. Repose angle cylinder test
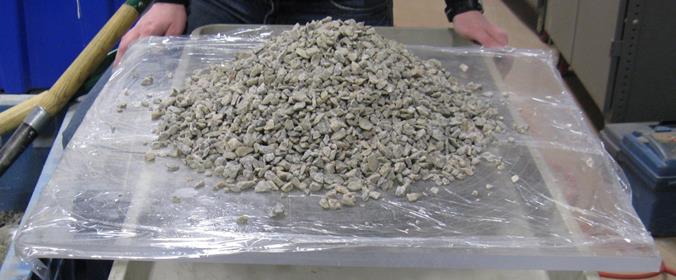
Figure 8. Photo. Aggregate pile to determine repose angle
Table 8. Repose angle of aggregates.
Sample |
Repose Angle |
||
|---|---|---|---|
Angle Finder |
String Method |
Average |
|
No. 5 |
30.1 |
31.5 |
30.8 |
No. 56 |
31.4 |
29.6 |
30.5 |
No. 57 |
29.7 |
30.8 |
30.2 |
No. 6 |
31.2 |
29.7 |
30.4 |
No. 67 |
27.6 |
28.4 |
28.0 |
No. 68 |
32.3 |
29.5 |
30.4 |
No. 7 |
29.3 |
27.9 |
28.6 |
No. 78 |
33.6 |
32.6 |
33.1 |
No. 8A |
31.1 |
30.8 |
31.0 |
No. 8B |
- |
- |
- |
No. 8C |
- |
- |
- |
No. 8D |
- |
- |
- |
No. 8E |
- |
- |
- |
No. 89 |
29.9 |
31.6 |
30.7 |
No. 9 |
26.8 |
27.8 |
27.3 |
No. 10 |
27.4 |
25.3 |
26.4 |
- = Not measured.
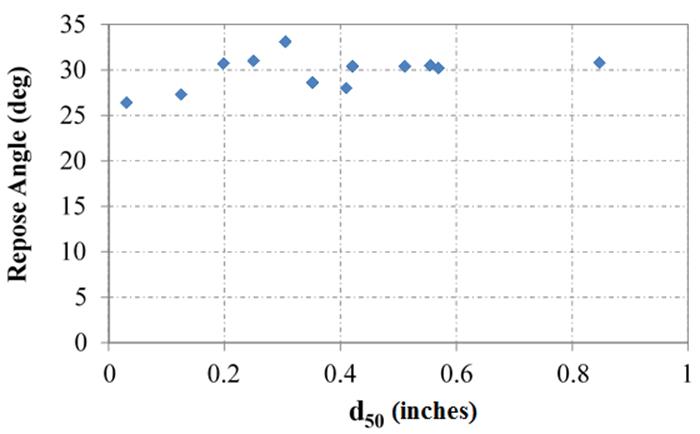
Figure 9. Chart. Relationship between repose angle and mean aggregate size
The aggregate imaging measurement system (AIMS) is a device that combines hardware that can capture real-time digital images of fine and coarse aggregates with software that can process those images and analyze the distribution of particle angularity, texture, and sphericity for the sample.(73)The second-generation AIMS device (AIMS2) is primarily used in the pavement industry for asphalt and concrete design; however, its applicability for structural backfill was investigated in this study. The procedure involves placing aggregates within an indented slot on a circular tray; the plate is then rotated slowly with a backlight, illuminating it as a digital camera takes images of the aggregates. Algorithms within the companion software convert the images to a graphical output describing the aggregates' angularity, texture, sphericity, and other parameters.
Angularity describes variations at the edges of the aggregates; in AIMS, it was defined as an index in terms of rounded, sub-rounded, sub-angular, or angular (figure 10), but in AIMS2, this index was changed to low, moderate, high, and extreme, although the relative range of the categories did not change.(74,73) To better relate angularity (as well as texture and sphericity) for geotechnical applications, the initial AIMS classifications are used herein. The surface texture of aggregates is also important; the index is defined in terms of polished or smooth, or low, moderate and high roughness (figure 11). Sphericity describes the degree of cubicalness of an aggregate; it is defined in terms of high sphericity (e.g., the aggregate is roughly the same dimension in all axes), moderate sphericity (i.e., semi-circular), low sphericity (i.e., semi-elongated), and flat/elongated (figure 12).
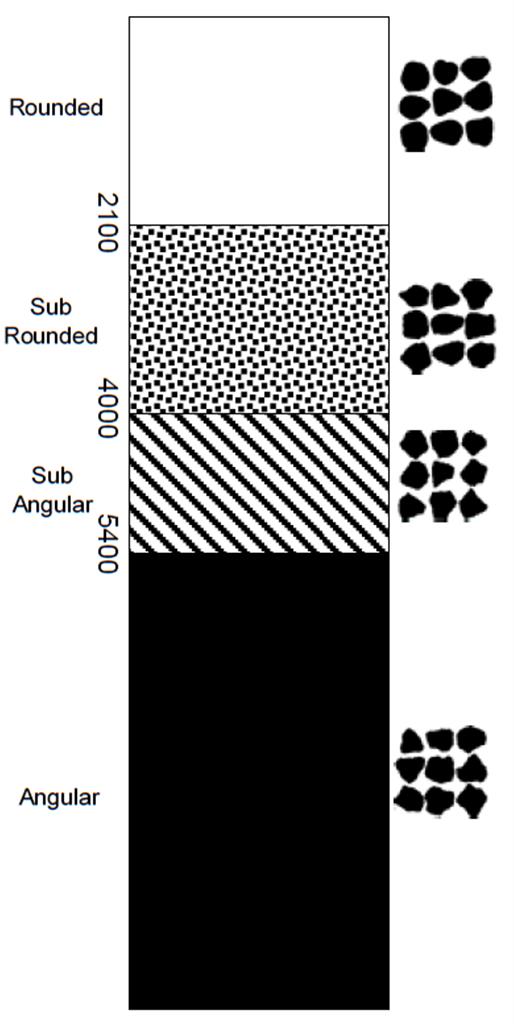
Figure 10. Diagram. AIMS angularity index classification ranges.(74)
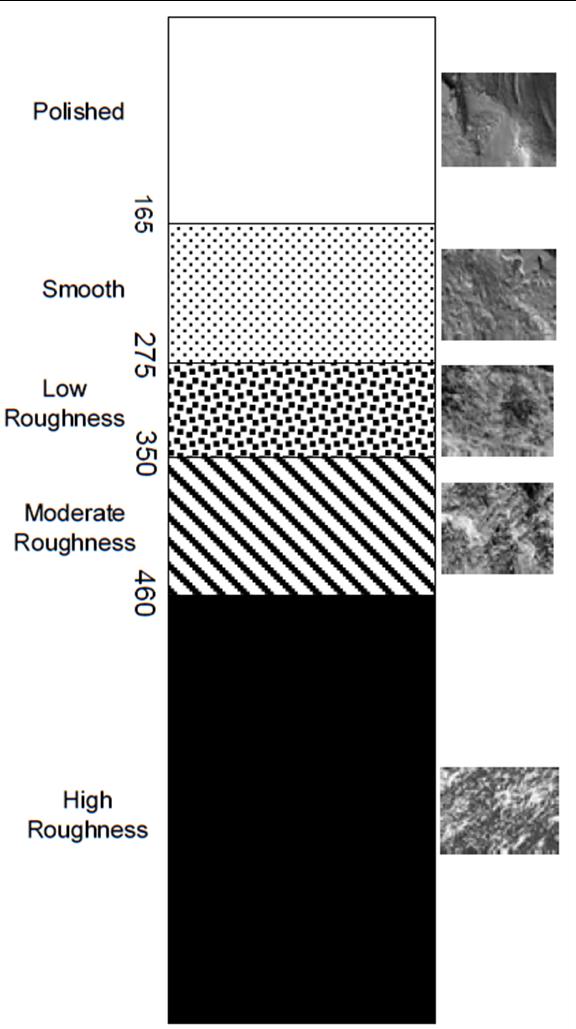
Figure 11. Diagram. AIMS texture classification ranges.(74)
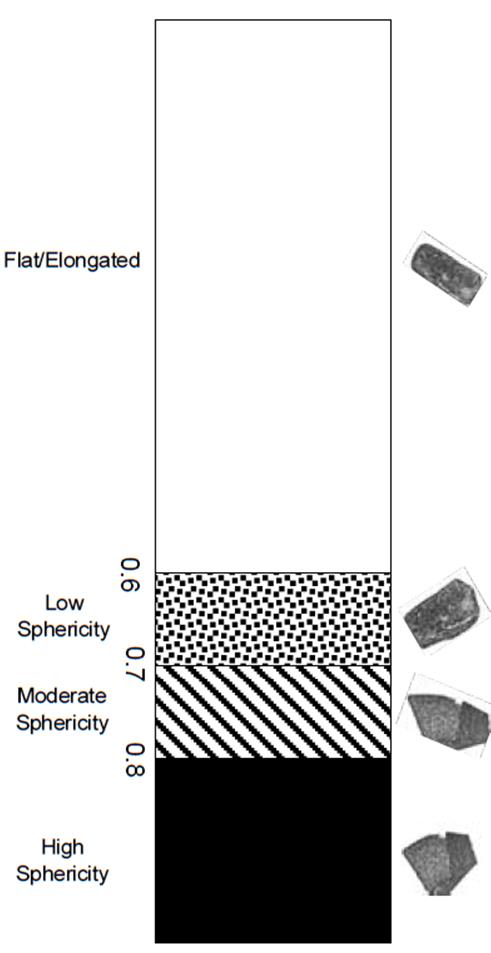
Figure 12. Diagram. AIMS sphericity index classification ranges.(74)
AIMS2 measures angularity by the gradient method, texture by wavelet analysis, and sphericity by three-dimensional measurements taken from the microscope (for depth) and the image from the camera (using eigenvector analysis).(73) After performing the analysis, the cumulative distribution of angularity, texture, and sphericity indexes for all particles making up the aggregate sample tested was then plotted (figure 13, figure 14, and figure 15, respectively). The averages for each aggregate are presented in table 9.
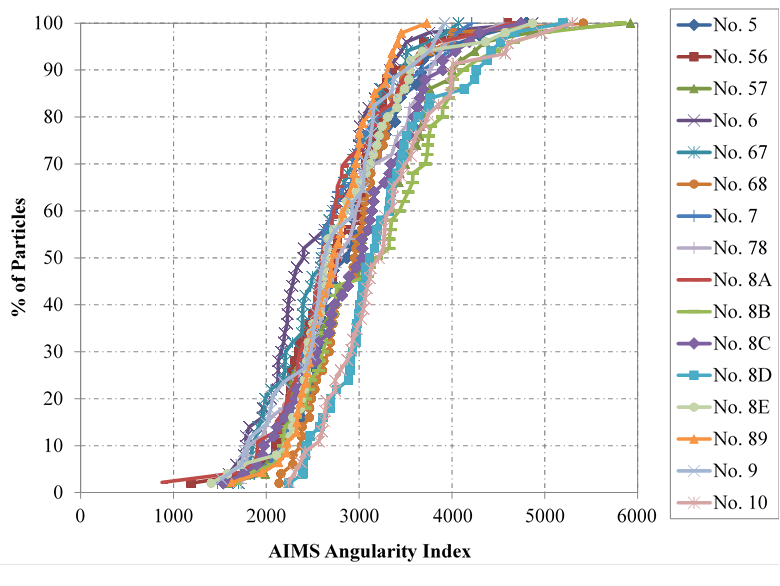
Figure 13. Chart. Angularity results from AIMS2
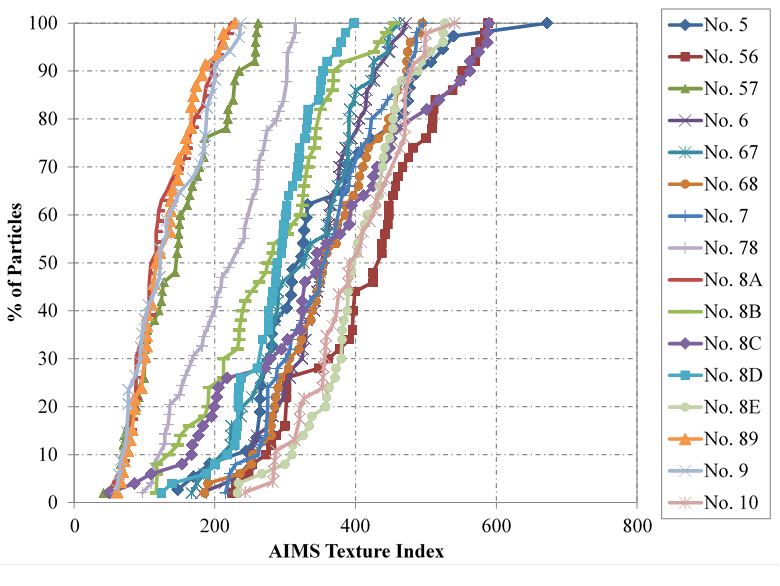
Figure 14. Chart. Texture results from AIMS2
Although visual analysis suggests the aggregates are angular, the average of the measured distributions using AIMS2 is between 2,100 and 4,000, indicating that the aggregates are sub-rounded based on the AIMS classification (table 9). The texture and sphericity of the aggregates were slightly more scattered. Characterizing the aggregates based on AIMS results in six sample groups: (1) No. 5, No. 56, No. 68, No. 8C, and No. 8E all have sub-rounded angularity, moderate roughness, and low sphericity; (2) No. 57, No. 8A, No. 89, and No. 9 all have sub-rounded angularity, polished texture, and low sphericity; (3) No. 6, No. 67, and No. 7 all have sub-rounded angularity, moderate roughness, and moderate sphericity; (4) No. 8B and No. 8D both have sub-rounded angularity, low roughness, and flat/elongated particles; (5) No. 10 is similar to Nos. 8B and 8D, except it has flat/elongated particles; and (6) No. 78 is the only aggregate with a smooth texture and low sphericity. Note that these properties are specific to the aggregates tested in this study, as evidenced by the various No. 8 aggregates. The use of AIMS in the classification of aggregates for structural backfill will be further investigated.
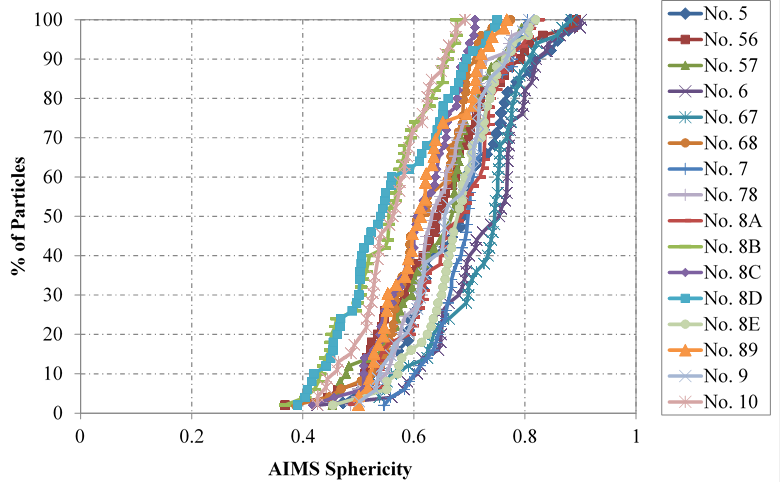
Figure 15. Chart. Sphericity results from AIMS2
Table 9. Summary of AIMS2 average results for angularity, texture, and sphericity.
Sample |
Angularity |
Texture |
Sphericity |
|||
|---|---|---|---|---|---|---|
Average Index |
Classification |
Average Index |
Classification |
Average Index |
Classification |
|
No. 5 |
2915.2 |
Sub-Rounded |
375.6 |
Moderate Roughness |
0.688 |
Low |
No. 56 |
2774.7 |
Sub-Rounded |
447.4 |
Moderate Roughness |
0.644 |
Low |
No. 57 |
3083.1 |
Sub-Rounded |
161.2 |
Polished |
0.662 |
Low |
No. 6 |
2577.2 |
Sub-Rounded |
360.1 |
Moderate Roughness |
0.74 |
Moderate |
No. 67 |
2643.1 |
Sub-Rounded |
361.1 |
Moderate Roughness |
0.741 |
Moderate |
No. 68 |
2985.8 |
Sub-Rounded |
373.5 |
Moderate Roughness |
0.64 |
Low |
No. 7 |
2770.5 |
Sub-Rounded |
370.2 |
Moderate Roughness |
0.714 |
Moderate |
No. 78 |
2869.6 |
Sub-Rounded |
232.5 |
Smooth |
0.654 |
Low |
No. 8A |
2714.6 |
Sub-Rounded |
154.2 |
Polished |
0.682 |
Low |
No. 8B |
3202.1 |
Sub-Rounded |
295.9 |
Low Roughness |
0.565 |
Flat/Elongated |
No. 8C |
2984.3 |
Sub-Rounded |
379.3 |
Moderate Roughness |
0.629 |
Low |
No. 8D |
3269.3 |
Sub-Rounded |
298.1 |
Low Roughness |
0.567 |
Flat/Elongated |
No. 8E |
2834.2 |
Sub-Rounded |
419.8 |
Moderate Roughness |
0.699 |
Low |
No. 89 |
2742.1 |
Sub-Rounded |
152.1 |
Polished |
0.641 |
Low |
No. 9 |
2726.2 |
Sub-Rounded |
149.8 |
Polished |
0.675 |
Low |
No. 10 |
3295.5 |
Sub-Rounded |
418.4 |
Moderate Roughness |
0.581 |
Flat/Elongated |
The strength of the aggregates was determined using three different devices: SDS, LSDS, and LDTX. In each test, samples were placed in the devices uncompacted with a relative density around 30 percent based on the vibratory table tests (table 7).
Standard Direct Shear Tests
Oftentimes, soil samples will be sent for DS testing to determine the strength parameters (friction angle and cohesion) of the material. The most common DS devices are either 2.5 inches in diameter or 4 inches square. According to ASTM D3080, the maximum particle size of the sample tested must be less than 1/10th the width or diameter of the device; for a 2.5-inch diameter device, the maximum particle size is limited to 0.25 inch, and for the 4-inch square device, the maximum particle size is limited to 0.4 inch.(75) For this reason, samples are often scalped, which neglects the effect the larger aggregate particles may have on strength.
From table 6, only two of the smaller AASHTO M43 aggregates could be tested in a standard 4-inch DS device: the No. 9 and No. 10. For most geotechnical applications utilizing OGAs, where a minimum of 0.5-inch maximum particle size is typically specified, standard DS testing cannot be performed. This limitation requires either (a) scalping the sample, whereby material greater than that which can be tested according to ASTM is removed; (b) generating a parallel gradation with the material, whereby the maximum gradation is 1/10th the DS device size with the remaining gradation curve parallel to that of the actual sample; or (c) testing in a larger DS device, whereby nothing special needs to be done to the sample.
Test Setup: To evaluate the impact of scalping the sample, SDS tests were performed according to ASTM D3080 using a 2.5-inch circular device in the geotechnical laboratory at FHWA's Turner-Fairbank Highway Research Center (TFHRC) (figure 16); material larger than the No. 4 sieve (opening size of 0.187 inches) was removed prior to testing. The shear rate was set at 0.002 inches/min based on the maximum measured time for 90 percent consolidation (t90) using the square root of time method (Taylor's method); the gap size was 0.025 inches.(75)
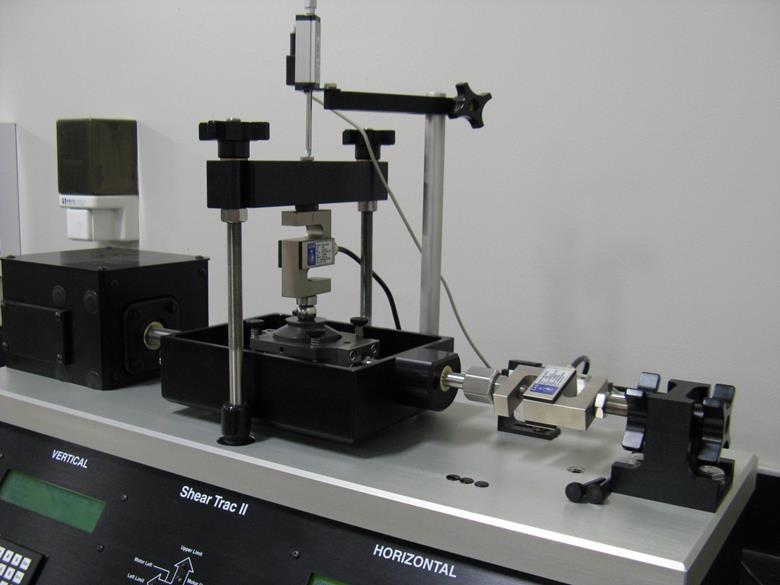
Figure 16. Photo. SDS test device at TFHRC
Prior to testing the aggregates, three sets of tests were performed using Ottawa 20/30 sand to ensure appropriate and repeatable results with the SDS device. The resulting measured peak friction angles for each test (dry and uncompacted), using the conventional MC criteria, are shown in table 10. The values are all less than 3 percent of the average, or 33 degrees for the tangent friction angle, which is consistent for Ottawa sand and demonstrates the repeatability of the test method.(76,77)
Table 10. Ottawa test results using SDS device and MC approach.
Test |
Tangent Friction Angle (degree) |
Secant Friction Angle at 5 psi (degree) |
|---|---|---|
1 |
34 |
34 |
2 |
32 |
31 |
3 |
33 |
32 |
After verification of the test apparatus and procedures using Ottawa sand, four tests were performed for each AASTHO aggregate tested, at different applied normal stresses: 5, 10, 20, and 30 psi. This range of stresses was selected based on typical loads a retaining wall or foundation utilizing these aggregates may experience, with 30 psi equivalent to most in-service, bridge-bearing pressures. The samples were tested in a dry condition.
For each initial applied normal stress, the shear stress and horizontal displacement were measured during shear using a load cell and LVDT, respectively. An example for the No. 57 aggregate is shown in figure 17.
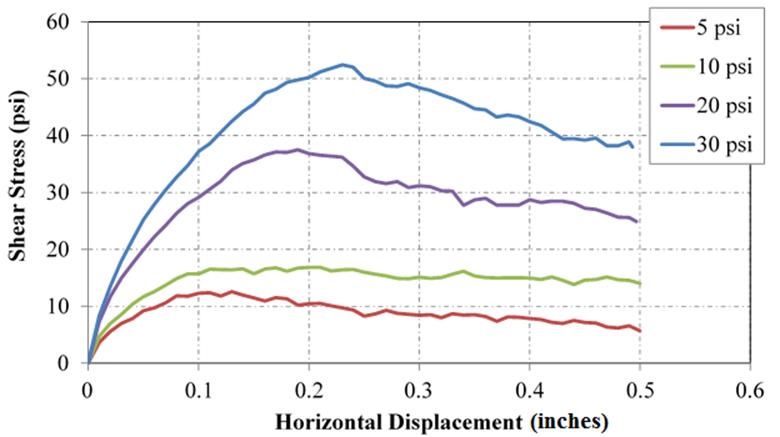
Figure 17. Chart. Shear stress versus horizontal displacement for No. 57 from SDS tests
The peak shear stress (𝜏f) is equal to the maximum measured during testing. In some cases, the peak shear stress was not always reached. (See figure 18 as an example.) The peak was therefore determined to equal the shear stress measured at a lateral strain of 20 percent (or 0.5 inches for a 2.5-inch device).(75)
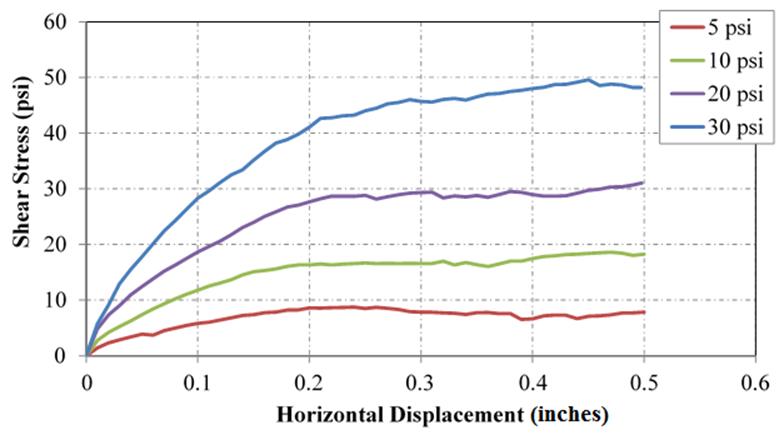
Figure 18. Chart. Shear stress versus horizontal displacement for No. 5 from SDS tests
MC Approach: Using the MC approach, the peak shear stress is then compared with the corresponding applied normal stress. Note that the applied normal stress must be corrected during the shear phase because the contact area is constantly changing. For a circular sample, the area correction factor (F) is found using equation 11.
 (11)
(11)
Where:
h = Horizontal displacement.
D = Sample diameter.
The correction factor is then applied to the original sample area (Ao) to determine the corrected area (Ac); see equation 12.
![]() (12)
(12)
This post-processing procedure was performed on each set of results to determine the normal pressure at the point of peak shear stress. No correction is needed for the recorded shear stress.
The peak, or secant, friction angle (ϕ's) at each corresponding applied normal stress (σ'n) is calculated according to equation 13.
![]() (13)
(13)
If a known applied load is given, then the corresponding peak friction angle can be directly selected (termed the secant angle of friction); however, oftentimes the stresses will be variable so a tangent internal angle of friction (ϕ 't) is determined over a range of stresses. The best-fit linear regression through the four points represents the MC failure envelope. (See figure 19 as an example.) The tangent of the slope is equal to the internal friction angle, and the shear stress intercept is equal to the (apparent) cohesion.
The results of standard DS testing using the linear MC approach for all of the aggregates are presented in table 11. Note that aggregates 8B, 8C, 8D, and 8E were not scalped and tested using the standard DS device. Appendix A provides the standard DS test results (peak shear and corresponding normal stress) leading to the resulting friction angle and measured cohesion in table 11.
The measured friction angles range between 43 and 57 degrees, with an average of 52 degrees. The results are generally within 10 percent of the average. The scalped samples indicate high strength, but the accuracy is unknown because the majority of the particles were removed. Eight of the samples removed about 90 percent of the sample or more during scalping, but two of the samples (No. 9 and No. 10) did not need much scalping, so their results may be more reliable. Comparison to large-scale testing will help in the analysis.
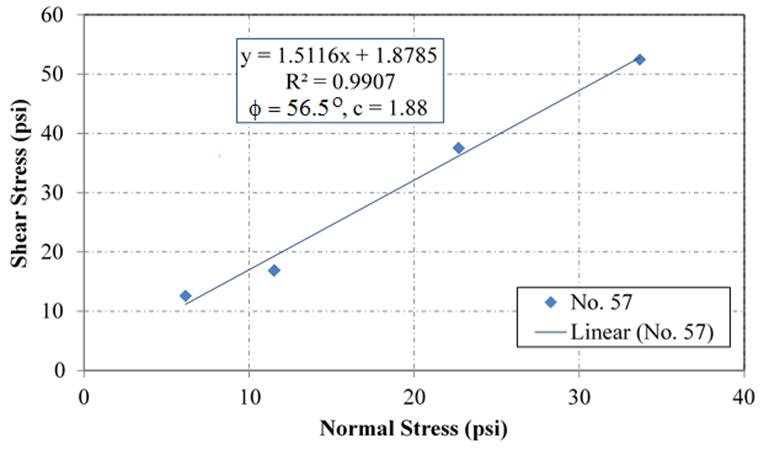
Figure 19. Chart. Shear versus normal stress for No. 57 using SDS
Table 11. SDS test results using MC approach.
Sample |
Percent Passing |
ϕ't,SDS (degree) |
c'SDS |
|---|---|---|---|
No. 5 |
0.46 |
50.1 |
1.7 |
No. 56 |
2.58 |
51.7 |
6.5 |
No. 57 |
3.67 |
56.5 |
1.9 |
No. 6 |
3.72 |
51.7 |
4.2 |
No. 67 |
3.96 |
57.3 |
7.1 |
No. 68 |
7.40 |
42.8 |
9.5 |
No. 7 |
10.26 |
54.6 |
7.8 |
No. 78 |
6.18 |
51.3 |
9.7 |
No. 8A |
26.50 |
53.0 |
5.2 |
No. 8B |
- |
- |
- |
No. 8C |
- |
- |
- |
No. 8D |
- |
- |
- |
No. 8E |
- |
- |
- |
No. 89 |
47.01 |
54.0 |
6.1 |
No. 9 |
94.22 |
50.2 |
3.5 |
No. 10 |
98.96 |
50.6 |
3.3 |
ϕ't,SDS = The friction angle using the Mohr-Coulomb (MC) approach.
c'SDS = The shear stress intercept from the best-fit linear MC failure envelope.
- = Not measured.
Note that using a linear MC interpretation results in a cohesion value for each test because the y-intercept of the best-fit approximation is not zero (figure 19, for example); however, these aggregates are cohesionless. This inconsistency is attributed to the fact that the failure envelope is actually nonlinear; there is also aggregate interlocking and dilation that occurs during shearing, depending on the applied normal stress.(54) In reality, the friction angle decreases with increased applied normal stress in a logarithmic function. For the range of stresses tested, the secant friction angle corresponding to the peak for each applied normal stress was larger than that approximated from the MC approach. Because of these issues, the use of an alternative ZDA method is proposed to determine the design friction angle, which is based on the critical state or constant volume concept.(3)
ZDA Approach: The ZDA method requires knowledge about the dilation behavior of the sample. The vertical displacement during the consolidation and shearing phases was measured using an LVDT. Comparing the vertical displacement to the horizontal displacement during shear provides an indication of the dilation behavior of the aggregates. An example for the No. 57 aggregate is shown in figure 20. Positive vertical displacement indicates compression of the sample, whereas negative displacement indicates dilation. The dilation angle (ψ) is found according to equation 14.
 (14)
(14)
Where:
Δv = The change in vertical displacement.
Δh = The change in horizontal displacement.
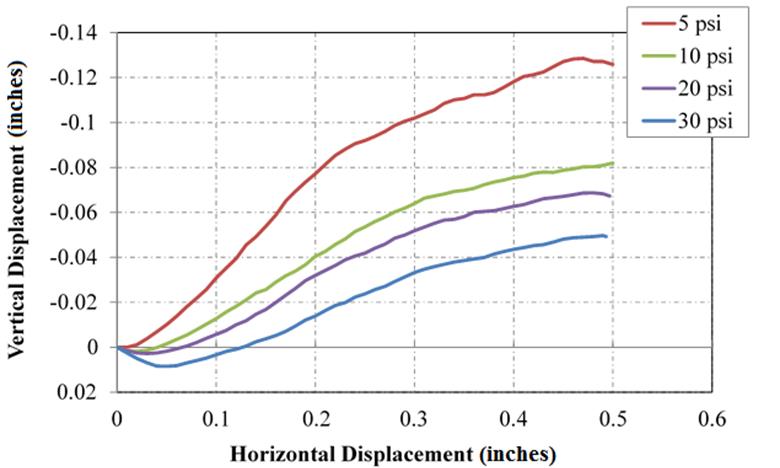
Figure 20. Chart. Deformation behavior of No. 57 during SDS testing
Data for the DS testing is provided at every 0.01 inch of horizontal displacement, so Δh is constant. As the sample is sheared, Δv will change for each horizontal displacement increment. The maximum dilation angle for the aggregate is therefore found when the maximum change in vertical displacement occurs. A three-point moving average of the change in vertical displacement was taken to smooth the data and eliminate any misleading sharp peaks.
There is generally a linear relationship between the measured dilation angles and the peak friction angles. The intercept at zero dilation is the constant volume friction angle (ϕ 'cv) found using the ZDA approach. For example, ϕ'cv is equal to 49 degrees for the No. 57 aggregate (figure 21). The resulting friction angle for each aggregate is shown in table 12; however, when combining the aggregates together (figure 22), there is no clear relationship. It was observed that the dilation angles measured during testing were sporadic and not as expected, likely a result of the considerable scalping performed on the aggregates, which changes its dilative behavior.
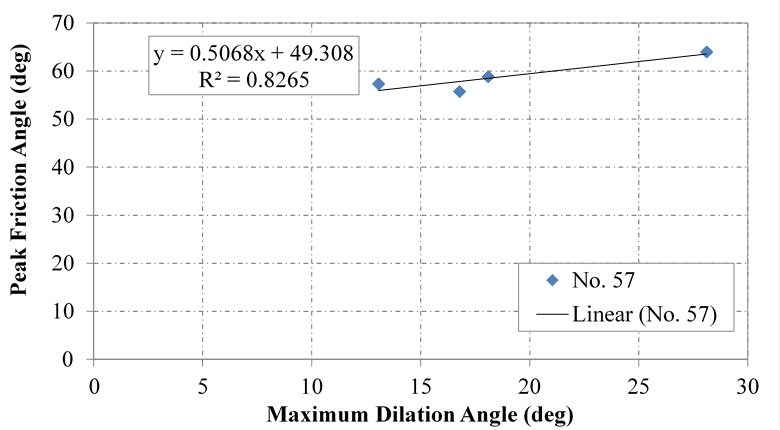
Figure 21. Chart. Friction angle versus dilation angle for No. 57 using SDS
Table 12 . SDS test results using the ZDA approach.
Sample |
ϕ'cv,SDS (degree) |
|---|---|
No. 5 |
50.6* |
No. 56 |
37.7 |
No. 57 |
49.0 |
No. 6 |
53.9 |
No. 67 |
49.1 |
No. 68 |
36.9 |
No. 7 |
51.3 |
No. 78 |
44.2 |
No. 8A |
37.3 |
No. 8B |
- |
No. 8C |
- |
No. 8D |
- |
No. 8E |
- |
No. 89 |
42.3 |
No. 9 |
52.0 |
No. 10 |
39.0 |
*Modified zero dilation angle approach whereby the stress-strain curves were used to determine constant volume friction angle.
- = Not measured.
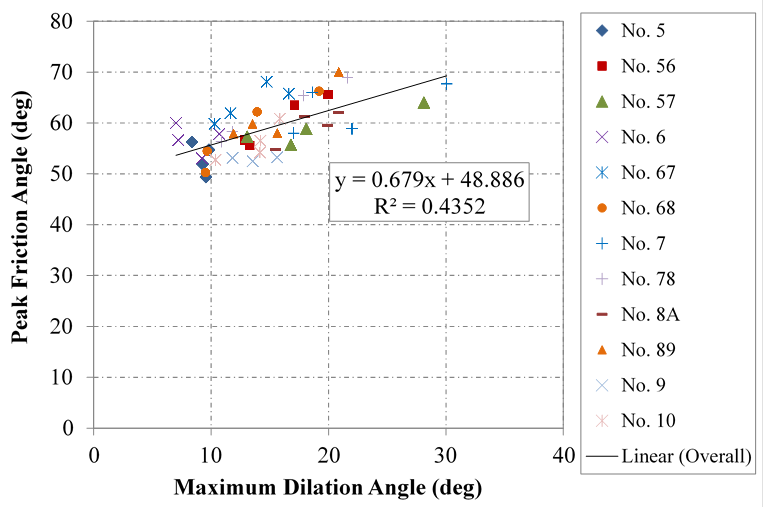
Figure 22. Chart. Relationship between friction and dilation angles in SDS testing.
Summary: The results from the standard direct shear testing on the scalped samples are shown in figure 23. The scalped samples all had friction angles higher than 34 degrees. Using the MC approach, friction angles ranged from 43 to 57 degrees, with a mean across all different sample aggregates of 52 degrees, a standard deviation of about 4 degrees, and a coefficient of variation (COV) of 7.2 percent. Using the ZDA approach, friction angles ranged from 38 to 54 degrees, with an overall mean of 45 degrees, a standard deviation of 6 degrees, and a COV of 13.6 percent.
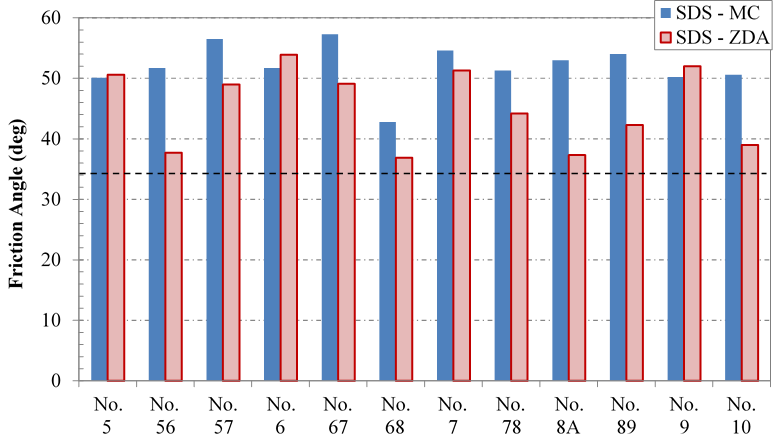
Figure 23. Chart. Summary of SDS testing
LSDS Tests
To evaluate the strength properties of the AASTHO OG aggregates, a DS test is needed that is large enough to avoid scalping. At TFHRC, a 12- by 12- by 8-inch DS box is available to perform LSDS testing on aggregates of up to 1.2-inch maximum particle size (figure 24). This device was used to measure the strength of the 12 classifications of AASHTO aggregates (table 4) under both dry and saturated conditions. Note that the SDS tests were only tested under dry conditions.
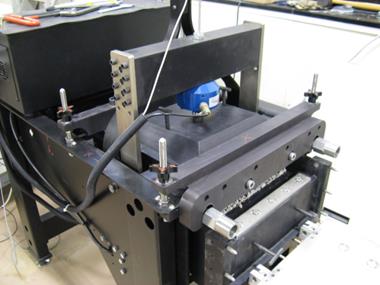
Figure 24. Photo. LSDS device at TFHRC
Test Setup: The ASTM D3080 test method was followed for LSDS testing with the exception of the gap size between the top and bottom shear boxes. ASTM D3080 was originally developed for SDS testing, which designated the gap size as 0.025 inches.(75) Because the LSDS device and the aggregates tested in this research are considerably larger, the gap size was instead set to d85 (the aggregate size in which 85 percent of the material is smaller) for each sample based on the sieve analysis (table 6). This setting was determined from review of test methods outlined in ASTM D5321 and trial runs at various gap sizes, and to it was used to avoid frictional interference from either the two shear boxes or larger particles that may fall within the gap during testing.(78,79)
The shear strain displacement rate was set at 0.015 inches/min for the OGAs based on the results obtained during the compression phase of testing. The samples were sheared to a maximum of 20 percent of the device length for a total shear displacement of 2.4 inches. Because the friction angle increases with relative density for sands and gravels, an assumed worst-case condition was used by placing the samples with no compactive effort into the shear box.(79) Similar to the SDS tests, each aggregate was tested at normal stresses of 5, 10, 20, and 30 psi to determine the internal friction angle, which is a typical stress range for most wall and bridge applications.
Note that before testing, the load cells and LVDTs were calibrated. In addition, the LSDS device was also calibrated for displacement and shear resistance. With no sample in the shear box and no shear deformation occurring, the vertical displacement during loading and unloading was measured to account for box compression. The resulting calibration equation (figure 25) is then subtracted from the raw data to obtain a true displacement of the sample itself.
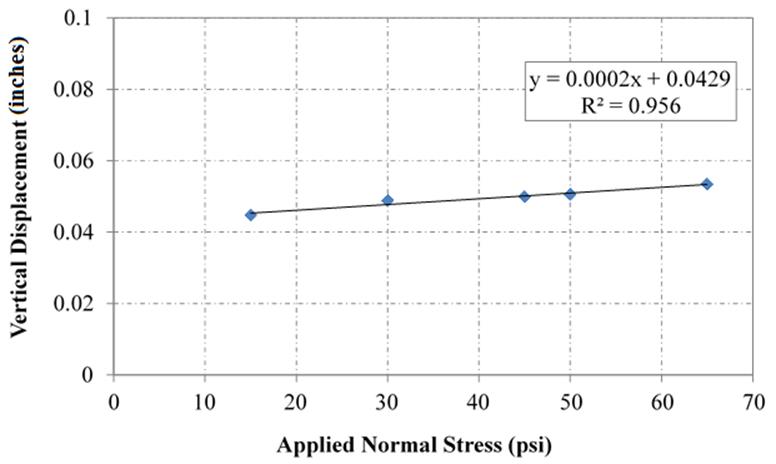
Figure 25. Chart. Vertical displacement calibration for LSDS device
Similarly, the shear resistance of the rollers to movement must be subtracted from the measured shear stress. To do this, dead load was put in the shear box to equal the normal stresses tested in the program (5, 10, 20, and 30 psi), and the average shear stress was computed (table 13).
Table 13 . LSDS resistance calibration values.
Normal Stress (psi) |
Average Shear Stress (psi) |
|---|---|
5 |
0.0307 |
10 |
0.0287 |
20 |
0.0481 |
30 |
0.0303 |
The area correction factor (F) for the applied normal load during testing is found in a different manner from that in equation 11 because the device is square, instead of circular like the SDS tests performed (equation 15).
![]() (15)
(15)
Where:
h = horizontal displacement.
B = Sample side dimension.
The correction factor is then applied to the original sample area (Ao) to determine the corrected area (Ac) (equation 12).
Similar to the verification of the SDS device, tests were performed using the LSDS device on Ottawa sand to demonstrate the repeatability and validity of the device. This material was evaluated at 5 psi; the average secant friction angle across two sets of tests is 30.4 degrees. (Each test was about 1 percent from the average.) The results of the LSDS test are approximately 2 degrees less than the SDS tests at the same applied pressure. These results are consistent with results showing that LSDS devices produce a lower friction angle than SDS devices for the same material.(54)
MC Approach: After taking into account the calibrations and corrections, the results of LSDS testing using the linear MC approach for all of the aggregates are presented in table 14. The cohesion values are omitted because the materials are cohesionless; however, the entire set of results can be found in appendix A and are visualized in figure 26. While there is a large amount of scatter across the entire series of AASHTO OGAs tested, a linear fit can be made to determine a global tangent friction angle: 49 and 48 degrees for dry and saturated conditions, respectively.
Table 14 . LSDS Test results using MC approach.
AASHTO Gradation |
Dry |
Saturated |
|---|---|---|
ϕ't,LSDS,dry (degree) |
ϕ't,LSDS,sat (degree) |
|
No. 5 |
47.6 |
55.3 |
No. 56 |
56.0 |
54.4 |
No. 57 |
48.9 |
52.1 |
No. 6 |
56.4 |
57.5 |
No. 67 |
53.2 |
57.3 |
No. 68 |
47.3 |
48.7 |
No. 7 |
54.0 |
48.9 |
No. 78 |
50.6 |
44.9 |
No. 8A |
52.3 |
46.9 |
No. 8B |
43.4 |
41.6 |
No. 8C |
48.3 |
41.9 |
No. 8D |
37.8 |
37.5 |
No. 8E |
52.2 |
46.8 |
No. 89 |
44.8 |
41.2 |
No. 9 |
50.5 |
42.9 |
No. 10 |
42.9 |
37.1 |
AASHTO = American Association of State Highway and Transportation Officials.
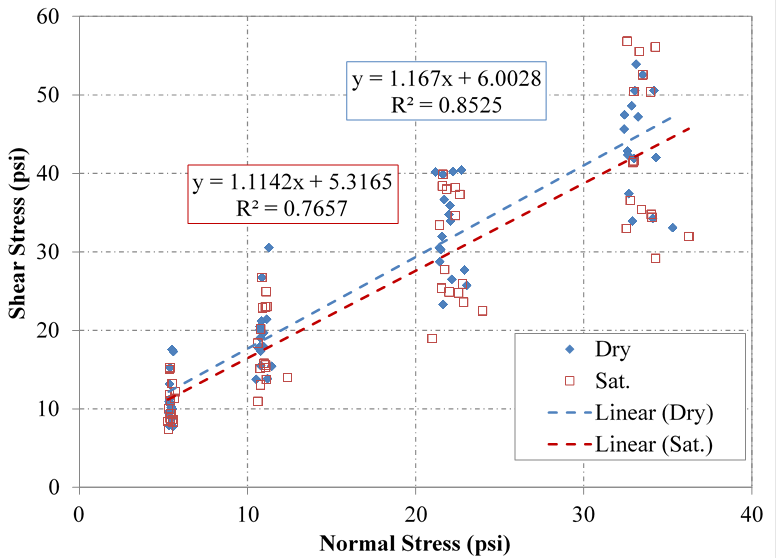
Figure 26. Chart. Global MC envelope for all AASHTO OGAs tested under both dry and saturated conditions
ZDA Approach: Using the ZDA approach, the CV friction angle from LSDS testing was found for each aggregate (table 15).
Table 15 . LSDS test results using ZDA approach.
AASHTO Gradation |
Dry |
Saturated |
|---|---|---|
ϕ'cv,LSDS, dry (degree) |
ϕ'cv,LSDS, sat (degree) |
|
No. 5 |
48.1 |
44.6 |
No. 56 |
50.3 |
52.9 |
No. 57 |
43.2 |
52.9 |
No. 6 |
45.2 |
51.7 |
No. 67 |
49.9 |
53.7 |
No. 68 |
47.0 |
47.9 |
No. 7 |
50.9 |
49.0 |
No. 78 |
49.2 |
45.5 |
No. 8A |
51.8 |
50.3 |
No. 8B |
45.7 |
45.5 |
No. 8C |
46.6 |
45.8 |
No. 8D |
44.4 |
42.1 |
No. 8E |
50.4 |
45.6 |
No. 89 |
45.6 |
45.8 |
No. 9 |
49.8 |
45.5 |
No. 10 |
43.0 |
42.0 |
AASHTO = American Association of State Highway and Transportation Officials.
Comparing the relationship between peak friction angle and maximum dilation angle for all of the aggregates yields a reasonable linear trend for the entire AASHTO OGA dataset evaluated in this study (figure 27). This relationship is better than that found from SDS testing (figure 22) and is considered more accurate because no scalping was necessary.
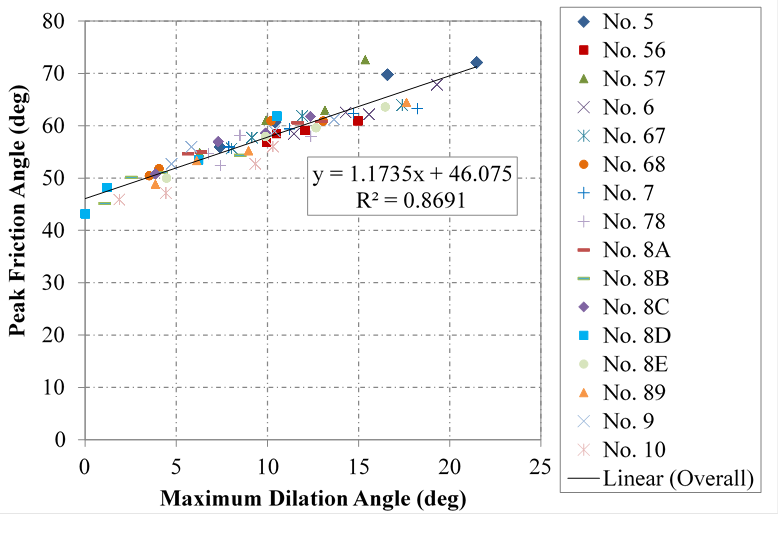
Figure 27. Chart. Relationship between friction and dilation angles in LSDS testing.
Summary: The results from the LSDS testing on the unscalped samples are shown in figure 28 for dry conditions and figure 29 for saturated conditions. The samples all had friction angles higher than 34 degrees. Using the MC approach, friction angles ranged from 37.1 to 57.5 degrees, with a mean across all different sample aggregates of 48.2 degrees, a standard deviation of 5.9 degrees, and a COV of 12.3 percent. The average friction angle under dry and saturated conditions is 49.1 and 47.2 degrees, respectively, so there is little impact resulting from saturation.
Using the ZDA approach, friction angles ranged from 42.0 to 53.7 degrees, with an overall mean of 47.6 degrees, a standard deviation of 3.3 degrees, and a COV of 6.9 percent. Saturation had no impact on the mean overall. It is interesting to note that the secant friction angles (ϕ 's) for the range of confining stresses tested are all higher than the tangent friction angle (ϕ 't).
By comparing the COV for the secant friction angles (ϕ 's) over the range of confining stresses tested with the variation between the average ϕ's and the corresponding ϕ't under dry and saturated conditions, a general linear relationship is observed (figure 39). The scatter in saturated conditions is larger, but the general trend is the same. No relationship was found between ϕ's values and ϕ'cv values; however, using the ZDA approach across all samples tested, the peak friction angle is 46.1 degrees (figure 27).
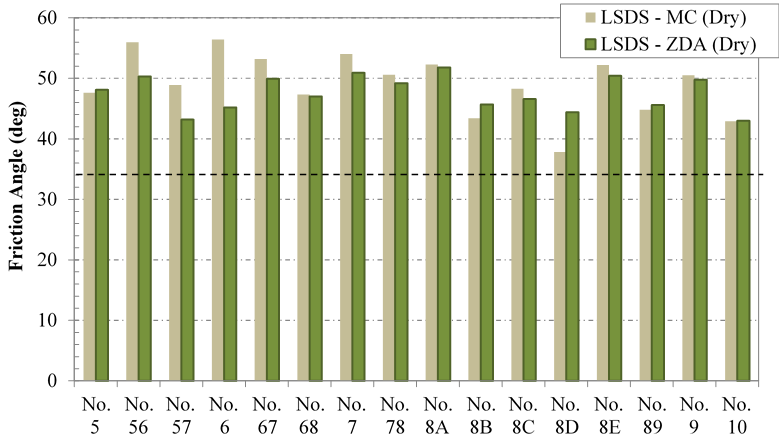
Figure 28. Chart. Summary of LSDS testing under dry conditions
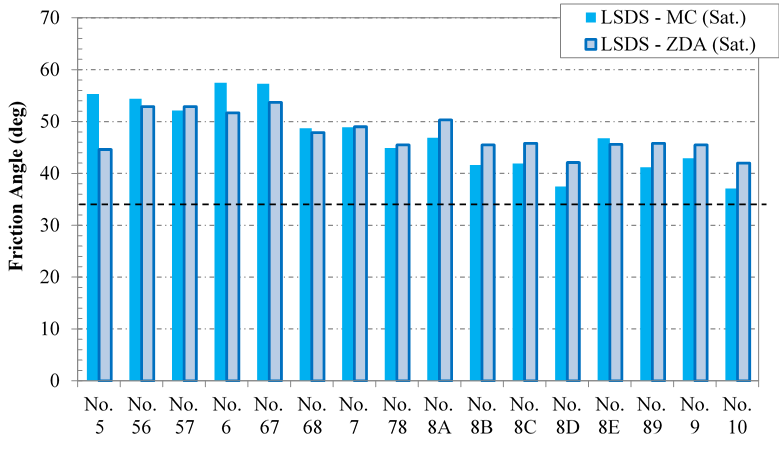
Figure 29. Chart. Summary of LSDS testing under saturated conditions
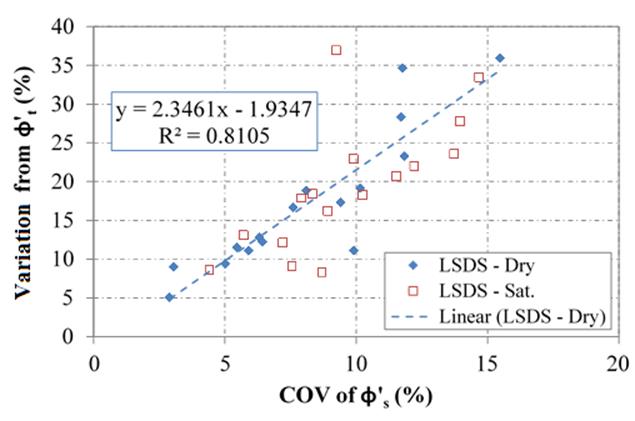
Figure 30. Chart. Comparison of the effective tangent and secant friction angles for LSDS testing
LDTX Tests
At TFHRC, a 6-inch diameter TX unit is available to conduct large-scale consolidated drained/undrained compression testing on aggregates of up to 1-inch maximum particle size. A consolidated drained TX compression test was conducted according to ASTM D7181 to determine the strength of the 12 primary AASHTO aggregates.(800) The same series of aggregates tested in the LSDS device were tested with the LDTX device; however, only No. 8E was examined from the five types of No. 8 aggregates (table 5).
Test Setup: All of the tests were conducted at loose compaction with relative density of 30 percent to simulate the worse-case scenario for strength characterization of granular materials. The dry mass needed for each test to achieve the target value of compaction was determined based on the performed funnel and vibratory table tests according to ASTM D4254 and ASTM D4253, respectively.(68,69) The overall steps starting from sample preparation to the end of the LDTX test are illustrated in figure 31.
Sample preparation for the loose condition consisted of pouring a known mass of OGAs through a funnel into the split mold from nearly zero drop height. The nominal diameter and height of the prepared sample was 6 inches and 12 inches, respectively; the height-to-diameter ratio is 2, as recommended by ASTM.(800) The stability of the samples throughout the sample preparation phase, prior to mounting into the load frame, was maintained by applying partial suction to the specimen through one of the drainage valves located on the base of the pedestal.
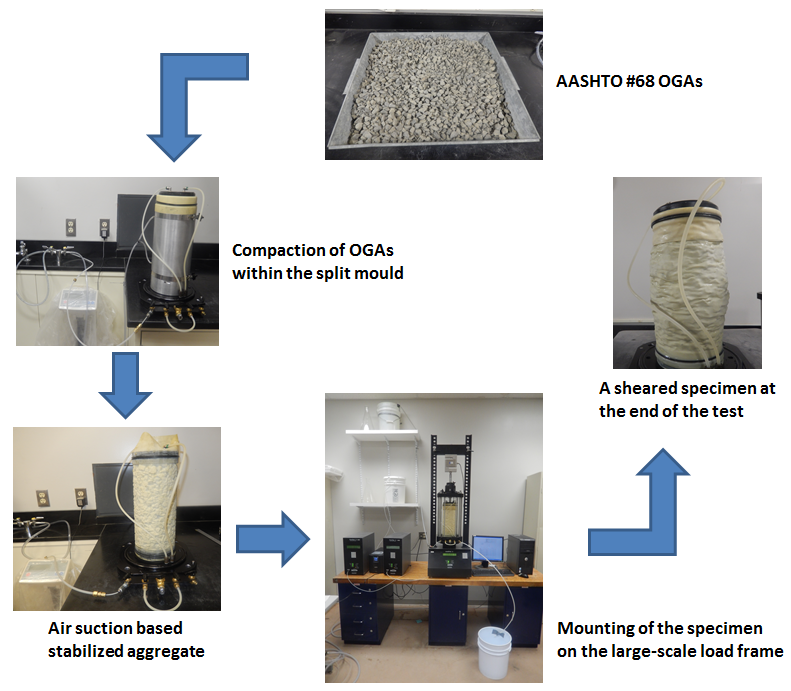
Figure 31. Diagram. Overview of the adopted procedure for LDTX testing
To minimize the risk of membrane puncture during shearing by the coarse aggregates, two 0.025-inch-thick membranes were used; the inner membrane was used as a sacrificial membrane during compaction, and the second membrane was placed once compaction was completed. The stiffness of the individual and double membranes was measured to determine the appropriate membrane correction for the test results. The results yielded a Young's modulus for the double membrane of 11.1 kip/ft2.
The compacted sample housed under the properly tightened chamber was mounted on the load frame, and the test chamber was filled with tap water. The sample was gravity presaturated through the tube connected to the bottom of the drainage valve prior to the initiation of the test. The water was also allowed to run through the drainage lines and the two tubes that connect these lines to remove the trapped air bubbles within the system. These steps helped reduce the back pressure required for saturation, and, as a result, the saturation period decreased. Furthermore, the pumps connected to the cell and the sample have a limited capacity; without the presaturation procedure, the pumps have to be filled multiple times while the test is running, which interrupts the experiment and further increases the duration of the experiment.
The next step was to connect the cell and pore pressure pumps to the base of the TX setup and open a new file for each new test with the right values of dry mass of the aggregates and the diameter and height of the specimen. To achieve the acceptable minimum Skempton's B-value of 0.95 during the saturation phase, a back-pressure saturation in the range of 4.2 to 7.5 kip/ft2 was employed.
Following saturation, the specimen was subjected to isotropic consolidation to the desired effective confining stress (5, 10, 20, or 30 psi) before the onset of the strain-controlled shear stage. The strain rate used for the shear phase was computed based on the estimated time needed to achieve 90 percent of the total consolidation (t90).(800) The shear tests terminated when 15 percent axial strain was reached.
At the end of each test, the provided outputs include: axial (ε1) and volumetric (εV) strain, major (σ'1) and minor (σ'3) effective principal stresses, and pore pressure. The difference between the major and minor principal stresses is termed the deviator stress (σ'd). This parameter is then plotted against the axial strain; an example for the No. 57 aggregate is shown in figure 32 for each of the four effective confining pressures. The deformation behavior is shown in the relationship between volumetric strain and axial strain; an example for the No. 57 aggregate is shown in figure 33.
The secant, or peak, friction angle for each test was computed from the measured σ'1 and σ'3 values corresponding to the maximum σd for each test (equation 6). The maximum dilation angle (ψmax) is computed using equation 16 based on the measured volumetric and axial deformation behavior.(81)
 (16)
(16)
Where:
dε1 = The incremental axial strain.
dε3 = the incremental lateral strain (equation 17).
![]() (17)
(17)
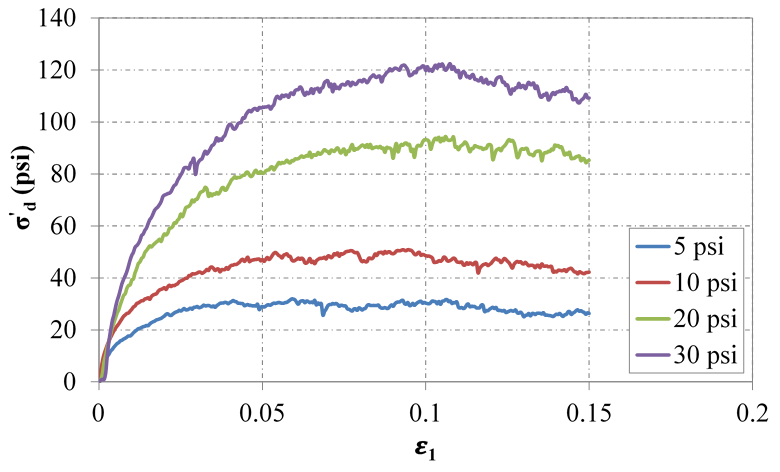
Figure 32. Chart. The effective deviator stress versus axial strain for No. 57 from LDTX testing
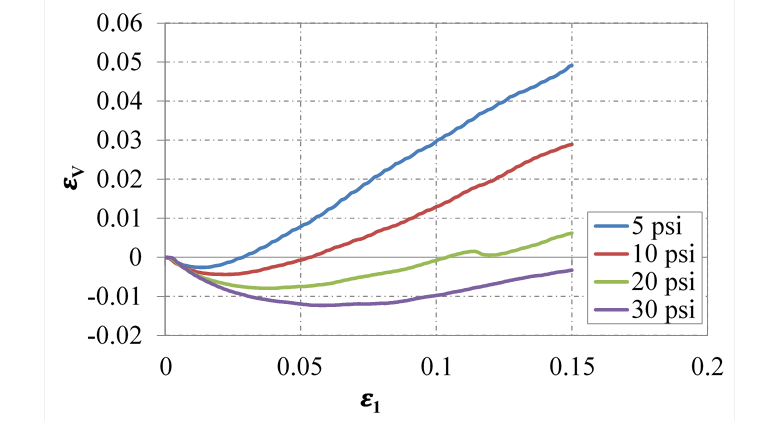
Figure 33. Chart. Volumetric strain versus axial strain for No. 57 from LDTX testing
The reliability and repeatability of the TX apparatus was verified by conducting a drained consolidated test for Ottawa 20/30 sand and a AASHTO No. 68 sample, respectively. The Ottawa sands were subjected to various stress levels, and the resulting secant friction angles and the tangent angle are shown in table 1. The resulting ϕ't is very close to the well-recorded friction angle values of the uniform Ottawa sands. In addition, three replicates of fresh No. 68 OGAs with the same compaction state were subjected to the same stress level (5 psi) to verify the repeatability of the test; the measured peak friction angles has a standard deviation of 0.5, and all values are within less than 1.3 percent of the average (50.5 degrees).
Table 16. LDTX test results for Ottawa sand and AASHTO No. 68.
Sample Type |
Effective Confining Stress (psi) |
ϕ's (degree) |
ϕ't (degree) |
|---|---|---|---|
Ottawa |
5 |
33.7 |
32.7 |
10 |
33.9 |
||
20 |
31.8 |
||
30 |
33.1 |
||
AASHTO #68 |
5 |
49.9 |
- |
5 |
50.7 |
||
5 |
50.9 |
AASHTO = American Association of State Highway and Transportation Officials.
- = Not measured.
Prior to determining the strength parameters, correction procedures were performed on the raw data collected from the LDTX software. The corrections are conducted to minimize the errors that could be incurred because of (1) the changing cross-sectional area during the consolidation and shearing phase, (2) the membrane stiffness, and (3) the considerable change of volume due to membrane penetration during the consolidation phase.
A bulging type area correction (equation 18) method was implemented to determine the corrected cross-sectional area of the specimen as the sample deformed during the shearing process.(82)
 (18)
(18)
Where:
Ac = Corrected area.
Ao = Initial area before correction.
εV = Volumetric strain.
a = Experimental constant normally between 1 and 2.
ε1 = Axial strain.
For the experimental constant, a value of 1.67 was used.(83)
The extra radial stress added to the effective confining stress due to the membrane stiffness was also corrected according to equation 19.(80) The computed value from equation 19 was then subtracted from the measured deviator stress.
 (19)
(19)
Where:
Δ(σ1- σ3) = Change in effective deviator stress due to the membrane correction.
Em = Young's modulus for the membrane material (11.1 kip/ft2).
tm = Thickness of the membrane (0.025 inches).
ε1 = Axial strain.
Dc = The specimen's diameter at the end of the consolidation phase.
The other potential error during the shear test is the significant volume reduction due to membrane penetration, which could be wrongly assumed as sample volume reduction. This phenomenon is more pronounced in samples with coarse grain sizes during the isotropic consolidation stage, especially after the application of high confining pressures. A graphical method proposed by Noor et al. was adopted to correct these potential errors in sample volume changes.(84) The approach assumes that the occurrence of membrane penetration and specimen compression is a consecutive process because the compression is only triggered after the membrane penetration has been fully mobilized. As a result, the initial sharp decrease in volume that is measured could be attributed to the membrane penetration (figure 32).
As demonstrated in figure 34, two straight (dashed) lines are drawn to best fit the initial and tail parts of the consolidation curve (CC).(84) A bisector line originating from the intersection of these lines is then made to connect to the CC; the distance from the intersection to the curve is found (L). A line with an equal distance of L is drawn away from the CC along the bisector line; from there, a perpendicular line is drawn until it intersects the initial part of the CC. This point marks the volume of the membrane reduction, which is deducted from the total reduced volume to determine the correct value of sample volume at the end of the consolidation phase. It is clear from figure 34 that the volume reduction due to membrane penetration increased significantly with the increase in grain size (AASHTO No. 5 > No. 8 > No. 10). Similarly, the correction increases with the increase of effective confining stress, the highest being for 30 psi (figure 35).
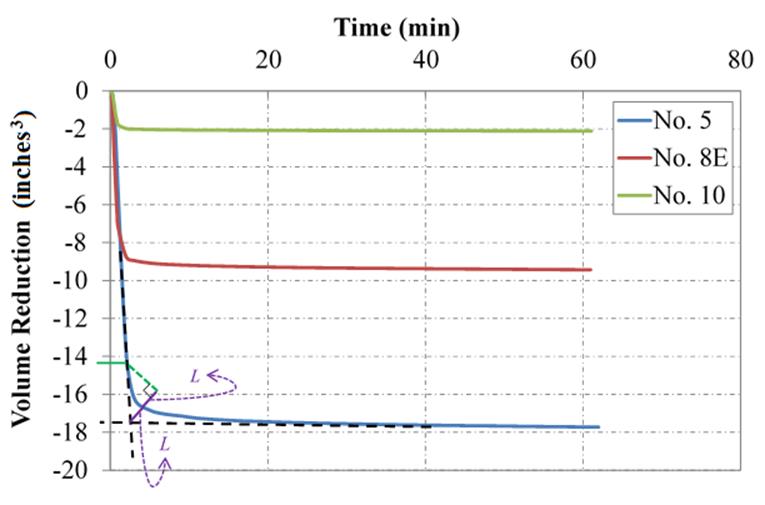
Figure 34. Chart. Graphical method to determine membrane penetration correction and the effect of aggregate size on volume reduction during LDTX testing
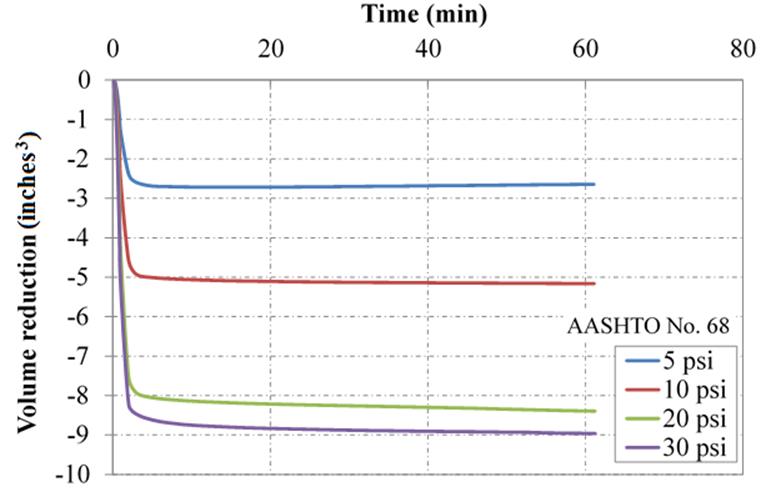
Figure 35. Chart. Effect of confining stress on volume reduction for AASHTO No. 68 sample during LDTX testing
MC Approach: The linear MC approach presented in equation 5 for LDTX testing was used to compute ϕ't for the 12 tested OGAs. The summarized results are displayed in table 17. The full results displaying the individual ϕ's, ψmax, and corresponding shear and normal stresses at failure for each test can be found in appendix A. The individual p' and q stress path values for the entire database tested were plotted together, and a good correlation is found for the entire series of OGAs tested with the LDTX device (figure 36). Using a linear regression, the overall computed friction angle is 39.1 degrees. An apparent cohesion is still observed because of the limitation of the MC approach for OGAs; however, if the linear regression is force-fit to zero, then q would equal about two-thirds p', with the friction angle slightly higher at 41.5 degrees.
Table 17 . LDTX test results using MC approach.
AASHTO Gradation |
ϕ't,LDTX (degree) |
|---|---|
No. 5 |
36.5 |
No. 56 |
39.5 |
No. 57 |
40.5 |
No. 6 |
36.4 |
No. 67 |
39.0 |
No. 68 |
38.1 |
No. 7 |
38.4 |
No. 78 |
34.9 |
No. 8A |
- |
No. 8B |
- |
No. 8C |
- |
No. 8D |
- |
No. 8E |
39.3 |
No. 89 |
38.3 |
No. 9 |
38.4 |
No. 10 |
40.1 |
AASHTO = American Association of State Highway
and Transportation Officials.
- = Not measured.
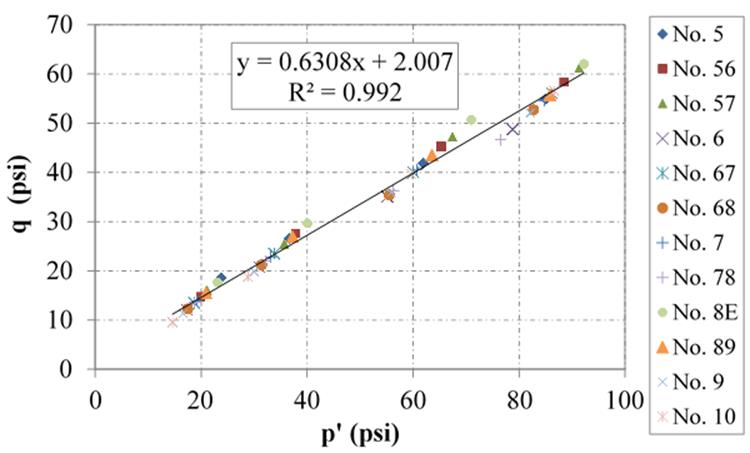
Figure 36. Chart. Relationship between p' and q values in LDTX testing series
ZDA Approach: The constant volume friction angle (ϕ'cv), which corresponds to the friction angle at which the dilation angle is zero, is determined using the ZDA approach. The results for each tested aggregate are presented in table 18. Similar to the LSDS results, the relationship between peak friction angle and maximum dilation angle for all of the aggregates yields a reasonable linear trend for the entire AASHTO OGA dataset evaluated in this study (figure 37). The resulting friction angle is 38.9, which is close to the value computed from the MC approach above.
Table 18 . LDTX test results using ZDA approach.
AASHTO Gradation |
ϕ'cv,LDTX (degree) |
|---|---|
No. 5 |
39.7 |
No. 56 |
39.4 |
No. 57 |
38.4 |
No. 6 |
36.8 |
No. 67 |
36.6 |
No. 68 |
38.7 |
No. 7 |
36.9 |
No. 78 |
38.3 |
No. 8A |
- |
No. 8B |
- |
No. 8C |
- |
No. 8D |
- |
No. 8E |
37.5 |
No. 89 |
40.3 |
No. 9 |
39.4 |
No. 10 |
34.8 |
AASHTO = American Association of State Highway and Transportation Officials.
- = Not measured.
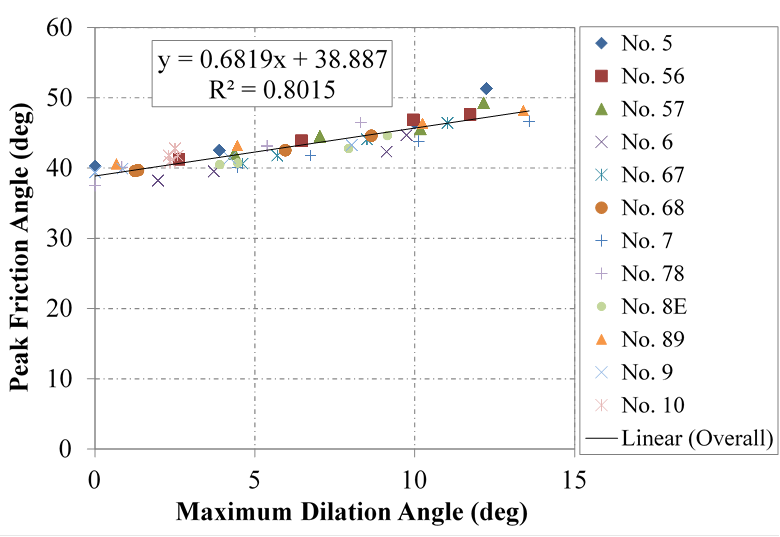
Figure 37. Chart. Relationship between friction and dilation angles in LDTX testing.
Summary: The results for both the tangent and CV friction angles for all conducted LDTX tests were marginally higher than the commonly adopted design value of 34 degrees (figure 38). The average and COV values for ϕ't for the entire series tested are 38.4 degrees and 4.6 percent, respectively; similarly for ϕ'cv, they are 38.1 degrees and 4.2 percent, respectively. It is interesting to note that the secant friction angles (ϕ's) for the range of confining stresses tested are typically higher than the tangent friction angle (ϕ't).
By comparing the COV for the secant friction angles (ϕ's) over the range of confining stresses tested with the variation between the average ϕ's and the corresponding ϕ't, a linear relationship is again observed (figure 39). The highest COV (11 percent) corresponds to the largest sample (i.e., No. 5), while the lowest (2 percent) corresponds to the smallest sample (i.e., No. 10). Despite high values of individual ϕ's for sample No. 5, the ϕ't was the lowest (appendix A). This trend was not observed for the ϕ'cv values using the ZDA approach.
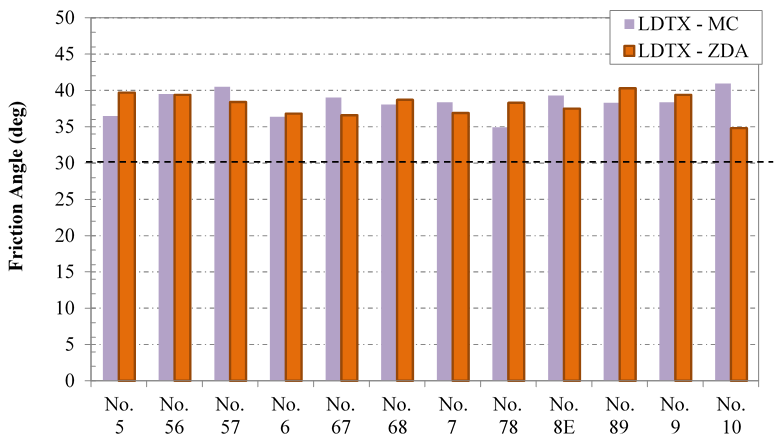
Figure 38. Chart. Summary of LDTX testing
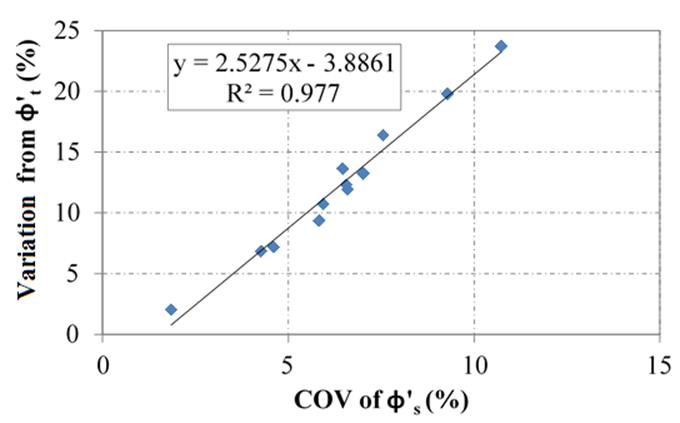
Figure 39. Chart. Comparison of the effective tangent and secant friction angles for LDTX testing