U.S. Department of Transportation
Federal Highway Administration
1200 New Jersey Avenue, SE
Washington, DC 20590
202-366-4000


Skip to content
Facebook iconYouTube iconTwitter iconFlickr iconLinkedInInstagram

Federal Highway Administration Research and Technology
Coordinating, Developing, and Delivering Highway Transportation Innovations

 
REPORT
This report is an archived publication and may contain dated technical, contact, and link information
Back to Publication List        
Publication Number:  FHWA-HRT-17-109    Date:  January 2018
Publication Number: FHWA-HRT-17-109
Date: January 2018


Cable-Stay Strand Residual Strength Related to Security Threats

Effects of Thermal Exposure

Another one of the project objectives was to identify quick methods to evaluate residual strength of strands from various qualification tests of protection measures versus a physical tension test. The two simple methods of evaluation considered for this project were microstructural evaluation and hardness evaluation. Both of these were of great interest for applying to the posttest qualification results of the thermal lance cutting test. This chapter reports on work performed to evaluate the change in microstructure and hardness of a virgin strand subjected to a thermal cycle of various temperatures.

Thermogravimetric Analysis

In the Tension Testing chapter, visual observations were made on the condition of the HDPE and grease of thermal lance strands. These simple visual observations may provide qualitative evidence as to the temperature exposure a strand may have experienced. To refine the temperature estimates, thermogravimetric analysis was performed on the HDPE and grease to understand the temperatures at which each decomposes and combusts. The test works on a small mass of material and monitors the mass loss as the temperature is increased. Tests were performed on each material in two different atmospheres: nitrogen and air. The first atmosphere of pure nitrogen created an inert atmosphere preventing combustion; therefore, the mass-loss profile represents decomposition of the material. The second atmosphere of air allowed combustion. The scenario within the actual bundle is somewhere in between the two atmospheric states depending on how easily air can enter the bundle. Combustion certainly occurs near the thermal lance, but deeper into the bundle where air flow is constrained, there is likely more decomposition in lieu of combustion. Table 11 shows the temperature where the mass-loss rate peaked and the range of temperature when 84 to 16 percent of the mass remained. This range of percent of mass loss was selected because it represents mass loss within 1 standard deviation of the mean for a normal probability distribution, which the data fit. When examining either the peak temperature or the range of temperatures, the mass changes of grease always occurred at lower temperatures than the mass changes in HDPE in both atmospheres. Therefore, due to sublimation, the temperature that a strand experiences likely never exceeds the decomposition/combustion temperature of the grease until all the grease is consumed. If grease remained on the strand, the thermogravimetric analysis data suggest the strand temperature never exceeded 800 °F. If grease was not present, the temperature likely exceeded 850 °F.

Note that the corrosion inhibiting grease and HDPE may have different compositions depending on the manufacturer, and the thermogravimetric results reported might be unique to the batch of strand tested for this project.

Table 11. Temperature of combustion and decomposition of HDPE and grease.
Atmospheric Condition HDPE
Temperature of
Peak Mass Loss
Grease
Temperature of
Peak Mass Loss
HDPE
Temperature Rangea
Grease
Temperature Rangea
Nitrogen (decomposition) 926 °F 622 °F 877–934 °F 515–696 °F
Air (combustion) 779 °F 630 °F 717–840 °F 535–806 °F

aTemperature range is reported as the temperature between which 84 and 16 percent of the mass remains. The cumulative distribution of the mass-loss curves was approximately normal, and therefore this represents the ±1 standard deviation of mass loss.

Microstructure

A length of virgin strand was cut into approximate ¾-inch lengths for characterization of the microstructure after exposure to various temperatures. The short lengths of strand were subjected to temperatures varying between 300 and 1,500 °F in 100 °F increments in a heat treatment oven. Once the oven reached its steady-state temperature, a pair of short strand lengths was placed in it for 30 min. After 30 min, the short strand lengths were taken out and air quenched. After cooling to room temperature, the pairs of strands were mounted in epoxy for grinding, polishing, and etching to reveal microstructure in both longitudinal and transverse cross section (i.e., one ¾-inch piece became the transverse section; the other was taken apart, and each wire was exposed for a longitudinal section). The samples were etched with 2 percent Nital for 5 s to reveal the microstructure. Figure 42 through figure 69 show the longitudinal and transverse microstructures of virgin strand and at 13 different temperatures ranging from 300 to 1,500 °F. All pictures were taken using an inverted microscope at x 1,000 magnification and the same illumination settings.

At temperatures between 300 and 1,000 °F, the microstructure does not change significantly; it is ferrite/pearlite with elongated grains in the longitudinal direction as would be expected for a cold-drawn wire. The light-colored grains are the ferrite, and the darker colored grains are pearlite. At 1,100 °F, it becomes apparent that recrystallization has begun. The pearlite lamellas begin to disassociate into finer globules as the temperature progresses through 1,200 and 1,300 °F. This is most noticeable in the longitudinal sections as the directionality of the original structure begins to fade. By 1,400 °F, the structure becomes spheroidized, and by 1,500 °F, it is clear the entire structure has fully austenitized and recrystallized into a more conventional ferrite/pearlite microstructure.

Lastly, the 30-min soak at elevated temperature with an air quench was explored because this was believed to represent what strands may experience during the thermal lance cutting event. Applying the results to scenarios that may maintain temperature for longer duration or have slower/faster cooling rates requires care (e.g., sustained fire with water quenching from firefighting activities).

A scale bar is provided in the picture showing a dimension of 0.001 inch, and therefore the field of view is approximately 0.005 inch wide and 0.0038 inch tall. The image comprises two types of microstructures: light and dark. Both microstructures are elongated across the width of the image and alternately layered through the height of the image.

Source: FHWA.
Figure 42. Photo. Longitudinal without heating.

A scale bar is provided in the picture showing a dimension of 0.001 inch, and therefore the field of view is approximately 0.005 inch wide and 0.0038 inch tall. The image comprises two types of microstructures: light and dark. Both microstructures appear to be randomly distributed through the image and have grain sizes on the order of 0.0002 inch.

Source: FHWA.
Figure 43. Photo. Transverse without heating.

A scale bar is provided in the picture showing a dimension of 0.001 inch, and therefore the field of view is approximately 0.005 inch wide and 0.0038 inch tall. The image comprises two types of microstructures: light and dark. Both microstructures are elongated across the width of the image and alternately layered through the height of the image.

Source: FHWA.
Figure 44. Photo. Longitudinal after 300 °F.

A scale bar is provided in the picture showing a dimension of 0.001 inch, and therefore the field of view is approximately 0.005 inch wide and 0.0038 inch tall. The image comprises two types of microstructures: light and dark. Both microstructures appear to be randomly distributed through the image and have grain sizes on the order of 0.0002 inch.

Source: FHWA.
Figure 45. Photo. Transverse after 300 °F.

A scale bar is provided in the picture showing a dimension of 0.001 inch, and therefore the field of view is approximately 0.005 inch wide and 0.0038 inch tall. The image comprises two types of microstructures: light and dark. Both microstructures are elongated across the width of the image and alternately layered through the height of the image.

Source: FHWA.
Figure 46. Photo. Longitudinal after 400 °F.

A scale bar is provided in the picture showing a dimension of 0.001 inch, and therefore the field of view is approximately 0.005 inch wide and 0.0038 inch tall. The image comprises two types of microstructures: light and dark. Both microstructures appear to be randomly distributed through the image and have grain sizes on the order of 0.0002 inch.

Source: FHWA.
Figure 47. Photo. Transverse after 400 °F.

A scale bar is provided in the picture showing a dimension of 0.001 inch, and therefore the field of view is approximately 0.005 inch wide and 0.0038 inch tall. The image comprises two types of microstructures: light and dark. Both microstructures are elongated across the width of the image and alternately layered through the height of the image.

Source: FHWA.
Figure 48. Photo. Longitudinal after 500 °F.

A scale bar is provided in the picture showing a dimension of 0.001 inch, and therefore the field of view is approximately 0.005 inch wide and 0.0038 inch tall. The image comprises two types of microstructures: light and dark. Both microstructures appear to be randomly distributed through the image and have grain sizes on the order of 0.0002 inch. The image also contains a random distribution of round inclusions, also around 0.0002 inch.

Source: FHWA.
Figure 49. Photo. Transverse after 500 °F.

A scale bar is provided in the picture showing a dimension of 0.001 inch, and therefore the field of view is approximately 0.005 inch wide and 0.0038 inch tall. The image comprises two types of microstructures: light and dark. Both microstructures are elongated across the width of the image and alternately layered through the height of the image.

Source: FHWA.
Figure 50. Photo. Longitudinal after 600 °F.

A scale bar is provided in the picture showing a dimension of 0.001 inch, and therefore the field of view is approximately 0.005 inch wide and 0.0038 inch tall. The image comprises two types of microstructures: light and dark. Both microstructures appear to be randomly distributed through the image and have grain sizes on the order of 0.0002 inch. The image also contains a random distribution of round inclusions, also around 0.0002 inch.

Source: FHWA.
Figure 51. Photo. Transverse after 600 °F.

A scale bar is provided in the picture showing a dimension of 0.001 inch, and therefore the field of view is approximately 0.005 inch wide and 0.0038 inch tall. The image comprises two types of microstructures: light and dark. Both microstructures are elongated across the width of the image and alternately layered through the height of the image. A larger proportion of the image comprises the darker microstructure.

Source: FHWA.
Figure 52. Photo. Longitudinal after 700 °F.

A scale bar is provided in the picture showing a dimension of 0.001 inch, and therefore the field of view is approximately 0.005 inch wide and 0.0038 inch tall. The image comprises two types of microstructures: light and dark. Both microstructures appear to be randomly distributed through the image and have grain sizes on the order of 0.0002 inch. The image also contains a random distribution of round inclusions, also around 0.0002 inch.

Source: FHWA.
Figure 53. Photo. Transverse after 700 °F.

A scale bar is provided in the picture showing a dimension of 0.001 inch, and therefore the field of view is approximately 0.005 inch wide and 0.0038 inch tall. The image comprises two types of microstructures: light and dark. Both microstructures are elongated across the width of the image and alternately layered through the height of the image.

Source: FHWA.
Figure 54. Photo. Longitudinal after 800 °F.

A scale bar is provided in the picture showing a dimension of 0.001 inch, and therefore the field of view is approximately 0.005 inch wide and 0.0038 inch tall. The image comprises two types of microstructures: light and dark. Both microstructures appear to be randomly distributed through the image and have grain sizes on the order of 0.0002 inch. The image also contains a random distribution of round inclusions, also around 0.0002 inch. The grain boundaries have started to become muted and less defined.

Source: FHWA.
Figure 55. Photo. Transverse after 800 °F.

A scale bar is provided in the picture showing a dimension of 0.001 inch, and therefore the field of view is approximately 0.005 inch wide and 0.0038 inch tall. The image comprises two types of microstructures: light and dark. Both microstructures are elongated across the width of the image and alternately layered through the height of the image.

Source: FHWA.
Figure 56. Photo. Longitudinal after 900 °F.

A scale bar is provided in the picture showing a dimension of 0.001 inch, and therefore the field of view is approximately 0.005 inch wide and 0.0038 inch tall. The image comprises two types of microstructures: light and dark. Both microstructures appear to be randomly distributed through the image and have grain sizes on the order of 0.0002 inch. The image also contains a random distribution of round inclusions, also around 0.0002 inch. The grain boundaries have started to become muted and less defined.

Source: FHWA.
Figure 57. Photo. Transverse after 900 °F.

A scale bar is provided in the picture showing a dimension of 0.001 inch, and therefore the field of view is approximately 0.005 inch wide and 0.0038 inch tall. The image comprises two types of microstructures: light and dark. Both microstructures are elongated across the width of the image and alternately layered through the height of the image.

Source: FHWA.
Figure 58. Photo. Longitudinal after 1,000 °F.

A scale bar is provided in the picture showing a dimension of 0.001 inch, and therefore the field of view is approximately 0.005 inch wide and 0.0038 inch tall. The image comprises two types of microstructures: light and dark. Both microstructures appear to be randomly distributed through the image and have grain sizes on the order of 0.0002 inch. The image also contains a random distribution of round inclusions, also around 0.0002 inch. The grain boundaries have started to become muted and less defined.

Source: FHWA.
Figure 59. Photo. Transverse after 1,000 °F.

A scale bar is provided in the picture showing a dimension of 0.001 inch, and therefore the field of view is approximately 0.005 inch wide and 0.0038 inch tall. The image comprises two types of microstructures: light and dark. Both microstructures are elongated across the width of the image and alternately layered through the height of the image. The boundaries between the individual microstructures are blurred and not well defined.

Source: FHWA.
Figure 60. Photo. Longitudinal after 1,100 °F.

A scale bar is provided in the picture showing a dimension of 0.001 inch, and therefore the field of view is approximately 0.005 inch wide and 0.0038 inch tall. The image comprises two types of microstructures: light and dark. Both microstructures appear to be randomly distributed through the image and have grain sizes on the order of 0.0002 inch. The image also contains a random distribution of round inclusions, also around 0.0002 inch. The grain boundaries have started to become muted and less defined.

Source: FHWA.
Figure 61. Photo. Transverse after 1,100 °F.

A scale bar is provided in the picture showing a dimension of 0.001 inch, and therefore the field of view is approximately 0.005 inch wide and 0.0038 inch tall. The image comprises two types of microstructures: light and dark. The microstructures appear to be evenly distributed, though there are faint signs of directionality from left to right.

Source: FHWA.
Figure 62. Photo. Longitudinal after 1,200 °F.

A scale bar is provided in the picture showing a dimension of 0.001 inch, and therefore the field of view is approximately 0.005 inch wide and 0.0038 inch tall. The image comprises two types of microstructures: light and dark. Both microstructures appear to be randomly distributed through the image and have grain sizes on the order of 0.0002 inch. The grain boundaries have started to become less defined and hard to distinguish at this magnification. The image also contains a random distribution of round inclusions, also around 0.0002 inch.

Source: FHWA.
Figure 63. Photo. Transverse after 1,200 °F.

A scale bar is provided in the picture showing a dimension of 0.001 inch, and therefore the field of view is approximately 0.005 inch wide and 0.0038 inch tall. The image comprises two types of microstructures: light and dark. The microstructures appear to be evenly distributed, and there are no signs of directionality.

Source: FHWA.
Figure 64. Photo. Longitudinal after 1,300 °F.

A scale bar is provided in the picture showing a dimension of 0.001 inch, and therefore the field of view is approximately 0.005 inch wide and 0.0038 inch tall. The image comprises two types of microstructures: light and dark. Both microstructures appear to be randomly distributed through the image, though their sizes are too small to distinguish at this level of magnification. The image also contains a random distribution of round inclusions, also around 0.0002 inch.

Source: FHWA.
Figure 65. Photo. Transverse after 1,300 °F.

A scale bar is provided in the picture showing a dimension of 0.001 inch, and therefore the field of view is approximately 0.005 inch wide and 0.0038 inch tall. The image comprises two types of microstructures: light and dark. The microstructures are randomly oriented fine grains with a size of approximately 0.0001 inch.

Source: FHWA.
Figure 66. Photo. Longitudinal after 1,400 °F.

A scale bar is provided in the picture showing a dimension of 0.001 inch, and therefore the field of view is approximately 0.005 inch wide and 0.0038 inch tall. The image comprises two types of microstructures: light and dark. Both microstructures appear to be randomly distributed through the image, though their sizes are too small to distinguish at this level of magnification. The image also contains a few round inclusions around 0.0002 inch in diameter, though their boundaries have started to blend into the microstructure.

Source: FHWA.
Figure 67. Photo. Transverse after 1,400 °F.

A scale bar is provided in the picture showing a dimension of 0.001 inch, and therefore the field of view is approximately 0.005 inch wide and 0.0038 inch tall. The image comprises two types of microstructures: light and dark. The microstructures are randomly oriented coarse grains with a size of approximately 0.001 inch.

Source: FHWA.
Figure 68. Photo. Longitudinal after 1,500 °F.

A scale bar is provided in the picture showing a dimension of 0.001 inch, and therefore the field of view is approximately 0.005 inch wide and 0.0038 inch tall. The image comprises two types of microstructures: light and dark. The grain sizes of the microstructures are quite large, on the order of 0.001 inch.

Source: FHWA.
Figure 69. Photo. Transverse after 1,500 °F.

Hardness

After the microstructures were evaluated, the 13 samples were repolished, and Vickers microhardness tests were performed on the transverse sections. The hardness testing conformed to ASTM E384 and used a 500-g force.[2](6) Figure 70 shows the pattern of 63 hardness measurements that were made on each cross section. For each wire, a local origin was established at the left edge from which the nine measurements were referenced as shown in the left side of figure 70. Within the wire, nine measurements were taken on a grid with 0.06-inch spacing in the two orthogonal directions as shown in the right portion of figure 70.
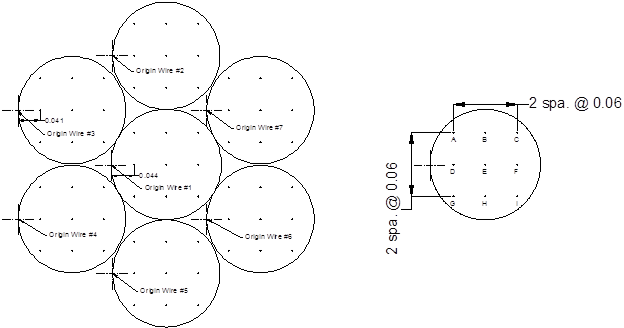
The left side of this schematic shows a cross section of strand and the orientation of six wires wrapped around a central wire. The central wire is referred to as “Origin Wire #1,” the wire above it is labeled “Origin Wire #2,” and the remaining outer wires are numbered sequentially counterclockwise. Each of the wires defines an origin to be at the wire’s outer radius on its left side. Within each of the wires is a three-by-three array of equally spaced dots. For Origin Wire #1, the middle left dot is spaced 0.044 inch from the origin; for the remaining six wires, the middle left dot is spaced 0.041 inch from the origin. The right side of the schematic shows the spacing of the dots in each wire and their identifying letters. The three-by-three array uses a fixed spacing of 0.06 inch in both directions. The upper left dot is A, the upper center is B, the upper right is C, the middle left is D, the middle center is E, the middle right is F, the lower left is G, the lower center is H, and the lower right is I.

Source: FHWA.
Note: Units = inches.
Figure 70. Illustration. Measurement locations for Vickers hardness.

The microstructural evaluation showed that changes in hardness started after approximately 1,000 °F. Thus, hardness test values were recorded first on 1,500 °F specimens and hardness values measured on consecutively lower temperature specimens until they remained constant. The raw data collected from each specimen are in appendix C. No variation in hardness was observed from one wire to the next in each sample, and only the bulk statistical results are discussed. Table 12 shows a summary of the average, standard deviation, and COV for each sample. The data in table 12 are graphed and shown in figure 71 with round data points. Error bars are shown for each data point representing 2 standard deviations to each side of the data point. The average data show the hardness remains constant through 900 °F and then begins to decrease until 1,400 °F. At 1,500 °F, the hardness then increases over the value at 1,400 °F. This same behavior was also reported by Robertson et al., and their data are also shown in figure 71 but plotted against the right-hand vertical axis, as they used a different hardness scale.(7) The Robertson data were attained with a 90-min soak, though replicates were performed at 752 °F at 4- and 8-h soaks. The differences between the data are likely due to a strand lot and the hardness scale selected.

Table 12. Average hardness data for strands exposed to temperature.
Temperature
(°F)
Average Hardness
(HVa)
Standard Deviation
(HVa)
COV
70
506.2
14.8
0.029
300
510.9
20.8
0.041
600
491.4
26.4
0.054
800
484.1
23.4
0.048
900
476.4
12.6
0.026
1,000
449.5
16.3
0.036
1,100
409.5
9.3
0.023
1,200
344.9
7.4
0.021
1,300
296.5
9.5
0.032
1,400
247.7
4.1
0.016
1,500
311.4
10.9
0.035

aHV values based on 500-g force indention load. This is equivalent to 1.102 lb.

This graph has a horizontal axis labeled “Temperature (°F)” ranging from 0 on the left to 1,600 on the right in increments of 200. The vertical axis is labeled “Vickers Microhardness” ranging from 0 at the bottom to 600 at the top in increments of 100. Two datasets are shown in the plot; red circles denote data from “This Study (500-g force),” and orange squares represent data from “Reference 7 (30-g force).” Individual red circles are plotted at temperatures of 70, 300, 600, 800, 900, 1,000, 1,100, 1,200, 1,300, 1,400, and 1,500 °F. The respective hardness values at these temperatures are 506.2, 510.9, 491.4, 484.1, 476.4, 449.5, 409.5, 344.9, 296.5, 247.7, and 311.4. Individual orange squares are plotted at temperatures of 77, 77, 392, 392, 752, 752, 752, 752, 752, 770, 770, 932, 932, 1,292, 1,292, and 1,472 °F. The respective hardness values at these temperatures are 534.4, 521.9, 541.9, 526.0, 515.8, 496.3, 485.7, 480.3, 462.6, 487.5, 475.1, 402.5, 393.6, 298.0, 220.2, and 214.8.

Source: FHWA.
Figure 71. Scatterplot. Variation in hardness with temperature exposure.

The other characteristic found in figure 71 is that hardness measurements are more scattered at lower temperatures but are the tightest between 1,100 and 1,400 °F. The scatter in measurements shows that hardness would only be good to assess if strands were subjected to temperatures between 1,100 and 1,400 °F, since the scatter bands in this range do not overlap with the lower temperatures. This assumption was based on an average of the 63 measurements per strand, and the graph shown in figure 72 shows the difference in scatter bands if only the center measurements in each of the seven wires are considered (shown as blue squares offset 25 °F to contrast with the red circles). This indicates that the number of measurement points could be reduced to just one within each wire, and the peak temperature between 1,100 and 1,400 °F can be uniquely identified.
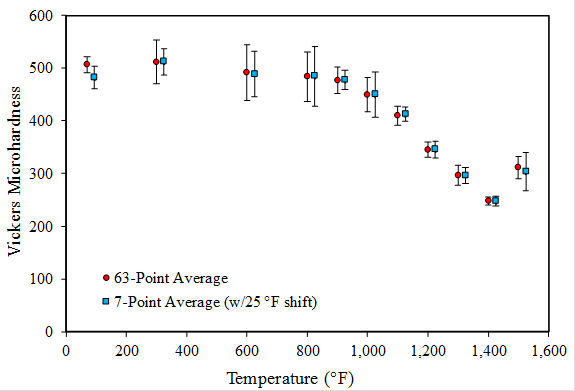
This graph has a horizontal axis labeled “Temperature (°F)” ranging from 0 on the left to 1,600 on the right in increments of 200. The vertical axis is labeled “Vickers Microhardness” ranging from 0 at the bottom to 600 at the top in increments of 100. Two datasets are shown in the plot; red circles denote data considering a “63-Point Average,” and blue squares represent data from a “7-Point Average” with a 25 °F shift. Individual red circles are plotted at temperatures of 70, 300, 600, 800, 900, 1,000, 1,100, 1,200, 1,300, 1,400, and 1,500 °F. The respective hardness values at these temperatures are 506.2, 510.9, 491.4, 484.1, 476.4, 449.5, 409.5, 344.9, 296.5, 247.7, and 311.4. Individual blue squares are plotted at temperatures of 95, 325, 625, 825, 925, 1,025, 1,125, 1,225, 1,325, 1,425, and 1,525 °F. The respective hardness values at these temperatures are 482.3, 512.1, 488.7, 484.5, 477.1, 449.9, 412.3, 345.6, 296.6, 247.9, and 303.6.

Source: FHWA.
Figure 72. Scatterplot. Variation in hardness with temperature and number of measurement points.

Chemical Analysis

The chemical content of steel, in particular the amount of carbon, contributes to the hardenability of the steel. Two strands were randomly selected, and from each, one outer wire and the king wire were sent out for chemical analysis. The results are reported in table 13. There are no chemical requirements for ASTM A416 strands, and this is reported strictly as informational.(2)

Table 13. Chemical composition (percent by weight).
Element Strand A36
King Wire
Strand A36
Outer Wire
Strand B28
King Wire
Strand B28
Outer Wire
C
0.794
0.747
0.760
0.762
Mn
0.900
0.834
0.888
0.827
Si
0.763
0.748
0.738
0.741
P
0.018
0.007
0.018
0.013
S
0.010
0.011
0.006
0.011
Cr
0.117
0.049
0.116
0.067
Ni
0.031
0.038
0.029
0.038
Mo
0.009
0.009
0.007
0.009
Cu
0.067
0.105
0.067
0.108
V
0.047
0.049
0.047
0.049
Al
0.001
0.001
0.001
0.001
Ti
0.003
0.002
0.002
0.002

Correlation to Temperature Exposure and Strength

Some thermal lance specimens had their hardness tested after the tensile test was performed. The focus was on the specimens that were likely subjected to the highest amount of heat (i.e., those shown in figure 31) with attention given to those with the lowest breaking strengths. From each select tensile test strand, an approximate 1.5-inch portion of the strand was cut centered around any fractures in the gauge or centered around visible heat damage (burned HDPE or grease). These isolated strand sections were separated into seven individual wires and mounted transversely in epoxy. The mounts were then ground and polished to a mirror finish, and Vickers microhardness values were measured on each. A picture of each mount is shown in appendix D with the raw hardness data annotated in each picture for each wire. Generally, two hardness measurements were taken along the wire centerline, and three measurements were taken near each fracture.

Using the 63-point average line in figure 72, hardness measurements were used to estimate the temperature to which the individual wires were exposed from select thermal lanced strands. Due to the shape of the correlation in figure 72, no estimate of temperature exposure was made if the hardness exceeded approximately 490 HV. For values exceeding 490 HV, the maximum temperature reached was assumed less than 600 °F. Hardness less than approximately 300 HV would indicate temperature exposure exceeded 1,300 °F, and microstructure evaluations were required to determine if 1,400 °F was reached or exceeded. Using this approach, the data were assembled to create table 14, which reports the estimated temperature for each wire in the strand and the AUTS for the specimen. The AUTS is plotted versus the peak temperature in figure 73.

Table 14. Estimated temperatures based on hardness measurements of select thermal lance strands.
Specimen Wire 1 Wire 2 Wire 3 Wire 4 Wire 5 Wire 6 Wire 7
(King Wire)
AUTS
(kips)
HDPE
Melted?
B12
1,100 °F
1,125 °F
1,075 °F
1,150 °Fa
1,175 °Fa
1,300 °Fa,b
1,075 °F
42.57
Yes
A34
1,050 °F
975 °F
1,000 °F
975 °F
1,475 °Fa,c
1,500 °Fa,c
950 °F
44.28
Yes
A1
1,100 °F
1,075 °F
1,075 °F
1,225 °Fa
1,100 °Fa
1,075 °F
1,075 °F
46.92
Yes
B18
d
d
700 °F
d
1,175 °Fa
1,175 °Fa
d
49.50
Yes
A32
900 °F
d
825 °F
d
1,150 °Fa
1,025 °Fa
d
57.08
Yes
B6
950 °F
d
d
900 °F
d
1,025 °Fa
d
57.37
Yes
A36
1,000 °F
950 °F
850 °F
925 °F
950 °F
900 °F
d
62.27
Yes
B28
875 °F
d
850 °F
850 °F
d
800 °F
d
64.51
Yes
B23
1075 °Fa
1,000 °F
d
700 °F
d
d
59.42
Yes
A30
1,125 °F
1,125 °F
1,175 °Fa
1,200 °Fa
1,100 °F
1,075 °F
1,075 °F
45.79
Yes

—No data to report.

aWire was fractured.

bHardness measurements were less than 300 HV and microstructure was evaluated to be more representative to that in figure 65, therefore temperature was not expected to have exceeded 1,400 °F.

cHardness measurements were less than 300 HV and microstructure was evaluated to be more representative of that in figure 68 than figure 65, so estimated temperature was based on extrapolation of data from figure 72 between 1,400 and 1,500 °F. For Wire 6, extrapolation would predict temperature higher than 1,500 °F, and due to lack of hardness data beyond this temperature, a value of 1,500 °F was assigned.

dEstimated temperature was less than 600 °F.


This graph has a horizontal axis labeled “Estimated Maximum Temperature (°F)” ranging from 0 on the left to 1,600 on the right in increments of 200. The vertical axis is labeled “AUTS (kips)” ranging from 0 at the bottom to 70 at the top in increments of 10. There is a dark gray, horizontal dashed line across the graph at 64.1 kip and annotated as “Virgin strand average AUTS = 64.14 kip.” There are 10 data points shown on the graph. Point A1 is at 1,225 °F and hardness of 46.92. Point A32 is at 1,150 °F and hardness of 57.08. Point A34 is at 1,500 °F and hardness of 44.28. Point A36 is at 1,000 °F and hardness of 62.27. Point B6 is at 1,025 °F and hardness of 57.37. Point B12 is at 1,300 °F and hardness of 42.57. Point B18 is at 1,175 °F and hardness of 49.5. Point B28 is at 875 °F and hardness of 64.51. Point B23 is at 1,075 °F and hardness of 59.42. Point A30 is at 1,200 °F and hardness of 45.79. The 10 points together have a downward trend beginning at the AUTS at about 900 °F to about 40 kip at 1,400 °F.

Source: FHWA.
Figure 73. Scatterplot. Correlation between estimated maximum temperature exposure and breaking load.

Federal Highway Administration | 1200 New Jersey Avenue, SE | Washington, DC 20590 | 202-366-4000
Turner-Fairbank Highway Research Center | 6300 Georgetown Pike | McLean, VA | 22101