This section discusses the enhancements that have occurred in TNM since Version 1.0. It includes changes implemented in Versions 1.0a, 1.0b, 1.1, and 2.0. The structure of this entire section is organized by TNM menu and function item to facilitate referencing within the TNM graphical user interface and this User's Guide Addendum:
Below is a summary table of TNM modifications that have been made since Version 1.0.
When creating a new run in TNM Version 2.0 and Version 1.1, it is important to note that because TNM has been upgraded from a 16-bit Windows application to a 32-bit Windows application, the eight-character run-name restriction no longer exists. Extended run file names may be used for Windows 95 (or later) and NT Version 4.0 (or later).
It is also important to note that any run created using TNM Version 2.0 will not run in 16-bit versions of TNM (i.e., Versions 1.0, 1.0a, and 1.0b). However, runs created in previous versions of TNM will run in Version 2.0.
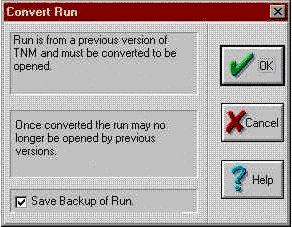
Opening a Version 1.0, 1.0a, or 1.0b TNM run will display the Convert Run dialog (see Figure 2). Once the user selects OK, TNM will automatically convert and open the selected run into a Plan View. Note that if you ever want to use the original unconverted run, you must save a backup of the run before selecting the OK button in the Convert Run dialog. The "Save Backup of Run" checkbox in the dialog allows you to automatically save a copy of your run as "Backup of Run_Name" prior to TNM Version 2.0 conversion.
 Save a backup of your runs: Always save a backup copy of your original TNM run prior to opening it in TNM 2.0. If you do not save a backup copy of the run, then once that run has been converted by TNM 2.0, it cannot be opened in previous versions of TNM (except Version 1.1).
TNM allows you to import a STAMINA 2.0/OPTIMA file. Prior versions of TNM did not correctly import STAMINA shielding factors. This has since been corrected. To import shielding factors into TNM, be sure to select the Import Shielding Factors check box in the Import STAMINA 2.0 Input File dialog window (see Section 4.7.1 in the TNM 1.0 User's Guide for more details).
 Shielding factors and adjustment factors: TNM imports shielding factors from your STAMINA files as adjustment factors (see Section 8.4.4 in the TNM 1.0 User's Guide). Typically, shielding factors in STAMINA files were used to account for things such as building row and tree zone effects. However, in most cases, you should not import them, but rather model building rows and tree zones explicitly in TNM. An exception would be where STAMINA factors were developed from measured data. You may wish to input/edit TNM adjustment factors to account for parallel barrier degradations between receiver-roadway pairs and propagation effects not calculated by TNM - for example, wind effects.
TNM's DXF import functionality was substantially updated to support compatibility with AutoCAD® 2000 objects. The following table shows all the DXF objects available in AutoCAD® 2000 and indicates which items TNM Version 2.0 can and cannot import.
| DXF Item | Import Object for Conversion | Import as Background |
|---|---|---|
| 3DFace | No | Yes |
| 3DSolid | No | No |
| ACAD_Proxy_Entity | No | No |
| Arc* | Yes | Yes |
| Arcaligned text** | No | Yes |
| Attdef | No | No |
| Attrib | No | No |
| Body | No | No |
| Circle* | Yes | Yes |
| Dimension** | Yes | Yes |
| Ellipse | Yes | Yes |
| Hatch | No | No |
| Image | No | No |
| Insert** | Yes | Yes |
| Leader | No | No |
| Line | Yes | Yes |
| LWPolyline | Yes | Yes |
| Mline | No | Yes |
| Mtext** | No | Yes |
| Oleframe | No | No |
| Ole2frame | No | No |
| Point | No | No |
| Polyline*** | Yes | Yes |
| Ray | No | No |
| Region | No | No |
| Rtext | No | No |
| Seqend | Yes | Yes |
| Shape | No | No |
| Solid | No | Yes |
| Spline | Yes | Yes |
| Text | No | No |
| Tolerance | No | No |
| Trace | No | Yes |
| Vertex | No | No |
| Viewport | No | No |
| Wipeout | No | No |
| Xline | No | No |
*Arcs and circles are converted into a series of straight segments.
**When you import a DXF file for conversion into TNM, DXF labels and other text are placed in the DXF Background, which is not normally displayed by default. To view labels/text, you must select Show/Hide in the View menu, then check the "DXF Background" check box in the "Show Objects" column (see also Section 6.2 in the TNM 1.0 User's Guide).
***Polylines are imported if the polyline or any of its vertices are complex, i.e., curve-fit, spline-fit, mesh, or polyface mesh.
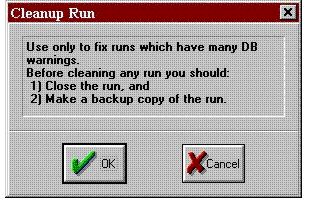
Importing DXF Point Objects: TNM does not import DXF points. As a work-around, the user may connect points with polylines in the CAD program prior to import, then after import, snap-digitize TNM receivers to the DXF points in the polylines.Unconverted DXF Objects:A Cancel option is available so that you may cancel closing the run before unconverted DXF objects are deleted.A number of users had been experiencing "DB error" messages during computations. These DB (data base) errors were being caused by TNM's internal, third-party data base software. Sometimes, simply acknowledging OK at the prompt when TNM encountered these errors would allow the model to continue computations uninterrupted. However, occasionally, the errors were too numerous for TNM to continue. As a result, a function has been implemented for the more severe cases. This function is the menu item called, Cleanup Run, in the File menu.
To use Cleanup Run, select Cleanup Run in the File menu (see Figure 3).
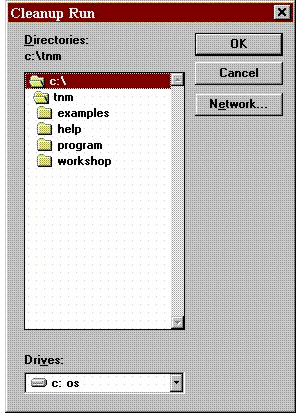
Figure 3. Cleanup Run menu item
TNM will remind you to close your run and make a backup copy of it (see Figure 4).
TNM will then display a Cleanup Run dialog which allows you to select the run (subdirectory) with the DB errors to "clean" (see Figure 5).
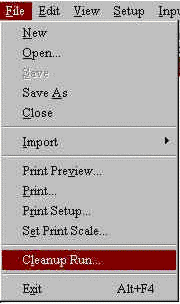
Figure 5. Cleanup Run "select run" dialog
As mentioned in the TNM 1.0 User's Guide, the Move capability is not a menu option; it is only available in the Plan View using the Ctrl key and a mouse. This selection is used to graphically relocate a selected object, or portions of an object, to a new location, i.e., change the XY coordinates. TNM has the added ability for the user to also use the Snap tool in conjunction with Move. This aids the user in moving objects or points of objects and "snapping" them to other objects, e.g., placing a barrier on structure or a wall on top of a berm for a combination barrier.
For all graphical views, any of TNM's input objects, as well as the aspects of those objects (e.g., point name and number), may be selected to be shown or hidden. This option is helpful in keeping complex cases from appearing cluttered and difficult to read. If point name/number text is not displayed after Show/Hide check boxes have been "checked," the TNM 1.0 User's Guide advises the user to first check their computer "TGLINK" settings. This was usually sufficient for most users - however, for some Windows NT Version 4.0 users, the following may also need to be checked:
General Input includes user preferences that affect TNM calculations. Most changes to TNM input will invalidate computed sound level results. TNM has been updated such that changes to the default ground type will invalidate results. Use File, Save As to rename a run prior to making any changes, if you want to keep the original run with its already computed sound level results.
Invalidating TNM results:If you inadvertently changed the default ground type, thus invalidating previously computed results, you may close the run without saving changes. You may then reopen your run with your previously computed results restored.Input data changes: For all input dialogs, changes to data in a dialog's spreadsheet area are reflected in RED until the user selects the Apply button to apply the changes.In the computation of the community noise equivalent level (Lden), a 5 dB penalty is added to evening operations, which equates to a 3.16 weighting factor. For consistency with state law in California, the primary user of the Lden metric, the weighting factor has been changed to 3.00. For information on how to select Lden as your desired traffic entry type, refer to Section 7.2 in the TNM 1.0 User's Guide. For information on how to enter Lden traffic for roadways, refer to Section 8.3.4 in the TNM 1.0 User's Guide.
The receiver input dialog has been changed such that information for all receivers are displayed on a single spreadsheet page (see Figures 6 through 9) rather than displaying information for a single receiver (i.e., one receiver at a time). This change allows for more efficient editing of receiver input information.
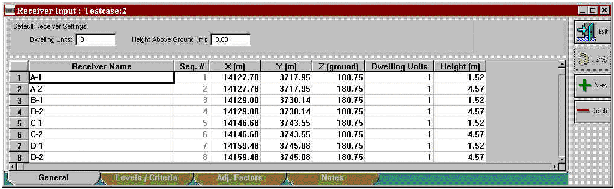
Figure 6. Changes to Receiver Input dialog: General tab
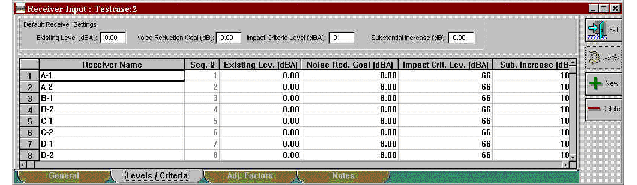
Figure 7. Changes to Receiver input dialog: Levels/Criteria tab
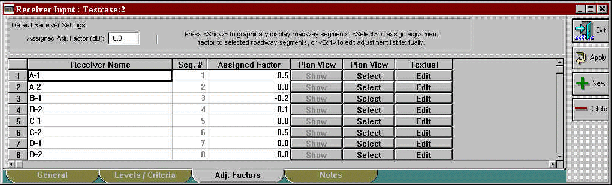
Figure 8. Changes to Receiver Input dialog: Adjustment Factors tab
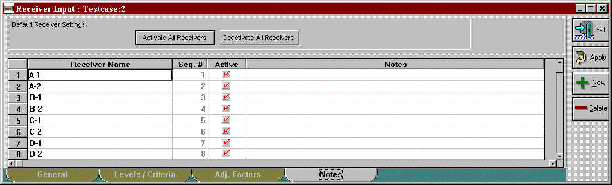
Figure 9. Changes to Receiver Input dialog: Notes tab
In the Notes tab shown in Figure 9 - users are able to "activate" or "deactivate" specific receivers for calculations by checking/unchecking boxes in the Active column. Two buttons are also available in the header area to activate and deactivate receivers. All receivers are active by default. Users can use this feature to:
Receiver active/inactive status is displayed in the receiver input table (see Figure 10) and is reflected in the sound level results tables, as well (see Figure 11).*

Figure 10. Changes to receiver input table
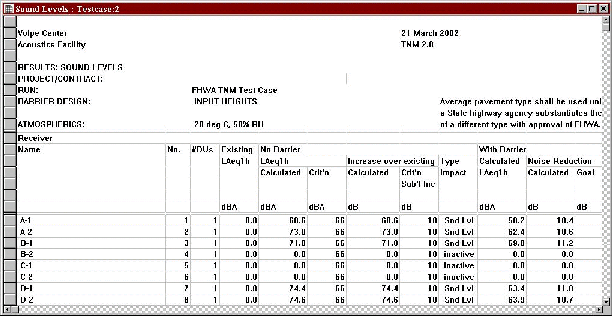
Figure 11. Changes to sound level results table
* Note: Results for a "deactivated" receiver will not be available in the sound level results table when a run is calculated with only the active receivers (see Section 2.6.2).
TNM has been updated such that changes to contour zone input do not invalidate computed sound level results.
Receiver adjustment factors are sound level adjustments in dB that are algebraically added to, not subtracted from, the sound levels calculated by TNM. TNM has been updated such that negative adjustment factors are allowed for input. See Section 8.4.4 in the TNM 1.0 User's Guide for more information.
 See Appendix A in the TNM 1.0 User's Guide for FHWA policy related to adjustment factors.
The following input checks have been implemented:
Users who would like to use the User-Defined Vehicles feature should contact TNM Technical Support (support@trafficnoisemodel.org) for additional guidance.
Error catching mechanisms have been implemented in TNM to eliminate any fatal crashes. As such, when TNM encounters a receiver error during computations, the program skips the problematic receiver and continues computations with the next receiver. At the end of computations, TNM will inform the user of receivers that were invalidated either via a pop-up dialog (see Figure 12) when computing a single run or in the error report generated when computing multiple runs (see Section 2.6.2). Any skipped receiver will be identified in TNM output tables as "invalid."

Figure 12. Invalidated receivers due to floating point errors
Runs with errors:Any runs with receivers invalidated should be sent to the Volpe Center Acoustics Facility for further testing and diagnosis. A run consists of an OBJECTS.DAT and an OBJECTS.IDX file. Also provide an indication of which receiver the error occurred on and a detailed description of the error message.When the user selects Calculate, two menu options are available (see Figure 13): calculate the sound levels for the Current Run; or calculate the sound levels in batch-mode for Multiple Runs.
When calculating multiple runs, you must first close all open runs or else TNM will display a warning.In the Calculation Manager dialog (see Figure 14), the Run Name area displays the list of selected runs. Runs are displayed with their full path name. The list will be automatically scrolled during the batch-mode calculations to ensure that the current run is visible in the list.
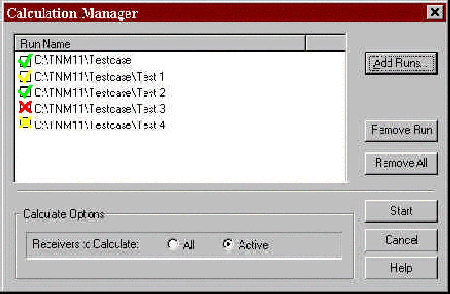
Figure 14. Calculation Manager dialog
Buttons are provided on the right side of the Calculation Manager dialog for the following functions:
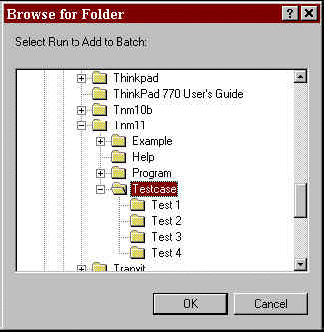
Figure 15. Browse for Folder dialog
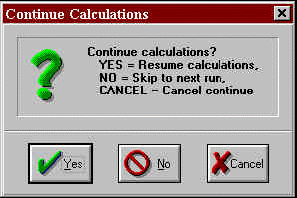
Figure 16. Continuing calculations after cancelling
A column of icons will be displayed to the left of the list of runs to indicate the status of each run as follows:
 |
Run not yet calculated; Computations in progress; Computations finished; Computations finished, but some receivers were invalidated (see Section 2.6.1); Computations cancelled; and Computations failed, errors were detected during input check that need fixing (see Appendix C of the TNM 1.0 User's Guide). |
The status is also reported in an Output Report window which is generated during multiple-run calculations (see Figure 17). The window displays information from each run as the batch progresses, including the status of the run currently being calculated, the status of runs completed, and each run's total run-time. This report will also indicate if TNM encountered an error during computations, and, if so, how many receivers were invalidated for a particular run (see Section 2.6.1). TNM saves a copy of this report in a file called, batchCalc.out, and places it in your TNM Program subdirectory. This file is over-written each time batch-mode calculations are performed.
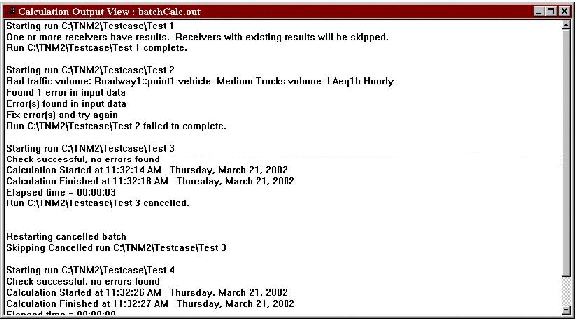
Figure 17. Multiple run (batch-mode) capability: output report
NMPlot Version 3.06 has been incorporated into TNM. The previous version of NMPlot was having difficulties running on computers with CPUs faster than 200 MHz giving some users a runtime error message.
Development is underway to incorporate the Windows version of NMPlot (Version 4.7) into TNM. In the interim, for users who would like to use some of the additional features that can be found in the Windows Version of NMPlot, it is available on the NMPlot website. To use Version 4.7, download and run install_nmplot.exe. Once TNM has computed the grid file (*.grd), it may be read by Version 4.7 and used to compute contours external to TNM.
"NMPlot Out of Memory" Error: If your computer displays an "Out of Memory" error while running NMPlot, modify your computer's memory allocation for MS-DOS applications as follows: open an MS-DOS window; select the MS-DOS window's upper-left icon; select Properties in the resultant pull-down menu; select the Memory tab; then increase the values shown. You may need to refer to your system administrator for additional assistance."Run-time 216" Error:If your TNM run is uses very large coordinates (e.g., greater than 1,000,000.00, NMPlot may display this error. Scaled all the coordinates down and the contours should be able to compute."Noisemap Grid File Could Not Be Opened" Error:NMPlot is a DOS application with an 8 character filename/directory limit. If your TNM run is greater than 8-characters or is embedded within many subdirectories or has long subdirectory names, then NMPlot may display this error. Reduce the number of characters in your run name or move your run to the root directory to run contours. In the right header area, TNM displays the current date and the version of TNM that is being used. An additional line of text has been added to let the user know which version of TNM was used to calculate the results being displayed (see Figure 18).
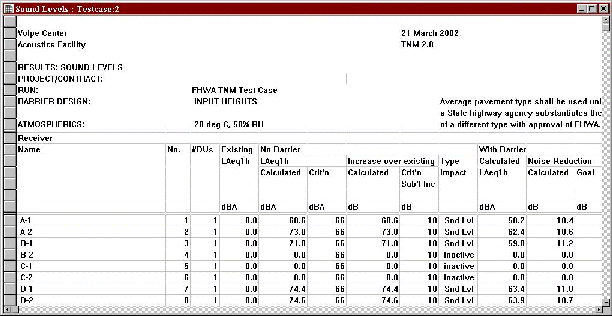
Figure 18. Version identification in all results tables
A new menu item in the Tables menu, Print Tables, has been implemented to allow the user to print all TNM tables at once (see Figures 19 and 20). When the user selects this menu item, TNM displays a Print Tables dialog that lists all TNM tables (labeling each as an Input or Results table). The user can individually select tables by highlighting/clicking on the them in the list.
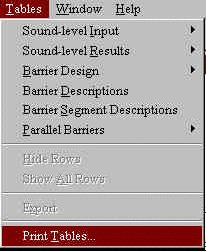
Figure 19. Print Tables menu item
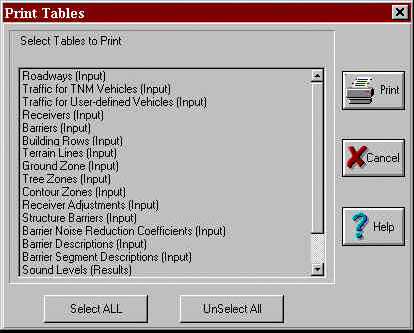
Figure 20. Print Tables dialog
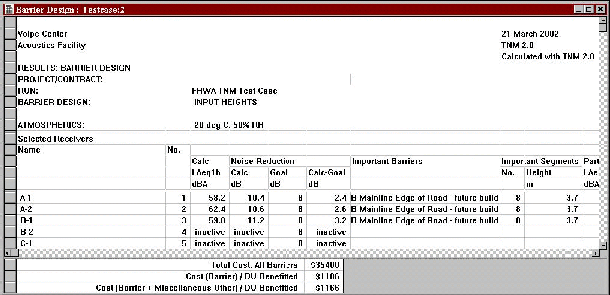
A new table has been designed and incorporated into TNM. The Barrier Design Table was developed to aid the user during the barrier analysis and design process by placing the most frequently referred to information from various tables into one comprehensive table. The Barrier Design Table combines select information from the following tables:
The table is available in two forms and can be selected using the Tables menu (see Figure 21).
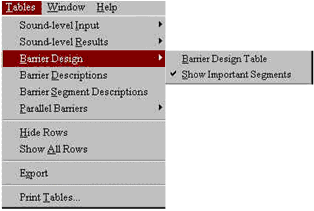
Figure 21. Barrier Design Table menu item
Two submenu options are listed: Barrier Design Table and Show Important Segments. Note that the Show Important Segments option is greyed-out until the user first opens a barrier design table. When the user opens a barrier design table, the table is displayed with the selected barrier analysis receivers and their associated data on sound levels, noise reduction, important barriers and barrier segments, and partial sound levels (see Figure 22).
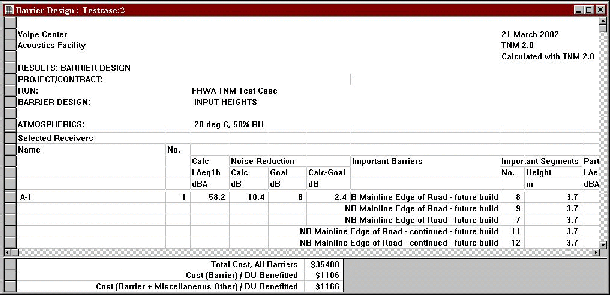
Figure 22. Barrier design table: expanded display
The user may then select the Show Important Segments option, which "unchecks" the option in the menu and toggles the table to a more condensed form, hiding the important barrier segment rows and their associated partial sound levels (see Figure 23).