U.S. Department of Transportation
Federal Highway Administration
1200 New Jersey Avenue, SE
Washington, DC 20590
202-366-4000
Federal Highway Administration Research and Technology
Coordinating, Developing, and Delivering Highway Transportation Innovations
 |
| This report is an archived publication and may contain dated technical, contact, and link information |
|
Publication Number: FHWA-RD-99-059 Date: FEBRUARY 1999 |
PaveSpec is written for IBM-compatible computers running the Windows 95 operating system. It will not run on earlier versions of Windows (including Windows 3.1) or DOS. To run PaveSpec, a computer must have the minimum system specifications:
The performance of the software will be greatly enhanced if the system has a 150-MHz Pentium processor or higher and 16 Mb or more of RAM.
For the best performance, it is recommended that PaveSpec be installed on (and run from) your computer's hard drive. Although the easiest way to install PaveSpec is from the CD-ROM, the PaveSpec executable file may also be manually copied to a hard drive or run directly from a floppy disk. The details of each method are described in the following sections.
Installing PaveSpec From the CD-ROM
Manually Installing PaveSpec to a Hard Drive From a Floppy Disk
If you wish to manually copy PaveSpec to your computer’s hard drive, it is recommended that you create a directory that will house the PaveSpec program file and any database files that you may create.
Running PaveSpec From a Floppy Disk
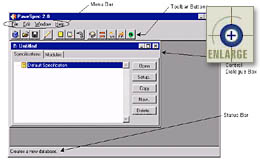
The primary elements of the PaveSpec main window are identified in figure 1. When you first open the program, a new default database appears in the PaveSpec main window.
 |
Figure
1. PaveSpec main window. |
The menu bar includes four items: File, Edit, Window, and Help. To display the available PaveSpec commands under a specific menu heading, click on the heading of your choice. You can then click on any of the commands shown in the drop-down box.
File Menu
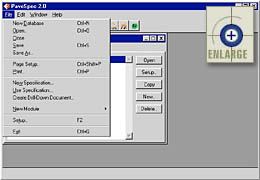
The file menu, shown in figure 2, contains 13 commands, each of which is described briefly in this section.
 |
Figure 2. PaveSpec file menu. |
New Database—Opens a new PaveSpec database.
Open—Opens a previously saved PaveSpec database.
Close—Closes the active PaveSpec database.
Save—Saves the active PaveSpec database. If the active database has been named and saved previously, the database will be saved under the previously defined file name. If the file has not been named and saved previously, the program will prompt the user to enter a file name and storage location.
Save As—Allows the user to save the active database under a new name or in a new location.
Page Setup—Allows the user to specify page formatting for printing (e.g., paper size, page orientation, and margins).
Print—Takes the user to the Print dialogue box in preparation for printing the selected PaveSpec item.
New Specification—Creates a new specification within the active database.
Use Specification—Allows the user to enter actual AQC field data into a previously defined specification and determine corresponding PRS-based lot pay factors and pay adjustments. More details on using a specification are contained in chapter 4 of this appendix, Using a Specification.
Create Drill-Down Document—Allows the user to investigate the simulation details of of a previously developed specification. More details on creating and using drill-down documents are contained in chapter 5, Drill-Down Documents.
New Module—Creates a new module. A secondary menu will appear showing the five different available types of modules: Pavement Design, Design Traffic, Climatic Variables, Maintenance and Rehabilitation Plan, and Unit Costs.
Setup—Allows the user to set up (define or edit) the specification currently selected in the Database Control dialogue box. Specification definition or editing is accomplished using the Specification Wizard (see chapter 3, The Specification Wizard).
Exit—Exits the PaveSpec program.
Edit Menu
The edit menu contains the following two commands:
Copy Selected Page—Copies a selected output report page to the clipboard.
Preferences—Opens a pop-up dialogue box that allows the user to: (1) specify the preferred units (English or metric) used throughout the program, and (2) set the simulation engine (random-number generator) seeds. In setting the simulation engine seeds, the user has the following two options:
- Use same initial seed for all simulations. This selection makes it so that the simulations are not random from one specification simulation to the next (the initial simulation seed is always set equal to zero). Each time the user simulates a new specification, the same set of random numbers between 0 and 1 are used to determine AQC sample values.
- Randomize initial seed for all simulations. This selection makes it so that the simulations are completely random from one specification simulation to the next. Each time the user simulates a new specification, a different set of random numbers between 0 and 1 are used to determine AQC sample values. This is the recommended option.
Window and Help Menus
These menus contain commands that are common to most, if not all, Microsoft Windows programs. See Windows 95 Help for further information.
The PaveSpec toolbar buttons provide quick access to many common PaveSpec commands. To activate a toolbar button, simply click on it.
| Creates a new database. | |
| Opens an existing database. | |
| Saves the current database. | |
| Allows the user to change the setup of the document currently highlighted in the Database Control dialogue box. This function works on all document types (i.e., specifications, modules, and specification-dependent documents). | |
| Creates a new specification document in the current database. | |
| Creates a new use specification document in the current database. | |
| Creates a new drill-down document in the current database. | |
| Creates a new pavement design module in the current database. | |
| Creates a new design traffic module in the current database. | |
| Creates a new climatic variables module in the current database. | |
| Creates a new maintenance and rehabilitation plan module in the current database. | |
| Creates a new unit costs module in the current database. |
The Database Control dialogue box is used to organize all of the documents in a given database. The Database Control window is divided into two tabbed sections: Specifications and Modules. To move from one tab to the other, click on the tab names.
Specifications Tab
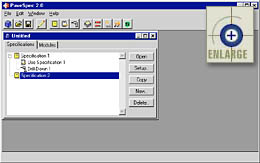
All of the developed specifications and specification-dependent documents within the open database are displayed in the Specifications tab, as shown in figure 3. Within the Specifications tab, each specification-dependent document is attached to its parent specification using a visual outline. The visual outline may be expanded or compressed by clicking on the boxes that contain plus (+) or minus (–) signs. The example in figure 3 shows a database containing two different developed specifications, Specification 1 and Specification 2, with two specification-dependent documents attached to Specification 1.
 |
Figure 3. Database Control dialogue box—Specifications tab. |
The buttons within the Specifications tab perform the following functions:
| Allows the user to view the output report accompanying the highlighted Specification, Use Specification, or Drill-Down document. | |
| Allows the user to edit the highlighted document. | |
| Makes a copy of the highlighted document. | |
| Allows the user to create a new document of the same type as the highlighted document. | |
| Deletes the highlighted document. |
Note:
A ![]() symbol next to a developed
specification indicates that the specification needs to be resimulated
to reflect one or more changes to variables (or modules) affecting the
preconstruction output. To update the specification, simply resimulate
using the specification wizard.
symbol next to a developed
specification indicates that the specification needs to be resimulated
to reflect one or more changes to variables (or modules) affecting the
preconstruction output. To update the specification, simply resimulate
using the specification wizard.
A
![]() symbol will also appear next to
any existing specification-dependent document when its parent specification
has been resimulated. This symbol, therefore, indicates that the
specification-dependent document is out of date with the current state
of the parent specification. A specification-dependent document
may be updated by redefining the document's details in setup mode.
symbol will also appear next to
any existing specification-dependent document when its parent specification
has been resimulated. This symbol, therefore, indicates that the
specification-dependent document is out of date with the current state
of the parent specification. A specification-dependent document
may be updated by redefining the document's details in setup mode.
Modules Tab
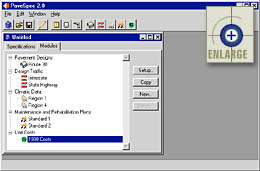
All of the user-defined module documents within the open database are stored in the Modules tab. This tab also makes use of a visual outline to organize the five different types of module documents. An example of the Modules tab is presented in figure 4. The buttons on this tab basically perform the same functions as the buttons in the Specifications tab. The only difference is that there is no Open button, as there are no output reports accompanying a Module document.
 |
Figure 4.
Database Control dialogue box—Modules tab. |
The PaveSpec status bar provides information describing a highlighted menu item or toolbar button. To obtain feedback via the status bar, move the pointer over the menu item or toolbar button of interest. Text describing the item will appear in the status bar.