U.S. Department of Transportation
Federal Highway Administration
1200 New Jersey Avenue, SE
Washington, DC 20590
202-366-4000
Federal Highway Administration Research and Technology
Coordinating, Developing, and Delivering Highway Transportation Innovations
| REPORT |
| This report is an archived publication and may contain dated technical, contact, and link information |
|
| Publication Number: FHWA-HRT-14-093 Date: December 2014 |
Publication Number: FHWA-HRT-14-093 Date: December 2014 |
A total of four labs took part in this study: a Federal research lab, an academic research lab, and two commercial labs. The two commercial labs were the only two labs known in the country at the time of this study that perform commercial RCSC slip testing services. One of the four labs only participated in half the study due to contracting difficulties. The ASTM E691-13 specification offers a guide for framing an interlaboratory variability study, including the suggestion that at least eight laboratories be engaged.(3) The scope of this project and the fact that a limited pool of laboratories in the United States are capable of running this test resulted in a smaller sample of participating laboratories.
Five coatings were evaluated. All were organic zinc-rich primers that represent materials widely used in and marketed to the bridge industry. Each coating was tested at two different thicknesses (+1 and +2 mil) over the manufactures’ recommended dry film thickness (DFT). The RCSC procedure requires testing at +2 mil to ensure that a casual buildup of the coating due to overspray and other causes does not jeopardize the coating’s performance. The +1-mil thickness specimens were tested to understand if the extra coating thickness may be a cause of the organic zinc-rich primers not passing class B slip resistance. To maintain an objective view of the test procedure, anonymity of the labs and coatings will be preserved throughout the remainder of this report and only referred to generically.
Each test is referred to by an alpha-numeric code in the form of "XY-Z" where "X" refers the letter of the coating, and "Y" is either "1" or "2" depending on the coating thickness over the recommended DFT. "Z" is a number ranging from 1 to 5 to designate the specimen number as the test protocol requires testing five replicate specimens. Therefore, specimen B2-4 refers to the fourth specimen of the series from coating B with a +2-mil thickness. Table 1 outlines the matrix of test series along with the participating labs as well as the date of slip testing.
Table 1 . Test matrix of coatings and labs.
Series |
Labs Participating |
Date Tested |
|---|---|---|
D1 |
1-3 |
11/15/2013 |
D2 |
1-3 |
12/13/2013 |
A1 |
1-3 |
1/10/2014 |
B2 |
1-3 |
1/24/2014 |
B1 |
1-3 |
2/7/2014 |
E1 |
1-4 |
2/21/2014 |
E2 |
1-4 |
3/7/2014 |
C1 |
1-4 |
3/21/2014 |
C2 |
1-4 |
4/4/2014 |
A2 |
1-4 |
4/18/2014 |
The RCSC test procedure dictates the specimen size and means of testing. Each sample is comprised of three identical plates. The test plate dimensions are shown in figure 1. The 4- by 4- by 5/8-inch test plate contains a 1-inch-diameter hole centered 1.5 inches from one edge. The 1-inch hole in the test plate is required to ensure that the specimens have sufficient room for slippage to occur. Thermally cut edges are not permitted but suggest that plates could be milled, as rolled, or saw cut. Plates should have yield strength between 36 and 50 ksi.
The three plates are stacked together, and the middle plate is rotated 180 degrees from the outer two. This is shown in figure 2 along with a generic representation of the loading system. A rod passes through the three test plates and is tensioned via an external hydraulic jack that clamps the three plates together. The clamping load is imparted on the plates through ASTM A563 nuts and ASTM F436 washers so the test accurately represents the loading conditions of a tensioned high-strength bolt.(4,5) The stack of three plates is then placed between a compression testing apparatus with fixed and spherical loading platens.
A clamping force of 49 ±0.5 kip tolerance is mandated by the RCSC protocol to start the test. Then a 1-kip vertical load is applied to the specimen, and the slip monitoring sensors are zeroed out. The test is completed by continuing to apply a vertical load until a slip displacement of 0.05 inch is achieved. The vertical loading rate should not exceed 0.003 inch per minute nor 25 kip per minute. Failure is defined as the peak load or the load at a slip of 0.02 inch, whichever comes first. The slip coefficient for each specimen is defined as the failure load divided by two times the clamping load. Five tests (replicates) are run, and the average slip value from all the tests is used for categorizing the coating as class A or B.
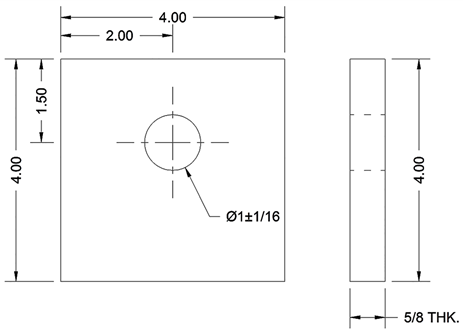
Note: Units are shown in inches.
Figure 1. Illustration. Test plate.
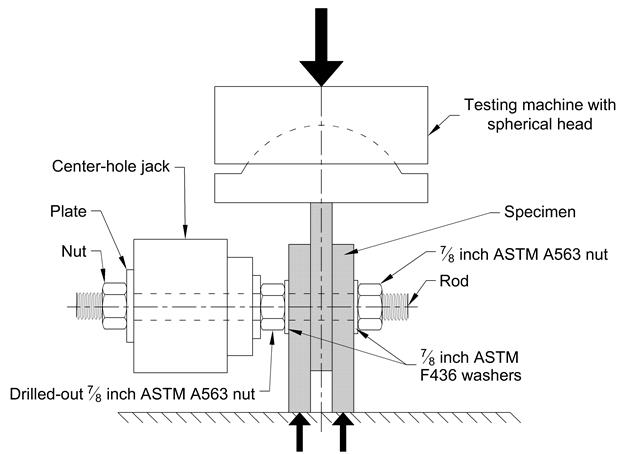
Figure 2. Illustration. RCSC compression slip test setup.
All test samples were coated by one lab and shipped to the other three labs for testing. Using only one lab for specimen preparation ensured that any variability from this was at a minimum throughout the testing program. In general, testing occurred once every 2 weeks between November 2013 and April 2014. Test samples were received either on a Wednesday or Thursday at each lab, with testing occurring on the Friday of the same week. This ensured there was at least a day for the samples to condition themselves to the local environment of the lab, and the total cure time was the same between all the labs at the time of testing.
All test plates used were abrasive blast cleaned with 100 percent steel grit to obtain a surface roughness between 2.0 and 3.0 mil. The test plates were coated using a semi-automated control arm fitted with an airless spray gun. The electronically controlled spray gun was positioned approximately 18 inches from the panel surfaces to prevent any runs or buildup of excess paint. During the coating application process, the test plates were mounted in horizontal racks to achieve double-sided application, while the adjustable traverse rate on the spraying apparatus maintained the desired target wet film thickness.
Due to research constraints of all labs testing on the same day, the total cure time was strictly maintained to 10 days for all primers. This allowed for primer application on Tuesday the week before testing followed by 6 to 7 days curing under controlled conditions of 72 ±2 °F and 50 ±5 percent relative humidity before packaging and shipping to the other three labs. Priority shipping was employed to maximize cure time under controlled conditions prior to packaging and to minimize transit time when conditions were uncontrolled. Prior to packaging, DFT was measured on each surface, and surfaces were matched to have similar DFTs. A table was provided to each lab indicating the stacking order of the individual plates to ensure the DFTs matched up. For each testing series, each lab received 20 test plates—15 were for the 5 replicate specimens and 5 were considered spares.
IMPLEMENTATION OF RCSC PROCEDURE
Each lab was visited once either by the project sponsor or by the sponsor’s representative to observe its specific practices in conducting the RCSC protocol. The following sections contain commentary regarding the specifics of the loading systems, lab-specific procedures, and other observations that may be sources of variability. The observer(s) tried not to interfere with normal testing operations and only made notes of observations.
One item the observers looked for in each lab was whether or not the individual labs were exercising proper calibration of their load and displacement devices. In particular, traceability was looked for with load measuring devices and if documentation could be traceable to the National Institute of Standards and Technology (NIST) load standards.
The testing concept used in lab 1 is shown in figure 3. An existing 1,000-kip compression machine was used to apply the vertical load, while a separate 60-kip hollow core jack was used to apply the horizontal clamping load.
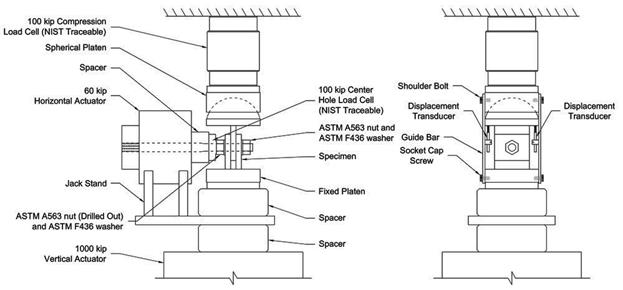
Figure 3. Illustration. Lab 1 testing system.
The loading rod that clamped the plates together was custom fabricated for this test setup. It was fabricated from an SAE 4340 alloy that was heat treated to a Rockwell C hardness between 38 and 42, which should yield strength properties equal to or higher than an ASTM A490 bolt.(6) The rod had a 7/8-inch diameter where it passed through the test plates with a threaded end to accept a 7/8-inch-diameter ASTM A563 nut but had a 1-inch diameter where it passed through the horizontal jack.(4) The horizontal jack had a custom end plate with a threaded hole in the center in which the load rod screwed into directly. A jack stand was also fabricated to support the horizontal jack such that the loading rod was in alignment with the holes in the test plates.
Both the horizontal and vertical jacks were servo valve controlled in a closed-loop feedback system and were operated by a computer control system. The vertical jack could be run in either displacement or load control. The load feedback was from a 100-kip compression load cell mounted above the spherical platen, while the displacement feedback was from a linear variable differential transformer (LVDT) mounted internally to the actuator piston. The horizontal load could only be maintained in load control either via a 100-kip center hole load cell or with strain gauges mounted directly to the loading rod. For the first four test series, the center hole load cell was used for feedback to the horizontal jack. It was difficult using this load cell, and it was later abandoned, being replaced with four strain gauges mounted directly to the loading rod in a full bridge configuration.
Slip displacement was monitored with two LVDTs. The LVDTs were secured to a bracket that screwed to the fixed and spherical platens (see figure 3). The bracket allowed vertical alignment of the two LVDTs to be maintained throughout testing and kept them centered on the test plates. This way of mounting the LVDTs essentially measured the displacement of the platen surfaces, assuming that is was equal to the actual slip displacement.
Prior to testing, built-up paint on the test plate edges in contact with the platens was sanded off. Installing the test plates first required slipping a drilled out 7/8-inch-diameter nut onto the loading rod followed by a 7/8-inch washer. Then the three test plates were slid onto the rod in the sequence provided followed by a 7/8-inch washer, and a nut was screwed to the end of the loading rod. Wedges were used to support the center test plate such that its bottom surface of the hole touched the bottom of the loading rod. This allowed for the maximum amount of slip displacement. At this point, the horizontal jack was commanded to apply the 49-kip clamping load. Since this was in load control, this load was generally maintained within ±0.01 kip, which was well within the RCSC tolerances.
Once the clamping load was set, the vertical actuator was commanded in load control to apply 1 kip of vertical load. Then the two LVDTs were installed and set so their stroke was maximized. The hydraulic computer control system could also collect data, and the LVDT signals were electrically offset to have an initial reading of 0 inch. At this point, the test could begin. The vertical actuator was commanded in displacement control to a rate of 0.003 inch per minute. The feedback LVDT was inside the actuator, which measures the slip of the specimens as well as compliance of the testing machine; therefore, the slip rate was slightly less than the commanded slip rate. The test continued at this rate until an average slip displacement of 0.025 inch was achieved. Next the loading rate was increased to 0.01 inch per minute. The test was terminated after a total average slip of 0.05 inch was achieved.
An independent observer witnessed the testing at lab 1 on December 13, 2013. In general, no deviations could be identified from the RCSC procedure. Overall testing of five specimens took about 2.5 h to conduct. It is interesting to note that roughly half of this overall test period was dedicated to mounting and aligning specimens and ensuring verticality of the slip load plane. Also of note is the utility of the data acquisition system during the initial loading stages of each test replicate. Since the data were acquired and could be observed quantitatively in real time by the operator, adjustments and observations of any minor test deviations could be noted and corrected by the operator if noticed early enough in the test run. This differs from the graphical method of data collection which requires a greater degree of real-time (experience-based) interpretation.
In addition, the use of the load and displacement control functionality of the setup in lab 1 allowed the operator to remain "hands free" during the loading process in order to focus his or her attention on the data stream rather than minor adjustments and/or catching and easing the load prior to slip failure.
The testing concept used in lab 2 is shown in figure 4. The test arrangement employs a dedicated load frame equipped with an air-driven hydraulic jack for vertically loading the specimens. The vertical load is measured with a 100-kip diaphragm load cell that is installed in line with the load train. The clamping force is supplied by a hand-pumped hydraulic jack with a calibrated pressure cell linked to a digital readout visually monitored throughout each test run to ensure consistent compressive load is applied to the sample throughout.
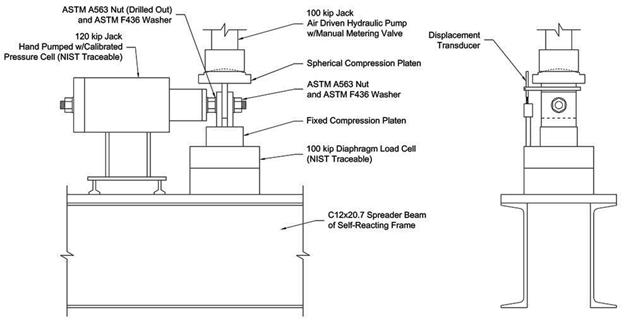
Figure 4. Illustration. Lab 2 testing system.
The three specimen plates were loaded onto the rod. The lab had its own custom spacer plate to place under the center plate to elevate it to produce the maximum possible amount of slip. The nut was hand-tightened to clamp the plates together enough such that the center plate would not move. Once completed, the spacer plate was removed. A clamping force of 49 ±0.5 kip was applied to the test assembly using the digital readout as a guide. It was observed that the clamping load was stable throughout testing, only requiring the operator to pump additional pressure one or two times through testing. The force only varied by approximately 0.2 kip throughout testing.
Once the clamping force was applied, a custom LVDT holding bracket was slid over the middle plate and tightened to the center plate with thumb screws. This bracket only held one LVDT that was referenced off the load cell beneath the specimen via an extended threaded rod that affixed the load cell to the self-reacting frame. A special thumb nut with a machine flat surface was threaded onto the top of this extended threaded rod. Turning the thumb nut allowed for quick adjustment of the LVDT into its desired range. The vertical jack was extended so that it contacted the top edge of the center test plate.
Lab 2 recorded vertical load and slip displacement from the single LVDT using an analog X-Y plotter. Before vertical loading began, the pen was lowered. Vertical loading commenced, and the operator could control the loading rate through a metering valve. There was no direct way to measure load or slip loading rate, though the operators said that after testing many specimens, they had a general sense of how many seconds the plotter could traverse 0.4 inch in the X and Y directions to be in conformance with the RCSC loading rates. An independent observer, using a stopwatch, found that the rates were within the RCSC specification, although this was only verified for one specimen. The self-reacting frame used was flexible, and as the specimen began to lose stiffness, the operator had to continually watch the plotter and slow down the loading rate with the metering valve. If this was not done, the frame would unload itself onto the specimen, and the center plate would crash onto the loading rod. "Crashing" indicates instances when the middle plate slipped suddenly into bearing on the loading rod with an unexpected bang. Provided the specimen did not crash, loading stopped after 0.05 inch of slip occurred.
The observation of a testing series occurred on April 4, 2014. The load frame had three calibration stickers affixed to it for the two load cells on one LVDT. All were less than 1 year old. In general, no gross deviations from the testing specification were identified. Overall, testing took approximately 90 min to test the five specimens. The following observations were noted as possible sources of variability. Generally, the specimens were loaded without a great deal of care to ensure they were centered within the load train. Some specimens were tested with a visual offset from the center of approximately 0.25 inch either front-to-back or side-to-side. The LVDT was visually inclined away from vertical axis of the load train, likely around a 5-degree deviation. Finally, in testing of one specimen, the vibration from the air-assisted hydraulic jack shook loose the electrical connection between the LVDT digital readout boxes (mounted directly to the load frame) and the X-Y plotter. This forced the pen all the way to the edge of the paper in the X-direction, and it only moved in the Y-direction until the connection could be reestablished. The operators mentioned that this had occurred in the past.
The testing arrangement and equipment used in lab 3 is depicted in figure 5. A 60-kip jack was used to provide the horizontal compressive load to the test plates. The jack was loaded with hydraulic pressure provided by a hand pump and load read out with an analog pressure gauge. The pressure gauge was calibrated against an in-house known traceable load cell. This cell is sent out for calibration on an annual basis. During the test, the gauge on the hand pump was observed for any deviation or loss of load. Typically, little detectable load loss is ever observed during the test.
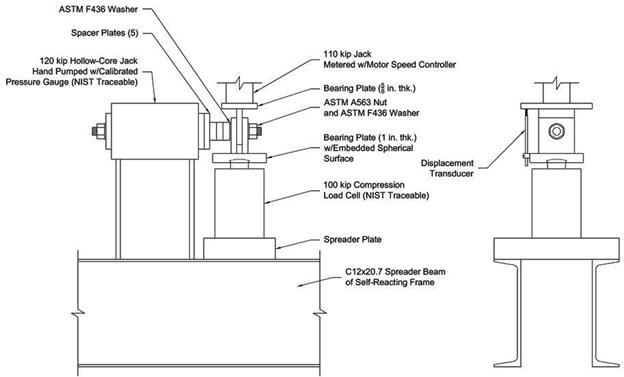
Figure 5. Illustration. Lab 3 testing system.
The vertical compressive load was applied using a self-reacting frame with a 110-kip jack linked to a pump powered by a motor controller with a dial setting (i.e., a rheostat). The motor controller only regulated the rotation rate of the pump. As a result, the rate of oil flow into the jack was constant, but this did not translate into a constant load or displacement rate on the jack because of the frame compliance. The rheostat on the motor controller was set on the same rate for every test (the rate was chosen based on experience of running so many tests by the lab). The operator verbally indicated that it was within the RCSC limits. The load during the test was read from a digital readout linked to the vertical load cell. A single LVDT was used to measure displacement. The vertical slip load and LVDT displacement signals were sent to an analog X-Y plotter, which traced the load-displacement profile during each test.
The specimens were placed within the test rig using an experience-based method of visual best alignment. This process was aided with a dedicated pre-marked ruler and a calibrated 20-mil shim. The 20-mil shim was used to check that the LVDT calibration was correct by placing it between the LVDT and the upper platen and verifying the plotter moved the correct distance. Once verified, the shim was removed. After visual alignment, the system was loaded to 1 kip, the pen was dropped onto the plotter paper, and the test was conducted. An independent observer noted that despite attempts to visually align the load train, there were still eccentricities ranging up to 0.25 inch that were noticeable.
Data acquired during the test consisted of the load versus slip displacement curve for each test as acquired by the X-Y plotter and the visual capture of the maximum vertical load obtained at the point of slip by the test operator. This visual notation of the maximum slip load was reconciled to the plot for the test run, and the slip coefficient was calculated.
Because of frame compliance and not adjusting the motor controller during testing, as the specimen began to lose stiffness, slip displacements of 0.05 inch could not be achieved by lab 3 and were routinely terminated after a slip displacement of just 0.02 inch. Lab 3 operators interpreted the RCSC definition of failure as the larger of the peak load or load at a slip of 0.02 inch, so there was no value in displacing beyond 0.02 inch anyways because that data did not provide any value in terms of the RCSC failure criterion. The lab also had a policy to terminate tests if the vertical load reached between 60 and 65 kip. At this load, the specimen was well past the point of interest in terms of coating qualification for class B, and it was deemed safer for the test operator to not load higher than 65 kip. These interpretations of the RCSC test procedure allowed for five runs to be conducted in a fairly short timeframe, and to be conveniently plotted on the same sheet of X-Y paper.
The slip tests conducted in lab 4 were performed in an existing 100-kip universal testing machine with a 30-ton center hole hydraulic jack applying the clamping force to the test plates. The overall test setup is shown in figure 6. The horizontal jack was arranged in series with a 100-kip load cell to allow monitoring of the clamping force. This jack and load cell were placed in a wood cradle constructed to hold them in horizontal alignment; this wood cradle also had four leveling feet supporting it to allow leveling of the clamping system and alignment with the test specimens. A 7/8-inch threaded rod (heat treated for additional strength) was inserted through the jack and load cell and held in place against the load cell with a plate washer and 7/8-inch nut. Due to the large diameter of the actuator’s center hole, the threaded rod was able to shift significantly when not engaged. To minimize displacement at this interface, a plastic spacer was fabricated and placed over the 7/8-inch threaded rod to ensure a tight fit between the elements. A plate washer and 7/8-inch nut (which has its threads drilled out to enable free movement along the threaded rod) were then placed on the threaded rod against the jack.

Figure 6. Illustration. Lab 4 testing system.
At the beginning of each test, a 7/8-inch washer was placed over the drilled-out nut, and the test plates were placed on the rod in the configuration provided. The test plates sat on a 3-inch-thick steel plate to allow alignment with the clamping system. This plate also held the bolts that the LVDTs bore against. A 7/8-inch washer and nut were then attached to the threaded rod and tightened until the middle test plate was aligned with the spherical head installed on the 100-kip testing machine. The middle plate was then raised until the bottom of its hole was in contact with the threaded rod (to ensure maximum possible slip) and then held in place with two wooden wedges. The horizontal jack was then extended (by use of a hand pump) until 49 kip of clamping force was applied. Due to creep in the coatings and bleeding in the actuator, this load often slowly dropped over time, so additional pumping was needed over the course of the test to maintain the clamping load within the 0.5-kip tolerance of the RCSC specifications. During clamping, the test plates often underwent a small shift in position upon initial contact with the actuator. Due to this shift, the plates could move out of alignment such that one test plate did not bear against the reaction surface. Thus, after clamping, a visual inspection of the plates was conducted to confirm contact between both plates and the bearing surface.
Once the test plates were properly aligned and clamped, the displacement bracket was attached. The bracket is an aluminum plate that has a slot machined out of its middle that allows it to fit over the middle test plate. The bracket has two additional holes drilled near its ends that allow the installation of two LVDTs. The bracket was centered on the middle plate, leveled, and then held in place by two thumb screws which bore against the middle test plate. Once installed, the LVDTs reacted against two 0.25-inch threaded rods installed in the 3-inch bearing plate, which were raised or lowered to the prescribed starting position of the LVDTs. A diagram of this displacement system is shown in figure 6. The LVDTs had a 0.2-inch stroke and were set at the beginning of each test 0.05 inch from their fully extended position to allow the maximum slip measurement while still allowing for small upward movements due to potential rotation of the test specimens.
To remove initial settlement from the data, the spherical head was lowered onto the middle test plate until a vertical load of 5 kip was applied. The spherical head was then raised until the vertical load reduced to 1 kip, and then the LVDTs were zeroed. The data acquisition system began taking readings from both LVDTs, the clamping load cell, and the load output from the test machine at approximately 1-s intervals, and the test machine began applying additional load. A maximum displacement rate of 0.003 inch per minute was the controlling limit for the tests, but the test machine could only be run in load control. Thus, the spherical head applied load at a rate of approximately 8 kip per minute, which kept the displacement rate below 0.003 inch per minute until slip of the specimen. The test machine had a built-in maximum displacement rate at this load rate, which prevented uncontrolled displacement after the test specimen reached a peak load. After reaching a maximum load, this inherent displacement rate was maintained until the specimen reached a total slip of 0.05 inch when the test was terminated.