U.S. Department of Transportation
Federal Highway Administration
1200 New Jersey Avenue, SE
Washington, DC 20590
202-366-4000


Skip to content
Facebook iconYouTube iconTwitter iconFlickr iconLinkedInInstagram

Federal Highway Administration Research and Technology
Coordinating, Developing, and Delivering Highway Transportation Innovations

 
REPORT
This report is an archived publication and may contain dated technical, contact, and link information
Back to Publication List        
Publication Number:  FHWA-HRT-14-093    Date:  December 2014
Publication Number: FHWA-HRT-14-093
Date: December 2014


Interlaboratory Variability of Slip Coefficient Testing for Bridge Coatings

APPENDIX A. DATA PLOTS

This appendix contains the load versus slip plots for all specimens tested as part of the interlaboratory variability study. For each coating series, the plots are scaled uniformly for the three or four labs participating to highlight the differences between individual laboratory practice in conducting the RCSC test. Lab 4 only participated in half of the coating series.

For some graphs, the individual data plots within them may be so close to each other that it is difficult to discern one line from the other. To assist readers, a black dashed line has been drawn intersecting all plots at one section. The dashed line is connected to a leader line that connects to the legend. The order of the legend from top to bottom correlates to the order in which the dashed line intersects the individual plots. The intersected plot furthest from the leader is the top entry in the legend, and the intersection closest to the leader is at the bottom of the legend.
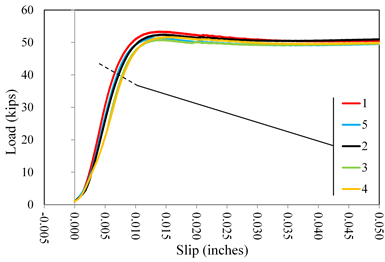
This graph shows load  versus slip displacement curves for lab 1 coating A1. Load is on the y-axis  from 0 to 60 kip. The x-axis shows the slip from -0.005 to 0.050 inch. Five  lines are plotted distinguished by color: red for specimen 1, black for  specimen 2, green for specimen 3, orange for specimen 4, and blue for specimen 5.  All lines plot fairly close to each other with linear behavior to approximately  50 kip at 0.01 inch of slip followed by constant load response for the extent of the graph.
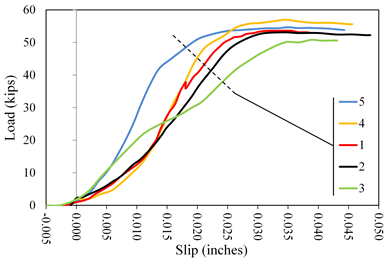
Figure 10. Graph. Load versus slip displacement curves for lab 1 coating A1.

This graph shows load  versus slip displacement curves for lab 2 coating A1. Load is on the y-axis  from 0 to 60 kip. The x-axis shows the slip from -0.005 to 0.050 inch. Five  lines are plotted distinguished by color: red for specimen 1, black for  specimen 2, green for specimen 3, orange for specimen 4, and blue for specimen 5.  All lines plot with an initially upward curved shakedown response followed by a  linear portion and rounding over to a constant load plateau. None of the lines  attained peak load response prior to the 0.02-inch failure criterion, and the  tests were terminated at displacements ranging between 0.04 and 0.048 inch.
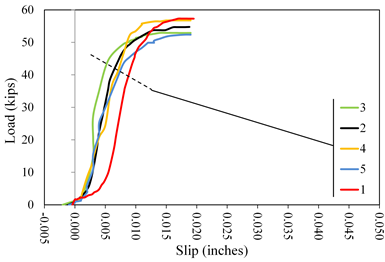
Figure 11. Graph. Load versus slip displacement curves for lab 2 coating A1.

This graph shows load  versus slip displacement curves for lab 3 coating A1. Load is on the y-axis  from 0 to 60 kip. The x-axis shows the slip from -0.005 to 0.050 inch. Five  lines are plotted distinguished by color: red for specimen 1, black for  specimen 2, green for specimen 3, orange for specimen 4, and blue for specimen 5.  All lines plot with an initially upward curved shakedown response followed by a  linear portion and rounding over to a constant load plateau. All lines show  tests were terminated at approximately 0.02 inch of slip, and at that point all  lines were showing constant load behavior.
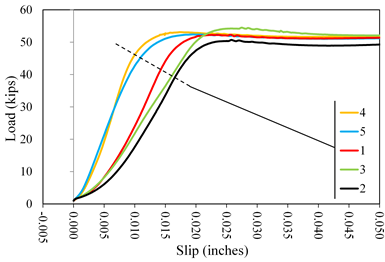
Figure 12. Graph. Load versus slip displacement curves for lab 3 coating A1.

This graph shows load  versus slip displacement curves for lab 1 coating A2. Load is on the y-axis  from 0 to 60 kip. The x-axis shows the slip from -0.005 to 0.050 inch. Five  lines are plotted distinguished by color: red for specimen 1, black for  specimen 2, green for specimen 3, orange for specimen 4, and blue for specimen 5.  All lines plot with an initially upward curved shakedown response followed by a  linear portion and rounding over to a constant load plateau. All lines show  constant load response out to 0.05 inch. Specimens 1, 4, and 5 attained peak  load before the 0.02-inch slip criterion, and specimens 2 and 3 were controlled by the 0.02-inch  slip criterion.
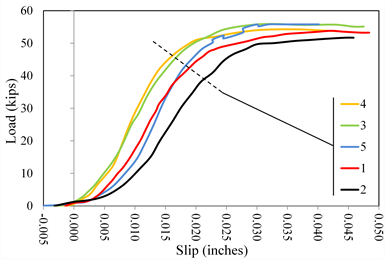
Figure 13. Graph. Load versus slip displacement curves for lab 1 coating A2.

This graph shows load  versus slip displacement curves for lab 2 coating A2. Load is on the y-axis  from 0 to 60 kip. The x-axis shows the slip from -0.005 to 0.050 inch. Five  lines are plotted distinguished by color: red for specimen 1, black for  specimen 2, green for specimen 3, orange for specimen 4, and blue for specimen 5.  All lines plot with an initially upward curved shakedown response followed by a  linear portion and rounding over to a constant load plateau. None of the lines  attained peak load response prior to the 0.02-inch failure criterion, and the  tests were terminated at displacements ranging between 0.04 and 0.048 inch.
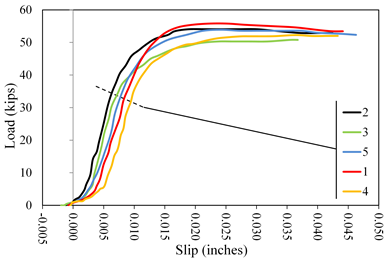
Figure 14. Graph. Load versus slip displacement curves for lab 2 coating A2.

This graph shows load  versus slip displacement curves for lab 3 coating A2. Load is on the y-axis  from 0 to 60 kip. The x-axis shows the slip from -0.005 to 0.050 inch. Five  lines are plotted distinguished by color: red for specimen 1, black for  specimen 2, green for specimen 3, orange for specimen 4, and blue for specimen 5.  All lines plot with an initially upward curved shakedown response followed by a  linear portion and rounding over to a constant load plateau. The tests were  terminated at displacements ranging between 0.036 and 0.045 inch. All specimens  except specimen 4 attained peak load prior to the 0.02-inch slip criterion.
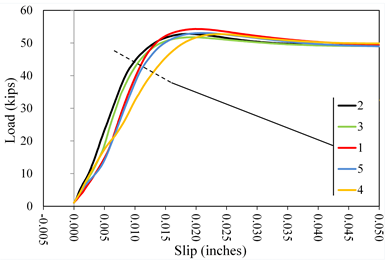
Figure 15. Graph. Load versus slip displacement curves for lab 3 coating A2.

This graph shows load  versus slip displacement curves for lab 4 coating A2. Load is on the y-axis  from 0 to 60 kip. The x-axis shows the slip from -0.005 to 0.050 inch. Five  lines are plotted distinguished by color: red for specimen 1, black for  specimen 2, green for specimen 3, orange for specimen 4, and blue for specimen 5.  All lines plot with an initially upward curved shakedown response followed by a  linear portion and rounding over to a constant load plateau. The tests were  terminated beyond a slip of 0.05 inch. All plots attained peak loads before the  0.02-inch   slip criterion.
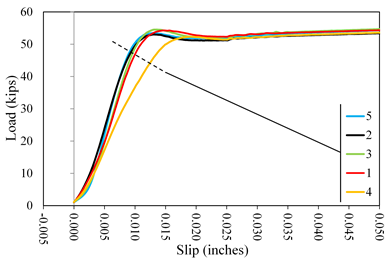
Figure 16. Graph. Load versus slip displacement curves for lab 4 coating A2.

This graph shows load  versus slip displacement curves for lab 1 coating B1. Load is on the y-axis  from 0 to 60 kip. The x-axis shows the slip from -0.005 to 0.050 inch. Five  lines are plotted distinguished by color: red for specimen 1, black for  specimen 2, green for specimen 3, orange for specimen 4, and blue for specimen 5.  All lines plot with an initially upward curved shakedown response followed by a  linear portion and rounding over to a constant load plateau. The tests were  terminated beyond a slip of 0.05 inch. All plots attained peak loads between  0.012 and 0.018 inch of slip.
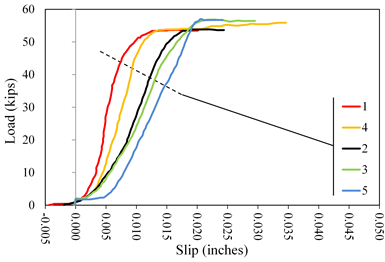
Figure 17. Graph. Load versus slip displacement curves for lab 1 coating B1.

This graph shows load  versus slip displacement curves for lab 2 coating B1. Load is on the y-axis  from 0 to 60 kip. The x-axis shows the slip from -0.005 to 0.050 inch. Five lines  are plotted distinguished by color: red for specimen 1, black for specimen 2,  green for specimen 3, orange for specimen 4, and blue for specimen 5. All lines  plot with an initially upward curved shakedown response followed by a linear  portion and rounding over to a constant load plateau. The tests were terminated  at displacements ranging between 0.020 and 0.035 inch. Peak loads were attained  at displacements ranging from 0.012 to 0.020 inch.
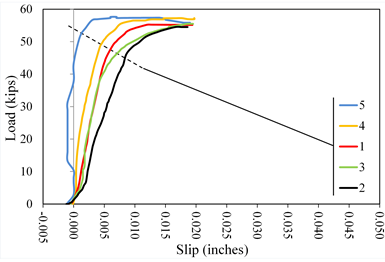
Figure 18. Graph. Load versus slip displacement curves for lab 2 coating B1.

This graph shows load  versus slip displacement curves for lab 3 coating B1. Load is on the y-axis  from 0 to 60 kip. The x-axis shows the slip from -0.005 to 0.050 inch. Five  lines are plotted distinguished by color: red for specimen 1, black for  specimen 2, green for specimen 3, orange for specimen 4, and blue for specimen 5.  All lines plot with an initially upward curved shakedown response followed by a  linear portion and rounding over to a constant load plateau. All the specimens  were terminated at a displacement of 0.020 inch. Specimen 5 exhibited extremely  stiff behavior with either no or negative displacement as load increased to  approximately 44 kip before it started to round over to a plateau.
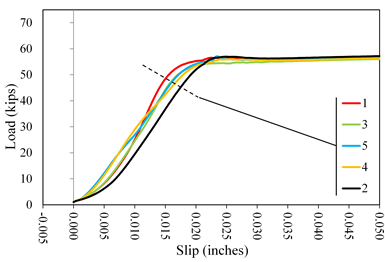
Figure 19. Graph. Load versus slip displacement curves for lab 3 coating B1.

This graph shows load  versus slip displacement curves for lab 1 coating B2. Load is on the y-axis  from 0 to 70 kip. The x-axis shows the slip from -0.005 to 0.050 inch. Five  lines are plotted distinguished by color: red for specimen 1, black for  specimen 2, green for specimen 3, orange for specimen 4, and blue for specimen 5.  All lines plot with an initially upward curved shakedown response followed by a  linear portion and rounding over to a constant load plateau. The tests were  terminated beyond a slip of 0.05 inch. All plots attained peak loads between  0.020 and 0.025 inch.
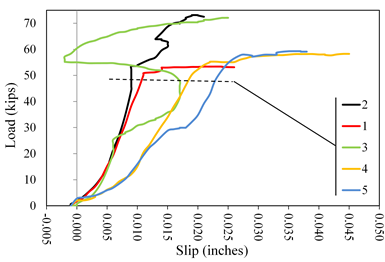
Figure 20. Graph. Load versus slip displacement curves for lab 1 coating B2.

This graph shows load  versus slip displacement curves for lab 2 coating B2. Load is on the y-axis  from 0 to 70 kip. The x-axis shows the slip from -0.005 to 0.050 inch. Five  lines are plotted distinguished by color: red for specimen 1, black for  specimen 2, green for specimen 3, orange for specimen 4, and blue for specimen 5.  All specimens have an initially upward curved shakedown response, but each  differs after that. Specimen 1 is linear to approximately 50 kip at 0.01 inch  and constant thereafter until 0.025 inch when the test was terminated. Specimen  2 continued to curve upward nonlinearly until about 53 kip at 0.008 inch  followed by a linear rise to about 60 kip at 0.015 inch. It then hooked backwards to 0.012 inch followed by a linear  increase to about 73 kip at 0.02 inch when the test was terminated. Specimen 3 continued  to curve upward nonlinearly to about 25 kip at 0.005 inch followed by a  leftward-facing hook maximized at about 45 kip and 0.015 inch ending at about  55 kip at -0.002 inch. It then increased linearly to peak load response at  about 71 kip at 0.025 inch. Specimen 4 increased linearly to about 52 kip at  0.02 inch and was constant until a displacement of 0.045 inch when the test was  terminated. Specimen 5 increased linearly to about 30 kip at 0.015 inch  followed by a brief load plateau and another linearly increasing trend to peak  load of about 58 kip at 0.025 inch and constant until termination at 0.037  inch.
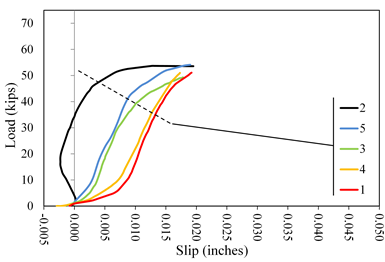
Figure 21. Graph. Load versus slip displacement curves for lab 2 coating B2.

This graph shows load  versus slip displacement curves for lab 3 coating B2. Load is on the y-axis  from 0 to 70 kip. The x-axis shows the slip from -0.005 to 0.050 inch. Five  lines are plotted distinguished by color: red for specimen 1, black for  specimen 2, green for specimen 3, orange for specimen 4, and blue for specimen 5.  Specimens 1, 3, 4, and 5 plot with an initially upward curved shakedown  response followed by a linear portion and rounding over to peak load. Specimen 2  initially hooked backwards to about 18 kip at -0.003 inch followed by linear  behavior to a load plateau. All tests were terminated at a displacement of  about 0.020 inch.
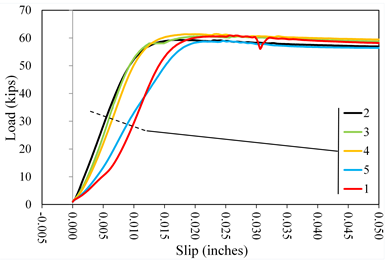
Figure 22. Graph. Load versus slip displacement curves for lab 3 coating B2.

This graph shows load  versus slip displacement curves for lab 1 coating C1. Load is on the y-axis  from 0 to 70 kip. The x-axis shows the slip from -0.005 to 0.050 inch. Five  lines are plotted distinguished by color: red for specimen 1, black for  specimen 2, green for specimen 3, orange for specimen 4, and blue for specimen 5.  All lines plot with an initially upward curved shakedown response followed by a  linear portion and rounding over to a constant load plateau. The tests were  terminated beyond a slip of 0.05 inch. All plots attained peak loads between  0.018 and 0.021 inch.
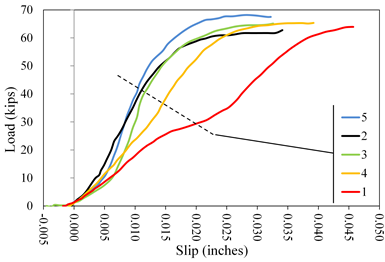
Figure 23. Graph. Load versus slip displacement curves for lab 1 coating C1.

This graph shows load  versus slip displacement curves for lab 2 coating C1. Load is on the y-axis  from 0 to 70 kip. The x-axis shows the slip from -0.005 to 0.050 inch. Five  lines are plotted distinguished by color: red for specimen 1, black for  specimen 2, green for specimen 3, orange for specimen 4, and blue for specimen 5.  All lines plot with an initially upward curved shakedown response followed by a  linear portion and rounding over to a constant load plateau. The tests were  terminated beyond a slip of 0.05 inch. Specimen 1 also showed and interim  plateau before reaching peak load. All plots attained peak load at  displacements ranging between 0.025 and 0.045 inch, and tests were terminated  at displacements ranging from 0.030 and 0.045 inch.
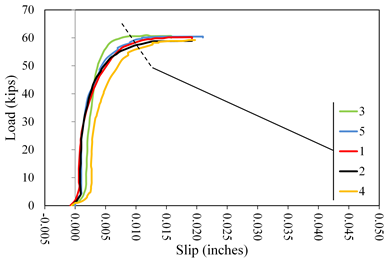
Figure 24. Graph. Load versus slip displacement curves for lab 2 coating C1.

This graph shows load  versus slip displacement curves for lab 3 coating C1. Load is on the y-axis  from 0 to 70 kip. The x-axis shows the slip from -0.005 to 0.050 inch. Five  lines are plotted distinguished by color: red for specimen 1, black for  specimen 2, green for specimen 3, orange for specimen 4, and blue for specimen 5.  All specimens plot with an initially upward curved shakedown response followed  by a linear portion and rounding over to peak load. Peak load was attained at  slip displacements ranging from 0.007 to 0.015 inch, and tests were terminated  at displacements between 0.015 and 0.020 inch.
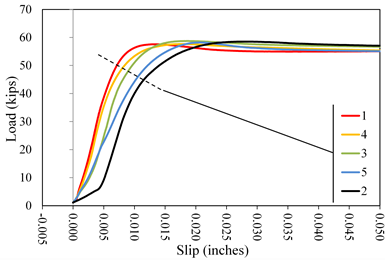
Figure 25. Graph. Load versus slip displacement curves for lab 3 coating C1.

This graph shows load  versus slip displacement curves for lab 4 coating C1. Load is on the y-axis  from 0 to 70 kip. The x-axis shows the slip from -0.005 to 0.050 inch. Five  lines are plotted distinguished by color: red for specimen 1, black for  specimen 2, green for specimen 3, orange for specimen 4, and blue for specimen 5.  All lines plot with an initially upward curved shakedown response followed by a  linear portion and rounding over to a constant load plateau. Peak loads were  attained at slip displacements ranging from 0.010 to 0.025 inch, and all tests  were terminated beyond a slip of 0.05 inch.
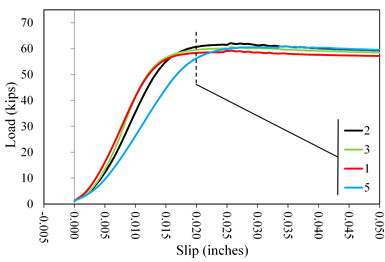
Figure 26. Graph. Load versus slip displacement curves for lab 4 coating C1.

This graph shows load  versus slip displacement curves for lab 1 coating C2. Load is on the y-axis  from 0 to 70 kip. The x-axis shows the slip from -0.005 to 0.050 inch. Four  lines are plotted distinguished by color: red for specimen 1, black for  specimen 2, green for specimen 3, and blue for specimen 5. All lines plot with an initially upward curved shakedown response  followed by a linear portion and rounding over to a constant load plateau. Peak  load response was attained at slip displacements ranging from 0.015 to 0.025  inch, and all tests were terminated beyond a slip of 0.05 inch.
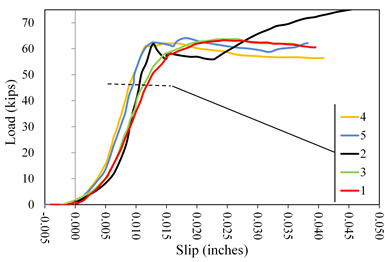
Figure 27. Graph. Load versus slip displacement curves for lab 1 coating C2.

This graph shows load  versus slip displacement curves for lab 2 coating C2. Load is on the y-axis  from 0 to 70 kip. The x-axis shows the slip from -0.005 to 0.050 inch. Five  lines are plotted distinguished by color: red for specimen 1, black for  specimen 2, green for specimen 3, orange for specimen 4, and blue for specimen 5.  All lines plot with an initially upward curved shakedown response followed by a  linear portion and rounding over to a constant load plateau. Specimen 2 showed  a plateau load response at approximately 59 kip until about 0.025 inch of slip.  It then picked up stiffness and slowly rose to 75 kip at 0.045 inch. All specimens  attained peak load response at displacement ranges between 0.012 and 0.020  inch.
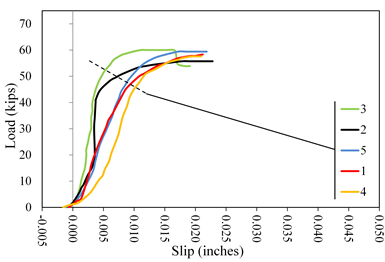
Figure 28. Graph. Load versus slip displacement curves for lab 2 coating C2.

This graph shows load  versus slip displacement curves for lab 3 coating C2. Load is on the y-axis  from 0 to 70 kip. The x-axis shows the slip from -0.005 to 0.050 inch. Five  lines are plotted distinguished by color: red for specimen 1, black for  specimen 2, green for specimen 3, orange for specimen 4, and blue for specimen 5.  All specimens plot with an initially upward curved shakedown response followed  by a linear portion and rounding over to peak load. Peak loads were attained at  slip displacements ranging from 0.010 to 0.020 inch, and tests were terminated  at displacements of approximately 0.020 inch.
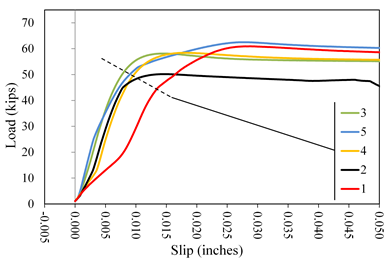
Figure 29. Graph. Load versus slip displacement curves for lab 3 coating C2.

This graph shows load  versus slip displacement curves for lab 4 coating C2. Load is on the y-axis  from 0 to 70 kip. The x-axis shows the slip from -0.005 to 0.050 inch. Five  lines are plotted distinguished by color: red for specimen 1, black for  specimen 2, green for specimen 3, orange for specimen 4, and blue for specimen 5.  All lines plot with an initially upward curved shakedown response followed by a  linear portion and rounding over to a constant load plateau. Peak loads were  attained at slip displacements ranging from 0.010 to 0.025 inch, and all tests  were terminated beyond a slip of 0.05 inch.
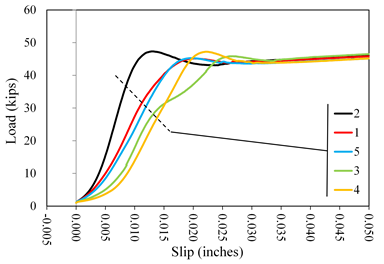
Figure 30. Graph. Load versus slip displacement curves for lab 4 coating C2.

This graph shows load  versus slip displacement curves for lab 1 coating D1. Load is on the y-axis  from 0 to 60 kip. The x-axis shows the slip from -0.005 to 0.050 inch. Five  lines are plotted distinguished by color: red for specimen 1, black for specimen  2, green for specimen 3, orange for specimen 4, and blue for specimen 5. All  lines plot with an initially upward curved shakedown response followed by a  linear portion and rounding over to a constant load plateau. Peak loads were  attained at slip displacements ranging from 0.010 to 0.025 inch, and all tests  were terminated beyond a slip of 0.05 inch.
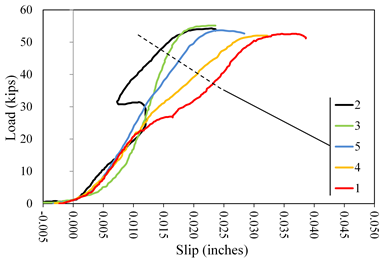
Figure 31. Graph. Load versus slip displacement curves for lab 1 coating D1.

This graph shows load  versus slip displacement curves for lab 2 coating D1. Load is on the y-axis  from 0 to 60 kip. The x-axis shows the slip from -0.005 to 0.050 inch. Five  lines are plotted distinguished by color: red for specimen 1, black for  specimen 2, green for specimen 3, orange for specimen 4, and blue for specimen 5.  Specimens 1, 3, 4, and 5 plot with an initially upward curved shakedown  response followed by a linear portion and rounding over to peak load. Specimen 2  had an initially linear response until about 20 kip at 0.011 inch. Its load  increased to 30 kip with no change in displacement and then reached a plateau  in load while moving backwards in displacement to 0.007 inch. It then increased  linearly to a plateau at about 52 kip at 0.020 inch. Peak loads were attained  at slip displacements ranging from 0.020 to 0.032 inch, and tests were  terminated at displacements ranging from 0.022 to 0.038 inch.
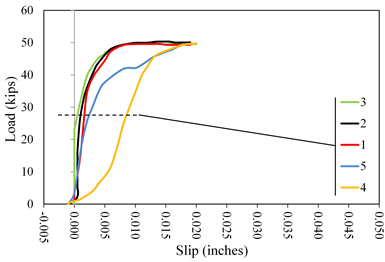
Figure 32. Graph. Load versus slip displacement curves for lab 2 coating D1.

This graph shows load  versus slip displacement curves for lab 3 coating D1. Load is on the y-axis  from 0 to 60 kip. The x- axis shows the slip from -0.005 to 0.050 inch. Five  lines are plotted distinguished by color: red for specimen 1, black for  specimen 2, green for specimen 3, orange for specimen 4, and blue for specimen 5.  Specimens 1, 2, 3, and 5 showed essentially infinitely stiff response until  about 25 to 40 kip and then rounded over to a plateau load response. Specimen 4  had an initially upward curved shakedown response followed by a linear portion  and rounding over to peak load. Peak loads were attained at slip displacements  ranging from 0.005 to 0.020 inch, and tests were terminated at displacements of  approximately 0.020 inch.
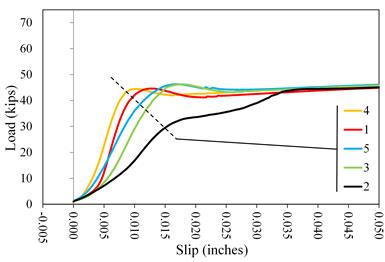
Figure 33. Graph. Load versus slip displacement curves for lab 3 coating D1.

This graph shows load  versus slip displacement curves for lab 1 coating D2. Load is on the y-axis  from 0 to 70 kip. The x-axis shows the slip from -0.005 to 0.050 inch. Five  lines are plotted distinguished by color: red for specimen 1, black for  specimen 2, green for specimen 3, orange for specimen 4, and blue for specimen 5.  All lines plot with an initially upward curved shakedown response followed by a  linear portion and rounding over to a constant load plateau. Specimens 1, 3, 4,  and 5 reached peak load at slip displacements ranging from 0.007 to 0.016 inch.  Specimen 2 showed a characteristic double plateau response with the first at  about 30 kip and 0.015 inch of slip. It then increased again to about 42 kip at  0.034 inch where it plateaued the second time. All tests were terminated beyond  a slip of 0.05 inch.
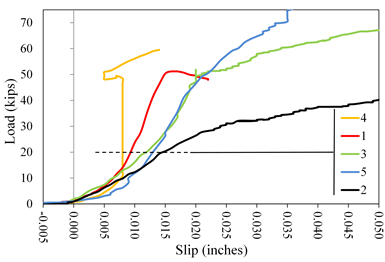
Figure 34. Graph. Load versus slip displacement curves for lab 1 coating D2.

This graph shows load  versus slip displacement curves for lab 2 coating D2. Load is on the y-axis  from 0 to 70 kip. The x-axis shows the slip from -0.005 to 0.050 inch. Five  lines are plotted distinguished by color: red for specimen 1, black for  specimen 2, green for specimen 3, orange for specimen 4, and blue for specimen 5.  All lines plot with an initially upward curved shakedown response followed by distinctly  different paths for each specimen. Specimen 1 continued linearly to a peak at  about 50 kip at a displacement of 0.014 inch and then decreased until test  termination at 0.020 inch. Specimen 2 continued to slowly increase linearly until approximately  30 kip at 0.025 inch, and then the slope decreased and loading continued to about 40 kip  at 0.050 inch. Specimen 3 continued nonlinear convex behavior until about 50  kip at 0.018 inch and then linearly ramped to about 65 kip at 0.050 inch. Specimen  4 was infinitely stiff from 10 to 49 kip at 0.007 inch, hooked backwards to  0.005 inch, and increased linearly to failure at 60 kip and 0.014 inch. Specimen  5 increased linearly to about 70 kip at 0.035 inch.
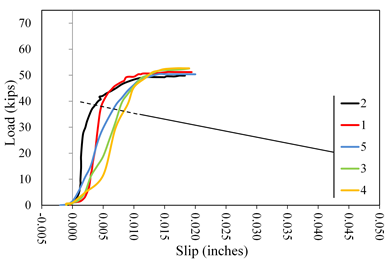
Figure 35. Graph. Load versus slip displacement curves for lab 2 coating D2.

This graph shows load  versus slip displacement curves for lab 3 coating D2. Load is on the y-axis  from 0 to 70 kip. The x-axis shows the slip from -0.005 to 0.050 inch. Five  lines are plotted distinguished by color: red for specimen 1, black for  specimen 2, green for specimen 3, orange for specimen 4, and blue for specimen 5.  Specimens 1 and 2 showed infinitely stiff responses until about 40 kip and then  rounded over to a plateau load response. Specimens 3, 4, and 5 had an initially  upward curved shakedown response followed by a linear portion and rounding over  to peak load. Peak loads for all five curves were at about 50 kip and 0.012  inch. All tests were terminated at displacements of approximately 0.020 inch.
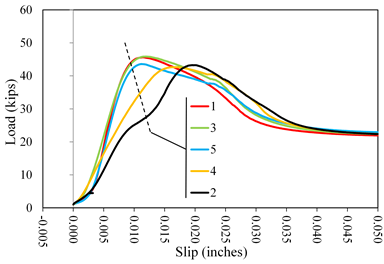
Figure 36. Graph. Load versus slip displacement curves for lab 3 coating D2.

This graph shows load  versus slip displacement curves for lab 1 coating E1. Load is on the y-axis  from 0 to 60 kip. The x-axis shows the slip from -0.005 to 0.050 inch. Five  lines are plotted distinguished by color: red for specimen 1, black for  specimen 2, green for specimen 3, orange for specimen 4, and blue for specimen 5.  All specimens had an initially upward curved shakedown response followed by a  linear portion to a distinct hump at peak load followed by a linear descending  branch to a lower plateau. The peak loads occurred at displacements ranging  from 0.009 to 0.020 inch. All tests were terminated at displacements beyond 0.050 inch.
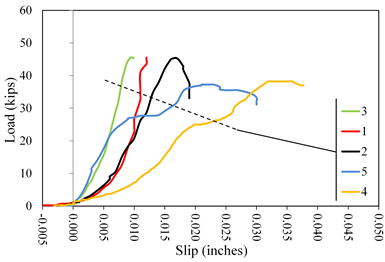
Figure 37. Graph. Load versus slip displacement curves for lab 1 coating E1.

This graph shows load  versus slip displacement curves for lab 2 coating E1. Load is on the y-axis  from 0 to 60 kip. The x-axis shows the slip from -0.005 to 0.050 inch. Five  lines are plotted distinguished by color: red for specimen 1, black for  specimen 2, green for specimen 3, orange for specimen 4, and blue for specimen 5.  All specimens had an initially upward curved shakedown response followed by a  linearly increasing portion, but then the differences become pronounced. Specimen 1 increased to about 45 kip at 0.010 inch, and then the test failed. Specimen  2 attained a distinct peak at about 45 kip at 0.016 inch, and then the load  decreased quickly. Specimen 3 attained a distinct peak at about 45 kip at 0.009  inch, and then the test failed. Specimen 4 showed a double plateau response,  with the first occurring at about 26 kip at 0.020 inch and then increased linearly  to the second at about 39 kip at 0.031 inch. Specimen 5 showed a double plateau  response, with the first occurring at about 26 kip at 0.010 inch and then  increased linearly to the second at about 38 kip at 0.020 inch.
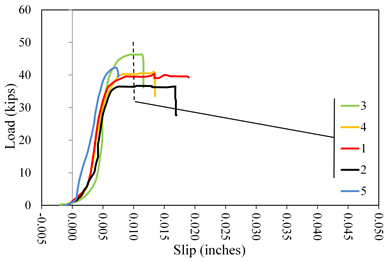
Figure 38. Graph. Load versus slip displacement curves for lab 2 coating E1.

This graph shows load  versus slip displacement curves for lab 3 coating E1. Load is on the y-axis  from 0 to 60 kip. The x-axis shows the slip from -0.005 to 0.050 inch. Five  lines are plotted distinguished by color: red for specimen 1, black for  specimen 2, green for specimen 3, orange for specimen 4, and blue for specimen 5.  All specimens had an initially upward curved shakedown response followed by a  linear portion and rounding over to peak load. Peak loads for all five curves  were at loads between 35 and 46 kip, and displacements ranged between 0.006 and  0.009 inch.
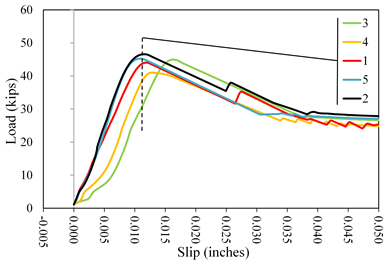
Figure 39. Graph. Load versus slip displacement curves for lab 3 coating E1.

This graph shows load  versus slip displacement curves for lab 4 coating E1. Load is on the y-axis  from 0 to 60 kip. The x-axis shows the slip from -0.005 to 0.050 inch. Five  lines are plotted distinguished by color: red for specimen 1, black for  specimen 2, green for specimen 3, orange for specimen 4, and blue for specimen 5.  All specimens had initially linear behavior increasing to a distinct peak load  followed by a linear descending branch to a lower plateau. The peak loads  ranged from about 41 to 46 kip over a displacement range of 0.010 and 0.015  inch. All tests were terminated at displacements in excess of 0.050 inch.
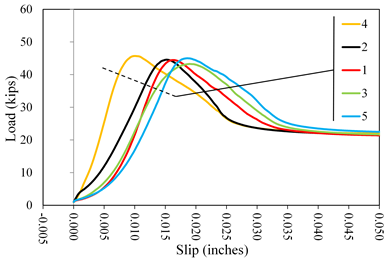
Figure 40. Graph. Load versus slip displacement curves for lab 4 coating E1.

This graph shows load  versus slip displacement curves for lab 1 coating E2. Load is on the y-axis  from 0 to 60 kip. The x-axis shows the slip from -0.005 to 0.050 inch. Five  lines are plotted distinguished by color: red for specimen 1, black for  specimen 2, green for specimen 3, orange for specimen 4, and blue for specimen 5.  All specimens had initially linear behavior increasing to a distinct peak load  followed by a linear descending branch to a lower plateau. The peak loads  ranged from about 42 to 45 kip over a displacement range of 0.009 and 0.018  inch. All tests were terminated at displacements in excess of 0.050 inch.
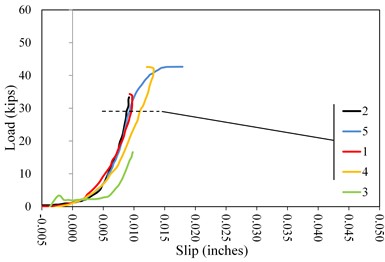
Figure 41. Graph. Load versus slip displacement curves for lab 1 coating E2.

This graph shows load  versus slip displacement curves for lab 2 coating E2. Load is on the y-axis  from 0 to 60 kip. The x-axis shows the slip from -0.005 to 0.050 inch. Five  lines are plotted distinguished by color: red for specimen 1, black for  specimen 2, green for specimen 3, orange for specimen 4, and blue for specimen 5.  All specimens had an initially upward curved shakedown response followed by a  linearly increasing portion. Specimen 1 increased to about 33 kip at 0.008 inch,  and then the test failed. Specimen 2 attained a distinct peak at about 32 kip  at 0.008 inch, and then the test failed. Specimen 3 increased to about 16 kip  at 0.010 inch, and then the test failed. Specimen 4 increased to about 41 kip  at 0.013 inch, and then the test failed. Specimen 5 increased to a round over  response followed by a 41-kip load plateau until failure at 0.020 inch.
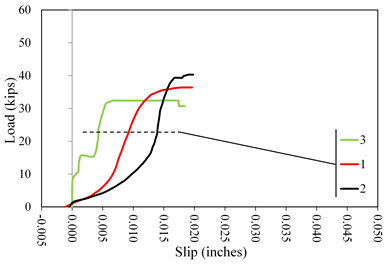
Figure 42. Graph. Load versus slip displacement curves for lab 2 coating E2.

This graph shows load  versus slip displacement curves for lab 3 coating E2. Load is on the y-axis  from 0 to 60 kip. The x-axis shows the slip from -0.005 to 0.050 inch. Three  lines are plotted distinguished by color: red for specimen 1, black for  specimen 2, and green for specimen 3. Specimens 1 and 2 had an initially upward  curved shakedown response followed by a linearly increasing portion and  ultimately a round over response at a load plateau before the final  displacement of about 0.020 inch. Specimen 3 had three distinct load plateaus with infinitely stiff  response between them. The first plateau occurred at about 9 kip, the second at  about 15 kip, and the final at about 32 kip at 0.005 inch. It stayed at that load until approximately 0.020  inch when the test terminated.
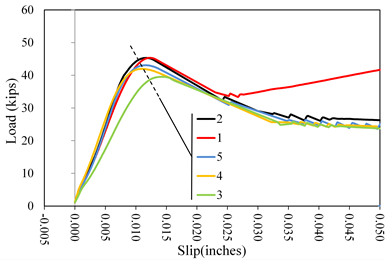
Figure 43. Graph. Load versus slip displacement curves for lab 3 coating E2.

This graph shows load  versus slip displacement curves for lab 4 coating E2. Load is on the y-axis  from 0 to 60 kip. The x-axis shows the slip from -0.005 to 0.050 inch. Five  lines are plotted distinguished by color: red for specimen 1, black for  specimen 2, green for specimen 3, orange for specimen 4, and blue for specimen 5.  All specimens had initially linear behavior increasing to a distinct peak load  followed by a linear descending branch to a lower plateau. The peak loads  ranged from about 40 to 45 kip over a displacement range of 0.010 and 0.015  inch. All tests were terminated at displacements in excess of 0.050 inch.
Figure 44. Graph. Load versus slip displacement curves for lab 4 coating E2.


Federal Highway Administration | 1200 New Jersey Avenue, SE | Washington, DC 20590 | 202-366-4000
Turner-Fairbank Highway Research Center | 6300 Georgetown Pike | McLean, VA | 22101