U.S. Department of Transportation
Federal Highway Administration
1200 New Jersey Avenue, SE
Washington, DC 20590
202-366-4000
Federal Highway Administration Research and Technology
Coordinating, Developing, and Delivering Highway Transportation Innovations
| REPORT |
| This report is an archived publication and may contain dated technical, contact, and link information |
|
| Publication Number: FHWA-HRT-14-093 Date: December 2014 |
Publication Number: FHWA-HRT-14-093 Date: December 2014 |
The data collected in this study were analyzed according to the ASTM E691-13 standard since its goal is to establish the precision and bias of a test method.(3) That standard cautions that a well-designed interlaboratory variation study should use around 30 labs to evaluate a test procedure, with 8 as a minimum. Recall that this study only included four participating laboratories. Therefore, the statistical analysis procedures set forth in ASTM E691-13 are presented in this appendix, although it is advised that its value in defining precision and bias is very low and should only be used to look for trends.
In the Experimental Results section of this report, it was described that the variation between the labs was dominated by the displacement measurement technique, and slip displacement measurements were the major source of the variation. The ASTM E691-13 statistics are presented two ways in this appendix. First, they are calculated with the slip coefficient considering the peak load or 0.02-inch slip displacement failure criterion. Second, they are calculated using just the peak load for the slip coefficient calculation.
For brevity, not all the statistical calculations are presented in this appendix. The main calculations of interest as far as ASTM E691-13 is concerned are h- and k-consistency statistics. The h-consistency statistic evaluates the variability of each lab average to the average amongst all the labs. The k-consistency statistic evaluates the variability of a given lab with respect to the overall average. The raw data for h and k are presented in table 5 through table 8 for each of the two failure criterion. For each calculation, a critical value was also determined based on a 95 percent confidence interval.
Table 5. h-statistic considering 0.02-inch failure criteria.
Lab |
Coating |
|||||||||
|---|---|---|---|---|---|---|---|---|---|---|
A1 |
A2 |
B1 |
B2 |
C1 |
C2 |
D1 |
D2 |
E1 |
E2 |
|
1 |
0.38 |
-0.14 |
-0.58 |
0.11 |
0.66 |
-0.24 |
-0.49 |
-1.00 |
0.74 |
1.00 |
2 |
-1.13 |
-1.36 |
-0.58 |
0.94 |
-1.46 |
1.37 |
-0.66 |
0.00 |
-1.15 |
-1.06 |
3 |
0.76 |
0.83 |
1.15 |
-1.05 |
0.62 |
-0.11 |
1.15 |
1.00 |
-0.52 |
-0.63 |
4 |
|
0.67 |
|
|
0.17 |
-1.02 |
|
|
0.92 |
0.69 |
Note: Blank cells indicate lab 4 did not participate in the coating series.
Table 6. h-statistic considering just peak load failure criteria.
Lab |
Coating |
|||||||||
|---|---|---|---|---|---|---|---|---|---|---|
A1 |
A2 |
B1 |
B2 |
C1 |
C2 |
D1 |
D2 |
E1 |
E2 |
|
1 |
-1.15 |
-1.13 |
-0.87 |
-0.28 |
-0.23 |
-0.19 |
-1.12 |
-0.84 |
0.69 |
0.92 |
2 |
0.45 |
1.28 |
-0.22 |
1.11 |
1.42 |
1.45 |
0.81 |
1.10 |
-0.46 |
-1.25 |
3 |
0.70 |
0.10 |
1.09 |
-0.83 |
-0.28 |
-0.47 |
0.31 |
-0.26 |
-1.18 |
-0.35 |
4 |
|
-0.25 |
|
|
-0.92 |
-0.79 |
|
|
0.96 |
0.68 |
Note: Blank cells indicate lab 4 did not participate in the coating series.
Table 7. k-statistic considering 0.02-inch failure criteria.
Lab |
Coating |
|||||||||
|---|---|---|---|---|---|---|---|---|---|---|
A1 |
A2 |
B1 |
B2 |
C1 |
C2 |
D1 |
D2 |
E1 |
E2 |
|
1 |
0.24 |
0.94 |
1.01 |
0.09 |
0.17 |
0.91 |
0.67 |
0.67 |
0.35 |
0.20 |
2 |
1.69 |
1.48 |
0.79 |
1.71 |
1.98 |
0.51 |
1.60 |
1.59 |
1.79 |
1.81 |
3 |
0.31 |
0.90 |
1.16 |
0.25 |
0.16 |
0.37 |
0.08 |
0.12 |
0.72 |
0.70 |
4 |
|
0.33 |
|
|
0.10 |
1.67 |
|
|
0.41 |
0.43 |
Note: Blank cells indicate lab 4 did not participate in the coating series.
Table 8. k-statistic considering just peak load failure criteria.
Lab |
Coating |
|||||||||
|---|---|---|---|---|---|---|---|---|---|---|
A1 |
A2 |
B1 |
B2 |
C1 |
C2 |
D1 |
D2 |
E1 |
E2 |
|
1 |
0.55 |
0.76 |
0.97 |
0.08 |
0.90 |
0.34 |
0.73 |
0.37 |
0.57 |
0.15 |
2 |
1.31 |
1.33 |
0.91 |
1.68 |
1.48 |
1.41 |
1.54 |
1.69 |
1.34 |
1.89 |
3 |
1.00 |
1.20 |
1.11 |
0.43 |
0.90 |
0.25 |
0.30 |
0.14 |
1.19 |
0.54 |
4 |
|
0.49 |
|
|
0.43 |
1.35 |
|
|
0.67 |
0.33 |
Note: Blank cells indicate lab 4 did not participate in the coating series.
The data are also shown in figure 45 through figure 52. Two plots are presented for each of the two statistics and for each of the two failure criterion: one for the laboratories within a material and one for materials within a lab. For the h-statistic, the critical value is a function of the number of labs participating in a certain material. Since lab 4 only participated in half the testing, there are two sets of critical values depending on whether each material was tested by three or four labs. In each of the graphs, black dashed lines represent the critical values. Because of the changing critical values, the black dashed lines appear saw-toothed when plotting materials within a lab and as a step function when plotting labs within a material.
Provided all the labs produced similar data, it would not be expected that any h-statistic data would exceed the critical values, and inspection of the plots finds this to be the case. The ASTM E691-13 specification also alludes to the notion that there should be no expected pattern in these plots.(3) That is, data per lab could have both positive and negative h values, or a lab could be entirely positive provided there are an equal number of labs that are all negative. The h-statistic data for both criteria do not have any discernable pattern and all fall with the 95 percent confidence limits.
The critical values for the k-statistic are a function of the number of participating labs and number of replicates tested in each series. Since lab 4 did not participate in all series and because the number of replicates varied from three to five, there are multiple critical k-statistic values. As in the graphs for the h-statistic, black dashed lines are plotted for the critical k-statistic values. Since the k-statistic can only be a positive value, the parameter to look for is if a lab or material exceeds the critical k-statistic value. Inspecting the k-statistic graphs for lab 2 highlights the lab’s differences. When considering the 0.02-inch failure criteria, 7 of the 10 materials for lab 2 had a k-statistic in excess of their critical values, while all other labs were much lower than their critical values (see figure 47 and figure 48). When using just the peak load criteria, lab 2 only exceeded the critical k-statistic value for 3 of the 10 materials, and variability was overall closer to the other 3 labs (see figure 51 and figure 52).
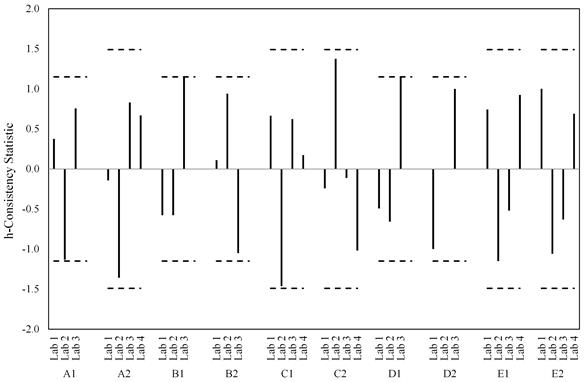
Figure 45. Graph. Labs within material for h-statistic considering the 0.02-inch slip criterion.
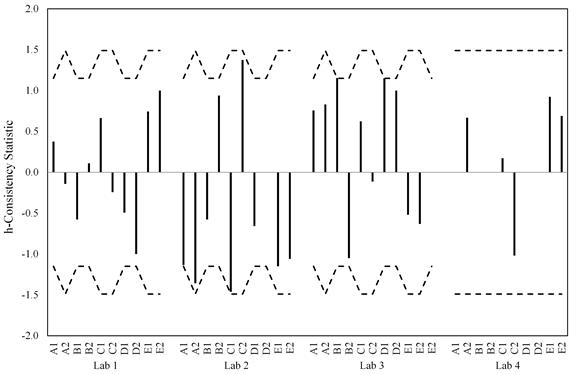
Figure 46. Graph. Materials within lab for h-statistic considering the 0.02-inch slip criterion.
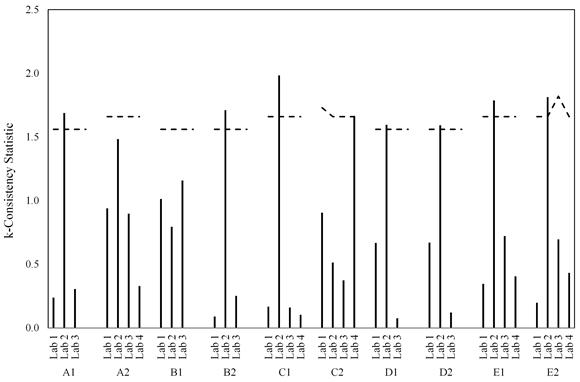
Figure 47. Graph. Labs within material for k-statistic considering the 0.02-inch slip criterion.
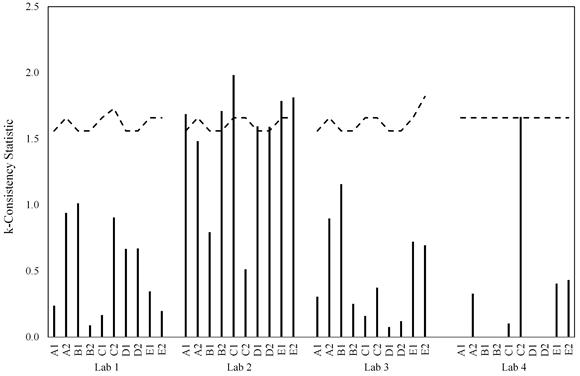
Figure 48. Graph. Materials within lab for k-statistic considering the 0.02-inch slip criterion.
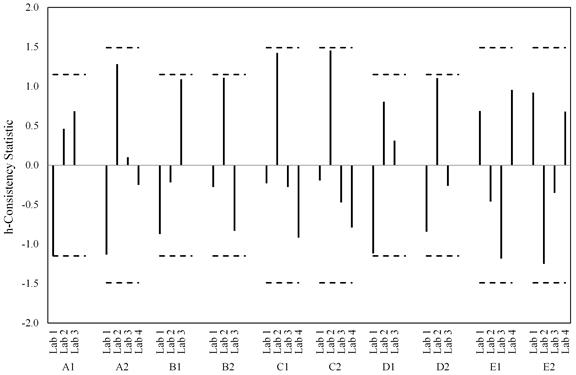
Figure 49. Graph. Labs within material for h-statistic considering just the peak load criterion.
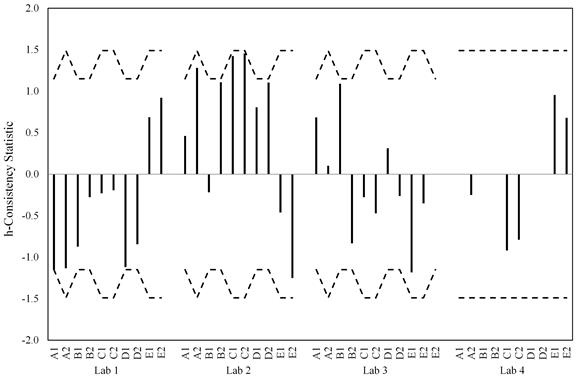
Figure 50. Graph. Materials within lab for h-statistic considering just the peak load criterion.
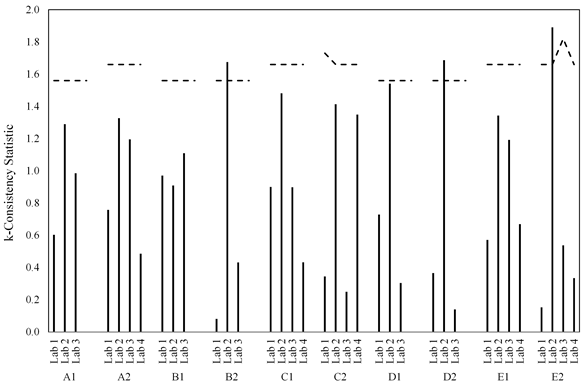
Figure 51. Graph. Labs within material for k-statistic considering just the peak load criterion.
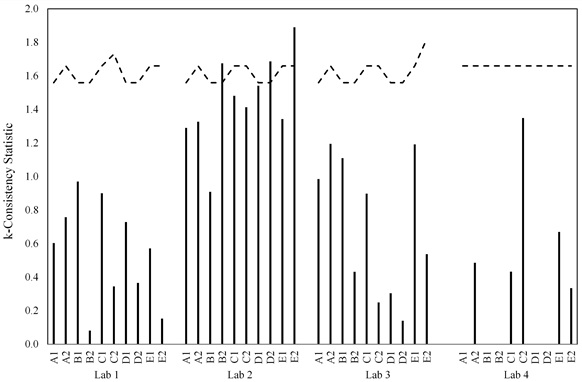
Figure 52. Graph. Materials within lab for k-statistic considering just the peak load criterion.
Table 9 and table 10 report the other precision statistics required to be output by the ASTM E691-13 specification when considering the 0.02-inch failure criteria and when using just peak loads.(3) Since there were only four labs, the repeatability and reproducibility statistics can become skewed. However, comparing the standard deviation of repeatability and reproducibility between the two tables shows many of the test series have lower variation when using just the peak load criterion. This is further proof that the displacement measurements and the 0.02-inch failure criteria were the major factor in the large standard deviation.
Table 9. Precision statistics considering 0.02-inch requirement.
Coating Series |
Average |
Standard Deviation |
Repeatability Standard Deviation |
Reproducibility Standard Deviation |
Repeatability Limit* |
Reproducibility Limit** |
|---|---|---|---|---|---|---|
A1 |
0.51 |
0.063 |
0.055 |
0.080 |
0.15 |
0.22 |
A2 |
0.52 |
0.025 |
0.025 |
0.034 |
0.07 |
0.09 |
B1 |
0.55 |
0.015 |
0.011 |
0.018 |
0.03 |
0.05 |
B2 |
0.56 |
0.024 |
0.093 |
0.087 |
0.26 |
0.24 |
C1 |
0.58 |
0.049 |
0.068 |
0.078 |
0.19 |
0.22 |
C2 |
0.61 |
0.031 |
0.024 |
0.037 |
0.07 |
0.10 |
D1 |
0.47 |
0.036 |
0.058 |
0.064 |
0.16 |
0.18 |
D2 |
0.48 |
0.046 |
0.083 |
0.087 |
0.23 |
0.24 |
E1 |
0.43 |
0.022 |
0.054 |
0.053 |
0.15 |
0.15 |
E2 |
0.40 |
0.051 |
0.057 |
0.073 |
0.16 |
0.20 |
* The value below which the absolute difference between two individual test results obtained under repeatability conditions may be expected to occur with a probability of approximately 95 percent.
** The value below which the absolute difference between two test results obtained under repeatability conditions may be expected to occur with a probability of approximately 95 percent.
Table 10 . Precision statistics considering just peak load.
Coating Series |
Average |
Standard Deviation |
Repeatability Standard Deviation |
Reproducibility Standard Deviation |
Repeatability Limit* |
Reproducibility Limit** |
|---|---|---|---|---|---|---|
A1 |
0.55 |
0.013 |
0.017 |
0.019 |
0.05 |
0.05 |
A2 |
0.54 |
0.006 |
0.019 |
0.018 |
0.05 |
0.05 |
B1 |
0.56 |
0.013 |
0.012 |
0.017 |
0.03 |
0.05 |
B2 |
0.58 |
0.057 |
0.054 |
0.075 |
0.15 |
0.21 |
C1 |
0.62 |
0.029 |
0.012 |
0.031 |
0.03 |
0.09 |
C2 |
0.62 |
0.037 |
0.036 |
0.048 |
0.10 |
0.14 |
D1 |
0.50 |
0.026 |
0.015 |
0.029 |
0.04 |
0.08 |
D2 |
0.57 |
0.138 |
0.071 |
0.152 |
0.20 |
0.43 |
E1 |
0.44 |
0.015 |
0.033 |
0.033 |
0.09 |
0.09 |
E2 |
0.39 |
0.066 |
0.074 |
0.094 |
0.21 |
0.26 |
* The value below which the absolute difference between two individual test results obtained under repeatability conditions may be expected to occur with a probability of approximately 95 percent.
** The value below which the absolute difference between two test results obtained under repeatability conditions may be expected to occur with a probability of approximately 95 percent.