U.S. Department of Transportation
Federal Highway Administration
1200 New Jersey Avenue, SE
Washington, DC 20590
202-366-4000


Skip to content
Facebook iconYouTube iconTwitter iconFlickr iconLinkedInInstagram

Federal Highway Administration Research and Technology
Coordinating, Developing, and Delivering Highway Transportation Innovations

 
REPORT
This report is an archived publication and may contain dated technical, contact, and link information
Back to Publication List        
Publication Number:  FHWA-HRT-17-093    Date:  February 2018
Publication Number: FHWA-HRT-17-093
Date: February 2018


Adjacent Box Beam Connections: Performance and Optimization

CHAPTER 2. EXPERIMENTAL INVESTIGATION

INTRODUCTION

Four connection design details were investigated with full-scale testing in this study using AASHTO type BII-36 box beams. These beams have a cross section of 36 inches (914 mm) wide, 33 inches (838 mm) deep, and 50 ft (15.2 m) long. Each test consisted of two box beams connected using one of the four connections being investigated. This chapter introduces the connection designs, construction materials, and construction procedures. It then presents the setup of the thermal loading and cyclic structural loading tests, including the loading protocols and instrumentation used.

SHEAR KEY AND BOX BEAM DESIGN DETAILS

Four connection designs were evaluated in this study. The first two used conventional high-strength non-shrink grout. One had a partial-depth connection, and the other had a full-depth connection, as shown in figure 1 and figure 2, respectively. It should be noted that, in accordance with common practice, the designs with conventional grout utilized transverse PT. Photographs of the partial-depth conventional grout shear key prior to casting and the means of applying the transverse PT force are presented in figure 3 and figure 4, respectively.

This illustration shows a cross section of American Association of State Highway and Transportation Officials type BII-36 box beams with a partial-depth conventionally grouted connection. The two box beams, the shear key connection, and the post-tensioning rod are shown. The locations of the prestressing strands and the other beam reinforcement are not shown for clarity. The illustration shows a pair of beams with a partial-depth conventionally grouted connection at the upper connection point between the beams. The post-tensioning bar traversing the connection is also shown close to the top of the beams.

Source: FHWA.
Figure 1. Illustration. Partial-depth conventional grout connection.

This illustration shows a cross section of American Association of State Highway and Transportation Officials type BII-36 box beams with a full-depth conventionally grouted connection. The two box beams, the shear key connection, and the post-tensioning rod are shown. The locations of the prestressing strands and the other beam reinforcement are not shown for clarity. The illustration shows the beams with a full-depth conventionally grouted connection with the connection covering nearly the entire abutting surfaces between the beams. The post-tensioning bar traversing the connection is also shown in the middle of the beams.

Source: FHWA.
Figure 2. Illustration. Full-depth conventional grout connection.

This photo shows beams with partial-depth connections aligned to connect the conventionally grouted shear key connection. One beam is resting in the testing configuration, and the second is suspended so it can be positioned adjacent to the stationary beam. Each beam has a wooden spacer around the hole for the post-tensioning rod, and the suspended beam has foam seals at the bottom of the shear key connection and on the wooden spacer. These are to prevent the grout from leaking during casting.

Source: FHWA.
Figure 3. Photo. Alignment of the partial-depth conventional grout connection.

This photo shows how post-tensioning (PT) force was applied to partial-depth beams with a conventionally grouted shear key connection. Two of the four PT rods are visible, and they are located approximately one-quarter of the height from the top of the beam. High-strength PT rods bear on the beams through 7- by 7-inch (178- by 178-mm) plates.

Source: FHWA.
Figure 4. Photo. Transverse PT bars after installation.

The other two connections investigated were new design details that take advantage of the enhanced mechanical and durability properties of UHPC. The UHPC connections used the same two basic details: one had a partial-depth connection, and the other had a full-depth connection, as shown in figure 5 and figure 6, respectively.

This illustration shows a cross section of American Association of State Highway and Transportation Officials type BII-36 box beams with a partial-depth ultra-high performance concrete (UHPC) connection. The two box beams, the shear key connection, and the reinforcement extending into the connection are shown. The locations of the prestressing strands and the other beam reinforcement are not shown for clarity. The illustration shows the beams with a partial-depth UHPC at the upper connection point between the beams. The rebar extending from each beam is shown as being lap spliced in the connection.

Source: FHWA.
Figure 5. Illustration. Partial-depth UHPC connection.

This illustration shows a cross section of American Association of State Highway and Transportation Officials type BII-36 box beams with a full-depth ultra-high performance concrete (UHPC) connection. The two box beams, the shear key connection, and the reinforcement extending into the connection are shown. The locations of the prestressing strands and the other beam reinforcement are not shown for clarity. The illustration shows the beams with a full-depth UHPC connection with a rebar lap splice connection being shown both at the top of the connection and at the bottom of the connection between the beams.

Source: FHWA.
Figure 6. Illustration. Full-depth UHPC connection.

The connection designs included two different surface finishes. The conventionally grouted connection used a sandblasted (SB) surface finish (see figure 7), while the UHPC connection used an exposed aggregate (EA) surface finish (see figure 8). The EA surface finish was created by applying a gelatinous set retarder to the formwork. This delayed the hydration reaction in the concrete, and the unhydrated paste was washed off with water after the formwork was removed. The EA surface preparation has been suggested for field applications of UHPC.(15–17)

This photo shows the difference between two finishes on conventionally grouted connections. The surface of the connection in the top of the photo is sandblasted (SB). It appears to be rougher, with some of the air voids from the concrete exposed. The finish of the beam as it is removed from the framework is visible in the bottom half of the photo and appears smooth to the touch.

Source: FHWA.
Figure 7. Photo. SB surface finish utilized in the conventionally grouted connection.

This photo shows the difference between the two finishes on ultra-high performance concrete (UHPC) connections. The finish of the beam as it is removed from the framework (i.e., steel framework surface finish) is visible in the top half of the photo and appears smooth to the touch. The surface of the connection in the bottom half of the photo (i.e., exposed aggregate (EA) surface finish) has the aggregate of the concrete exposed. It is much rougher, with the coarse EA of the concrete protruding from the surface.

Source: FHWA.
Figure 8. Photo. EA surface finish utilized in the UHPC connection.

The design of the UHPC connection included protruding reinforcing steel from each of the precast box beams. These rebars formed a non-contact lap splice when filled with UHPC. With UHPC, a reduced embedment length for deformed reinforcements allowed for simplified design and construction of connection details. An embedment length of 5.5 inches for a No. 4 bar (140 mm for an M13 bar) in the UHPC connections was used in this study and has been demonstrated to be sufficient to develop the yield strength of the steel bar.(18,19) Transverse PT was only applied to the UHPC beams during the casting of the connection to ensure stability of the system during construction. The partial-depth UHPC connection can be seen during and after alignment, as shown in figure 9 and figure 10, respectively.

This photo shows beams with partial-depth connections being aligned to connect the ultra-high performance concrete (UHPC) shear key connection. One beam is resting in the testing configuration, and the second is suspended so it can be positioned adjacent to the stationary beam. Foam seals are visible on the bottom of the shear key connection and on the wooden spacers around the post-tensioning holes. Reinforcement protrudes from the connections of each of the beams.

Source: FHWA.
Figure 9. Photo. Alignment of the partial-depth UHPC connection.

This photo shows beams aligned with partial-depth ultra-high performance concrete (UHPC) connections. They have been positioned and aligned but are not yet grouted together. The size and shape of the connection is visible, and the reinforcement extending from each beam can be seen extending between the beams. The reinforcement toward the end of the beam appears to be nearly in contact, while reinforcement more toward the center is not.

Source: FHWA.
Figure 10. Photo. Partial-depth UHPC connection after alignment.

The concepts for the partial- and full-depth connections are presented in figure 11 and figure 12, respectively. The box beam designs and connection detail dimensions are presented in figure 113 through figure 116 in the appendix. Each box beam has two connection details, one on each side. Figure 13 and figure 14 show the same box beams aligned for the conventional grout and the UHPC connections, respectively. With this design, each beam could be tested with both a conventional grout and a UHPC connection. The conventionally grouted connection was tested first, and the two beams were then separated and arranged to test the UHPC connection.

This illustration shows a conventionally grouted connection, which is taller and narrower in comparison to the ultra-high performance concrete connection. Only half of the beam is shown, and it is divided on the centerline (labeled as “CL”) of the beam that divides the beam cross section into two equal halves. The tall and narrow connection pocket is located in the upper right hand corner of the beam and only comprises of about one-third of the total height of the beam. The surface of this pocket is shaded and labeled as “SB,” indicating that the surface of the pocket has a sandblasted finish.

Source: FHWA.
A. Conventional.
1 inch = 25.4 mm.

This illustration shows the ultra-high performance concrete (UHPC) connection, which is shallower and more bulbous than the conventional connection. It also includes #4 reinforcement bars spaced at 8-inch (203-mm) intervals along the length extending from the box beam itself into the bulb of the connection. The surface of the bulb connection is shaded and labeled as “EA,” indicating that it has an exposed aggregate finish. Only half of the beam is shown, and it is divided on the centerline (labeled as “CL”) of the beam that divides the beam cross section into two equal halves.

Source: FHWA.
B. UHPC.

Figure 11. Illustrations. Partial-depth connection details for the conventional and UHPC connections.

This illustration shows the conventionally grouted connection, which has a uniform narrow thickness through the entire height of the beam. Only half of the beam is shown, and it is divided on the centerline (labeled as “CL”) of the beam that divides the beam cross section into two equal halves. The surface of the pocket is shaded and labeled as “SB,” indicating that the surface of the pocket has a sandblasted finish.

Source: FHWA.
A. Conventional.
1 inch = 25.4 mm.

This illustration shows the ultra-high performance concrete (UHPC) connection, which contains two bulbs, one on the top and one on the bottom of the beam. Number 4 reinforcement bars extend from the box beam itself into each bulb in the connection at 8-inch (203-mm) intervals along the length of the beam. The surface of each bulb connection is shaded and labeled as “EA,” indicating that it has an exposed aggregate finish. Only half of the beam is shown, and it is divided on the centerline (labeled as “CL”) of the beam that divides the beam cross section into two equal halves.

Source: FHWA.
B. UHPC.

Figure 12. Illustrations. Full-depth connection details for the conventional and UHPC connections.
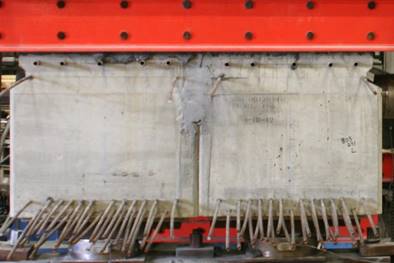
This photo shows an end view of two beams with partial-depth connections joined using conventional grout. The connection has already been poured, and the beams are resting on their end supports. The bulbous ultra-high performance concrete connection is visible on the outside of each beam.

Source: FHWA.
Figure 13. Photo. Partial-depth beams aligned for connection with the conventional grout shear key connection.
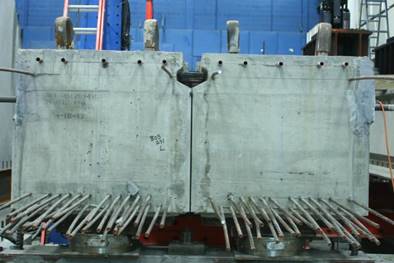
This photo shows an end view of two beams with partial-depth connections aligned for use with ultra-high performance concrete (UHPC). The connection has not been poured, but the beams can be seen resting on their end supports. The cracked remnants of the conventionally grouted connection are visible on the outside of each beam.

Source: FHWA.
Figure 14. Photo. Partial-depth beams aligned for connection with the UHPC shear key connection.

SHEAR KEY MATERIALS

Two field-cast cementitious materials were used in the connection details. One was a conventional non-shrink grout, and the other was UHPC.

Conventional Non-Shrink Grout

The conventional grout material used in this study was a portland cement-based, prepackaged, non-shrink grout. A water-to-solids ratio of 0.17 was used, and the grout reached an average compressive strength of between 7,800 and 8,120 psi (54 and 56 MPa) at the time of testing. Further assessment of the properties of this grout can be found elsewhere.(20,21) A summary of the properties of the grout is available in table 1. More details about the non-shrink grout and the UHPC can be found in research by Graybeal et al. (See references 16–18 and 20–24.)

Table 1. Typical material properties of the utilized conventional non-shrink grout.
Material Characteristic Average Result
Water-to-solids ratioa 0.17
Average compressive strengtha (ksi) 8.000
Flow after 25 dropsa (inches) 9.125–10.0
Solid specific gravityb 2.93
Final time of setb (h) 6.8
Air contentb 5.1
Unit weightb (lb/ft3) 129

1 ksi = 6.89 MPa.

1 inch = 25.4 mm.

1 lb/ft3 = 16 kg/m3.

aValues recorded in this study.

bValues reported by De la Varga and Graybeal.(20)

UHPC

Advances in the science of concrete materials have led to the development of a new class of advanced cementitious materials, namely UHPC. These concretes tend to contain high amounts of cementitious materials and a very low water-to-cementitious materials ratio as well as exhibit high compressive and tensile strengths. Discrete steel fiber reinforcement is included in UHPC and allows the concrete to sustain a tensile load after the cracking of the cementitious matrix.

UHPC has been defined as follows:

UHPC is a cementitious composite material composed of an optimized gradation of granular constituents, a water-to-cementitious materials ratio less than 0.25, and a high percentage of discontinuous internal fiber reinforcement. The mechanical properties of UHPC include compressive strength greater than 21.7 ksi (150 MPa) and sustained post-cracking tensile strength greater than 0.72 ksi (5 MPa). UHPC has a discontinuous pore structure that reduces liquid ingress, significantly enhancing durability compared to conventional concrete. (p. 1)(22)

Typical field-cast UHPC material properties are presented in table 2, which represent average values for a number of test parameters relevant to the use of UHPC as obtained from independent testing of a commercially available product.(23) This research, which was published in 2006 by the Federal Highway Administration (FHWA), investigated a number of material properties of a UHPC.(23) It also analyzed both mechanical- and durability-based behaviors of UHPC to assess its potential for use in future highway and bridge construction projects.

Table 2. Typical field-cast UHPC material properties.
Material Characteristic Average Result
Density (lb/ft3) 155
Compressive strength (ksi) with 28-d strength (ASTM C39)(24) 18.3
Modulus of elasticity (ksi) at 28 d (ASTM C469)(25) 6,200
Split cylinder cracking strength (ksi) (ASTM C496)(26) 1.3
Prism flexure cracking strength (ksi) with 12-inch span (ASTM C1018)(27) 1.3
Mortar briquette cracking strength (ksi) (AASHTO T132)(28) 0.9
Direct tension cracking strength (i.e., axial tensile load) (ksi) 0.8–1.0
Prism toughness index I30 (dimensionless) with 12-inch span (ASTM C1018)(27) 48
Long-term creep coefficient with 11.2-ksi load (ASTM C512)(29) 0.78
Long-term shrinkage with initial reading after set (microstrain (με)) (ASTM C157)(30) 555
Total shrinkage with embedded vibrating wire gauge (με) 790
Coefficient of thermal expansion (inch/inch/°F) (AASHTO TP60)(31) 8.2 × 10⁻⁶
Chloride ion penetrability with 28-d test (coulombs) (ASTM C1202)(32) 360
Chloride ion permeability with 0.5-inch depth (lb/yd3) (AASHTO T259)(33) <0.10
Scaling resistance (ASTM C672)(34) No scaling
Abrasion resistance with double weight ground surface (oz) (ASTM C944)(35) 0.026
Freeze–thaw resistance using method A for 600 cycles (percent) (ASTM C666)(36) 112
Alkali-silica reaction with 28-d test (ASTM C1260)(37) Innocuous

1 lb/ft3 = 16 kg/m3.

1 ksi = 6.89 MPa.

1 inch = 25.4 mm.

1 inch/inch/°F = 1.8 mm/mm/°C.

1 lb/yd3 = 0.593 kg/m3.

1 oz = 28.35 g.

The UHPC used for this research was a proprietary product produced by a major materials supplier. The UHPC formulation contained a premix powder, water, a modified phosphonate plasticizer, a modified polycarboxylate high-range water-reducing admixture, a non-chloride accelerator, and non-deformed, cylindrical, high-tensile strength steel fibers. The steel fibers had a diameter of 0.008 inch (0.2 mm), a length of 0.5 inch (12.7 mm), tensile strength greater than 290 ksi (2,000 MPa), and a thin brass coating that provided lubrication during the drawing process and provided corrosion resistance. The proportions used in this mix are shown in table 3. The UHPC used for this study had an average compressive strength of 26 ksi (179 MPa) at the time of testing.

Table 3. UHPC mix design.
Material Amount
(lb/yd3)
Premix powder 3,700
Water 219
Modified phosphonate plasticizer 30
Modified polycarboxylate high-range water reducer 20
Non-chloride accelerator 39
Steel fibers (2 percent by volume) 263

1 lb/yd3 = 0.593 kg/m3.

SHEAR KEY CONSTRUCTION

The primary objective of this research was to evaluate the connection performance under thermal and cyclically structural loading. To ensure that the connection material was not biased toward poor performance from early age degradation, such as shrinkage or debonding prior to structural loading, the following standard procedures were adopted:

This photo shows a connection using conventional grout that is being wetted before the grout is cast. A worker is placing a white hose into the shear key connection. The connection and the concrete surrounding it are visibly wet.

Source: FHWA.
Figure 15. Photo. Pre-wetting the shear key prior to casting the grout.

This photo shows wet burlap covering the freshly poured conventionally grouted connection. A continuous strip of burlap is seen running down the center of the connection. An additional roll of burlap is lying on top of the flat burlap. The rolled burlap is draped into 5-gal (18.925-L) buckets filled with water in order to keep the burlap wet.

Source: FHWA.
Figure 16. Photo. Wet burlap curing for the conventionally grouted connection.

This photo shows a layer of white plastic sheeting covering the freshly poured ultra-high performance concrete (UHPC) connection. Plastic runs the entire length of the beam and is weighted down on either side of the connection with wood or reinforcing bars.

Source: FHWA.
Figure 17. Photo. Plastic cover curing for the UHPC connection.

After the connection was cured, the top surface of the connection was ground to achieve a smooth surface. This served to assist in examining the shear key and in identifying interface cracking. An example of the ground connection surface is presented in figure 18.
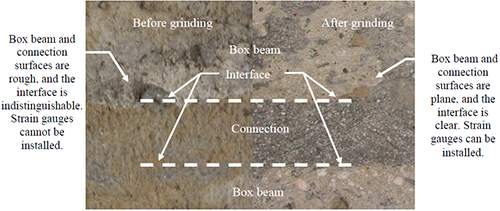
This photo shows a conventionally grouted connection before and after it has been prepared with surface grinding. The left half of the figure shows the surface before grinding. It is rough, and the connection not easily distinguishable. The right half of the figure shows the surface after grinding; the surface is much smoother, and the connection is much clearer with a clearly distinguishable interface between the connection and box beams. Dotted lines indicate the interface locations.

Source: FHWA.
Figure 18. Photo. Comparison of the connection surface and interface between the box beams before and after grinding.

THERMAL LOADING TEST SETUP

Thermal loading was simulated by pumping steam through copper tubes cast in the top flange of the box beams to create a temperature gradient through the depth of the beams. The copper tube arrangement is illustrated in figure 19 and can be seen in the box beam before the concrete was cast in figure 20.
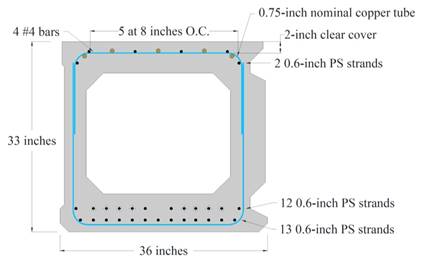
This illustration shows the arrangement of copper tubing, which carries the steam for the thermal cycling. The overall cross section of the box beam is 33 inches (838 mm) tall and 36 inches (914 mm) wide. There are five 0.75-inch (19.05-mm) copper tubes running the length of the beam located 8 inches (203 mm) on the center (labeled as “O.C.”) in the top flange of the beam with the four #4 rebar reinforcement (M13 rebar). There are three levels of prestressing strands in the beam. The bottom flange has two layers of 0.6-inch prestressing (PS) strands. The bottom layer of the bottom flange has 13 0.6-inch (15.24-mm) PS strands, and the top layer of the bottom flange has 12 0.6-inch (15.24-mm) PS strands. The top flange also has one layer of two 0.6-inch (15.24-mm) PS strands. The figure also shows the confinement reinforcement included in the beam indicated as two blue U-shaped lines, one in the bottom flange and one inverted in the top flange.

Source: FHWA.
1 inch = 25.4 mm.
PS = prestressing.
O.C. = on the center.
Figure 19. Illustration. Copper tube arrangement within the top flange of the beams.

This photo shows copper tubing running in the top flange of a box beam prior to casting the top of the beam. Five lines of copper tubing can be seen resting on top of the top mat of reinforcement.

Source: FHWA.
Figure 20. Photo. Copper tubes in the box beam prior to casting.

The beams were kept inside the laboratory with a room temperature of 70 °F (21 °C). The rate of thermal heating was approximately 18 °F/h (10 °C/h). The steam was cut off when the temperature gradient between the flanges was approximately 50 °F (28 °C). A total of 10 cycles were performed on each connection configuration. Temperatures were recorded using thermocouples embedded within the beams.

CYCLIC STRUCTURAL LOADING TEST SETUP

Two box beams were connected, and four-point bending loads were applied. Three boundary configurations were used: one configuration with both beams simply supported, a second condition with limited end transverse rotation of both beams, and a third with the same limited end rotation plus an additional restraint on one beam’s mid-span deflections. The latter two conditions provided more stiffness to the system.

Transverse PT

Transverse PT was used with the conventionally grouted connections. The transverse PT force varied from 0 to 100 kip (0 to 445 kN) at each transverse PT location. These applied PT levels ranged from 8 to 0 kip/ft (0 to 117 kN/m) (i.e., high to low). The transverse PT force was monitored using the load cells (see figure 21). The PT was applied through the internal diaphragms of the girders. No transverse PT was applied for the UHPC connections.

This photo shows one end of post-tensioning (PT) rods bearing on a load cell. Instead of bearing on the box beam, the 7- by 7-inch (178- by 178-mm) plate bears on a spacer that brings the load through a load cell before bearing on the box beam. This allows for the load in the PT rod to be monitored.

Source: FHWA.
Figure 21. Photo. Transverse PT monitored with a load cell.

Transverse PT is widely used in precast prestressed box beam bridge systems. Annamalai and Brown conducted experimental studies to investigate the effect of transverse PT on the behavior of small assemblies.(38) They concluded that transverse PT exhibited a high degree of monolithic behavior and significantly improved the shear strength of grouted shear key connections. However, according to Russell, more than 80 percent of designers surveyed as part of a study did not complete any design calculations to determine the level of transverse PT force needed.(1) When box girder bridges were examined in the field by Huckelbridge et al., they concluded that transverse PT was ineffective at resisting Δδ after the connection partially fractured, despite observing a satisfactory load distribution among beams.(4)

Simply Supported Load and Reaction Arrangement

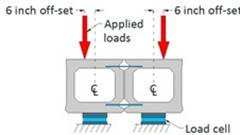
The loading setup on the two connected box beams is illustrated in figure 22. The box beams were simply supported at each end, providing a span length of 48 ft (14.6 m). Each individual beam was loaded with a spreader beam attached to an actuator. The loading points were 3 ft (0.9 m) on either side of the mid-span. The load was intentionally placed 6 inches (15 cm) off the centerline of the box beam to create a more severe tension force at the connection interface. A photograph showing the laboratory setup is presented in figure 23.
In the side view, the actuator, loading points, post-tensioning (PT) points and supports are shown. The loading points are 6 ft (1.83 m) apart centered on the 48 ft (14.63 m) span. The two of the four PT points are located 19 inches (0.48 m) from each end support, and the remaining two PT points are 13 ft 5 inches (4.09 m) from the first PT points. A total of 20 ft (6.1 m) separate the middle two PT points.

Source: FHWA.
1 ft = 0.305 m.
1 inch = 25.4 mm.
A. Side view.

The end view of the setup shows that the load is placed 6 inches (152 mm) off the centerline of the beams toward the outer edge of each beam.

Source: FHWA.
1 inch = 25.4 mm.
B. End view.
Figure 22. Illustrations. Loading setup for the simply supported configuration.

This photo shows beams set up in a loading frame. Two joined beams with post-tensioning rods attached are installed in the load frame with the actuator attached. The end clamp and middle supports for the system stiffness modifications are also both visible.

Source: FHWA.
Figure 23. Photo. Cyclic structural loading test setup.

Modified Reactions to Increase System Restraint

The simply supported two-beam system is more flexible than a multi-beam bridge. In a multi-beam bridge, adjacent members are forced to deflect simultaneously when load is applied to a single beam as vertical shear force is transferred through the connections. When the deflection of an adjacent member is restrained by other beams in the bridge, a higher shear force at the connection can be expected compared to the case with two members.

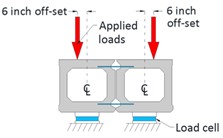
With this consideration, two strategies were used to provide additional stiffness in the two-beam system tested in this study. The first required clamping the beam ends to restrain end transverse rotation. The second employed end clamping in tandem with providing in-span support under one beam at the in-span diaphragms. These are referred to as “partially stiffened” and “fully stiffened” boundary conditions, respectively, while the simply supported condition is referred to as “unstiffened.” The clamp-down force at each end was applied with two double C channels with a total clamp-down force of 100 kip (445 kN). For the support at the in-span diaphragms, the inside edge of the beam sat on a 6- by 24- by 2-inch (15- by 61- by 5-cm) neoprene pad, while the outside edge of the beam was tied down with a 35-kip (156-MPa) force to reduce the torsional rotation of the cross section when the beam was loaded. The setup is illustrated in figure 24 and pictured in figure 25 and figure 26.
In the side view, the actuator, loading points, end clamps, and supports are shown. The loading points are 6 ft (1.83 m) apart centered on a 48-ft (14.63-m) span. Two of the four PT points are located 19 inches (0.48 m) from each end support, and the remaining two PT points are 13 ft 5 inches (4.09 m) from the first PT points. A total of 20 ft (6.1 m) separate the middle two PT points. Clamps are added to the beam ends to reduce torsional rotation, and in-span supports are added at internal diaphragms 13 ft 5 inches (4.09 m) from each end support to limit displacements of one of the beams.

Source: FHWA.
1 ft = 0.305 m.
1 inch = 24.5 mm.

A. Side view.

Section A-A shows the cross section at the bearing location at each end of the test setup. The vertical centerline of each beam is shown by a dotted line. The two vertically applied loads are each located 6 inches (0.15 m) to the outside of the centerline of each beam. The two load cells are centered under each of the two beams.

Source: FHWA.
1 inch = 24.5 mm.

B. Section A-A.
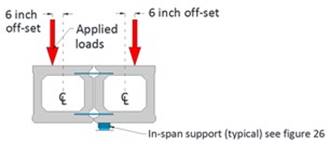
Section B-B shows the cross section at the interior supports, which are centered on the mid-span and are each located 10 ft (3.05 m) from the mid-span. The vertical centerline of each beam is shown by a dotted line. The two vertically applied loads are each located 6 inches (0.15 m) to the outside of the centerline of each beam. The in-span support is located under the right beam positioned at the left edge of the beam.

Source: FHWA.
1 inch = 24.5 mm.

C. Section B-B.

Figure 24. Illustrations. Boundary conditions intended to increase structural stiffness.

This photo highlights the clamping system that is used to reduce torsional rotation at the beam ends. The clamping system is highlighted within a dashed rectangle. Two double channels are shown spanning transversely across the end of the beams. These steel channels serve to clamp down on the beam ends, attaching them to the strong floor through the use of threaded rods.

Source: FHWA.
Figure 25. Photo. Clamping at the beam ends to restrain the transverse rotation.

This photo highlights in-span supports that reduce in-span deflections of one beam. This consists of a neoprene support near the connection between the two beams and a pulldown force applied by a threaded rod toward the outside of the same beam. The other beam, shown to the left, is not supported or held down at this location.

Source: FHWA.
Figure 26. Photo. Additional support provided at in-span diaphragms.

Loading Protocol

The basic cyclic loading protocol included load application to the two beams through a 2-Hz sinusoidal wave ranging from the minimum to the maximum load. A 180-degree phase angle between the actuators on each beam was included to generate load transfer through the connection. Load data from load cells on the actuators in one of the tests is shown in figure 27. A minimum load of 5 kip (34.5 kN) was employed to avoid actuator lift off and potential actuator movement relative to the beams.
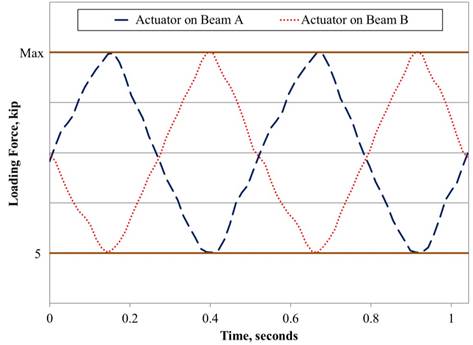
This graph shows a sample of load data recorded by the load cells attached to the actuators on each beam in the simply supported and partially stiffened setups. The y-axis shows loading force from 0 kip (0 kN) to maximum. The x-axis shows time from 0 to 1 s. Two sinusoidal plots are shown (actuator on beam A and actuator on beam B) with a 2-Hz frequency and 180-degree phase angle. The minimum value of the cycles is 5 kip (34.5 kN) and cycles up to a non-specified maximum value that changes based on the current loading range.

Source: FHWA.
1 kip = 4.448 kN.
Figure 27. Graph. Example of force read by the actuator load cells in the simply supported and partially stiffened beam setups.

When the partially stiffened configuration was used, the beams were loaded following the same loading protocol as the unstiffened configuration. For the fully stiffened configuration, the cyclic load was applied to the unrestrained beam, while the load on the restrained beam was held constant at 5 kip (22 kN). Some load data from load cells on the actuators in one of the tests are shown in figure 28. Minor fluctuations in beam B can be seen, which were caused by the loading on beam A.
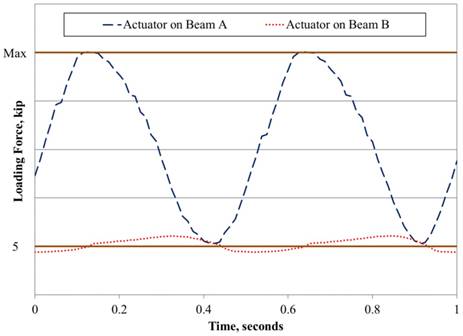
This graph shows a sample of load data recorded by the load cells attached to the actuators on each beam in the fully stiffened setup. The y-axis shows loading force and ranges from 0 kip (0 kN) to maximum. The x-axis shows time and ranges from 0 to 1 s. Two sinusoidal plots are shown: actuator on beam A and actuator on beam B. The actuator on beam A has a 2-Hz frequency, a minimum value of 5 kip (34.5 kN), and a non-specified maximum value that changes based on the current loading range. The actuator on beam B remains around 5 kip (34.5 kN) with minor fluctuations caused by the loading on the other beam.

Source: FHWA.
1 kip = 4.448 kN.
Figure 28. Graph. Example of force read by the actuator load cells for beams with the fully stiffened boundary condition.

An analysis of a representative adjacent box beam bridge indicated that an 18-kip (80-kN) loading amplitude was approximately the force effect on a single beam induced by a fatigue truck in the AASHTO LRFD Bridge Design Specifications.(6) Based on this information, loading ranges of 18, 36, 54, 72, and 90 kip (80, 160, 240, 320, and 400 kN) were applied in the study. The loading summaries for the cyclic loading scenarios are presented in table 4 through table 7. They include the boundary conditions, loading ranges, PT levels, and number of cycles performed for each of the four test specimens.

Table 4. Summary of structural loading scenarios for the partial-depth conventional shear key connections.
Connection
Condition
Boundary Load Range
(kip)
PT
(kip/ft)
Cycles*
(×106)
Uncracked Unstiffened 18, 36, 54, and 72 8.0 0.50
Uncracked Unstiffened 90 8.0 1.00
Uncracked Unstiffened 54, 72, and 90 6.0 0.50
Uncracked Unstiffened 54 and 72 4.0 0.15
Uncracked Unstiffened 90 4.0 0.50
Uncracked Unstiffened 54 and 72 2.0 0.15
Uncracked Unstiffened 90 2.0 0.50
Uncracked Unstiffened 54 and 72 0.8 0.15
Uncracked Unstiffened 90 0.8 0.50
Uncracked Partially stiffened 54 and 72 2.0 0.15
Uncracked Partially stiffened 90 2.0 0.50
Uncracked Partially stiffened 54 and 72 0.8 0.15
Uncracked Partially stiffened 90 0.8 0.50
Uncracked Fully stiffened 54 and 72 2.0 0.15
Uncracked Fully stiffened 90 2.0 0.50
Uncracked Fully stiffened 54 and 72 0.8 0.02
Uncracked Fully stiffened 90 0.8 0.55
Uncracked Fully stiffened 54 and 72 0.0 0.03
Uncracked Fully stiffened 90 0.0 0.30
Partially cracked Fully stiffened 54 and 72 8.0 0.01
Partially cracked Fully stiffened 90 8.0 0.15
Partially cracked Fully stiffened 54 and 72 4.0 0.01
Partially cracked Fully stiffened 90 4.0 0.30
Partially cracked Fully stiffened 54 and 72 0.8 0.01
Partially cracked Fully stiffened 90 0.8 0.15
Partially cracked Fully stiffened 54 and 72 0.0 0.01
Partially cracked Fully stiffened 90 0.0 0.15
Fully cracked Fully stiffened 18, 36, 54, 72, and 90 8.0 0.01
Fully cracked Fully stiffened 18, 36, 54, 72, and 90 4.0 0.01
Fully cracked Fully stiffened 18, 36, 54, 72, and 90 0.8 0.01
Fully cracked Fully stiffened 18, 36, 54, 72, and 90 0.0 0.01

1 kip = 4.448 kN.

1 kip/ft = 14.59 kN/m.

*Number of cycles listed is for each individual loading range, not the total for all loading ranges listed.

Table 5. Summary of structural loading scenarios for the full-depth conventional shear key connections.
Connection
Condition
Boundary Load Range
(kip)
PT
(kip/ft)
Cycles*
(×106)
Partially cracked Unstiffened 54 and 72 8.0 0.15
Partially cracked Unstiffened 90 8.0 0.30
Partially cracked Unstiffened 54 and 72 4.0 0.15
Partially cracked Unstiffened 90 4.0 0.30
Partially cracked Unstiffened 54 and 72 0.8 0.15
Partially cracked Unstiffened 90 0.8 0.30
Partially cracked Unstiffened 54 and 72 0.0 0.15
Partially cracked Unstiffened 90 0.0 0.15
Fully cracked Unstiffened 90 0.0 0.15

1 kip = 4.448 kN.

1 kip/ft = 14.59 kN/m.

*Number of cycles listed is for each individual loading range, not the total for all loading ranges listed.

Table 6. Summary of structural loading scenarios for the partial-depth UHPC shear key connections.
Connection
Condition
Boundary Load Range
(kip)
PT
(kip/ft)
Cycles*
(×106)
Uncracked Partially stiffened 54 and 72 0 0.15
Uncracked Fully stiffened 54 and 72 0 0.15
Uncracked Fully stiffened 90 0 0.65

1 kip = 4.448 kN.

1 kip/ft = 14.59 kN/m.

*Number of cycles listed is for each individual loading range, not the total for all loading ranges listed.

Table 7. Summary of structural loading scenarios for the full-depth UHPC shear key connections.
Connection
Condition
Boundary Load Range
(kip)
PT
(kip/ft)
Cycles*
(×106)
Uncracked Unstiffened 54, 72, and 90 0 0.050
Uncracked Partially stiffened 54, 72, and 90 0 0.150
Uncracked Fully stiffened 54 and 72 0 0.200
Uncracked Fully stiffened 90 0 0.515

1 kip = 4.448 kN.

1 kip/ft = 14.59 kN/m.

*Number of cycles listed is for each individual loading range, not the total for all loading ranges listed.

Instrumentation

The beams were loaded with a computer-controlled servo-hydraulic loading system, and the structural response of each specimen was captured through the use of electronic instrumentation. The test utilized thermocouples, load cells, linear variable differential transformers (LVDTs), and strain gauges to record critical data on the structural performance. A high-speed data acquisition system was used for the capture of data from the instruments during both the thermal and cyclic loading.

Each beam was equipped with seven embedded thermocouples. There was one placed in the bottom flange at the mid-span, while the other six were distributed along the top flange. Of these six, three were placed around the mid-span (i.e., one at the mid-span and two 6 ft (1.83 m) longitudinally on each side of the mid-span). Two thermocouples were positioned to monitor incoming and outgoing steam temperatures at one beam end. The final thermocouple was at the opposite beam end.

The load was monitored by six load cells placed under the end supports of each beam, as shown in figure 29. The west end of the beams utilized a single load cell under each beam, while the east end had two load cells under each beam. Load cells inside each actuator captured the force imparted to the structure through the actuators. A load cell was also used to monitor the PT force in each PT bar.

This photo shows a load cell under a beam at the west support. The load cell is located at the center of the beam. The beam is resting on a steel plate so that the entire width of the beam is supported.

Source: FHWA.
Figure 29. Photo. Load cell under the beam at the west support.

The vertical displacements of the beams were recorded by four LVDTs placed under the beam at the mid-span 2 inches (51 mm) away from each edge of each beam. Figure 30 shows the installation of these vertical transformers. Six transverse LVDTs measured separation of the connection between the beams. Three transverse LVDTs spanned the connection at the top of the beam, and three spanned the connection at the bottom of the beam. They were placed at the mid-span and 6 ft (1.83 m) longitudinally from the mid-span in each direction. The transverse bottom LVDT at the mid-span is visible in figure 30. Figure 31 shows a typical transverse LVDT spanning the top of the connection.
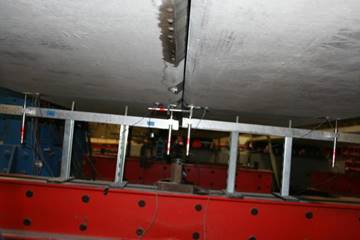
This photo shows the arrangement of the five linear variable differential transformers (LVDTs) located at the mid-span. Four are aligned vertically at each edge of each of the two beams. The fifth LVDT is aligned horizontally and spans across the gap between the two beams to measure separation.

Source: FHWA.
Figure 30. Photo. Five LVDTs (four vertical and one transverse) at the mid-span used to measure vertical deflection of the beams and the transverse connection opening.
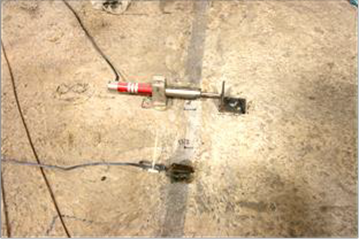
This photo shows the installation of a linear variable differential transformer (LVDT) and a transverse strain gauge on the top of the connection. The LVDT is mounted on one beam, measuring against a steel angle on the second beam. The strain gauge is positioned parallel to the LVDT on the grouted connection.

Source: FHWA.
Figure 31. Photo. Transverse LVDT and strain gauge on the top surface spanning the connection.

Electrical resistance strain gauges were used to capture longitudinal and transverse strain in the concrete. Each beam had six embedded strain gauges placed on sister rebar. The sister rebar was then coupled with the reinforcing steel of the beams. Figure 32 shows one of the longitudinal strain gauges at the mid-span in the bottom flange of one of the beams coupled with the top layer of prestressing strands. Transverse embedded strain gauges were placed at four locations: in the top and bottom flanges at the mid-span and in the top flange 6 ft (1.83 m) longitudinally on each side of the mid-span. Longitudinal strain gauges were placed in both the top and bottom flanges and at the mid-span. All embedded strain gauges were placed along the centerline of the beams. Some of the embedded strain gauges were not used in some of the tests. Table 8 shows what gauges were included in which tests.
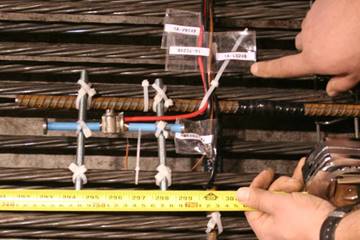
This photo shows a longitudinal embedded strain gauge and a thermocouple installed in the bottom flange of one of the beams prior to placing of concrete. The embedded strain gauge is aligned parallel to the prestressing strands. The thermocouple is directly next to this strain gauge as a brown wire. Red and blue wires are also shown as well as a ruler to provide context as to the length of the devices.

Source: FHWA.
Figure 32. Photo. Longitudinal strain gauge and thermocouple located at the mid-span in the bottom flange of one of the beams.

Table 8. Strain gauges used in the test setups.
Setup Embedded
Transverse
Gauges
Embedded
Longitudinal
Gauges
External
Longitudinal
Gauges
Transverse
Grout
Gauges
Transverse
Near
Connection
Transverse
Top Beam
Partial-depth grout Three on top (middle, east, and west) and one on the bottom One on the top and one on the bottom Not used Not used Not used Not used
Partial-depth grout (fully stiffened) Three on top (middle, east, and west) and one on the bottom One on the top and one on the bottom Two on each beam near the edge of the beams One at the mid-span, one 6 ft east, one 6 ft west, and four PT Not used Not used
Full-depth grout Three on top (middle, east, and west) and one on the bottom One on the top and one on the bottom Two on each beam near the edge of the beams One at the mid-span, one 6 ft east, one 6 ft west, and four PT Not used Not used
Partial-depth UHPC Three on top (middle, east, and west) and one on the bottom One on the top and one on the bottom Two on each beam near the edge of the beams One at the mid-span, one 6 ft east, one 6 ft west, and four PT Not used Not used
Full-depth UHPC One on the top of each beam (east gauges only were used in the north beam and middle gauges only were used in the south beam) Bottom only Two on each beam near the edge of the beams One at the mid-span, one 6 ft east, and one 6 ft west Two at the mid-span, two 6 ft east, and two 6 ft west each location one on each beam Three at the mid-span and four 6 ft east (center of each beam and the outside edge*)

1 ft = 0.305 m.

*The southern mid-span gauge did not capture any data.

Surface strain gauges were installed after the beams were connected. Seven transverse surface strain gauges were installed along the length of the connection to measure PT confinement strain and the development of tensile strain during the tests. Gauges were located at the mid-span 6 ft (1.83 m) from the mid-span in each direction and at PT locations. Additional transverse gauges were located on the top of the girder at the mid-span and 6 ft on each side of the mid-span. Three gauges were placed on each beam at the centerline and 6 inches (152 mm) from each edge. The location 6 ft (1.83 m) east of the mid-span had all six gauges. At the mid-span, the southern-most gauge was missing. The location 6 ft (1.83 m) west only had the two gauges nearest the connection. Four longitudinal surface strain gauges were placed on the bottom flange at the mid-span 6 inches (152 mm) from each edge. It should be noted that the surface strain gauges were not used on every specimen. Table 8 shows what gauges were included in which tests. The arrangement of all of the instrumentation is shown in figure 33.

This illustration shows the location of all possible instruments in the test specimens. The instruments are distributed along seven principal lines along the span length: the west support, the west post-tensioning (PT) diaphragm, 6 ft (1.83 m) west of the mid-span, the mid-span, 6 ft (1.83 m) east of the mid-span, the east PT diaphragm, and the east support. Instruments include external strain gauges (SGs) on top of the beams, internal SGs near the top of the beams, internal SGs on the bottom of the beam, internal SGs near the bottom of the beams, linear variable differential transformers (LVDTs) on top of the beams, LVDTs on the bottom of the beams, thermocouples on top and bottom of the beams, load cells under the beams and at the PT points, and actuators with load cells and LVDTs. The west support has two load cells under the centerline of each beam, a load cell monitoring the PT force, two thermocouples on the top of each beam on the outside and inside edges, and an external SG on the connection. Both the west and east PT diaphragms have a load cell monitoring the PT force and an external strain on the connection. The line 6 ft (1.83 m) west of the mid-span has three external SGs (one on the connection and one on either side of the connection), LVDTs on the top and bottom of the connection, a thermocouple on the top of the centerline of each beam, and an internal SG on the top of the centerline of each beam. The mid-span has six external SGs on the top of the beam (one on the connection, one on either side of the connection, one on the centerline of each beam, and one on the exterior edge of the north beam), six LVDTs (two on the edge of each beam and one on the top and bottom of the connection), eight internal SGs (two in both the top and bottom flanges of each beam at the centerlines and four thermocouples one in the top and bottom of each beam at the centerline). The line 6 ft (1.83 m) east of the mid-span has seven external SGs on the top of the beam (one on the connection and each beam has one at the centerline and each edge), LVDTs on the top and bottom of the connection, a thermocouple on the top of the centerline of each beam, and an internal SG on the top of the centerline of each beam. The east support has five load cells (one to monitor the PT force and one on each edge of each beam, one external SG on the top of the beam on the connection, and two thermocouples in the top flange with one on the centerline of each beam). Each of the four actuators also have a load cell and LVDT.

Source: FHWA.
1 ft = 0.305 m.
SG = strain gauge.
Figure 33. Illustration. Plan view of instrumentation installed on the test specimens.

Federal Highway Administration | 1200 New Jersey Avenue, SE | Washington, DC 20590 | 202-366-4000
Turner-Fairbank Highway Research Center | 6300 Georgetown Pike | McLean, VA | 22101