U.S. Department of Transportation
Federal Highway Administration
1200 New Jersey Avenue, SE
Washington, DC 20590
202-366-4000
Federal Highway Administration Research and Technology
Coordinating, Developing, and Delivering Highway Transportation Innovations
| REPORT |
| This report is an archived publication and may contain dated technical, contact, and link information |
|
| Publication Number: FHWA-HRT-16-064 Date: November 2016 |
Publication Number: FHWA-HRT-16-064 Date: November 2016 |
The cost-effective bottleneck mitigation strategies described in chapter 4 have already been implemented in many real-world locations. This project produced research on the following three strategies, which are not known to have been deployed in any U.S. locations:
Some of the simulation datasets used to evaluate these strategies can be obtained by contacting the STOL at TFHRC and referencing the bottleneck project (i.e., STOL task order 6).
Because of its success in treating recurrent congestion, it is natural to contemplate the possible effectiveness of HSR versus nonrecurrent congestion. For example, after an incident occurs, lane blockages may produce severe bottlenecks. In this situation, opening some section of the hard shoulder could be an effective way to increase capacity and help vehicles bypass the incident. This section proposes the concept of dynamic HSR as a traffic incident management strategy.(71) A dynamic HSR strategy can be explained using the example in figure 76, which illustrates a three-lane freeway segment and one hard shoulder lane on the far right. When an incident blocks the rightmost mainline lane, a section of the shoulder could be opened temporarily. This would allow vehicles to bypass the incident, thus avoiding the formation of excessive traffic congestion. Opening or closing shoulder sections could be accomplished preferably by smartphones, pushed auditory messages, or overhead gantries.
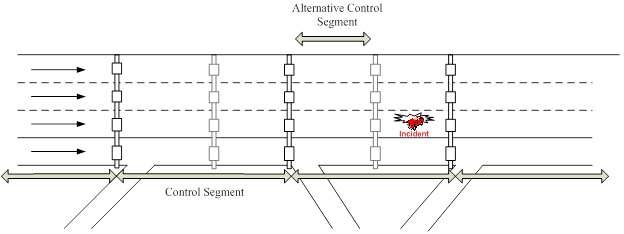
Figure 76. Illustration. Dynamic HSR for incident response.
Incidents are categorized as fatal and injury (FI) and property damage only (PDO). During an FI incident, more field operations are needed. Emergency vehicles tend to block more lanes (usually including incident lanes, lanes next to incident lanes, and shoulder lanes), and shoulders cannot be used after their arrival. Also, it is critical for emergency vehicles to arrive on time. Shoulders are usually reserved for these vehicles so that they can arrive as soon as possible. Therefore, dynamic HSR strategies are not recommended for FI incidents. For minor PDO incidents only, police arrive at the scene and push blocking vehicles to leave the highway and drive to the shoulder if vehicles do not voluntarily drive away or cannot leave the mainline. Traffic management centers usually have more flexibility in managing PDO incidents; thus, dynamic HSR can be more efficient for these types of incidents.
In general, dynamic HSR is useful in the following PDO scenarios:
Experiments were conducted using VISSIM™ 6.0 microscopic traffic flow simulation tool. Incidents were modeled by adding two vehicles with a speed of 0 mi/h to the incident location at the incident occurrence time. This was realized through the VISSIMTM component object model interface. After the incident clearance time (TCL), the two vehicles were removed through the same interface. Shoulder lanes and general purpose lanes were assumed to be 11 and 12 ft wide, respectively. Based on the 2010 HCM procedures for basic freeway segments, lane widths affect the free flow speed according to the equation in figure 77.(6)
![]()
Figure 77. Equation. Free-flow speed from lane width and lateral clearance.
Where:
FFS = Free-flow speed (mi/h).
fLW = Speed adjustment for lane width (mi/h).
fLC = Speed adjustment for lateral clearance (mi/h).
TRD = Total ramp density (ramps/mi).
In order to model rubbernecking effects within a VISSIMTM three-lane section, Hadi et al. recommended the application of 20-mi/h speeds in adjacent lanes.(72) According to the 2000 HCM, this speed produces typical incident period capacities.(73) To capture rubbernecking effects on freeway segments with more than four lanes in one direction, Miller-Hooks also suggested the use of lane-specific speed reduction values.(74) Thus for these experiments, reduced speed areas in VISSIMTM were added 150 ft upstream of the incident.
The existence of ramps could be another key factor affecting dynamic HSR effectiveness. Because the excessive number of possible ramp-deployment scenarios could not be explicitly evaluated by microscopic simulation, this study considered ramp effects through the ramp-density concept in figure 77. The simulation experiments assumed a total ramp density of two ramps per mile and assumed typical real-world lateral clearances producing speed adjustment factors equal to zero.
In addition to the assumptions related to free-flow speeds and rubbernecking speeds, the dynamic HSR simulations required a second set of logistical assumptions. First, it was assumed possible to seamlessly and flexibly close or open any length of shoulder, upstream or downstream of the incidents, at any location. In practice, the necessary driver notification could be only possible through smartphones and connected vehicles. While the assumptions might apply to smartphone use, if overhead gantries were the sole source of driver notification, this would constrain shoulder length closures to the spacing of these gantries (typically 0.5 to 1 mi). For incidents occurring directly under gantries, the choice of which freeway sections to close would be clear. For incidents between gantries, traffic operations engineers can decide an opening strategy based on recommended values in this study. The second logistical assumption was that incidents occur on lanes closest to the shoulder. In an incident with two lanes blocked, the two lanes closest to the shoulder were assumed to be involved. This assumption was made to reduce the number of simulation runs to a manageable level.
The following conclusions were derived after statistical analysis of the simulation results:
Given the results obtained from this study, some related research efforts are recommended for the future. First, insights on the effects of other general system parameters, such as vehicle composition and freeway grades, may need to be derived. Second, this strategy can be combined with other ATM strategies for better incident recovery. It might also be interesting to investigate a left shoulder scenario or shoulders on both freeway sides. Further, the concept of shoulder opening and closure can be extended to general mainline lanes, manipulating freeway capacity to achieve effects similar to speed harmonization. Last, it would be beneficial to investigate how information sharing with connected vehicle technology could play a role in dynamic HSR strategies.
The following subsections suggest ways to safely and efficiently implement dynamic HSR.
Geometric Design
Ramp density could be a key factor affecting dynamic HSR effectiveness. Because of the excessive number of possible ramp-deployment scenarios, the dynamic HSR study assumed a ramp density of two ramps per mile and typical lateral clearances. A feasible but costly geometric design option would be the installation of refuge pull-outs at 1,600-ft intervals combined with emergency call boxes. However, communication to and from traffic management centers should be available via smartphones. Enhanced pavement texture and resurfacing could help to make drivers aware of the dynamic HSR functionality and could facilitate safer driving conditions. A dynamic HSR strategy should consider real-world roadway geometry, incident scenarios, and clearance strategies. In practice, a hard shoulder can be on the left, right, or both sides of a freeway mainline. The standard width of a hard shoulder can be anywhere between 10 and 12 ft. These different lane widths affect free-flow speeds and lane capacities. An incident may block a shoulder lane or any number of mainline lanes. Finally, some vehicles involved in accidents are able to drive away or drive to the shoulders. However, in other cases, emergency vehicles must tow incident vehicles to the shoulder or tow them away completely. Dynamic HSR research concluded that only the part of the shoulder 0.5 mi upstream and downstream of an incident location needs to be opened to fully use the potential of shoulders for incident management. If overhead gantries are the sole source of driver notification, this will constrain shoulder length closures to the spacing of these gantries (typically 0.5 to 1 mi). Enhanced accident monitoring and emergency response is desirable in all HSR implementations.
Signing
The dynamic HSR treatment is applicable to minor traffic accidents, in which vehicles come to a stop in one or more mainline freeway lanes. As such, speed reduction advisories are recommended to prevent unsafe travel speed discrepancies between lanes. Opening and closing shoulder sections could be accomplished by smartphones, pushed auditory messages, or overhead gantries. FHWA has conducted research on optimum message sign formats and messages. In a report titled Travel Time Displays at Freeway Entrance Approaches, researchers indicated that highway agencies have increasingly made freeway travel time information available to motorists.(75) The project included computerized laboratory and field survey studies to assess participants’ comprehension, decisionmaking, strategies, preferences/acceptance/ satisfaction, and behavioral responses to a variety of sign formats and messages.
Signalization
Dynamic HSR advisories or controls are proposed to be implemented by smartphones, pushed auditory messages, or overhead gantries as opposed to signalization.
The diamond interchange with its signal control has been successfully used in numerous freeway-to-arterial connections. However, the operation of a conventional signalized diamond interchange design is now becoming a challenging issue, particularly in an urban or suburban environment where heavy traffic volumes must be served and right-of-way is restrictive.(76) Figure 78 shows a typical diamond interchange with two closely spaced signalized ramp intersections, and the LT lanes on the internal link are back-to-back.
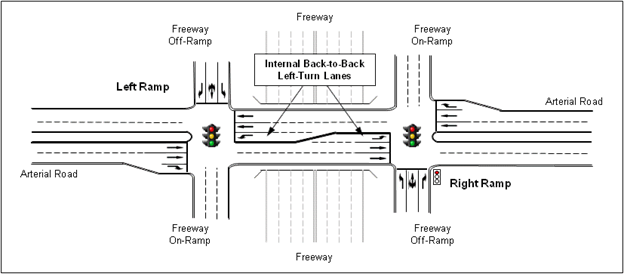
Figure 78. Illustration. Typical signalized diamond interchange with back-to-back LT lanes.
Several design concepts have been applied to improve the operational efficiency and mitigate recurring traffic congestion at diamond interchanges, such as signal control treatments and interchange design improvements. The idea of a DRLT lane was put forth to deal with many of the traffic congestion issues in diamond interchanges.(77) By removing the internal center back-to-back LT lanes and creating reversible lanes, the signal timings can be set to give each LT movement use of the full-length lane during each of the opposing LT movement. The cost to such a design is a TCL which necessitates a completely free lane for the opposing lane’s LT movement. The signal timing strategy must be such that the LT vehicles cleared before shifting the green light to conflicting TH traffic. Expanding an overpass (or underpass) or realigning intersection configuration design may eliminate the limitations, but it would result in substantial costs and footprint impacts. This section presents the DRLT interchange design and puts forth scenarios in which this design is advantageous to more traditional design scenarios.
The reversible lane concept can be applied to signalized diamond interchanges. Previous numerical analysis has been done on the DRLT lane diamond interchange.(77) Since there is limited capacity between the two intersections of the diamond interchange, the center lane (LT lane for each approach) is turned into a full-length LT lane when it is that approach’s turn for a green phase. These lanes are referred to as DRLT lanes in this section. LT on-ramp vehicles can enter and traverse through these DRLT lanes from both directions but only one direction at a time, which is dynamically controlled by a signal. Overhead traffic signals are necessary to notify drivers when the reversible lanes are open or closed to driving.
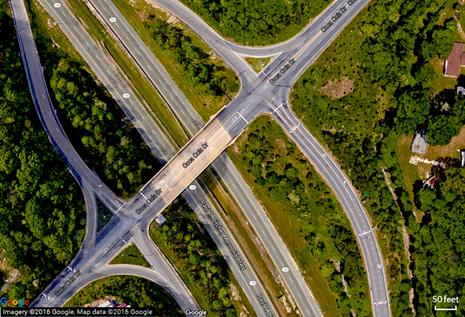
The diamond interchange of Paul Pitcher Memorial Highway (Route 100) and Coca Cola Drive in Howard County, MD, was selected as a real-world case study for operational study. Figure 79 displays the aerial view of the selected diamond interchange. The geometry of this diamond interchange was used as a base case for simulation. Its geometry is that of a conventional four-lane diamond interchange with a single LT lane and can be representative of numerous diamond interchanges. Due to the short distances between the intersections, the conventional three-phase signal design was used. A four-phase design would not allow for sufficiently short cycle times. The center LT bays are back-to-back and occupy the length of the region between the two signalized intersections. This interchange was chosen for its delay and congested conditions during peak periods. Specifically, there are heavy LT on-ramp movements that cannot be accommodated by the existing LT storage lanes in recurring conditions. This is largely due to a major business district northeast of the intersection that must use this interchange to get to the highway during the afternoon peak.
©2016 Google®
Figure 79. Map. Selected signalized diamond interchange case study.(78)
A microscopic traffic simulation package, VISSIMTM 6.0, was used to model several geometries of signalized diamond interchanges and compare the operational performances of the base case conventional signal design and the alternative DRLT design concept. Three geometries of cross streets were evaluated in order to simulate the following traffic volumes: (1) four-lane arterial road and five-lane bridge with single LT lane, (2) four-lane arterial road and six-lane bridge with double LT lanes, and (3) six-lane arterial road and six-lane bridge with double LT lanes. The only difference between the base case and the alternative is that the LT bays in the conventional signal design were switched to be reversible lanes for the alternative design. For each of the six total geometries, two traffic demands are considered. An interchange’s traffic demand is varied by the v/c ratios: 1.0 and 1.3. The input interchange traffic volume for each scenario is as follows:
For each interchange traffic volume, it was assumed that freeway off-ramp traffic was 70 percent of the arterial road traffic. For instance, the interchange traffic volume of 6,800 vehicles/h accommodated 2,000 vehicles/h on each direction of arterial road and 1,400 vehicles/h on each freeway off-ramp. Three traffic patterns shown in figure 80 were tested. An interchange’s traffic pattern characterized by the degree of balance in both the arterial road and freeway ramp traffic movements included balanced, unbalanced (heavy off-ramp LT), and unbalanced (heavy on-ramp LT) patterns. The proportions of turning movements (LT:TH:RT) on arterial roads were 1:1:1 for balanced and 2:1:1 for unbalanced patterns, and those on freeway on-ramps (LT:RT) were 1:1 for balanced and 2:1 for unbalanced patterns. For the conventional diamond interchange scenarios, the optimal signal cycle length and the amount of green time required for each approach were calculated by the HCM procedure using Synchro® software. The cycle length of both signalized intersections was assumed to be the same for coordination purposes. However, it was impossible to deal with the DRLT lane control using the same package. The cycle lengths and minimum green times required on each approach of the DRLT diamond interchange scenarios were set the same as those of conventional scenarios for a fair comparison. Manual refinement was performed in order to meet the signal timing and TCL warrants.

Figure 80. Illustration. Interchange traffic patterns.
The signalization can be rather confusing at first glance, so it can be best understood via a simulation video. This video can be obtained by contacting STOL at FHWA’s TFHRC. The simulation was created in VISSIMTM by simply stacking LT lanes on top of one another and then creating a conflict area over the length of the segment for the two lengths of roadway. This way, if the intersection does fail, all the vehicles for the oncoming reversible lane would stop at the beginning of their approach and simply would not be able to move forward, causing the cycle to fail. This is a realistic interpretation of what may occur in a real-world situation. When one approach fails, the phasing must go through an entire cycle before the opposing LT movement can be evacuated.
Operational benefits of the DRLT design, relative to the conventional diamond design, were as follows:
The diamond interchange of Georgetown Pike and Interstate 495 in McLean, VA, was selected for a second case study, whose experimental design was similar to the Maryland case study. Plan views for the before-and-after lane configurations are illustrated in figure 81 and figure 82. Table 29 demonstrates very significant traffic flow improvements as measured by delays, speeds, and vehicle stops. Specifically, the researchers noted that southbound (SB) off-ramp traffic improved significantly in the morning peak. Further, benefits in the afternoon peak were even more significant, mostly due to major improvements in WB on-ramp flow. In the base case, there had been a very long queue, which cleared almost completely in the DRLT case.

Figure 81. Screenshot. Georgetown Pike interchange with conventional lanes.

Figure 82. Screenshot. Georgetown Pike interchange with DRLT lanes.
| Scenario | Morning Peak | Afternoon Peak | ||||
|---|---|---|---|---|---|---|
| Delay (s/vehicle) | Speed (mi/h) | Number of Stops | Delay (s/vehicle) | Speed (mi/h) | Number of Stops | |
| Base case | 140.5 | 9.7 | 1.9 | 343.4 | 4.7 | 5.7 |
| DRLT | 54.7 | 16.8 | 1.1 | 65.2 | 16.4 | 1.2 |
| Improvement (percent) | 61.1 | 73.8 | 40.7 | 81.0 | 249.4 | 78.5 |
This DRLT design is not applicable for all diamond interchange scenarios, but for high volumes with geometries of low number of LT lanes, its application may greatly reduce travel time and increase interchange throughput. These conclusions apply only for the selected geometries and traffic conditions modelled and simulated. Finally, it should be noted that this is a theoretical evaluation of a new design concept that remains unused in the real world. Safety concerns should be fully evaluated before serious consideration for implementation.
The following guidance is suggested for safe and efficient implementation of DRLT lanes. A follow-on human factors research project began in April 2016. It is expected that final reports and Techbriefs for the human factors study will become available in 2017 or 2018.
Geometric Design
In the DRLT strategy, it was important that on-ramp vehicles did not get stuck on the reversible lane after the signal turned red. The entire platoon of vehicles should be served during each green phase. According to traffic flow theory, when a signal turns green, platoons of closely spaced vehicles begin to disperse as they travel downstream. If the distance between intersections is too far, platoon dispersion may lower the probability of all vehicles arriving on green, even when signal timings are optimized. Because of this, a relatively small distance between intersections (i.e., 650 ft or less) was recommended for the DRLT treatment. In the case study of Paul Pitcher Memorial Highway (Route 100) and Coca Cola Drive presented previously, the distance between intersections was approximately 400 ft, and the operational benefits of DRLT were shown (in simulation experiments) to be significant.
Figure 83 through figure 85 illustrate three layouts of DRLT signalized diamond interchanges used in this study: (1) four-lane arterial road and five-lane bridge with single DRLT lane, (2) four-lane arterial road and six-lane bridge with double DRLT lanes, and (3) six-lane arterial road and six-lane bridge with double DRLT lanes. The highlighted bold lines in the figures indicate an elevated curb, with suggested dimensions of 2 by 2 inches. This would discourage adjacent lanes’ vehicles from entering the reversible lanes during a time when the opposing traffic has the right-of-way. Due to the possibility of emergency situations where vehicles get stuck in reversible lanes after the signal turns red, the elevated curb height should not exceed 3 inches. In these situations, the stuck vehicles will need some way to vacate the right-of-way so that reversible lane flows can continue to operate normally. In other words, the stuck vehicles would change lanes by driving over the elevated curb even though the elevated curb is designed to discourage lane changing under normal circumstances. It is also recommended that the elevated curbs be extended further beyond the STOP bar to discourage off-ramp vehicles from entering the reversible LT lanes.
Simulation studies found that DRLT increased on-ramp throughput, reduced network travel time, and reduced delay for all geometries.(76) However, these operational benefits were most prominent when the number of TH lanes was proportionally higher than the number of LT lanes.
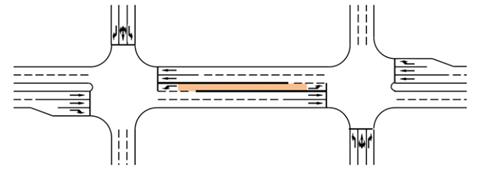
Figure 83. Illustration. DRLT design for a four-lane road with a single LT lane.
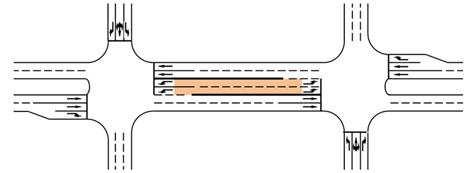
Figure 84. Illustration. DRLT design for a four-lane road with dual LT lanes.
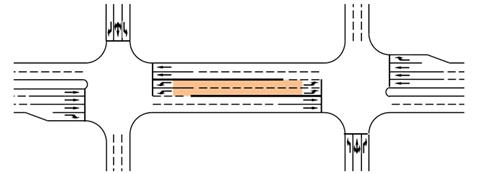
Figure 85. Illustration. DRLT design for a six-lane road with dual LT lanes.
Signalization
Overhead traffic signs and signals can inform drivers about whether reversible lanes are open or closed at any given time. Figure 86 through figure 88 illustrate the proposed signal and sign display for a four-lane arterial and a five-lane bridge. The interior roadway has a single DRLT lane. When the DRLT displays a green signal during the peak period (see figure 86), the overhead changeable message sign (CMS) transforms into a guide sign for accessing the freeway. The large green arrow indicates that the reversible lane is open to SB TH traffic. Traffic signals for the other two TH lanes display circular green signal indications. The middle lane displays a black arrow, indicating that only TH movements are allowed from that lane. The size and spacing of overhead DMS should reflect reversible lane widths and should conform to MUTCD standards.(79)
During off-peak periods when reversible lane use is disallowed (see figure 87), drivers must use the LT pocket to access the downstream on-ramp. The overhead CMS guide sign is put into blank mode. A large red cross is displayed on the other CMS, indicating that the lane is not open for traffic. However, the other two TH lanes are open, as indicated by circular green signal indications (see figure 87). Figure 88 shows what the SB displays would look like when NB traffic is moving. Traffic signal heads in the rightmost TH lanes display a circular red signal indication, and the overhead DMS displays a large red cross.
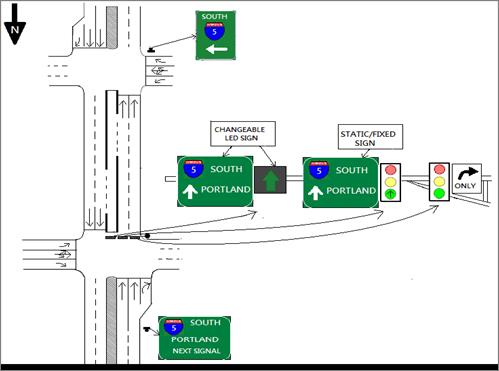
Figure 86. Illustration. Proposed single-lane DRLT signalization during peak-period green phases.
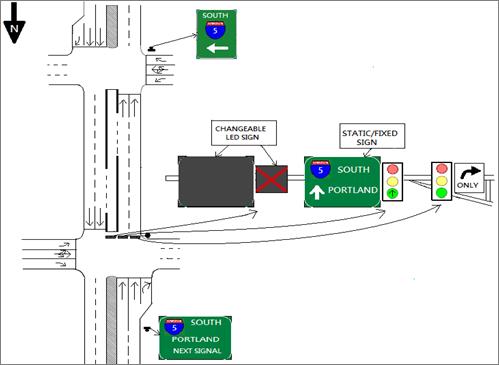
Figure 87. Illustration. Proposed single-lane DRLT signalization during off-peak-period green phases.
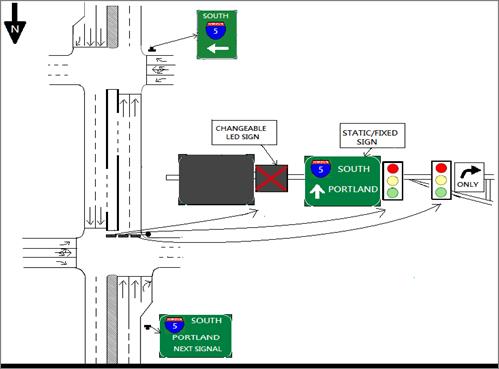
Figure 88. Illustration. Proposed single-lane DRLT signalization during red phases for all periods.
For dual DRLT lane scenarios, additional signs were needed to properly guide drivers. Figure 89 illustrates the proposed signal and sign display for a six-lane arterial and a six-lane bridge. Design guidance for the dual-lane DRLT includes the following:
Similar design guidance can be followed for a four-lane arterial road with a six-lane bridge having dual DRLT lanes. However in this scenario, a LT storage lane should be placed within the upstream median, if possible. This would allow LT storage lane drivers to proceed directly into the left-most reversible LT lane during peak-period green phases. Figure 90 illustrates a set of dual-lane DRLT guide signs for use during the peak and off-peak periods, respectively. The designs are mostly consistent with similar signs from section 2b of the 2009 MUTCD.(79) These DMS designs could potentially be programmed within a single physical sign and illuminated when necessary. The signs could be post-mounted or placed overhead.
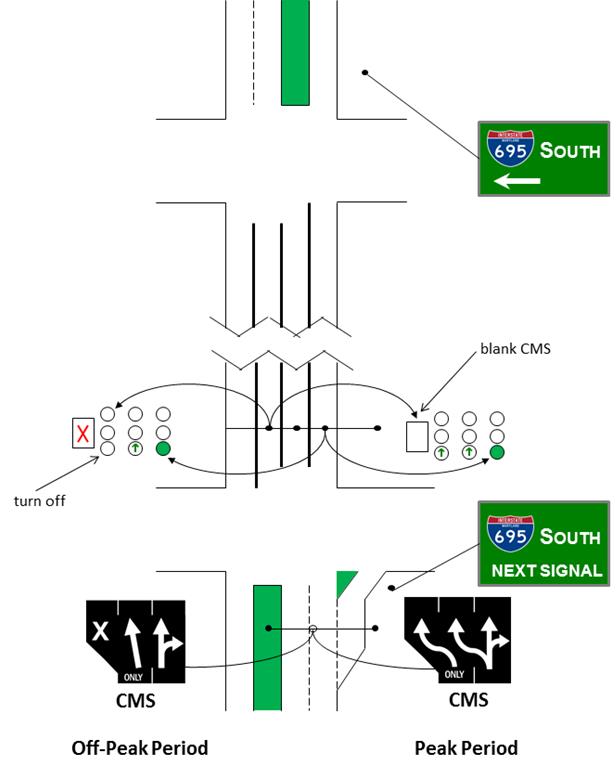
Figure 89. Illustration. DMSs for dual DRLT lanes during peak and off-peak periods.
Four-phase signal timing plans are required for DRLT operation. Figure 90 shows the phasing diagram and ring structure of two signalized intersections for the DRLT diamond interchange proposed in this study. Two signals were treated as one four-phase signal control. Each of the four phases indicates the movements from four external approaches, EB phase ( Φ2), SB ( Φ4), WB ( Φ6), and NB ( Φ8), and Φ1 and Φ5 are for internal LT movements. The signal sequence is typical of the conventional four-phase control.
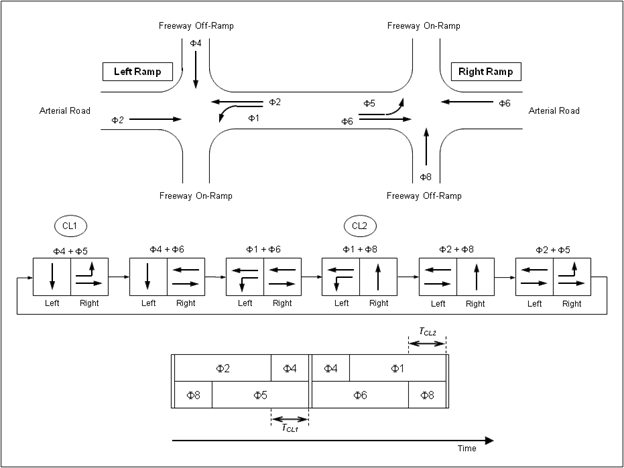
Figure 90. Illustration. Signal phasing and ring structure for proposed DRLT diamond interchanges.(76)
To create DRLT movements for two opposite directions, the TCLs, denoted as TCL1 and TCL2, (as shown in figure 90) were proposed to ensure there was no conflict between two opposite movements. TCL is the minimum green time required for LT on-ramp vehicles to depart from the upstream signalized intersection, fully progress along the DRLT lane, and complete their LT movement at the downstream signalized intersection without stopping on the LT lanes. If this value is given an insufficient allotment of time, then the next cycle will fail, and no cars will be able to turn left from the opposite approach. It is therefore imperative that this TCL is sufficient for all vehicles on the network.
TCL ensures that the last left-turning vehicle from the upstream intersection can make an LT at the downstream intersection during one green phase. In other words, vehicles from Φ2 (or Φ6) should complete their movement before the end of Φ5 (or Φ1). There should not be any vehicles remaining on the DRLT lanes so that the opposing LT vehicles can enter the DRLT lanes from the opposite direction. Mathematically, TCL should be at least longer than travel time between two intersections, as expressed in the equation in figure 91.
![]()
Figure 91. Equation. Calculation of DRLT signal TCL.
For example, if the interchange spacing is 300 ft and the vehicle operating speed on the arterial road is 25 mi/h, then the TCL should be at least 8 s.
It should be noted that traffic movements on Φ5 and Φ1 occupy the same physical space of the reversible lane from opposite directions; hence, these two phases cannot occur at the same time. For this alternative to be feasible, some safety precautions must be taken. The dynamic reversible lane could implement sensing cameras in order to make sure the lane is cleared before the phasing is switched. There could conceivably be a broken-down vehicle in the DRLT lane in which equipment must be able to respond to by disallowing entrance to the lane via signalization.
Signing and Pavement Marking
Pavement markings and striping generally need to reflect off-peak operations. In the case of DRLT, this means the striping would indicate location and length of LT pockets facing in each direction. However, in the peak period, signalization, and DMS information (shown in the previous section) would take precedence over the striping.
An advance warning sign to notify drivers of the upcoming dynamic lane treatment should be considered. This advance warning sign could contain a flashing yellow light, as shown in figure 92, similar to warning signs for DLG. The flashing yellow light could then be illuminated at times of the day when dynamic lane reversals are in effect. To provide drivers enough reaction time for smooth lane changing, it is recommended that the upstream signage be installed 1,000 to 1,500 ft away from the intersection.
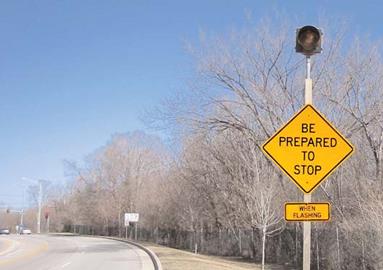
Figure 92. Photo. Upstream advance warning sign for DRLT.(80)
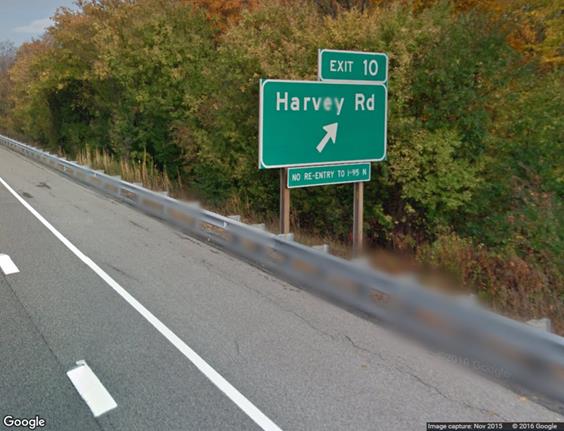
In the proposed signal phasing and ring structure (see figure 90), when off-ramp vehicles turn left onto the arterial, reversible lane vehicles will be traveling in the opposing arterial direction. This means that unlike a typical diamond interchange, immediate re-entry to the freeway (i.e., a U-turn maneuver spanning both signalized intersections) would not be possible. As such, proper signage is recommended near the off-ramp to notify drivers of this restriction. Figure 93 illustrates an example of “no re-entry” warning signage under a typical freeway exit sign. The no re-entry sign could also contain a flashing yellow light to be illuminated when dynamic lane reversals are in effect.
©2016 Google®
Figure 93. Map. Example of no re-entry signage.(81)
During the peak hours of traffic congestion, some signalized intersections suffer from excessive queue spillover of left-turning vehicles into adjacent TH lanes. The innovative CLT pocket treatment aims to mitigate the problem by dynamically allocating lanes in the opposing direction to create an additional LT pocket lane, as shown by the green area in figure 94.(82) By adding additional capacity to the LT movement, delays for the entire intersection can be reduced. Increased LT movement capacity can help to mitigate or eliminate the spillover. In some cases, the additional LT capacity could allow LT green times to be reduced such that green time could be reallocated towards other turning movements at the signal. Although this congestion mitigation strategy requires presignals to control entrances to the contraflow turn pockets, it would not require advanced vehicles or infrastructure. As a result, it has the potential of being a cost-effective bottleneck mitigation strategy. Moreover, there appear to be at least 50 successful real-world implementations of CLT pocket intersections in China, which are described later in this section.
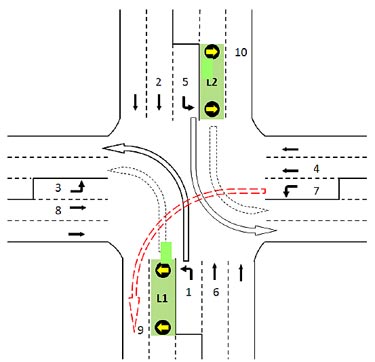
Figure 94. Illustration. CLT intersection geometry.
The intersection between Tuckerman Lane and Rockville Pike in Bethesda, MD, was selected because the intersection has high LT volume demand, has enough lanes in the opposing direction, and has enough receiving lanes. NB and SB TH movements are oversaturated due to excessive volume demands. Thus, in the contraflow treatments, excess LT green times can be reassigned to the TH movement while leaving the cycle length unchanged. Figure 95 illustrates the lane configuration and turn movement demand volumes at this intersection.
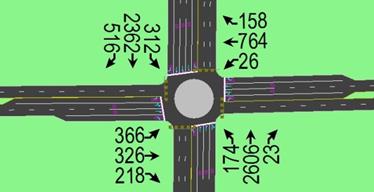
Figure 95. Illustration. Turn movement volumes at Tuckerman Lane and Rockville Pike in Maryland.
VISSIM™ simulation results showed that the contraflow treatment produced the most delay savings under high travel demands. Another finding was that the highest percentage delay reductions occurred when NB and SB turning movement demands were balanced (i.e., almost equal). Table 30 reveals delay reductions between 7 and 22 percent under various scenarios. Therefore, the case study simulations indicated that CLT pockets are capable of significant overall delay reduction.
| Volume Demand Scenario | 1.0 v/c | 1.05 v/c | 1.1 v/c | |||
|---|---|---|---|---|---|---|
| Base | Contraflow | Base | Contraflow | Base | Contraflow | |
| Scenario 1 | ||||||
| Cycle length (s) | 100 | 100 | 100 | 100 | 100 | 100 |
| Throughput (vehicles) | 5,963 | 5,983 | 6,203 | 6,266 | 6,276 | 6,416 |
| Delay (s/vehicle) | 51 | 42 | 67 | 52 | 83 | 70 |
| Scenario 2 | ||||||
| Cycle length (s) | 100 | 100 | 100 | 100 | 100 | 100 |
| Throughput (vehicles) | 5,452 | 5,600 | 5,633 | 5,810 | 5,797 | 5,961 |
| Delay (s/vehicle) | 44 | 41 | 47 | 42 | 50 | 44 |
| Scenario 3 | ||||||
| Cycle length (s) | 120 | 120 | 120 | 120 | 120 | 120 |
| Throughput (vehicles) | 5,963 | 5,983 | 6,203 | 6,266 | 6,276 | 6,416 |
| Delay (s/vehicle) | 52 | 46 | 75 | 60 | 91 | 74 |
An additional set of simulations was conducted to assess CLT benefits under various LT demand levels. To achieve this objective, researchers created an ideal VISSIM™ simulation model instead of modeling a real-world case. The experimental design and intersection conditions are shown in table 31. While traffic conditions were held constant on the NB and SB approaches, traffic demands increased in 100-vehicle/h increments on the EB and WB approaches. Figure 96 and figure 97 demonstrate that the delay reductions and throughput increases, respectively, became more significant as LT demands increased.
| Intersection Characteristics | Approach | |||
|---|---|---|---|---|
| EB | WB | NB | SB | |
| Lane configuration | 1 CFLT pocket, 1 LT pocket, 2 TH, and 1 RT |
1 CFLT pocket, 1 LT pocket, 2 TH, and 1 RT |
1 LT pocket, 2 TH, and 1 RT |
1 LT pocket, 2 TH, and 1 RT |
| Volume (vehicles/h) |
|
|
|
|
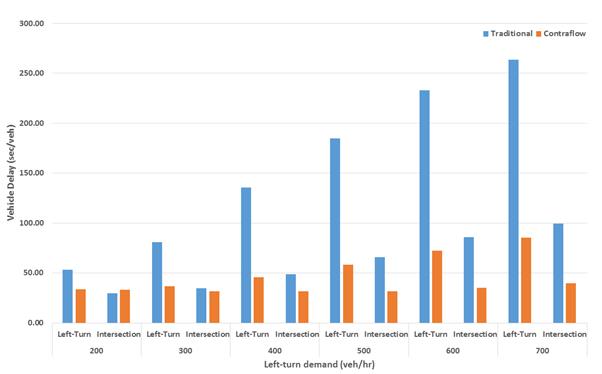
Figure 96. Graph. Delay reductions due to CLT at various LT demand levels.
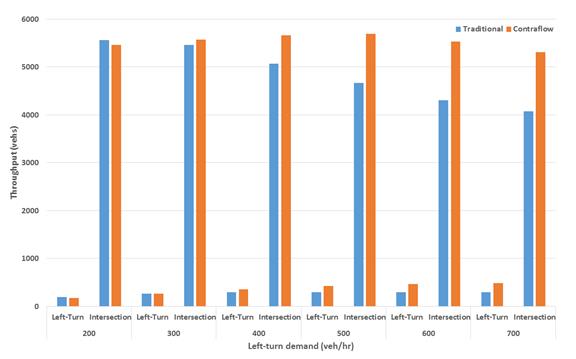
Figure 97. Graph. Throughput increases due to CLT at various LT demand levels.
The following guidance is suggested for safe and efficient implementation of CLT pockets. It is mostly consistent with real-world implementation in China, which are illustrated and described later in this chapter.
Geometric Design
The CLT treatment is only recommended for intersections having heavy LT demands and specific geometric designs. Under the right conditions, CLT application could greatly reduce travel time and increase intersection throughput. For safety reasons, left-turning vehicles cannot have access to the CLT pocket at all times. Instead, vehicles must enter the CLT pocket through an opening, as shown by the shaded area in figure 98. In the figure, L1 is the length of the CLT pocket, while L2 is the length of the standard LT pocket. Multiple factors can influence the most appropriate length of L1 in terms of both traffic flow efficiency and safety. Generally, L1 should be shorter than L2.
The bolded black lines in figure 98 through figure 101 indicate curbs that prohibit passing. The saturation flowrate of the CLT pocket is expected to be similar to the normal LT lane. Depending on the demand volume level, there are three possible lane utilizations (see figure 99 through figure 101). These vehicle assignments are based on assumption that the drivers prefer using the normal LT lane but will also use the CLT lane if the normal LT lane is filled. At low volume, as shown in figure 99, the normal LT pocket is long enough to store all the LT vehicles, and the expected lane utilization ratio is 1:0. At medium volume, as shown in figure 100, some vehicles will use the CLT lane, and the expected lane utilization ranges between 1:0 and 1:1. For the high-volume case, as shown in figure 101, when both the two lanes are oversaturated, the expected lane utilization is L2/L1.
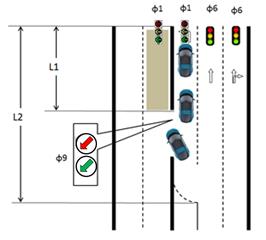
Figure 98. Illustration. CLT pocket configuration.

Figure 99. Illustration. Expected CLT lane utilization under low LT demand.

Figure 100. Illustration. Expected CLT lane utilization under medium LT demand.

Figure 101. Illustration. Expected CLT lane utilization under high LT demand.
Since the CLT treatment is only considered for intersections with high LT demand, the ideal length would achieve a 1:1 lane utilization ratio. Using 95th percentile of the LT queue length in feet, the optimal CLT pocket length is one-half of that value (assuming only one existing LT lane). Figure 102 and figure 103 can be used to calculate the 95th percentile queue length based on the 2000 HCM.(73) In this case, the CLT pocket helps reduce congestion at the high travel demand levels.
![]()
Figure 102. Equation. 95th percentile queue length.
![]()
Figure 103. Equation. 95th percentile back-of-queue factor.
Where:
Q95% = 95th percentile queue length (number of vehicles).
Q = Average queue length (number of vehicles).
fB95% = 95th percentile back-of-queue factor.
e = Exponential function.
Although the optimal CLT pocket length can be estimated by the previously mentioned methods, other constraints may apply. If the CLT pocket length is too long, traffic operations may be inefficient, as drivers would have a strong tendency to only use the standard LT pocket. Moreover, long CLT pockets would increase the risk of queues not clearing during the green phase, and blocking oncoming vehicles later in the signal cycle. If the CLT pocket length is too short, operational benefits might not be significant enough to justify deployment of the innovative treatment. Based on simulation experiments and engineering judgment, the researchers recommend CLT turn pocket lengths between 150 and 250 ft. The ability to use an opposing lane for CLT depends on the total number of opposing lanes and the number of receiving lanes. There should be at least two lanes in the opposing direction. While the innermost opposing TH lane is being used for CLT, the outermost opposing TH lane can be used by incoming vehicles. Next, the total number of LT lanes must not exceed the number of receiving lanes. Finally, incoming LT vehicles (from a perpendicular approach) would have a larger turning radius than before (see figure 94) because they must avoid the CLT pocket. Therefore, the intersection must have enough width to avoid LT conflicts.
Some consideration should be given to the risk of side-swipe accidents between CLT vehicles and right-turning vehicles on the adjacent approach. For example, figure 104 illustrates NB left-turning vehicles in lane 2 at risk of being side-swiped by EB vehicles turning SB into lane 1. This risk could be mitigated by channelized RT islands on the EB approach or by flex posts installed between lanes 1 and 2.
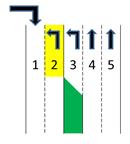
Figure 104. Illustration. Side-swipe risk between CLTs and adjacent RTs.
Signalization
CLT pocket entrances are controlled by presignals. Figure 105 illustrates a presignal, which should be presented at the CLT pocket entrance. This signal, which may have a similar construction and appearance as a ramp metering signal, is used to indicate when it is safe to enter the CLT pocket. The red-green light should be arrow-shaped instead of ball-shaped, so TH-moving drivers will not feel obligated to stop. Conflicting flows must be prevented by the use of proper TCLs. Vehicles in the CLT pocket must be cleared before vehicles move in the opposing direction. This can be achieved by terminating presignal green durations a few seconds in advance of conflicting phase start times. Figure 106 shows the proposed overhead signal at a CLT intersection when the CLT lane is available. Figure 107 shows the proposed overhead signal at a CLT intersection when the CLT lane is not available. An advance warning sign with a flashing yellow light should be installed to notify drivers of the CLT pocket.

Figure 105. Illustration. Presignal at CLT pocket entrance.
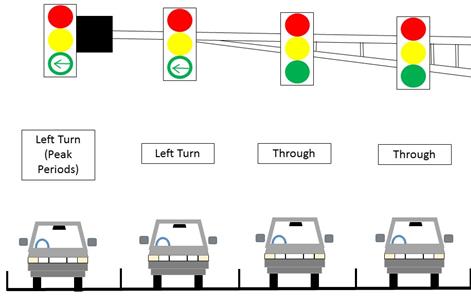
Figure 106. Illustration. Proposed CLT signalization during peak period.
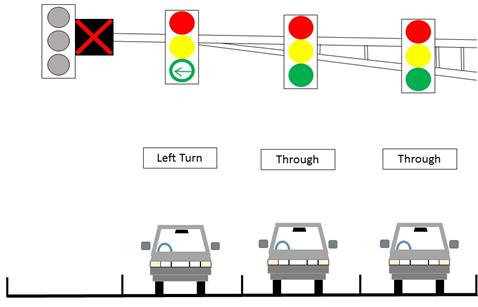
Figure 107. Illustration. Proposed CLT signalization during off-peak period.
A proposed signal phasing plan, having protected LT phases on all approaches, is illustrated in figure 108. NB and SB approaches have CLT treatments. The pocket entrances are controlled by Φ9 (NB and Φ10 (SB). Three incoming flows in conflict with the NB CLT lane are illustrated by red arrows in figure 109. The conflict with SB TH movement must be prevented by proper TCLs of Φ9 so that all vehicles on the CLT lane can be cleared before SB TH vehicles start moving. This can be achieved by terminating the Φ9 green phase a few seconds before Φ1 green ends, as shown by TCL1 in figure 108. TCL1 is the time offset between Φ9 and 1. The appropriate TCL1 and TCL2 durations depend on the CLT pocket length since longer time is needed to clear the vehicles if the CLT lane is longer.
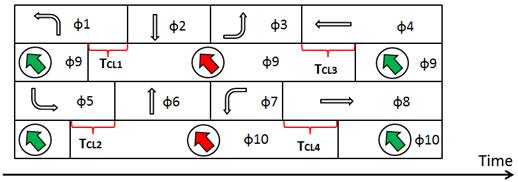
Figure 108. Illustration. CLT pocket signalization.
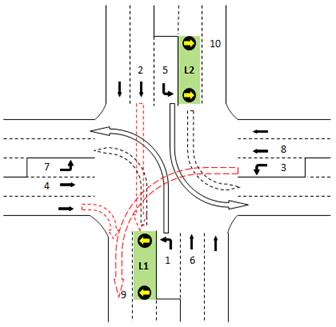
Figure 109. Illustration. CLT intersection geometry.
The equation in figure 110 is proposed to ensure that the offset time is long enough to clear the full length of the turn pocket. For example, if the CLT pocket is 150 ft long and the average left-turning speed is 20 mi/h, then TCL1 should be at least 5 s long.
![]()
Figure 110. Equation. Calculation of CLT signal TCL for clearing the turn pocket.
To add a layer of safety from a temporal standpoint, it is best to have conflicting LT vehicles (e.g., WB left and NB left) moving at completely different times during the cycle. Thus, Φ9 should turn green TCL3 seconds after Φ3 to avoid time-based overlaps with WB LT vehicle movements. Note that routing WB LT vehicles into the right-most lane helps to prevent the same conflicts, albeit from a spatial standpoint. The distance of the WB LT red arrow in figure 109 is called the “red track.” TCL3 should be longer than the time needed for WB LT vehicles to traverse the red track. The equation in figure 111 is proposed for ensuring that NB LT vehicles can safely enter the CLT pocket.
![]()
Figure 111. Equation. Calculation of CLT signal TCL for ensuring safe pocket entry.
The amount of green time that could be truncated from the LT green depends on two factors: (1) how much green time can be saved by the contraflow lane and (2) whether the remaining green time should be enough to clear the queue since phase failures will lead to head-on collision conflicts. For the first factor, assuming 2-s vehicle clearing headway, the time savings of the contraflow lane is 2 × x, where x is the queue length by the number of vehicles. Thus the truncated green time should be equal to or less than 2 × x, as shown in figure 112 and figure 113. Considering the minimum green time constraint, using 2-s start up lost time, the minimum green time should be 2 × x + 2. The critical shortest value in the equations in figure 112 and figure 113 should be used as truncated green time.
![]()
Figure 112. Equation. Truncated green time based on vehicle clearance.
![]()
Figure 113. Equation. Truncated green time based on original green time.
A safety concern is that distracted drivers might not discharge from the CLT pocket during the current green phase. This creates head-on collision conflicts. A potential signalization-based counter-measure is to provide a green extension whenever un-cleared vehicles are detected in the contraflow area.
After an intersection approach has been identified as a CLT candidate, the following signalization and lane length design steps could be followed:
Signing and Pavement Marking
In addition to the presignal at the entrance, CLT pockets should be controlled by lane open/close signs. Conflicts between adjacent LT movements can be avoided by using pavement markings. These markings would route left-turning traffic to the right-most lane instead of the CLT lane (see figure 108). Regarding the safety issue mentioned previously (distracted drivers not discharging during the green phase), another possible countermeasure would be the use of special signage to remind drivers to pay attention.
All information in this subsection was derived from unpublished interviews that the research team conducted with Chinese transportation officials. As illustrated in figure 114, there are believed to be at least 50 real-world implementations of CLT intersections in at least 9 Chinese cities.
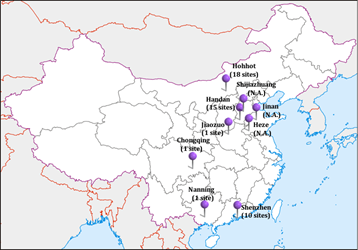
Figure 114. Map. CLT implementations in China.
Figure 115 through figure 117 illustrate real-world implementations of CLTs in China. They show left-turning vehicles before, during, and after their entry into the contraflow lanes.
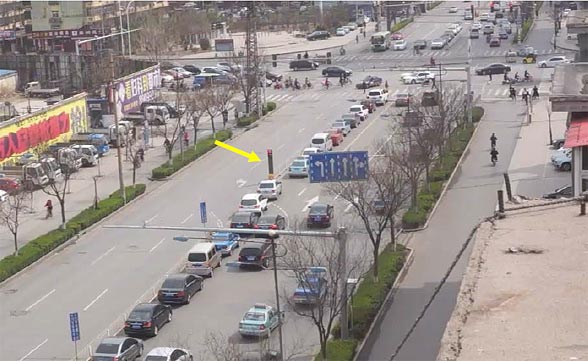
Source: Professor Pan Liu of Southeast University School of Transportation with arrow overlay added by Leidos, Inc. to indicate the presignal location.
Figure 115. Photo. CLT intersection in China before the presignal has turned green.
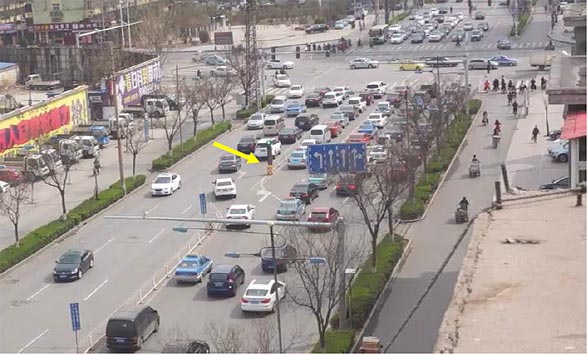
Source: Professor Pan Liu of Southeast University School of Transportation with arrow overlay added by Leidos, Inc. to indicate the presignal location.
Figure 116. Photo. CLT intersection in China after the presignal has turned green but before the main signal has turned green.
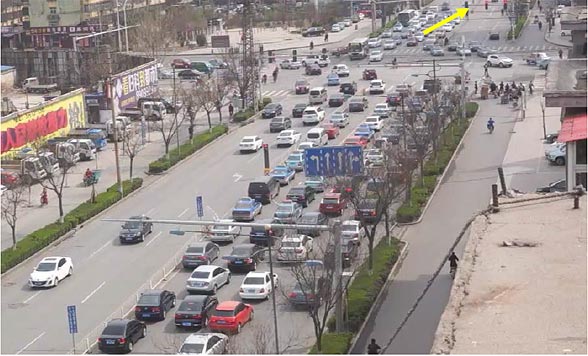
Source: Professor Pan Liu of Southeast University School of Transportation with arrow overlay added by Leidos, Inc. to indicate the main signal location.
Figure 117. Photo. CLT intersection in China after the main signal has turned green.
The first real-world implementation is believed to be in Handan, China.(83) In 2014 and 2015, a total of 15 intersections and 45 intersection approaches in Handan were reconfigured for CLT operation. These CLT pockets were approximately 210 ft long. Throughput increases were measured at 720 vehicles/h.
Additional real-world implementations were constructed in Shenzhen and Hohhot, China.(84–86) Since August 2014, 10 intersections in Shenzhen have been reconfigured for CLT operation. These CLT pockets were approximately 330 ft long. Capacity increases were measured at 30 to 40 percent for LT movements and 6 percent for CLT intersections as a whole. Since September 2015, 18 intersections in Hohhot have been reconfigured for CLT operation. These CLT pockets were approximately 330 ft long. Capacity increases were estimated at 80 percent for LT movements. The Hohhot implementations were unique in regards to their automatic retractable gates. The retractable gates automatically open at the outset of morning/afternoon peak periods and automatically close at the outset of off-peak periods.
In December 2015, one intersection in Nanning, China, was reconfigured for CLT operation.(84) The CLT pocket was approximately 330 ft long. This implementation was reportedly not well-received by drivers. Some were concerned that driver avoidance of the CLT pockets would instead increase congestion. The Nanning implementation was unique in regards to the intersection being T-shaped with only three approaches. In November 2015, one intersection in Jiaozuo, China, was reconfigured for CLT operation.(87) The CLT pocket was approximately 165 ft long. No before-and-after operational studies were available for this implementation. The Jiaozuo implementation was unique in regards to its integrated LED signal and DMS.