U.S. Department of Transportation
Federal Highway Administration
1200 New Jersey Avenue, SE
Washington, DC 20590
202-366-4000
Federal Highway Administration Research and Technology
Coordinating, Developing, and Delivering Highway Transportation Innovations
| REPORT |
| This report is an archived publication and may contain dated technical, contact, and link information |
|
| Publication Number: FHWA-HRT-15-033 Date: May 2015 |
Publication Number: FHWA-HRT-15-033 Date: May 2015 |
The ESTD was designed to create flow conditions simulating log-law velocity profiles, which is accomplished by propelling flow through an enclosed test channel with a moving belt and a centrifugal pump. Various combinations of belt speed, flow rate, and bottom roughness were evaluated to generate the log-low velocity profile for a range of shear stresses.
Particle image velocimetry (PIV) is used to measure the flow velocity. The PIV system contains a double-pulsed solo PIV 120 laser and a Megaplus ES 1.0 digital camera. The flow is seeded with silver-coated hollow glass spheres that serve as the PIV tracing particles. The spheres have a median diameter of 0.0063 inches (0.016 mm) and a density of 81 lb/ft3 (1300 kg/m3).
The PIV system has a frame rate of 15 Hz x 2.The measurements usually lasted 10 s. The recorded PIV images were 1.6 by 1.6 inches (40 by 40 mm), equivalent to 960 by 960 pixels. The interrogation windows were 64 by 64 pixels with a 75-percent overlap. The first velocity point was therefore 32 pixels (approximately 0.059 inches (1.5 mm)) away from the test channel bed. Because the PIV image size was quite small, the velocity profile for each flow condition was averaged both over time and along the flow direction (over the image size).
For all PIV measurements, the entire test channel bottom was covered by either smooth Plexiglass™ plates or plates with glued sandpaper except for a 1.6- by 0.079-inch (40- by 2-mm) slot. The slot provided access for the PIV laser through the sandpaper-treated plates.
Figure 16 shows the PIV setup. The laser emitter is placed adjacent to, but lower than, the ESTD tank. After emerging from the emitter, the laser beam is transformed into a laser sheet by a laser optic. The laser sheet is then reflected vertically upward by a 45° mirror under the ESTD tank into the small slot as shown in figure 17. The charge-coupled device camera is placed beside the ESTD tank to capture the illuminated plane under the moving belt. The measurement plane is highlighted in figure 18. A Pitot tube was mounted at a height of 0.24 inches (6 mm) above the bed downstream of the PIV measurement position as shown in figure 17. The Pitot tube was used to validate the PIV measurements.
A total of 236 combinations of flow rate, belt speed, and bed roughness were tested to find combinations that generated log-law velocity profiles. The first tests were simple conduit flow with the clear Plexiglass™ on the top and sides of the conduit. Five bottom roughness values were used as well as tests with a clear Plexiglass™ bottom. Table 1 summarizes the bed materials and the corresponding roughness heights. Five flow rates-0.53, 0.66, 0.79, 0.92, and 1.06 gal/s (2.0, 2.5, 3.0, 3.5 and 4.0 L/s)-were tested with each bed roughness.
The remaining tests were combination flow tests, meaning that both the moving belt and pump propelled the flow. Combinations with five flow rates-ranging from 0.48 to 1.19 gal/s (1.8 to 4.5 L/s)-and belt speeds ranging from 0 to 16.4 ft/s (0 to 5 m/s) were set for each roughness. A subset of these combination runs were with the pump off and the flows propelled only by the moving belt. These combinations were tested with each bed roughness.
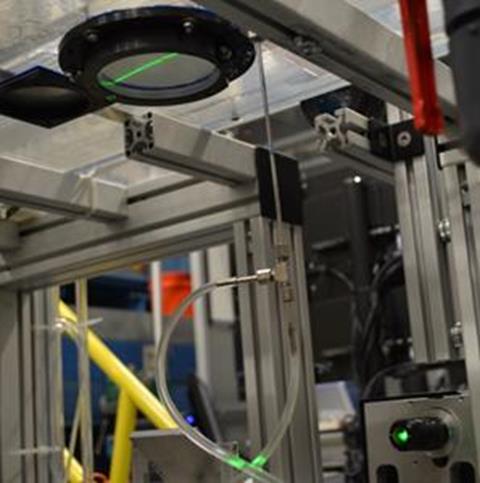
Figure 16. Photo. The PIV system
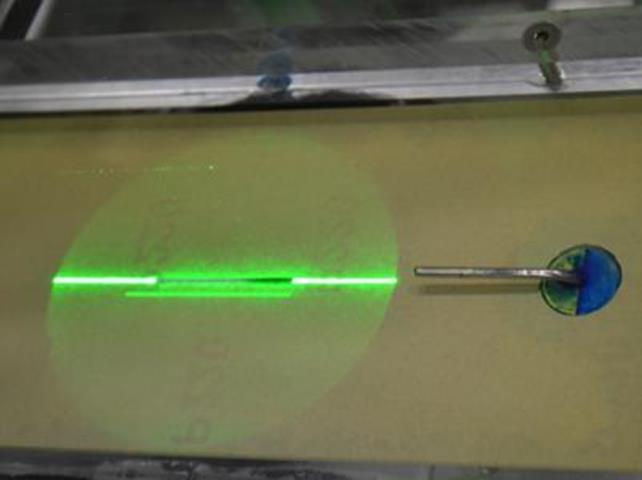
Figure 17. Photo. The PIV illuminated laser
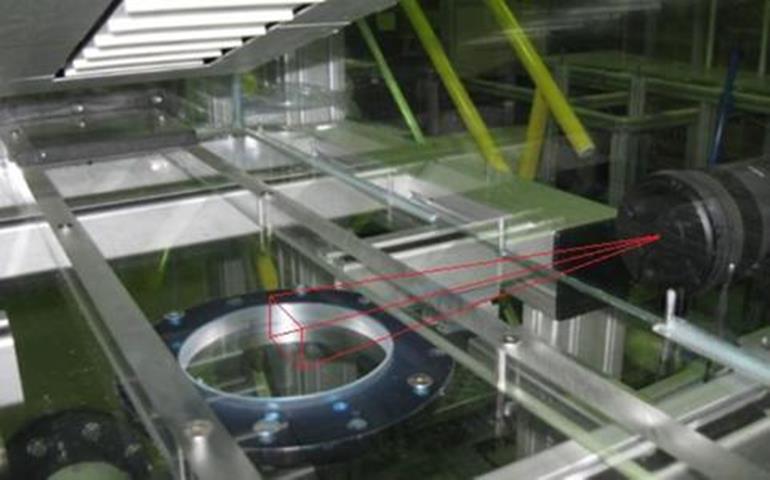
Figure 18. Photo. The PIV measurement plane
Bed Material |
Roughness Height (inches) |
Roughness Height (mm) |
|---|---|---|
Smooth Plexiglass™ |
not applicable |
not applicable |
P320 sandpaper |
0.0018 |
0.045 |
P220 sandpaper |
0.0027 |
0.068 |
P150 sandpaper |
0.0039 |
0.100 |
P100 sandpaper |
0.0064 |
0.162 |
P80 sandpaper |
0.0079 |
0.200 |
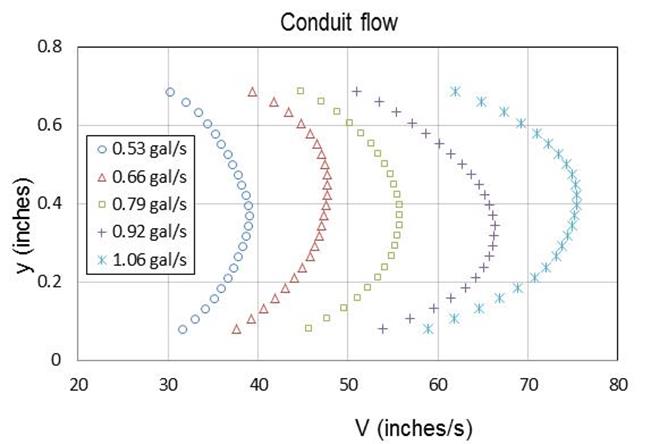
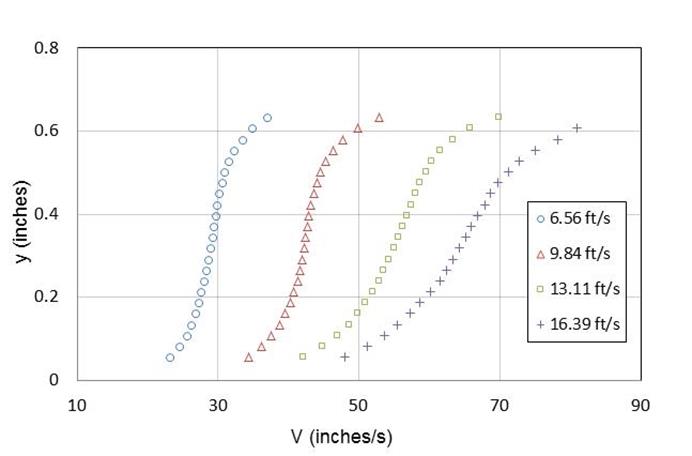
Figure 19 displays a typical set of velocity profiles for rectangular conduit flow with the P220 sandpaper. The difference between the PIV measurement and that of the Pitot tube is less than 5 percent, which is within the accuracy of the Pitot tube. The velocity profiles of the rectangular conduit flows are parabola-shaped with maximum velocity in the middle of the flow.
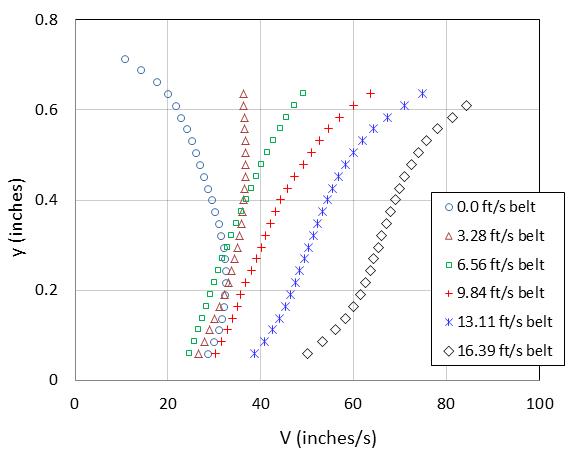
Figure 20 shows the velocity profiles of flows that are propelled by the moving belt alone. These profiles exhibit an S-shape. The velocity gradient in the top part of the flow is larger than that of the bottom part. The faster the belt runs, the more the velocity profile curves. As the belt speed rises, the average velocity increases because velocity gradients in both the top and bottom parts of the flow field increase.
Figure 21 illustrates a typical set of velocity profiles for the combination flow with both the pump and the moving belt together. Each of the runs in the figure is for a 0.58 gal/s (2.2 L/s) flow rate with the velocity profile measured in the center of the channel. The transition from parabolic velocity profile with a belt speed of 0.0 to an S-shaped profile with a belt speed of 16.4 ft/s (5 m/s) is clearly indicated.
In figure 21, the test run with the 3.3 ft/s (1.0 m/s) belt speed appears to approximate a log-law velocity profile better than the other test runs. This observation will be verified later by fitting the law of the wall to the measured velocity data.
Although each of the runs in figure 21 was conducted at the same constant flow rate, vertical integration of these flow profiles suggests flow rates from 0.37 gal/s (1.4 L/s) to 1.03 gal/s (3.9 L/s), assuming that these profiles exist across the full width of the rectangular conduit. However, this suggestion is not accurate. At lower belt speeds, the velocities are higher at the channel edges than in the center because the gap between the belt edge and the cutout boundary offered less resistance than the belt. Conversely, when the belt was moving at higher speeds, the velocity at the channel edges was lower than in the center because the belt was moving the water in the center forward.
1 gal = 3.8 L.
1 inch = 25.4 mm.
Figure 19. Graph. Velocity profiles of conduit flow with P220 sandpaper bed
1 ft = 0.3 m.
1 inch = 25.4 mm.
Figure 20. Graph. Velocity profiles for belt-only tests with a P100 sandpaper bed
1 ft = 0.3 m.
1 inch = 25.4 mm.
Figure 21. Graph. Combination velocity profiles at 0.58 gal/s (2.2 L/s) with a P80
sandpaper bed
The Pitot tube was used to validate the PIV measured profiles. The measurement differences between the Pitot tube and the PIV were within 16 percent for the combination runs. Because these differences are greater than those observed for the conduit flows (within 5 percent), the validity of the Pitot tube measurements became questionable because of the possibility of greater turbulence for the combination runs.
To test the repeatability of the PIV measurements, a smaller image size of 0.75 by 0.75 inches (19 by 19 mm) was used in test runs with the P80 and P220 sandpaper beds. A total of 12 flow/bed combinations were tested in this manner. The difference of velocity magnitude between the two image sizes was within 6 percent, indicating good agreement.
Four additional validation tests were performed using longer time intervals. These tests used the P220 sandpaper bed and are summarized in table 2. The comparisons resulted in velocity measurement differences of 2 percent or less, supporting the validity of the PIV measurements.
Table 2. Time interval validation tests.
Flow Rate, gal/s (L/s) |
Belt Speed, ft/s (m/s) |
Original Time Interval (ms) |
Validation Time Interval (ms) |
|---|---|---|---|
0.53 (2.0) |
3.3 (1.0) |
0.10 |
0.16 |
0.53 (2.0) |
6.6 (2.0) |
0.09 |
0.14 |
0.79 (3.0) |
0.0 (0.0) |
0.10 |
0.20 |
0.79 (3.0) |
9.8 (3.0) |
0.07 |
0.11 |
Of the 236 flow/bed conditions for which velocity measurements were taken, shear stress measurements were also collected for 187 of those conditions by the direct force gauge. Initial testing of the shear stress measurements was accomplished by mounting a dummy sample with sandpaper glued to its surface onto the sensor disk of the direct force gauge. The cylindrical dummy sample had a diameter of 2.5 inches (63.5 mm). The surface elevation of the dummy sample was carefully adjusted to be flush with the bottom of the test channel in the ESTD tank.
Each flow/bed condition was maintained for 10 min. The measured shear stresses collected over the test duration were averaged to obtain a representative shear stress for that flow/bed condition. Variations in the measured shear stress over the test duration ranged within plus or minus 0.0084 lbf/ft2 (0.4 Pa) for low belt speeds and within plus or minus 0.031 lbf/ft2 (1.5 Pa) for high belt speeds.
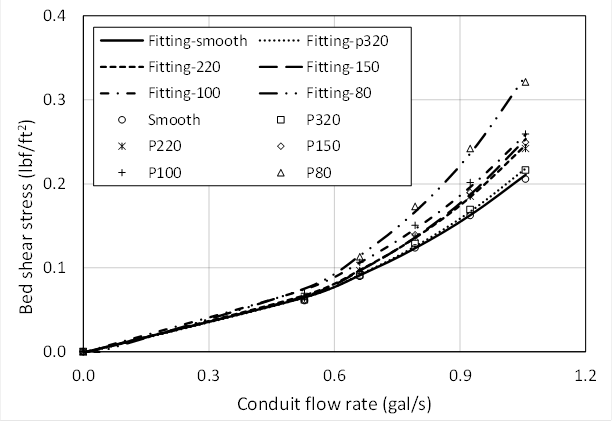
For the rectangular conduit tests (belt not moving), it is anticipated that shear stress on the dummy sample will increase with both flow rate and bed roughness. The measured shear stress is plotted for a range of conditions in figure 22. These data are satisfactorily fit to the equation found in figure 23. The equation constants are provided in table 3.
1 ft = 0.3 m.
1 gal = 3.8 L.
1 lbf/ft2 = 47.8 Pa.
Figure 22. Graph. Shear stress measurements of conduit flow on each sandpaper bed
![]()
Figure 23. Equation. Bed-specific relation for conduit flow bed shear stress in the ESTD
Where:
𝜏 = Bed shear stress, lbf/ft2 (Pa).
Q = Flow rate in the ESTD test channel, gal/s (L/s).
a,b,c = Constants based on bed material.
α = Unit conversion constant, 0.021 in U.S. customary units and 1.0 in S.I.
Table 3. ESTD shear stress parameters for rectangular conduit tests.
Bed Material |
a |
a |
B |
c |
|---|---|---|---|---|
Smooth Plexiglass™ |
0.40 |
1.52 |
0.94 |
2.6 |
P320 sandpaper |
0.42 |
1.59 |
0.88 |
2.5 |
P220 sandpaper |
0.48 |
1.82 |
0.71 |
2.1 |
P150 sandpaper |
0.51 |
1.93 |
0.60 |
1.9 |
P100 sandpaper |
0.45 |
1.70 |
0.90 |
2.5 |
P80 sandpaper |
0.57 |
2.16 |
0.60 |
2.1 |
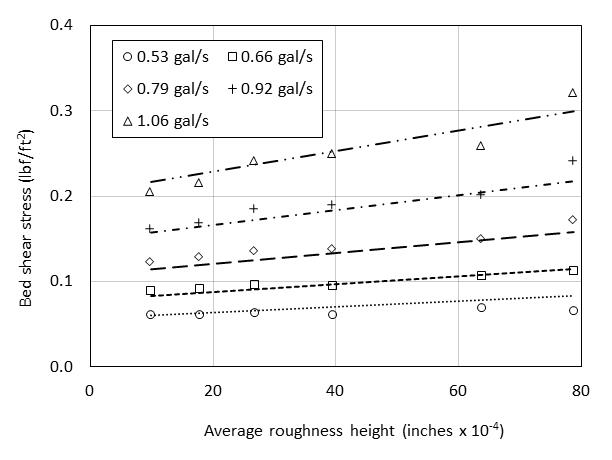
Figure 24 shows the relationship between the shear stress and the bed roughness at different flow rates. It was determined that these data for rectangular conduit flow can be fit to the equation in figure 25.
1 gal = 3.8 L.
1 inch = 25.4 mm.
1 lbf/ft2 = 47.8 Pa.
Figure 24. Graph. Shear stress measurements of conduit flow
![]()
Figure 25. Equation. Equation of bed shear stress for conduit flow in the ESTD
Where:
𝜏 = Bed shear stress, lbf/ft2 (Pa).
ks = Roughness height, inches (mm).
Q = Flow rate in the ESTD test channel, gal/s (L/s).
m1 = Fitting constant, 41 inches-1 (1.6 mm-1).
m2 = Fitting constant, 0.653 (dimensionless).
m3 = Fitting constant, 2.43 (gal/s)-1 (0.639 (L/s)-1).
m4 = Fitting constant, 0.152 (dimensionless).
α = Unit conversion constant, 0.021 in U.S. customary units and 1.0 in S.I.
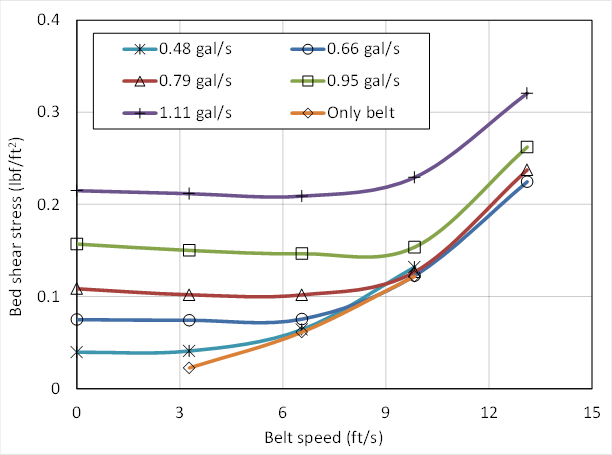
For the combination flow conditions with the moving belt running, the relation between flow rate and bed roughness is complicated by the motion of the belt. Figure 26 shows a typical set of measurements with a P150 sandpaper bed. At small flows, the shear stress monotonically increases as the belt speed increases. However, at larger flows, the shear stress initially decreases as the belt speed increases from 0 to 6.6 ft/s (0 to 2 m/s). Then, it increases when belt speed increases from 9.8 to 13.1 ft/s (3 to 4 m/s). The gradient increases further when the belt speed increases from 13.1 to 16.4 ft/s (4 to 5 m/s). A possible explanation is that at small flows, the pump and the moving belt have equivalent influence on the bed shear stress. However, as the flow increases, the influence of the moving belt on bed shear stress is diminished.
1 ft = 0.3 m.
1 gal = 3.8 L.
1 lbf/ft2 = 47.8 Pa.
Figure 26. Graph. Shear stresses for combination tests on a P150 sandpaper bed
The shear stress measurement was validated for the conduit flow case where the flow rate is 1.06 gal/s (4 L/s) with a P100 sandpaper bed by two methods. The measured shear stress under these conditions was 0.26 lbf/ft2 (12.4 Pa). The first validation approach was to estimate the shear stress at the bottom of the conduit based on the friction factor and average velocity. The Moody diagram is used to estimate the friction factor from the roughness height, Reynolds number, and conduit size. The bed shear stress was computed to be 0.21 lbf/ft2 (10.1 Pa). The second validation approach applied a proposed modified log-wake law for turbulent flow velocity in smooth pipes.(30) The measured velocity data were fit to the equation to determine the shear velocity. The shear stress was then computed from the fitted equation as 0.25 lbf/ft2 (11.8 Pa). The largest difference, at 20 percent, was the Moody approach. These tests support the measured values of shear stress.
The repeatability of the shear stress measurements was tested in two ways. The first validation strategy was to repeat one set of conduit flow tests four times in succession on the same day. The results of these tests showed only 3 percent or less variation in the measured shear stress from these four measurements.
The second validation strategy was applied to a series of combination flow tests on two consecutive days (i.e., one test on one day and a second test on the next day). The results, summarized in table 4, indicate shear stress differences between the tests within 0.011 lbf/ft2 (0.5 Pa). In percentage terms, the difference is larger for the low flow (low stress) conditions. The differences in results between the two days are likely the consequence of variations in the sample mounting process. Because the sensor is sensitive to the flush condition of the sample with the bottom, these variations would result in changes in form drag and, therefore, changes in the shear stress measurement.
Table 4. Consecutive day validation shear tests.
Run |
Q (gal/s) |
Belt Speed (ft/s) |
Day 1 𝜏 |
Day 2 𝜏 |
Difference |
Percent |
|---|---|---|---|---|---|---|
1 |
0.53 |
3.3 |
0.044 |
0.033 |
0.011 |
29 |
2 |
0.66 |
3.3 |
0.065 |
0.056 |
0.009 |
15 |
3 |
0.79 |
3.3 |
0.090 |
0.082 |
0.008 |
9 |
4 |
1.00 |
3.3 |
0.142 |
0.134 |
0.008 |
6 |
5 |
1.19 |
3.3 |
0.196 |
0.190 |
0.006 |
3 |
1 gal = 3.8 L.
1 ft = 0.3 m.
1 lbf/ft2 = 47.8 Pa.
A goal for the ESTD was to find a series of flow rate, belt speed, and bed combinations that generated a range of bed stresses for erosion testing while fitting the log-law velocity profile. It was found that sandpaper roughness used in the ESTD resulted in hydraulically transitional flow conditions (3.5 < ks+ < 70), where ks+ is defined by the equation in figure 27.

Figure 27. Equation. Dimensionless roughness height
Where:
ks+ = Roughness height, dimensionless.
u* = Shear velocity, ft/s (m/s).
ks = Roughness height, ft (m).
v = Kinematic viscosity of water, ft2/s (m2/s)
Using the law of flows in rough pipes proposed by Nikuradse, the bed shear stress can be deduced by knowing the velocity profile and bed roughness height.(31) Nikuradse found that the friction coefficient of a rough pipe depends on the pipe roughness and Reynolds number (Re) expressed as the product of the average pipe velocity and the pipe diameter divided by the kinematic viscosity. When Re is low (less than 2 x 10³), the friction coefficient depends only on the Re. As Re increases, the friction coefficient becomes a function of both Re and relative pipe roughness. At higher levels of Re (the threshold being dependent on relative roughness), the friction coefficient depends only on the relative pipe roughness. For turbulent flow in rough pipes, Nikuradse provided the velocity distribution function seen in figure 28:

Figure 28. Equation. The law of the wall
Where:
u = Velocity at a depth, y, ft/s (m/s).
u* = Shear velocity, ft/s (m/s).
κ = Von Karman constant, 0.4.
y = Depth at which the velocity, u, is taken, ft (m).
B = Constant depending on the dimensionless roughness height, ks+.
Although Nikuradse conducted experiments in circular pipes, the velocity function can be extended to flow along a plate, a streamline body, a rectangular pipe, or an open channel. The velocity function is then called the universal law of the wall. For flows in the ESTD, the conduit flow condition can be considered similar to that of Nikuradse’s experiments except that the ESTD test channel does not have identical roughness on all of the boundaries. The belt roughness is much larger than that of the test channel bed. The effect of this difference will vary with the belt speed.
As stated at the beginning of this section, the goal was to find combinations of discharge, belt speed, and bed roughness that recreated the log-law velocity profile. When the belt speed is too low or too high, the influence of belt roughness will extend to very close to the test channel bed, which in turn may limit the application of the law of the wall to a very small height above the bed. Such a limited depth would make fitting observed and theoretical values of velocity nearly impossible.
A four-step procedure was used to identify the combinations appropriate for ESTD testing.
Step 1: Calculate the Bed Roughness with the Measured Shear Stress of the Conduit Flows
The measured shear stresses were considered to be accurate. The friction coefficient, f, was then calculated by the equation in figure 29.

Figure 29. Equation. Friction coefficient
Where:
f = Friction coefficient.
𝜏 = Shear stress, lbf/ft2 (Pa).
ρ = Density of water, lb/ft3 (kg/m3).
![]() = Average velocity, ft/s (m/s).
= Average velocity, ft/s (m/s).
Nikuradse provides relationships between f, r, ks, and ks+ for different values of log(ks+) as listed in table 5.(31) The equivalent circular radius for the rectangular conduit, r, is calculated by r = 2A/P, where A is the cross-sectional area and P is the wetted perimeter. With known f, a roughness height, ks, can be calculated based on the relationships in table 5.
Table5 . Relationship between f, r, ks, and ks+.
Value of log(ks+) |
Relationship between f, r, ks, and ks+ |
|---|---|
log (ks+) ≤ 0.55 |
|
0.55 ≤ log(ks+) ≤ 0.85 |
|
0.85 ≤ log(ks+) ≤ 1.15 |
|
1.15 ≤ log(ks+) ≤ 1.83 |
|
1.83 ≤ log(ks+) |
|
It was found that for a specific sandpaper grade, the calculated roughness height varied with flow rate. The reasons for this may include the following: 1) the fact that only the test channel bed (not the sides and top) was lined with sandpaper, and the calculation assumes identical roughness across the cross section of the test channel; and 2) the uncertainty in measuring the bed shear stress. For each sandpaper grade, the average roughness height was used in the subsequent analyses. Table 6 summarizes the roughness heights for the bed conditions.
Table 6. Particle size and modeled roughness height.
Bed Material |
Average particle size, D50 (inches) |
Average particle size, D50 (mm) |
Roughness Height, ks (inches) |
Roughness Height, ks (mm) |
ks/D50 |
|---|---|---|---|---|---|
Plexiglass™ |
N/A |
N/A |
0.0101 |
0.257 |
N/A |
P320 sandpaper |
0.0018 |
0.045 |
0.0109 |
0.277 |
6.2 |
P220 sandpaper |
0.0027 |
0.068 |
0.0128 |
0.325 |
4.8 |
P150 sandpaper |
0.0039 |
0.100 |
0.0128 |
0.326 |
3.3 |
P100 sandpaper |
0.0064 |
0.162 |
0.0156 |
0.395 |
2.4 |
P80 sandpaper |
0.0079 |
0.200 |
0.0195 |
0.496 |
2.5 |
The roughness height is larger than average particle size of the bed sandpaper as shown in the last column of the table. In Nikuradse’s experiments, uniform sand particles were glued to the inner surface of the pipes. Two layers of lacquer were applied to the sands to provide a strong bond. This reduced the effective particle size somewhat, so that the effective roughness was also smaller. Although Nikuradse used average particle size as the relevant roughness height, some have proposed the use of 2.5 or larger multipliers on the actual particle size to determine the effective bed roughness height.
Step 2: Validate the Bed Roughness by Predicting Conduit Flow Velocity Profiles
The roughness height was validated by predicting conduit flow velocity profiles using the equation in figure 28. Nikuradse provided relations to calculate the constant B, which are listed in table 7.(31) The constant, B, is calculated using the roughness height determined in step 1 and the shear velocity calculated from the measured shear stress. The velocity profile of the lower half of the flow field of the rectangular conduit flow-as shown in figure 19, for example-can be predicted.
Table 7. Equations for the constant B.
Value of log(ks+) |
Equation for B |
|---|---|
log (ks+) ≤ 0.55 |
B = 5.5 + 5.75log(ks+) |
0.55 ≤ log(ks+) ≤ 0.85 |
B = 6.59 + 3.5log(ks+) |
0.85 ≤ log(ks+) ≤ 1.15 |
B = 9.58 |
1.15 ≤ log(ks+) ≤ 1.83 |
B = 11.5 - 1.62log(ks+) |
1.83 ≤ log(ks+) |
B = 8.48 |
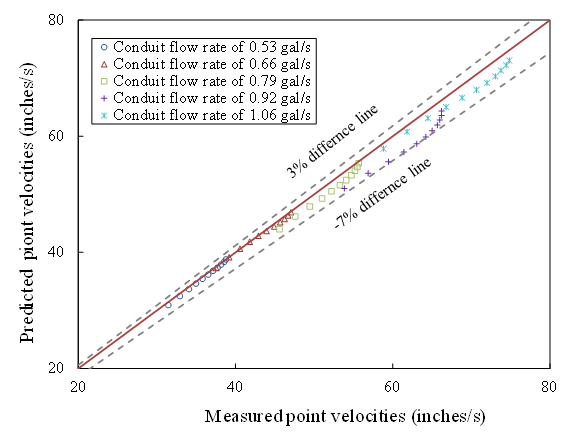
The predicted velocity profile is then compared with the measured velocity profile. For example, figure 30 summarizes a comparison of measured and predicted conduit flow velocities for the P220 sandpaper bed for a range of flow rates. The difference between the measured and predicted velocity on all sandpaper beds evaluated was within -7 and 3 percent, demonstrating that the velocity can be predicted by the roughness height estimated from shear stress measurements.
1 inch = 25.4 mm.
1 gal = 3.8 L.
Figure 30. Graph. Comparison of conduit flow point velocities on a P220 sandpaper bed
Step 3: Fit the Shear Velocity of Flow Conditions with Both the Pump and Belt Running
After validation, the roughness height calculated in step 1 is used to predict the velocity profiles for flow conditions when both the belt and pump are running. By fitting measured velocity data to the equation in figure 28, the shear velocity can be fitted, and, therefore, the wall shear stress can be calculated. The constant B is calculated by the relations in table 7.
Step 4: Identify the Flow Conditions for ESTD Testing
Flow conditions with equivalent fitted (step 3) and measured shear stresses and velocity profiles over the entire flow depth that approximate the log-law velocity profile were identified by comparing velocity predictions from the equation in figure 28 with measured velocity data. Those conditions providing a match were used for testing soil samples in the ESTD.
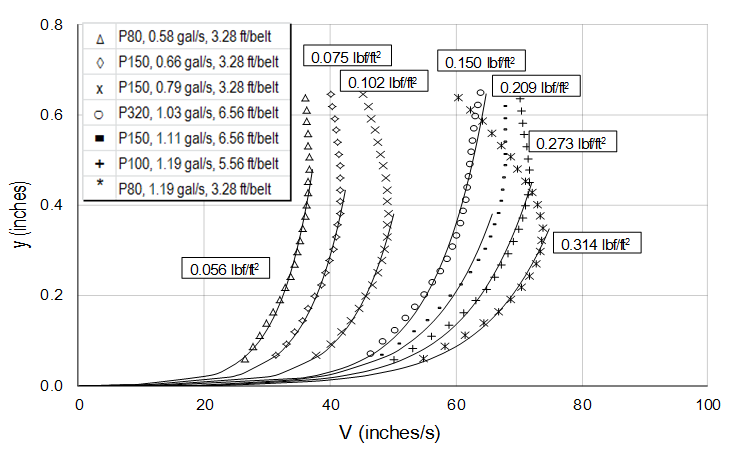
A series of seven test conditions whose velocity profiles follow the log-law profile and result in the desired range of shear stress conditions were identified. Figure 31 illustrates the measured velocity data compared to the law of the wall for the selected conditions. The discrete symbols in the figure represent the measured velocity points. The curves shown are composed of three parts. When the dimensionless flow depth, y+, is greater than 30, the curve is the fitted log-law equation. When the dimensionless flow depth, y+, is less than 5, the curve represents the Newton shear stress equation, u = 𝜏 y/µ. In this equation, 𝜏 is the bed shear stress, y is flow depth, and µ is the dynamic viscosity of water. A linear relation is estimated between the upper end of the range of y+ covered by the Newton shear stress and the lower end of the range of y+ covered by the log-law equation.
The velocity profile corresponding to a shear stress of 0.15 lbf/ft2 (7.2 Pa) is an example of a profile where nearly the entire velocity profile corresponds to the law of the wall. These seven conditions indicate that the ESTD can model the very near-bed flow condition of an open-channel flow given a specific wall shear stress and bed roughness.
In each of the seven cases, the computed shear stress matches the measured shear stress that is shown on the figure. The fitted parameters and shear stress for each condition is summarized in table 8. All erosion tests were conducted using one of these combinations of flow rate, belt speed, and bed roughness.
1 ft = 0.3 m.
1 gal = 3.8 L.
1 inch = 25.4 mm.
Figure 31. Graph. Conditions used for erosion testing in the ESTD
Table 8. Test conditions for the ESTD.
Bed Sandpaper |
Flow, gal/s (L/s) |
Belt Speed, ft/s (m/s) |
Measured Bed Shear Stress, lbf/ft2 (Pa) |
Fitted Bed Shear Stress, lbf/ft2 (Pa) |
|---|---|---|---|---|
P80 |
0.58 (2.2) |
3.3 (1) |
0.056 (2.7) |
0.063 (3.0) |
P150 |
0.66 (2.5) |
3.3 (1) |
0.075 (3.6) |
0.073 (3.5) |
P150 |
0.79 (3.0) |
3.3 (1) |
0.102 (4.9) |
0.108 (5.2) |
P320 |
1.02 (3.9) |
6.6 (2) |
0.150 (7.2) |
0.150 (7.2) |
P150 |
1.11 (4.2) |
6.6 (2) |
0.209 (10.0) |
0.188 (9.0) |
P100 |
1.19 (4.5) |
6.6 (2) |
0.273 (13.1) |
0.235 (11.3) |
P80 |
1.19 (4.5) |
3.3 (1) |
0.314 (15.0) |
0.308 (14.8) |