

Precast Bent System for High Seismic Regions: Laboratory Tests of Column-to-Footing Socket Connections
CHAPTER 2. DESIGN OF TEST SPECIMENS
Three cantilever column specimens with footings were designed, constructed, and tested as part of this research. All three specimens had identical 20-inch-diameter, 60-inch-long precast columns, resulting in a span-to-depth ratio of 3. Each column was embedded in a cast-in-place footing (90 inches long and 68 inches wide). This geometry represented, at 42 percent scaling, a 48-inch-diameter column embedded in an 18-foot by 18-foot cast-in-place footing. Those dimensions were the ones used in a prototype bridge constructed by WSDOT shortly after completion of the testing. The prototype bridgewas designed in parallel with the development and testing of the socket concept.
The specified nominal material strengths for the test specimens were the same as for the prototype bridge. The concrete strength specified was 4 ksi for both the columns and the footings, and all reinforcement conformed to ASTM A706. Expected material strengths were used in the design, in accordance with the AASHTO Seismic Guide Specifications. The construction drawings for the three specimens are provided in appendix A.
Specimens SF-1 and SF-2 were nearly identical. For scheduling reasons, both had to be built at the same time, so the reductions in reinforcement used in specimen SF-2 had to be based on estimates, rather than knowledge of the performance of specimen SF-1.
- The cast-in-place footings had the same geometry (22.5 inches deep, 90 inches long, and 68 inches wide).
- Both columns were segmental and included a splice 20 inches above the footing surface. At this location, it was expected that the yield moment would develop at the same time as the ultimate moment would develop at the column-to-footing interface. These moments were calculated for the smallest axial load expected for the prototype column on site, which corresponded to the unfactored dead load and included the effects of overturning. The scaled down axial load was 87.5 kips.
SF-1 and SF-2 differed only in the column-to-footing connection details, including:
- The presence (SF-1) or absence (SF-2) of a slot at the base of the embedded column to permit some of the footing steel to be placed directly under the column.
- The amount of diagonal reinforcement in the footing surrounding the column was less in specimen SF-2.
- The amount of transverse reinforcement within the footing was reduced 50 percent in specimen SF-2.
The design of specimen SF-3 was influenced by the test results of specimens SF-1 and SF-2. In the first two tests, the failure occurred in the columns, so specimen SF-3 was designed to fail in the footing. The specimen had the same column design as specimens SF-1 and SF-2, in which the expected moment strength was 3,100 kip-in. However, the footing depth in SF-3 was reduced to half of the column depth (10 inches). Reinforcement in the footing wasplaced in strategic locations to suppress one-way shear failure but allow for a combined punching shear and moment transfer failure mechanism to occur.
Design of Prototype and Test Columns
The test specimen dimensions and reinforcement were scaled (42 percent) from a bridge over Interstate 5 (US 12) designed by WSDOT. This bridge was designed according to the AASHTO LRFD, the AASHTO Seismic Guide Specifications, the WSDOT BDM, and the Caltrans Seismic Design Criteria (SDC). (See references 14, 15, 16, and 17.) The AASHTO Seismic Guide Specifications were based on the Caltrans SDC, but the 2009 edition omits some reinforcement steel as footing ties. These ties are expected to be included in the next edition of the AASHTO Seismic Guide Specifications. For those details, the Caltrans criteria were used in the project.
The prototype columns were constructed of precast concrete with three segments (top, base and middle). Segmental construction was not necessarily economical in this case, but WSDOT wanted to use this project to tests its feasibility in future projects in which it would be necessary. Both the top and base segments had a longitudinal reinforcement ratio, ρl, of 1.0 percent (8 No. 14 bars) and a transverse reinforcement ratio, ρs, of 0.76 percent (No. 5 spiral at 4-inch pitch). In the prototype, the top segments had projecting bars that were to be grouted into ducts in the cap beam. This top segment was not modeled in the laboratory for this project, because it had already been tested.(8)
The bottom part of the base segment that was embedded in the cast-in-place footing was intentionally roughened with a saw-tooth detail similar to the one required by the WSDOT BDM for the ends of prestressed girders. Shear-friction design of the socket was calculated according to the AASHTO LRFD. The longitudinal bars for the base segment were terminated with mechanical anchors at their bottom ends, instead of the more conventional detail of bending the longitudinal bars outwards into the foundation.
In the prototype, the middle segments had 16 No. 10 bars lap-spliced at both ends to steel ducts and confined by No. 5 spiral at 4-inch pitch. All reinforcement conformed to ASTM A706. Prescribed ducts conformed to ASTM A653 and were 30 inches tall and had an outside diameter (o.d.) of 4 inches.
For the prototype, the locations of the splices were determined by plastic-hinge length calculations performed using procedures found in the AASHTO Seismic Guide Specifications. AASHTO Seismic Guide Specifications article 4.11.7 requires that heavier lateral confinement reinforcement be provided over the plastic-hinge region length, Lpr, The length is to be taken as the larger of:
- 1.5 times the gross-section column diameter (72 inches).
- The location where 75 percent of the overstrength moment occurs (30 inches).
- The analytical plastic-hinge length calculated using equation 4.11.6-1 in the AASHTO Seismic Guide Specifications (35 inches).
The location of the splice for the prototype bridge was controlled by 1.5 times the cross-sectional diameter, which corresponded to 6 feet above the footing-column interface.
Specimens SF-1 and SF-2 were constructed segmentally, similar to the prototype. The longitudinal reinforcement for the scaled-down precast base segment of the column consisted of eight No. 6 bars and had projecting bars to be grouted in ducts in the middle segment. However, the transverse reinforcement ratio was increased slightly to 0.88 percent to be consistent with previous tests done at the University of Washington.(8,11) The transverse reinforcement consisted of 3-gauge (0.244-inch-diameter) smooth spiral at a pitch of 1.25 inches. The diameters of the steel ducts were scaled down from the prototype 4 inches to 1.67 inches, but the duct length of 15 inches was controlled by the splice length requirements between the ducts and longitudinal bars in the specimen's top segments. The splice length was evaluated using the procedure described in article 12.2.3 in ACI 318-08, rather than the AASHTO LRFD, because ACI's procedure resulted in a more conservative development length than that of the AASHTO LRFD. In both procedures, a reduction factor based on the presence of the column spiral confinement was used, and an amplification "top steel" factor was used because the precast columns were to be cast horizontally. (The size of the test precast columns would have allowed them to be cast vertically, but that was not true for the prototype columns.) In the test specimen, a shear key was added in the joint between column segments, even though the horizontal shear could theoretically be fully resisted by the longitudinal reinforcement crossing the interface between the segments. Figure 4 shows an elevation for specimens SF-1 and SF-2.
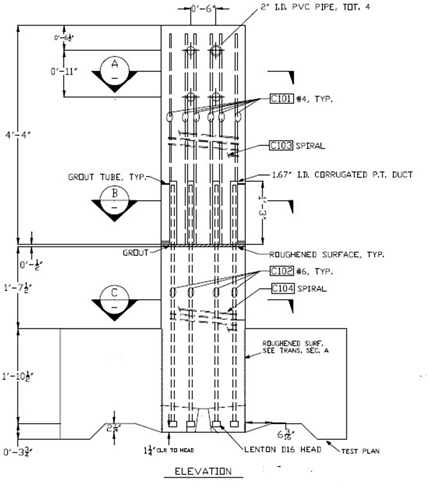
Figure 4. Diagram. Precast column elevation for specimens SF-1 and SF-2.
To better understand the performance of the splices near the yield moment, the splice locations in SF-1 and SF-2 were located less conservatively than would be required by the AASHTO Seismic Guide Specifications. Namely, the splices were located such that the first yield moment (My = 1,861 kip-in.) was expected to develop at the splice at the same time the overstrength moment (Mpo = 2,792 kip-in.) was reached at the interface (assuming an axial load of 87.5 kips, the smallest unfactored axial load in the scaled-down column). That moment was calculated to occur 20 inches above the footing surface, which was less than 1.5 times the specimen column diameter.
The column in specimen SF-3 did not consist of two segments like the previous two specimens, but rather, it was cast as one piece and had the same reinforcement detail as the bottom segments in specimens SF-1 and SF-2.
The dimensions of the roughened surface at the column base (that was going to be embedded in the cast-in-place footing) were scaled down to 42 percent of those of the prototype.
The moment-curvature program XTRACT was used to analyze the test specimens. Steel and concrete were modeled according to the AASHTO Seismic Guide Specifications, and the confined concrete was modeled using Mander's confined concrete model.(19)
Design of Prototype and Test Specimen Column-to-Footing Connection
Specimens SF-1 and SF-2
The prototype spread footing was designed according to the AASHTO LRFD, the AASHTO Seismic Guide Specifications, the WSDOT BDM, and the Caltrans SDC. Elevations of the spread footing for SF-1 and SF-2 are provided in figure 4. The detailed drawings of these two specimens are provided in appendix A.
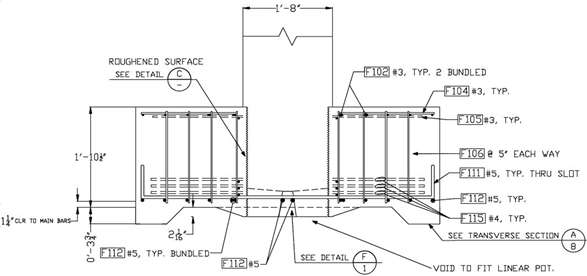
Stability against overturning and one-way shear determined the footing's dimensions. The AASHTO Seismic Guide Specifications require that the resultant reaction forces be located within the center two-thirds of the base, if no live load were present, which resulted in a footing length and width of 18 feet. The one-way shear stress demand was kept limited to (psi) by keeping the depth at 4.5 feet. Minimum transverse reinforcement was provided using No. 5 bars at 12 inches within the effective width, as required by the Caltrans SDC. Top and bottom flexural steel were determined by minimum steel requirements and resulted in No. 8 bars at 12 inches on center (o.c.) and No. 11 bars at 12 inches o.c., respectively, in each principal direction. Diagonal bars, 12 No. 10, were placed horizontally around the column, to provide confinement of the region around the column which would lead to normal force and corresponding shear friction resistance across the interface between the precast and cast-in-place elements. They are shown in figures 5 and 6, marked as F115. The diagonal bars were concentrated into three sets at the bottom and one at the top. The diagonal reinforcing steel used was equal to the amount needed if the cohesive component of the shear friction force defined by the AASHTO LRFD was ignored completely. An additional four No. 8 diagonal bars were provided on the top mat for trimming purposes.

Figure 5. Diagram. Specimen SF-1 footing steel arrangement.
The design of SF-1 was the more conservative.(12) SF-1 had slots under the column to allow some bars of the bottom mat (No. 5 at 5 inches o.c.) reinforcement to go through the base of the column, which ensured a direct engagement between the compressive strut from the column and the tension steel in the footing. The scaled-down top mat consisted of No. 3 bars at 5 inches o.c. Diagonal shear friction bars placed around the column were 12 No. 4 in the bottom and 4 No. 3 in the top. Caltrans's requirement of transverse reinforcement was met with 3-gauge ties at 5-inch spacing within the effective width of the footing. The total number of stirrups was therefore 128 in specimen SF-1.
Specimen SF-2 was a simplified version of specimen SF-1. One difference was that the slots at the base of the columns were removed to simplify the column formwork. Consequently, the bars could not go under the column, and instead, they were bundled with existing bars on either side of the column. Most of the diagonal shear friction steel was taken out, leaving only one set (four bars) in each of the bottom and top mats. Ties were reduced by half and kept in the locations where they would most effectively engage with 45-degree compressive struts.
(a) SF-1 (Conservative)
(b) SF-2 (Simpler)
Figure 6. Diagrams. Spread footing cross section for (a) SF-1 and (b) SF-2 (section A-4).
Specimen SF-3
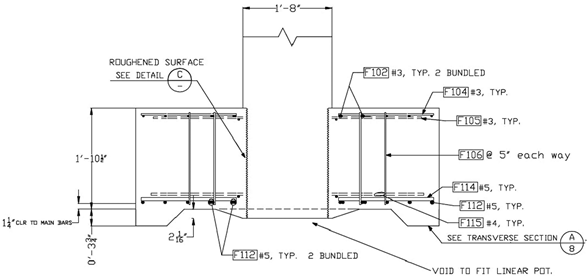
The design of specimen SF-3 was based on the test results for specimens SF-1 and SF-2, in which nearly all of the damage was concentrated in the column, as opposed to the footing.(13) The footing in SF-3 was designed to be much thinner to increase the likelihood of footing damage.
To estimate the failure load and mode of the footing, a design space was created based on AASHTO code criteria. However, the demands were based on the columns strength calculated using expected material properties (fy = 68 ksi and f'c = 5.2 ksi), while the footing and connection capacities were based on nominal strengths, calculated with φ factors according to the AASHTO LRFD and AASHTO SeismicGuide Specifications. The design space (displayed in figure 7 for specimen SF-3) shows combinations of the normalized column depth (hfooting/Dcolumn) and normalized footing length (Lfooting/ Dcolumn) that would lead to failure. Each curve in the figure corresponds to a particular failure mode. Combined shear and moment transfer was also added to the design space, where it is designated "ACI moment transfer." Each curve is marked "above" or "below," to indicate whether the design point on the graph should lie above or below the curve.
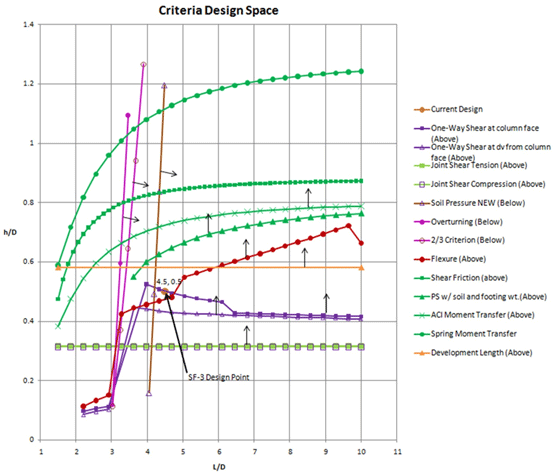
Figure 7. Graph. Final criteria design space for specimen SF-3.
The Lfooting/Dcolumn ratio of the footing was determined by overturning considerations to be 4.5. Then, the design space showed that the critical failure modes were one-way shear, and the ACI combined punching shear and moment transfer mechanism (shown as the green line with "x" marks). Note that the design space also shows a potential shear friction failure and a column longitudinal bar development failure. These criteria are not relevant in the design of specimen SF-3. First, the shear friction curve corresponds to shear friction resistance provided by the cohesive component alone and ignores the benefits of any shear friction steel. In fact, shear friction steel was provided. Second, the longitudinal bar development curve does not account for the fact that the column bars were terminated with mechanical anchors.
To suppress the one-way beam shear but allow combined punching shear and moment transfer to occur, shear reinforcement needed to be placed in strategic locations. Transverse reinforcement was placed outside the nominal conical failure surface for punching shear (extending d from the column faces in all directions) but within the beam shear failure planes (consisting of lines located d from the "compression" and "tension" faces of the column). Since the column portion embedded in the footing was octagonal, the failure plane was predicted to be closer in shape to that of an octagon, and is shown in figure 8 as the perimeter marked "punching shear critical perimeter." Placement of the shear reinforcement was also limited by the effective shear width defined in the AASHTO Seismic Guide Specifications, which is shown in figure 8 as the effective width boundary.
The result of this design procedure was a footing depth that was half the column diameter. Unlike specimens SF-1 and SF-2, the bottom flexural reinforcement of specimen SF-3 was not controlled by minimum requirements. Strength considerations resulted in No. 7 bars at 2.5 inches o.c. in which the first four lines of steel on either side of the column were bundled. Minimum steel was placed in the top mat, and instead of distributing those bars along the specimen's width, fewer and larger bars were used and were placed near the column to hold up the ties. Since the tie steel was designed to suppress the one-way shear failure mechanism, it exceeded the Caltrans SDC minimum requirement of (psi) stress capacity and resulted in a stress of about (psi) (area of steel within the effective width, beff, 40 inches). The 2 to 1 ratio of column diameter to footing depth, along with suppression of beam shear, predicted that the footing would fail in combined punching shear and moment transfer. Figures 9 and 10 show sections through the footing.

Figure 8. Diagram. Specimen SF-3 footing steel arrangement.
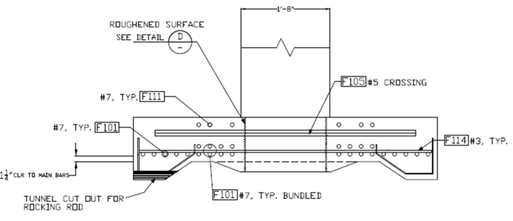
Figure 9. Diagram. Specimen SF-3 spread footing cross-section (section A-5).
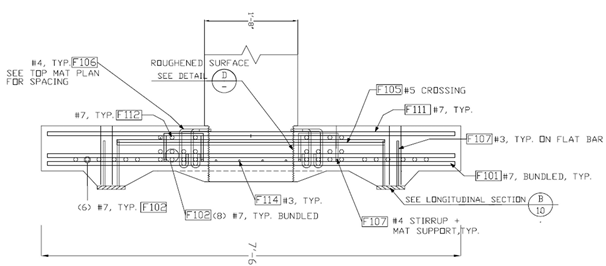
Figure 10. Diagram. Specimen SF-3 longitudinal section (section A-7).