U.S. Department of Transportation
Federal Highway Administration
1200 New Jersey Avenue, SE
Washington, DC 20590
202-366-4000
Federal Highway Administration Research and Technology
Coordinating, Developing, and Delivering Highway Transportation Innovations
| REPORT |
| This report is an archived publication and may contain dated technical, contact, and link information |
|
| Publication Number: FHWA-HRT-17-020 Date: February 2017 |
Publication Number: FHWA-HRT-17-020 Date: February 2017 |
The raw data for all of the fatigue results are shown in table 5 through table 17 for all of the different series of panels tested. Each table reports the minimum and maximum loads applied to the specimen, the total force range, the load ratio, the percent penetration that was achieved (calculated as the projection of rib thickness onto the deck plate by the penetration measured along the deck plate), failure mode (either in the deck plate, rib wall, or weld root), LSS, and the number of cycles to failure. Finally, the tables report the root condition that existed in the as-welded condition.
Table 5. GM8 series results.
| Specimen ID | Minimum/ Maximum Loads (kips) |
Load Ratio |
Load Range (kips) |
Root Gap | Penetration (percent) |
Failure Mode | LSS Range (ksi) |
Cycles to Failure |
|---|---|---|---|---|---|---|---|---|
| GM8-1 | 2.75/−2.75 | −1 | 5.50 | Close | 72.7 | Deck weld toe | 40.32 | 888,807 |
| GM8-2 | 0.00/5.00 | 0 | 5.00 | Close | 73.3 | Runout | 36.65 | 20,000,655 |
| GM8-3 | 0.00/2.75 | 0 | 2.75 | Close | 79.0 | Deck weld toe | 20.16 | 18,253,515 |
| GM8-4 | 2.50/−2.50 | −1 | 5.00 | Close | 67.0 | Weld root | 24.53a | 6,060,816 |
| GM8-5 | 2.75/−2.75 | −1 | 5.50 | Close | 81.2 | Deck weld toe | 40.32 | 770,672 |
| GM8-6 | 2.50/−2.50 | −1 | 5.00 | Close | 79.1 | Deck weld toe | 36.65 | 1,517,705 |
| GM8-7 | 2.75/−2.75 | −1 | 5.50 | Close | 83.0 | Deck weld toe | 40.32 | 751,609 |
| GM8-8 | 0.00/5.00 | 0 | 5.00 | Close | 69.3 | Deck weld toe | 36.65 | 302,451 |
| GM8-9 | 1.25/−1.25 | −1 | 2.50 | Close | 84.1 | Runout | 18.33 | 10,000,000 |
| GM8-10 | 0.00/5.00 | 0 | 5.00 | Close | 85.3 | Deck weld toe | 36.65 | 296,571 |
| GM8-11 | 2.50/−2.50 | −1 | 5.00 | Close | 88.8 | Deck weld toe | 36.65 | 1,390,062 |
| GM8-12 | 2.00/−2.00 | −1 | 4.00 | Close | 87.8 | Deck weld toe | 29.32 | 2,112,094 |
| GM8-13 | 1.25/−1.25 | −1 | 2.50 | Close | 94.5 | Runout | 18.33 | 10,000,000 |
| GM8-14 | 0.00/6.00 | 0 | 6.00 | Close | 77.9 | Deck weld toe | 43.98 | 146,635 |
| GM8-15 | 2.50/−2.50 | −1 | 5.00 | Close | 96.5 | Deck weld toe | 36.65 | 863,459 |
| GM8-16 | 2.50/−2.50 | −1 | 5.00 | Close | 83.3 | Deck weld toe | 36.65 | 1,657,918 |
| aLSS analysis is only applicable to the analysis of weld toe cracking. LSS range reported is based on extrapolation of stresses on the inside surface of the rib. ID = Identification. |
||||||||
Table 6. SA8 series results.
| Specimen ID | Minimum/ Maximum Loads (kips) |
Load Ratio |
Load Range (kips) |
Root Gap | Penetration (percent) |
Failure Mode | LSS Range (ksi) |
Cycles to Failure |
|---|---|---|---|---|---|---|---|---|
| SA8-1 | 2.50/−2.50 | −1 | 5.00 | Close | 58.5 | Rib weld toe | 39.91 | 689,134 |
| SA8-3 | 2.50/−2.50 | −1 | 5.00 | Close | 53.0 | Rib weld toe | 39.91 | 3,732,998 |
| SA8-4 | 2.50/−2.50 | −1 | 5.00 | Close | 76.2 | Rib weld toe | 39.91 | 2,321,046 |
| SA8-5 | 2.50/−2.50 | −1 | 5.00 | Close | 73.8 | Deck weld toe | 36.66 | 3,332,973 |
| SA8-6 | 2.50/−2.50 | −1 | 5.00 | Close | 66.5 | Deck weld toe | 36.66 | 2,623,398 |
| SA8-7 | 2.50/−2.50 | −1 | 5.00 | Close | 67.9 | Rib weld toe | 39.91 | 3,399,577 |
| SA8-8 | 2.50/−2.50 | −1 | 5.00 | Close | 56.0 | Rib weld toe | 39.91 | 2,743,534 |
| SA8-9 | 2.75/−2.75 | −1 | 5.50 | Close | 53.4 | Rib weld toe | 43.90 | 283,556 |
| SA8-10 | 2.50/−2.50 | −1 | 5.00 | Close | 51.9 | Rib weld toe | 39.91 | 869,732 |
| SA8-11 | 2.75/−2.75 | −1 | 5.50 | Close | 60.4 | Rib weld toe | 43.90 | 617,702 |
| SA8-12 | 2.75/−2.75 | −1 | 5.50 | Close | 73.1 | Deck weld toe | 40.32 | 1,930,296 |
| SA8-13 | 2.75/−2.75 | −1 | 5.50 | Close | 72.7 | Deck weld toe | 40.32 | 1,782,037 |
| SA8-14 | 0.00/5.00 | 0 | 5.00 | Close | 71.6 | Deck weld toe | 36.66 | 1,417,734 |
| SA8-15 | 0.00/5.00 | 0 | 5.00 | Close | 67.1 | Deck weld toe | 36.66 | 943,434 |
| SA8-16 | 0.00/5.00 | 0 | 5.00 | Close | 74.4 | Deck weld toe | 36.66 | 927,241 |
Table 7. SA6 series results.
| Specimen ID | Minimum/ Maximum Loads (kips) |
Load Ratio |
Load Range (kips) |
Root Gap | Penetration (percent) |
Failure Mode | LSS Range (ksi) |
Cycles to Failure |
|---|---|---|---|---|---|---|---|---|
| SA6-1 | 0.00/5.00 | 0 | 5.00 | Close | 72.8 | Deck weld toe | 36.65 | 317,140 |
| SA6-2 | 0.00/5.00 | 0 | 5.00 | Close | 70.0 | Deck weld toe | 36.65 | 257,016 |
| SA6-3 | 0.00/5.00 | 0 | 5.00 | Close | 66.2 | Deck weld toe | 36.65 | 286,626 |
| SA6-4 | 2.75/−2.75 | −1 | 5.50 | Close | 71.3 | Deck weld toe | 40.32 | 629,917 |
| SA6-5 | 2.75/−2.75 | −1 | 5.50 | Close | 65.4 | Deck weld toe | 40.32 | 2,074,221 |
| SA6-6 | 2.75/−2.75 | −1 | 5.50 | Close | 72.3 | Deck weld toe | 40.32 | 860,759 |
| SA6-7 | 2.75/−2.75 | −1 | 5.50 | Close | 69.3 | Deck weld toe | 40.32 | 588,156 |
| SA6-8 | 2.75/−2.75 | −1 | 5.50 | Close | 64.7 | Deck weld toe | 40.32 | 521,486 |
Table 8. SA4 series results.
| Specimen ID | Minimum/ Maximum Loads (kips) |
Load Ratio |
Load Range (kips) |
Root Gap | Penetration (percent) |
Failure Mode | LSS Range (ksi) |
Cycles to Failure |
|---|---|---|---|---|---|---|---|---|
| SA4-1 | 2.75/−2.75 | −1 | 5.50 | Close | 58.3 | Deck weld toe | 40.32 | 643,413 |
| SA4-2 | 2.75/−2.75 | −1 | 5.50 | Closea | 62.6 | Deck weld toe | 40.32 | 540,472 |
| SA4-3 | 2.75/−2.75 | −1 | 5.50 | Close | 57.0 | Deck weld toe | 40.32 | 607,547 |
| SA4-4 | 2.75/−2.75 | −1 | 5.50 | Close | 59.5 | Deck weld toe | 40.32 | 840,760 |
| SA4-5 | 2.75/−2.75 | −1 | 5.50 | Close | 61.8 | Deck weld toe | 40.32 | 649,093 |
| SA4-6 | 0.00/5.00 | 0 | 5.00 | Close | 58.2 | Deck weld toe | 36.65 | 294,621 |
| SA4-7 | 0.00/5.00 | 0 | 5.00 | Close | 52.3 | Deck weld toe | 36.65 | 300,716 |
| SA4-8 | 0.00/5.00 | 0 | 5.00 | Close | 66.1 | Deck weld toe | 36.65 | 407,819 |
| aSide opposite the failure did have an open gap. | ||||||||
Table 9. SA2 series results.
| Specimen ID | Minimum/ Maximum Loads (kips) |
Load Ratio |
Load Range (kips) |
Root Gap | Penetration (percent) |
Failure Mode | LSS Range (ksi) |
Cycles to Failure |
|---|---|---|---|---|---|---|---|---|
| SA2-1 | 2.75/−2.75 | −1 | 5.50 | Close | 89.1 | Deck weld toe | 40.32 | 750,996 |
| SA2-2 | 2.75/−2.75 | −1 | 5.50 | Close | 66.8 | Deck weld toe | 40.32 | 2,690,351 |
| SA2-3 | 2.75/−2.75 | −1 | 5.50 | Close | 71.4 | Deck weld toe | 40.32 | 708,693 |
| SA2-4 | 2.75/−2.75 | −1 | 5.50 | Close | 65.2 | Deck weld toe | 40.32 | 381,990 |
| SA2-5 | 2.75/−2.75 | −1 | 5.50 | Close | 62.0 | Deck weld toe | 40.32 | 534,364 |
| SA2-6 | 0.00/5.00 | 0 | 5.00 | Close | 64.1 | Deck weld toe | 36.65 | 258,639 |
| SA2-7 | 0.00/5.00 | 0 | 5.00 | Close | 71.4 | Deck weld toe | 36.65 | 222,741 |
| SA2-8 | 0.00/5.00 | 0 | 5.00 | Close | 64.5 | Deck weld toe | 36.65 | 238,136 |
Table 10. FIL series results.
| Specimen ID | Minimum/ Maximum Loads (kips) |
Load Ratio |
Load Range (kips) |
Root Gap | Penetration (percent) |
Failure Mode | LSS Range (ksi) |
Cycles to Failure |
|---|---|---|---|---|---|---|---|---|
| FIL-1 | 0.00/5.00 | 0 | 5.00 | Close | 66.1 | Deck weld toe | 36.65 | 308,351 |
| FIL-2 | 0.00/5.00 | 0 | 5.00 | Close | 58.5 | Deck weld toe | 36.65 | 352,981 |
| FIL-3 | 0.00/5.00 | 0 | 5.00 | Close | 64.2 | Deck weld toe | 36.65 | 302,927 |
| FIL-4 | 2.75/−2.75 | −1 | 5.50 | Close | 67.2 | Deck weld toe | 40.32 | 698,763 |
| FIL-5 | 2.75/−2.75 | −1 | 5.50 | Close | 62.8 | Deck weld toe | 40.32 | 855,918 |
| FIL-6 | 2.75/−2.75 | −1 | 5.50 | Close | 65.1 | Deck weld toe | 40.32 | 2,179,319 |
| FIL-7 | 2.75/−2.75 | −1 | 5.50 | Close | 46.4 | Deck weld toe | 40.32 | 870,418 |
| FIL-8 | 2.75/−2.75 | −1 | 5.50 | Close | 69.6 | Deck weld toe | 40.32 | 529,113 |
Table 11. LP1 and LP2 series results.
| Specimen ID | Minimum/ Maximum Loads (kips) |
Load Ratio |
Load Range (kips) |
Root Gap | Penetration (percent) |
Failure Mode | LSS Range (ksi) |
Cycles to Failure |
|---|---|---|---|---|---|---|---|---|
| LP1-1 | 0.00/5.00 | 0 | 5.00 | None | 100 | Deck weld toe | 36.65 | 278,209 |
| LP1-2 | 0.00/5.00 | 0 | 5.00 | None | 100 | Deck weld toe | 36.65 | 193,114 |
| LP1-3 | 2.75/−2.75 | −1 | 5.50 | None | 100 | Deck weld toe | 40.32 | 302,479 |
| LP1-4 | 2.75/−2.75 | −1 | 5.50 | None | 100 | Deck weld toe | 40.32 | 235,185 |
| LP1-5 | 2.75/−2.75 | −1 | 5.50 | None | 100 | Deck weld toe | 40.32 | 315,624 |
| LP1-6 | 2.75/−2.75 | −1 | 5.50 | None | 100 | Deck weld toe | 40.32 | 367,003 |
| LP1-7 | 2.75/−2.75 | −1 | 5.50 | None | 100 | Deck weld toe | 40.32 | 367,875 |
| LP1-8 | 2.75/−2.75 | −1 | 5.50 | None | 100 | Deck weld toe | 40.32 | 407,218 |
| LP1-9 | 3.00/−3.00 | −1 | 6.00 | None | 100 | Deck weld toe | 43.98 | 381,539 |
| LP1-10 | 2.75/−2.75 | −1 | 5.50 | None | 100 | Deck weld toe | 40.32 | 513,805 |
| LP1-12 | 2.75/−2.75 | −1 | 5.50 | None | 100 | Deck weld toe | 40.32 | 552,488 |
| LP1-13 | 2.75/−2.75 | −1 | 5.50 | None | 100 | Deck weld toe | 40.32 | 492,048 |
| LP1-14 | 2.75/−2.75 | −1 | 5.50 | None | 100 | Deck weld toe | 40.32 | 435,953 |
| LP1-15 | 2.75/−2.75 | −1 | 5.50 | None | 100 | Deck weld toe | 40.32 | 404,372 |
| LP2-1 | 1.60/−1.60 | −1 | 3.20 | None | 100 | Deck weld toe | 23.46 | 1,788,904 |
| LP2-2 | 1.60/−1.60 | −1 | 3.20 | None | 100 | Deck weld toe | 23.46 | 2,956,726 |
| LP2-3 | 1.60/−1.60 | −1 | 3.20 | None | 100 | Deck weld toe | 23.46 | 2,898,356 |
| LP2-4 | 1.60/−1.60 | −1 | 3.20 | None | 100 | Deck weld toe | 23.46 | 2,448,412 |
| LP2-5 | 1.60/−1.60 | −1 | 3.20 | None | 100 | Deck weld toe | 23.46 | 3,276,984 |
| LP2-6 | 1.60/−1.60 | −1 | 3.20 | None | 100 | Deck weld toe | 23.46 | 2,440,312 |
| LP2-7 | 1.60/−1.60 | −1 | 3.20 | None | 100 | b | 23.46 | 635,000 |
| LP2-8 | 0.00/3.20 | 0 | 3.20 | None | 100 | Deck weld toe | 23.46 | 2,021,012 |
| LP2-9 | 0.00/3.20 | 0 | 3.20 | None | 100 | Deck weld toe | 23.46 | 741,520 |
| LP2-10 | 0.00/3.20 | 0 | 3.20 | None | 100 | Deck weld toe | 23.46 | 967,256 |
| LP2-11 | 0.00/3.20 | 0 | 3.20 | None | 100 | Deck weld toe | 23.46 | 1,138,650 |
| LP2-12 | 0.00/3.20 | 0 | 3.20 | None | 100 | Deck weld toe | 23.46 | 861,537 |
| LP2-13 | 0.00/3.20 | 0 | 3.20 | None | 100 | Deck weld toe | 23.46 | 992,876 |
| LP2-14a | 0.00/3.20 | 0 | 3.20 | None | Not measured | Deck weld toe | 23.46 | 1,320,314 |
| aThis specimen was not HLAW welded; it was just fillet welds used to hold the rib in place for HLAW. bData quality was questionable due to lack of documentation for this particular specimen, and, based on unusually low fatigue resistance, it was not included in any analysis. |
||||||||
Table 12. LP3 series results.
| Specimen ID | Minimum/ Maximum Loads (kips) |
Load Ratio |
Load Range (kips) |
Root Gap | Penetration (percent) |
Failure Mode | LSS Range (ksi) |
Cycles to Failure |
|---|---|---|---|---|---|---|---|---|
| LP3-0a | 2.75/−2.75 | −1 | 5.50 | None | Not measured | Deck weld toe | 40.32 | 1,262,905 |
| LP3-1 | 2.75/−2.75 | −1 | 5.50 | None | 100 | Deck weld toe | 40.32 | 471,293 |
| LP3-2 | 0.00/5.00 | 0 | 5.00 | None | 100 | Deck weld toe | 36.65 | 208,968 |
| LP3-3 | 2.75/−2.75 | −1 | 5.50 | None | 100 | Deck weld toe | 40.32 | 251,375 |
| LP3-4 | 2.75/−2.75 | −1 | 5.50 | None | 100 | Deck weld toe | 40.32 | 338,584 |
| LP3-5 | 0.00/5.00 | 0 | 5.00 | None | 100 | Deck weld toe | 36.65 | 169,658 |
| LP3-6 | 2.75/−2.75 | −1 | 5.50 | None | 100 | Deck weld toe | 40.32 | 474,830 |
| LP3-7 | 0.00/4.00 | 0 | 4.00 | None | 100 | Deck weld toe | 29.32 | 302,748 |
| LP3-8 | 0.00/4.00 | 0 | 4.00 | None | 100 | Deck weld toe | 29.32 | 425,770 |
| LP3-9 | 0.00/4.00 | 0 | 4.00 | None | 100 | Deck weld toe | 29.32 | 361,781 |
| LP3-10 | 0.00/4.00 | 0 | 4.00 | None | 100 | Deck weld toe | 29.32 | 502,781 |
| LP3-11 | 0.00/4.00 | 0 | 4.00 | None | 100 | Deck weld toe | 29.32 | 477,681 |
| LP3-12 | 0.00/4.00 | 0 | 4.00 | None | 100 | Deck weld toe | 29.32 | 430,735 |
| LP3-13a | 0.00/3.20 | 0 | 3.20 | None | Not measured | Deck weld toe | 23.46 | 5,407,198 |
| aThis specimen was not HLAW welded; it used fillet welds to hold the rib in place for HLAW. | ||||||||
Table 13. OB series results.
| Specimen ID | Minimum/ Maximum Loads (kips) |
Load Ratio |
Load Range (kips) |
Root Gap | Penetration (percent) |
Failure Mode | LSS Range (ksi) |
Cycles to Failure |
|---|---|---|---|---|---|---|---|---|
| OB-1 | 2.50/−2.50 | −1 | 5.00 | Open | 45.2 | Weld root | 30.85a | 647,879 |
| OB-2 | 2.50/−2.50 | −1 | 5.00 | Open | 65.1 | Weld root | 30.85a | 981,142 |
| OB-3 | 2.50/−2.50 | −1 | 5.00 | Open | 67.0 | Weld root | 30.85a | 2,385,939 |
| OB-4 | 2.50/−2.50 | −1 | 5.00 | Open | 80.6 | Weld root | 30.85a | 1,376,487 |
| OB-5 | 0.00/5.00 | 0 | 5.00 | Open | 66.5 | Deck weld toe | 36.65 | 574,148 |
| OB-6 | 0.00/5.00 | 0 | 5.00 | Open | 66.3 | Deck weld toe | 36.65 | 688,273 |
| OB-7 | 2.75/−2.75 | −1 | 5.50 | Open | 66.0 | Weld root | 33.94a | 1,076,871 |
| OB-8 | 2.75/−2.75 | −1 | 5.50 | Open | 70.1 | Weld root | 33.94a | 618,383 |
| OB-9 | 2.50/−2.50 | −1 | 5.00 | Open | 76.3 | Weld root | 30.85a | 2,451,238 |
| OB-10 | 2.50/−2.50 | −1 | 5.00 | Open | 52.8 | Weld root | 30.85a | 1,056,726 |
| OB-11 | 2.50/−2.50 | −1 | 5.00 | Open | 54.2 | Weld root | 30.85a | 996,626 |
| OB-12 | 2.50/−2.50 | −1 | 5.00 | Open | 65.8 | Weld root | 30.85a | 1,316,952 |
| OB-13 | 0.00/5.00 | 0 | 5.00 | Open | 67.7 | Deck weld toe | 36.65 | 990,806 |
| OB-14 | 0.00/5.00 | 0 | 5.00 | Open | 57.1 | Deck weld toe | 36.65 | 979,089 |
| OB-15 | 2.75/−2.75 | −1 | 5.50 | Open | 64.8 | Rib weld toe | 47.18 | 660,272 |
| OB-16 | 2.75/−2.75 | −1 | 5.50 | Open | 51.6 | Weld root | 33.94a | 768,171 |
| aLSS analysis is only applicable to the analysis of weld toe cracking. LSS range reported is based on extrapolation of stresses on the inside surface of the rib. | ||||||||
Table 14. UB series results.
| Specimen ID | Minimum/ Maximum Loads (kips) |
Load Ratio |
Load Range (kips) |
Root Gap | Penetration (percent) |
Failure Mode | LSS Range (ksi) |
Cycles to Failure |
|---|---|---|---|---|---|---|---|---|
| UB-1 | 2.50/−2.50 | −1 | 5.00 | Close | 65.1 | Deck weld toe | 36.65 | 1,359,570 |
| UB-2 | 2.50/−2.50 | −1 | 5.00 | Close | 68.8 | Weld root | 30.85a | 694,734 |
| UB-3 | 2.50/−2.50 | −1 | 5.00 | Close | 65.1 | Rib weld toe | 42.90 | 2,011,029 |
| UB-4 | 2.50/−2.50 | −1 | 5.00 | Close | 60.7 | Deck weld toe | 36.65 | 1,372,641 |
| UB-5 | 0.00/5.00 | 0 | 5.00 | Close | 65.6 | Deck weld toe | 36.65 | 386,829 |
| UB-6 | 0.00/5.00 | 0 | 5.00 | Close | 66.2 | Deck weld toe | 36.65 | 474,226 |
| UB-7 | 2.75/−2.75 | −1 | 5.50 | Close | 72.9 | Deck weld toe | 40.31 | 1,292,525 |
| UB-8 | 2.75/−2.75 | −1 | 5.50 | Close | 70.7 | Deck weld toe | 40.31 | 1,182,601 |
| UB-9 | 2.50/−2.50 | −1 | 5.00 | Open | 76.4 | Deck weld toe | 36.65 | 2,024,920 |
| UB-10 | 2.50/−2.50 | −1 | 5.00 | Open | 69.8 | Runout | 36.65 | 4,725,868 |
| UB-11 | 2.50/−2.50 | −1 | 5.00 | Open | 54.6 | Weld root | 30.85a | 1,483,203 |
| UB-12 | 2.50/−2.50 | −1 | 5.00 | Open | 54.0 | Weld root | 30.85a | 1,590,018 |
| UB-13 | 0.00/5.00 | 0 | 5.00 | Open | 45.4 | Rib weld toe | 42.90 | 448,014 |
| UB-14 | 0.00/5.00 | 0 | 5.00 | Open | 64.4 | Deck weld toe | 36.65 | 591,939 |
| UB-15 | 2.75/−2.75 | −1 | 5.50 | Open | 64.9 | Weld root | 33.94a | 856,676 |
| UB-16 | 2.75/−2.75 | −1 | 5.50 | Open | 57.4 | Rib weld toe | 47.18 | 1,177,345 |
| aLSS analysis is only applicable to the analysis of weld toe cracking. LSS range reported is based on extrapolation of stresses on the inside surface of the rib. | ||||||||
Table 15. OG1 series results.
| Specimen ID | Minimum/ Maximum Loads (kips) |
Load Ratio |
Load Range (kips) |
Root Gapa (inches) | Penetration (percent) |
Failure Mode | LSS Range (ksi) |
Cycles to Failure |
|---|---|---|---|---|---|---|---|---|
| OG-1 | 2.75/−2.75 | −1 | 5.50 | 0.000 | b | Rib weld toe | 65.52 | 716,527 |
| OG-2 | 2.75/−2.75 | −1 | 5.50 | 0.000 | b | Deck weld toe | 59.15 | 674,990 |
| OG-3 | 2.75/−2.75 | −1 | 5.50 | 0.000 | b | Deck weld toe | 59.15 | 536,828 |
| OG-4 | — | — | — | 0.000 | — | — | — | — |
| OG-5 | — | — | — | 0.000 | — | — | — | — |
| OG-6 | — | — | — | 0.013 0.000 |
— | — | — | — |
| OG-7 | — | — | — | 0.005 0.000 |
— | — | — | — |
| OG-8 | — | — | — | 0.006 0.000 |
— | — | — | — |
| OG-9 | — | — | — | 0.006 0.007 |
— | — | — | — |
| OG-10 | — | — | — | 0.000 | — | — | — | — |
| OG-11 | — | — | — | 0.000 | — | — | — | — |
| OG-12 | — | — | — | 0.000 | — | — | — | — |
| OG-13 | — | — | — | 0.000 | — | — | — | — |
| OG-14 | — | — | — | 0.000 0.003 |
— | — | — | — |
| OG-15 | — | — | — | 0.000 0.009 |
— | — | — | — |
| OG-16 | — | — | — | 0.000 0.007 |
— | — | — | — |
| aThe target pre-weld gap was 0.020 inch. When two numbers are presented in a cell, they represent measurements that were different on each of the rib legs. bMacro-etch was never performed, so weld dimensions could not be reported. — Specimen was accidently destroyed (no data to report). |
||||||||
Table 16. OG2 series results.
| Specimen ID | Minimum/ Maximum Loads (kips) |
Load Ratio |
Load Range (kips) |
Root Gapa (inches) | Penetration (percent) |
Failure Mode | LSS Range (ksi) |
Cycles to Failure |
|---|---|---|---|---|---|---|---|---|
| OG-17 | 2.75/−2.75 | −1 | 5.50 | 0.000 | b | Deck weld toe | 59.15 | 431,912 |
| OG-18 | — | — | — | 0.006 0.000 | — | — | — | — |
| OG-19 | — | — | — | 0.000 | — | — | — | — |
| OG-20 | — | — | — | 0.000 | — | — | — | — |
| OG-21 | — | — | — | 0.000 | — | — | — | — |
| OG-22 | — | — | — | 0.000 | — | — | — | — |
| OG-23 | — | — | — | 0.007 0.000 | — | — | — | — |
| OG-24 | — | — | — | 0.000 | — | — | — | — |
| OG-25 | — | — | — | 0.009 0.000 | — | — | — | — |
| OG-26 | 2.75/−2.75 | −1 | 5.50 | 0.000 | b | Deck weld toe | 59.15 | 318,523 |
| OG-27 | 2.75/−2.75 | −1 | 5.50 | 0.000 | b | Deck weld toe | 59.15 | 218,223 |
| OG-28 | — | — | — | 0.000 | — | — | — | — |
| OG-29 | — | — | — | 0.000 | — | — | — | — |
| OG-30 | — | — | — | 0.000 | — | — | — | — |
| OG-31 | — | — | — | 0.000 | — | — | — | — |
| OG-32 | — | — | — | 0.000 | — | — | — | — |
| aThe target pre-weld gap was 0.031 inches. When two numbers are presented in a cell, they represent measurements that were different on each of the rib legs when the specimen was not tested. bMacro-etch was never performed, so weld dimensions could not be reported. —Specimen was accidently destroyed (no data to report). |
||||||||
Table 17. W series results.
| Specimen ID | Minimum/ Maximum Loads (kips) |
Load Ratio |
Load Range (kips) |
Root Gap | Penetration (percent) |
Failure Mode | LSS Range (ksi) |
Cycles to Failure |
|---|---|---|---|---|---|---|---|---|
| W-1 | 1.50/−1.50 | −1 | 3.00 | Closed | 32.7 | Deck weld toe | 32.27 | 2,852,314 |
| W-2 | 0.00/4.00 | 0 | 4.00 | Closed | 32.4 | Deck weld toe | 43.02 | 341,178 |
| W-3 | 2.00/−2.00 | −1 | 4.00 | Closed | 40.7 | Deck weld toe | 43.02 | 972,348 |
| W-4 | 0.00/3.00 | 0 | 3.00 | Closed | 42.3 | Deck weld toe | 32.27 | 600,935 |
| W-5 | 2.00/−2.00 | −1 | 4.00 | Closed | 33.2 | Deck weld toe | 43.02 | 859,795 |
| W-6 | 0.00/3.00 | 0 | 3.00 | Closed | 38.0 | Deck weld toe | 32.27 | 689,455 |
| W-7 | 2.00/−2.00 | −1 | 4.00 | Closeda | 47.4 | Rib weld toe | 45.86 | 795,766 |
| W-8 | 0.00/3.00 | 0 | 3.00 | Closeda | 45.6 | Deck weld toe | 32.27 | 552,962 |
| W-9 | 2.00/−2.00 | −1 | 4.00 | Closed | 36.6 | Deck weld toe | 43.02 | 858,519 |
| W-10 | 0.00/3.20 | 0 | 3.20 | Closed | 36.4 | Deck weld toe | 34.42 | 483,507 |
| W-11 | 2.20/−2.20 | −1 | 4.40 | Open | 34.9 | Deck weld toe | 47.32 | 512,260 |
| W-12 | 0.00/3.20 | 0 | 3.20 | Closed | 40.3 | Deck weld toe | 34.42 | 403,150 |
| W-13 | 2.20/−2.20 | −1 | 4.40 | Closed | 46.5 | Deck weld toe | 47.32 | 655,818 |
| W-14 | 0.00/3.00 | 0 | 3.00 | Closed | 31.4 | Deck weld toe | 32.27 | 624,567 |
| W-15 | 2.00/−2.00 | −1 | 4.00 | Closed | 38.5 | Deck weld toe | 43.02 | 1,211,796 |
| W-16 | 0.00/3.00 | 0 | 3.00 | Closed | 40.0 | Deck weld toe | 32.27 | 980,335 |
| aSide opposite the failure did have an open gap. | ||||||||
Root condition is controlled by fit-up tolerance between the rib and deck plate prior to welding. The root condition being open or closed was only determined visually. As previously described, the OB and UB series had many specimens with purposeful saw cuts to expose the root, and these were obviously open conditions (as shown in figure 7). The open condition can also occur naturally, as shown in the macro in figure 17, where the inside corner of the rib was not in contact with the deck plate prior to welding, and weld shrinkage did not close that gap. For the specimens that had purposeful fit-up gaps introduced, it was observed in most instances that the gap would disappear from weld shrinkage. This is mainly shown in table 15 through table 17. For the OG1, OG2, and W series specimens covered in these tables, the fabricator tack welded the rib to deck with pre-set gaps along the entire length of the panel before final welding. This was done by clamping and jacking the rib relative to the deck plate using feeler gauges to set the gap. The rib was tacked approximately every 6 inches. The OG1 and W panels had a 0.020-inch pre-weld gap, and the OG2 panel had a 0.031-inch gap.
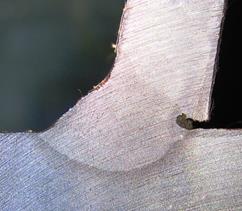
Figure 17. Photo. Macro of specimen SA4-2 (example of open root condition).
Once the OG1 and OG2 panels had been cut up into distinct specimens, feeler gauges were once again used to see if they could be inserted into the root on each side of the specimen. For the OG1 panel with a pre-weld gap of 0.020 inch, it can be seen in in table 15 that of the 32 roots, a feeler gauge could not be inserted into 25 of them. The remaining seven had measurable gaps varying from 0.003 to 0.013 inch. The OG2 panel had a pre-weld gap of 0.031 inch, and it can be seen in table 16 that of the 32 roots measured after welding, 29 had fully closed, with the remaining 3 with measurable gaps varying from 0.006 to 0.009 inch. Unfortunately, the W series specimen gaps were not measured with feeler gauges; and the determination was made strictly based on visual appearance from the weld macro of each specimen.
The closed root condition was interpreted as a condition where the unfused portion of the rib was in contact or almost in contact with the deck plate. A photo of the closed root condition is shown in figure 18; the inside corner of the rib was plastically deformed into the deck plate from the weld shrinkage. Figure 19 and figure 20 show photos from two W series specimen welds. Because this panel used a rib beveled to sit flush on the deck plate, 29 of the welds from all the specimens looked like the photo in figure 19, and this was considered to be a closed root condition. Three of the weld macros from the W series panel specimens looked like the specimen in figure 20 where there was a gap at the root (likely formed because the bevel was not fully machined), and this was considered to be an open root condition. In the closed root condition, stresses could be transferred through bearing between the rib and deck plates without large deformation to the rib.
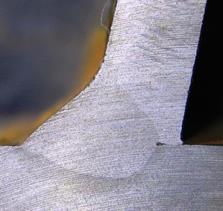
Figure 18. Photo. Macro of specimen SA6-1 (example of closed root condition).
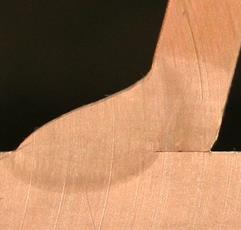
Figure 19. Photo. Macro of specimen W-1.
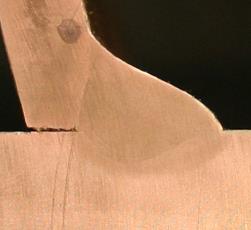
Figure 20. Photo. Macro of specimen W-11.
Several additional points should be noted when reviewing table 5 through table 17. First, all of the HLAW-welded panels achieved 100-percent penetration through visual inspection of the cross section exposed at the edge of each specimen. In fact, the weld root even had a small amount of reinforcement, indicating that penetration even exceeded 100 percent at times. However, in the tables, a value of 100 percent was assumed. Taking photos of every HLAW weld was deemed unproductive because the photos were only being used for attaining weld penetration, which was greater than or equal to 100 percent. Therefore, only 10 specimens had their weld cross sections photographed. As the program progressed, the photographs of all specimens were used to define further geometric variables beyond just penetration. However, the data for the HLAW series of panels may appear incomplete for this reason.
Second, most of the specimens from the OG1 and OG2 panel were accidently destroyed before they were tested. In addition, none of the photographs of the weld cross sections were preserved, and this gap appears in the data tables in appendix B.
The data from all specimens tested at a load ratio of −1 are plotted as blue-filled squares in figure 21 in S-N format against the AASHTO category B, C, and D curves. The heavy line represents the lower bound of the data (i.e., mean minus two standard deviations) and plots slightly above the category B curve. The data from all specimens tested at a load ratio of zero are plotted as circles in figure 22. The heavy line represents the lower bound of the data and plots just below the category C curve. The difference between these two results comes down to magnitude of residual stress and how effective the compression portion of the fatigue cycle is for R = −1 loading. Because it is nearly impossible to predict the load ratio in design because residual stresses are not known, it would be best to categorize the rib-to-deck weld based on tension-only loaded specimens.
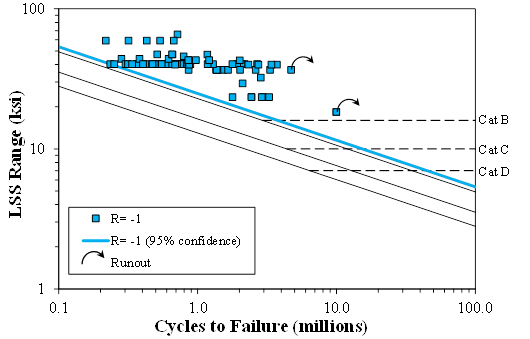
Figure 21. Graph. Plot of all R = −1 data.
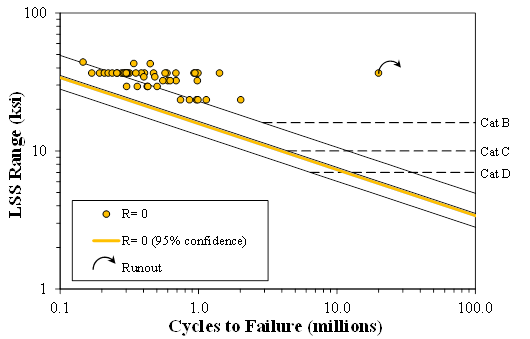
Figure 22. Graph. Plot of all R = 0 data.
The data from all weld root failures, which coincidently only occurred at load ratios of −1, are plotted as triangles in figure 23. The heavy green line represents the lower bound of the data and plots slightly above the category B curve. This indicates that according to the LSS procedure implemented in this document, weld root failures would be a category B detail. However, the procedure was slightly unconventional and used the LSSs on the inside of the rib wall that happened to not be at the weld toe. If the interior LSS is less than the LSS at the weld toe on the outside of the rib, then there should be no concern for weld root failures. If the interior LSS is larger, then that stress range should be compared to category B for design purposes. The specimens that suffered weld root failures had penetrations that varied between 45 and 76 percent.
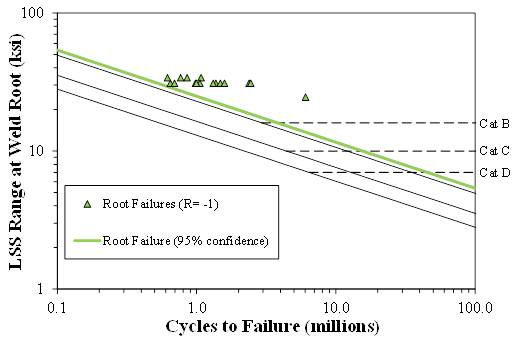
Figure 23. Graph. Plot of all root failures (R = −1).
Because the original hypothesis guiding the work assumed penetration had an influence on fatigue resistance, all of the R = 0 data are presented in S-N format in figure 24. The data were divided into three groups: penetration greater than 80 percent, penetration between 80 and 60 percent, and penetration less than 60 percent. The group representing specimens with penetration less than 60 percent demonstrated higher fatigue resistance with a lower bound just above category B. The other two groups of specimens had lower bound resistance around category C. This may indicate that penetration is not as influential on fatigue resistance as originally thought when the research began.
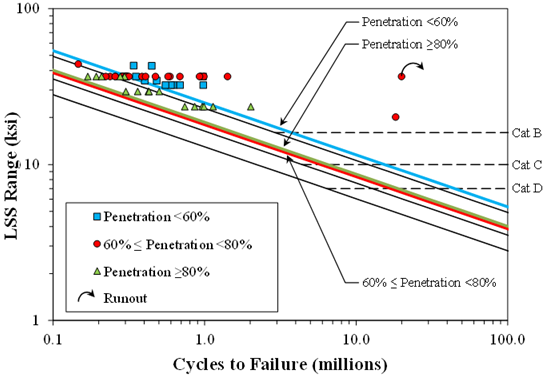
Figure 24. Graph. Plot of all R = 0 data sorted by penetration.
The other factor that seemed to influence the fatigue resistance was that the HLAW specimens appeared to have noticeably lower fatigue resistance than all other specimens made with conventional welding processes. This is better shown in figure 25, which divides all of the data into two groups: those that were fabricated with HLAW and those that were fabricated with other weld processes. The lower bound of each group is in between categories B and C, though the HLAW specimens are the lower of the two. There were two visually obvious differences with the HLAW specimens: (1) they consistently attained complete joint penetration welds between the rib and deck plates, and (2) the weld nugget was noticeably smaller than those made with the conventional weld processes. Because of these two observations, it was felt that the weld dimensions likely had an influence on fatigue strength. A first attempt to quantify this is shown figure 26 through figure 33. Each bubble plot presents the relation between two normalized dimension variables and the fatigue strength of individual specimens expressed through the fatigue resistance coefficient, A. The bubble plots are stacked upon each other with the top one using R = −1 specimens and the bottom one using R = 0 specimens. The legends are consistent between the all the plots with the same R-ratio. As a point of reference, for a category B detail, A = 120 ksi3 and A = 250 ksi3 for a category A detail. The area of the bubbles is scaled to the fatigue resistance for each data point, so small bubble area have low A values, and large bubbles have large A values. There are obvious trends in the data as they relate to weld geometry, that is, there is a negative relationship between penetration and deck plate leg length (figure 28) and a positive relationship between penetration and weld throat (figure 32). However, no obvious trend in the bubble diameters can be seen in any of these plots, and a higher level of regression analysis is needed to identify trends between all these various factors of weld geometry, load ratio, weld process, and weld penetration to the fatigue strength. This is more fully described in the next section.
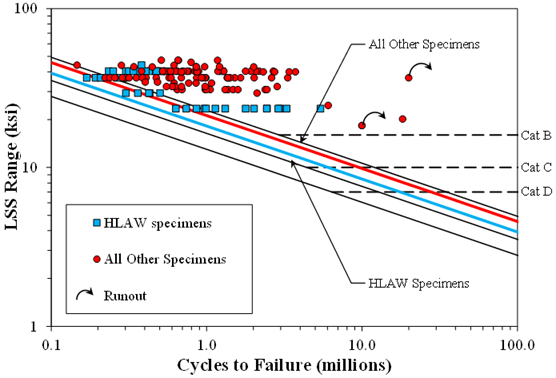
Figure 25. Graph. Plot of all fatigue data differentiated by welding process.
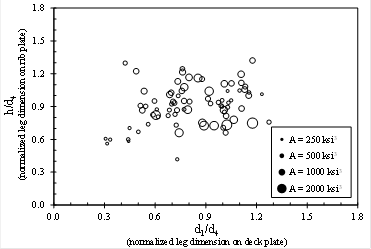
Figure 26. Graph. Relation between rib and deck plate leg sizes at R = −1.
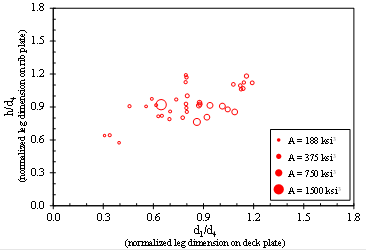
Figure 27. Graph. Relation between rib and deck plate leg sizes at R = 0.
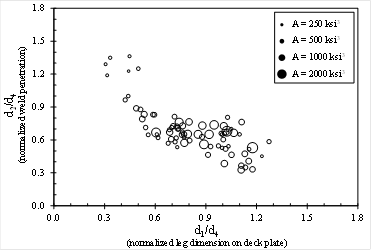
Figure 28. Graph. Relation between weld penetration and deck plate leg size at R = −1.
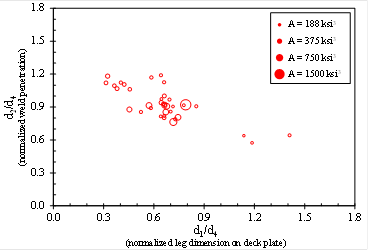
Figure 29. Graph. Relation between weld penetration and deck plate leg size at R = 0.
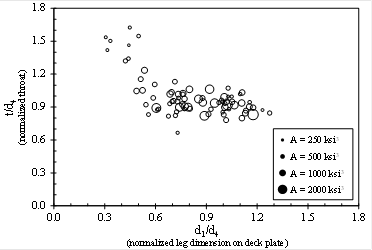
Figure 30. Graph. Relation between throat and deck plate leg sizes at R = −1.
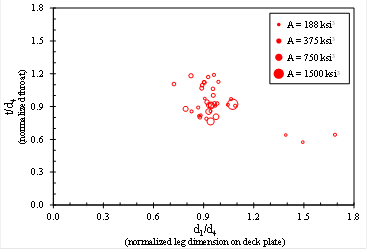
Figure 31. Graph. Relation between throat and deck plate leg sizes at R = 0.
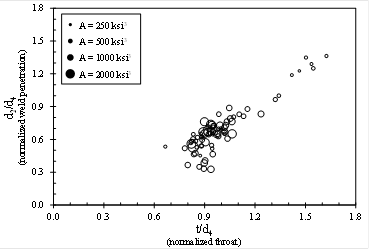
Figure 32. Graph. Relation between weld penetration and throat at R = −1.
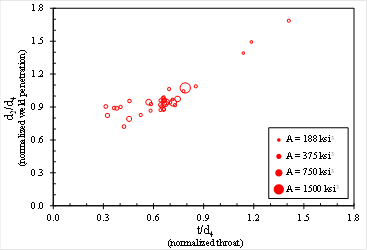
Figure 33. Graph. Relation between weld penetration and throat at R = 0.