U.S. Department of Transportation
Federal Highway Administration
1200 New Jersey Avenue, SE
Washington, DC 20590
202-366-4000
Federal Highway Administration Research and Technology
Coordinating, Developing, and Delivering Highway Transportation Innovations
| REPORT |
| This report is an archived publication and may contain dated technical, contact, and link information |
|
| Publication Number: FHWA-HRT-17-020 Date: February 2017 |
Publication Number: FHWA-HRT-17-020 Date: February 2017 |
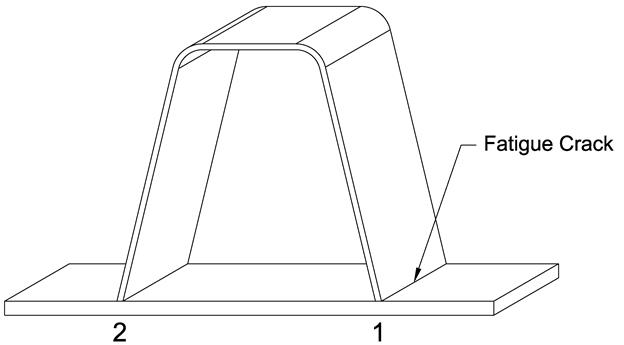
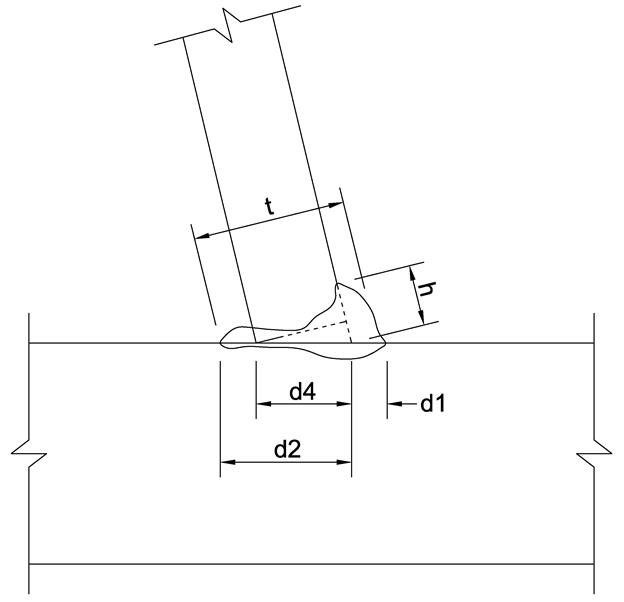
This appendix presents the data associated with measurements of some of the laser panel specimens. The original intent of etching the welds was to confirm the weld penetration, and, after etching so many laser welded specimens, it was clear that it consistently attained 100 percent or more penetration, and further documentation of weld cross sections ceased. Later in the research program, it was found the dimensions of the weld were relevant to fatigue life; however, only a few of the weld cross sections were photo documented, and the data in this appendix may appear incomplete. Only one face of the laser panel specimens was etched. The weld location syntax used in table 31 is shown in figure 65. Location 1 represents the side with the dominant fatigue crack size because sometimes both welds cracked simultaneously. The remaining column headings in table 31 present the measurements recorded as shown in figure 66.
Because the laser was able to achieve full penetration, there is no definition for the weld throat as there was for the conventional weld processes. To be able to introduce the weld throat dimension in the multiple linear regression statistical analysis, a throat dimension had to be defined for the laser specimens. For this work and for just the laser specimens, the actual throat dimension was taken from the toe of the root reinforcement to the outside of the face weld in a direction aligned with the thickness direction of the rib wall.

Figure 65. Schematic. Denotation of weld locations for laser panel specimens.

Figure 66. Schematic. Measured dimensions for laser panel specimens.
Where:
d1 = Weld length along the deck plate.
d2 = Weld penetration.
d4 = Projected width of rib on deck plate.
d2/d4 = Percentage of the weld penetration.
t = Actual weld throat measured from the toe of the root reinforcement to the face of the weld aligned in the thickness direction of the rib wall.
h = Weld length along the rib plate.
Table 31. Weld dimensions of some LP series specimens.
| Specimen | Weld Location | d1 (inches) |
d2 (inches) |
d4 (inches) |
d2/d4 | t (inches) |
h (inches) |
|---|---|---|---|---|---|---|---|
| LP1-1 | 1 | 0.109 | 0.454 | 0.322 | 1.410 | 0.543 | 0.207 |
| 2 | 0.112 | 0.392 | 0.323 | 1.214 | 0.450 | 0.199 | |
| LP1-2 | 1 | 0.099 | 0.366 | 0.322 | 1.137 | 0.448 | 0.206 |
| 2 | 0.120 | 0.424 | 0.322 | 1.317 | 0.495 | 0.174 | |
| LP1-3 | 1 | 0.100 | 0.377 | 0.317 | 1.189 | 0.450 | 0.178 |
| 2 | 0.119 | 0.433 | 0.323 | 1.341 | 0.471 | 0.164 | |
| LP1-4 | 1 | 0.142 | 0.394 | 0.321 | 1.227 | 0.470 | 0.187 |
| 2 | 0.091 | 0.419 | 0.324 | 1.293 | 0.485 | 0.192 | |
| LP1-5 | 1 | 0.097 | 0.409 | 0.317 | 1.290 | 0.487 | 0.192 |
| 2 | 0.110 | 0.476 | 0.320 | 1.488 | 0.539 | 0.200 | |
| LP1-6 | 1 | 0.142 | 0.432 | 0.317 | 1.363 | 0.515 | 0.223 |
| 2 | 0.107 | 0.467 | 0.317 | 1.473 | 0.519 | 0.215 | |
| LP1-7 | 1 | 0.106 | 0.429 | 0.318 | 1.349 | 0.478 | 0.190 |
| 2 | 0.128 | 0.432 | 0.322 | 1.342 | 0.494 | 0.192 | |
| LP3-1 | 1 | 0.143 | 0.325 | 0.325 | 1.000 | 0.436 | 0.195 |
| 2 | 0.138 | 0.315 | 0.315 | 1.000 | 0.427 | 0.211 | |
| LP3-2 | 1 | 0.127 | 0.382 | 0.322 | 1.186 | 0.481 | 0.185 |
| 2 | 0.135 | 0.409 | 0.320 | 1.278 | 0.502 | 0.198 | |
| LP3-6 | 1 | 0.160 | 0.400 | 0.320 | 1.250 | 0.495 | 0.214 |
| 2 | 0.120 | 0.404 | 0.320 | 1.263 | 0.497 | 0.203 |