U.S. Department of Transportation
Federal Highway Administration
1200 New Jersey Avenue, SE
Washington, DC 20590
202-366-4000
Federal Highway Administration Research and Technology
Coordinating, Developing, and Delivering Highway Transportation Innovations
| REPORT |
| This report is an archived publication and may contain dated technical, contact, and link information |
|
| Publication Number: FHWA-HRT-13-066 Date: August 2013 |
Publication Number: FHWA-HRT-13-066 Date: August 2013 |
The dimensions for each PT are given in table 7. For each test, the base to height ratio was kept constant at about 2 to mimic triaxial conditions. The height is equivalent to 10 courses of CMU block, while the outside dimensions of the PT with facing are 3.5 blocks wide. For each test, the total width of the PT with the CMU facing (Btotal) is 54½ inches; the width of the GRS composite itself (B) is 39¼ inches. The footing width on top of the GRS composite (b) is 36 inches.
Test No |
No. Reinf. Layers |
Sv (inch) |
H (inch) |
H/B |
DC-1 |
9 |
7⅝* |
76¼ |
1.9 |
DC-2 |
9 |
7⅝** |
76¼ |
1.9 |
DC-3 |
9 |
7⅝** |
76¼ |
1.9 |
DC-4 |
9 |
7⅝** |
76¼ |
1.9 |
DC-5 |
9 |
7⅝** |
76¼ |
1.9 |
TF-1 |
9 |
7⅝ |
76¼ |
1.9 |
TF-2 |
9 |
7⅝ |
76¼ |
1.9 |
TF-3 |
9 |
7⅝ |
76¼ |
1.9 |
TF-4 |
9 |
⅝ |
76¼ |
1.9 |
TF-5 |
9 |
7⅝ |
76¼ |
1.9 |
TF-6 |
9 |
7⅝ |
76¼ |
1.9 |
TF-7 |
9 |
7⅝ |
76¼ |
1.9 |
TF-8 |
9 |
7⅝** |
76¼ |
1.9 |
TF-9 |
4 |
15¼ |
76¼ |
1.9 |
TF-10 |
4 |
15¼ |
76¼ |
1.9 |
TF-11 |
19 |
3 |
76¼ |
1.9 |
TF-12 |
19 |
3 |
76¼ |
1.9 |
TF-13 |
6 |
11¼ |
78¾ |
2.0 |
TF-14 |
6 |
11¼ |
78¾ |
2.0 |
Sv = the reinforcement spacing, H = the height of the PT,
B = the width of the GRS composite (without the facing element).
**Two courses of bearing bed reinforcement placed at the top of the PT.
The reaction frames were slightly different among the tests. The Defiance County PTs (DC-1 through DC-5) were built on a reinforced concrete base pad similar to the Vegas mini-pier setup (figure 3 and figure 4). The base pad was elevated on CMU blocks to make room for the bottom set of bolted channel beams, while the top set of bolted channels was supported on the top concrete pad which was centered on the GRS composite. The top load pad is supported on the GRS composite, inside the perimeter of the CMU facing; there is an inset of 1⅝ inches around the load pad and the back of the CMU facing (figure 17). The upper and lower channel beams were coupled together with high strength post-tensioning bar. Four hollow core hydraulic jacks were bolted to the top channel beams (figure 18). All jacks were connected to a manifold and controlled with an electric hydraulic pump controlled by a push button solenoid valve. The stroke and capacity of the hollow core jacks were 6 inches and 120 kips, respectively.
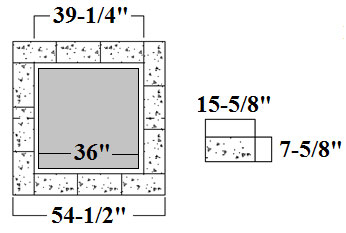
Figure 17. Illustration. Concrete footing on GRS composite, inset from facing.
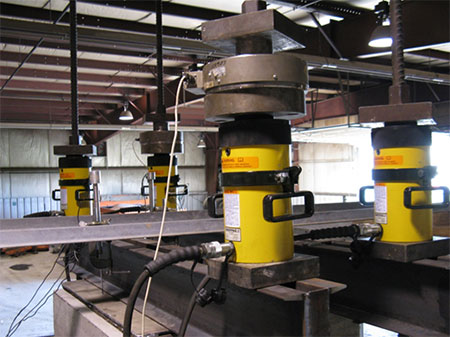
Figure 18. Photo. Hollow core hydraulic jacks for PT assembly.
A similar reaction frame setup was used for the initial TFHRC PTs (figure 19), except the concrete strong floor was used for the reaction instead of sandwiching the GRS composite between twin sets of bolted channels (figure 4). The top sets of bolted channels were placed on an elastomeric pad and positioned on the top concrete pad to evenly distribute the load delivered from the hydraulic jacks; a 1-inch steel plate was also bolted to the top concrete pad to increase the rigidity of the concrete.
The reaction frame was changed after eccentric loading was observed with the previous setup on the TF-4 test. Subsequent TF tests used a rigid two post frame that provided additional benefits in terms of easier setup and the ability to gang two high-capacity, 600-kips jacks to ensure sufficient stroke to fail any GRS composite without having to reset the loading beam position (figure 20, figure 21, and figure 22). A spherical bearing was used in the two-post frame assembly to maintain a vertical load on the top bearing pad (figure 23). Figure 23 also illustrates that the top concrete load pad was pushed approximately 18 inches into the GRS composite before failure was induced.
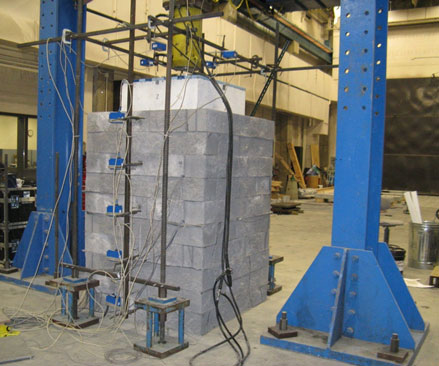
Figure 20. Photo. TF-6 PT setup with reaction frame.
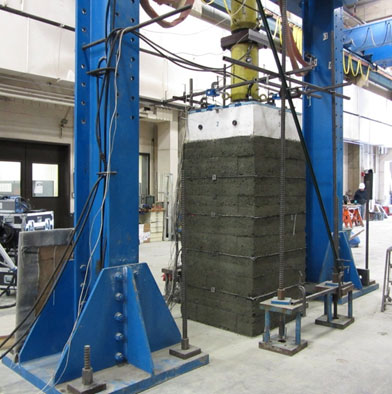
Figure 21. Photo. TF-10 PT setup with reaction frame.
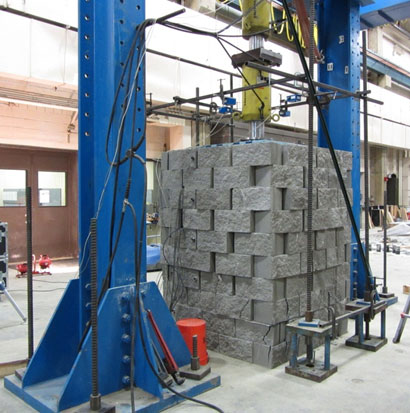
Figure 22. Photo. TF-9 at failure with reaction frame.
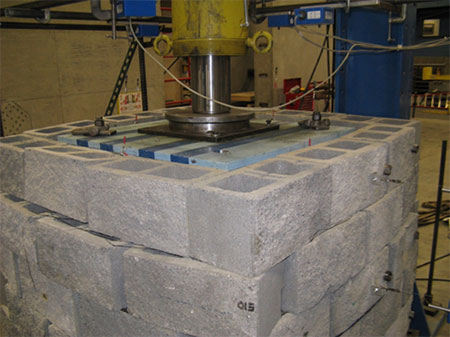
Figure 23. Photo. Spherical bearing to apply load to the footing on the GRS composite.
The method of construction for the mini piers was basically the same for all of the PTs; the GRS composite was built from the bottom up, one course of block at a time. The primary difference in construction between the Defiance County tests and the TFHRC tests was the level of quality control. The five Defiance County tests (DC-1 through DC-5) were each constructed with the same supervisor, but different crews, as part of the FHWA's EDC-GRS Validation Sessions in 2010. The quality control for these tests was therefore limited, which may have impacted the testing results, particularly the stiffness. The 14 PTs conducted at TFHRC were constructed in the Structures Laboratory and were research quality experiments, with consistent construction procedures and compaction control.
At the start of construction for each PT, the first course of block was placed level and centered within the position of the reaction assembly. Aggregate was then infilled using either a front-end loader (for the DC test series) or a concrete dump hopper (for the TF test series). For the TF tests, the squareness of the facing and the verticality of the composite were checked before placement of fill in each course of block by measuring the inside diagonal lengths and checking with a plumb bob on every other lift.
Compaction for the DC tests was performed using a standard 18-inch-wide, gas powered vibratory plate compactor at each lift of aggregate, a nominal 8-inch thickness (height of the CMU block). For the TF tests, it was necessary to compact each 8-inch lift of fill in half layer increments, or at a lift thickness of about 4 inches because a lightweight electric vibratory plate compactor was used for construction; with this equipment, it was impossible to achieve the target density at the nominal 8-inch lifts. The electric compactor had a 10-square-inch plate, with a weight of 48 lb and an adjustable impact force of 700 lb.
For the well-graded AASHTO A-1-a (VDOT 21A) aggregate, compaction control consisted of testing each nominal 4-inch lift (half the height of a CMU) with a nuclear density gauge to ensure the target density and moisture content (± 2 percent) were met throughout the height of the GRS composite. In the field, density tests are typically performed after the compaction of fill material to the height of CMU block; however, during construction of the TF PTs using well-graded backfill, density testing was performed on nominal 4-inch lifts to test the compaction effort of the lightweight (48 lb) tamper used. For each lift, approximately 100 percent of the standard Proctor value was achieved; the results of the nuclear density gauge for each test are shown in appendix B.
For the open-graded aggregates, compaction was performed until no further compression of the aggregate was observed, which consisted of running the plate compactor across each lift with a minimum of four passes. While it is not common practice to test open-graded aggregates with a nuclear density gauge, backscatter tests were performed on each nominal 4-inch lift for PT TF-1 to collect the surficial density value (appendix B). The percent compaction is based on the maximum index density determined from ASTM D4253 (table 4).(16)
Rodding with a shovel end was also used for each PT to compact the aggregate at the corners and edges of the facing. Once final compaction was achieved to the leveled height of the facing block and before placement of the next course of CMU blocks, any remaining aggregate was brushed off of the facing block so that a smooth surface existed to prevent point loading and ensure even placement of the next layer of block. Depending on the reinforcement schedule, a layer of geotextile reinforcement was then placed over the aggregate with a facing element coverage ratio of at least 85 percent the width of facing element. While the geotextiles used in each test were biaxial, the stiffness in the machine (warp) and cross-machine (fill) directions for the reinforcement was different (table 6). For this reason, the reinforcement was placed in an alternating pattern with each subsequent layer to prevent preferential failure of the PT in the weaker reinforcement direction.
To facilitate construction, two sets of ratchet straps were placed around the facing blocks to secure and maintain block alignment during compaction. During each layer of GRS construction, the lower strap was removed and then used to band the new, upper course of block; the process was repeated until the pier was completed. This process was employed because of the geometry and the reduced footprint of the PT where lateral block movement during compaction is increased compared to a typical in-service bridge abutment (plane strain condition). The ratchet strap on the top course of block was removed after specimen construction was fully completed, prior to loading.
Once the fabric was placed, the next layer of CMU blocks were positioned and the aggregate infilled. This process was repeated for 10 courses of CMU blocks. The concrete footing was then placed on top of the GRS composite and the load frame assembled for testing. Construction of the open-graded aggregate tests took about 4 hours, and 20 hours for the DC tests and TF tests, respectively. The principal difference in time was attributable to the need for compaction in 4-inch lifts, the requirement for nuclear density testing, and the level of quality control. Construction of the well-graded aggregate tests at TF took approximately 30 hours.
Each PT was instrumented to measure the response to the static, vertical applied pressure on the top of the GRS composite. Vertical and lateral deformation was constantly monitored with displacement transducers. Four transducers measured the vertical displacement at the middle of each loading block edge while five transducers measured the horizontal displacement along one face of the specimen (figure 24). For the five PTs conducted in Defiance County, OH, (DC-1 through DC-5) and the first PT conducted at TFHRC (TF-1), linear voltage displacement transducers (LVDT) were used.
String potentiometers (POT) replaced the LVDTs for the remaining tests at TFHRC with CMU blocks (TF-2, TF-6, TF-9, TF-12, TF-14) to measure both vertical and lateral deformation. For the PTs without any facing element (TF-3, TF-4, TF-5, TF-7, TF-8, TF-10, TF-11, TF-13), LVDTs were still used to measure lateral deformation in addition to the string POTs used to measure vertical deformation. The instrumentation layouts for deformation measurements in each test, similar to that shown in figure 24, are presented in appendix C. With the TFHRC PT series, additional instrumentation was included to monitor vertical pressure near the base of the composite, strain on different geotextile layers, and lateral earth pressure behind the face just above the center height of the composite (figure 25). This report focuses on the vertical deformation data, which can be immediately used in the design of GRS composites for load bearing applications. (1)
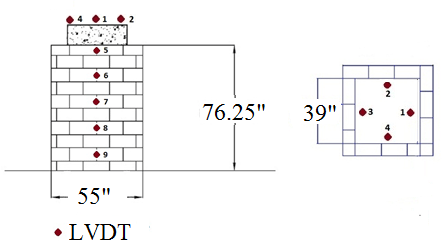
Figure 24. Illustration. Instrumentation layout for DC tests and TF-1.
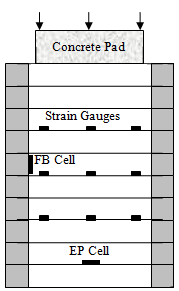
Figure 25. Illustration. General additional instrumentation layout TF PT series.
For each TFHRC test, the loading schedule was prepared in the same manner. The basic protocol included estimating the ultimate vertical capacity determined from the semi-empirical equation (figure 8). The estimated capacity was then divided into a minimum of ten load increments to capture the deformation characteristics of each test. In addition, between two and four load increments below the 4,000 psf service limit were included in each test to better define the behavior of the composite at low applied loads.
Each load increment was applied manually using an electric hydraulic pump with a push button controlled solenoid valve. Load was maintained with a strain indicator box calibrated to a load cell placed within the reaction assembly. Hydraulic jack pressure was also checked at each load increment to ensure operation of the system throughout the course of the load test. In each experiment, load was increased, from increment to increment, only when there was no significant change (< 0.003 inch) in settlement between any two time intervals; however, the load increment was held for a minimum of 5 minutes and a maximum of 30 minutes. The data acquisition system was programmed to record settlement at 1-, 3-, 5-, 7-, 15-, 20-, 25-, and 30-minute intervals from the start of each load increment.
The settlement of the top footing, lateral displacement of the face, and geotextile strain were recorded every minute within each load increment. Any vertical earth pressure measurements and lateral stress information were collected at the end of each load increment. Photographs were also taken at the conclusion of each load increment to visually document the test. Typically, each test took about 6 hours to complete.